manuals.online logo
Brands
  1. Home
  2. •
  3. Brands
  4. •
  5. Eaton
  6. •
  7. Controllers
  8. •
  9. Eaton ELC-PC12NNDR User manual

Eaton ELC-PC12NNDR User manual

IL05003012E.pdf
5011630506-C206
2007-05-08
ELC-PC12NNDR/T
ELC-PC12NNAR
Logic Controller with Multi-Function,
Multiple Commands
Instruction Sheet
WARNING
•This Instruction Sheet only provides descriptions for electrical specifications, general specifications,
installation & wiring, troubleshooting and peripherals. Other detail infromation about programming and
commands is compatible with ELC-PC/PA/PH series; please see ELC Application Manual. For more
information about the optional peripherals , please see individual product manual.
•This is an OPEN TYPE Controller. The ELC should be kept in an enclosure away from airborne dust, humidity,
electric shock risk and vibration. Also, it is equipped with protective methods such as some special tools or
keys to open the enclosure, so as to avoid the hazard to users and the damage to the ELC.
•Never connect the AC main circuit power supply to any of the input/output terminals, as it will damage the
ELC. Check all the wiring prior to power up. To avoid any electromagnetic noise, make sure the ELC is
properly grounded . Do NOT touch terminals when power on.
•Battery replacement: use UL component type: TDRTL-2150/S lithium battery. Refer to following table for
battery life. (NOTE: RTC should be reset after changing battery).
Temperature((°C) 0 25 50 70
Life(Years) 9 8 6 5
Precision of calendar timer:
At 0°C/32°F, less than –117 seconds error per month.
At 25°C/77°F, less than 52 seconds error per month.
At 55°C/131°F, less than –132 seconds error per month.
•Warning – Do not disconnect while circuit is live unless area is known to be non-hazardous.
•Power, input and output (I/O) wiring must be in accordance with Class 1, Div. 2 wiring methods - Article
501-10(B)(1) of the National Electrical Code.
•Suitable for use in Class 1, Division 2, Groups A, B, C, D or Non-Hazardous locations only.
•Warning – Explosion hazard - Substitution of components may impair suitability for Class 1, Division 2.
•Warning – Wxplosion hazard - Do not disconnect equipment unless power has been switched off or the area
is known to be Non-Hazardous.
1 INTRODUCTION
1.1 Model Name Explanation and Peripherals
Thank you for choosing Eaton Logic Controller (ELC) series products. The ELC-PC series has a 12-points (8 input
points + 4 outputs) ELC main processing unit with multiple commands for use. It also has an 8K Steps program
memory to connect to every ELC-PC series expansion unit, including digital I/O (Maximum 128 Inpus / 128 Outputs
expansion points), analog module, etc. for various applications.
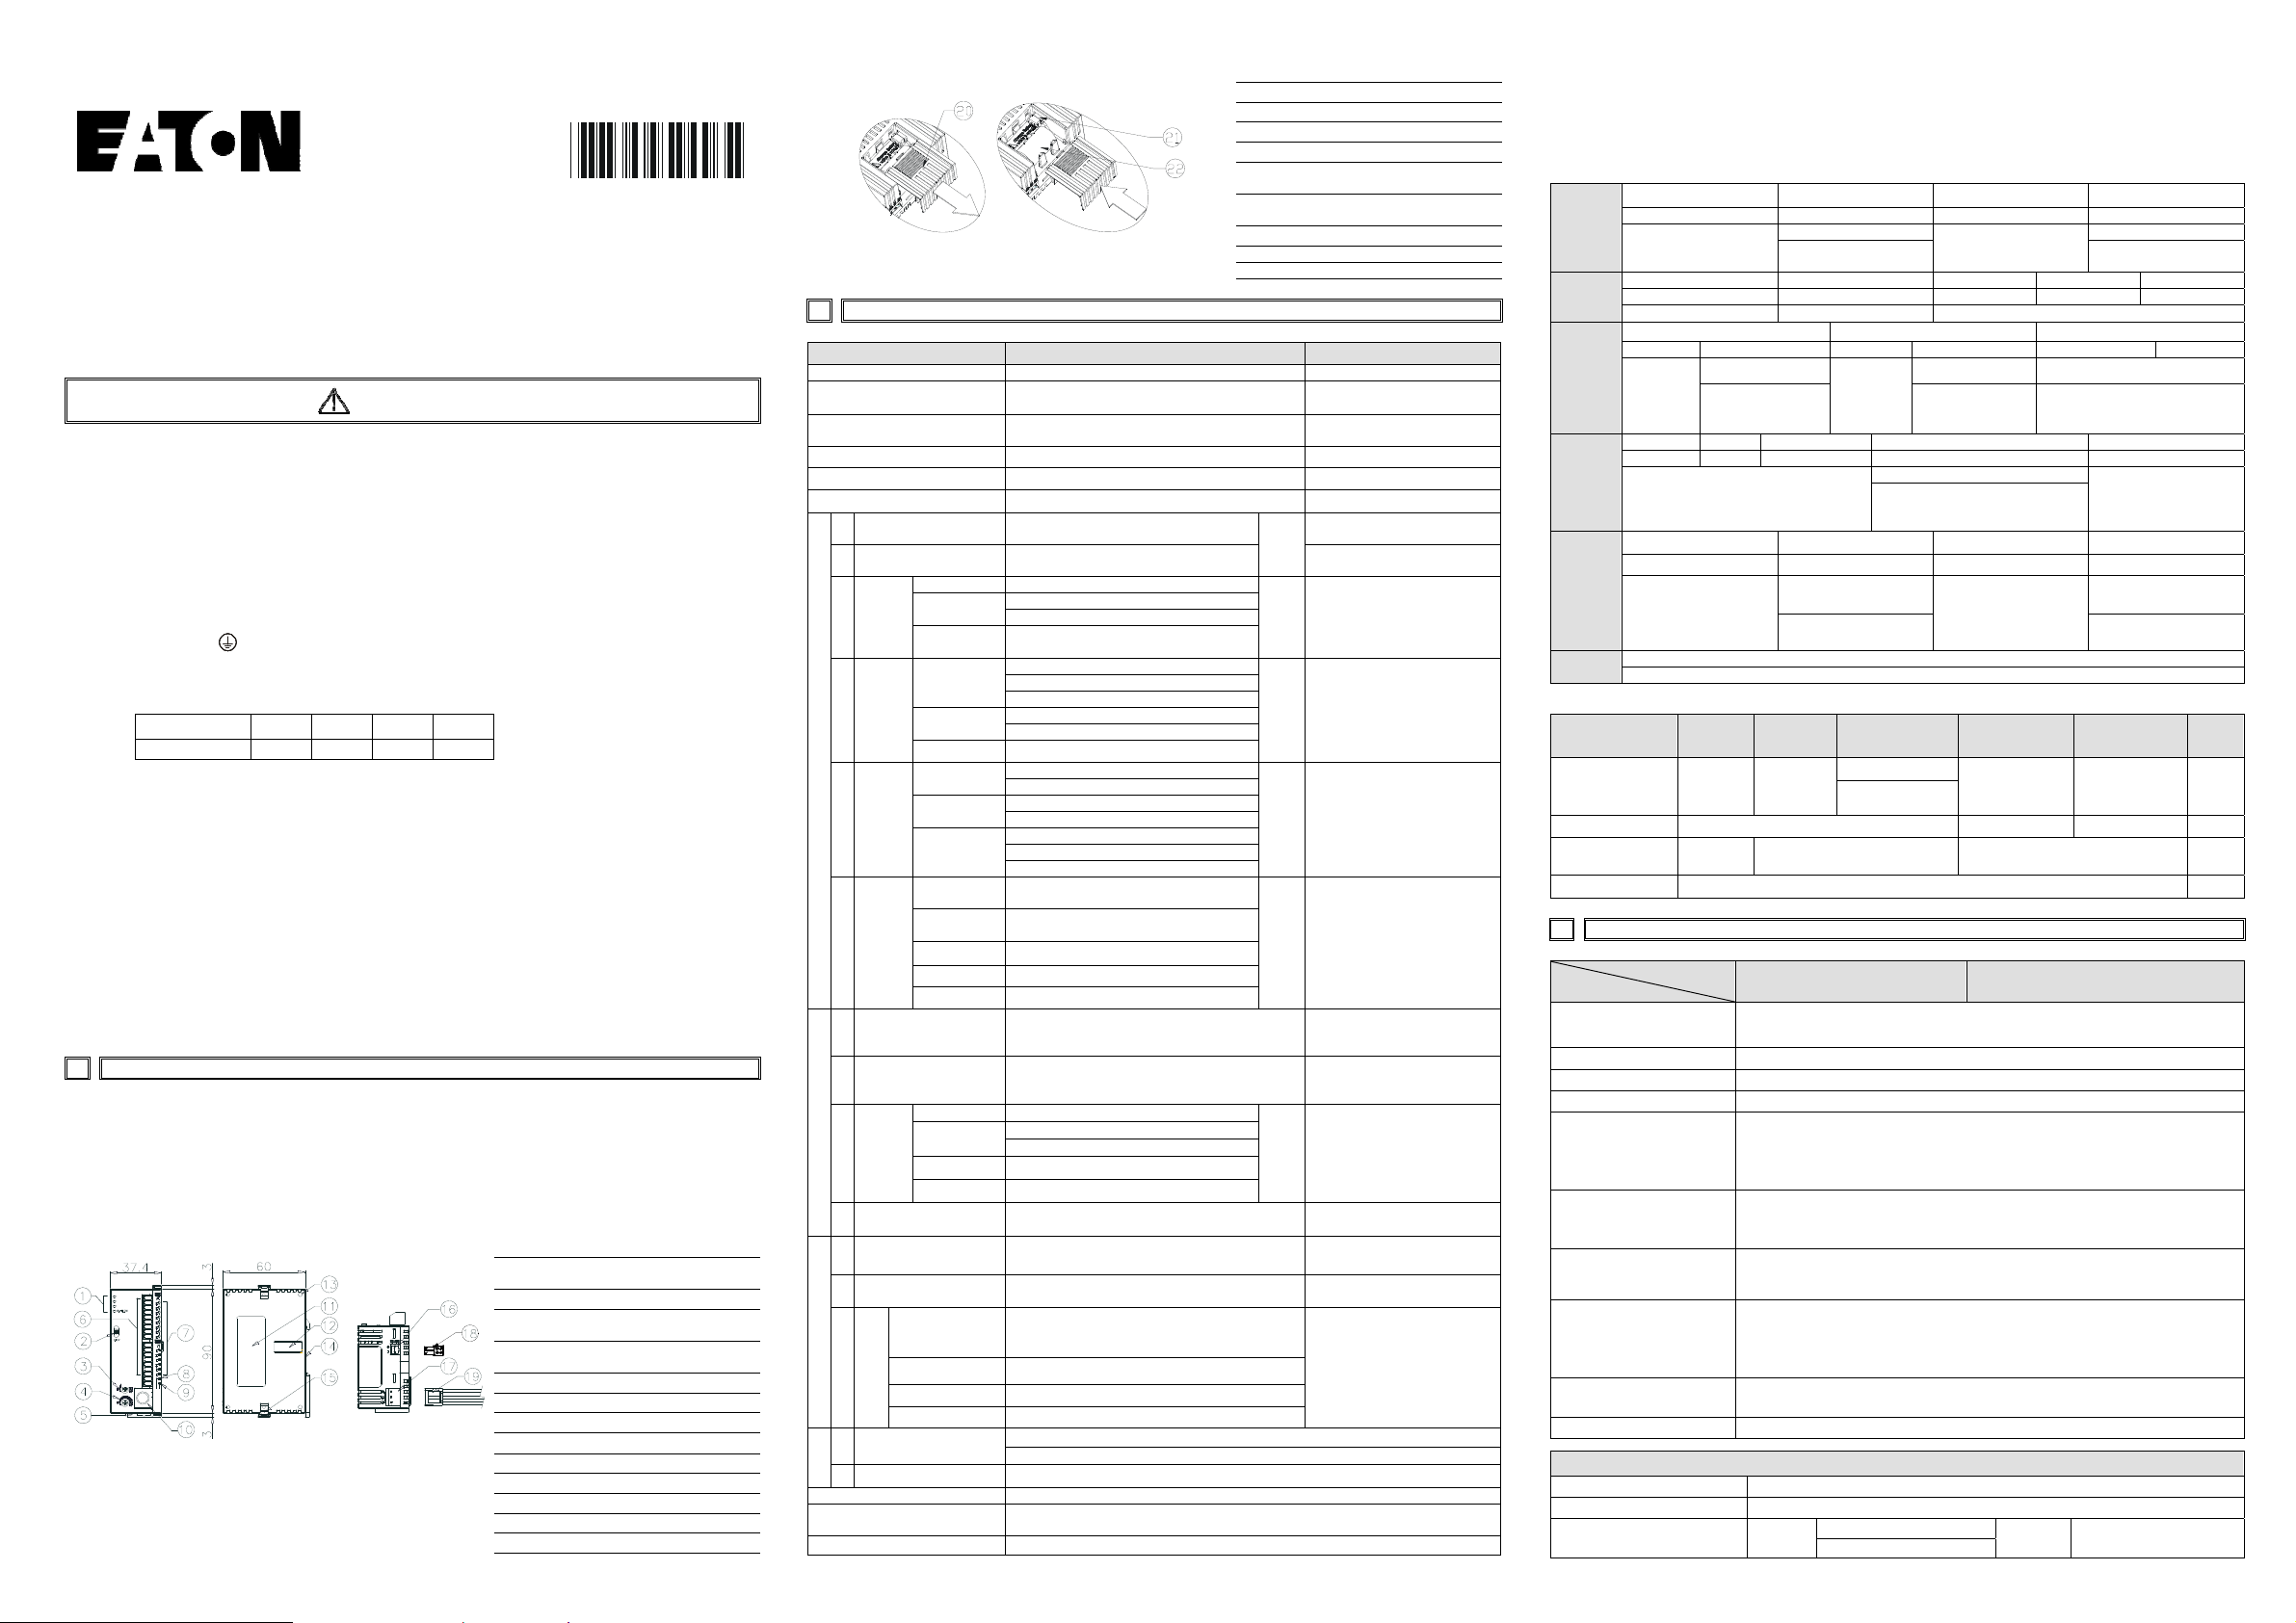
1.2 Product Profile and Outline
ELC-PC12NNAR
Y3
RS-232
RS-485
Y1
Y2
C2
Y0
C1
RUN
RUN
ERROR
POWER
Unit: mm
Warning: Battery replacement: Please change the battery within 3
minutes, or the internal data of the ELC (including the program area,
perpetual calendar and latched registers) could be lost or destroyed.
1 Status indicator: POWER, RUN,
ERROR, BAT.LOW
2 RUN/STOP switch
3 VR0: M1178 Start-up/D1178
Corresponding value
4 VR1: M1179 Start-up/D1179
corresponding value
5 DIN rail clip
6 I/O terminals
7 I/O point indicators
8 COM1 (RS-232) (Rx) indicator
9 COM2 (RS-485) (Tx) indicator
10 COM1 (RS-232) programming port
11 Nameplate
12 Expansion port
13 Mounting hold of the expansion unit
14 DIN rail (35mm)
15 Expansion unit clip
16 COM2 (RS-485) Communication port
17 DC Power input
18 2 pin removable terminal (standard
accessory)
19 Power input cable (standard
accessory)
20 Battery Cover
21 Battery socket connection
22 Battery mount
2 FUNCTION SPECIFICATIONS
Items Specifications Remarks
Control Method Stored program, cyclic scan system
I/O Processing Method Batch processing method (when END command
is executed)
I/O refresh command is
available
Execution Speed Basic commands (several us) Application Commands
(10~hundreds us)
Program Language Commands + Ladder Logic + SFC Including the Step commands
Program Capacity 7,920 STEPS SRAM + Battery
Commands 32 Basic sequential commands 168 Application commands
Relay (bit mode)
X External Input Relay X0~X177, octal number system, 128
points Tot al
256
points
Correspond to external I/P
point
Y External Output Relay Y0~Y177, octal number system, 128
points
Correspond to external O/P
point
M Auxiliary
Relay
General M0~M511, 512 points (*1)
Tot a l
4,096
points
Contacts can switch to On/Off
in program
Latched M512~M999, 488 points (*3)
M2000~M4095, 2,096 points (*3)
Special M1000~M1999, 1,000 points (some are
latched)
T Timer
100ms
T0~T199, 200 points (*1)
Tot a l
256
points
When the timer that set by
TMR command reaches the
preset value, the T contact with
the same number will be On.
T192~T199 for Subroutine
T250~T255, 6 points Accumulative (*4)
10ms T200~T239, 40 points (*1)
T240~T245, 6 points Accumulative (*4)
1ms T246~T249, 4 points Accumulative (*4)
C Counter
16-bit Count
Up
C0~C95, 96 points (*1)
Tot a l
250
points
When the counter that set by
CNT (DCNT) command
reaches the preset value, the C
contact with the same number
will be On.
C96~C199, 104 points (*3)
32-bit Count
Up/Dn
C200~C215, 16 points (*1)
C216~C234, 19 points (*3)
32bit
High-speed
Count Up/Dn
C235~C245, 1 ph, 1 input, 9 points (*3)
C246~C250, 1 ph, 2 input, 3 points (*3)
C251~C254, 2 ph, 2 input, 3 points (*3)
S Step
point
Initial Step
Point S0~S9, 10 points (*1)
Tot a l
1,024
points
Usage device of step ladder
diagram (SFC)
Latched Range:
Start: D1214 (K512)
End: D1215 (K895)
Zero Point
Reset
S10~S19, 10 points (use with IST
command) (*1)
General S20~S511, 492 points (*1)
Latched S512~S895, 384 points (*3)
Alarm S896~S1023, 128 points (*3)
Register (WORD data)
T Current Value of the
Timer T0~T255, 256 points
When the timer reaches the
preset value, the contact of
timer will be On.
C Current Value of the
Counter
C0~C199, 16-bit counter, 200 points
C200~C254, 32-bit counter, 50 points
When the counter reaches the
preset value, the contact of
counter will be On.
D Data
Register
General D0~D199, 200 points (*1)
Tot a l
5,000
points
Can be memory area for
storing data. E and F can be
used as the special purpose of
index indication.
Latched D200~D999, 800 points (*3)
D2000~D4999, 3,000 points (*3)
Special D1000~D1999, 1,000 points
Index E0~E3, F0~F3, 8 points (*1)
None
File Register 0~1,599 (1,600 points) (*4) Expansion register for storing
data.
Pointer
N For Master Control
Nested Loop N0~N7, 8 points Control point of master control
nested loop
P For CJ, CALL
Commands P0~P255, 256 points The location point of CJ, CALL.
I
Interrupt Service
External Interrupt
I001 (X0), I101 (X1), I201 (X2), I301 (X3), I401
(X4), I501 (X5); 6 points (all are rising-edge
trigger) The location pointer of interrupt
subroutine
Time Interrupt I6 (1ms), I7 (1ms), ( 1~99ms)
*1: The non-latched area is fixed, and can’t be changed.
*2: The non-latched area can be changed to a latched area with parameter setting.
*3: The latched area can be changed to a non-latched area with parameter setting.
*4: The latched area is fixed, and can’t be changed.
M
Auxiliary
Relay
General Latched Special auxiliary relay Latched
M0~M511 M512~M999 M1000~M1999 M2000~M4095
Non-latched (fixed)
Latched (default) Some are latched and
can’t be changed
Latched (default)
Start: D1200 (K512)
End: D1201 (K999)
Start: D1202 (K2,000)
End: D1203 (K4,095)
T
Timer
100 ms 10 ms 10ms 1 ms 100 ms
T0 ~T199 T200~T239 T240~T245 T246~T249 T250~T255
Non-latched (fixed) Non-latched (fixed) Accumulative Latched (fixed)
C
Counter
16-bit count up 32-bit count up/down 32-bit high-speed count up/down
C0~C95 C96~C199 C200~C215 C216~C234 C235~C245 C246~C255
Non-latched
(fixed)
Latched (default)
Non-latched
(fixed)
Latched (default) Latched (default)
Start: D1208 (K96)
End: D1209 (K199)
Start: D1210
(K216)
End: D1211 (K234)
□□ □□ □□=
Hi-speed Counter I010, I020, I030, I040, I050, I060; 6 points
Communication I150, 1 point
Constant
K Decimal K-32,768 ~ K32,767 (16-bit operation)
K-2,147,483,648 ~ K2,147,483,647 (32-bit operation)
H Hexadecimal H0000 ~ HFFFF (16-bit operation), H00000000 ~ HFFFFFFFF (32-bit operation)
Programming Port COM1: RS-232, COM2: RS-485 (Master/Slave), Can be used at the same time.
Analog Volume / Perpetual
Calendar (RTC) ELC built-in 2 points VR / ELC built-in RTC
Special Expansion Module Use the same modules of ELC series. (Max. 8 Expansion Unit points)
Start: D1212 (K235)
End: D1213 (K255)
S
Step Relay
For general Latched Special register Latched For general
S0~S9 S10~S19 S20~S511 S512~S895 S896~S1023
It is fixed to be non-latched
Factory setting is latched
It is fixed to be latched
Start: D1214 K512( )
End: D1215 K895( )
D
Register
General Latched Special registers Latched
D0~D199 D200~D999 D1000~D1999 D2000~D4999
Non-latched (fixed)
Factory setting is
latched. Some are latched and
can’t be changed.
Factory setting is
latched.
Start: D1216 (K200)
End: D1217 (K999)
Start: D1218 (K2,000)
End: D1219 (K4,999)
File
Register
K0~K1,599
Latched (fixed)
When switching between power On/Off or ELC RUN/STOP modes:
Memory Type POWER
OffÖOn STOPÖRUN RUNÖSTOP Clear all M1031
non-latched area
Clear all M1032
latched area
Factory
Setting
Non-latched Clear Unchanged
M1033=Off, clear
Clear Unchanged 0
M1033=On,
unchanged
Latched Unchanged Unchanged Clear 0
Special M, Special
D, Index register Initial value Unchanged Unchanged Initial
value
File register Unchanged 0
3ELECTRICAL SPECIFICATIONS
Model
Item ELC-PC12NNDR/T ELC-PC12NNAR
Power Supply Voltage ELC: 24VDC (-15%~+20%) (With DC input reverse polarity protection),
Expansion Unit: supplied by the ELC
Fuse 2A / 250VAC
Power Consumption 3.5W MAX
Insulation Resistance > 5 M at 500 VDC (Between all inputs / outputs and earth)Ω
Noise Immunity
ESD(IEC 61131-2, IEC 61000-4-2): 8KV Air Discharge
EFT(IEC 61131-2, IEC 61000-4-4): Power Line: 2KV, Digital I/O: 1KV, Analog &
Communication I/O: 1KV
RS(IEC 61131-2, IEC 61000-4-3): 26MHz~1GHz, 10V/m
Grounding
The diameter of grounding wire cannot be smaller than the wire diameter of
terminals 24V and 0V (All ELC units should be grounded directly to the ground
pole).
Environment Operation: 0 ~55 (Temperature), 50~95% (Humidity), Pollution degree 2;℃ ℃
℃ ℃Storage: -25 ~70 (Temperature), 5~95% (Humidity)
Agency Approvals
UL508
UL1604, Class1,Div2 Operating temperature code: T5
European community EMC Directive 89/336/EEC and Low Voltage Directive
73/23/EEC
Vibration / Shock Resistance Standard: IEC61131-2, IEC 68-2-6 (TEST Fc) / IEC61131-2 & IEC 68-2-27 (TEST
Ea)
Weight (approx.) (g) 158
DC Input Point Electrical Specification
Input Type DC (SINK or SOURCE)
Input Current 24VDC 5mA
Active Level Off On→ →
X0,X1: above18.5VDC On Off X0~X7: below 8VDC
X2~X7: above16.5VDC
IL05003012E.pdf
Responding Time Adjustable 0~20ms, Default10ms, selected through D1020)
AC Input Point Electrical Specification
Rated Input Voltage 100 to 120 VAC (-15%~+10%)
Maximum Input Current Less than 20 mA
Minimum ON Voltage 80 VAC
Maximum OFF Voltage 30 VAC
Output Point Electrical Specification
Output Type Relay-R Transistor-T
Current
Specification 1.5A/1 point (5A/COM) 0.3A/1 point @ 40 ; When the output of Y0 and Y1 is high-speed
pulse, Y0 and Y1 = 30mA
℃
Voltage
Specification
Below 250VAC,
30VDC 30VDC
Maximum Loading 75VA (Inductive) 9W/1 point
When the output of Y0 and Y1 is high-speed pulse,
Y0 and Y1 = 0.9W (Y0 = 32kHz, Y1 = 10kHz), Y0
can be 50Khz using D registers
90 W (Resistive)
Responding Time About 10 ms Off On 20us→
→On Off 30us Y0 and Y1 are specified points for high-speed pulse
4 MODEL NAME & I/O CONFIGURATION
Model
Input / Output Profile
Reference I/O Configuration
Power Input Unit Output Unit
Point Type Point Type
ELC-PC12NNAR
24VDC
8 100~120VAC 4 Relay
S/S
X0
X1
X2
X3
X4
X5
X6
X7
C0
Y0
C1
Y1
C2
Y2
Y3
COM
X0
X1
X2
X3
X4
X5
X6
X7
C0
Y0
C1
Y1
C2
Y2
Y3
DC AC
input input
ELC-PC12NNDR 8
DC Sink or
Source
4 Relay
ELC-PC12NNDT 8 4 Transistor
5 INSTALLATION & WIRING
5.1 Installation of the DIN rail
The ELC can be secured to a cabinet by using the DIN rail that is 35mm high with a depth of 7.5mm. When
mounting the ELC on the DIN rail, be sure to use the end bracket to stop any side-to-side motion of the ELC, thus
to reduce the chance of the wires being pulled loose. At the bottom of the ELC is a small retaining clip.
To remove it, pull down the retaining clip and gently pull the ELC
away from the DIN rail. As shown on the right:
When installing the ELC, make sure that it is installed in an
enclosure with sufficient space (as shown on the right) to its
surroundings so as to allow heat dissipation.
D
D
DD
E
L
C
D>50mm
5.2 Wiring
22-16AWG
<1.5mm
1. Please use 22-16AWG (1.5mm) wiring (either single or multiple core) for
I/O wiring terminals. The specification for the terminals is as shown on the
left. ELC terminal screws should be tightened to 1.95 kg-cm (1.7 lb-in). Use
Copper Conductor Only, 60/75 °C.
2. I/O signal wires or power supply should not run through the same
multi-wire cable or conduit.
5.3 Power Input Wiring
1. When DC voltage is supplied to the ELC, make sure the power is at terminals 24VDC and 0V (power range is
20.4VDC~28.8VDC). When voltage is lower than 20.4VDC, ELC will stop operating, all outputs will turn OFF
and the ERROR LED will flash continuously.
2. If the power-cut time is less than 10ms, the ELC still operates unaffectedly. If the power-cut time is too long or
the power voltage drops, the ELC will stop operating and all the outputs will be Off.
DC Input Type 2A
20.4V~28.8V
DC/DC +5V
S/S X0 X1 X2
24V 0V
GND ELC
5.4 Input Point Wiring
There are two types of DC type wiring: SINK and SOURCE, defined as follows:
SINK Mode SOURCE Mode
+24V 0V
DC Power Supply
S/S X0 X1 X2
Sink mode
+24V 0V
DC Power Supply
S/S X0 X1 X2
Source mode
5.5 AC Type Wiring
Input Circuit Connection 110V AC Input Specifications
COM X0 X1 X2
ELC-12PCNNAR
85~132VAC
50/60Hz
Input voltage 100~120VAC (-15%~+10%)
Input impedance 21Kohm/50Hz 18Kohm/60Hz
Input current 4.7mA 100VAC/50Hz
6.2mA 110VAC/60Hz
OFF ON/ON OFF→ → 80V 3.8mA/30V 1.7mA
Response time OFF ON:30ms ON OFF:50ms→ →
Circuit isolation/Operation indication Photocoupler/LED On
5.6 Output Point Wiring
Output point wiring
Y0
RY
LED C0
LOAD
POWER
ELC-**-**NN*R
RELAY OUTPUT
1. ELC-PC series have two output modules, relay and transistor. See
“Function Specifications” for their specifications.
2. Please watch out the connection of common terminals whilewire the
outputs. For example, when wiring ELC-PC12NNDR/T,output
terminal Y0 uses one common terminal C0, Y1 uses C1, and Y2~Y3
share C2, as shown below:
C0 Y0 Y1 Y2C1 Y3C2
RELAY
C0 Y0 C2 Y2 Y3C1 Y1
Transistor
When output points are enabled, their corresponding indicators on
the front panel will be on.
3. Isolation circuit: The optical coupler is used to isolate signals
between the circuit inside ELC and input modules.
Y0
LED
C0
TRANSISTOR OUTPUT
LOAD
ELC-**-**NN*T
< 0.5A
Trigger circuit
The Relay Output Circuit Wiring
2
3
1
5
C0 Y0 Y1C1 Y2 Y3
C2
4
MC1
9
3
2
7
8
6
1 Flywheel diode: To extend the life span of contact*1
2 Emergency stop: Uses external switch
3 Fuse: Uses 5 ~ 10A fuse at the shared terminal of output contacts
to protect the output circuit.
4 Varistor: To reduce the interference on AC load*2:
5 Empty terminal: no in use
6 DC power supply
7 AC power supply 8 Incandescent light (resistive load)
9 Manually exclusive output: Uses external circuit and forms an interlock, together with ELC internal program, to ensure safe
protection in case of any unexpected errors. *3
*1: For switching direct current on inductive loads, a reverse-current protection diode should be installed in parallel
with the load. The relay contact life decreases significantly if this is not done.
The reverse-current protection diode needs to satisfy the following specifications.
- The diode is rated for maximum reverse voltage of 5~10 times the load voltage.
- The forward current is more that the load current
*2: For switching AC on inductive loads, a surge absorber (0.1uF + “100ohm to 120ohm”) should be installed in
parallel with the load. The relay contat life decreases significantly if this is not done.
*3: Ensure all loads are applied to the same side of each ELC output, see above figure. Loads which should
NEVER simultaneously operate(e.g. direction control of a motor), because of a critical safety situation, should not
rely on the ELC’s sequencing alone. Mechanical interlocks MUST be fitted to all critical safety circuits.
The Transistor Output Circuit Wiring
MC1
2
3
1
C0 Y0 Y1 C2 Y2 Y3
4
5
3
4
C1
1 DC power supply
2 Emergency stop
3 Circuit protection fuse
4 Flywheel diode + inductive load
5 Manually exclusive output: Uses external circuit and forms an
interlock, together with ELC internal program, to ensure safe
protection in case of any unexpected errors. *1
*1: Transistor outputs use internal zener diode(39V) as protection circuitry. When driving the inductive load with
transistor output, a reverse-current protection diode can be installed in parallel with the load if necessary.
The reverse-current protection diode needs to satisfy the following specifications.
- The diode is rated for maximum reverse voltage of 5 to 10 times the load voltage.
- The forward current is more than the load current.
6TRIAL RUN
☼Power Indication
The “POWER” LED at the front of the ELC will be lit (in green) if the power is on.
■Low Battery Voltage Indication
There is also a “BAT.LOW” LED at the front of the ELC. When the LED is on, it indicates that the battery voltage is
insufficient. Please change the battery (within 3 minutes) as soon as possible; otherwise the user programs and the
data in latched area may be lost.
■Preparation
1. Prior to applying power, please verify that the power lines and the input/output wiring are correct. And
be advised not to supply AC110V or AC220V into the I/O terminals, or it might short-circuit the wiring
and would cause direct damage to the ELC.
2. After using the peripheral devices to write the program into the ELC and that the ERROR LED of the
ELC is not on, it means that the program in use is legitimate, and it is now waiting for the user to give
the RUN command.
3. Use ELC-HHP to execute the forced On/Off test of the output contact.
■Operation & Test
If the “ERROR” LED of the ELC is not blinking, use RUN/STOP switch or the peripheral devices (ELC-HHP or
ELCSoft) to give the RUN command, and the RUN indicator will then be on. If the “RUN” LED is not on, it indicates
that there is no program inside the ELC.
ELC-HHP could be utilized to monitor the settings and the registered values of the timer (T), the counter (C) and the
data register (D) during operation, and moreover, to force the output contacts to conduct the On/Off action. If the
ERROR LED is on (but not blinking), it means that the setting of the user’s program has exceeded the preset
overtime limit. At this time, please turn RUN/STOP switch to STOP and get program time-out address from special
register D1008. (it is recommended to improve by WDT command)
■ELC Input/Output Reaction Time
The total reaction time from the input signal to the output operation is calculated as follows:
Reaction Time = input delay time + program scan time + output delay time
Input delay time Factory setting is 10ms. Please refer to special registers D1020~1021.
Program scan time Please refer to the usage of special register D1010.
Output delay time Relay module: 10ms. Transistor module: 20~30us.
■Basic Commands and Application Commands of the ELC:
1. The basic commands and the application commands of the ELC of this series are totally applicable to the
ELC. Refer to the ELC Technique Application Manual for relevant basic commands and application
commands.
2. The ELC-HHP handheld programming panel and the ELCSoft (Windows version) editing program of the
ladder diagram are both good for use with the ELC. Also, the ELC could connect with the
ELC-PC12NNDR/T,ELC-PC12NNAR through specific transmission wire to execute the program
transmission, the ELC control and the program monitoring.
7TROUBLESHOOTING
Judge the errors by the indicators on the front panel. When errors occurred on ELC, please check:
☼“POWER” LED
There is a “POWER” LED at the front of the ELC. When the ELC is powered On, the green LED light will be on.
☼ELC “RUN” LED
Identify the status of the ELC. When the ELC is in operation, this light will be on, and users could thus use
ELC-HHP or the editing program of the ladder diagram to give commands to make the ELC “RUN” or “STOP”.
☼“ERROR” LED
If incorrect programs are input to the ELC, the indicator will blink. Please check D1004(Error code) and
D1137(Error step number).
When the ERROR LED is on (not blinking), it indicates that the execution time of the program loop has
exceeded the time-out setting (set by D1000). Please turn the ELC RUN/STOP switch to STOP, and find out the
address of the time-out program by special data register D1008. ”WDT”. After completing modifying program,
user only need to reload program and this LED will be off at this moment. Once the LED still lights, please turn
off the power and check if there is interference or any conductive material in ELC.
☼“BAT.LOW” LED
When the battery voltage is low, the “BAT.LOW” LED will be on, please change the battery within 3 minutes to
retain the ELC’s internal user programs and data).
☼“Input/Output” LED
The On/Off signals of the input point could be displayed through the “Input” LED. “Output” LED indicates if the
output signals are On or Off.
IL05003012E.pdf
☼“RS-232, RS-485” LED
“RS-232” LED will light when RS-232 is receiving data, “RS-485” LED will light when RS-485 is transferring
data.

Other manuals for ELC-PC12NNDR

1

This manual suits for next models

2

Other Eaton Controllers manuals

Eaton Vickers SMC20 User manual

Eaton

Eaton Vickers SMC20 User manual

Eaton xComfort CKOZ-00/13 User manual

Eaton

Eaton xComfort CKOZ-00/13 User manual

Eaton xComfort CHAZ-01/12 User manual

Eaton

Eaton xComfort CHAZ-01/12 User manual

Eaton ER9.3-10 User manual

Eaton

Eaton ER9.3-10 User manual

Eaton ELC-PA10AADR User manual

Eaton

Eaton ELC-PA10AADR User manual

Eaton SFX Series User manual

Eaton

Eaton SFX Series User manual

Eaton CGLine+ Web-Controller User manual

Eaton

Eaton CGLine+ Web-Controller User manual

Eaton xComfort CJAU-01 Series User manual

Eaton

Eaton xComfort CJAU-01 Series User manual

Eaton Crouse-hinds series User manual

Eaton

Eaton Crouse-hinds series User manual

Eaton Cuttler-Hammer Digitrip 1150V User manual

Eaton

Eaton Cuttler-Hammer Digitrip 1150V User manual

Eaton xComfort CHVZ-01/04 User manual

Eaton

Eaton xComfort CHVZ-01/04 User manual

Eaton xComfort CSAU-01/01 Manual

Eaton

Eaton xComfort CSAU-01/01 Manual

Eaton RTC-100 User manual

Eaton

Eaton RTC-100 User manual

Eaton DILE Series User manual

Eaton

Eaton DILE Series User manual

Eaton OPTE9 User manual

Eaton

Eaton OPTE9 User manual

Eaton CDAU-01/04 User manual

Eaton

Eaton CDAU-01/04 User manual

Eaton Cutler-Hammer LMR User manual

Eaton

Eaton Cutler-Hammer LMR User manual

Eaton Greengate RC3 User manual

Eaton

Eaton Greengate RC3 User manual

Eaton xComfort CSAP-01/XX User manual

Eaton

Eaton xComfort CSAP-01/XX User manual

Eaton xComfort CJAU Series User manual

Eaton

Eaton xComfort CJAU Series User manual

Eaton XV-102 Series User manual

Eaton

Eaton XV-102 Series User manual

Eaton MFD-Titan MFD-80 Series Manual

Eaton

Eaton MFD-Titan MFD-80 Series Manual

Eaton DE1-121D4 Series Manual

Eaton

Eaton DE1-121D4 Series Manual

Eaton EDS Series Setup guide

Eaton

Eaton EDS Series Setup guide

Popular Controllers manuals by other brands

Beijer Electronics EXTER K10m installation manual

Beijer Electronics

Beijer Electronics EXTER K10m installation manual

NT KN303 user manual

NT

NT KN303 user manual

Ametek Gemco 952CP Ram-Set Installation and maintenance manual

Ametek

Ametek Gemco 952CP Ram-Set Installation and maintenance manual

X10 KR22A user manual

X10

X10 KR22A user manual

JOOBY Avenue Smart Cover user manual

JOOBY

JOOBY Avenue Smart Cover user manual

Sinclair SWC-86A User and installation manual

Sinclair

Sinclair SWC-86A User and installation manual

Watts Lync AEGIS user manual

Watts

Watts Lync AEGIS user manual

Scolmore Click Smart Series Installation & Control Manual

Scolmore

Scolmore Click Smart Series Installation & Control Manual

HP MSA 2040 installation instructions

HP

HP MSA 2040 installation instructions

LS XGF-PO1H installation guide

LS

LS XGF-PO1H installation guide

SJE Rhombus NEX Series Installation instructions and operation manual

SJE Rhombus

SJE Rhombus NEX Series Installation instructions and operation manual

ABB LME620-AI instructions

ABB

ABB LME620-AI instructions

OptoSigma CJ-200A quick start guide

OptoSigma

OptoSigma CJ-200A quick start guide

Dell CMC Technical specification

Dell

Dell CMC Technical specification

Omron EP-3 - datasheet

Omron

Omron EP-3 - datasheet

jablotron JA-154J MS II quick start guide

jablotron

jablotron JA-154J MS II quick start guide

Schalk SMS 2 quick start guide

Schalk

Schalk SMS 2 quick start guide

Leviton intellect ZL057-D0Z quick start guide

Leviton

Leviton intellect ZL057-D0Z quick start guide

manuals.online logo
manuals.online logoBrands
  • About & Mission
  • Contact us
  • Privacy Policy
  • Terms and Conditions

Copyright 2025 Manuals.Online. All Rights Reserved.