ECG LD 174201 User manual

LD 174201
English
Deutsch
Čeština
Eesti keel
Hrvatski
Bosanski
Latviešu valoda
Lietuvių kalba
Magyar
Polski
Română
Slovenčina
Slovenščina
Srpski
Crnogorski
Ελληνικά
Українська мова
Always read the safety&use instructions carefully before using your appliance for the rst time. The user´smanual must be always included. Bitte lesen Sie vor der Inbetriebnahme des Produktes diese Anleitung und
die darin enthaltenen Sicherheitshinweise aufmerksam durch. Die Bedienungsanleitung muss dem Gerät immer beigelegt sein. Před uvedením výrobku do provozu si důkladně pročtěte tento návod abezpečnostní
pokyny, které jsou vtomto návodu obsaženy. Návod musí být vždy přiložen kpřístroji. Enne seadme esmakordset kasutamist lugege ohutus- ja kasutusjuhised alati hoolikalt läbi. Kasutusjuhend peab alati kaasas
olema. Uvijek pročitajte sigurnosne upute iupute za uporabu prije prvog korištenja vašeg uređaja. Upute moraju uvijek biti priložene. Pirms ierīces pirmās lietošanas reizes vienmēr rūpīgi izlasiet drošības un
lietošanas norādījumus. Rokasgrāmata vienmēr jāpievieno ierīcei. Prieš naudodamiesi prietaisu pirmąjį kartą, visuomet atidžiai perskaitykite saugos ir naudojimo instrukcijas. Kartu su gaminiu visada privalo
būti jo naudotojo vadovas. Atermék használatba vétele előtt gyelmesen olvassa el ezt a használati útmutatót és az útmutatóban található biztonsági rendelkezéseket. A használati útmutatót tartsa a készülék
közelében. Przed pierwszym użyciem urządzenia prosimy ouważne zapoznanie się zinstrukcjami dotyczącymi bezpieczeństwa iużytkowania. Instrukcja obsługi musi być zawsze dołączona. Citiți întotdeauna
instrucțiunile de siguranță și utilizare cu atenție înainte de a utiliza aparatul pentru prima dată. Manualul utilizatorului trebuie să e întotdeauna inclus. Pred uvedením výrobku do prevádzky si dôkladne prečítajte tento
návod abezpečnostné pokyny, ktoré sú vtomto návode obsiahnuté. Návod musí byť vždy priložený kprístroju.
Pred vklopom izdelka temeljito preberite ta navodila in varnostne napotke, ki so navedeni vteh
navodilih. Navodila morajo biti vedno priložena knapravi.
Uvek pažljivo pročitajte uputstva za sigurnost iupotrebu pre upotrebe uređaja po prvi put. Korisničko uputstvo mora uvek biti priloženo.
Πριν
χρησιμοποιήσετε τη συσκευή σας για πρώτη φορά, διαβάστε οπωσδήποτε τις οδηγίες ασφάλειας και χρήσης. Το εγχειρίδιο χρήστη πρέπει να περιλαμβάνεται πάντα στη συσκευασία.
Завжди уважно читайте
інструкції з техніки безпеки та використання перед першим використанням пристрою. Посібник користувача повинен бути завжди включений.
FULL-MOTION LED TV WALL MOUNT
INSTRUCTION MANUAL
WIELOKIERUNKOWY UCHWYT NA
TELEWIZOR LED
INSTRUKCJA OBSŁUGI
ALLSEITIG SCHWENKBARE
WANDHALTERUNG FÜR LED TV
BEDIENUNGSANLEITUNG
SUPORT DE PERETE PENTRU LED CU
MIȘCARE COMPLETĂ
INSTRUCȚIUNI DE UTILIZARE
VŠESMĚROVÝ DRŽÁK LED TV
NÁVOD KOBSLUZE VŠESMEROVÝ DRŽIAK LED TV
NÁVOD NA OBSLUHU
TÄIELIKULT LIIKUVA LED-TELERI
SEINAKINNITUS
KASUTUSJUHEND
VEČSMERNI TV LED NOSILEC
NAVODILA
VIŠESMJERNI DRŽAČ ZA LED TELEVIZOR
UPUTE ZA UPORABU VIŠESMERNI DRŽAČ ZA LED TELEVIZOR
UPUTSTVO ZA UPOTREBU
PILNKUSTĪBAS LED TV SIENAS
KRONŠTEINS
ROKASGRĀMATA
ΒΑΣΗ ΤΟΙΧΟΥ ΓΙΑ ΤΗΛΕΟΡΑΣΗ LED ΜΕ
ΔΥΝΑΤΟΤΗΤΑ ΠΛΗΡΟΥΣ ΚΙΝΗΣΗΣ
ΕΓΧΕΙΡΙΔΙΟ ΟΔΗΓΙΩΝ
PILNO APSISUKIMO LED TV SIENINIS
MONTAVIMO ĮTAISAS
INSTRUKCIJŲ VADOVAS
РУХЛИВЕ НАСТІННЕ КРІПЛЕННЯ ДЛЯ
LED ТЕЛЕВІЗОРУ
ІНСТРУКЦІЯ З ЕКСПЛУАТАЦІЇ
TÖBB IRÁNYBA BEÁLLÍTHATÓ LED TV
TARTÓ
HASZNÁLATI ÚTMUTATÓ


English
English
3
FULLMOTION LED TV WALL MOUNT
SAFETY INSTRUCTIONS
Read carefully and save for future use!
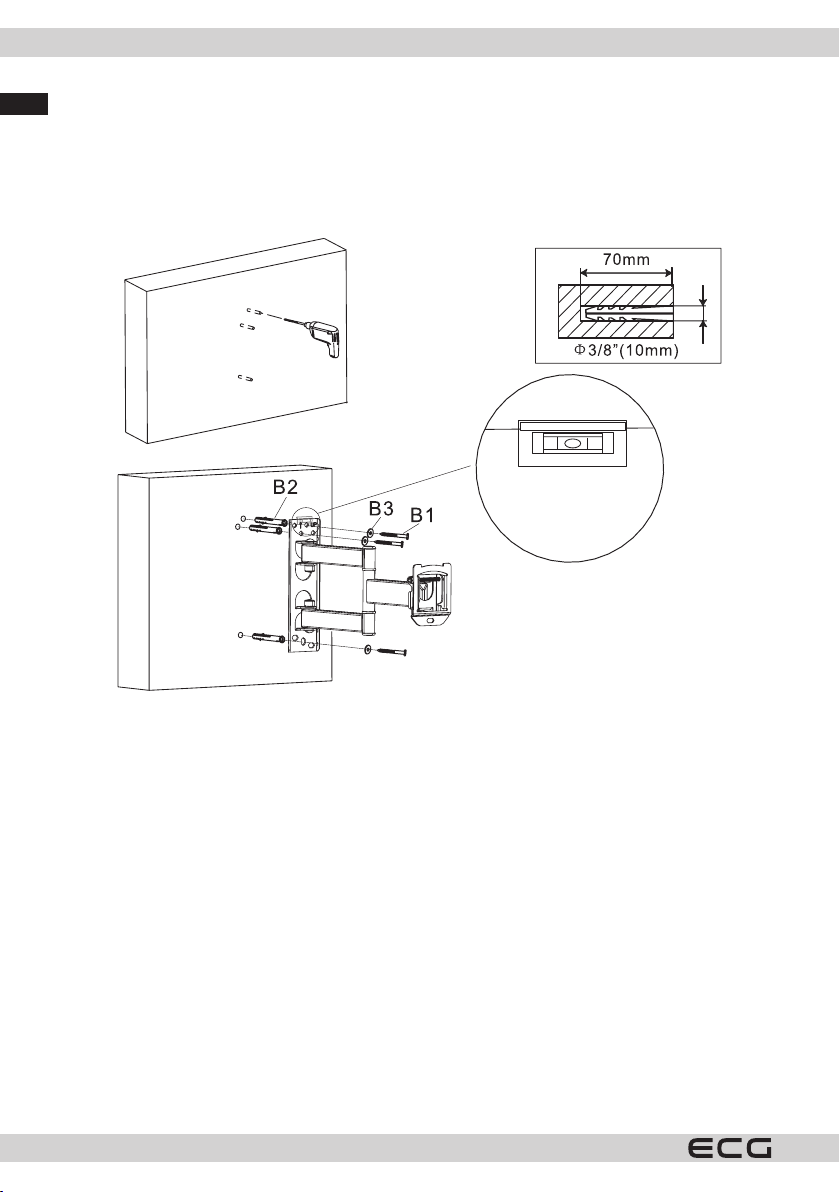
Please refer to a qualied professional to install the wall mount properly.
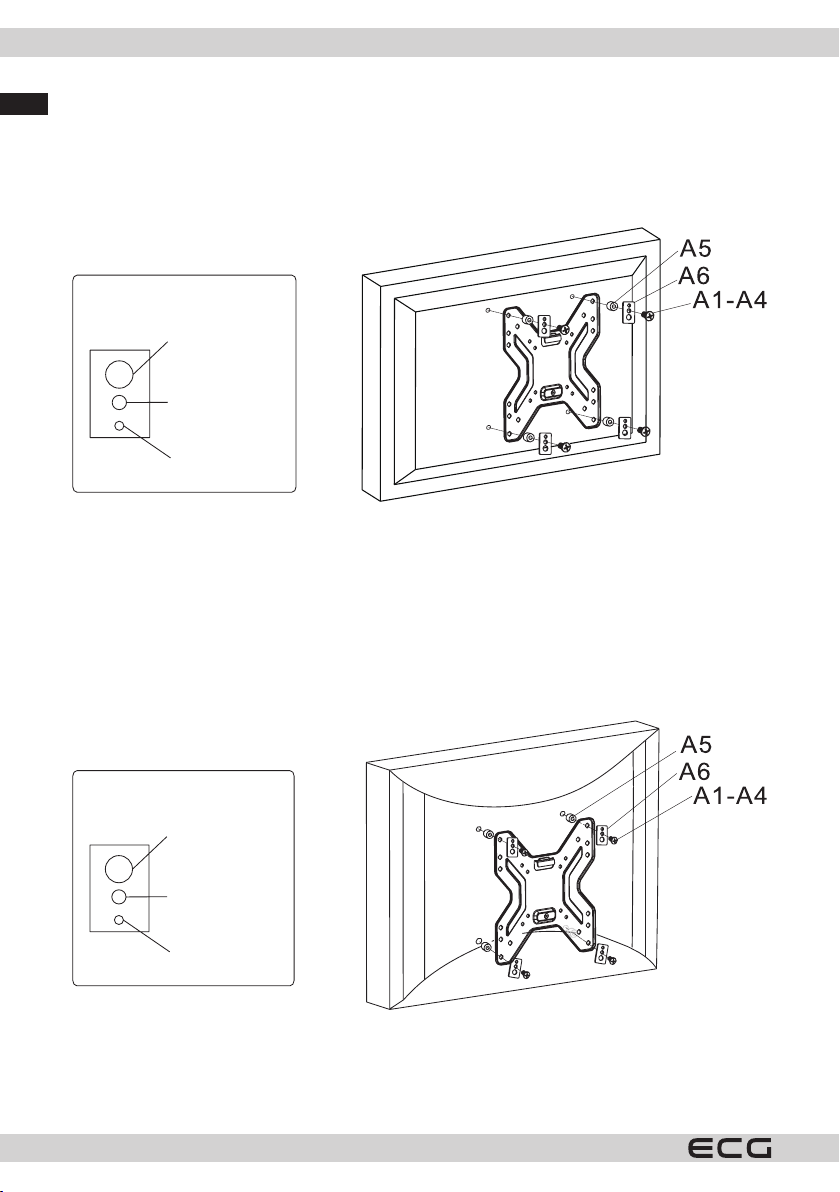
Prior to the wall mount installation, check the contents of the assembly
set and inform your vendor in case you discover any components are
missing or are defective. Do not use defective components!! Use the
wall mount solely for the purpose intended by the manufacturer. Make
sure the wall is capable of supporting (especially in terms of weight) the
wall mount prior to installing. Also make sure no power, water, gas or
other lines are located behind the wall in the installation area. Keep the
specied distance between the TV and wall (depends on the TV model).
Install the wall mount to a safe location, which does not present a risk to
anyone. Once the wall mount and at screen TV are mounted, ensure that
the stability and safety are sucient. This inspection shall be repeated on
a regular basis, every 2 months.
The equipment is intended to be installed on wooden crossbars or solid
concrete walls. Prior to the installation, make sure the assembly surface
has he necessary loading capacity to carry the total weight of the TV and
mount. Never exceed the maximum capacity of the holder 25 kg including
cables.
This product is designed for household use only. Using the product
outdoors can result in product failure or injury.
The manufacturer is not liable for damages to the equipment and health
caused by improper installation of the wall mount.
1. Read all instructions and make sure you understand them prior to
the installation. If you are not sure about any part of the installation
process, contact a professional technician for support.
2. The wall or surface on which the mount will be anchored to shall
be capable of carrying the entire weight of the wall mount and TV.
Reinforcement will be required otherwise.
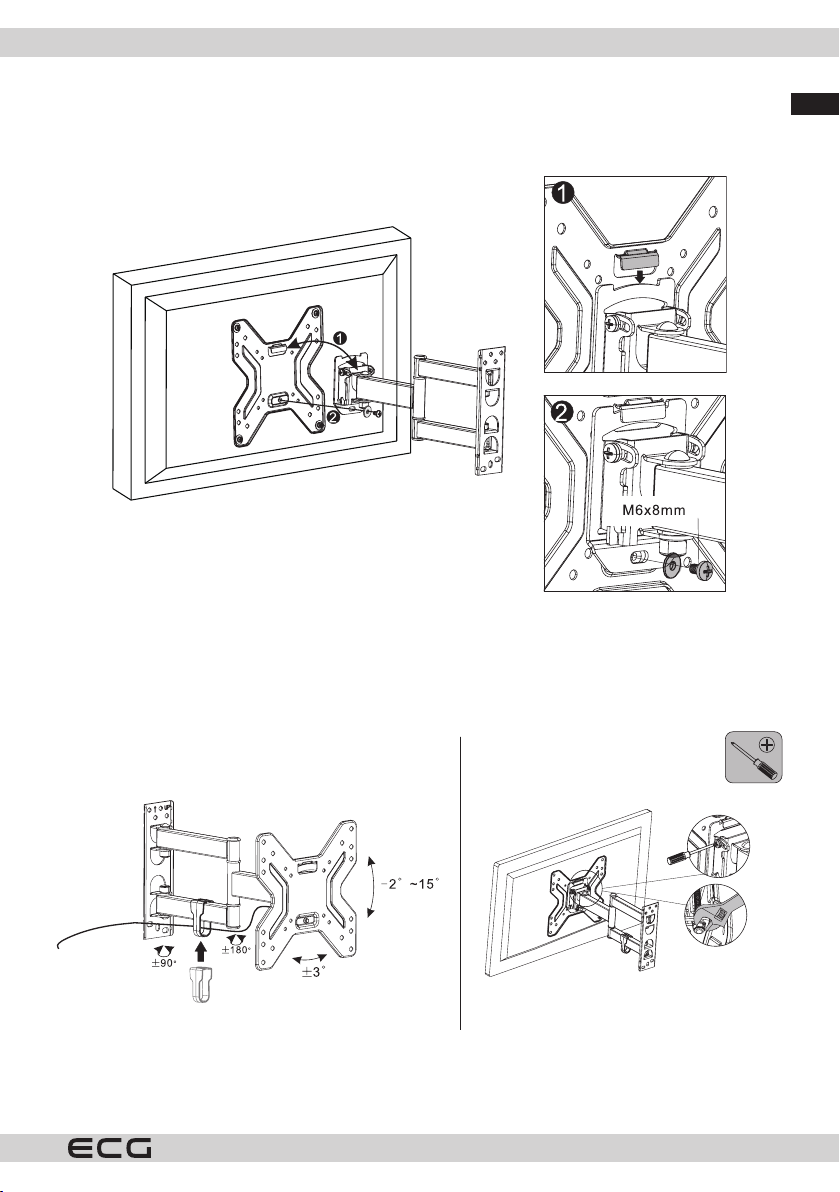
3. The installation requires the cooperation of at least two people and the
use of a mechanical security mechanism and suitable tools. Otherwise
it could result in damage to property or serious injury or fatal injury.
FULL-MOTION LED TV WALL MOUNT
English

English
English
4
4. Follow all instructions and recommendations concerning adequate
ventilation and selecting a suitable location for anchoring the TV. See
the your TV user's manual for more information.
5. The product contains smaller pieces, which upon being inhaled or
swallowed can lead to choking. Keep these pieces away from children!

English
English
5
DESCRIPTION
Assembly set
Wall board
Cable organizer
Washer for short bolt
Bolt M6 × 8 mm
TV adapter panel
A1 A2 A3 A4 A5 A6
B1 B2 B3
C1
Identication Unit(s) Description
A1 4 Bolt M4 × 20 mm
A2 4 Bolt M5 × 20 mm
A3 4 Bolt M6 × 20 mm
A4 4 Bolt M8 × 20 mm
A5 4 Spacer
A6 4 Washer for bolts
B1 3 Long bolt
B2 3 Dowel
B3 3 Washer for long bolt
C1 1 Magnetic level

English
English
6
ASSEMBLY
1A – Concrete wall assembly
Apply the wall board to the wall, align into a level position and use it as a template to mark three holes. Drill
three holes 10 mm in diameter and 70 mm deep. Insert three dowels (B2) into the holes and xate the wall
board to the wall using long screws (B1) and washers (B3). Tighten the bolts rmly, but not too much.
Concrete wall
Level (included)

English
English
7
1B – Wooden crossbar assembly
Use the wall board as a template. Make sure that it is level, mark three mounting holes into the wooden post.
Drill three holes 5 mm in diameter and 70 mm deep. Apply the wall board horizontally and xate to the wall
using three long bolts (B1) and washers (B3). Tighten the bolts rmly, but not too much.
Wooden post
Wooden beam detector
(not supplied)
Level (included)

English
English
8
2A – Mounting the TV adapter panel to the TV with at back
Check to see how the mounting holes are arranged on the back side of your television set. Select the proper
bolts for your TV. Remove the TV adapter plate from the wall plate and attach it to the TV with the four screws
(A1–A4), spacer (A5) and washer (A6). Tighten the bolts rmly, but not too much.
Selecting a suitable washer
hole (A6) according to the screw
size
Diameter M8 (A4)
M5 and M6 diameter
(A2 + A3)
Diameter M4 (A1)
Warning: If the holes on the back of yourTV are too shallow and none of the included screws t into them, use
the appropriate screws of your choice.
2B – Mounting the TV adapter panel to the TV with rounded back
Check to see how the mounting holes are arranged on the back side of your television set. Select the proper
bolts for your TV. Remove the TV adapter plate from the wall plate and attach it to the TV with the four screws
(A1–A4), spacer (A5) and washer (A6). Tighten the bolts rmly, but not too much.
Selecting a suitable washer
hole (A6) according to the screw
size
Diameter M8 (A4)
M5 and M6 diameter
(A2 + A3)
Diameter M4 (A1)
Warning: If the holes on the back of yourTV are too shallow and none of the included screws t into them, use
the appropriate screws of your choice.

English
English
9
3 – Installing the adapter panel to the wall board
Mount the adapter panel to the wall arm so that the adapter ange is placed on the wall board rails. Tighten
the M6 bolt on the wall board rails. Tighten the bolt rmly, but not too much.
4 – Cable xing, tilt angle adjustment and tightening
You can insert the wiring through the cable hole on the wall arm of the bracket. After pulling the cables
through the hole, t the enclosed cable organizer.
Loosen the screws on the wall arm plate to adjust the tilt angle of the TV as shown below. Loosen and tighten
the screws using a Phillips screwdriver and wrench. After adjusting the desired angle, tighten the screws rmly
again, but not with excessive force.

English
English
10
TECHNICAL SPECIFICATIONS
Panel size: 17" to 42"
Maximum TV weight: 25 kg
Compatibility: VESA 200×200
forward/back tilt: -2° to +15°
Vertical axis rotation: 2 levels, ±90° and ±90°
Distance from the wall: 56–356 mm
USE AND DISPOSAL OF WASTE
Wrapping paper and corrugated paperboard – deliver to scrapyard. Packing foil, PE bags, plastic elements – throw into plastic
recycling containers.
DISPOSAL OF PRODUCTS AT THE END OF LIFETIME
The represented symbol on the product or package means the product shall not be treated as domestic waste.
Hand over the product to the specied location for recycling. Prevent negative impacts on human health and
the environment by properly recycling your product. Recycling contributes to preserving natural resources.
For more information on the recycling of this product, refer to your local authority, domestic waste processing
organization or store, where you purchased the product.
The operating manual is available on internet at www.ecg-electro.eu.
Changes of text and technical parameters are reserved.
08/05

Deutsch
Deutsch
11
ALLSEITIG SCHWENKBARE WANDHALTERUNG FÜR LED TV
SICHERHEITSHINWEISE
Bitte aufmerksam lesen undgut aufbewahren!
Damitdie MontagederWandhalterungrichtig durchgeführtwerdenkann,
empfehlen wir einen qualizierten Sachverständigen hinzuzuziehen.
ÜberprüfenSie nochvor derInstallation derWandhalterung denInhaltdes
Montagesets. Sollten irgendwelche Teile fehlen oder Mängel aufweisen,
informieren Sie hierüber Ihren Verkäufer. Beschädigte Teile dürfen
nicht benutzt werden!! Benutzen Sie die Wandhalterung ausschließlich
für den seitens des Herstellers bestimmten Verwendungszweck.
Vor der Installation ist es notwendig die Tauglichkeit der Wände zu
überprüfen (vor allem aus Sicht der Tragfähigkeit). Weiter sollten Sie sich
vergewissern, dass sich an der Stelle der geplanten Installation keine
Strom-, Wasser-, Gasleitungen oder sonstige Leitungen benden. Halten
Sie die vorgeschrieben Entfernung zwischen Fernseher und Wand ein
(hängt vom jeweiligen Fernsehtyp ab). Sie sollten die Wandhalterung an
eine sichere Stelle installieren, damit keine Personen gefährdet werden.
Nachdem die Wandhalterung und der Flachbildschirm installiert wurden,
sollten Sie die Stabilität und die Gefahrlosigkeit überprüfen. Die Kontrolle
sollte in regelmäßigen Intervallen alle 2 Monate wiederholt werden.
Die Vorrichtung ist zur Montage an Holztrennwände oder feste
Betonwände bestimmt. Sie sollten sich vor der Installation vergewissern,
dass die Montageäche über eine ausreichendeTragfähigkeit verfügt und
Fernseher sowie Wandhalterung tragen kann. Überschreiten Sie niemals
die maximale Tragfähigkeit der Halterung von 25 kg einschließlich Kabel.
Dieses Produkt ist ausschließlich für den Innengebrauch bestimmt. Falls
Sie das Produkt im Freien verwenden, könnte dieses beschädigt werden
oder es könnte zu einer Verletzung kommen.
Der Hersteller haftet weder für Produkt- noch Personenschaden,
sofern diese auf eine unsachgemäße Installation der Wandhalterung
zurückzuführen sind.
1. Lesen Sie vor der Installation sämtliche Anweisungen durch und
vergewissern Sie sich, dass Sie alles verstanden haben. Falls Sie sich
Allseitig schwenkbare Wandhalterung für LED TV
Deutsch

Deutsch
Deutsch
12
bzgl. des Installationsprozesses nicht sicher sind, lassen Sie sich von
einem professionellen Techniker beraten.
2. Die zur Installation bestimmte Wand/Fläche sollte ausreichend
tragfähig sein, um die Halterung und den Fernseher halten zu können.
Anderenfalls ist eine Wandverstärkung erforderlich.
3. Bei der Installation werden mindestens zwei Personen, eine
mechanische Absicherung und geeignete Werkzeuge benötigt.
Anderenfalls könnte es zu einem Vermögensschaden, einer schweren
Verletzung oder einem tödlichen Unglücksfall kommen.
4. Halten Sie sämtliche Anweisungen und Empfehlungen bzgl. einer
entsprechenden Entlüftung und der Auswahl der geeigneten Stelle
für die Befestigung des Fernsehers ein. Für mehrere Informationen s.
Benutzerhandbuch.
5. Das Produkt enthält kleine Teile, die eingeatmet oder verschluckt
werden könnten, sodass Erstickungsgefahr droht. Diese Teile müssen
außer Reichweite von Kindern gehalten werden!

Deutsch
Deutsch
13
BESCHREIBUNG
Montageset
Wandplatte
Kabelmanagement
Unterlegscheibe für
kurze Schraube
Schraube M6 ×
8 mm
Adapterplatte
A1 A2 A3 A4 A5 A6
B1 B2 B3
C1
Bezeichnung St. Beschreibung
A1 4 Schraube M4 × 20 mm
A2 4 Schraube M5 × 20 mm
A3 4 Schraube M6 × 20 mm
A4 4 Schraube M8 × 20 mm
A5 4 Distanzstück
A6 4 Unterlegscheibe
B1 3 Lange Schraube
B2 3 Dübel
B3 3 Unterlegscheibe für lange Schraube
C1 1 Magnetische Wasserwaage

Deutsch
Deutsch
14
MONTAGE
1A – Montage an eine Betonwand
Wandplatte an dieWand legen, waagerecht ausgleichen und als Schablone für die Markierung von drei Löchern
benutzen. Bohren Sie drei 70 mm tiefe Löcher mit einem Durchmesser von 10 mm. Setzen Sie drei Dübel (B2) in
die Löcher ein und befestigen Sie die Wandplatte mit langen Schrauben (B1) mit Unterlegscheiben (B3) an der
Wand. Schrauben fest anziehen, jedoch nicht allzu viel Kraft ausüben.
Betonwand
Wasserwaage (Bestandteil
der Verpackung)

Deutsch
Deutsch
15
1B – Montage an eine Holztrennwand
Verwenden Sie die Wandplatte als Schablone. Vergewissern Sie sich, dass diese waagerecht ist. Markieren
Sie drei Montagelöcher auf der Holzsäule. Bohren Sie drei 70 mm tiefe Löcher mit einem Durchmesser von
5 mm. Legen Sie die Wandplatte waagerecht an und befestigen Sie diese mit drei lange Schrauben (B1) und
Unterlegscheiben (B3) an der Wand. Schrauben fest anziehen, jedoch nicht allzu viel Kraft ausüben.
Holzsäule
Balkensucher (nicht
Bestandteil der Lieferung)
Wasserwaage (Bestandteil
der Verpackung)

Deutsch
Deutsch
16
2A – Montage der Adapterplatte an einen Fernseher mit einer achen Rückseite
StellenSiefest,wiedieMontagelöcheraufderHinterseiteIhresFernsehersaufgeteiltsind.WählenSiediepassenden
SchraubenfürIhrenFernseheraus.NehmenSiedieAdapterplattevonderWandplatteabundbefestigenSiediese
am Fernseher mit Hilfe von vier Schrauben (A1–A4), einem Distanzstück (A5) und einer Unterlegscheibe (A6).
Schrauben fest anziehen, jedoch nicht allzu viel Kraft ausüben.
Auswahl einer passenden
Unterlegscheibe (A6) je nach
Schraubengröße
Durchmesser M8 (A4)
Durchmesser M5
und M6
(A2 + A3)
Durchmesser M4 (A1)
Hinweis: Falls die Löcher auf der Rückseite Ihres Fernsehers zu ach sind und keine der beigelegten Schrauben
passen sollten, benutzen Sie Schrauben nach eigener Wahl.
2B – Montage der Adapterplatte an einen Fernseher mit einer abgerundeten
Rückseite
StellenSiefest,wiedieMontagelöcheraufderHinterseiteIhresFernsehersaufgeteiltsind.WählenSiediepassenden
SchraubenfürIhrenFernseheraus.NehmenSiedieAdapterplattevonderWandplatteabundbefestigenSiediese
am Fernseher mit Hilfe von vier Schrauben (A1–A4), einem Distanzstück (A5) und einer Unterlegscheibe (A6).
Schrauben fest anziehen, jedoch nicht allzu viel Kraft ausüben.
Auswahl einer passenden
Unterlegscheibe (A6) je nach
Schraubengröße
Durchmesser M8 (A4)
Durchmesser M5
und M6
(A2 + A3)
Durchmesser M4 (A1)

Deutsch
Deutsch
17
Hinweis: Falls die Löcher auf der Rückseite Ihres Fernsehers zu ach sind und keine der beigelegten Schrauben
passen sollten, benutzen Sie Schrauben nach eigener Wahl.
3 – Aufsetzen der Adapterplatte an den Arm der Wandhalterung
Adapterplatte an den Wandarm befestigen, indem Sie den Adapteransch in die Schienen der Wandplatte
einschieben. Ziehen Sie die Schraube M6 an der Schiene der Wandplatte nach. Schrauben fest anziehen,
jedoch nicht allzu viel Kraft ausüben.
4 - Durchziehen von Kabeln, Einstellen der Winkelneigung und Nachziehen
Sie können die Kabelleitungen durch das Kabelloch am Arm der Wandhalterung durchziehen. Benutzen Sie
hierfür das beigelegte Kabelmanagement.
Durch Lösen der Schrauben an der Wandhalterungsplatte stellen Sie die Winkelneigung wie gewünscht ein.
Benutzen Sie einen Kreuzschlitz-Schraubendreher und einen französischen Schlüssel, um die Schrauben zu
lösen und nachzuziehen. Sobal die gewünschte Winkelneigung eingestellt wurden, ziehen Sie die Schrauben
wieder nach. Üben Sie jedoch keine allzu große Kraft aus.

Deutsch
Deutsch
18
TECHNISCHE ANGABEN
Bildschirmdiagonale: 17" bis 42"
Maximale Tragfähigkeit: 25 kg
Kompatibilität: VESA 200×200
Neigung nach vorne/hinten: -2° bis +15°
Drehen um die Hochachse: 2 Grad, ±90° und ±90°
Abstand von der Wand: 56-356 mm
VERWERTUNG UND ENTSORGUNG VON ABFALL
Verpackungspapier und Wellenpappe an einer Sammelstelle abgeben. Verpackungsfolie, PET-Beutel und Kunststoteile
gehören in Sammelcontainer für Kunststo.
ENTSORGUNG DES PRODUKTES NACH ABLAUF DER LEBENSDAUER
Das abgebildete Symbol auf dem Produkt oder auf der Verpackung weist darauf hin, dass das Produkt nicht in
den Hausmüll gehört. Das Produkt sollte an einem Ort abgeben werden, der für dieWiederverwertung bestimmt
ist. Eine richtige Entsorgung des Produktes beugt negativen Einüssen auf die menschliche Gesundheit und
die Umwelt vor. Die Wiederverwertung trägt zum Schutz der Naturressourcen bei. Weitere Informationen über
die Wiederverwertung des Produktes erhalten Sie über das Gemeindeamt, eine Organisation, die sich mit der
Behandlung von Hausmüll befasst, oder die Verkaufsstelle, an der das Produkt erworben wurde.
Die Bedienungsanleitung nden Sie unter www.ecg-electro.eu.
Änderungen im Text und der technischen Parameter sind vorbehalten.
08/05

Čeština
Čeština
19
VŠESMĚROVÝ DRŽÁK LED TV
BEZPEČNOSTNÍ POKYNY
Čtěte pozorně auschovejte pro budoucí potřebu!
Pro správnou montáž nástěnného držáku se obraťte na kvalikovaného
odborníka.Předinstalacínástěnnéhodržákuzkontrolujteobsahmontážního
setu a v případě chybějících nebo vadných komponent informujte svého
prodejce. Poškozené součásti nikdy nepoužívejte!! Nástěnný držák použijte
jenprostanovenýúčeluvedenývýrobcem.Předinstalacísibezpodmínečně
ověřte způsobilost zdi (především kvůli nosnosti). Dále se ujistěte, že se ve
zdi v místě zamýšlené instalace nenachází el. vedení, vodovodní, plynové
nebo jiné potrubí. Dodržujte předepsanou bezpečnou vzdálenost TV od
zdí (závisí na modelu TV). Nástěnný držák nainstalujte na bezpečné místo,
na kterém nemůže způsobit ohrožení osob. Po montáži nástěnného držáku
a ploché obrazovky prověřte dostatečnou stabilitu abezpečnost provozu.
Kontrola by se měla opakovat vpravidelných intervalech každé 2 měsíce.
Zařízení je určeno k instalaci na dřevěné příčky nebo pevné betonové zdi.
Před instalací se ujistěte, že má montážní povrch dostatečnou nosnost,
aby unesl celkovou hmotnost televizoru a držáku. Nikdy nepřekračujte
maximální nosnost držáku 25 kg včetně kabelů.
Tento produkt je určen pouze pro vnitřní použití. Venkovní použití může
mít za následek selhání produktu nebo úraz.
Výrobce neručí za škody na zařízení a na zdraví zapříčiněné nesprávným
nainstalováním nástěnného držáku.
1. Před instalací si pozorně přečtěte veškeré pokyny a ujistěte se, že jste
jim dobře porozuměli. Vpřípadě, že si nejste jisti některou částí procesu
instalace, požádejte o pomoc profesionálního technika.
2. Stěna nebo plocha pro upevnění musí mít dostatečnou nosnost pro
celkovou hmotnost držáku atelevizoru. V opačném případě je nutné
provést zpevnění.
3. Instalace vyžaduje součinnost minimálně dvou osob a použití
mechanického zabezpečení a vhodného nářadí. V opačném případě
může dojít k poškození majetku nebo vážnému poranění či smrtelnému
úrazu.
Všesměrový držák LED TV
Čeština

Čeština
Čeština
20
4. Dodržujte všechny pokyny a doporučení týkající se odpovídajícího
odvětrání a výběru vhodného místa pro upevnění televizoru. Další
informace viz příručka vašeho televizoru.
5. Výrobek obsahuje drobné součásti, které mohou při vdechnutí nebo
polknutí představovat riziko udušení. Tyto součásti držte mimo dosah
dětí!
Table of contents
Languages:
Other ECG TV Mount manuals
Popular TV Mount manuals by other brands

Manhattan
Manhattan 461825 Installation instruction

Dynex
Dynex DX-TVM111 Quick setup guide

Speaka Professional
Speaka Professional Teleskop operating instructions

Atlantic Technology
Atlantic Technology System 20 LCR instruction manual

Crimson
Crimson AU65WP20 user manual

STC
STC SPACE SAVER 30504 installation manual