ecosens ECO-03 User manual

Ceiling PIR Sensor
ECO-03
Manual
Welcome to use ECO-03 infrared motion sensor!
The product adopts good sensitivity detector, integrated circuit. SMT. It gathers automatism,
convenience, safety, saving-energy and practicality functions. The wide detection field is
consisting of detectors. It works by receiving human motion infrared rays. When one enters the
detection field, it can start the load at once and identify automatically day and night; its
installation is very convenient and its using is very wide. It has functions of power indication and
the detection indication.
SPECIFICATION:
Power Sourcing: 220V/AC-240V/AC Detection Range: 360°
Power Frequency: 50Hz Working Temperature: -20~+40℃
Ambient Light: 3-2000LUX (Adjustable) Working Humidity: <93%RH
Time-Delay: min: 10sec±3sec Installing Height: 2.2m~4m
Max: 8min±2min Power Consumption: 0.45W (work)
Rated Load: 1200W (incandescent lamp) 0.1W (static)
300W (energy-saving lamp) Detection Motion Speed: 0.6~1.5m/s
Detection Distance: 2-6m (<24℃) adjustable
FUNCTION:
Can identify day and night: The consumer can adjust work ambient light. It can work in the
daytime and at night when it is adjusted on the “sun” position (max). It can work in the
ambient light less than 3LUX when it is adjusted on the “moon” position (min). As for the
adjustment pattern, please refer to the testing pattern.
SENS adjustable: It can be adjusted according to using location; low sensitivity with 3m for
detection distance; high sensitivity with 6m, it fits for large room.
Time-Delay is added continually: When it receives the second induction signals after the first
induction, it will compute time once more on the basic of the first time-delay rest.
Time–Delay is adjustable. It can be set according to the consumer’s desire. The minimum
time is 10sec±3sec. The maximum is 8min±2min.
INSTALLATIION (see the diagram)
Switch off the power.
Please move the upper cover with anti-clockwise whirl as per
the diagram in the crust.
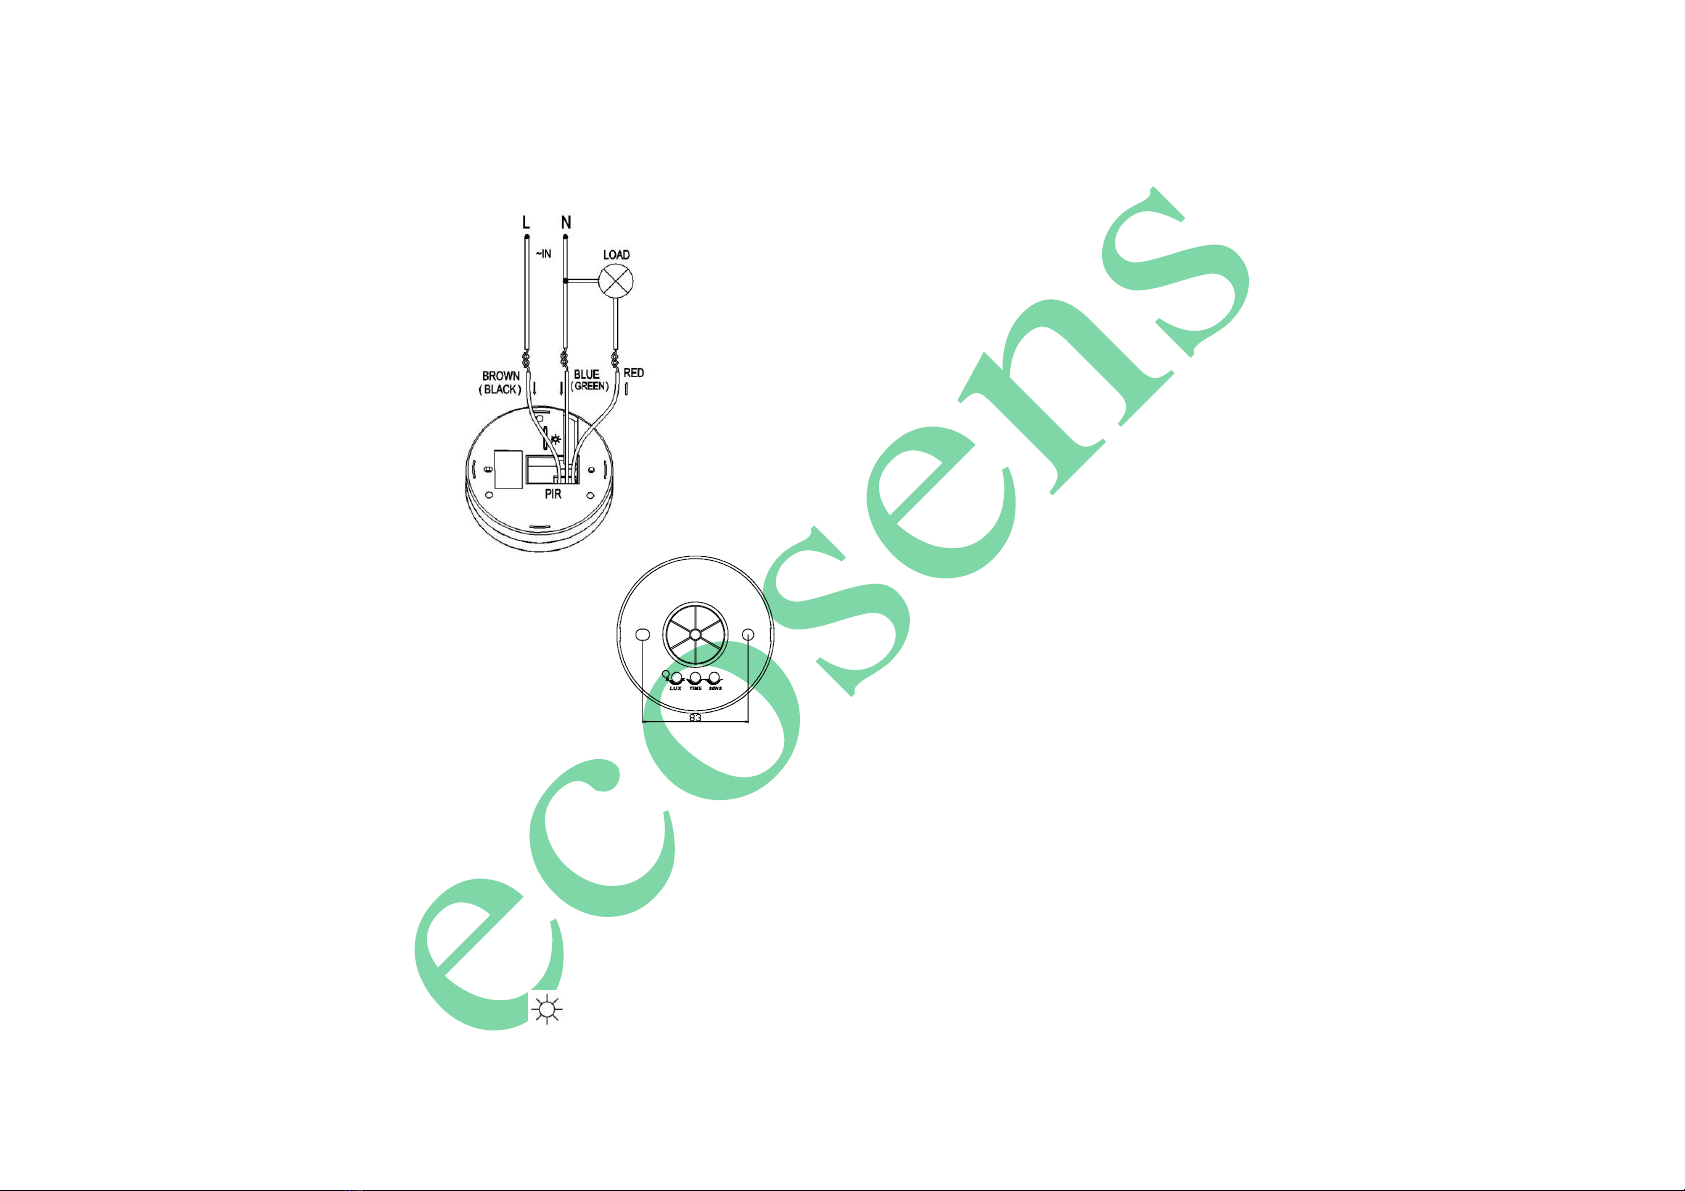
Fix the bottom on the selected position with the inflated screw
Connecting the power and the load to sensor as per the connection-wire sketch diagram.
Buttoning the upper cover on the sensor, whirling the cover with clockwise when LED light
bare, then you could switch on the power and test it.
CONNECTION-WIER SKETCH DIAGRAM
(See the right figure)
TEST:
Turn the LUX knob clockwise on the maximum (sun), turn the
TIME knob anti-clockwise on the minimum, and turn the SENS
knob clockwise on the maximum.
When you switch on the power, the controlled load and
indication lamp are both not working. Preheat 30 seconds later,
the load and the indicator lamp are turned on synchronization,
in the absence of no inductor signals, the load should be stopped working within 5-30sec,
the indicator lamp is turned off.
After the first is out, make it sense again after 5~10sec. The load should work. When thereis
no inductor signals in the indicator lamp, the load should be stopped working within 5-15sec.
Turn ambient light knob anti-clockwise on the minimum. If it is adjusted in the less than
3LUX, the inductor load should not work after load stop working. If you cover the detection
window with the opaque objects (towel etc), the load work .under no induction signal
condition, the load should stop working within 5-15sec.
Note: when testing in daylight, please turn LUX knob to (SUN) position, otherwise the
sensor lamp could not work!
NOTES
:
Electrician or experienced human can install it.
The unrest objects can’t be regarded the installation basis-face.
In front of the detection window there shouldn’t be hinder or unrest objects effecting
detection.
Avoid installing it near air temperature alteration zones for example: air condition, central
heating, etc.
For your safety. Please don’t open the case if you find hitch after installation.
In order to avoid the unexpected damage of product, please add a safe device of 6A when
installing infrared sensor, for example, fuse, safe tube etc.
SOME PROBLEM AND SOLVED WAY
The load don’t work:
a. Check the power and the load.
b. Whether the indicator light is turned on after sensing? If yes, please check load.
c. If the indicator light does not turn on after sensing, please check if the working light
corresponds to the ambient light.
d. Please check if the working voltage corresponds to the power source.
The sensitivity is poor:
a. Please check if in front of the detection window there are hinder that effect to
receive the signals.
b. Please check the ambient temperature.
c. Please check if the signals source is in the detection fields.
d. Please check the installation height.
The sensor can’t shut automatically the load:
a. If there are continual signals in the detection fields.
b. If the time delay is set to thelongest.
c. If the power correspond to the instruction.
d. If the air temperature change near the sensor, air condition or central heating etc.
Other ecosens Accessories manuals


Popular Accessories manuals by other brands

SSS Siedle
SSS Siedle NS 511-01 Product information

Hatching Time
Hatching Time CIMUKA HB Series user manual

Agilent Technologies
Agilent Technologies N8480 Series Operating and service guide

Radio Shack
Radio Shack LX-3100 user manual

WUBEN
WUBEN TP10-G user manual

Waterpik
Waterpik Water Flosser WP-560 quick start guide

Vega
Vega VEGAFLEX 81 operating instructions

United Technologies
United Technologies Interlogix RF-1012-07-5 Installation sheet

Aeotec
Aeotec Recessed Door Sensor 7 manual

BAC
BAC PT2 Operation & maintenance manual

Honeywell
Honeywell RPW314 Instruction leaflet

Hytronik
Hytronik HCD418-I Installation and instruction manual


