Ecotop PILATUS B4 User manual

Order N° 066GB4
ATTENTION !
Ce modèle à construire n’est pas un jouet, il
ne convient pas aux enfants de moins de 14 ans.
Une mauvaise utilisation de ce matériel peut
provoquer des dommages matériels ou corporels.
Vous êtes pleinement responsable
lorsque vous utilisez votre modèle.
Volez à une distance de sécurité des zones
habitées.
Soyez sûr que personne n’émet sur la même
fréquence que vous.
CAUTION !
This model construction kit is not a toy and is not
suitable for children under the age of 14.
Incorrect use of this material could cause material
damage ou personal injury.
You are fully responsible for your actions when you
use this model.
Fly at a safe distance from occupied zones.
Be sure that no one else is using the same
frequency as you.
Distribué par / Distributed by:
TOPMODEL S.A.S.
Le jardin d’entreprises de SOLOGNE - F-41300 SELLES SAINT DENIS - www.topmodel.fr
©TOPMODEL 2012
Caractéristiques techniques/Technical data:
Echelle/scale: 1:5
Envergure/wingspan: 3,00m
Longueur/length: 1,52m
Poids/TO weight: 3,0/3,2kg
Surface/wing area: 56dm2
Profil/airfoil: MH42
Equipements recommandés/Recommended equipments:
Moteur/motor: XPower XC3522/5LS
Contrôleur/ESC: XPower XREG60
Accu/battery pack: LiPo XPower Xtreme 55C 11,1V 3200mAh (3S)
Hélice/prop: XPower FOLDING PROP 14x8” #099FB1408
Cône/spinner: PORTE PALES XPower Ø5/20mm +2,5° #099H200806
Radio/RC set: Récepteur/receiver: JETI DUPLEX R8 EX
Ailerons: 2 servos TOPMODEL DS6010 MG
Profondeur/Elevator: 1 servo TOPMODEL DS6010 MG
Direction/Rudder: 1 servo TOPMODEL SS1816
AF/Speedbrakes: XPower electric 250mm #099ELAF25
Train rentrant/Retract XPower electric 1/5 #099ELRS1/5
ADV
pour modélistes ayant
un bon niveau
For advanced
modellers
ARF
Distribué par / Distributed by:
p/ y
TOPMODEL
SAS
L
Planeur semi-maquette
Semi-scale sailplane

2
RETENDRE L’ENTOILAGE
1) Déballez doucement en prenant soin de ne pas endommager une
partie du kit. Déballez toutes les pièces de leur emballage plastique pour
inspection.
Avant de commencer tout montage ou de poser tout auto-collant, il
est très important de retendre l’entoilage déjà appliqué. A cause du
transport, de la chaleur et de l’humidité qui varient beaucoup suivant les
différents climats, l’entoilage peut se détendre et se “rider” au soleil. Si
vous prenez le temps de retendre l’entoilage, vous serez récompensé par
un modèle qui restera magnifique dans le temps.
2) En utilisant un fer à soler et un chiffon doux, “repassez” délicatement
et “suivez” en appliquant le film avec le chiffon. Si des bulles apparaissent,
votre fer est peut être trop chaud. Réduire la température et travaillez
doucement et patiemment.
3) Si les bulles persistent, piquer les bulles à l’aide d’une aiguille pour
évacuer l’air emprisonné et chauffer de nouveau.
4) Utilisez le décapeur thermique avec beaucoup de précaution. Faire
attention de ne pas chauffer au même endroit trop longtemps. Cela
pourrait trop rétracter les bords et laisser un espace découvrant le bois
aux jointures des différentes couleurs. Les filets sont particulièrement
vulnérables à la surchauffe.
5) Votre
PILATUS B4 ECOTOP
est entoilé avec de l’Oracover® blanc N°10,
bleu france N°50 et rouge Ferrari N°23.
MERCI
d’avoir choisi le planeur semi-maquette PILATUS B4 ECOTOP!
Nous avons fait un grand effort en dessinant et construisant ce planeur pour qu’il soit le meilleur modèle que vous ayez jamais construit et fait voler.
Nous vous fournissons un kit avec la plus haute qualité et les meilleures performances possibles.
Nous vous souhaitons un grand succès en assemblant et en faisant évoluer votre nouveau
PILATUS B4 ECOTOP.
Le
PILATUS B4
est un des planeurs les plus mythiques! C’est la raison pour laquelle nous avons décidé de le reproduire dans notre nouvelle gamme de planeurs semi-
maquette ECOTOP. Mais, ce n’est pas un PILATUS de plus dans la production mondiale déjà très fournie! Grace à notre nouveau concept de planeur semi-maquette autonome,
plus besoin d’attendre le vent à la pente ou le remorqueur à la plaine pour voler.
IMPORTANT:Merci de bien vouloir lire et étudier cette notice de montage avant de commencer l’assemblage. Faire l’inventaire des pièces à l’aide de la nomenclature
pour contrôler qu’il n’y a pas de manquant ou d’imperfection.
Merci de contacter immédiatement TOPMODEL si vous constatez une pièce manquante ou une pièce endommagée.
GARANTIE: Il est important de notifier à TOPMODEL tous dommages ou problèmes avec ce modèle dans les 7 jours suivant la réception du kit pour bénéficier de la
garantie. En cas de retour du modèle, le client est responsable du transport et le port retour est à sa charge. En cas de défaut, la pièce sera échangée ou remplacée une fois
que celle-ci sera réceptionnée par TOPMODEL pour expertise (transport à la charge du propriétaire). En cas de problème, n’hésitez pas à contacter TOPMODEL.
TOPMODEL ne peut pas contrôler la dextérité du modéliste et ne peut pas influencer le constructeur durant l’assemblage ou l’utilisation de ce modèle radio-commandé. Aussi,
nous ne pouvons, en aucun cas, être tenus responsables des dégâts matériels, accidents corporels ou décès pouvant être causés par ce modèle réduit.
L’acheteur/utilisateur accepte toutes les responsabilités en cas de problèmes structurels ou mécaniques.
RAPPEL
Nous prenons grand soin à fournir la meilleure qualité possible.
Toutefois, nous vous rappelons que ce ne sont pas des modèles prêts à voler et que la part du travail restante vous incombant est très importante pour
rendre le modèle apte au vol. Pour cette raison, nous vous demandons de bien vouloir contrôler tous les collages et assemblages.
Sécurité d’abord!
Nous vous remercions pour votre attention lors de l’assemblage de nos kits, et vous souhaitons de bons et nombreux vols!
POUR ASSEMBLER CE KIT
Pour assembler ce kit, vous aurez besoin des produits énumérés ci-dessous:
■ COLLES: Cyano fluide et épaisse, époxy 30mn et 5mn.
■ OUTILS: Couteau de modéliste, tournevis cruciforme (petit et moyen), pince à bec fin, pince coupante, ciseaux, ruban adhésif, ruban adhésif de
masquage, ruban adhésif double-faces, perçeuse (foret Ø0,6-1,8-3 et 3,5mm), papier verre, règle, feutre, clips, alcool, fer à souder, chiffon.

3
THANK YOU for your purchase of the RC semi-scale sailplane
PILATUS B4 ECOTOP
!
We made a main effort while drawing and building this sailplane so that it is the best model you ever built and fly.
We provide you a kit with the highest quality and the best possible performances.
We wish you a great success while assembling and flying your new
PILATUS B4 ECOTOP
The
PILATUS B4
is one of the most legendary gliders! That’s why we decided to reproduce it in our new range of Ecotop sacle series. But this is not just an other PILATUS in
the already busy world production! Thanks to our new concept of autonomous semi-scale glider, no need to wait for the wind at the slope or for the tug at your airfield to fly.
IMPORTANT: Please take a few moments to read this instruction manual before beginning assembly. Do an inventory of the parts using the parts list, to control that
there is no lack or imperfection.
Thank you to contact TOPMODEL immediately, if you note a missing part or a damaged part.
WARRANTY: It is important to notify to TOPMODEL all damage or problems with this model within 7 days following the reception of the kit to be able to benefit the
warranty. In the event of return of the model, the customer is responsible for transport and return shipping cost is at his expenses. In the event of defect, the part will be
exchanged or replaced once this one will be delivered to TOPMODEL for expertise (transport on your cost). In the event of problem, do not hesitate to contact TOPMODEL.
TOPMODEL cannot control the dexterity of the modeler and cannot influence the builder during the assembly or the use of this radiocontrolled model, thus TOPMODEL will in
no way accept or assume responsability or liability for damages resulting from the use of this user assembled product.
The purchaser/user accepts all the responsibilities in the event of structural or mechanical problems.
REMINDER
We take great care to delivering the best possible quality.
We kindly remind you that these models are not ready to fly and that the remaining work is an important part to get the model flying. For this, please, check
all glue joints and assemblies.
Safety first!
We thank you for your attention during the assembly of our kits, and wish you good and numerous flights!
RE-SHRINKING THE COVERING
1) Open you kit slowly and take care not to damage any parts of the kit.
Remove all parts from their plastic protective bags for inspection. Before
doing any assembly or installation of any decals, it is very important to
re-shrink or re-tighten the already applied covering. Due to the shipping
process, heat and humidity changes from different climates, the covering
may become lose and wrinkle in the sun. If you take the time to re-tighten
the covering, you’ll be rewarded with a long lasting beautifully covered
model.
2) Using your covering iron with a soft sock, gently apply pressure and rub
in the covering. If any bubbles occur, your iron may be too hot.
Reduce heat and work slowly.
3) If bubbles persist, use a small pin to punch holes in the bubble to
relieve trapped air and reheat.
4) Use your heat gun with extreme caution. Take care not to apply too
much heat to one area for long periods of time. This may cause the trim
colors to over shrink and pull away leaving sightly gaps on the color lines.
The trim stripes are especially vulnerable to over shrinking.
5) Your
PILATUS B4 ECOTOP
is covered with Oracover® white #10, blue
#50 and Ferrari red #23.
TO ASSEMBLE THIS KIT
To assemble this kit, you’ll need the items listed below:
■ ADHESIVE: Cyanoacrylate thin and thick, epoxy 30’ and 5’ adhesives.
■ TOOLS: Knife (X-acto), Phillips screw driver (small and medium), needle tip pliers, pliers, scissors, scotch tape, masking tape, double sticking
tape, drill (with 0,6-1,8-3 and 3,5mm bits), sanding paper, ruler, ball point pen, clips, alcohol, soldering iron, piece of cloth or rags.

4

5
CONTENU DU KIT
KIT CONTENT
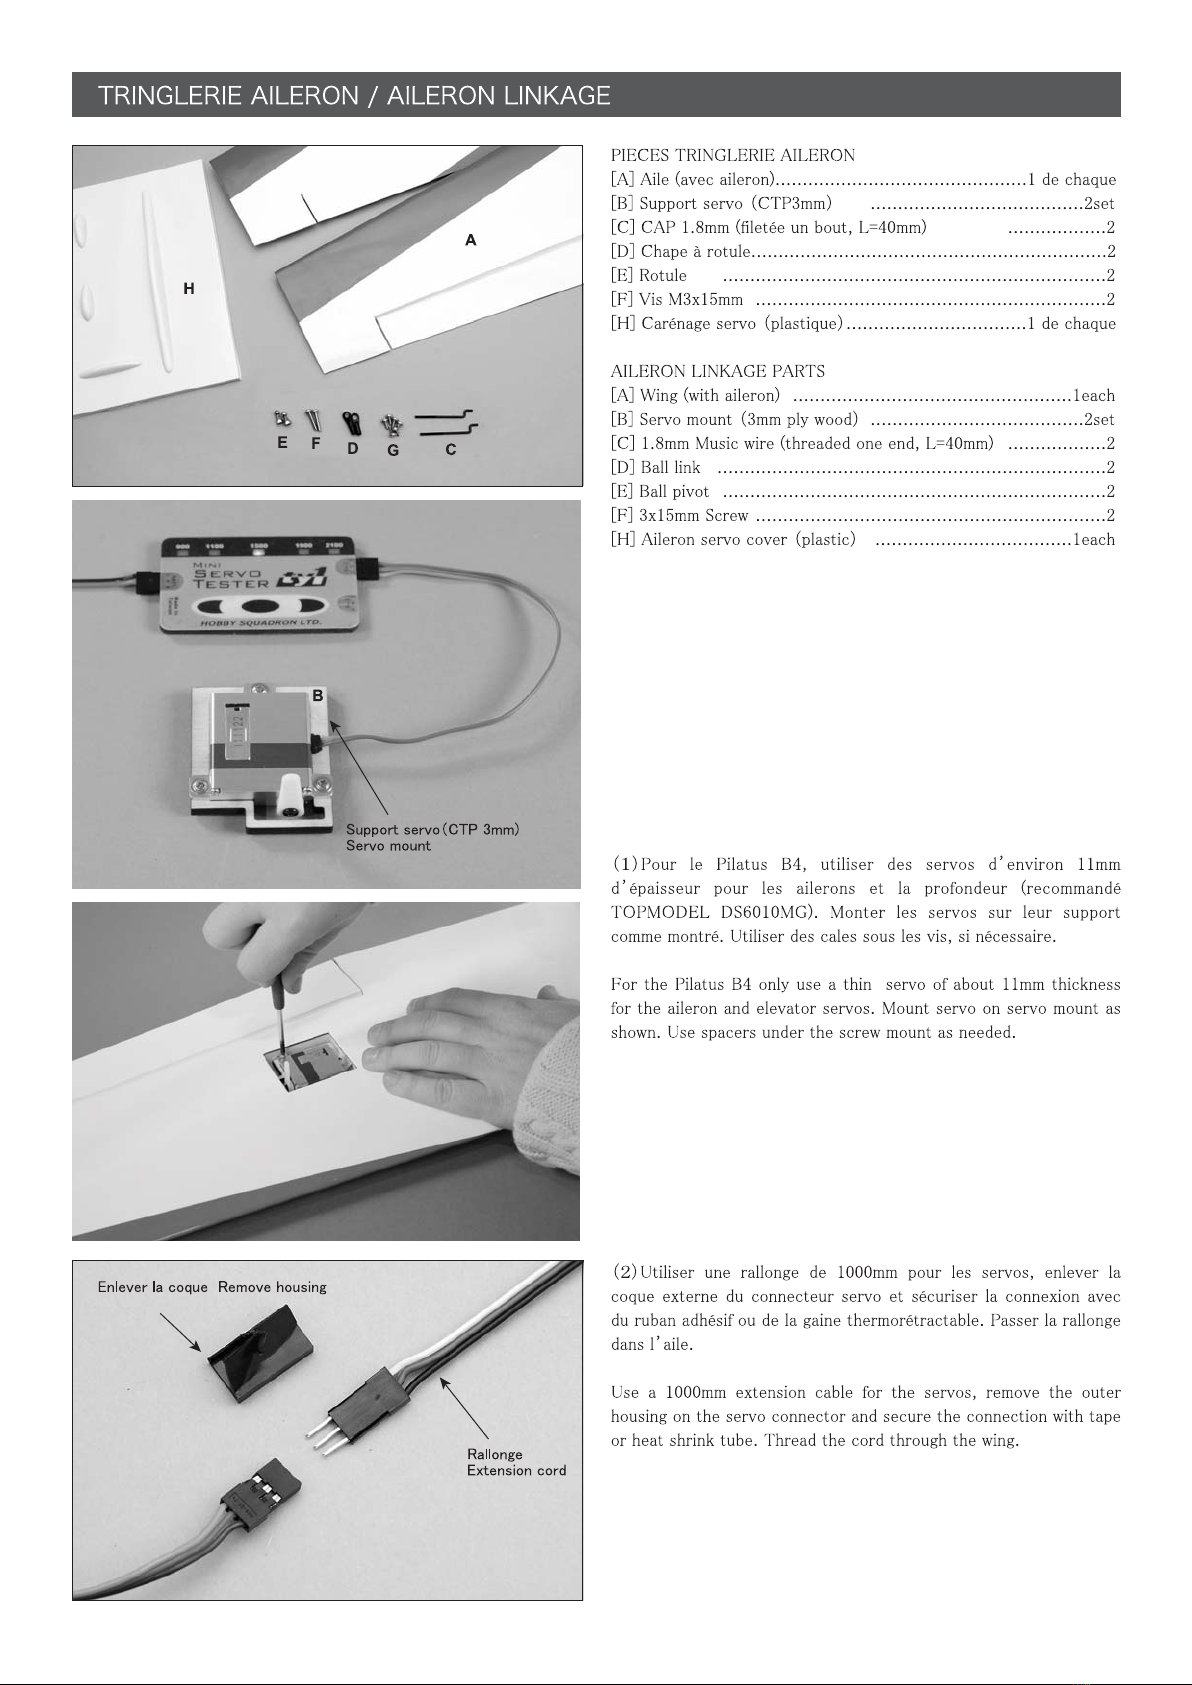
AILERON LINKAGE PARTS
[A] Wing (with aileron) .................................1each
[B] Servo mount (3mm ply wood)...........................2
[C] 1.8mm Music wire (threaded one end) ........2
[D] Ball link ............................................................2
[E] Ball pivot ..........................................................2
[F] 3x15mm Screw ..............................................2
[G] 2.6x8mm Self tapping screw ............................6
[H] Aileron servo cover (plastic) ....................1each
SPOILER PARTS
[B] Spoiler cover (1.5x14x258mm)........................2
[C] 2x6mm Self tapping screw (flat head) ..........4
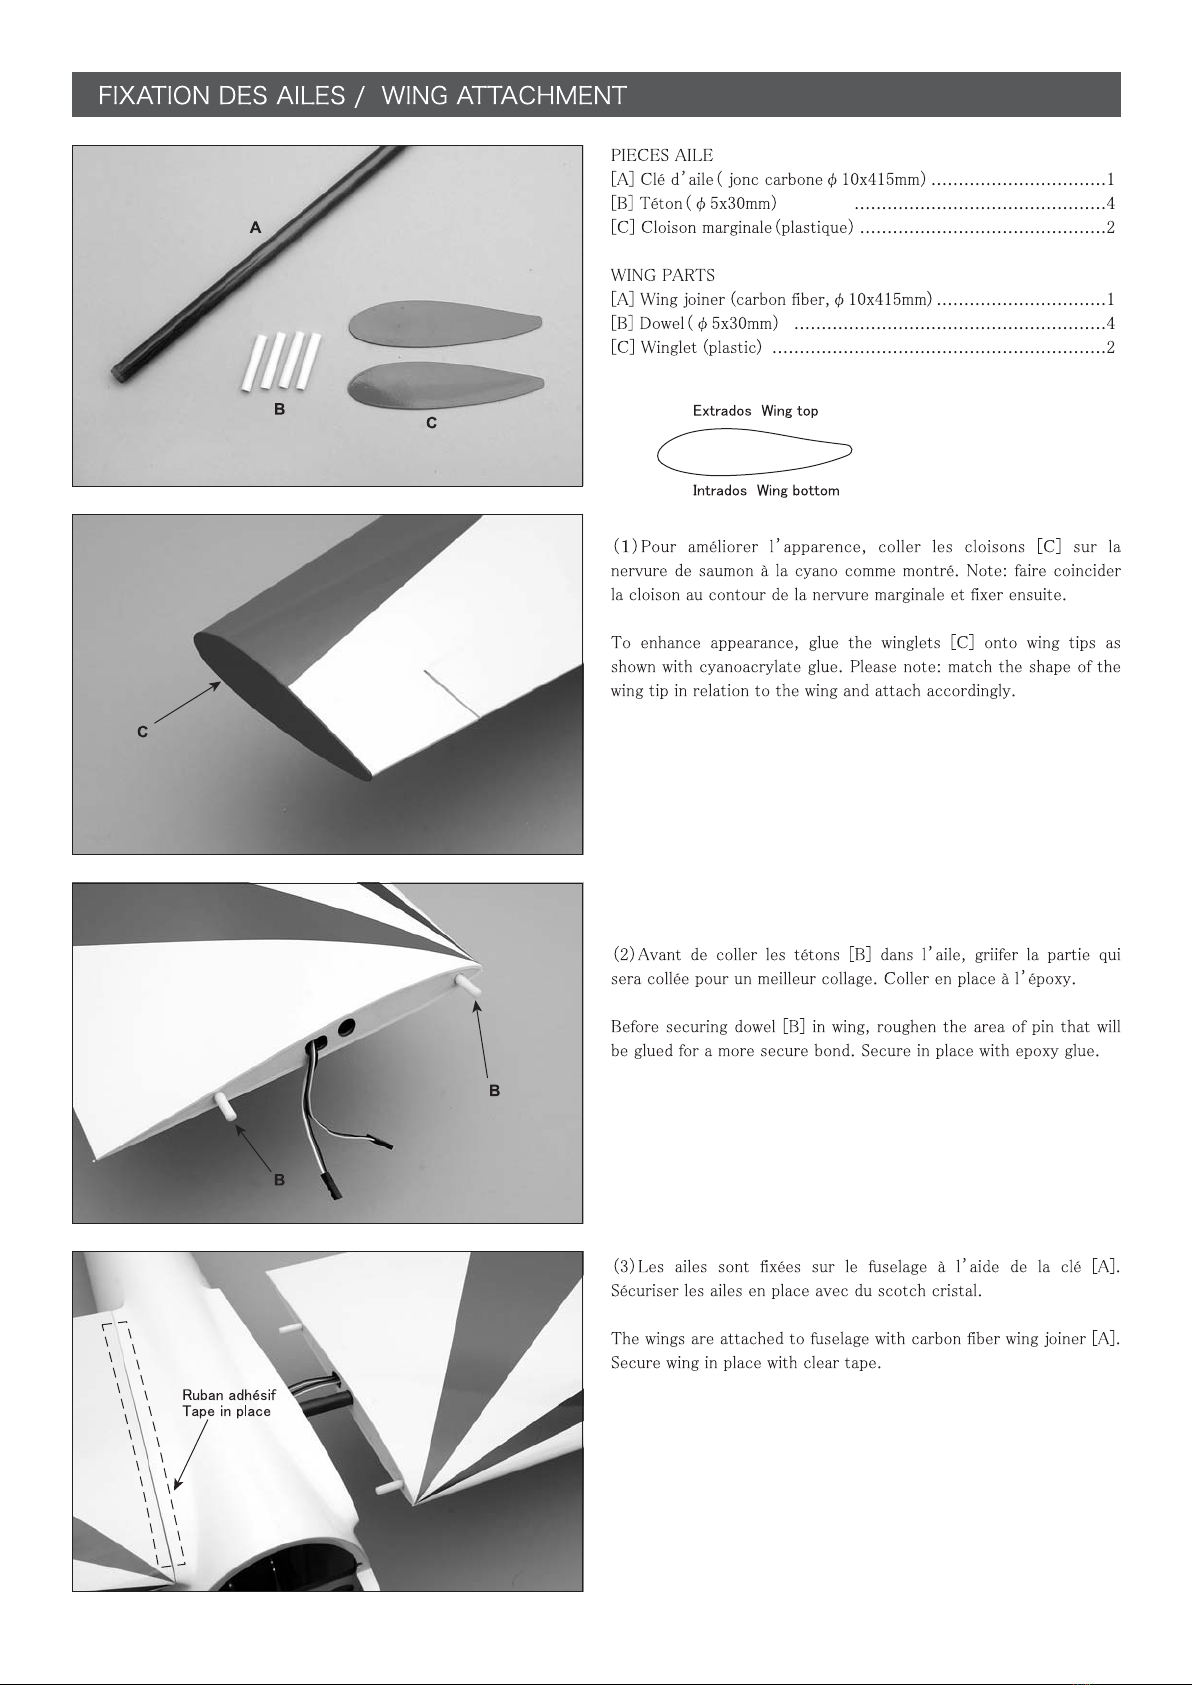
WING PARTS
[A] Wing joiner (carbon fiber,Ø10x415mm) ........1
[B] Dowel (Ø5x30mm) .........................................4
[C] Winglet (plastic) ...........................................2
ELECTRIC RETRACT PARTS
[B] 3x10mm Screw ...............................................2
[C] 3x15mm Screw ..............................................2
[D] Retract gear cover(plastic) ..........................1set
[E] Rubber band .....................................................2
[F] Hook (retract gear cover) ...............................2
PIECES TRINGLERIE AILERON
[A] Aile (avec aileron)............................1 de chaque
[B] Support servo (CTP3mm) ................................2
[C] CAP 1.8mm (filetée un bout, L=40mm) ..........2
[D] Chape à rotule...................................................2
[E] Rotule ...........................................................2
[F] Vis M3x15mm .............................................2
[H] carénage servo (plastique)............1 de chaque
PIECES AF
[B] Chapeau d’AF (1.5x14x258mm, balsa) ...........2
[C] Vis à bois 2x6mm (tête plate) ......................4
PIECES AILE
[A] Clé d’aile (jonc carboneØ10x415mm)..............1
[B] Téton (Ø5x30mm) ............................................4
[C] Cloison marginale (plastique) ...........................2
PIECES TRAIN RENTRANT
[B] Vis M3x10mm ...................................................2
[C] Vis M3x15mm ...................................................2
[D] Trappe de train (plastique) .........................1set
[E] Elastique de rappel ..........................................2
[F] Crochet (CTP) ...................................................2
RUDDER PARTS
[A] Rudder ..............................................................1
[B] Pin hinge ...........................................................4
[C] Control horn (aluminum) ................................1
[D] 1.2mm Music wire (threaded one end) .........1
[E] Clevis (metal)......................................................1
[F] 2mm Nut ............................................................1
[G] Servo mount (3mm ply wood).......................1set
[H] 2.6x10mm Self tapping screw...........................2
[I] Nylon tie (3x165mm)..........................................1
HORIZONTAL STABILIZER PARTS
[A] Horizontal stabilizer (with elevator) ..................1
[B] 3x20mm Flat head screw .................................2
[C] Washer (aluminum) .........................................2
[D] Control horn (brass) .......................................1
[E] 1.8mm Music wire (threaded one end) ..........1
[F] Clevis (metal) ................................................1
[G] 2mm Nut............................................................1
[H] Servo mount (3mm plywood)........................1set
[I] 2.6x8mm Self tapping screw .............................3
[J] Servo room hatch (plastic) ...............................1
PIECES DIRECTION
[A] Dérive................................................................1
[B] Charnière bâton .............................................4
[C] Guignol (aluminium) .......................................1
[D] CAP 1.2mm (filetée un bout, L=910mm) ........1
[E] Chape (métal) .................................................1
[F] Ecrou 2mm .......................................................1
[G] Support servo (CTP 3mm)...........................1set
[H] Vis à bois 2.6x10mm........................................2
[I] Collier plastique (3x165mm) ..........................1
PIECES EMPENNAGE HORIZONTAL
[A] Empenange horizontal (avec profondeur)........1
[B] Vis tête plate M3x20mm ...............................2
[C] Rondelle (aluminium) .................................2
[D] Guignol (laiton) ..............................................1
[E] CAP 1.8mm (filetée un bout, L=250mm...........1
[F] Chape (métal)....................................................1
[G] Ecrou 2mm ................................................1
[H] Support servo (CTP 3mm)...........................1set
[I] Vis à bois 2.6x8mm ...........................................3
[J] Trappe servo (plastique)....................................1
CANOPY PARTS
[A] Canopy ............................................................1
[B] Canopy latch .................................................1set
[C] Nylon hinge........................................................2
[D] 2x6mm Self tapping screw (flat head) .........12
[E] Instrument panel (plastic) .........................1
[F] Pilot doll (plastic) ......................................1set
[G] Pilot doll mount (3mm ply wood) ............1set
[H] Dowel (Ø2x10mm carbon fiber rod) .................1
[I] Control stick (Ø3x60mm plastic pipe) ................1
RECEIVER / BATTERY PARTS
[A] Velcro(20x200mm) ....................................1set
[B] Velcro band (20x200mm).................................1
[C] Clear tape .........................................................1
[D] Nylon tie (3x165mm) ................................3
[E] Receiver mount (3mm ply wood).......................1
[F] Battery mount (3mm ply wood) ........................1
OTHER PARTS
[A] Construction guide book .................................1
[B] Color sticker ...............................................1set
PIECES VERRIERE
[A] Verrière ..............................................1
[B] Verrou verrière ................................1set
[C] Charnière nylon.................................................2
[D] Vis à bois 2x6mm (tête plate)........................12
[E] Tableau de bord................................................1
[F] Pilote ......................................................1set
[G] Support base pilote (CTP 3mm) ...............1set
[H] Téton (jonc carbone Ø2x10mm).......................1
[I] Manche (tube plastique Ø3x60mm)...................1
PIECES RECEPTEUR / ACCU
[A] Velcro® (20x200mm) ...........................1set
[B] Bande Velcro® (20x200mm) .......................1
[C] Ruban adhésif ..................................................1
[D] Collier Tie Rap (3x165mm) ........................3
[E] Platine récepteur (CTP 3mm) ....................1
[F] Platine accu (CTP 3mm) ........................1
AUTRES PIECES
[A] Manuel de construction.....................................1
[B] Autocollants..................................................1set

6
● Aérofreins
-AF ELECTRIQUE XPower 250mm (#099ELAF25)
● Moteur
-Moteur XPower Brushless XC3522/5LS
-Contrôleur XPower XREG60
-Pack accu LiPo XPower Xtreme 55C 11,1V 3200mAh
-PORTE PALES XPower Ø5/20mm +2,5° (#099H200806)
-XPower FOLDING PROP 14x8” (#099FB1408)
● Speedbrakes
-XPower ELECTRIC SPEEDBRAKES (#099ELAF25)
● MOTOR
-XPower Brushless motor XC3522/5LS
-XREG60 XPower controller
-55C 11.1V 3200mAh XPower Xtreme LiPo pack
-XPower H PROP HUB Ø5.0/20mm +2.5° (#099H200806)
-XPower FOLDING PROP 14x8” (#099FB1408)
● Train rentrant
-TR ELECTRIQUE PLANEUR 1:5 XPower
(#099ELRS1/5)
● Retract gear
-XPower SAILPLANE ELECTRIC RETRACT 1:5
(#099ELRS1/5)
POUR ASSEMBLER CE KIT/ TO ASSEMBLE THIS KIT
● Radio
-Ensemble radio (8 voies mini)
-Servos: aile type mince x3 (DS6010 MG), micro x1
(SS1816)
-Rallonges servo: 1000mm x3, 300mm x4
● Radio
-Radio set (more than 8 channnels)
-Servos: wing slim type x3 (DS6010 MG), micro x1
(SS1816)
-Servo extension cords: 1000mm x3, 300mm x4

7

8

9

10

11

12

13

14

15

16

17

18

19

20
Table of contents
Other Ecotop Toy manuals

Ecotop
Ecotop Schleicher Ka-8b User manual

Ecotop
Ecotop Schleicher Scale Series User manual

Ecotop
Ecotop ARS 300 User manual

Ecotop
Ecotop BIDULE 55 User manual

Ecotop
Ecotop 066GDHC2 User manual

Ecotop
Ecotop Spacewalker I 06604 User manual

Ecotop
Ecotop PILATUS PC-6 TURBO PORTER User manual

Ecotop
Ecotop Schleicher Ka-8b User manual
Popular Toy manuals by other brands

Fisher-Price
Fisher-Price DORA TALKING KITCHEN H1581 instruction sheet

NOCH
NOCH LASER CUT minis 14350 Freilager Open-Air... manual

Eduard
Eduard Musashi manual

WARCRADLE STUDIOS
WARCRADLE STUDIOS New Kyoto Medium H.A.B. Assembly guide

Seagull Models
Seagull Models CESSNA 188 AGWAGON Assembly manual

Eduard
Eduard Bison I Assembly instructions