Ecotric SEA26S900-MB User manual

SEA26S900-MB,
SEA26S900-W,
(XXX represents any alphanumeric character)

- 1 -
TABLE OF CONTENTS
Carton Contents................................................................................................................................................................- 1 -
WARNING..........................................................................................................................................................................- 3 -
Avertissement...................................................................................................................................................................- 4 -
Assembling Instruction..................................................................................................................................................... - 5 -
Front Wheel Installation...........................................................................................................................................- 5 -
Handle Bar,Display Installation.................................................................................................................................- 7 -
Seat Post Installation................................................................................................................................................ - 8 -
Pedals Installation.....................................................................................................................................................- 9 -
Battery Installation & Removing & Charging......................................................................................................... - 10 -
Operating Instructions/INSTRUCTIONS D'UTILISATION.........................................................................................- 11 -
Display Instrument Setting............................................................................................................................................. - 13 -
Presentation of Screen........................................................................................................................................... - 13 -
Display Setting........................................................................................................................................................ - 13 -
Troubleshooting..............................................................................................................................................................- 14 -
The display can not light up....................................................................................................................................- 14 -
The throttle does not work.................................................................................................................................... - 15 -
Error Codes............................................................................................................................................................. - 16 -
Warranty Information.....................................................................................................................................................- 17 -
Situations that are not covered by warranty......................................................................................................... - 17 -
18 months Limited Warranty Components............................................................................................................- 17 -
Exclusions................................................................................................................................................................- 17 -
Return Policy...................................................................................................................................................................- 18 -
FAQ..................................................................................................................................................................................- 19 -
Q: How does after-sale customer service/ warranty work?..................................................................................- 19 -
Q: I'm tech inclined and think I can fix it myself,does that void the warranty if I do?..........................................- 19 -
Q:Why is the charger hot?......................................................................................................................................- 19 -
Q:What is the range of this bike?...........................................................................................................................- 19 -
Q: Can I ride the bike in the rain?...........................................................................................................................- 19 -
Q: What is the most important thing for maintaining battery?............................................................................ - 19 -
Q: Do you have spare keys for the E-bike?.............................................................................................................- 19 -
Battery And Charger Care...............................................................................................................................................- 20 -
USER MAINTENANCE INSTRUCTIONS............................................................................................................................ - 21 -
Safety.............................................................................................................................................................................. - 22 -
General Warning.............................................................................................................................................................- 24 -
AVERTISSEMENT GÉNÉRAL.............................................................................................................................................- 25 -
Electrical Parameters...................................................................................................................................................... - 26 -
The Universal Wiring Diagram........................................................................................................................................- 27 -
Recording Your Bike Info.................................................................................................................................................- 27 -
Carton Contents
(x1) Bike
(x1) Lithium Ion Battery
(x1) Battery Charger
(x1) Kit Box
(x2) Pedals
(x1) Bike Bell
(x1) Saddle
(x1) Display
(x2) Keys
(x1) Tool Kit
(x2) Reflectors
(x1) Owner’s user Manual

- 2 -
First of all, we would like to thank you for choosing the electric bike. We believe this technology, with the
benefits of electric propulsion, provides you with the perfect vehicle to increase your mobility.
Our brush-less electric hub motor allows you to run errands or commute to work while saving money on
gas and reducing your environmental impact on our world. It also allows you to pedal if you want to get
exercise along the way.
All this and it is just plain fun to ride!
If you have any concerns, questions, or suggestions about the electric bike, please contact us at the website
where you bought the bike firstly,we will always do our best to serve you.
PLEASE NOTE:
THIS MANUAL IS NOT INTENDED AS A DETAILED USER, SERVICE, REPAIR OR
MAINTENANCE MANUAL. PLEASE SEEK ASSISTANCE FROM A QUALIFIED
TECHNICIAN FOR SERVICE, REPAIRS OR MAINTENANCE.

- 3 -
WARNING
Electric Bikes can be dangerous to use. The user or consumer assumes all risk of personal injuries, damage,
or failure of the bicycle or system and all other losses or damages to themselves and others and to any
property arising as a result of using the bicycle.
As with all mechanical components, the bicycle is subjected to wear and high stresses. Different materials
and components may react to wear or stress fatigue in different ways. If the design life of a component has
been exceeded, it may suddenly fail possibly causing injuries to the rider. Any form of crack, scratches, or
change of coloring in highly stressed areas indicates that the life of the component has been reached and it
should be replaced.
For replacement parts, technical information and warranty assistance, please feel free to contact us.
YOUR INSURANCE POLICIES MAY NOT PROVIDE
COVERAGE FOR ACCIDENTS INVOLVING THE USE OF
THIS BICYCLE. TO DETERMINE IF COVERAGE IS
PROVIDED YOU SHOULD CONTACT YOUR INSURANCE
COMPANY OR AGENT.

- 4 -
Avertissement
Le vélo électrique est dangereux.Hypothèses de l 'utilisateur ou du consommateur
Le risque de lésions corporelles, d'endommagement ou de panne de bicyclette ou de système, ainsi que
toutes autres pertes ou dommages causés à soi - même et à d'autres personnes ou à des biens du fait de
l'utilisation de bicyclettes.
Comme tous les composants mécaniques, la bicyclette est soumise à l 'usure et à des contraintes
élevées.Différents matériaux et ingrédients.
De différentes façons, l 'usure ou la fatigue par contrainte.Si le composant a dépassé sa durée de vie utile, il
risque d'être soudainement neutralisé et de causer des blessures au jockey.Dans les zones à forte
contrainte, toute forme de fissure, de rayure ou de changement de couleur indique que le composant a
atteint sa durée de vie utile et doit être remplacé.
VOTRE POLICE D 'ASSURANCE NE COUVRE PAS L'
ACCIDENT DE BICYCLETTE.POUR DÉTERMINER S'
IL Y A UNE ASSURANCE, VOUS DEVEZ
CONTACTER VOTRE COMPAGNIE D 'ASSURANCE
OU VOTRE AGENT.
NE PAS DÉMONTER, MODIFIER
OU REMPLACER DES
COMPOSANTS ÉLECTRIQUES
- 5 -
Assembling Instruction
Instruction d'assemblage
Front Wheel Installation
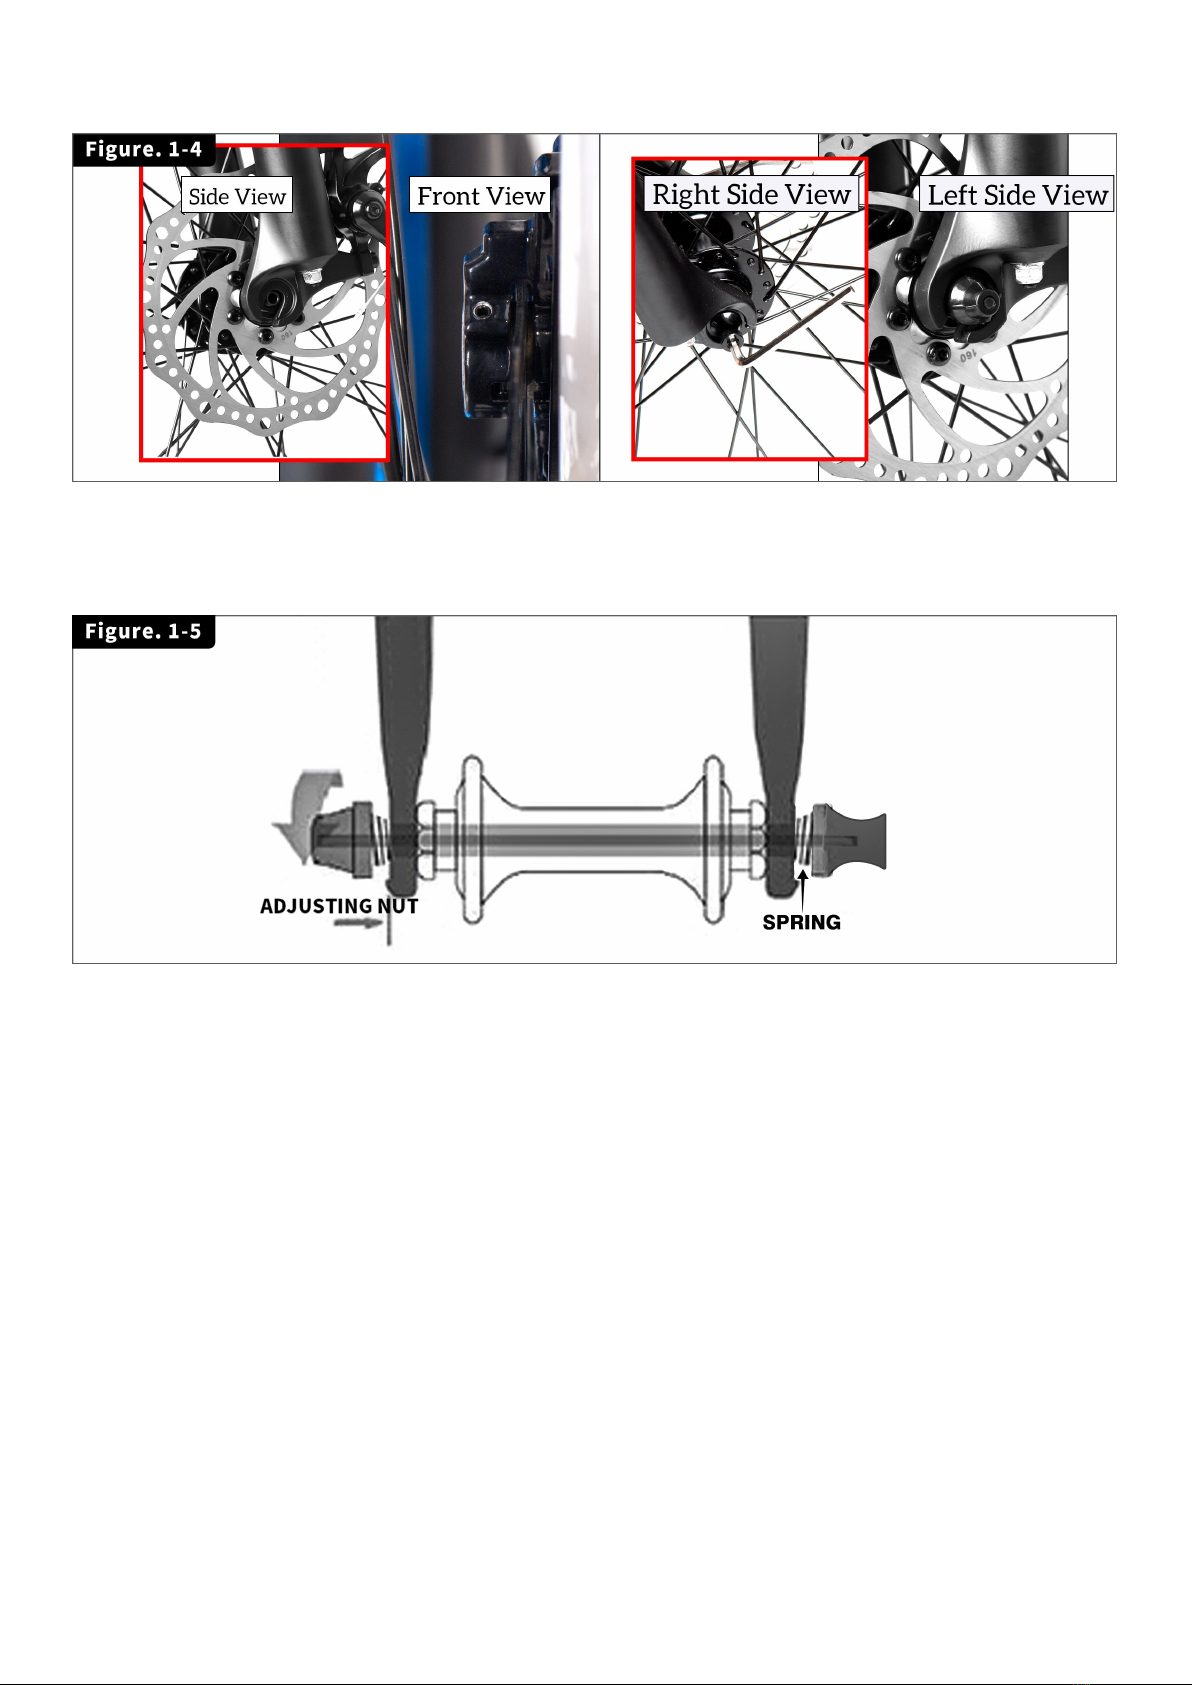
CAUTION: Your Electric bike equips with a front disk brake. Be careful not to damage the disk, caliper, or
brake pads when reinserting the disk into the caliper. Never activate a disk brake’s control lever unless
the disk inserts correctly in the caliper.
ATTENTION: votre vélo électrique est équipé d'un frein à disque avant. Veillez à ne pas endommager le
disque, l'étrier ou les plaquettes de frein lors de la réinsertion du disque dans l'étrier. N'activez jamais le
levier de commande d'un frein à disque à moins que le disque ne s'insère correctement dans l'étrier.
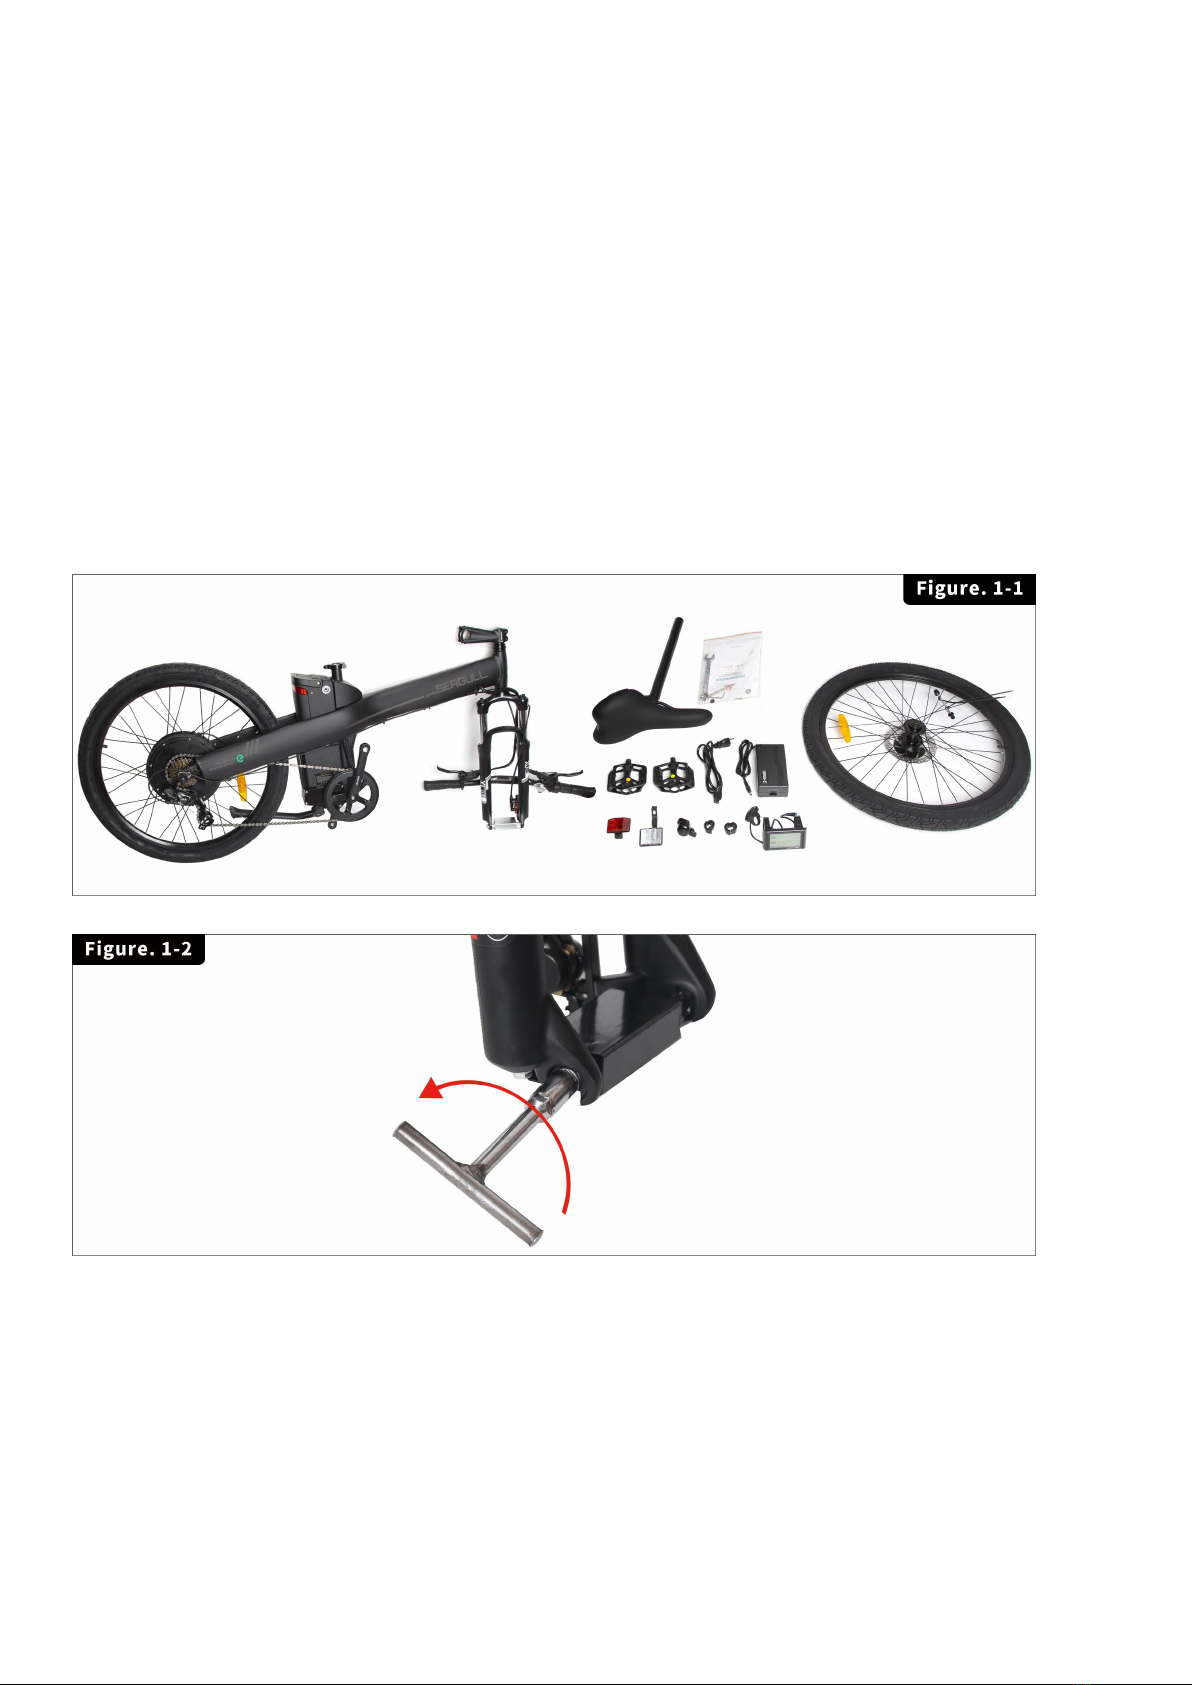
(1) Carefully take your bike out of the carton and gently rest it in place with the kickstand down
(2) Remove all of the inside cardboard protection and bubble wrap on the bike. Please locate and set
aside the kit box containing the battery charger, pedals, and tool kit, etc. (Figure.1-1)
(3) Remove the rubber pad and metal block from the front wheel and front fork (Figure.1-2).
- 6 -
(4) With the steering fork facing forward, insert the front wheel between the fork blades so that the
axle seats firmly at the top of the fork dropouts.
(5) Push the wheel firmly to the top of the slots in the fork dropouts, and center the wheel rim in the
fork at the same time.
(6) Use the Allen Wrench to tighten the nut of the quick release(Figure. 1-4). Note: The small spring
heads face the center and one on each side of the wheel(Figure. 1-5).
- 7 -
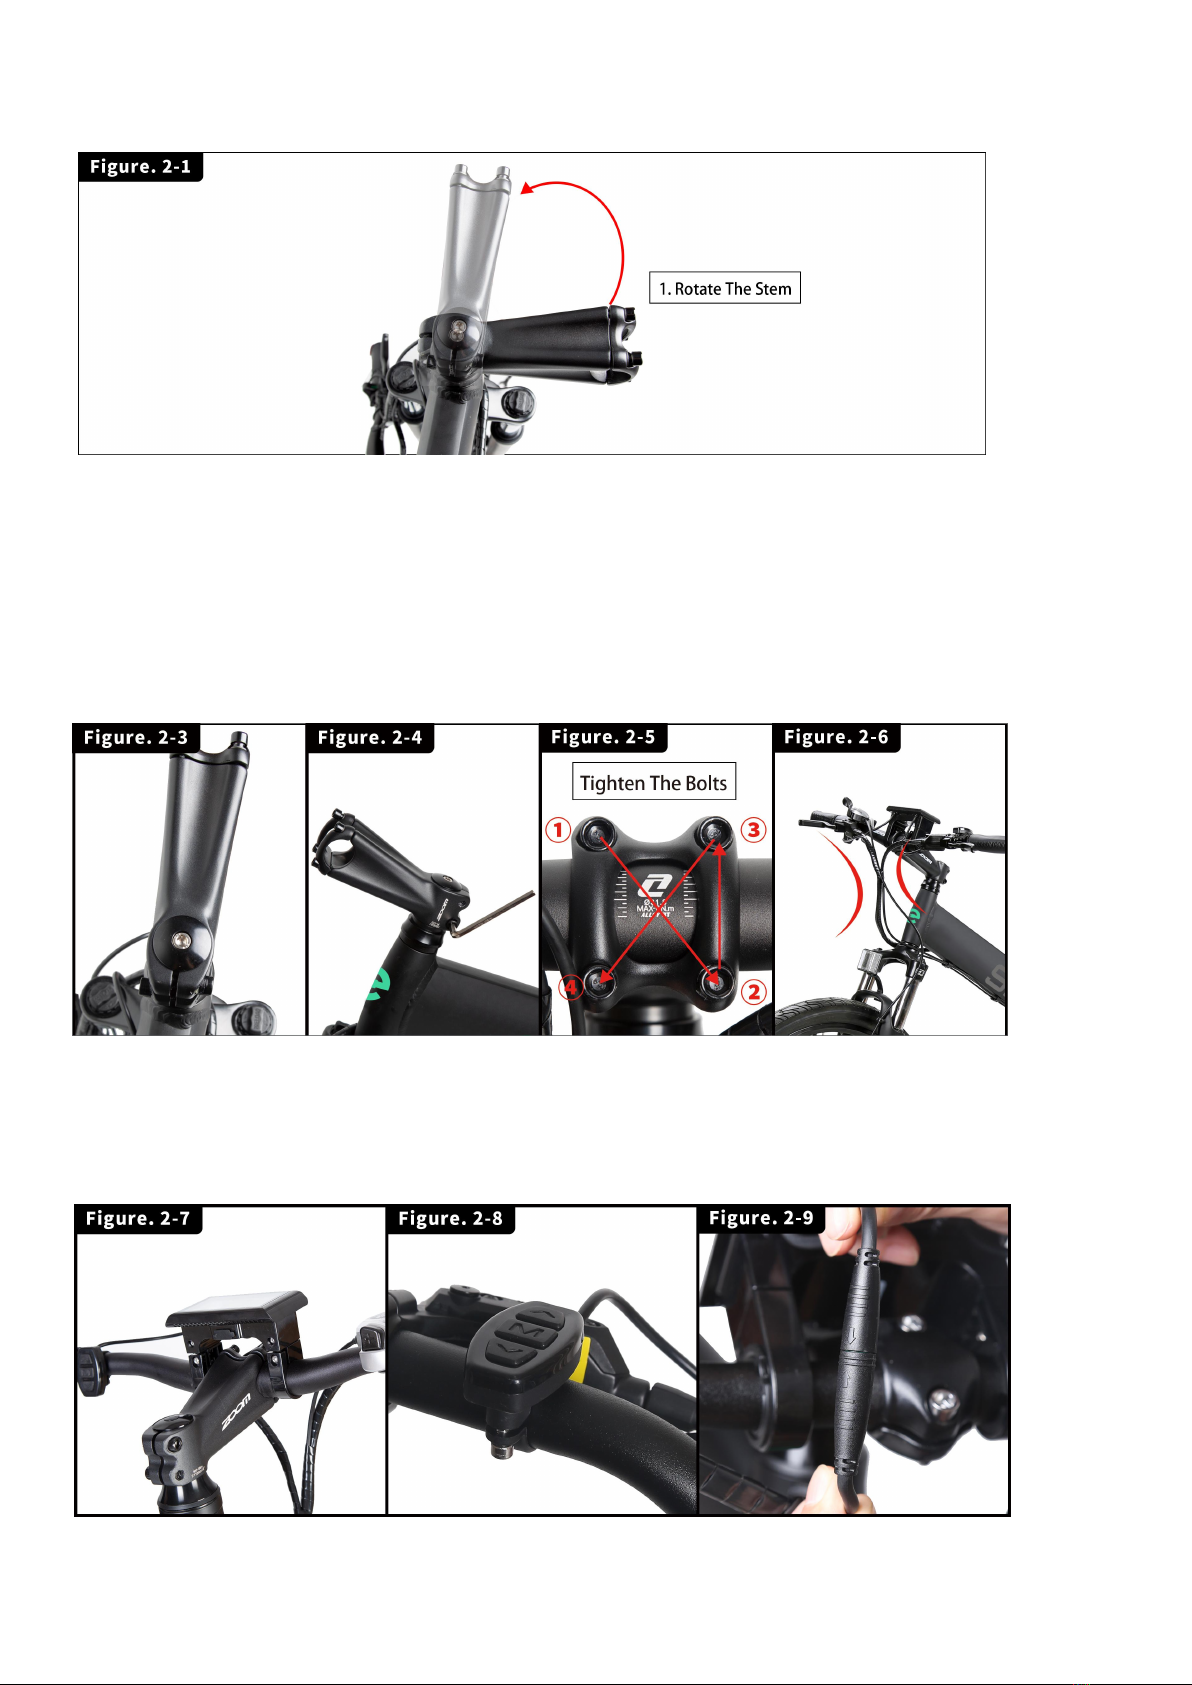
Handle Bar,Display Installation
1. Loose the bolts on both sides and top of the stem, then Rotate the stem (Figure. 2-1).
.
2. Tighten the top bolt firmly (Figure. 2-3),then tighten the two side bolts on the stem
(Figure. 2-4).
3. Unscrew the 4 screws in front of the stem, place the handlebar on the stem, then tighten the 4 front
bolts until full tightened (Figure. 2-5) Note: Before installing the handlebar, please pay attention to the
wires harness that connects to it, they need to be placed as shown in the picture to prevent the wire
harness from being entangled (Figure. 2-6).
Attention: Please tighten the top screws first, and then the side screws, otherwise the stem cannot be
tightened to the fullest
4. Unscrew the two screws on display, then install the display on the center of the handlebar(the rubber
gasket is necessary for this bike), then install the control panel (the buttons) on the driver side of the
handle, then connect the quick release connector, it has arrows on both ends of the connector, you can
plug the connector easily with aligning arrows (Figure 2-6). Unscrew the bolt on the front of the fork, then
install the front reflector.
- 8 -
Seat Post Installation
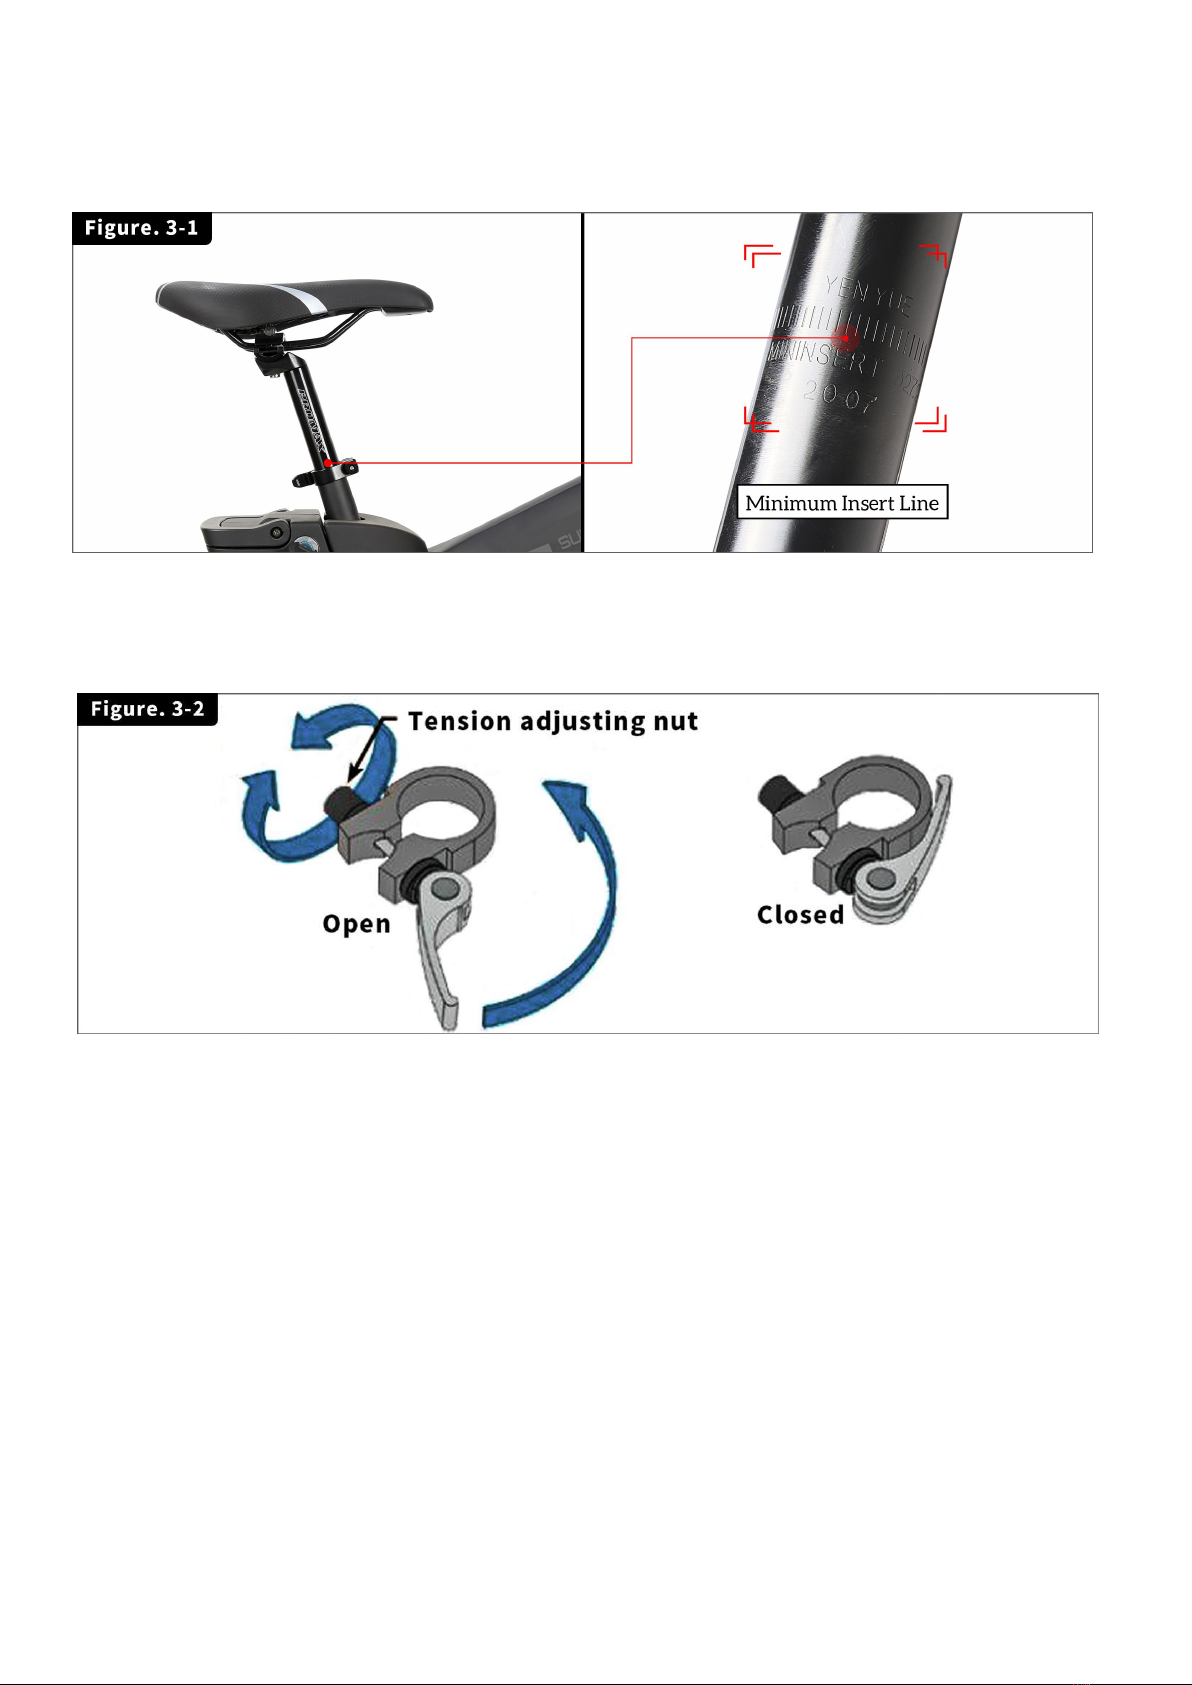
1. Please pay attention to the vertical lines on the seat post; it is the minimum insert line/safety line.
Please make sure install the post into the frame deeper than the minimum insertion line. It is at the bottom
of the seat post (Figure. 3-1).
Warning: It could break the seat tube during riding if the seat post does not install correctly. It is not
covered by the warranty.
Avertissement: cela pourrait casser le tube de selle pendant la conduite si la tige de selle ne s'installe pas
correctement. Elle n'est pas couverte par la garantie.
2. Open the clamp on the seat tube, insert the seat post into the seat tube, adjust the seat to a
comfortable height, tighten the tension adjusting nut, and press the clamp lever inward toward the seat
tube(Figure. 3-2).
Please Note: If necessary, tighten the clamp by twisting the clamp handle clockwise while in the
un-clamped position. Then, fold the handle in toward the seat post. This should require a fair amount
of force to ensure the seat post is held tight. If necessary, the clamp can be further tightened with a 5
mm Allen wrench while in the clamped position.

- 9 -
Pedals Installation
1. Identify left vs. right pedal
There is an “L” or "R” stamped into the axle (the threaded part that looks like a screw) (Figure. 4-1)
Please Note: They are not the same!! Apply a small amount of grease if possible.
2. Install the left-hand pedal firstly
You will have to screw it in counter-clockwise because the threading is the reverse of a normal screw.
Do this by slowly pedaling the cranks backward. If the pedal feels stiff, stop, and then re-try, it should
feel like a smooth motion. Please do not use the wrench until you are ready to tighten it for the final
few turns. Tighten it down until you can't anymore (Figure. 4-2).
Please Note: Hand-tight is not sufficient. Use a tool. If the threads on the crank are stripped after riding,
it means the crank needs to replace. It is NOT covered by warranty.
3. Install the right-hand pedal
This one threads in clockwise, like a normal screw. Follow the same principals, as discussed in step 2 for
the left pedal (Figure. 4-3).
4. Wipe off any excess grease from around the crank.
TORQUE SPECIFICATIONS

- 10 -
Battery Installation & Removing & Charging
1. Battery Installation
The keys are tied to the handle on the battery. If the key is on the "Off" position, push the key in, and
turn it to the "Unlock" position (Figure. 5-1), then pull the battery out of the frame. When mounting
the battery, you should align the battery and the rail on the frame, and slide the battery into the frame.
Then turn the key to the "On" position(Figure. 5-2).
2. Introduction of the battery
There are three positions on the battery lock.
"ON": The bike is powered on, and the battery locks on the frame. The key cannot be removed at this
time. "OFF": The bike is powered off, but the battery is locked on the frame. The key can be removed
at this time. "UNLOCK": You need to push the key in to turn to this position. The bike is powered off,
and the battery is not locked on the bike.
Sensor lamp(Figure. 5-3): When the key is in the ON position, using the brake lever or the light is too
dark will cause the sensor lamp to turn on.
3. Battery Charging
Find the charging port on the battery (Figure. 5-4), connect the charger’s plug to the battery charging
port first, and then connect the other side plug to the AC outlet (120V).The charger’s LED is the red
color when charging, and it will turn to green color when the battery is fully charged. It will take 6-8
hours to fully charge the battery. Remember to charge the battery before the first ride fully.
Please note: Please do not charge the battery indoors, recommend to charge in a cool, ventilated
and open space.
4. Battery storage outside of the eBike
If the battery is not used for an extended period, charge it fully and recharge it every two months.Store
it in a cool, dry place.

- 11 -
Operating Instructions/INSTRUCTIONS D'UTILISATION
1. Lighting Up The Display
Turn the key to lock position, make sure the battery lock firmly on the frame, and then press the “M”
button on the control panel and hold 3 seconds (Figure. 7-1), the display will light up.
2. Testing The Throttle,Pedal Assist, And Walk Assist Mode
The bike has three modes: throttle, pedal-assist, and walk-assist. Please lift the rear wheel, then test them
separately.
Please Note: please make sure the number of the PAS level is bigger than “0” (Figure. 7-2), “0” means no
throttle or pedal assist.
A. Throttle: please twist the throttle. It is on the right side of the handlebar(Figure. 7-3).
B. Pedal Assist: please lift the rear wheel and turn the pedal by hand. The motor will work once you turn
the crank 3/4-cycle (Figure. 7-4).
C. Walk assist: Please press and hold the “down” button on the control panel. The bike will go into a
walk-assist mode (Figure. 7-5).
- 12 -
3. Testing The Brake System
Please hold the two brake levers on both sides of the handlebar, then trying to push the bike forward to
make sure the bike is assembled firmly, and brakes can stop the bike properly.
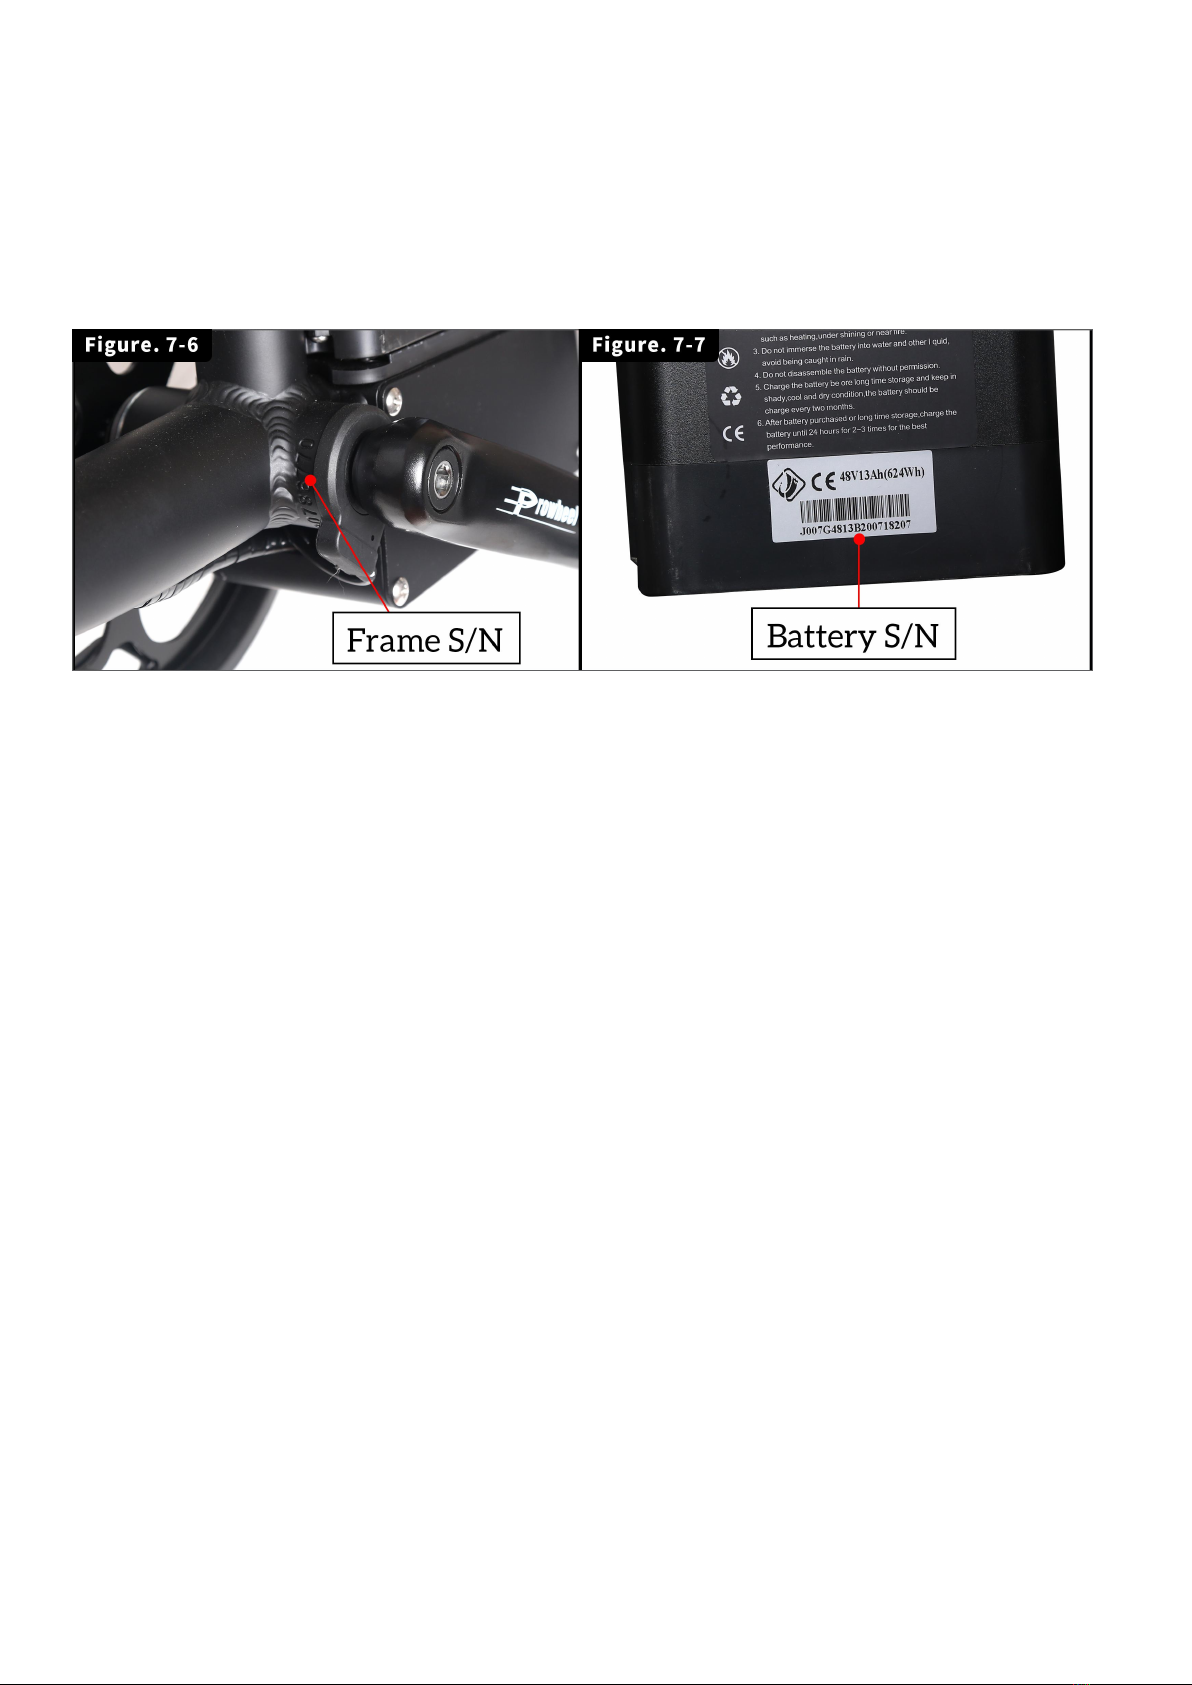
4. Please record the bike’s serial number (Figure. 7-6) and battery serial number (Figure. 7-7) on the user
manual’s last page in case of stolen or missing.
5. You are ready to ride!
- 13 -
Display Instrument Setting
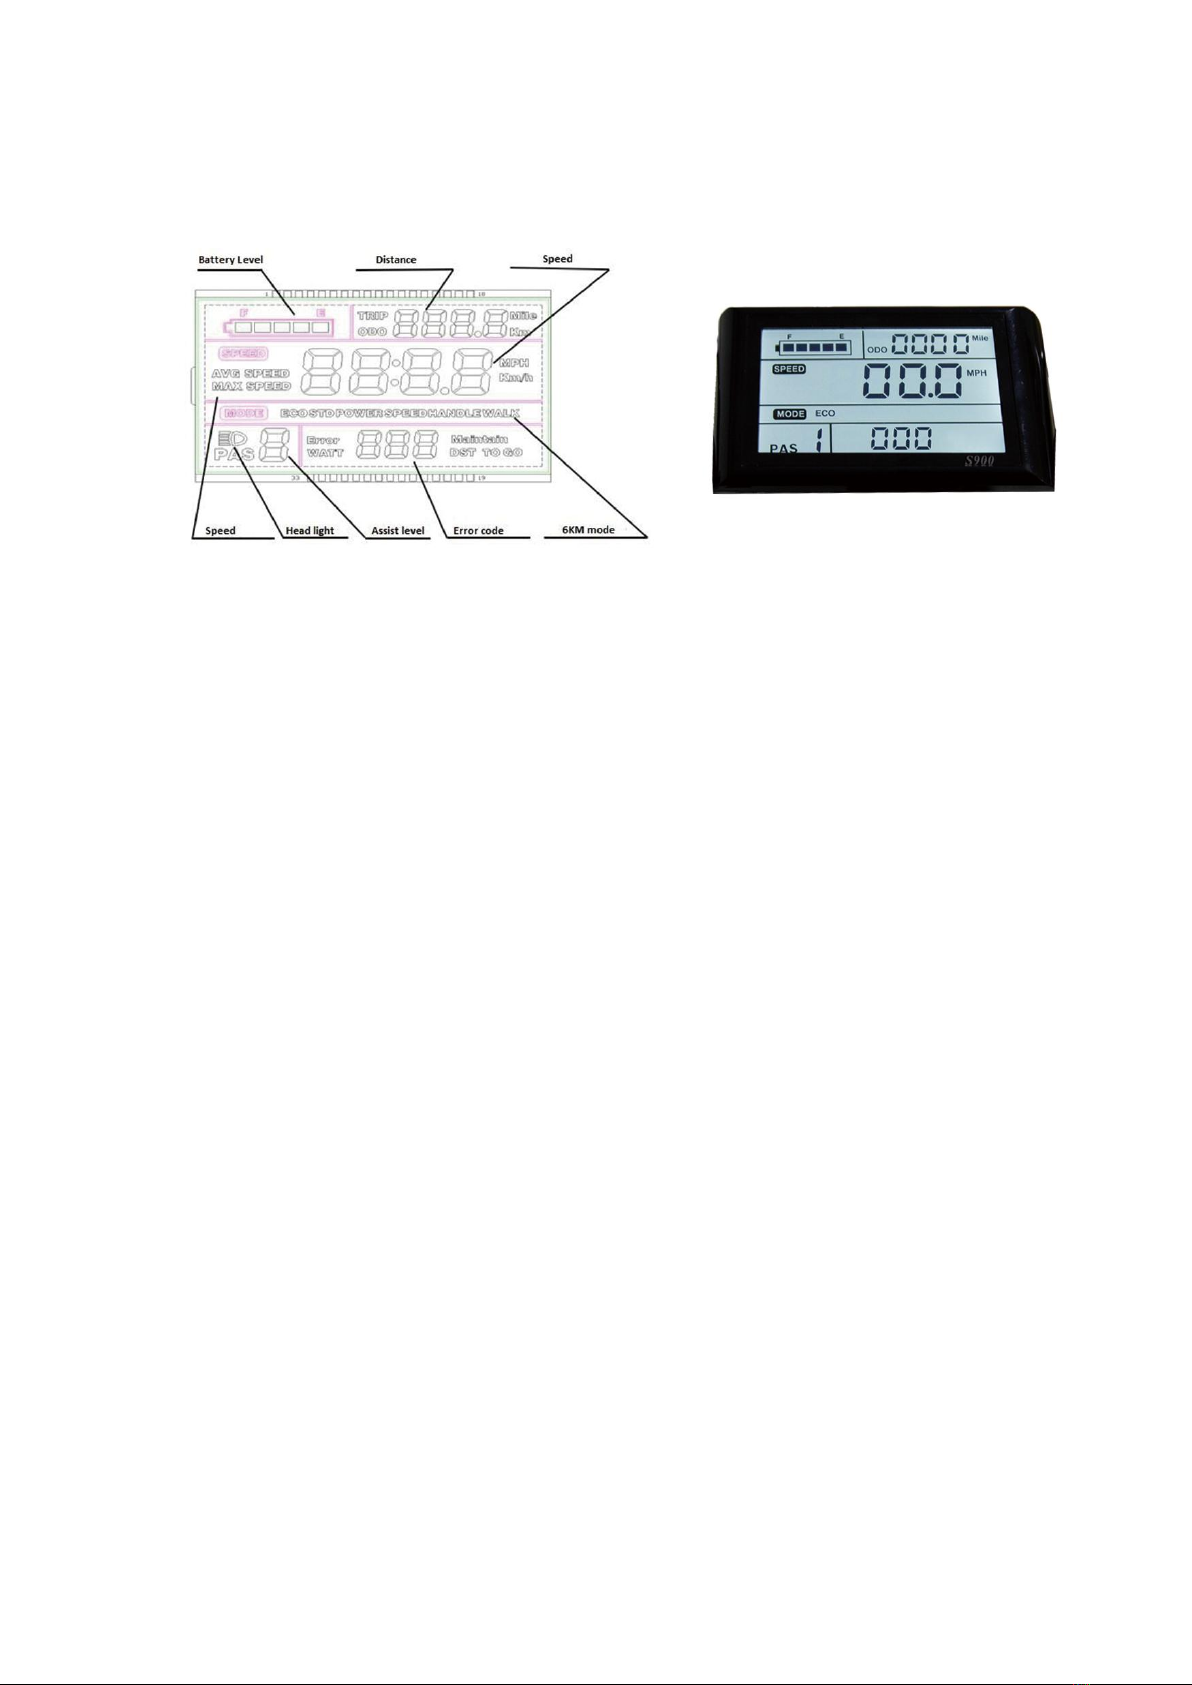
Presentation of Screen
Speed: Average SPEED/MAX SPEED
Speed unit: KMH/MPH
Battery level: 5 levels, voltage interval, could be customized
Headlight icon: indicates when headlight and backlight are on (No headlight function for this bike).
Error code: ERROR and code when there is error
Assist level: actual assist level 0~5, 0 –no assist, 1- ECO, 2/3-STD, 4/5-POWER
Distance: TRIP/ODO
6km mode
To turn the unit on, press and hold the “M” button to light up the display. And long press again “M”
will switch it off. The display switches off automatically if there is no activity for five minutes
(default).
Display Setting
Short press the “M” button to switch ODO/Trip.
Short press the up or down button to change assist level. The default value is level 1.
Long press down button to enter walk assist mode, “walk” will show up on the screen.
- 14 -
Troubleshooting
We fully understand your feelings when you meet a problem with the bike. Contacting us on the
website where you bought the bike and telling us your problem in detail with some pictures and
videos will be the fastest and easiest way to help you solve the problem. Please don't forget to
leave your order number to us for reference.
The following are some assist tips for electrical problems:
The display can not light up
Please fully charge the battery (6-8 hours). The LED on the charger should be green color when the
battery is full charged.
If it still doesn’t work, please check the wires and battery, please make sure the connections are not
loose, and the battery installs in place, then please light up the display in the correct order (light up the
power button on the battery,press the “M” button, and hold 3 seconds).
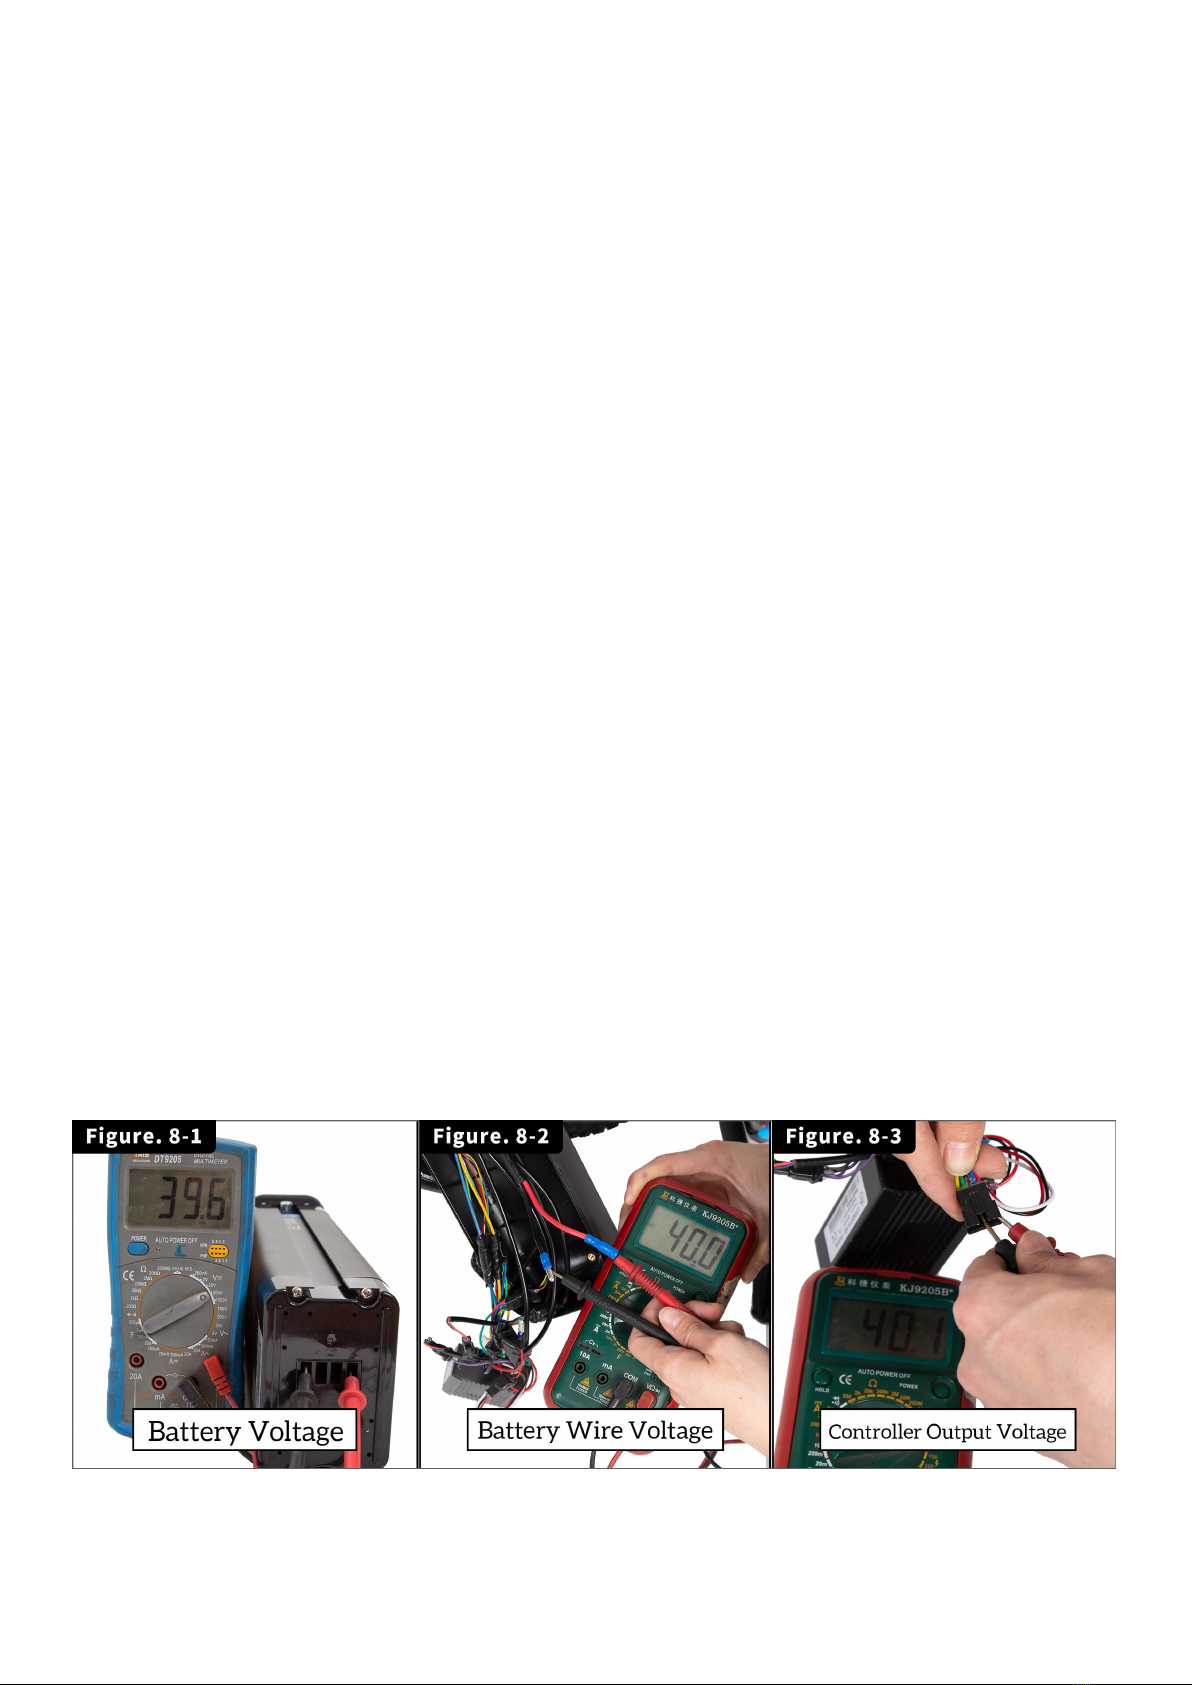
If it still doesn’t work, we need to get a voltmeter, and do some testing:
First,please light up the power button, and test the battery output voltage (Figure 8-1). If the voltage is
“0”, it means there is something wrong with the battery output plug, cell, or fuse. Please take a picture
or a video to show your testing result, and then send it to us. The customer service department will
give you a solution. If the battery voltage is not “0”, but less than 42V, please full charge the battery
(6-8 hours), then test it again; if the battery voltage is between 42v-54v, but the display can not be light
up, it means the battery is in good condition, we need to test the other two plugs.
Second, please open the controller box, and find the power wire (black and red color) that connecting
the battery and controller (Figure. 8-2). Please test the power wire’s voltage. If it is “0”, it means the
power wire needs to replace, please take pictures, and send the pics to us. If the voltage is the same as
the battery, there's no problem with the power wire. We need to test the output voltage of the
controller. It is the plug that connects the controller and display. It has five wires on the plug, please
test the red and black wires (Figure. 8-3). If the voltage is “0”, it means the controller needs to be
replaced, please take some pictures and send them to us; if the voltage is the same as the battery, it
means the display needs to be replaced. Please picture the testing results and send them to us. It will
help us for solving your problem asap.
- 15 -
The throttle does not work
We mean the display can be lighted up, with no error codes, but the throttle does not work. The
brakes have two functions when you pull the brake lever: 1. it will stop the bike 2. it will cut the power
of the motor.
First, please check the brake lever, and make sure the brake lever can hold or release fluently. If not,
maybe the brake cut the power. Please video your problem and send it to us. We will give you a
solution.
Second, please make sure the number behind “PAS” is bigger than “0”. If the number is “0”, it means
no throttle or no pedal assist. Please test the pedal assist mode (please lift the rear wheel, then turn
the crank a whole cycle), and walk assist mode(press the “down” button and hold 3 seconds). If only
the throttle does not work, it means the throttle needs to be replaced. Please video your testing and
send the video to us. If none of the three modes works, we need to test the motor wire and brake
sensor.
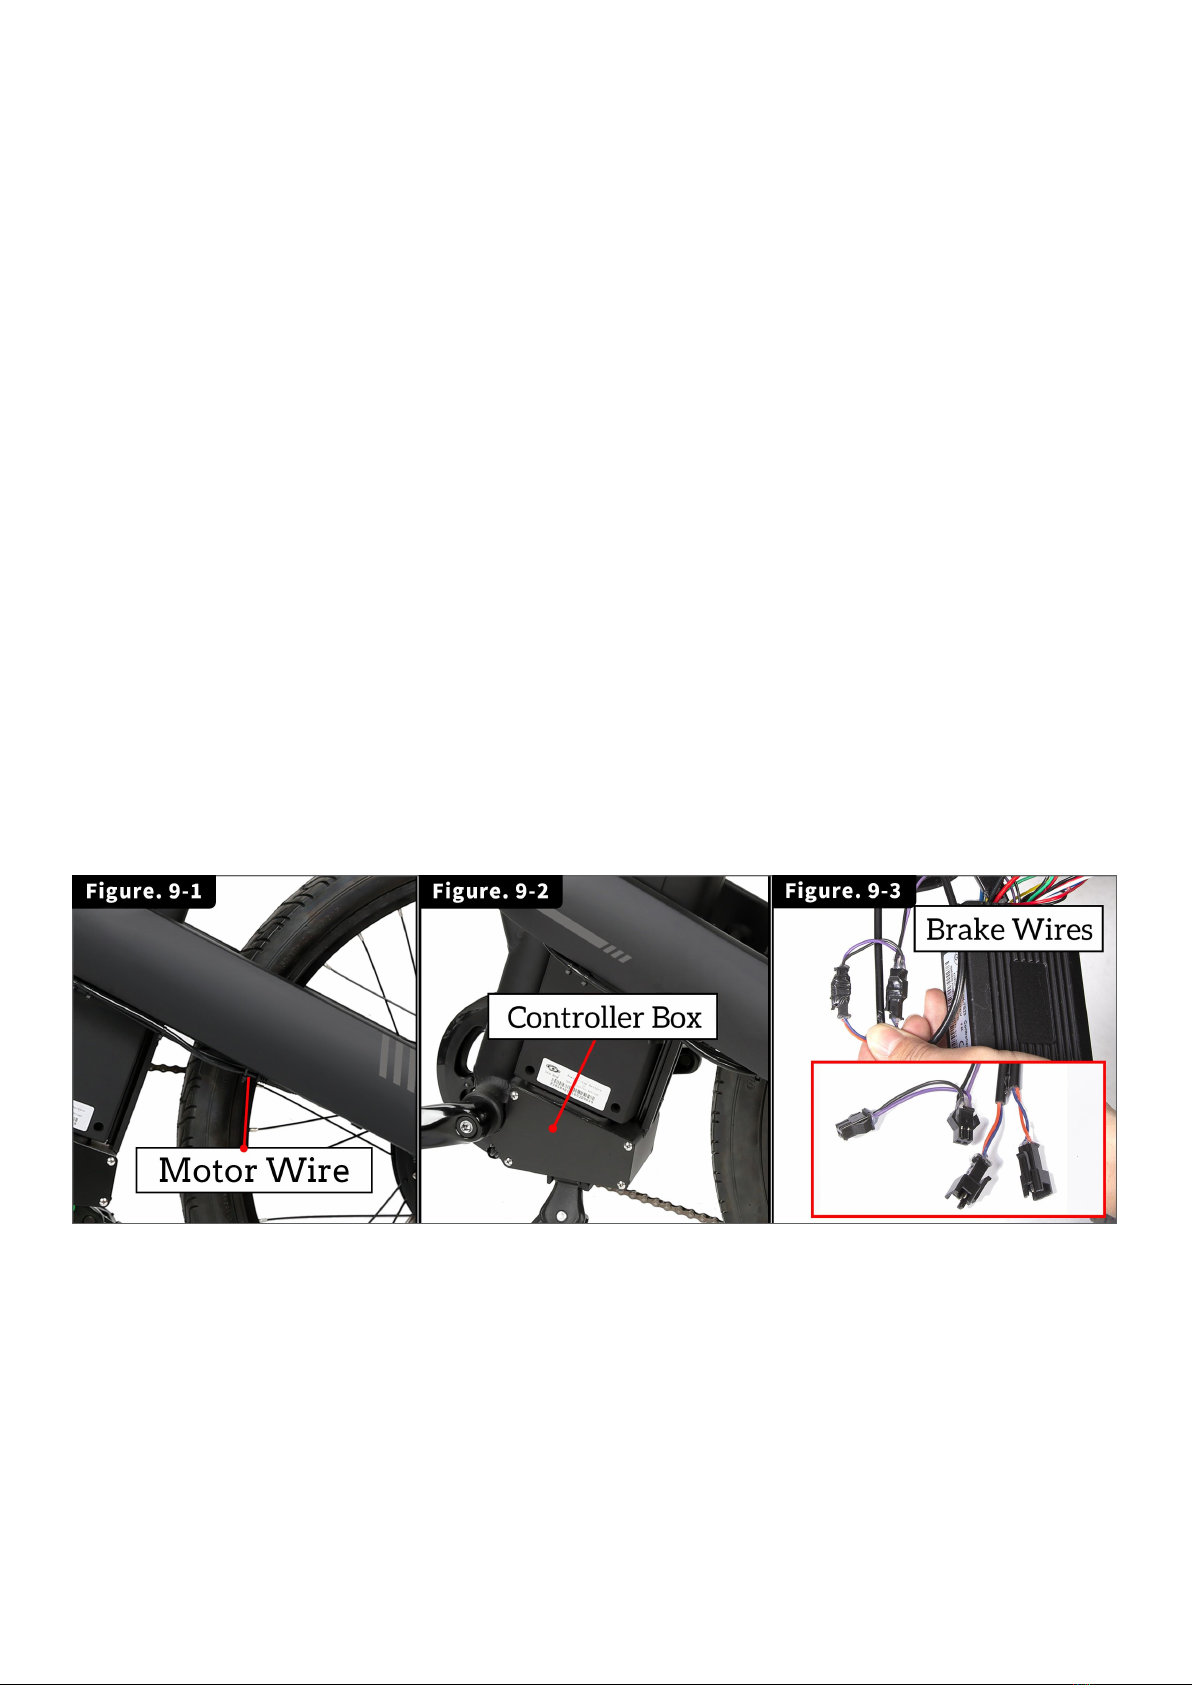
Third, please find the plug on the motor wire (Figure. 9-1), the connection may loose. Please re-plug it,
restart the bike, and then test all three modes, if it still doesn’t work, we need to check the brake
sensor.
Fourth, please open the controller box (Figure. 9-2), and find the two plugs that connect the brake
levers and controller. It is the only two plugs that have two wires on each plug (Figure. 9-3). Please
disconnect them , then test all three modes again. If they work, it means the brake sensor is defective.
The brake wires need to be replaced. If it still doesn’t work, it means the controller needs to be
replaced. Please video your problem, and send the video to us.
If it still doesn’t work after replacing the brake wire or controller, please video how you do the
troubleshooting, and send the video to us.

- 16 -
Error Codes
When something goes wrong with the system, an error code will flash on display. Check the details
on the attached list.
Please note: The motor will stop working in the event of an error. Only when the error is gone, the
motor will work again. Please send us a pic to show the error code. It will help us a lot in solving your
problem as soon as possible.
Error Codes:
Error code
Definition
0
Normal
2
Short circuit protection of motor
3
Controller error
4
Throttle error
5
Motor error
8
Low battery level
9
High battery level
10
Motor hall sensor error
30
UART receive error
CODE 0: Normal.
ERROR 02: The controller or motor needs to replace.
ERROR 03: The controller needs to replace.
ERROR 04: Turn the throttle in the opposite direction. Maybe the throttle does not return to the
original position. If still not solved, the throttle needs to replace.
ERROR 05: Replace the controller or motor.
ERROR 08: Please fully charge the battery until the LED on the charger turns to green color (6-8 hours);
if still not solved, please test the output voltage of the battery, and send us a pic to show your result.
ERROR 09: Please test the output voltage of the battery, and send us a pic to show your result.
ERROR 10: Please find the plug that connects the controller and motor, please re-plug it, maybe the
connection is loose; if still not solved, please video your problem and send your video to us.
ERROR 30: Replace the controller or display.

- 17 -
Warranty Information
The warranty covers items that fail when used within their normal operating parameters. Please provide
the order number when you need warranty. This warranty applies only to the original registered owner of
the bicycle and is not transferable.
If any part happen to be damaged during shipping, please contact us immediately after shipment arrival.
We will send a replacement part at our expense and will work with you to fix the issue.
Situations that are not covered by warranty
Water Damage (wading in the water, parking in the rain)
Refit (refit the motor, electrical system, battery, frame, fork, etc. without our authorization)
Overloading (Riding on steep slope/load more than 265lbs)
Artificial damage (incorrect installation/usages)
Uncontrollable factors (Crash, falling, stolen, etc.)
Improper use (Abusive use the bicycle in off-road terrain, mud, water, gravel or jumping from ramps,
stairs or elevated ramps,or using the bike at an altitude higher than 6562 feet )
Damages caused by natural disasters (such as earthquakes, lightning, fire, flooding and other hazards).
Use of other components (such as charger, battery, display, or controller, it may result in fire or death)
Acts in violation of laws
Never registered your ebike or cannot provide the order number
18 months Limited Warranty Components(In the period of 18 months from purchase by
Official Authorized Store)
Frame – are warranted to be free from defects in material or workmanship for 18 months from
purchase by Official Authorized Store. Paint finish is considered consumable and is not part of the
warranty.
Motor, Display, Controller and Motor Assembly – are warranted to be free from defects in material or
workmanship for a period of 18 months from purchase by Official Authorized Store.
Original Battery –are warranted to be free from defects in material or workmanship for a period of
18 months from the date of purchase as follows: full replacement during the first 12 months, while
replacements needed during months 13-18 are prorated.
Exclusions:
The warranty does not cover components subject to wear: Tires, inner tubes, brake lines, brake pads, wheel
lining tape, fuses, etc. The other parts are Normal wear parts which are excluded from this warranty.
Please note that for warranty issues, the customer is responsible for the cost of
labor to install warrantied components.

- 18 -
Return Policy
1. Electric Bicycle Return Policy allows you to return or exchange your electric bicycle once within 30
days start from the date of receiving the bike. Please check the warranty terms for complete
information for when a return is applicable. Please note that we do not accept the return of the spare
parts. If you insist on returning it, you need to bear a 50% restocking fee of the original price.
2. Ship-back charge:
A. If the unit purchase under a free-shipping promotion, there will not be a refund for shipping cost.
However, the customer will have to bear the 20% restocking fee of the original price if the return is
unrelated to quality, damages, or wrong item but merely for a personal and discretional last-minute
decision from the buyer.
B. If you need the pick-up service, please tell us, and we will arrange a return label with the pick-up fee
for you, but the customer will need to pay for this pick-up fee.)
3. The returned unit must be in like-new condition, include all original packaging, accessories, and
documentation. Any missing components may be deducted from the refund. Any shipping damage
during the ship-back may incur a deduction from the refund.
4. Returned units are subject to a 20% of inspection and restocking fee from the original purchase
price.
5. The refund will be issued in an average time frame of 2-3 weeks after we are receiving, inspecting,
and processing the returned unit.
6. If the customer wants to cancel the order after the shipping label being created, the customer will
have to bear the shipping cost.
Please note: Buyer is required to get the packing box, pack the bike, and take the bike to UPS/FedEx
Store when the buyer wants to return the bike. (Please keep the original box in case of returning if
necessary). We cannot accept your return request if you bought the bike for more than 30 days, but we
will keep providing our best customer service.
If the buyer picks up the bike locally, the buyer is responsible for carrying the bike back to our
warehouse.
If you buy the bike in the USA, but use it in the other country or Hawaii, Alaska, or Puerto Rico, PO
Boxes/APO's is out of our delivery range. The buyer is responsible for returning the bike to the original
shipping address.

- 19 -
FAQ
Q: How does after-sale customer service/ warranty work?
A: When you have problems with your bike, please message us on the website where you bought the bike.
We will reply to you in one business day. It is best to describe your problem in details, and make a video to
show your concern, it is the fastest way to solving your problem.
Example: My bike does not work. The customer should tell us that the display can be lighted up, but the
throttle does not work. When you have electrical problems, the first thing we want to know is the display
can be lighted up or not, (The condition of the display will help us to distinguish how to solve the electrical
problems), then please provide more details about how it happens and the symptom of the problem. We
will report your problem/video to our technician team, and give you a solution. If your bike is under
warranty, we will arrange spare parts from our warehouse in the USA.
Q: I'm tech inclined and think I can fix it myself,does that void the warranty if I do?
A: No, we always like to work with and support customers who are resourceful enough to fix an issue on
their own, and we will provide plenty of tech support over email to guide you through the process. It saves
wasted time and expense in shipping and it can be a useful and fun learning process. Please contact us
before attempting a DIY repair, however, as some things have non-obvious complications.
Q:Why is the charger hot?
A: When the battery is charging, it is normal that the charger is getting hot, because part of the energy is
converted into heat energy when converting AC to DC. As long as there's no smell, you don't need to worry
about it. However, it's better to put it in a ventilated place, because the heat will accelerate the aging of
electronic components.
Q:What is the range of this bike?
A: We try to give an exact number, but the range is related to the road conditions, rider’s weight, wind
resistance, ramp or not, and how you ride the bike. We test the bike on the city road, (slight wind, flat
highway, rider 160lbs, throttle, and pedal assist), the range is 20 miles. Suppose you can ride 16-23 miles. It
is normal. Full charging the bike, and pump up the tire full will Increase range.
Q: Can I ride the bike in the rain?
A: Yes, ride the bike in moderate or light rain is no problem. Please make sure the bike is bone dry before
next riding, or the bike will cut-off randomly. But do not park the bike in rain and never wading in water.
The battery and controller have a self-protection program, they will cut the power if there is a short, but
water damage will destroy the the bike's electrics.
Q: What is the most important thing for maintaining battery?
A: Remember to charge the bike in time, and not leave the bike with an empty battery. Remember to
charge the battery every 2 months if you do not use it for a long time, or the battery will starve to death as
no power. It will result in a short-range or display can not light up.
Q: Do you have spare keys for the E-bike?
A: Sorry, we do not have spare keys, but spare lock-set. You should replace the whole lock set if you
lost the keys. Remember to keep a copy of the key if necessary.
This manual suits for next models
1
Table of contents
Other Ecotric Bicycle manuals


