ECS Tuning BMW S54 User manual
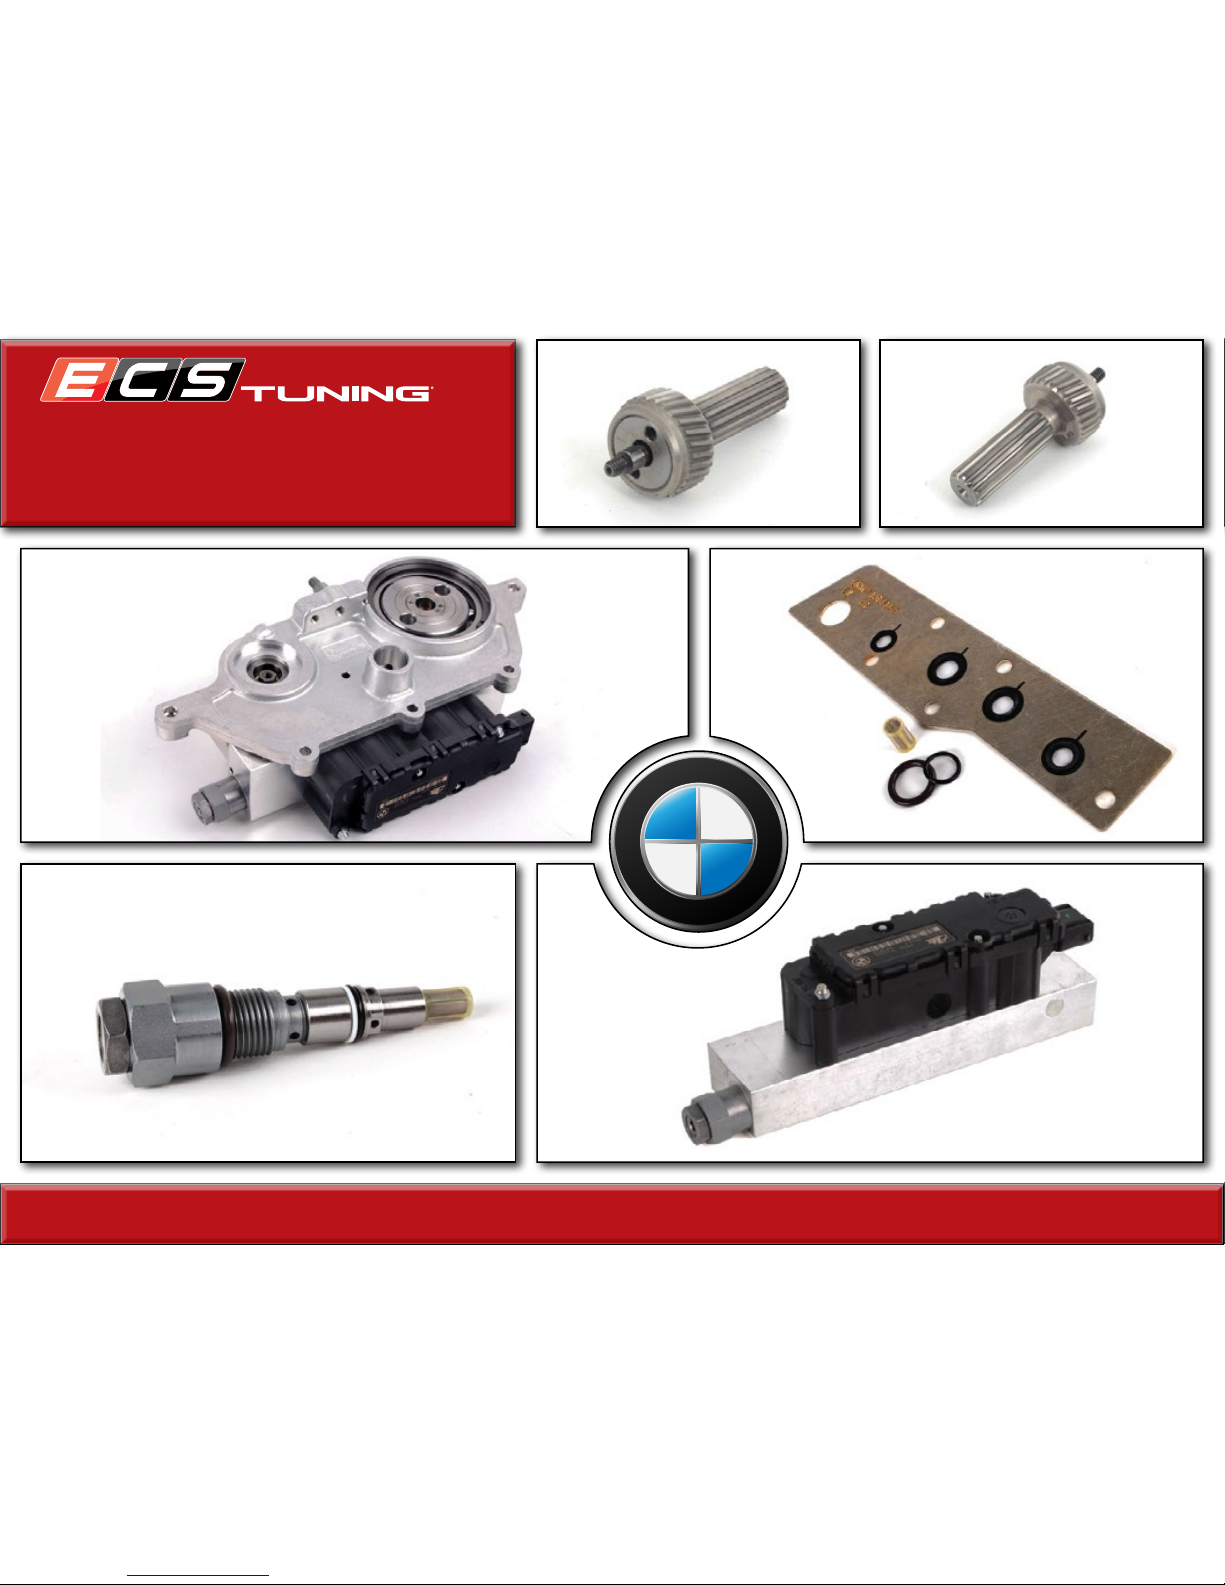
BMW S54
Vanos Rebuild Kit
Installation Instructions
Proper service and repair procedures are vital to the safe, reliable operation of all motor vehicles as well as the personal safety of those performing the repairs. Standard safety procedures and precautions (including
use of safety goggles and proper tools and equipment) should be followed at all times to eliminate the possibility of personal injury or improper service which could damage the vehicle or compromise its safety.
B
M
W

ECS TUNING 1000 SEVILLE RD. WADSWORTH, OH 44281 1.800.924.5172 WWW.ECSTUNING.COM 2
BMW S54 DUAL VANOS REBUILD
®
ECS Difficulty Gauge
I
I
I
I
I
I
I
I
I
I
I
I
I
I
I
I
I
I
I
I
I
I
I
I
I
I
I
I
I
I
I
I
I
I
I
I
I
I
I
I
I
I
I
1
2 4
3
Advanced - 3
Pro - 4
2 - Moderate
1 - Easy
BMW S54 Dual Vanos Rebuild
INTRODUCTION
BMW’s Vanos variable valve timing system is one of the most recognized systems in the industry. There are a number of different designs, and they all
work off of ingeniously simple mechanical principals. Their notoriety, however, is not likely to be from their design and performance, but more so from
the fact that they frequently wear out. Today we’re going to be working on the dual Vanos unit that is found in the 6 cylinder S54 engines. The most
common Vanos problem is worn out seals. We’ll be replacing them all, and In the case of the S54 Vanos, there are a few other well known issues that we
will also be dealing with. The oil pump drive tabs on the Vanos exhaust hubs are known to break. The problem is caused by improperly sized holes in
the oil pump rotor, and we’ll show you how to replace it. Another common problem, known as Vanos “rattle”, is one we will take care of by repairing the
Vanos transfer gear sets and replacing the diaphragm springs behind the Vanos hub. To finish things off we’ll also replace the Vanos hub bolts and cam
sprocket hub bolts - which are known to loosen over time, and the upper timing chain guide as well. Rebuilding the S54 dual Vanos is time consuming
due to a lot of steps, but overall it’s not too difficult of a job. The best part is that it’ll restore smooth, consistent performance, some of which you may
not even realize you’ve lost.
An experienced technician can complete the job in a day, however if this is the first time you’ve done
one or if you’re light on experience, it’s best to plan a couple days - a perfect weekend project. There
are a number of steps that require precision and patience, and this is not something you want to rush
through. The best advice, as always, is to read through these instructions first to familiarize yourself with
the project and make sure you have all of the required tools on hand.
Thank you for looking to ECS Tuning for all your performance and repair needs.
We appreciate your business!
While you’re in the middle of this, there are a few jobs that you’ll have the perfect opportunity to
do. Take a look at the list below and consider these before you start. It’ll save you a lot of time
down the road!
• Valve cover gasket replacement
• Spark plug replacement
• Valve adjustment

ECS TUNING 1000 SEVILLE RD. WADSWORTH, OH 44281 1.800.924.5172 WWW.ECSTUNING.COM 3
BMW S54 DUAL VANOS REBUILD
®
Required Tools and Equipment................................................................................pg.4
Shop Supplies and Materials.....................................................................................pg.6
Installation and Safety Information........................................................................pg.7
Vanos Repair Procedures............................................................................................pg.8
Torquing Tips ..................................................................................................................pg.102
Torque Specications...................................................................................................pg.103
Schwaben Tools .............................................................................................................pg.104
TABLE OF CONTENTS
Due to the depth of this repair, there are a lot of different components that you may choose to replace
or leave alone if they have already been done. These instructions are designed around a complete
Vanos service, as well as replacement/repair of the most common problems that develop in the related
areas. As you work your way through the repair, be sure and closely follow the links/directions next to
any of the yellow street signs. These will direct you where to go depending on the step you are on or
the components that you are replacing.
ECS TUNING 1000 SEVILLE RD. WADSWORTH, OH 44281 1.800.924.5172 WWW.ECSTUNING.COM 4
BMW S54 DUAL VANOS REBUILD
®
Return to Table of Contents
• Protecta-Sockets (for lug nuts)........................................................ES#2221243
• 3/8” Drive Ratchet ..................................................................... ES#2765902
• 3/8” Drive Torque Wrench....................................................... ES#2221245
• 3/8” Drive Deep and Shallow Sockets................................. ES#2763772
• 3/8” Drive Extensions ............................................................... ES#2804822
• Hydraulic Floor Jack ................................................................... ES#240941
• Torx Drivers and Sockets.................................................................ES#11417/8
• 1/2” Drive Deep and Shallow Sockets................................. ES#2839106
• 1/2” Drive Ratchet
• 1/2” Drive Extensions
• 1/2” Drive Torque Wrench....................................................... ES#2221244
• 1/2” Drive Breaker Bar................................................................ ES#2776653
• File Set
• Air Nozzle/Blow Gun
• Bench Mounted Vise
• Crows Foot Wrenches
• Hook and Pick Tool Set ............................................................ ES#2778980
• 1/4” Drive Ratchet...............................................................................ES#2823235
• 1/4” Drive Deep and Shallow Sockets................................. ES#2823235
• 1/4” Drive Extensions ............................................................... ES#2823235
• 1/4” Drive Torque Wrench
• Plier and Cutter Set ................................................................... ES#2804496
• Flat and Phillips Screwdrivers .......................................................ES#2225921
• Jack Stands.............................................................................................ES#2763355
• Ball Pein Hammers
• Pry Bar Set...............................................................................................ES#1899378
• Electric/Cordless Drill
•Wire Strippers/Crimpers
• Adjustable (Crescent) Type Wrenches
• Drill Bits
• Punch and Chisel Set
• Hex Bit (Allen) Wrenches and Sockets .......................................ES#11420
• Thread Repair Tools .............................................................................ES#1306824
• Open/Boxed End Wrench Set ........................................................ES#2765907
Standard Automotive Tools Available On Our WebsiteRequired For This Install
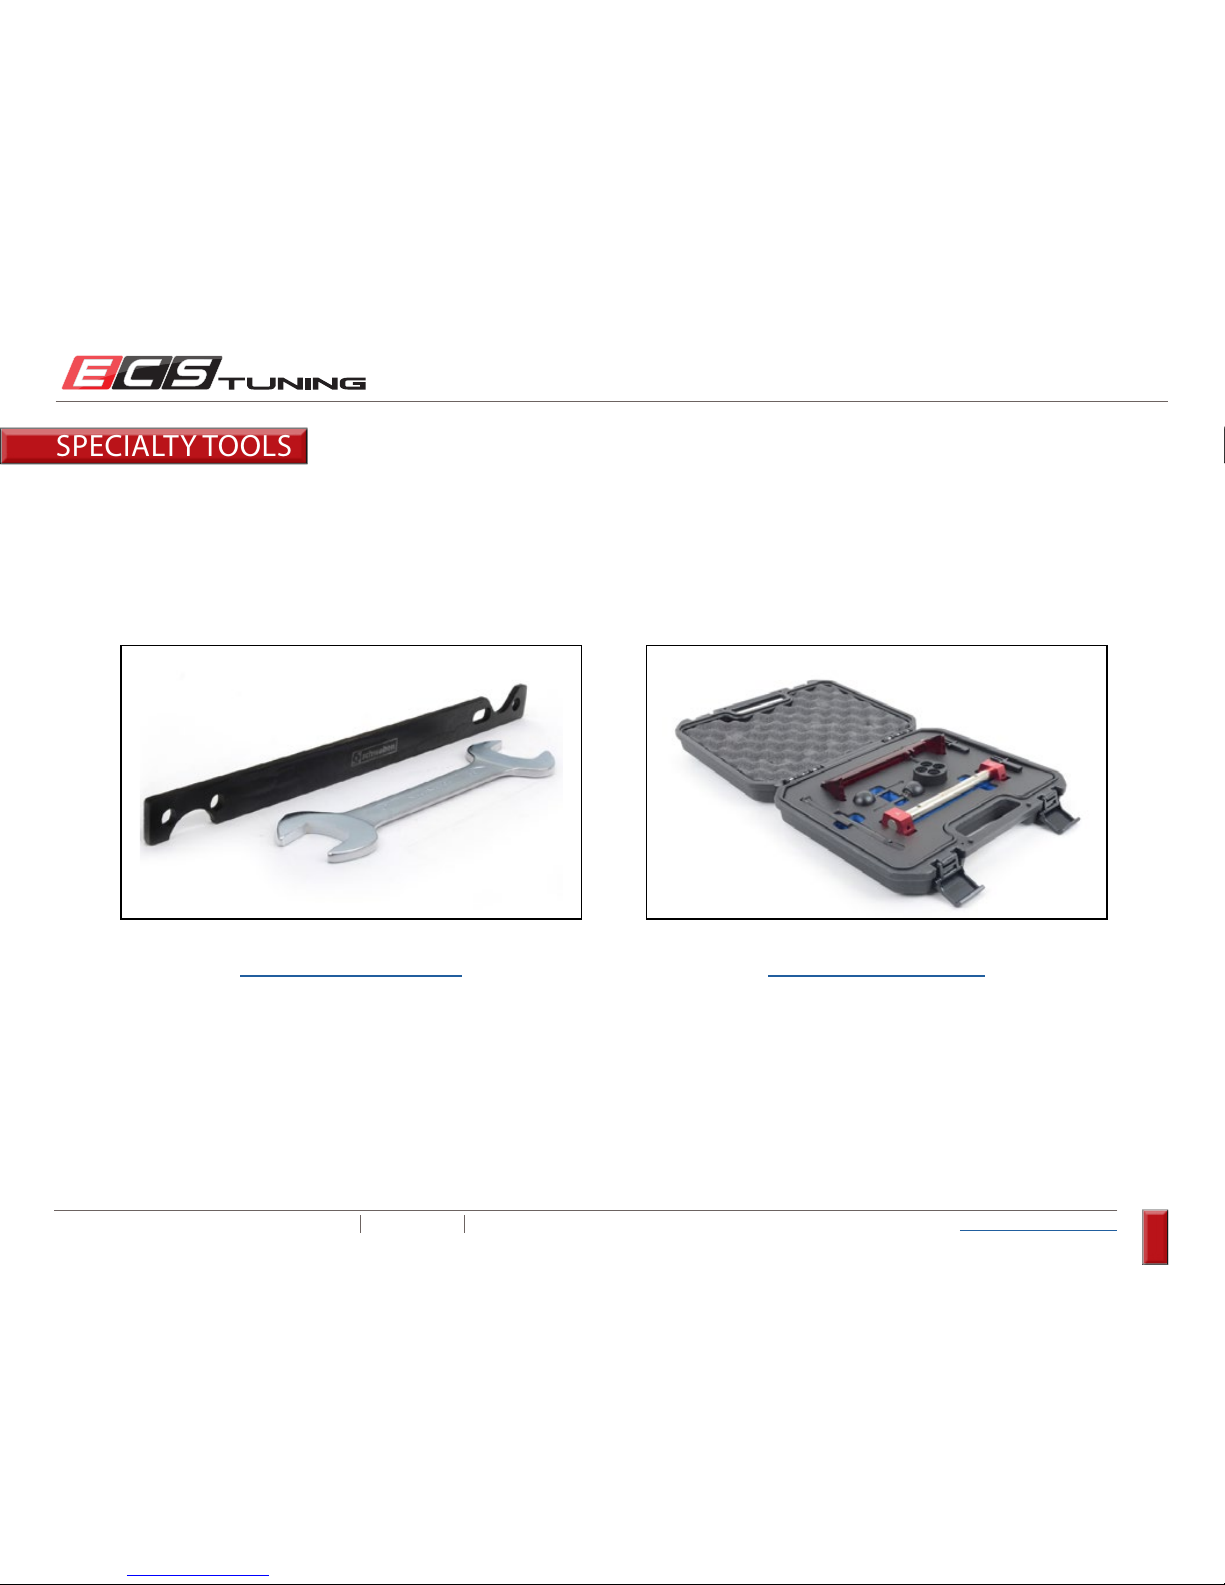
• BMW Fan Clutch Tool Set................................................................. ES#2627584
Specialty Tools
Note: The tools required for each step will be listed by the step number throughout these instructions.
REQUIRED TOOLS
• S54 Camshaft Alignment Tool Kit................................................ ES#3145744
See Page 5 for additional information on specialty tools.
ECS TUNING 1000 SEVILLE RD. WADSWORTH, OH 44281 1.800.924.5172 WWW.ECSTUNING.COM 5
BMW S54 DUAL VANOS REBUILD
®
Return to Table of Contents
SPECIALTY TOOLS
The BMW fan clutch tools are very helpful for removing the
fan/clutch. The wrench fits the large nut that holds the fan/
clutch to the water pump and the holding fixture will lock
onto two of the water pump bolts so you can hold it stationary
to break the fan loose.
The BMW S54 camshaft alignment tool set is required for
engine timing. During this repair, you will need to lock the
crankshaft in place and use the camshaft bridge and pins to
properly time the engine. For some cars, you will also need
the special crankshaft socket.
ES#2627584 ES#3145744

ECS TUNING 1000 SEVILLE RD. WADSWORTH, OH 44281 1.800.924.5172 WWW.ECSTUNING.COM 6
BMW S54 DUAL VANOS REBUILD
®
Return to Table of Contents
Standard Shop Supply Recommendations: We recommend that you have a standard inventory of automotive shop supplies before
beginning this or any automotive repair procedure. The following list outlines the basic shop supplies that we like to keep on hand. Shop
supplies with a hyperlink are available on our website.
• Hand Cleaner/Degreaser - Click Here
• Pig Mats - for protecting your garage floor and work area from spills and stains - Click Here
• Spray detailer - for rapid cleaning of anything that comes into contact with your paint such as brake fluid - Click Here
• Micro Fiber Towels - for cleaning the paint on your car - Click Here
• Latex Gloves - for the extra oily and dirty jobs - Click Here
• Medium and High Strength Loctite Thread lock compound - to prevent bolts from backing out - Click Here
• Anti-Seize Compound - to prevent seizing, galling, and corrosion of fasteners - Click Here
• Aerosol Brake/Parts Cleaner - for cleaning and degreasing parts
• Shop Rags - used for wiping hands, tools, and parts
• Penetrating oil - for helping to free rusted or stuck bolts and nuts
• Mechanics wire - for securing components out of the way
• Silicone spray lube - for rubber components such as exhaust hangers
• Paint Marker - for marking installation positions or bolts during a torquing sequence
• Plastic Wire Ties/Zip Ties - for routing and securing wiring harnesses or vacuum hoses
• Electrical tape - for wrapping wiring harnesses or temporary securing of small components
SHOP SUPPLIES AND MATERIALS
Note that both medium and high strength thread locking compounds are required for the S54 Dual Vanos repair.

ECS TUNING 1000 SEVILLE RD. WADSWORTH, OH 44281 1.800.924.5172 WWW.ECSTUNING.COM 7
BMW S54 DUAL VANOS REBUILD
®
Return to Table of Contents
• RH refers to the passenger side of the vehicle.
• LH refers to the driver side of the vehicle.
• Always use the proper torque specifications.
• If applicable to this installation, torque specifications will be listed throughout the document and at the end as well.
• Please read all of these instructions and familiarize yourself with the complete process BEFORE you begin.
• Park your car in a safe, well lit, level area.
• Shut the engine off and remove the key from the ignition switch.
• Make sure any remote start devices are properly disabled.
• ALWAYS wear safety glasses.
• Make sure the parking brake is applied until the vehicle is safely lifted and supported.
• If using an automotive lift, be sure and utilize the factory specied lift points. Lifting a vehicle in an incorrect location can cause damage to the
• suspension/running gear.
• When lifting a vehicle using a jack, always utilize the factory specified lift points. Lifting a vehicle in an incorrect location can cause
• damage to the suspension/running gear. ALWAYS support the vehicle with jack stands.
• ALWAYS read and follow all safety information and warnings for the equipment you are using.
ECS Tuning cares about your health and safety. Please read the following safety information. This information pertains to automotive service
in general, and while it may not pertain to every job you do, please remember and share these important safety tips.
Never get underneath a vehicle that is supported only by a jack. Always make
sure that the vehicle is securely supported on jack stands.
INSTALLATION NOTES
PREPARATION AND SAFETY INFORMATION

ECS TUNING 1000 SEVILLE RD. WADSWORTH, OH 44281 1.800.924.5172 WWW.ECSTUNING.COM 8
BMW S54 DUAL VANOS REBUILD
®
Return to Table of Contents
1a: Initial component removal and Vanos system access ...............................................................................................................................Page 9
Section 1: Getting Started
2a: Removing the valve block .................................................................................................................................................................................Pa ge 11
Section 2: Valve Block Service
2b: Cleaning and solenoid/valve operation ........................................................................................................................................................ Page 13
2c: Seal and filter replacement...............................................................................................................................................................................Page 15
3a: Piston housing removal .....................................................................................................................................................................................Page 18
Section 3: Piston Housing Service
3b: Oil system service................................................................................................................................................................................................Page 27
3c: Intake piston seal replacement........................................................................................................................................................................ Page 39
3d: Exhaust piston seal replacement..................................................................................................................................................................... Page 49
4b: Vanos hub service................................................................................................................................................................................................ Page 71
Section 4: Anti Rattle Repairs
4d: Upper timing chain guide replacement ........................................................................................................................................................ Page 79
5a: Reassembly............................................................................................................................................................................................................Page 85
Section 5: Reassembly
VANOS REPAIR PROCEDURES
4a: Vanos transfer gear service...............................................................................................................................................................................Page 56
4c: Cam sprocket service..........................................................................................................................................................................................Page 76

ECS TUNING 1000 SEVILLE RD. WADSWORTH, OH 44281 1.800.924.5172 WWW.ECSTUNING.COM 9
BMW S54 DUAL VANOS REBUILD
®
Return to Vanos Repair Table of Contents
SECTION 1A: VANOS SYSTEM ACCESS
Component removal to get down to the Vanos system is pretty basic, and we’re betting if you’re going to tackle this job you don’t need us to step
you through the easy stuff, but we’ll give you a quick run-down anyhow. The following items will need to be removed:
2. Radiator Fan and Shroud
1. Air Box
3. Cabin Filter Housing
4. Suspension Cross Brace
5. Engine Top Cover, Valve
Cover, and Ignition Coils
1
3
5
2
4
The Vanos system is located
on the front of the engine at
the top.

ECS TUNING 1000 SEVILLE RD. WADSWORTH, OH 44281 1.800.924.5172 WWW.ECSTUNING.COM 10
BMW S54 DUAL VANOS REBUILD
®
Return to Vanos Repair Table of Contents
With all the preliminary components removed, you’ll have plenty of room to access the Vanos system, timing chains, and camshafts. As we
mentioned in the introduction, this is a perfect time to perform a valve adjustment.
Vanos Transfer
Gear Set and
Vanos Hub
(Intake)
Vanos Transfer
Gear Set and
Vanos Hub
(Exhaust)
Vanos Valve Block w/Coil Pack
Vanos Piston
Housing
Pressure
Limiting
Valve
SECTION 1A: VANOS SYSTEM ACCESS
- End of Section 1a -

ECS TUNING 1000 SEVILLE RD. WADSWORTH, OH 44281 1.800.924.5172 WWW.ECSTUNING.COM 11
BMW S54 DUAL VANOS REBUILD
®
Return to Vanos Repair Table of Contents
Step 1:
Step 2:
Disconnect the electrical plug from the coil pack. It’s located on the lower
left side, and should unplug pretty easily by hand.
Place shop rags underneath the valve block to protect the coolant hose
and belts from oil that you’ll lose when you loosen the bolts.
SECTION 2A: REMOVING THE VALVE BLOCK
There may be a cable tie near the plug that secures the harness in place. If
so, remove it by cutting it off.

ECS TUNING 1000 SEVILLE RD. WADSWORTH, OH 44281 1.800.924.5172 WWW.ECSTUNING.COM 12
BMW S54 DUAL VANOS REBUILD
®
Return to Vanos Repair Table of Contents
Step 3:
Step 4:
22mm Wrench
5mm Allen (Hex Bit)
Loosen the pressure limiter in the valve block. Do not remove it at this
time, just break it loose.
Remove the five mounting bolts, then pull the valve block out from
underneath the piston housing and remove it along with the sealing plate.
SECTION 2A: REMOVING THE VALVE BLOCK
- End of Section 2a -
ECS TUNING 1000 SEVILLE RD. WADSWORTH, OH 44281 1.800.924.5172 WWW.ECSTUNING.COM 13
BMW S54 DUAL VANOS REBUILD
®
Return to Vanos Repair Table of Contents
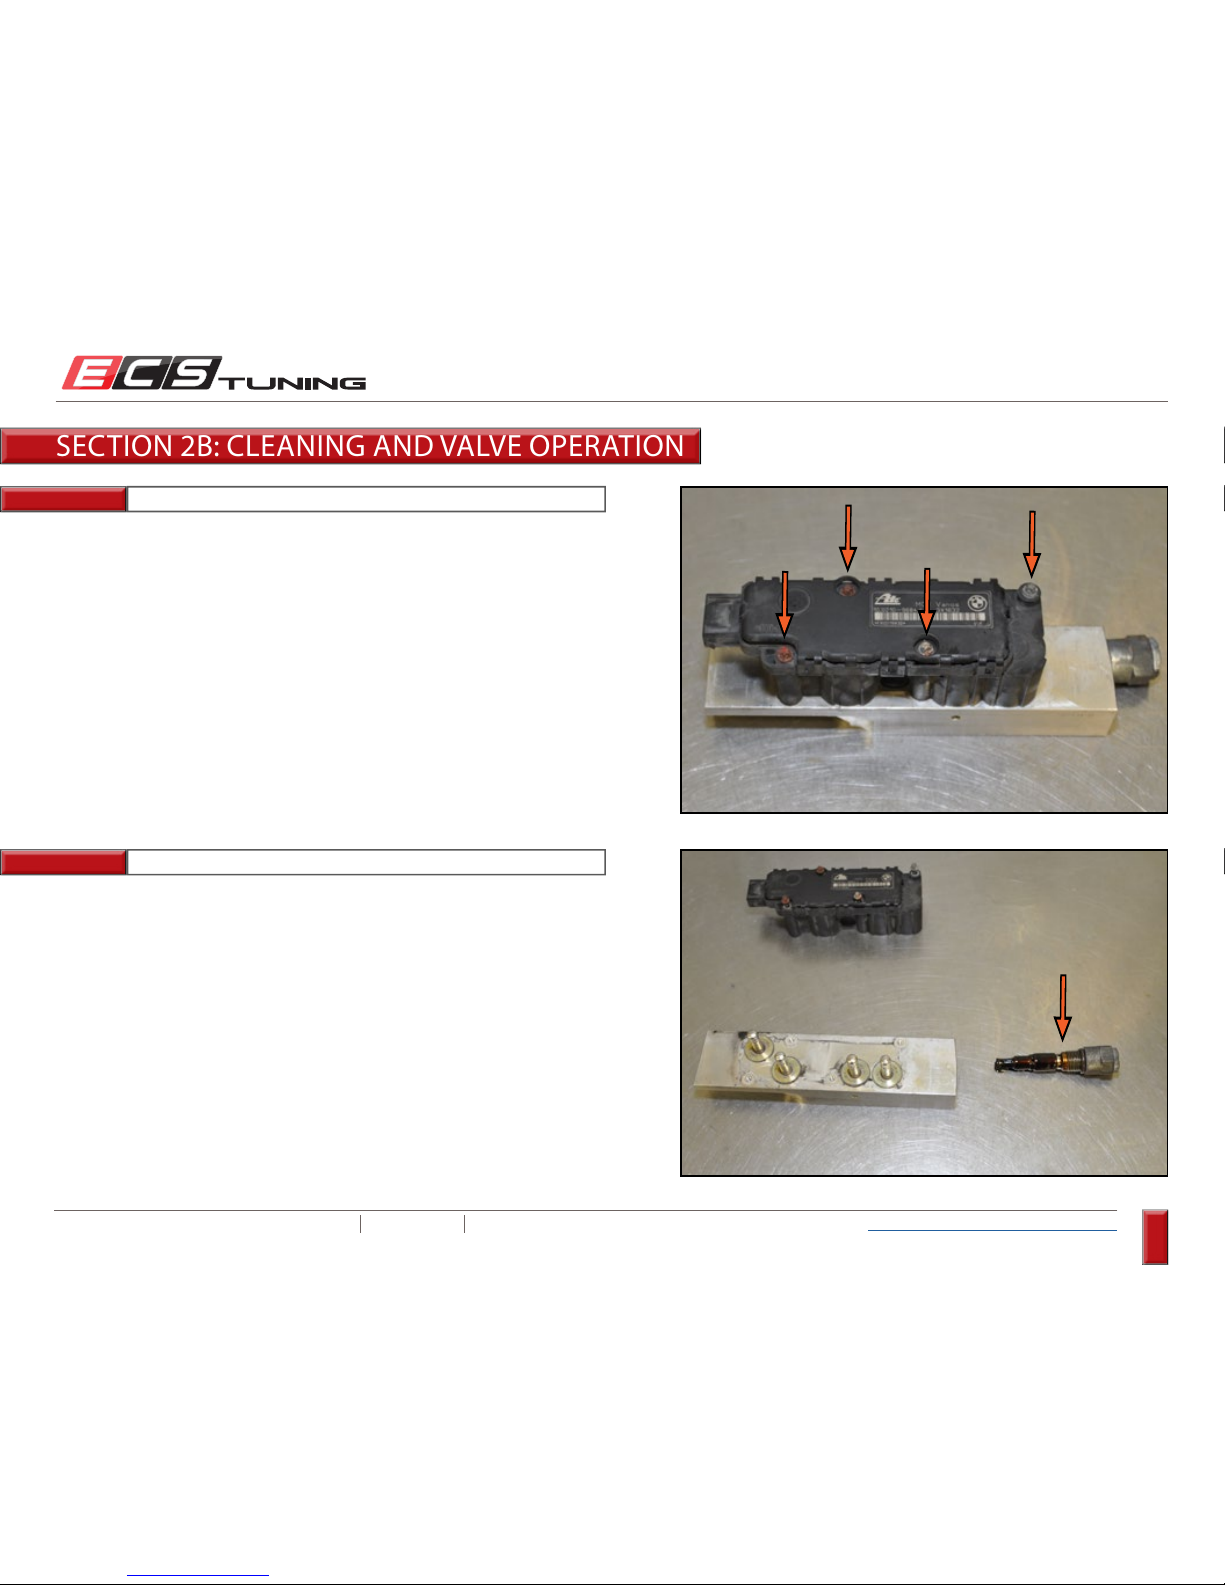
Step 1:
Step 2:
E5 Torx Socket
Remove the four coil pack mounting screws and lift the coil pack off of the
valve block.
Unthread and remove the pressure limiter from the valve block (you
should have loosened this on page 12).
SECTION 2B: CLEANING AND VALVE OPERATION

ECS TUNING 1000 SEVILLE RD. WADSWORTH, OH 44281 1.800.924.5172 WWW.ECSTUNING.COM 14
BMW S54 DUAL VANOS REBUILD
®
Return to Vanos Repair Table of Contents
Step 3:
Step 4:
Strong Magnet
Clean the outside of the valve block thoroughly. Next, place a magnet
onto the end of each solenoid plunger. We are using a large drain plug
magnet here. Listen very closely as you place the magnet onto the
plunger, then remove it. You will hear a faint “click” as the valve opens
and closes.
One at a time, place the magnet on top of each plunger and confirm that
you hear the “click” of the valve opening. With the valve open, spray
brake cleaner into the corresponding hole underneath to flush out any
debris.
SECTION 2B: CLEANING AND VALVE OPERATION
- End of Section 2b -
ECS TUNING 1000 SEVILLE RD. WADSWORTH, OH 44281 1.800.924.5172 WWW.ECSTUNING.COM 15
BMW S54 DUAL VANOS REBUILD
®
Return to Vanos Repair Table of Contents
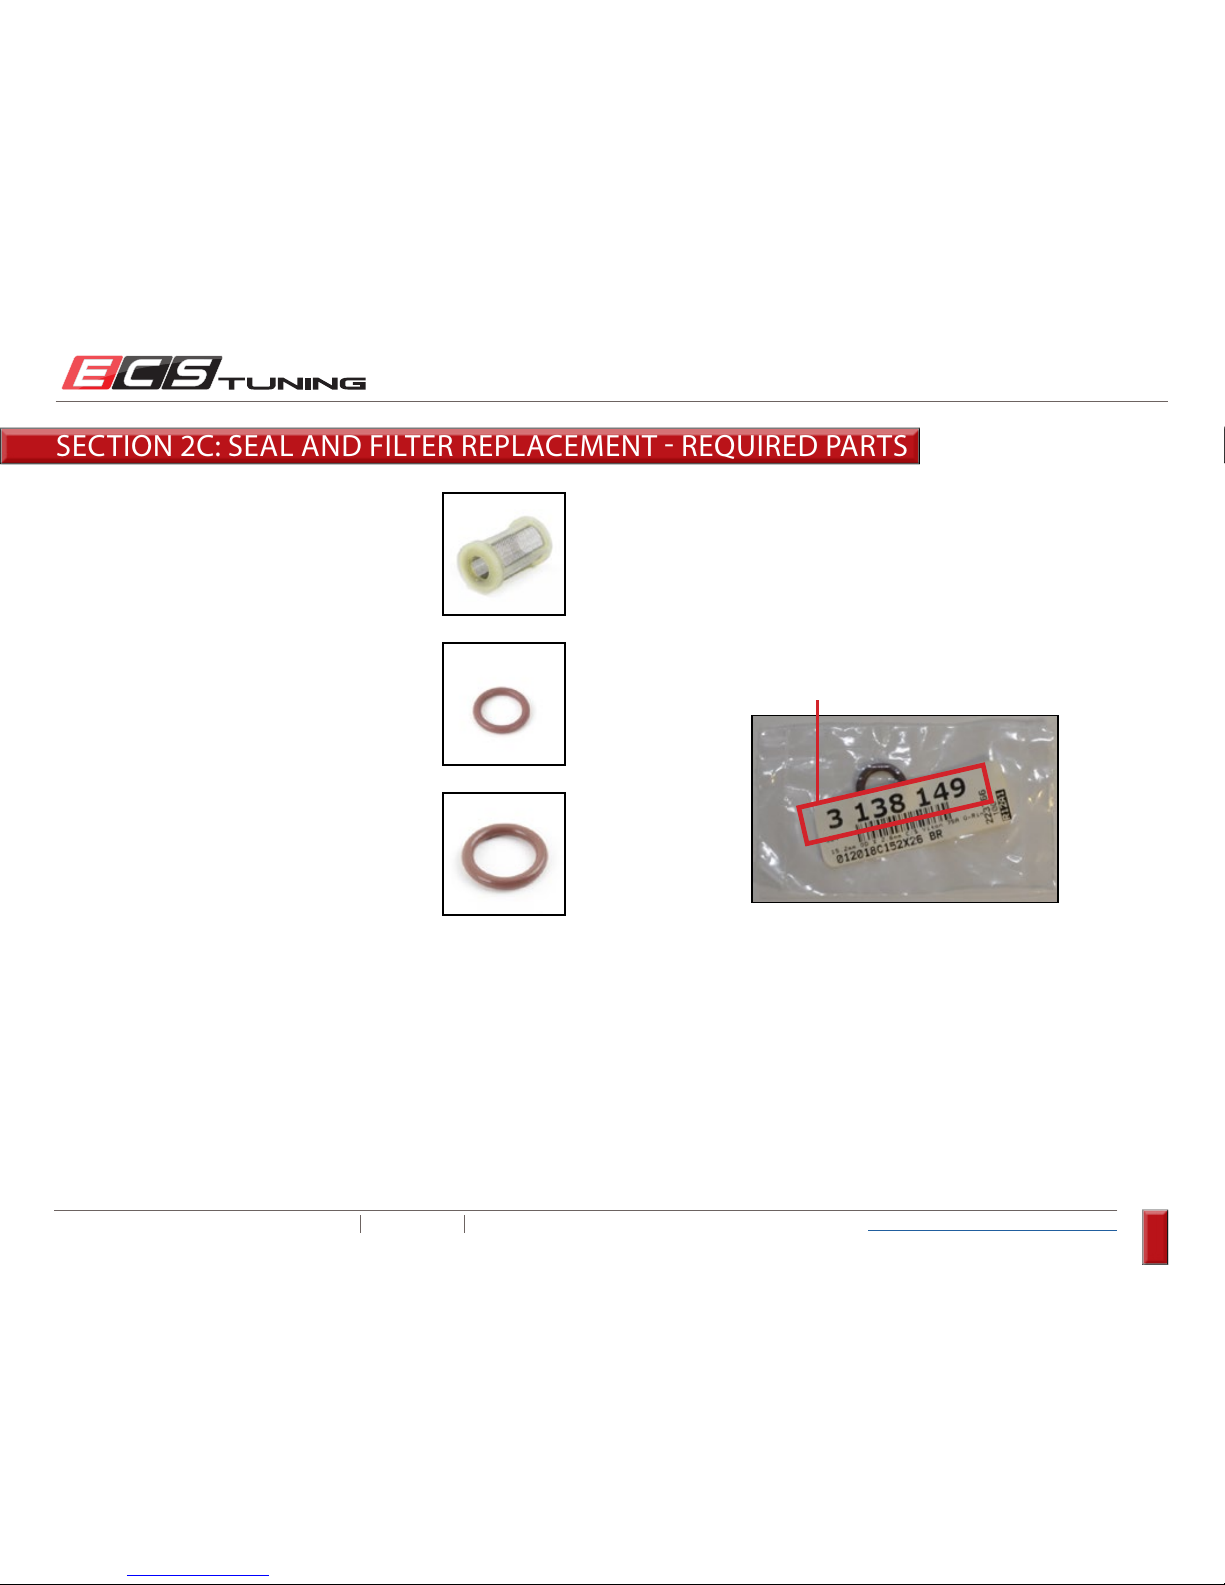
ES#23069
Description...............Vanos Filter
Location....................Pressure Limiting Valve
Quantity....................1
ES#3138145
Description...............14mm OD x 2.0mm o-Ring
Location....................Pressure Limiting Valve Small
Quantity....................1
ES#3138146
Description...............14.5mm ID x 3mm o-Ring
Location....................Pressure Limiting Valve Large
Quantity....................1
All o-rings and Teflon rings will be sealed in individual poly bags
- do not unpack them until you are ready to install them. Prior to
use, always positively identify each seal by the ES# on the label.
ES#
NOTE:
SECTION 2C: SEAL AND FILTER REPLACEMENT REQUIRED PARTS

ECS TUNING 1000 SEVILLE RD. WADSWORTH, OH 44281 1.800.924.5172 WWW.ECSTUNING.COM 16
BMW S54 DUAL VANOS REBUILD
®
Return to Vanos Repair Table of Contents
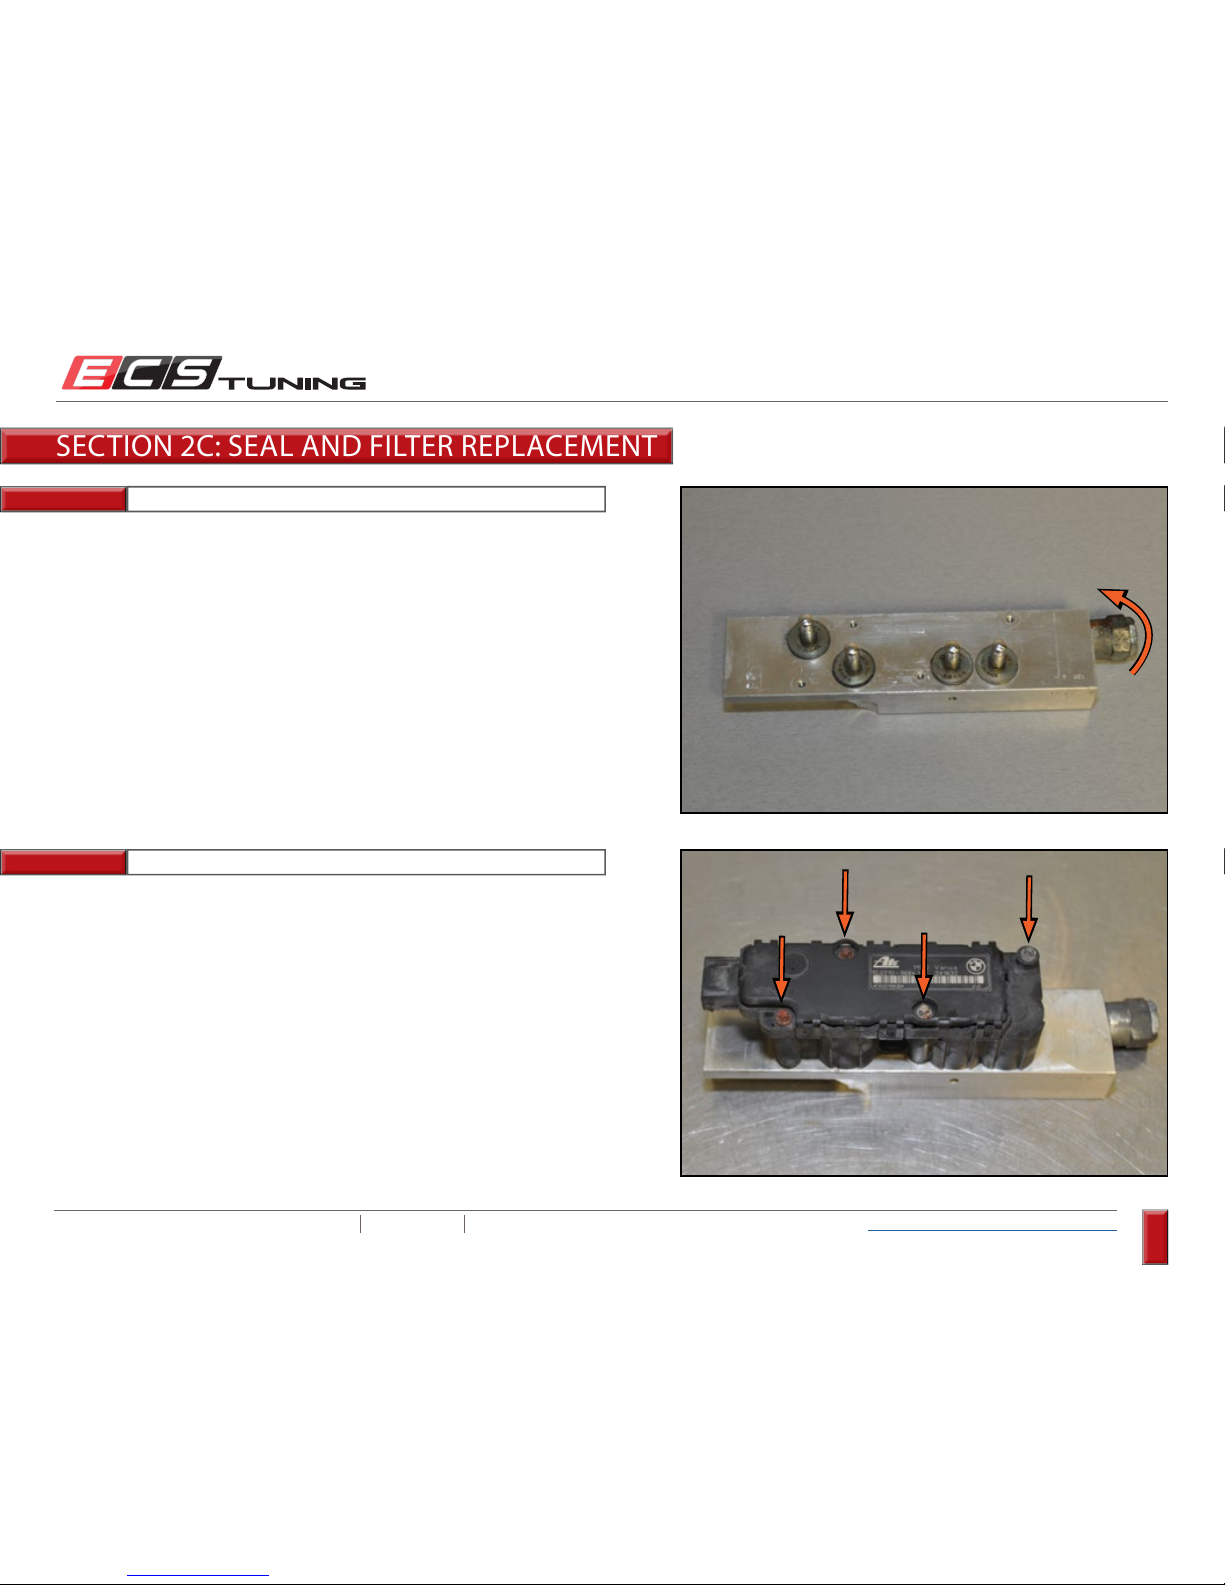
Step 1:
Step 2:
Remove the large o-ring, small o-ring, and the screen from the pressure
limiter, using the following guidelines:
Install the new large and small o-rings, and the new screen onto the
pressure limiter.
SECTION 2C: SEAL AND FILTER REPLACEMENT
1) Pull the screen off the end of the limiter using a pair of pliers.
Screen Small
o-ring Large
o-ring
2) Carefully cut the small o-ring off using an exacto knife.
3) Remove the large o-ring.
Be careful not to cut the nylon washer when removing the
small o-ring. You may also notice a split in the washer. This is
normal. The washer is split for the purpose of installation.
ECS TUNING 1000 SEVILLE RD. WADSWORTH, OH 44281 1.800.924.5172 WWW.ECSTUNING.COM 17
BMW S54 DUAL VANOS REBUILD
®
Return to Vanos Repair Table of Contents
Step 3:
Step 4: E5 Torx Socket, 1/4”Torque Wrench
Lubricate the o-rings with clean engine oil, then thread the pressure
limiter back into the valve block. You do not have to tighten it at this
point, you’ll tighten it later after it is installed.
Reinstall the coil pack and torque the mounting screws in an even manner
to 4 Nm (3 Ft-lbs).
SECTION 2C: SEAL AND FILTER REPLACEMENT
You’re all done with the valve block! You can set it aside for now
until it’s time for reassembly.
- End of Section 2c -

ECS TUNING 1000 SEVILLE RD. WADSWORTH, OH 44281 1.800.924.5172 WWW.ECSTUNING.COM 18
BMW S54 DUAL VANOS REBUILD
®
Return to Vanos Repair Table of Contents
Step 1:
Step 2:
Remove the spark plugs. You’re going to have to rotate the engine over a
few times during this repair, and this will make it much easier.
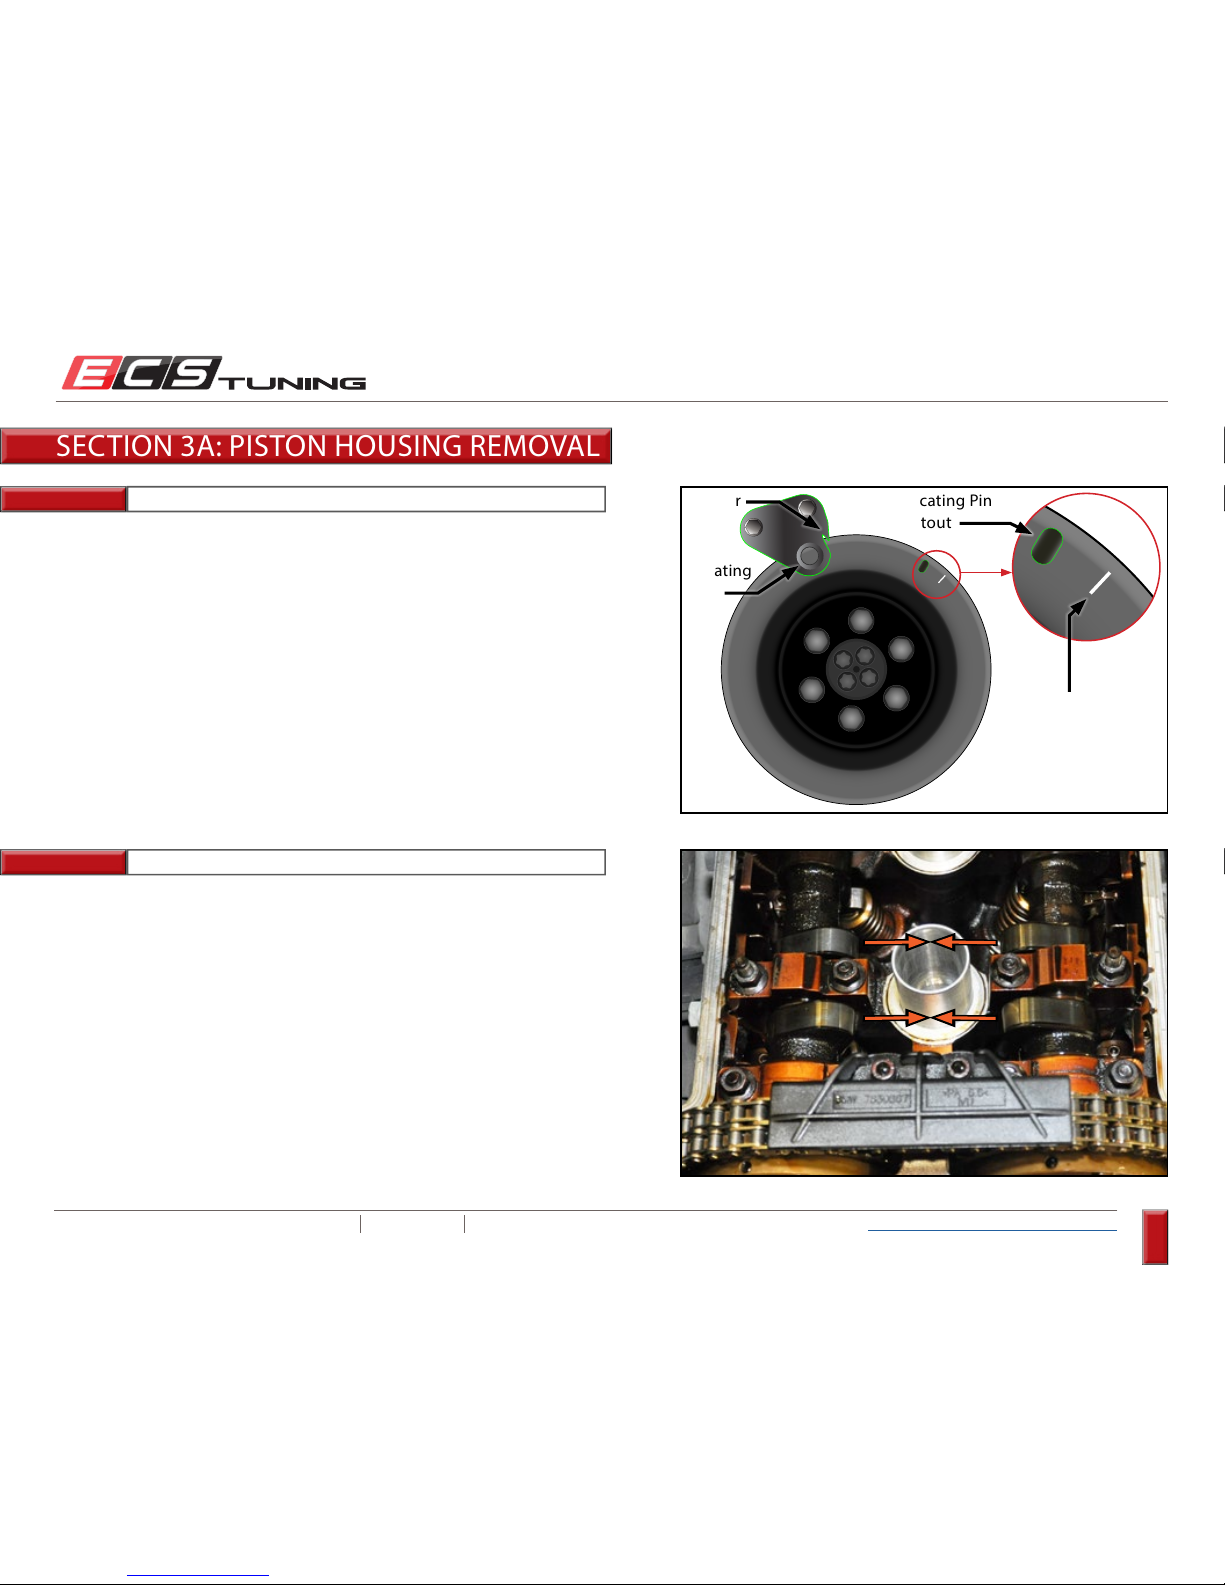
Inspect the front of the crankshaft pulley (you may need to use a mirror).
You will see either a large hex or four Torx bolts. The large hex will require
a 32mm socket, and if equipped with the four Torx bolts, you will need the
special socket that is included in the S54 camshaft alignment tool kit.
O T
SECTION 3A: PISTON HOUSING REMOVAL
O T
Requires 32mm
Socket
ECS TUNING 1000 SEVILLE RD. WADSWORTH, OH 44281 1.800.924.5172 WWW.ECSTUNING.COM 19
BMW S54 DUAL VANOS REBUILD
®
Return to Vanos Repair Table of Contents
Step 3:
Step 4: 1/2” Drive Ratchet
The crankshaft pulley has a line that indicates top dead center and a small
recessed cutout for the crankshaft locating pin. Locate these marks and
also note that there is a fixed pointer that is located in approximately
the 11 o’clock position. The pointer also has a hole in it to accept the
crankshaft locating pin.
Using a long ratchet and the socket needed for your engine (step 2), rotate
the engine in a clockwise direction until the intake and exhaust cam lobes
on cylinder #1 are pointing together in an approximate 45 degree angle.
O T
O T
TDC indicating
mark
Locating Pin
Cutout
When the cylinder #1 cam lobes are pointing at each other, this indicates
that the engine is at (approximately) TDC.
Pointer
Locating
Pin
SECTION 3A: PISTON HOUSING REMOVAL

ECS TUNING 1000 SEVILLE RD. WADSWORTH, OH 44281 1.800.924.5172 WWW.ECSTUNING.COM 20
BMW S54 DUAL VANOS REBUILD
®
Return to Vanos Repair Table of Contents
Step 5:
Step 6:
Make fine adjustments as needed so the TDC pointer is lined up with the
TDC indicating mark on the crank pulley. In this position, the locating pin
cutout will be centered perfectly in the hole in the pointer.
Insert the crankshaft locking pin into the hole in the pointer and into the
crankshaft pulley. Make sure that the end of the pin is fully seated into the
crank pulley.
O T
O T
O T
O T
O T
TDC Pointer
Locating Pin
Cutout
It is OK to rotate the crankshaft counter clockwise in order to line up the
marks.
SECTION 3A: PISTON HOUSING REMOVAL
Table of contents
Other ECS Tuning Automobile Accessories manuals


