eeese Hugo User manual

User manual
Dehumidier Hugo
Art. 2556 & 2557
Thank you for choosing this product.
Please read this instruction manual before using it.
MV-2556-2557-08-2022 eeese-aircare.com © All rights eeese air care aps 85
UK
Table of Contents
1. Safety Instructions............................................................................................................................ 86
2. Parts List ................................................................................................................................................. 88
3. Continuous Drainage ........................................................................................................................ 89
4. Prior to Operation................................................................................................................................ 90
5. Operation Instructions ..................................................................................................................... 90
6. Cleaning the dehumidier .............................................................................................................. 95
7. Cleaning the Air Pre-Filter Frame................................................................................................ 95
8 Storage..................................................................................................................................................... 96
9. Trouble Shooting................................................................................................................................. 96
10. Technical Specications ................................................................................................................. 98
11. Service...................................................................................................................................................... 98
12. Warranty .................................................................................................................................................. 99
13. Responsible Disposal........................................................................................................................ 100
14. Warning on Refrigerant R290...................................................................................................... 100
15. Connection to WIFI............................................................................................................................. 101
Please read the user manual before any use, refer to the
corresponding section in this user manual. Save it for future
reference. We reserve the right for any error in text or images
and any necessary changes made to technical data.
Recycle unwanted materials instead of disposing of them.
All appliances and packaging should be sorted and tendered
at a regional recycling centre and be processed in an
ecological manner.
The product conforms to the applicable European and
other directives.

86 MV-2556-2557-08-2022 eeese-aircare.com © All rights eeese air care aps
UK
1. Safety Instructions
Warning
This appliance is intended for use in a domestic environment only. Any other use
is not recommended by the manufacturer and may cause re, electrical shocks
or other person injury and property damage. Never try to dismantle or repair the
machine yourself. The appliance shall be installed in accordance with national
wiring regulations. The machine is designed A-weighted sound pressure level below
70dB. Check the voltage and make sure it meets the technical specication of the
machine. This machine can be used by children aged from 8 years and above and
persons with reduced physical, sensory or mental capabilities or lack of experience
and knowledge if they have been given supervision or instruction concerning use of
the appliance in a safe way and understand the hazards involved.
Cautions Wet hands not allowed Warning
Power Cord
Do not pull the
power cord in
order to unplug
the device from
the socket.
Do not use
the appliance
in overloaded
extension cord.
Do not put any
heavy objects
on the power
cord in order
to avoid safety
hazard.
Do not use the
appliance if its
socket holes
cannot rmly
hold a plug.
Do not attempt
to change the
power cord,
contact the
authorized
service center
for repair.
Do not touch
the plug with
wet hands in
order to avoid
electric shock.

MV-2556-2557-08-2022 eeese-aircare.com © All rights eeese air care aps 87
UK
Unplug the
product im-
mediately if it
emits strange
noises, odours
or smoke. Please
pull out the plug
during lightning
storms. Unplug
the product
when it is not
in use.
The socket has
to be earthed
and appropriate-
ly secured.
Placement
Do not put am-
mable and ex-
plosive objects
around the appli-
ance in order to
avoid re.
Do not use
the appliance
in swimming
pool or similar
facilities in order
to avoid safety
hazard.
Do not use the
appliance in a
draughty place
or next to a radi-
ator or heating
appliance.
Place the appli-
ance on a stable,
at surface. The
machine must
always stand
upright.
During Use
Before moving
the dehumidier
please turn o
the power,
unplug the
power cord and
make sure that
the water tank
is empty
Do not pour
water into the
appliance in
order to avoid
malfunction.
Children shall
not play with
the machine.
Never insert for-
eign objects into
the machine.
Do not put any
heavy objects
on the appliance
in order to avoid
malfunction.
Never sit on the
product.

88 MV-2556-2557-08-2022 eeese-aircare.com © All rights eeese air care aps
UK
Do not push
the appliance
over or let the
appliance suer
strong impact
in order to avoid
malfunction.
The appliance
must not be
covered when
being used.
Do not put
hands on the air
outlet in order
to avoid injury or
malfunction.
Please install
the air lter and
make sure it
is clean before
using it.
2. Parts List
Components
1. Front casing
2. Control panel
3. Air outlet
4. Handle
5. Pre-lter
6. Continuous drainage outlet
7. Water tank
8. Power cord
9. HEPA lter
10. Drain hose
Control panel
11. Mode & Ionizer Button
12. Auto Button
13. Fan Speed & WiFi Button
14. Timer & Child Lock Button
15. Humidity Setting Button
16. Power Button
2
1
34
5
6
7
8
9
10
1211 1413 15 16

MV-2556-2557-08-2022 eeese-aircare.com © All rights eeese air care aps 89
UK
Drainage
3. Continuous Drainage
Continuous drainage option allows easy removal of collected water instead of manually
emptying from the water tank when the environment is very high humidity.
1. Remove the rubber plug covering the drain hose connection.
2. Connect a suitable drain hose (14mm inner diameter) through the drainage outlet.
Ensure that the hose is secure and tight to prevent leakage.
3. Always make sure the drainage hose is not blocked or obstructed to maintain
a smooth ow.
Please always make sure the pipe is going downhill, and is not blocked or kinked.
Timer Indicator
Ionizer Indicator
Air Purifying Indicator
Sleep Indicator
Laundry Drying Indicator
Auto Indicator
Low Fan Speed Indicator
High Fan Speed Indicator
WiFi Indicator
Childlock Indicator
Defrosting Indicator
Tank Full Indicator
Rubber Plug Drain Hose
90 MV-2556-2557-08-2022 eeese-aircare.com © All rights eeese air care aps
UK
4. Prior to Operation
• Check the dehumidier for any transport damage. In case of damage, you should
contact our eeese service line immediately.
• Place the dehumidier in an upright position on a stable, at surface.
• Make sure that the mains lead is easily accessible and is not damaged by sharp
edges or is crushed in any way during use.
• Ensure the dehumidier is at a safe distance at least 50 cm away from a wall
or furniture and has air space on all sides.
• The machine must stand upright for at least 1 hour before it is used for the rst time
• If any part of your house suers from severe humidity, the dehumidier can be
placed there rst and then moved to another part of the house later.
• Ensure the supply power is in correspondence with the value on the nameplate
and power outlet needs to be grounded.
• Ensure the water tank is correctly tted before the dehumidier can be switched on.
• If the dehumidier is turned o and then turned back on again immediately, it will
take approximately 3 minutes to reach full power (compressor back to work).
• If the dehumidier is switched o by a power cut, it will automatically switch back
on once the power is restored.
• The dehumidier works best at normal room temperature, its eiciency is reduced
if the ambient temperature falls to below 15°C.
• Turn on the power and run the machine as per instructions below.
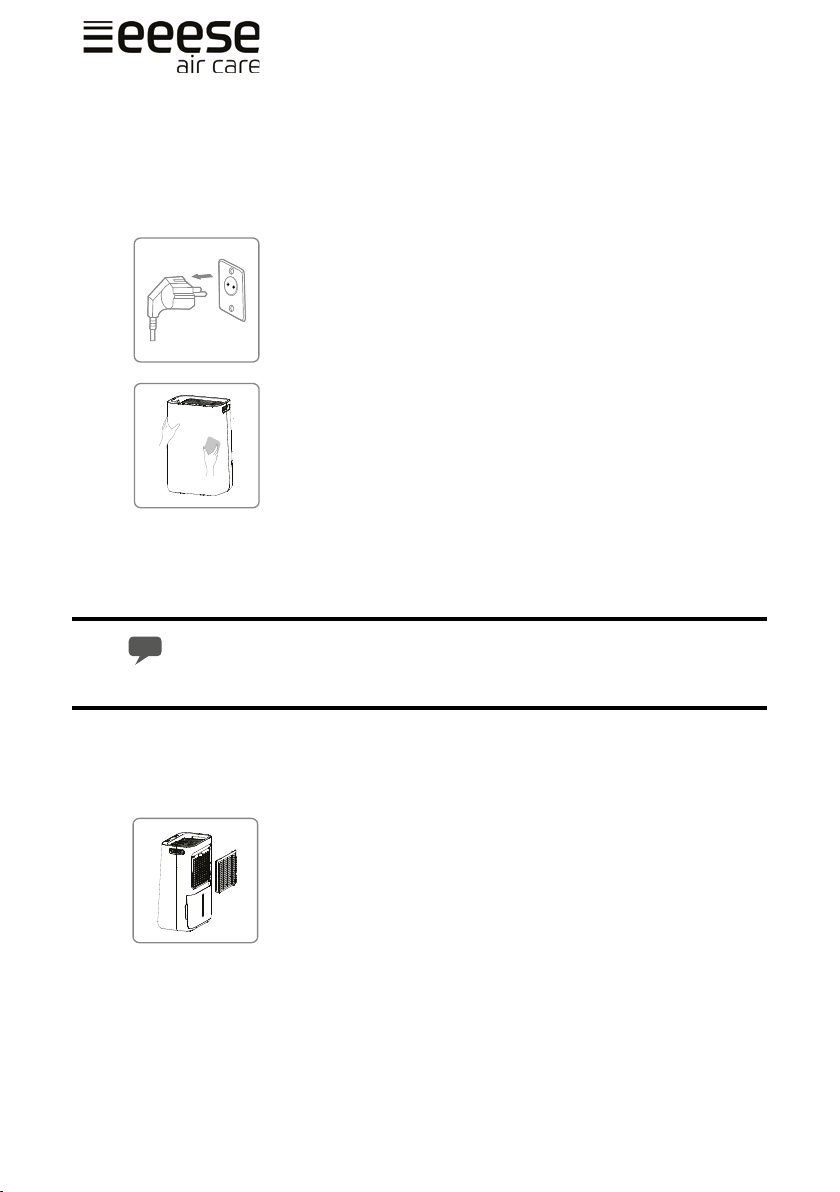
5. Operation Instructions
Switch On / Switch O The Unit
1. Connect the mains lead to socket.
2. Press Power button (A) once to turn on the unit. By default, it runs
on Manual Dehumidifying Mode.
3. Press Power button once again to turn o the unit.
A
MV-2556-2557-08-2022 eeese-aircare.com © All rights eeese air care aps 91
UK
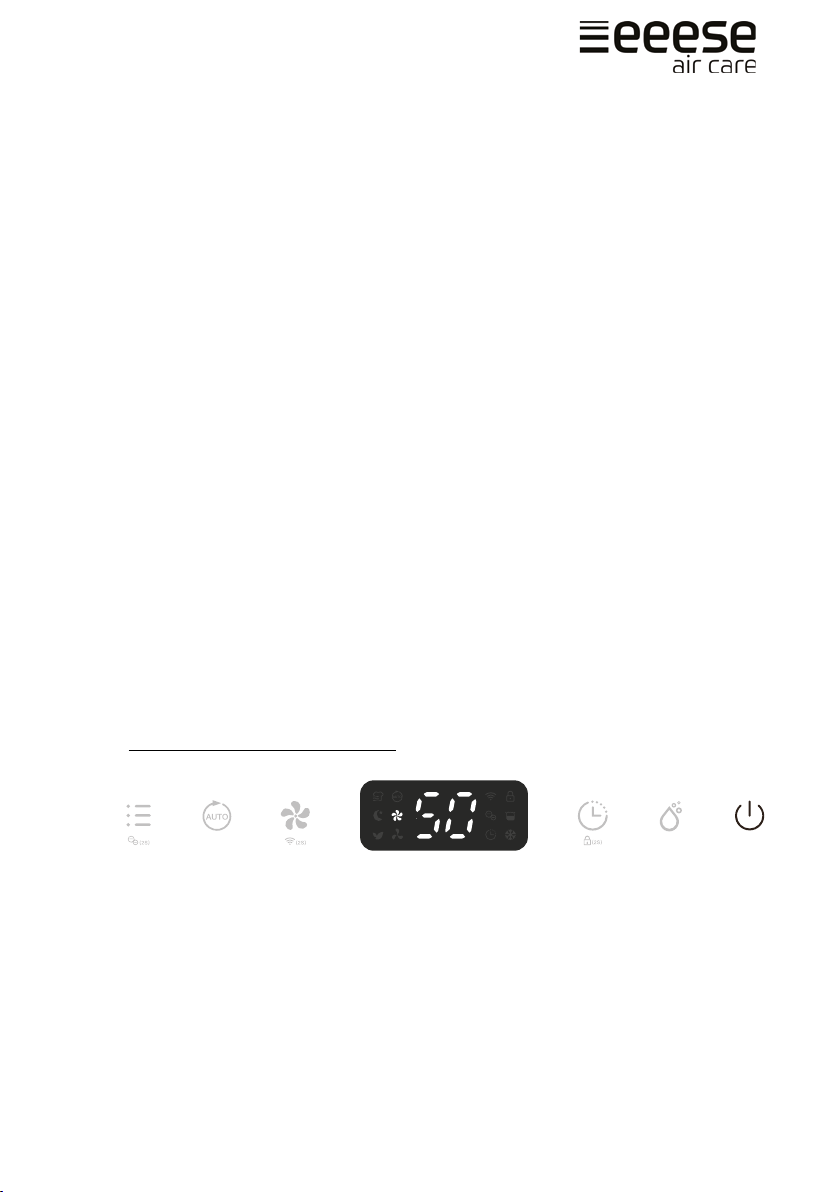
Humidity Setting Control
Press the Humidity setting button (A) to select the desired maximum level of humidity
between the following CO-30%-35%-40%-45%-50%-55%-60%-65%-70%-75%-80%-CO. CO
stands for continuous non-stop dehumidication. If you select one of the percentages,
then the unit will run until that level is reached. And if the humidity is below the selected
percentage, the unit will not run.
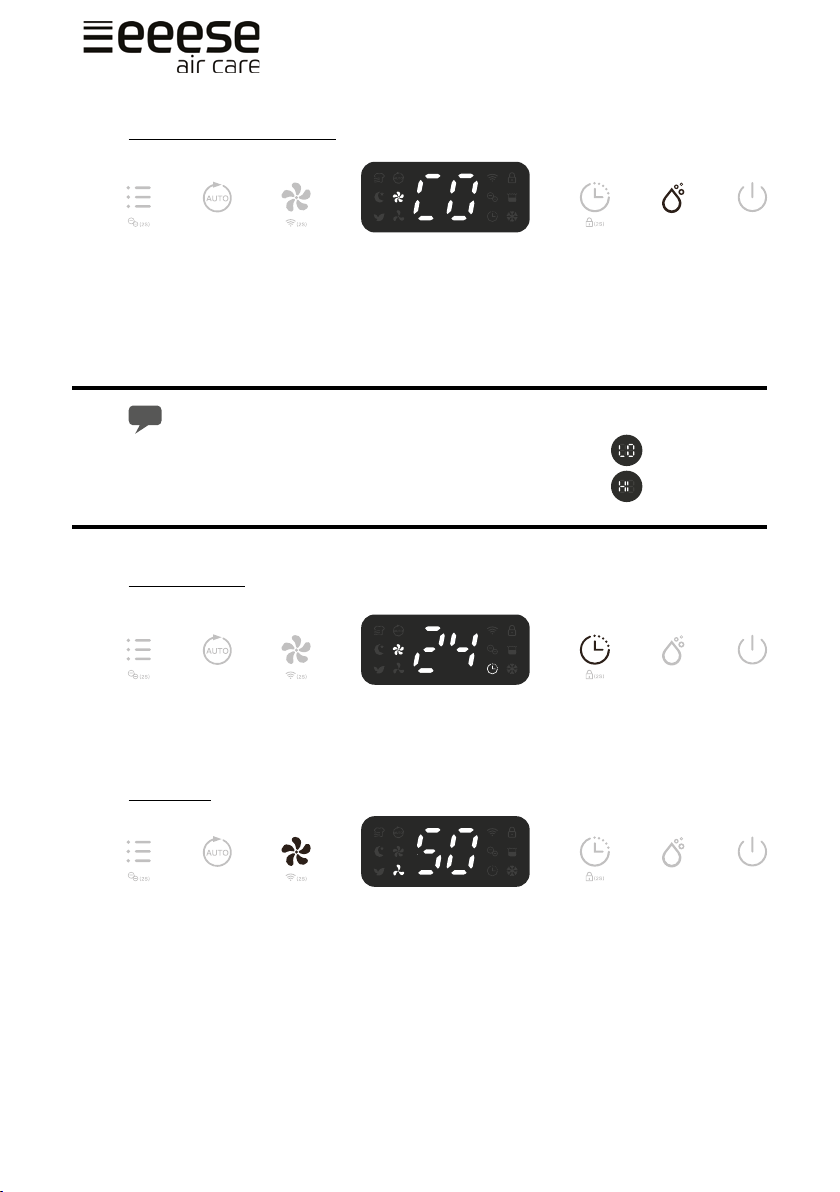
If the ambient humidity is lower than 30% the display will show LO
If the ambient humidity is higher than 90% the display will show HI
Timer Setting
When the unit is turned on, press the Timer button (A) and select between 1-24hr to
select your preferred timer duration before automatic shuto setting. The timer indicator
will be activated on the display.
Fan speed
During normal dehumidication, you can select high or low fan speed (A). This will aect
how quickly dehumidies.
A
A
A

92 MV-2556-2557-08-2022 eeese-aircare.com © All rights eeese air care aps
UK
WIFI Function
Press the Fan Speed button (A) for 2 seconds to activate the WIFI function and enter into
the distribution network mode. During the network conguration, the WIFI indicator (B)
ashes and after the WIFI is connected, the icon is on.
See below section Connection to WIFI for detalied settings.
Press the Fan Speed button for 2 seconds and you can disconnect to the WIFI.
Auto Dehumidication
Press the Auto button (A) to enter into the Auto Dehumidifying Mode, the unit runs auto-
matically accordance to the ambient humidity detected below.
Ambient RH% detected Compressor Fan Speed Level
RH%>65% Working High
55%≤RH%≤65% Working Low
RH%<55% Stops Working Low
RH = Relative humidity
Sleep Mode
Press the Mode button (A) until the Sleep mode indicator (B) shows on the display. 10
seconds later, all indicators will be o. At Sleep mode, it operates on low fan speed.
A
B
A
AB

MV-2556-2557-08-2022 eeese-aircare.com © All rights eeese air care aps 93
UK
At Sleep mode, press any button to wake up the unit and then you can operate
the unit as usual.
Air Purifying Mode
Press the Mode Button (A) until the Air Purier and Ionizer indicator (B) shows on the
display (B). The unit works with high fan speed without dehumidifying, it will only purify
the air.
The ionizer function can be turned o by pressing the Mode button for 2 seconds.
Built in Ionizer
The ionizer creates negative ions that attach to positive charged molecules such as dust,
bacteria, pollen, smoke, and other allergens. These molecules attach to each other into
bigger molecules that cannot oat in the air and falls to the ground.
Press the Mode button (A) for 2 seconds to activate the ionizer function. The ionizer
indicator will show on the display once activated (B). Inactivate it by pressing the Mode
button for 2 seconds again. Note that the ionizer indicator disappears.
If the fan stops working, the ionizer function will automatically be deactivated.
AB B
AB

94 MV-2556-2557-08-2022 eeese-aircare.com © All rights eeese air care aps
UK
Safety Childlock Function
To prevent the mishandling by young children, the unit is equipped with a childlock func-
tion. Press Timer button (A) for 2 seconds to activate or deactivate the childlock function.
The child lock indicator will be activated on the display (B).
Automatic Shut O
When the water tank becomes full during normal use, the unit shuts o automatically
with Full tank indicator (A) on the screen and buzzer alarm goes o for 5 times.
If water tank is removed or not placed properly, the above described will occur.
Automatic Defrost Feature
The unit is equipped with an automatic defrost feature. When room temperature is too
low, the compressor shuts o and the unit will run on high fan speed until the frost has
disappeared. No settings can be made while the defrost indicator is on (A).
Memory Feature
When power failure and after recovering, the unit will work with the mode prior to the
shutdown. Means the timer setting, humidity setting and working mode setting will be
kept.
B A
A
A - Pull the water tank
out
B - Pour out the water C - Push the water
tank back again
A
MV-2556-2557-08-2022 eeese-aircare.com © All rights eeese air care aps 95
UK
6. Cleaning the dehumidier
When used regularly, the lter may become clogged with dust and particles. To ensure
the eectiveness of the dehumidier, it is recommended to clean the unit at least every
two weeks:
Switch the device o and remove the plug from the socket
before cleaning.
Clean the housing with a soft, dry cloth. Vacuum clean the
air inlet and outlet grilles of the dehumidier. If the device is
extremely dirty, use a mild cleaning agent. Wipe the dehumid-
ier with a slightly damp cloth. Remove the water tank and
wash it by hand using a mild detergent. Rinse it with clean
water.
Note: Do not spray water directly onto the unit.
Cleaning and user maintenance shall not be made by children
without supervision.
The HEPA lter cannot be cleaned and needs to be replaced once a year.
7. Cleaning the Pre Filter Frame
1. Remove the inlet frame from the back.
2. Wash the pre-lter frame carefully in warm water, use
a mild detergent if necessary.
Note: DO NOT wash the pre-lter frame in a
dishwasher.
3. Rinse the pre-lter frame in clean water and let it dry
before reinserting it.
4. Fit the pre-lter frame back onto the unit.
Note: DO NOT use the dehumidier without
the pre-lter frame in place.
96 MV-2556-2557-08-2022 eeese-aircare.com © All rights eeese air care aps
UK
8. Storage
If the dehumidier will not be used for a long period of time, take the following steps:
1. Remove the plug from the socket and empty the tank, make sure the tank and the
dehumidier is completely dry. This may take a couple of days.
2. Clean the air lter.
3. Check the dehumidier for perfect condition to ensure a safe use of it after a long
period of storage.
4. Pack the device with the suitable packaging.
5. Store the dehumidier in a dust-free location, and out of direct sunlight. Preferably
covered with a sheet of plastic.
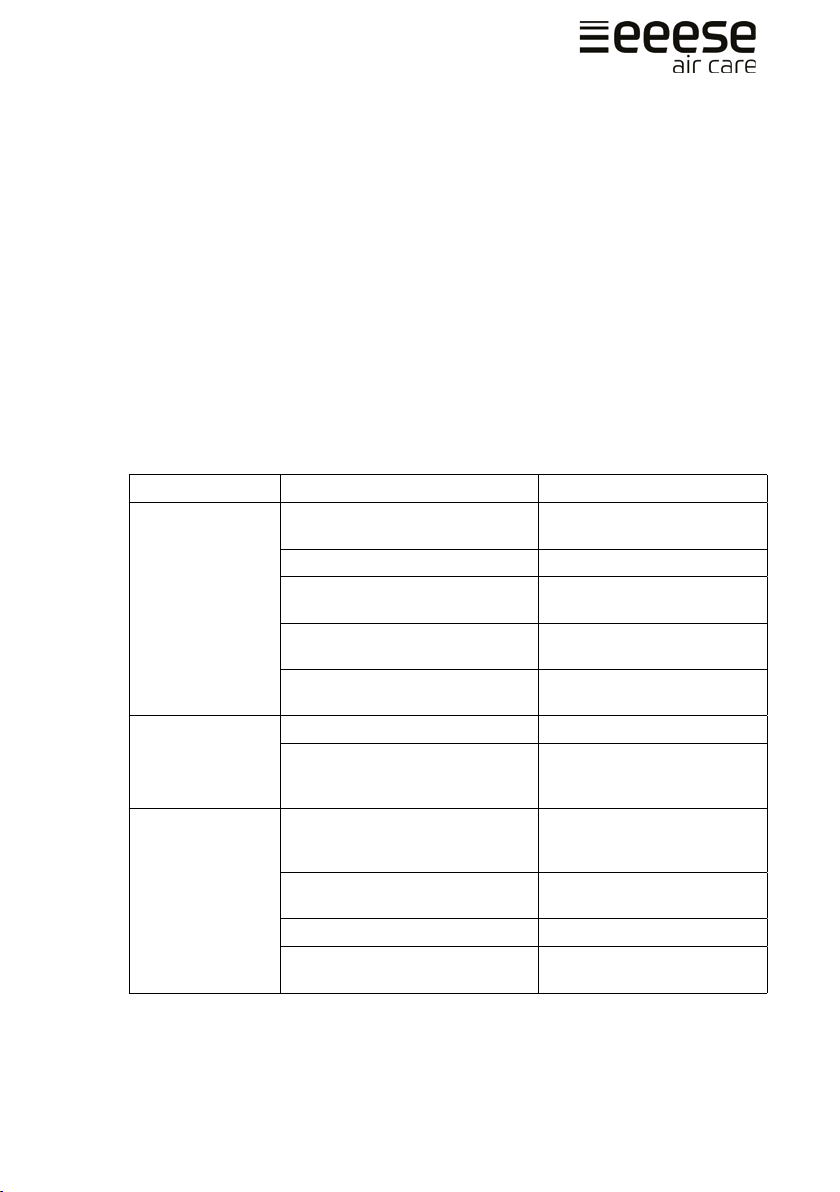
9. Trouble Shooting
Check the following before contacting technical support:
PROBLEM POSSIBLE CAUSE SOLUTION
The dehumidier
will not switch on
The power is not connected Insert the plug into the wall
outlet
The water tank is full Empty the tank
The tank has not been replaced
correctly Replace the tank
The set humidity level has been
reached. Lower the humidity level
Power plug or cord damaged Contact an authorized
service centre for repair
Water removal
capacity is too low
Runtime is too short Be patient and wait
Ambient temperature or
humidity is too low
It is normal that the device
does not dehumidify in these
conditions
The device works,
but reduces the
relative humidity
insuiciently
The room is too big
We recommend using a
dehumidier with a greater
capacity
There is too much ventilation Reduce ventilation (e.g. close
windows and shut doors)
The pre-lter is clogged Clean the pre-lter
Set humidity is higher than the
ambient humidity
Set the humidity lower than
ambient humidity
MV-2556-2557-08-2022 eeese-aircare.com © All rights eeese air care aps 97
UK
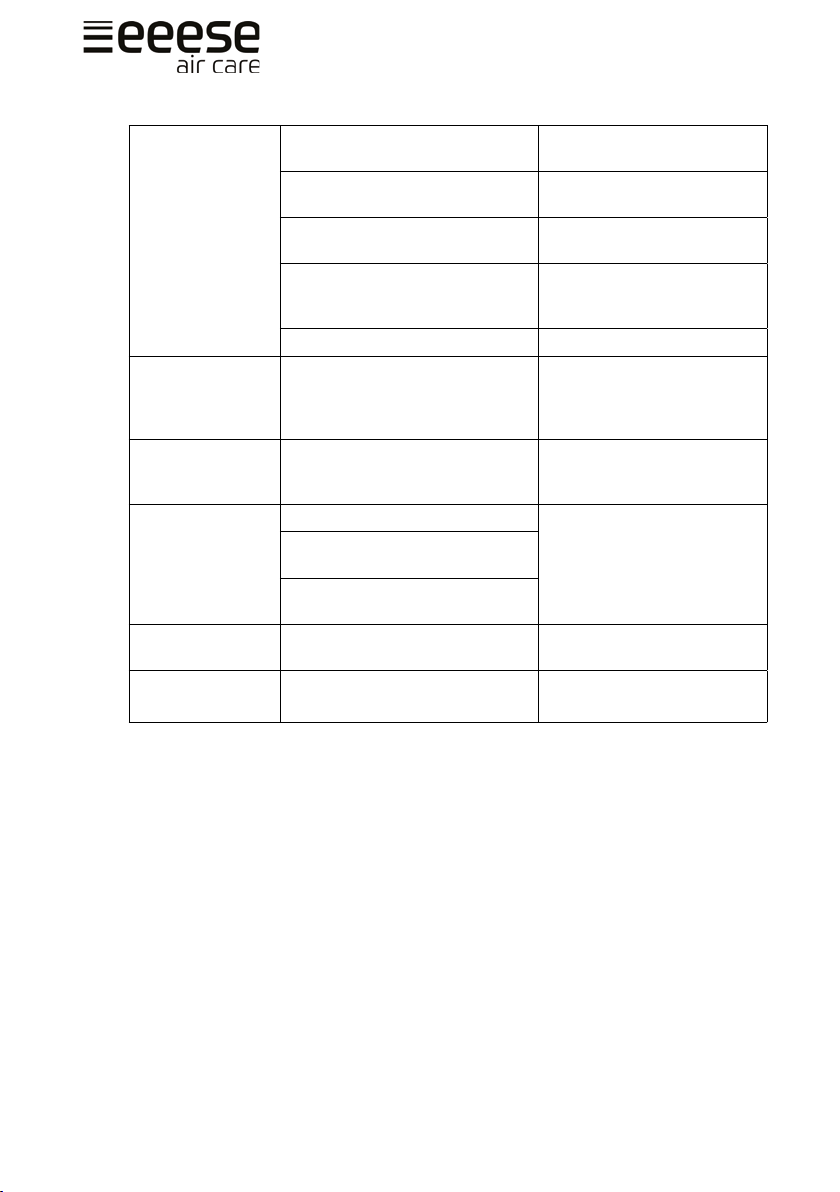
The humidity is
not reducing
The dehumidier has not been
used long enough. Be patient and wait
The ambient temperature is too
low
Reduce the ambient
temperature
The surrounding humidity level is
too low
This is normal. You can dou-
blecheck with a hydrometer
The ambient humidity level is
lower than the desired humidity
level set
This is normal. You can
doublecheck with a
hydrometer
The air lter frame is dirty Clean the pre -lter frame
Dehumidier is
blowing out warm
air
The dried air is passed over heat-
ing coils before it is blown into
the room as part of the dehumidi-
fying process
This is normal, a dehumidier
is not an air cooler
Water on oor
There is residual water in tank,
and the device is lurched too
much by moving
Be careful when moving the
tank
Water in tank
overows
The water tank may be damaged
Contact our eeese service
line
Float for water auto-sensor is not
in place
Internal drainage passage is
blocked or obstructed
The dehumidier
is noisy
The pre-lter is blocked or the
device is on an uneven surface
Clean the pre-lter or put the
device on a at surface
Error code E1: Temperature sensor error
E2: Humidity sensor error
Contact our eeese
service line
98 MV-2556-2557-08-2022 eeese-aircare.com © All rights eeese air care aps
UK
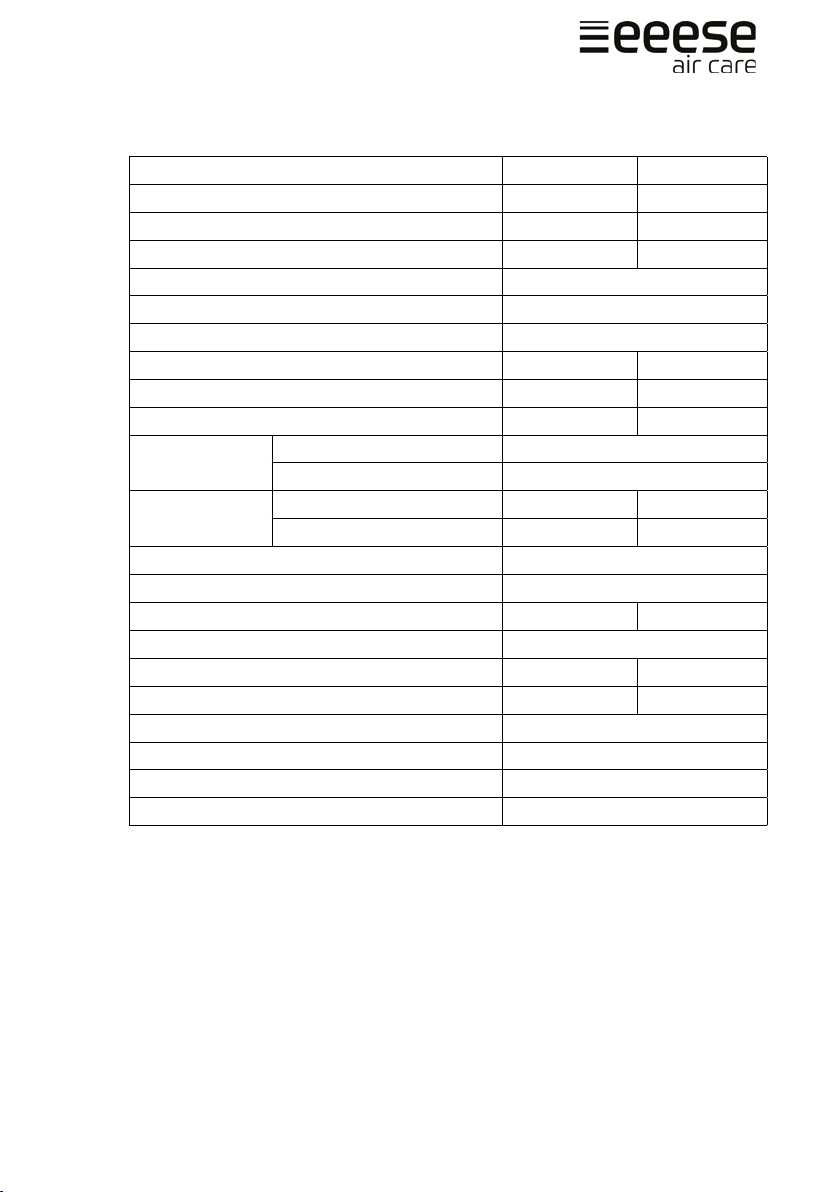
10. Technical Specications
Model Hugo Art. no 2556 2557
Max. working area m2100 120
Recommended working area m24-70 4-85
WiFi Yes Yes
Timer, h 1 ~ 24
IP code IPX4
Power Supply 220-240V - 50Hz
Dehumidifying Capacity (30°C RH 80%), L/day 20 25
Dehumidifying Capacity (27°C RH 60%), L/day 12 15
Power Consumption, W 245 290
Air Volume m3/h High 190
Low 160
Noise Level dB(A) High 44 44
Low 40 42
Water Tank Capacity, L 4.5
Operating Temperature, °C 5~35
Refrigerant R290 / 0.068kg R290 / 0.075kg
Compressor Reciprocating
Net Weight, kg 14.9 15.6
HEPA lter included Yes Yes
Pre-lter Washable
Drain Hose Diameter mm 14
Drain hose included Yes
Product Size (HxWxD), cm 58 x 37.8 x 27.3
The above technical data are for reference only. We reserve the right to modify them
without notice.
11. Service
If you have any questions or need more information, please feel free to call
eeese customer service on +45 69 16 32 00
If you need service or to make a warranty claim, you must create a case directly
in our support system. Go to the website under SUPPORT.

MV-2556-2557-08-2022 eeese-aircare.com © All rights eeese air care aps 99
UK
12. Warranty
Limited warranty
We guarantee that all parts are free of defects in materials and workmanship for a
period of two years from the date of purchase. The warranty covers only material
or manufacturing defects that prevent the product from being able to be installed or
operated in a normal way. Defective parts will be replaced or repaired.
The warranty does not cover transportation damage, any use other than what is
intended, damage caused by incorrect assembly or improper use, damage caused by
impact or other error, or by improper storage.
The warranty becomes void if the user modies the product.
The warranty does not include product-related damage, property damage or general
operational loss.
The manufacturer's liability cannot exceed the repair or replacement of defective
parts and does not include labour costs to remove and reinstall the defective part,
transportation costs to and from the service center, and all other materials necessary to
carry out the repair.
This warranty does not cover failure or malfunction as a result of the following:
• Lack of proper installation, operation or maintenance of the unit in accordance with our
published "User's Guide" supplied with the unit.
• The workmanship of any installation of the unit.
• Misuse, alteration, accident, re, ood, lightning strike, rodents, insects, negligence or
unforeseen events.
• Use of non-factory authorised parts or accessories in conjunction with the product.
Limitation of liability
This is the only warranty provided by the manufacturer. No one is authorised to make any
other warranties on our behalf.
This warranty is in lieu of all other warranties, expressed or implied, including but not
limited to any implied warranty of tness for a particular purpose and saleability. We
expressly disclaim all liability for consequential damage, accidental damage, indirect loss
or loss related to a breach of the expressed or implied warranty.
This warranty gives you specic legal rights, which may vary by country.
Complaints
In the event of any warranty claim a valid purchase receipt must be presented. Read
about raising a warranty-claim under the SERVICE section.
100 MV-2556-2557-08-2022 eeese-aircare.com © All rights eeese air care aps
UK
IMPORTANT!
If you need technical help – contact our service line:
eeese DK-telephone +45 69 16 32 00
We have specialist knowledge of our products and the eld in general, so you can
get help quickly and easily.
13. Responsible Disposal
This symbol indicates that this product should not be disposed of with
general household waste. This applies throughout the entire EU. In order to
prevent any harm to the environment or health hazards caused by incorrect
waste disposal, the product must be handed in for recycling so that the
material can be disposed of in a responsible manner. When recycling your
product, take it to your local collection facility or contact the place of pur-
chase. They will ensure that the product is disposed of in an environmental-
ly sound manner.
14. Warning on Refrigerant R290
The machine is designed only for use with R290(propane) gas as
the designated refrigerant.
Note: The refrigerant loop is sealed. Only a qualied technician
should attempt to service.
The lack of smell does not indicate a lack of escaped gas. No open
ames, cigarettes or other possible sources of ignition should be
used in the vicinity of the machine. Component parts are designed
for propane and non-incentive and non-sparking. Component parts shall only be replaced
with identical repair parts.
Note: The machine may only be installed in a room with a minimum oor area of 4m2.
R290 is a ammable gas that is heavier than air. On this basis, if the gas leaks from the
unit, the concentration will be the highest at ground level. However, the gas can be lifted
(e.g. by draught, fan, etc) to higher levels. The R290(propane) used in this unit has no
odour. Do not use the machine in a room with an open ame, other high-level heat sourc-
es (e.g. cigarettes, candles, etc.) or electrical discharges. Install the machine in a room
which can be ventilated when necessary and where gas accumulation is not possible.
If R290(propane) is detected in the room, or a leak is suspected, do not allow unauthor-
ized persons to search for the source of the leak. In such cases, evacuate all people
from the room, open the windows, leave the room and notify your local re department
to advise them that a propane leak has occurred. Do not allow any person to return to
the room until the commanding oicer of the re department or a certied service
engineer decides that the risk has ceased to exist.

MV-2556-2557-08-2022 eeese-aircare.com © All rights eeese air care aps 101
UK
15. Connection to WIFI
App binding device
Search for the App TuyaSmart or scan
the following QR code for downloading the APP.
Step 1
Make sure your phone is connected to your WIFI at home, and turn on Bluetooth.
Tap the +in the upper right corner of the home page to add the device.

102 MV-2556-2557-08-2022 eeese-aircare.com © All rights eeese air care aps
UK
Step 2
Follow the guide to select the device to be congured and then enter the WIFI password.
Step 3
Complete the connection to set the dehumidier with the App.

MV-2556-2557-08-2022 eeese-aircare.com © All rights eeese air care aps 103
UK
Adding device manually
Step 1
Tap Add Device on the home page or tap the +in the upper right corner, to go to
the Add device page.
This manual suits for next models
2
Table of contents
Other eeese Dehumidifier manuals


