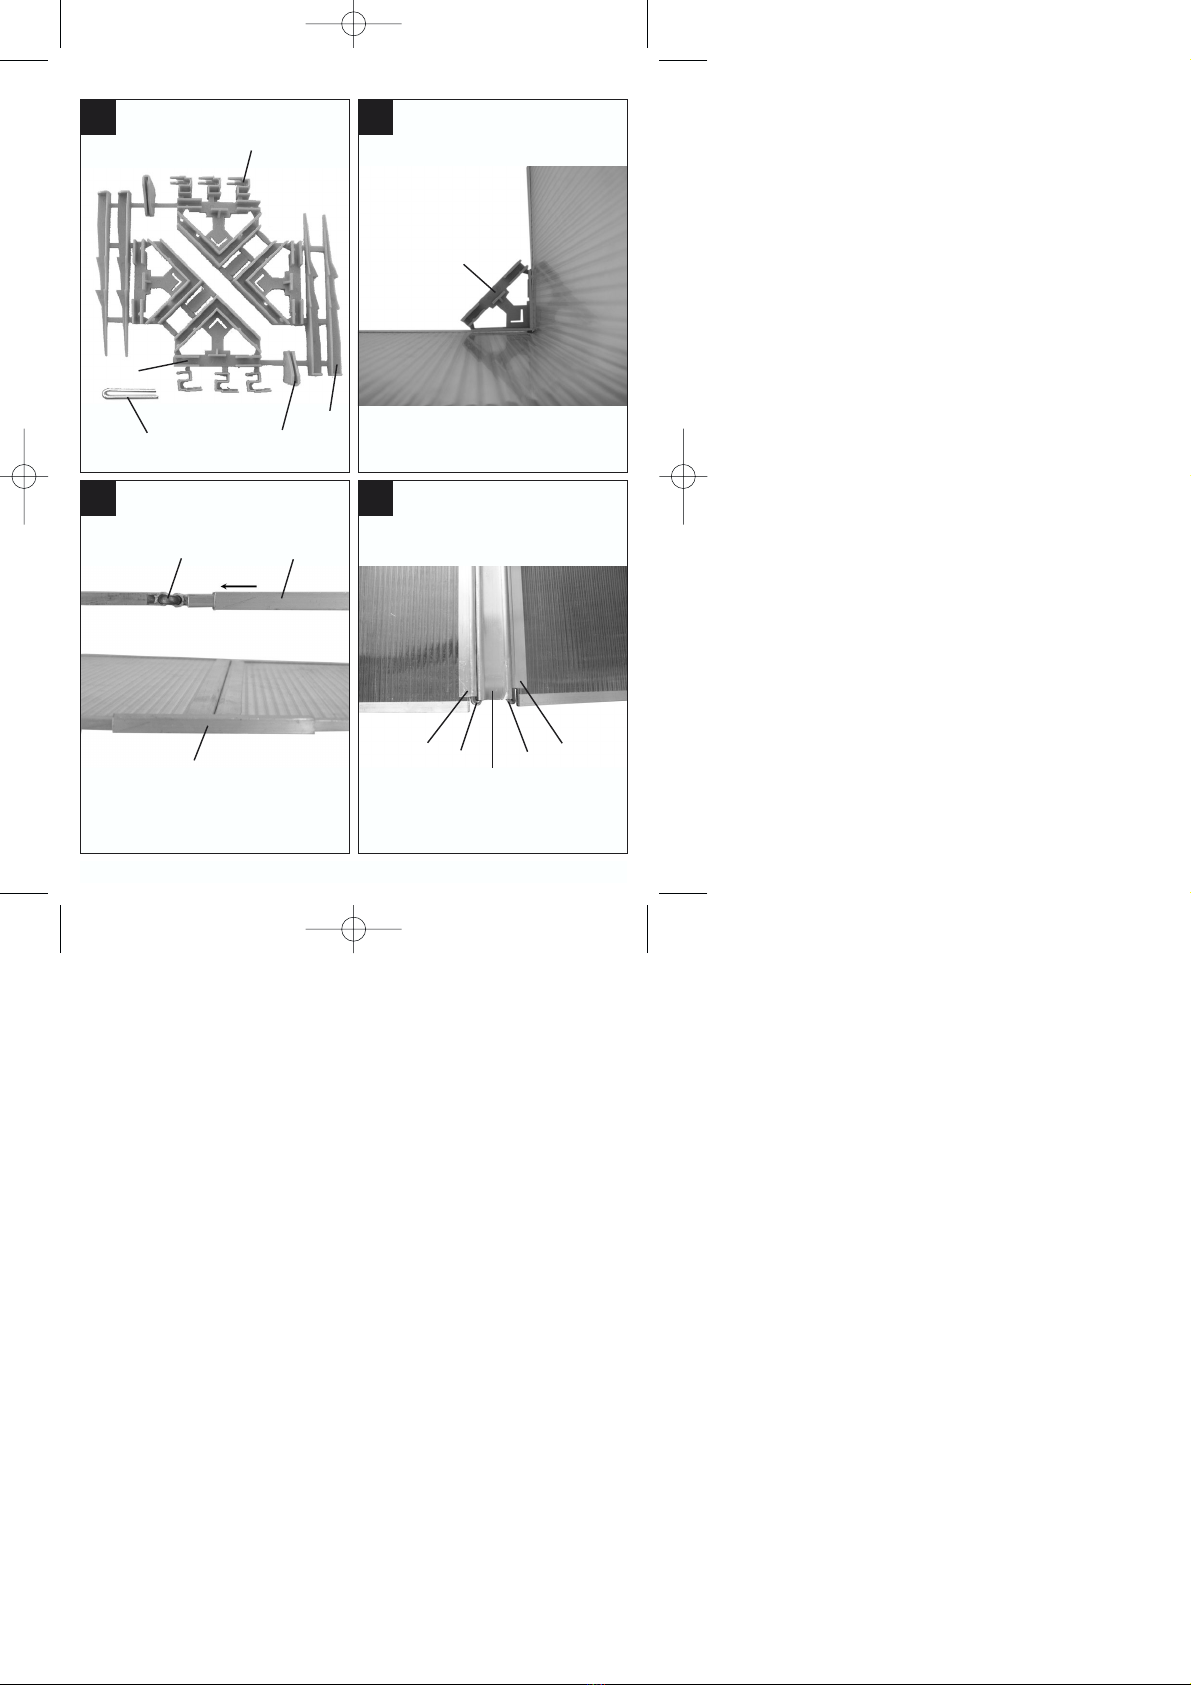
EINHELL FBK 62A User manual

D
GB
F
I
CZ
HR
Aufbauanleitung
Assembly instructions
Instructions de montage
Istruzioni per il montaggio
Montáž
Montaža
FBK 62A
FBK 12 0 A
Art.-Nr.: 36.806.10 I.-Nr.: 01014
Art.-Nr.: 36.806.60 I.-Nr.: 01014
®
Anleitung FBK 62 A - FBK 120 A 06.10.2004 14:18 Uhr Seite 1

2
5
8
8
7
6
5
1
3
2
2
76
1
2
Anleitung FBK 62 A - FBK 120 A 06.10.2004 14:18 Uhr Seite 2

3
5 6
3 4
8
6
4
kh
h
5
5
7
a434a
Anleitung FBK 62 A - FBK 120 A 06.10.2004 14:18 Uhr Seite 3

4
9
9a
10
7 8
b
6
55
c
6
7
Anleitung FBK 62 A - FBK 120 A 06.10.2004 14:18 Uhr Seite 4

D
55
1. Lieferumfang
a) FBK 62 A (Abb. 1)
1 St. Klappfrühbeet montiert
1 St. Kunststoffmontageset
ET-Nr.: 36.804.10.01.021
(4 Montageecken, 4 Erdanker, 6 Klipse, 2
Deckel-Eckstücke)
b) FBK 120 A (Abb. 2)
1 St. Seitenwand (Abb. 2 / Pos. 1)
ET-Nr.: 36.806.60.01.001
2 St. Deckel (Abb. 2 / Pos. 2)
ET-Nr.: 36.806.60.01.002
1 St. Giebelscharnierprofil (Abb. 2 / Pos. 3)
ET-Nr.: 36.806.60.01.003
4 St. Scharnierklammern (Abb. 3 / Pos. 4)
ET-Nr.: 36.806.60.01.004
2 St. Kunststoffmontageset (Abb. 3)
ET-Nr.: 36.804.10.01.021
(je 4 Montageecken, 4 Erdanker, 6 Klipse, 2
Deckel-Eckstücke)
2. Platzauswahl im Garten
Wählen Sie für Ihr Frühbeet einen Platz mit gut
gelockertem Erdreich im Garten aus. Das Frühbeet
ist auf ein ebenes Fundament zu schrauben bzw. der
Boden muss im Bereich der Seitenwand eben sein,
damit es mit den Erdhaken (Abb. 3 Pos. 8) im Boden
fixiert werden kann. Nach der Fixierung ist das Früh-
beet ca. 5 cm hoch mit Erdreich aufzufüllen. Vor dem
ersten Schneefall ist das Frühbeet abzubauen und
bis zum nächsten Frühjahr frostsicher zu lagern.
3. Montage
Für die Montage benötigen Sie einen leichten
Hammer sowie eine Zange. Schutzhandschuhe
tragen!
(Abb. 4) Seitenwand auffalten, die 4 unteren Ecken
der Seitenwand in die Montageecken (5) drücken.
(Abb. 5) Nur FBK 62 A: Das Aluminiumprofil (h) auf
beiden Seiten über das Scharnier (k) der Seitenwand
schieben. Das Scharnier ist damit an der oberen
Kante fixiert.
(Abb. 6) Nur FBK 120 A: Aluminiumprofil (a) der
Deckelhälfte auf beiden Seiten mittels einer
Scharnierklammer (4) mit dem Giebelscharnierprofil
(3) verbinden. Bei zweiter Deckelhälfte wiederholen.
(Abb. 7) Nur FBK 120 A: Auf beiden Seiten des
Deckels eine Montageecke (5) in die Nut (b) des
Aluminiumprofils schieben. Deckel
zusammenklappen
(Abb. 8) Nur FBK 120 A: Montageecke (5) in die Nut
(c) des mittleren Aluminiumprofils auf beiden Seiten
der Seitenwand schieben.
(Abb. 9) Deckelecken (6) auf die beiden Ecken des
Deckels schieben.
(Abb. 9a) Deckelecken an der Unterseite des
Deckels mit Schraube 2,9x6,5 fixieren.
(Abb. 10) Klipse (7) auf die Seitenteile drücken. Es
können auf jeder Frühbeetseite drei Öffnungen
eingestellt werden. Vorzugsweise vollständig
geöffnet, vollständig geschlossen und eine individuell
einstellbare Öffnung.
Die Deckelecken (6) werden dabei in die Klipse (7)
gedrückt.
Anleitung FBK 62 A - FBK 120 A 06.10.2004 14:18 Uhr Seite 5

1. Items supplied
a) FBK 62 A (Fig. 1)
1Hinged cold frame - assembled
1Plastic assembly set
Replacement part no.: 36.804.10.01.021
(4 assembly corners, 4 earth anchors, 6 clips, 2
hood corner pieces)
a) FBK 120 A (Fig. 2)
1Side panel (Fig. 2 / Pos. 1)
Replacement part no.: 36.806.60.01.001
2Hoods (Fig. 2 / Pos. 2)
Replacement part no.: 36.806.60.01.002
1Central hinge profile (Fig. 2 / Pos. 3)
Replacement part no.: 36.806.60.01.003
4Hinge clamps (Fig. 3 / Pos. 4)
Replacement part no.: 36.806.60.01.004
2Plastic assembly sets (Fig. 3)
Replacement part no.: 36.804.10.01.021
(each with 4 assembly corners, 4 earth anchors,
6 clips, 2 hood corner pieces)
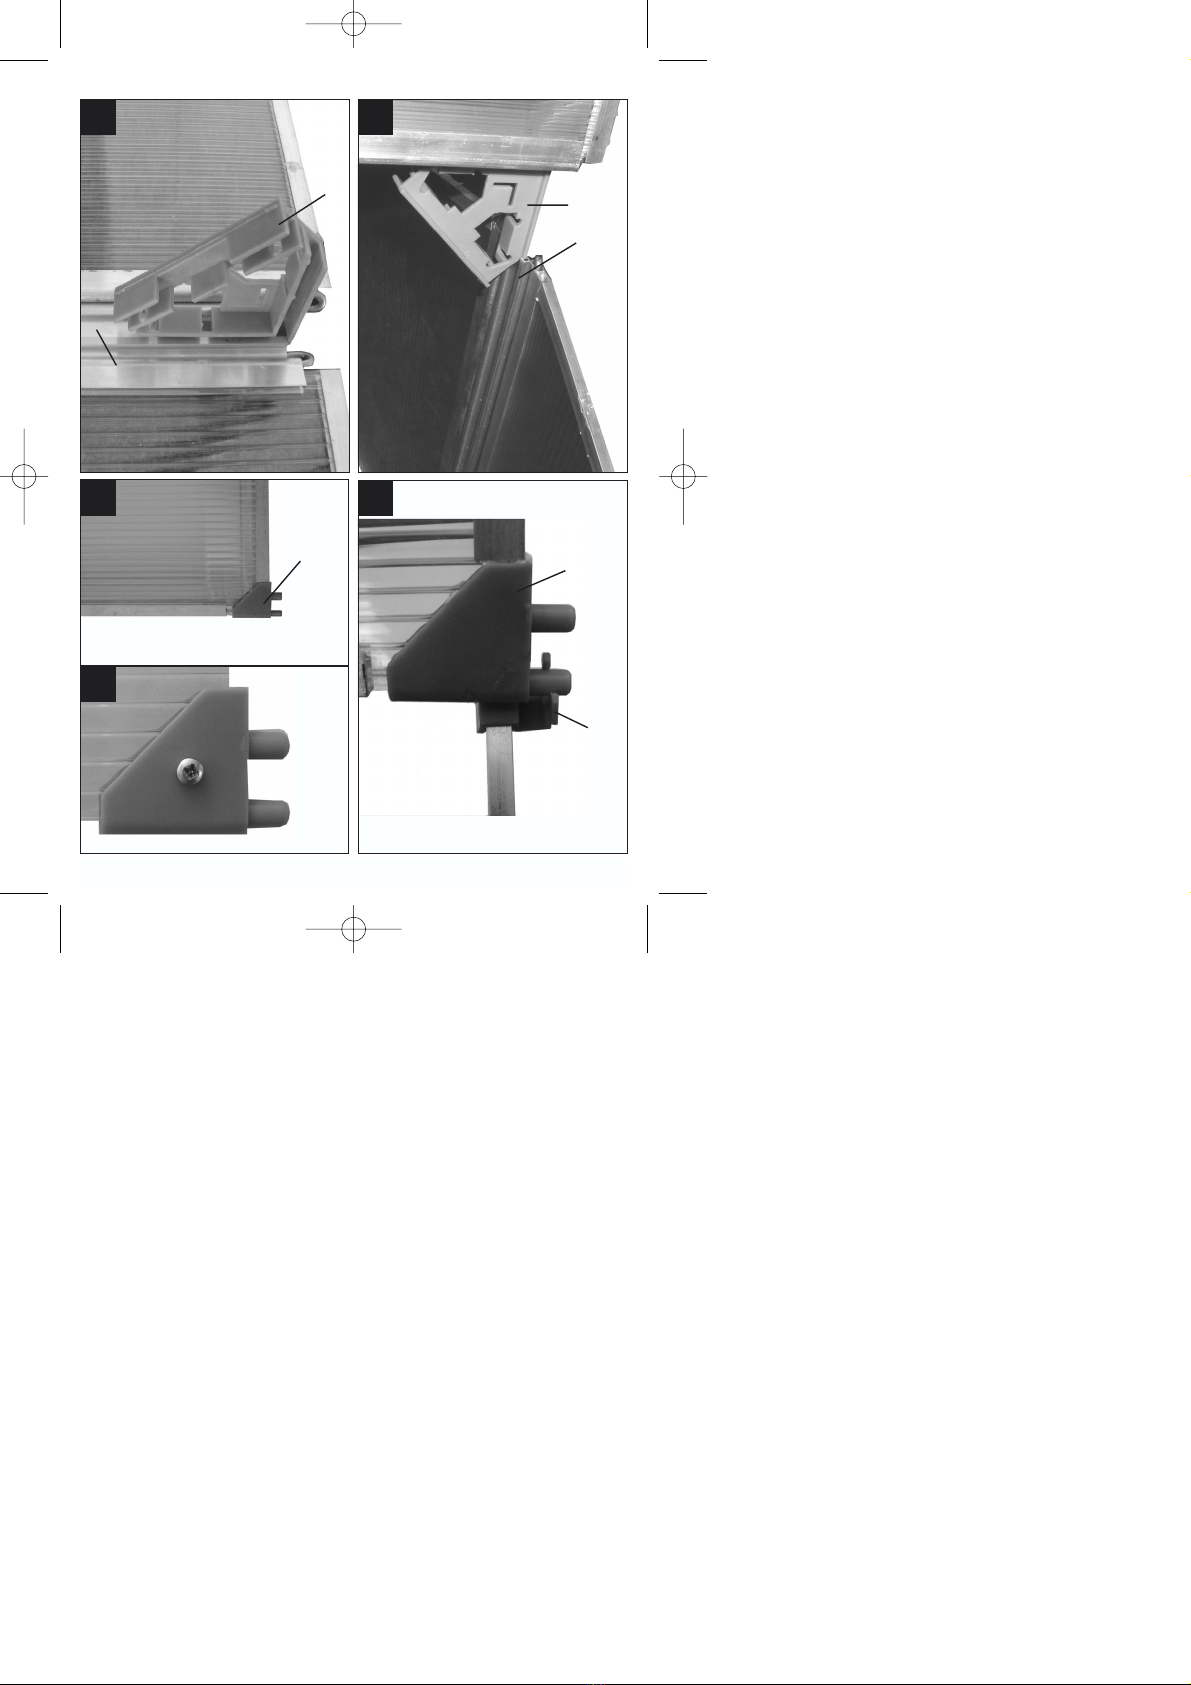
2. Choosing a place in the garden
Choose a place in the garden for your cold frame.
The cold frame must be screwed to a level
foundation, or the ground must be level around the
area of the side panel, so that it can be fixed to the
ground with the earthing clamps (Fig. 3 Pos. 8).
3. Assembly
For the purposes of assembly, you will need a light
hammer and some pincers.
(Fig. 4) Unfold the side panel, press the 4 lower
corners of the side panel into the assembly corners
(5).
(Fig. 5) Only applies to FBK 62 A: On both sides,
slide the aluminum profile (h) over the hinge (k) of
the side panel. In doing so, the hinge is fixed to the
upper edge.
(Fig. 6) Only applies to FBK 120 A: On both sides,
connect the aluminum profile (a) of one half of the
cover to the central hinge profile (3) using a hinge
clamp (4). Repeat for the second half of the cover.
(Fig. 7) Only applies to FBK 120 A: On both sides
of the cover, push an assembly corner (5) into the
groove (b) on the aluminum profile. Fold down the
cover.
(Fig. 8) Only applies to FBK 120 A: On both sides
of the side panel, push the assembly corner (5) into
the groove (c) on the central aluminum profile.
(Fig. 9) Slide the cover corners (6) onto both corners
of the cover.
(Fig. 9a) Fix the cover corners to the underside of the
cover with a 2.9x6.5 screw.
(Fig. 10) Push the clips (7) on the side halves. Three
openings can be inserted in each side of the cold
frame. Preferably, one completely opened, one
completely closed and one individually adjustable
opening.
At the same time, the cover corners (6) are pushed
into the clips (7).
GB
6
Anleitung FBK 62 A - FBK 120 A 06.10.2004 14:18 Uhr Seite 6

1. Pièces livrées
a) FBK 62 A (fig. 1)
1 couche pour cultures hâtées montée
1 kit de montage en matière plastique
pièce de rechange n° : 36.804.10.01.021
(4 coins de montage, 4 tirants d’ancrage, 6 clips,
2 montants d’angle de couvercle)
b) FBK 120 A (fig. 2)
1 Paroi latérale (fig. 2 / pos. 1)
Pièce de rechange n° : 36.806.60.01.001
2 Couvercles (fig. 2 / pos. 2)
Pièce de rechange n° : 36.806.60.01.002
1 Profil de charnière centrale (fig. 2 / pos. 3)
Pièce de rechange n° : 36.806.60.01.003
4 Pinces de charnière (fig. 3 / pos. 4)
Pièce de rechange n° : 36.806.60.01.004
2 Kits de montage en matière plastique (fig. 3)
Pièce de rechange n° : 36.806.10.01.021
(Comportant chacun 4 coins de montage, 4
tirants d’ancrage, 6 clips, 2 montants d’angle de
couvercle.)
2. Choix de l’endroit du jardin
Sélectionnez un emplacement pour votre serre dans
le jardin. La serre doit être vissée à une fondation
plane et le sol doit être plan dans la zone de la paroi
latérale pour pouvoir la fixer au sol avec les ancres
(Fig. 3 Pos. 8).
3. Montage
Vous avez besoin d’un léger marteau et d’une pince
pour le montage.
(fig. 4) Dépliez la paroi latérale, enfoncez les 4 coins
inférieures de la paroi latérale dans les coins de
montage (5).
(fig. 5) Uniquement FBK 62 A : Poussez le profilé
d’aluminium (h) des deux côtés sur la charnière (k)
de la paroi latérale. La charnière est alors fixée à
l’arrête supérieure.
(fig. 6) Uniquement FBK 120 A : Raccordez le profil
d’aluminium (a) du demi-couvercle au profilé de la
charnière centrale (3) des deux côtés à l’aide d’une
pince à charnière (4). Recommencer pour la
deuxième moitié du couvercle.
(fig. 7) Uniquement FBK 120 A : Poussez un coin
de montage (5) dans la rainure (b) du profilé
d’aluminium des deux côtés du couvercle. Replier le
couvercle.
(fig. 8) Uniquement FBK 120 A : Poussez le coin de
montage (5) dans la rainure (c) du profil central en
d’aluminium sur les deux côtés de la paroi latérale.
(fig. 9) Poussez les coins de couvercle (6) sur les
deux coins du couvercle.
(fig. 9a) Fixez les coins de couvercle à la face
inférieure du couvercle à l’aide de vis 2,9x6,5.
(fig. 10) Pressez les clips (7) sur les pièces latérales.
On peut régler trois ouvertures sur chaque serre. De
préférence complètement ouverte, complètement
fermée et une ouverture réglable individuellement.
Les coins de couvercle (6) s’enfoncent alors dans les
clips (7).
F
7
Anleitung FBK 62 A - FBK 120 A 06.10.2004 14:18 Uhr Seite 7

1. Elementi forniti
a) FBK 62 A (Fig. 1)
N. 1 Semenzaio ribaltabile montato
N. 1 Kit di montaggio in plastica
N.-Ric. 36.804.10.01.021
(4 angoli di montaggio, 4 picchetti, 6 clip, 2
pezzi angolari per coperchio)
a) FBK 120 A (Fig. 2)
N. 1 Parete laterale (Fig. 2/ Pos. 1 )
N.-Ric. 36.806.60.01.001
N. 2 Coperchio (Fig. 2/ Pos. 2 )
N.-Ric. 36.806.60.01.002
N. 1 Profilato cerniera centrale (Fig. 2/ Pos. 3 )
N.-Ric. 36.806.60.01.003
N. 4 Graffe della cerniera (Fig. 3/ Pos. 4 )
N.-Ric. 36.806.60.01.004
N. 2 Kit di montaggio in plastica (Fig. 3).
N.-Ric. 36.804.10.01.021
(4 angoli di montaggio, 4 picchetti, 6 clip, 2
pezzi angolari per coperchio)
2. Scelta dell’ubicazione in giardino
Scegliete il posto per il vostro semenzaio in giardino.
Il semenzaio deve essere avvitato su fondazioni
piane oppure il suolo deve essere piano nella zona
della parete laterale affinché possa venire fissato con
i picchetti (Fig. 3 pos. 8) nel terreno.
3. Montaggio
Per il montaggio avete bisogno di un martello
leggero e di una pinza.
(Fig. 4) Spiegate la parete laterale, premete i 4
angoli inferiori della parete laterale negli angoli di
montaggio (5).
(Fig. 5) Solo FBK 62 A: Spingete sui due lati il
profilato di alluminio (h) sulla cerniera (k) della parete
laterale. Così la cerniera è fissata sul bordo
superiore.
(Fig. 6) Solo FBK 120 A: Collegate il profilato di
alluminio (a) della metà coperchio sui due lati
mediante una graffa per cerniera (4) con il profilato
della cerniera centrale (3). Ripetete la procedura con
la seconda metà del coperchio.
(Fig. 7) Solo FBK 120 A: Spingete sui due lati del
coperchio un angolo di montaggio (5) nella
scanalatura (b) del profilato di alluminio. Ribaltate il
coperchio.
(Fig. 8) Solo FBK 120 A: Spingete l’angolo di
montaggio (5) nella scanalatura (c) del profilo di
alluminio centrale sui due lati della parete laterale.
(Fig. 9) Spingete gli angoli del coperchio (6) sui due
angoli del coperchio.
(Fig. 9a) Fissate gli angoli del coperchio sul lato
inferiore del coperchio con vite 2,9x6,5
(Fig. 10) Premere le clip (7) sulle parti laterali. Su
ogni lato del semenzaio possono venire inserite tre
aperture. Di preferenza aperto completamente,
chiuso completamente e un’apertura da impostare
individualmente.
Per fare ciò gli angoli del coperchio (6) vengono
premuti nelle clip (7).
8
I
Anleitung FBK 62 A - FBK 120 A 06.10.2004 14:18 Uhr Seite 8

1. Rozsah dodávky
a) FBK 62 A (obr. 1)
1 ks vyklápěcí pařeniště
1 ks plastová montážní sada
ET č.: 36.804.10.01.021
(4 montážní rohy, 4 zemní kotvy, 6
úchytek, 2 rohy víka)
b) FBK 120 A (obr. 2)
1 ks boční stěna (obr. 2 / pol. 1)
ET č.: 36.806.60.01.001
2 ks víko (obr. 2 / pol. 2)
ET č.: 36.806.60.01.002
1 ks střední kloubový profil (obr. 2 / pol. 3)
ET č.: 36.806.60.01.003
4 ks kloubová spona (obr. 3 / pol. 4)
ET č.: 36.806.60.01.004
2 ks plastová montážní sada (obr. 3)
ET č.: 36.804.10.01.021
(v každé sadě 4 montážní rohy, 4 zemní
kotvy, 6 úchytek, 2 rohy víka)
2. Volba místa v zahradě
Pro pařeniště zvolte v zahradě vhodné místo.
Pařeniště přišroubovat na rovný základ, resp. půda v
oblasti boční stěny musí být rovná, aby se pařeniště
mohlo pomocí zemních kotev (obr. 3 pol. 8) fixovat v
půdě.
3. Montáž
K montáži potřebujete lehké kladivo a kleště.
(obr. 4) Boční stěnu rozložit, 4 spodní rohy boční
stěny vtlačit do montážních rohů (5).
(obr. 5) Pouze FBK 62 A: Hliníkový profil (h)
nasunout na obou stranách přes kloubový závěs (k)
boční stěny. Kloubový závěs je takto fixován na
horní hraně.
(obr. 6) Pouze FBK 120 A: Hliníkový profil (a)
poloviny víka spojit na obou stranách pomocí
kloubové spony (4) se středním kloubovým profilem
(3). Postup opakovat také u druhé poloviny víka.
(obr. 7) Pouze FBK 120 A: Na obou stranách víka
nasunout do drážky (b) hliníkového profilu jeden
montážní roh (5). Víko sklapnout.
(obr. 8) Pouze FBK 120 A: Montážní roh (5)
zasunout do drážky (c) středního hliníkového profilu
na obou stranách boční stěny.
(obr. 9) Rohy víka (6) nasunout na oba rohy víka.
(obr. 9a) Rohy víka fixovat na spodní straně víka
šroubem 2,9x6,5.
(obr. 10) Úchytky (7) přitlačit na boční díly. Na každé
straně pařeniště mohou být nastaveny tři otvory:
zcela otevřeno, zcela zavřeno a individuálně
nastavitelný otvor.
Rohy víka (6) se přitom vtlačí do úchytek (7).
9
CZ
Anleitung FBK 62 A - FBK 120 A 06.10.2004 14:18 Uhr Seite 9

1. Opseg isporuke
a) FBK 62 A (sl. 1)
1 kom Montirano preklopivo klijalište
1 kom Plastični komplet za motnažu
ET-br.: 36.804.10.01.021
(4 montažna kutnika, 4 sidra za tlo, 6
opružnih stezaljki, 2 kutna poklopca)
b) FBK 120 A (sl. 2)
1 kom Bočna stjenka (sl. 2 / poz. 1)
ET br.: 36.806.60.01.001
2 kom poklopac (sl. 2 / poz. 2)
ET br.: 36.806.60.01.002
1 kom profil srednjeg šarnira (sl. 2 / poz. 3)
ET br.: 36.806.60.01.003
4 kom Kopče šarnira (sl. 3 / poz. 4)
ET br.: 36.806.60.01.004
2 kom Plastični komplet za montažu (sl. 3)
ET br.: 36.804.10.01.021
(4 montažna kutnika, 4 sidra za tlo, 6
opružnih stezaljka, 2 kutnika poklopca)
2. Odabir mjesta u vrtu
Za Vaše klijalište odaberite mjesto u vrtu. Klijalište
treba pričvrstiti vijcima na ravnu podlogu odnosno
tlo mora biti ravno u području bočne stjenke kako bi
se kuke (sl. 3 poz. 8) mogle fiksirati u zemlju.
3. Montaža
Za montažu je potreban lagani čekić i kliješta.
(sl. 4) Naborajte bočnu stjenku, a 4 donja kutnika
bočne stjenke pritisnite u montažne kutnike (5).
(sl. 5) Samo FBK 62 A: Aluminijski profil (h) gurnite
na objema stranama preko šarnira (k) bočne stjenke.
Na taj način šarnir je fiksiran na gornjem rubu.
(sl. 6) Samo FBK 120 A: Aluminijski profil (a)
polovice poklopca spojite na objema stranama
pomoću kopče (4) sa profilom srednjeg šarnira (3).
Postupak ponovite kod druge polovice poklopca.
(sl. 7) Samo FBK 120 A: Na obje strane poklopca
montažni kutnik (5) gurnite u utor (b) aluminijskog
profila. Spojite poklopac
(sl. 8) Samo FBK 120 A: Montažni kutnik (5) gurnite
u utor (c) srednjeg aluminijskog profila na objema
stranama bočne stjenke.
(sl. 9) Kuteve poklopca (6) gurnite na oba kutnika.
(sl. 9a) Kuteve poklopca fiksirajte vijcima 2,9x6,5 na
donjoj strani.
(sl. 10) Opružne stezaljke (7) pritisnite na bočne
dijelove. Na svakom klijalištu mogu se podesiti tri
otvora. Po mogućnosti jedan potpuno otvoren,
potpuno zatvoren i jedan individualno podesiv otvor.
Pritom kuteve poklopca (6) pritisnite u opružne
stezaljke (7).
10
HR
Anleitung FBK 62 A - FBK 120 A 06.10.2004 14:18 Uhr Seite 10

11
GARANTIEURKUNDE
Auf das in der Anleitung bezeichnete Gerät geben wir 2 Jahre
Garantie, für den Fall, dass unser Produkt mangelhaft sein sollte.
Die 2-Jahres-Frist beginnt mit dem Gefahrenübergang oder der
Übernahme des Gerätes durch den Kunden. Voraussetzung für
die Geltendmachung der Garantie ist eine ordnungsgemäße
Wartung entsprechend der Bedienungsanleitung sowie die be-
stimmungsgemäße Benutzung unseres Gerätes.
Selbstverständlich bleiben Ihnen die gesetzlichen Gewähr-
leistungsrechte innerhalb dieser 2 Jahre erhalten. Die Garan-
tie gilt für den Bereich der Bundesrepublik Deutschland oder der
jeweiligen Länder des regionalen Hauptvertriebspartners als Er-
gänzung der lokal gültigen gesetzlichen Vorschriften. Bitte be-
achten Sie Ihren Ansprechpartner des regional zuständigen Kun-
dendienstes oder die unten aufgeführte Serviceadresse.
ISC GmbH · International Service Center
Eschenstraße 6 · D-94405 Landau/Isar (Germany)
Info-Tel. 0180-5 120 509 • Telefax 0180-5 835 830
Service- und Infoserver: http://www.isc-gmbh.info
CERTIFICATO DI GARANZIA
Per l’apparecchio indicato nelle istruzioni concediamo una garanzia di 2 anni,
nel caso il nostro prodotto dovesse risultare difettoso. Questo periodo di 2 anni
inizia con il trapasso del rischio o la presa in consegna dell’apparecchio da parte
del cliente. Le condizioni per la validità della garanzia sono una corretta
manutenzione secondo le istruzioni per l’uso così come un utilizzo appropriato
del nostro apparecchio.
Naturalmente in questo periodo di 2 anni continuiamo ad assumerci gli
obblighi di responsabilità previsti dalla legge.
La garanzia vale per il territorio della Repubblica Federale Tedesca o dei
rispettivi paesi del principale partner di distribuzione di zona a completamento
delle norme di legge in vigore sul posto. Rivolgersi all’addetto del servizio
assistenza clienti incaricato della rispettiva zona o all’indirizzo di assistenza
clienti riportato in basso.
WARRANTY CERTIFICATE
The product described in these instructions comes with a 2 year warranty
covering defects. This 2-year warranty period begins with the passing of risk or
when the customer receives the product.
For warranty claims to be accepted, the product has to receive the correct
maintenance and be put to the proper use as described in the operating
instructions.
Your statutory rights of warranty are naturally unaffected during these 2
years.
This warranty applies in Germany, or in the respective country of the
manufacturer’s main regional sales partner, as a supplement to local
regulations. Please note the details for contacting the customer service center
responsible for your region or the service address listed below.
GARANCIJSKI LIST
Za uredjaj opisan u uputama dajemo 2 godine jamstva u slučaju eventulanog
nedostatka na našem proizvodu. Rok od 2 godine započinje s prijelazom rizika
ili s preuzimanjem uredjaja od strane kupca.
Pretpostavka za ostvarivanje prava jamstva je pravilno održavanje u skladu s
uputama za uporabu, kao i svrsishodno korištenje našeg uredjaja.
Razumljivo je da zadržavate zakonsko pravo jamstva unutar te 2 godine.
Jamstvo važi za područje Savezne Republike Njemačke ili dotičnih zemalja
regionalnog glavnog trgovačkog partnera kao dopuna lokalno važećih
zakonskih propisa. Molimo Vas da obratite pažnju na Vašu kontakt osobu
nadležne servisne službe u regiji ili na dolje navedenu adresu servisa.
GARANTIE
Nous fournissons une garantie de 2 ans pour l’appareil décrit dans le mode
d’emploi, en cas de vice de notre produit. Le délai de 2 ans commence avec la
transmission du risque ou la prise en charge de l’appareil par le client.
La condition de base pour le faire valoir de la garantie est un entretien en bonne
et due forme, conformément au mode d’emploi, tout comme une utilisation de
notre appareil selon l’application prévue.
Vous conservez bien entendu les droits de garantie légaux pendant ces 2
ans.
La garantie est valable pour l’ensemble de la République Fédérale d’Allemagne
ou des pays respectifs du partenaire commercial principal en complément des
prescriptions légales locales. Veuillez noter l’interlocuteur du service après-
vente compétent pour votre région ou l’adresse mentionnée ci-dessous.
ZÁRUČNÍ LIST
Na přístroj označený v návodu poskytujeme záruku 2 let, pro ten případ, že by
byl náš výrobek vadný. Tato 2letá lhůta začíná přechodem rizika nebo
převzetím přístroje zákazníkem.
Předpokladem pro uplatňování záruky je řádná údržba příslušně podle návodu
k obsluze a používání našeho přístroje k určenému účelu.
Samozřejmě Vám během těchto 2 let zůstanou zachována zákonná
záruční práva.
Záruka platí na území Spolkové republiky Německo nebo příslušné země
regionálního hlavního distribučního partnera jako doplněk lokálně platných
zákonných předpisů. V případě potřeby se prosím obrat’te na Vašeho
kontaktního partnera regionálního příslušného zákaznického servisu nebo na
dole uvedenou servisní adresu.
Technische Änderungen vorbehalten
Technical changes subject to change
Sous réserve de modifications
Con riserva di apportare modifiche tecniche
Technické změny vyhrazeny
Zadržavamo pravo na tehnične izmjene.
Der Nachdruck oder sonstige Vervielfältigung von Dokumentation und
Begleitpapieren der Produkte, auch auszugsweise ist nur mit aus-
drücklicher Zustimmung der ISC GmbH zulässig.
The reprinting or reproduction by any other means, in whole or in part,
of documentation and papers accompanying products is permitted only
with the express consent of ISC GmbH.
La réimpression ou une autre reproduction de la documentation et des
documents d’accompagnement des produits, même incomplète, n’est
autorisée qu’avec l’agrément exprès de l’entreprise ISC GmbH.
La ristampa o l’ulteriore riproduzione, anche parziale, della
documentazione o dei documenti d’accompagnamento dei prodotti è
consentita solo con l’esplicita autorizzazione da parte della ISC GmbH.
Dotisk nebo jiné rozmnožování dokumentace a průvodních
dokumentů výrobků, také pouze výňatků, je přípustné výhradně se
souhlasem firmy ISC GmbH.
Naknadno tiskanje ili slična umnožavanja dokumentacije i pratećih
papira ovih proizvoda, čak i djelomično kopiranje, moguće je samo uz
izričito dopuštenje tvrtke ISC GmbH.
Anleitung FBK 62 A - FBK 120 A 06.10.2004 14:18 Uhr Seite 11

ISC GmbH
Eschenstraße 6
D-94405 Landau/Isar
Tel. (0180) 5 120 509 (12 Ct/min), Fax (0180) 5 835 830 (12 Ct/min)
Hans Einhell Österreich Gesellschaft m.b.H.
Mühlgasse 1
A-2353 Guntramsdorf
Tel. (02236) 53516, Fax (02236) 52369
Fubag International
St. Gallerstraße 182
CH-8404 Winterthur
Tel. (052) 2358787, Fax (052) 2358700
Einhell UK Ltd
Unit 5 Morpeth Wharf
Twelve Quays
Birkenhead, Wirral
CH 41 1NG
Tel. 0151 6491500, Fax 0151 6491501
Pour toutes informations ou service après
vente, merci de prendre contact avec votre
revendeur.
Einhell Benelux
Veldsteen 44
NL-4815 PK Breda
Tel. 076 5986470, Fax 076 5986478
Comercial Einhell, S.A.
Travesia Villa Ester, 9 B
Poligono Industrial El Nogal
E-28119 Algete-Madrid
Einhell Portugal Lda.
Apartado 2100
Rua da Aldeia , 225 Apartado 2100
P-4410-459 Arcozelo (VNG)
Tel. 122 0917500 Fax 122 0917529
Einhell Italia s.r.l.
Via Marconi, 16
I-22070 Beregazzo (Co)
Tel. 031 992080, Fax 031 992084
Einhell Skandinavia
Bergsoesvej 36
DK-8600 Silkeborg
Tel. 087 201200, Fax 087 201203
Hasse Haraldson
Barlastgatan 3
S-41463 Gøteborg
Tel. 031 123160, Fax 031 123165
Einhell Norge A/S
Sophus Buggesvaj 48
Postboks 2005
N-3255 Larvik
Tel. 033 179840, Fax 033 179841
Sähkötalo Harju OY
Korjaamonkatu 2
FIN-33840 Tampere
Tel. 03 2345000, Fax 03 2345040
Einhell Polska sp. Z.o.o.
Ul. Miedzyleska 2-6
PL-50-514 Wroclaw
Tel. 071 3346508, Fax 071 3346503
Einhell Hungaria Service
Pannoniastr. 32
H-1136 Budapest
Tel. 01 2370494, Fax 01 2370495
Semak
makina ticaret ve sanayi ltd. sti.
Altay Cesme mah. Yasemin Sok. No: 19
TR 34843 Maltepe - Istanbul
Tel. 0216 4594865, Fax 0216 4429325
Agi s.r.o
Stefanikova 10
SK-91101 Trecin
Tel. 32 7445270, Fax 32 7445270
1Turkestan
Investitions- Baugesellschaft
Christofor Stefanidi
Belinskij-102
KZ-486008 st. Chimkent
Tel./Fax 03252 242414
Einhell Distribution SRL
Drumul Odaii 26 A
Otopeni, Ilfov
RO-075100 Bucuresti
Tel. 021 2664302, Fax 021 2664313
Poker Plus S.R.O.
Areal vu Bechovice
Budava 10 B
CZ-19011 Prahe - Bechovice 911
Tel. 02579 10204, Fax 02579 10204
Slav GmbH
Mihail Koloni str. 18 W
BG-9000 Varna
Tel. 052 601653
Einhell Croatia d.o.o.
Velika Ves 2
HR-49224 Lepajci
Tel 049 342 444, Fax 049 342 392
GMA-Elektromechanika d.o.o
Cesta Andreja Bitenca 115
SLO 1000 Ljubljana
Tel 01/5838304, Fax 01/5183803
An. Mavrofidopoulos S.A.
Technical & Commercial Company
12, Papastratou & Asklipiou Str.
GR 18545 Piräus
Tel 0210 4136155, Fax 0210 4137692
Bermas, Moscow
Altufyevskoe shosse, 2A
RUS-127273 Moscow
Tel. 095 5401750 (central office)
Tel. 095 9033761 (Repair center Moscow)
Tel. 812 2240544 (Repair center St. Petersburg)
Dirbita
Metalo str. 23
LT-02190 Vilnius
Tel 05 2395769, Fax 05 2395770
AS Baltoil
Roiu alev
Haaslava vald
EE-62102 Tartu
Tel 07 301 700, Fax 07 301 701
1Halai Trading Co. LLC
POB 9282, Nakheel Rd. Deira, Shop No. 15
UAE-Dubai
Tel. 04 2279554, Fax 04 2217686
Alborz Abzar Co. Ltd.
No. 111, Bastan Passage, Imam Khomeini Ave.
IR-11146 Teheran
Tel 021 6716072, Fax 021 6727177
Einhell BiH d.o.o.
Poslovni Centar 96
BA-72250 Vitez
Tel 030 717250, Fax 030 717255
Eurasia Industrial and Automotive Supply
3, Bessemer Str.
Duncanville
ZA-Vereeniging 1939
Tel 016 455 571 2, Fax 016 455 571 6
1Svyaz Prominvest Ltd.
#207-11, Skariny av.
BY-220023 Minsk
Tel 017 2642777, Fax 017 2642591
UAE
KZ
BY
EH 09/2004
Anleitung FBK 62 A - FBK 120 A 06.10.2004 14:18 Uhr Seite 12
This manual suits for next models
3
Table of contents
Languages:
Other EINHELL Greenhouse Kit manuals