EINHELL BG-SH 1 User manual

Art.-Nr.: 45.004.80 I.-Nr.: 01017
Bedienungsanleitung
Forstschutzhelm
Operating Instructions
Forest Safety Helmet
Mode dʼemploi
Casque forestier
Istruzioni per lʼuso
Elmetto forestale
Bruksanvisning
Skogshjälm
Bf Upute za rukovanje
Zaštitni šumarski šljem
4Uputstva za rukovanje
Zaštitni šumarski šlem
jNávod k obsluze
Lesnická ochranná přilba
WNávod na obsluhu
Lesná ochranná prilba
BG-SH 1
Anleitung_BG_SH_1_SPK1:_ 06.02.2009 7:00 Uhr Seite 1

2
1
2
5
4
3
2
5
1
3a
6
Anleitung_BG_SH_1_SPK1:_ 06.02.2009 7:00 Uhr Seite 2

3
3b 3c
3d 3e
3f 3g
Anleitung_BG_SH_1_SPK1:_ 06.02.2009 7:00 Uhr Seite 3

4
4b 4c
5
8
-+
6
4a3h
A
B
C
Anleitung_BG_SH_1_SPK1:_ 06.02.2009 7:00 Uhr Seite 4

5
7 8
910
EF
D
GH
J
K
I
M
L
Anleitung_BG_SH_1_SPK1:_ 06.02.2009 7:00 Uhr Seite 5

6
D
Achtung!
Beim Benutzen von Geräten müssen einige
Sicherheitsvorkehrungen eingehalten werden, um
Verletzungen und Schäden zu verhindern. Lesen Sie
diese Bedienungsanleitung / Sicherheitshinweise
deshalb sorgfältig durch. Bewahren Sie diese gut
auf, damit Ihnen die Informationen jederzeit zur
Verfügung stehen. Falls Sie das Gerät an andere
Personen übergeben sollten, händigen Sie diese
Bedienungsanleitung / Sicherheitshinweise bitte mit
aus. Wir übernehmen keine Haftung für Unfälle oder
Schäden, die durch Nichtbeachten dieser Anleitung
und den Sicherheitshinweisen entstehen.
1. Sicherheitshinweise
앬Benutzen Sie den Helm nur korrekt justiert, damit
die volle Schutzwirkung vorhanden ist.
앬Benutzen Sie nur vom Hersteller empfohlene
Zurüstteile. Verändern Sie den Helm in keiner
Form für die Montage anderer Zubehörteile.
앬Halten Sie den Helm fern von lösungsmittel- oder
alkoholhaltigen Flüssigkeiten wie Sprays,
Lacken, etc. Diese können die Kunststoffe
beschädigen. Bringen Sie Etiketten nur mit auf
Wasser, Acryl oder Gummi basierenden
Klebstoffen an. Der Helm darf nicht
bemalt/lackiert werden.
앬Durch Stöße oder Schläge kann der Helm
äußerlich nicht sichtbare Beschädigungen
aufweisen (z.B. Haarrisse) und im Notfall keinen
vollen Schutz mehr bieten. Tauschen Sie den
Helm aus, sobald er starker Belastung
ausgesetzt wurde.
앬Benutzen Sie den Gehörschutz solange die
Lärmbelästigung andauert. Der volle Schutz ist
nur bei voller Tragedauer gewährleistet.
앬Untersuchen Sie den Helm und das Zubehör vor
jeder Benutzung auf Beschädigungen wie Risse,
Sprünge, Abschürfungen etc. Benutzen Sie nur
einwandfreie Helme und Zubehör.
Beschreibung der Symbole auf dem Helm
(Bild 7-9)
D = Herstellungsmonat
E = Herstellungsjahrzehnt (z.B. 2009)
F = Herstellungjahr (z.B. 2009)
G = CE – Zeichen
H = Angewandte Norm
I = Material
J = Hersteller Type
K = Helm Größe
L = Helm Größe
M = Hersteller
2. Beschreibung und Lieferumfang
(Bild 1/2)
1. Außenschale
2. Visier
3. Gehörschutz
4. Gehörschutz-Verstellung
5. Nackenband-Verstellung
6. 4-Punkt-Gurtband
3. Bestimmungsgemäße Verwendung
Der Schutzhelm schützt den Tragenden vor Verlet-
zungen im Kopfbereich durch herabfallende oder
pendelnde Gegenstände und durch Stöße gegen
feststehende Objekte.
Der Helm darf nur nach seiner Bestimmung verwen-
det werden. Jede weitere darüber hinausgehende
Verwendung ist nicht bestimmungsgemäß. Für
daraus hervorgerufene Schäden oder Verletzungen
aller Art haftet der Benutzer/Bediener und nicht der
Hersteller.
Bitte beachten Sie, dass unsere Helme bestim-
mungsgemäß nicht für den gewerblichen, handwerk-
lichen oder industriellen Einsatz konstruiert wurden.
Wir übernehmen keine Gewährleistung, wenn der
Helm in Gewerbe-, Handwerks- oder Industriebe-
trieben sowie bei gleichzusetzenden Tätigkeiten ein-
gesetzt wird.
Anleitung_BG_SH_1_SPK1:_ 06.02.2009 7:00 Uhr Seite 6

D
7
4. Technische Daten
Kopfumfang: 52-64 cm
Gewicht: 720 g
Gehörschutz:
Frequenz (Hz) 125
Mittlere Schalldämmung (dB) 9,8
Standard-Abweichung (dB) 3,0
Angenommener Schallschutz (APV) (dB) 6,8
Frequenz (Hz) 250
Mittlere Schalldämmung (dB) 14,0
Standard-Abweichung (dB) 1,2
Angenommener Schallschutz (APV) (dB) 12,8
Frequenz (Hz) 500
Mittlere Schalldämmung (dB) 22,8
Standard-Abweichung (dB) 2,2
Angenommener Schallschutz (APV) (dB) 20,6
Frequenz (Hz) 1000
Mittlere Schalldämmung (dB) 30,4
Standard-Abweichung (dB) 3,4
Angenommener Schallschutz (APV) (dB) 27,0
Frequenz (Hz) 2000
Mittlere Schalldämmung (dB) 31,6
Standard-Abweichung (dB) 3,3
Angenommener Schallschutz (APV) (dB) 28,3
Frequenz (Hz) 4000
Mittlere Schalldämmung (dB) 33,6
Standard-Abweichung (dB) 3,4
Angenommener Schallschutz (APV) (dB) 30,2
Frequenz (Hz) 8000
Mittlere Schalldämmung (dB) 31,3
Standard-Abweichung (dB) 2,7
Angenommener Schallschutz (APV) (dB) 28,6
Empfohlener Pegelbereich:
Hoch (H) = 29dB
Mittel (M) = 22dB
Tief (L) = 14dB
Kernschalldämmung (SNR) =25dB
Kennummern, Namen und vollständige Adressen
der jeweiligen Prüfstellen:
Helm
N.B. 0197
Tüv Rheinland Product Safety Gmbh
Am Grauen Stein
D-51105 Cologne
Gesichtsschutz und Gehörschutz
N.B. 0194
Select International UK Ltd
23-25 Friar Lane
Lelcester
LE 1 5QQ. England
5. Montage
Siehe Bild 3a-3h
6. Einstellmöglichkeiten
6.1 Nackenband
Durch Drehen der Nackenband-Verstellung (Bild
2/Pos. 5) wird der Schutzhelm an den Kopfumfang
angepasst. Drehen im Uhrzeigersinn verringert den
Umfang, Drehen gegen den Uhrzeigersinn erhöht
den Umfang. Benutzen Sie den Helm nur korrekt
eingestellt.
Für eine korrekte Einstellung den Schutzhelm bei
maximalem Umfang so aufsetzen dass das 4-Punkt-
Gurtband (Bild 2/Pos. 6) straff auf dem Kopf aufliegt.
Durch Drehen der Nackenband-Verstellung im
Uhrzeigersinn das Nackenband so lange straffen bis
der Helm fest auf dem Kopf sitzt, aber nicht drückt.
6.2 Gehörschutz
Der Gehörschutz ist in Höhe und Position verstellbar.
Die Höhe wird verstellt durch Verschieben der
Gehörschutzkapsel (Bild 4a). Die Position lässt sich
durch Drehen (Bild 4b) verändern. Für ein bequemes
Auf- und Absetzen des Helmes kann der
Gehörschutz durch ziehen nach außen weggeklappt
werden. Bei nachlassender Spannkraft kann diese
durch Verschieben der Gehörschutz-Verstellung
(Bild 4c/Pos. 4) in Richtung „ + “ nachgestellt
werden. In Richtung „ - “ wird die Spannkraft
verringert.
Anleitung_BG_SH_1_SPK1:_ 06.02.2009 7:00 Uhr Seite 7

D
8
6.3 Visier
Der Abstand vom Gesicht zum Visier wird verstellt
durch Verschieben des Visiers in der
Visierbefestigung wie in Bild 5 gezeigt. Bei Bedarf
kann das Visier durch ziehen nach oben
weggeklappt werden.
6.4 Höhenverstellung
Das Nackenband ist in seiner Höhe einstellbar. Zum
Einstellen der gewünschten Höhe den Haltezapfen
(Bild 6/Pos. A) entweder in der unteren Position (Bild
6/Pos. B) oder in der oberen Position (Bild 6/Pos. C)
arretieren. Achtung: Die Haltezapfen müssen auf
beiden Seiten immer in gleicher Höhe arretiert sein.
7. Reinigung, Lagerung und
Ersatzteilbestellung
7.1 Reinigung
앬Reinigen Sie den Helm regelmäßig mit
lauwarmem Wasser und etwas Schmierseife.
Verwenden Sie keine Reinigungs- oder
Lösungsmittel; diese könnten die Kunststoffe
angreifen.
앬Zur regelmäßigen Reinigung und Desinfektion
des Gehörschutzes können Sie die Dämmkissen
aus den Gehörschutzkapseln ziehen und mit
lauwarmem Wasser reinigen. Auch die
Dichtungsringe können abgenommen werden,
sie sind an die Gehörschutzkapseln angeclipst
und können einfach herunter gezogen werden.
앬Das Visier regelmäßig mit lauwarmem Wasser
und etwas Schmierseife reinigen oder mit
Druckluft ausblasen.
7.2 Lagerung
앬Den Helm nicht in extrem heißen Umgebungen
und unter Einwirkung von UV-Strahlen lagern.
Dies kann die Lebenszeit der Kunststoffe
verkürzen. Den Helm bei Nichtgebrauch an einer
dunklen, kühlen Stelle lagern.
앬Bei der Lagerung den Gehörschutz in
Betriebsstellung halten und sicherstellen dass
die Dichtungsringe nicht gequetscht werden.
Eine dauerhafte Belastung der Dichtungsringe
beeinträchtigt deren Wirkung.
7.2.1 Haltbarkeit
Aufgrund der Alterung der verwendeten Stoffe darf
der Helm maximal 5 Jahre nach der Herstellung
verwendet werden. Das Herstellungsdatum
entnehmen Sie dem Helm (Bild 7).
D = Herstellungsmonat
E = Herstellungsjahrzehnt (z.B. 2009)
F = Herstellungjahr (z.B. 2009)
7.3 Ersatzteilbestellung:
Bei der Ersatzteilbestellung sollten folgende
Angaben gemacht werden;
앬Typ des Gerätes
앬Artikelnummer des Gerätes
앬Ident-Nummer des Gerätes
앬Ersatzteilnummer des erforderlichen Ersatzteils
Aktuelle Preise und Infos finden Sie unter
www.isc-gmbh.info
8. Entsorgung und Wiederverwertung
Das Gerät befindet sich in einer Verpackung um
Transportschäden zu verhindern. Diese Verpackung
ist Rohstoff und ist somit wieder verwendbar oder
kann dem Rohstoffkreislauf zurückgeführt werden.
Das Gerät und dessen Zubehör bestehen aus
verschiedenen Materialien, wie z.B. Metall und
Kunststoffe. Führen Sie defekte Bauteile der
Sondermüllentsorgung zu. Fragen Sie im
Fachgeschäft oder in der Gemeindeverwaltung nach!
Anleitung_BG_SH_1_SPK1:_ 06.02.2009 7:00 Uhr Seite 8

GB
9
Important!
When using the equipment, a few safety precautions
must be observed to avoid injuries and damage.
Please read the complete operating instructions and
safety regulations with due care. Keep this manual in
a safe place, so that the information is available at all
times. If you give the equipment to any other person,
hand over these operating instructions and safety
regulations as well. We cannot accept any liability for
damage or accidents which arise due to a failure to
follow these instructions and the safety instructions.
1. Safety regulations
앬Use the helmet only after it has been correctly
adjusted to ensure that it offers you full
protection.
앬Use only additional parts that have been
recommended by the manufacturer. Do not
modify the helmet in any way to facilitate the
installation of other accessories.
앬Keep the helmet away from liquids that contain
solvents or alcohol, such as sprays, coatings,
etc. These may damage the plastic. Apply labels
to the helmet only with water, acrylic or rubber-
based adhesives. The helmet must not be
painted or coated.
앬Impacts and blows may cause damage to the
helmet that cannot be seen from the outside (for
example hairline cracks). In such cases the
helmet may not provide full protection. Replace
the helmet immediately after it has been
subjected to any great stresses.
앬Use the ear protectors for as long as the noise
level is high. It will only provide full protection if it
is worn throughout such noise.
앬Each time before you use the helmet and the
accessories, examine them for signs of damage
such as cracks, ruptures, chafing, etc. Use the
helmet and accessories only if they are in perfect
condition.
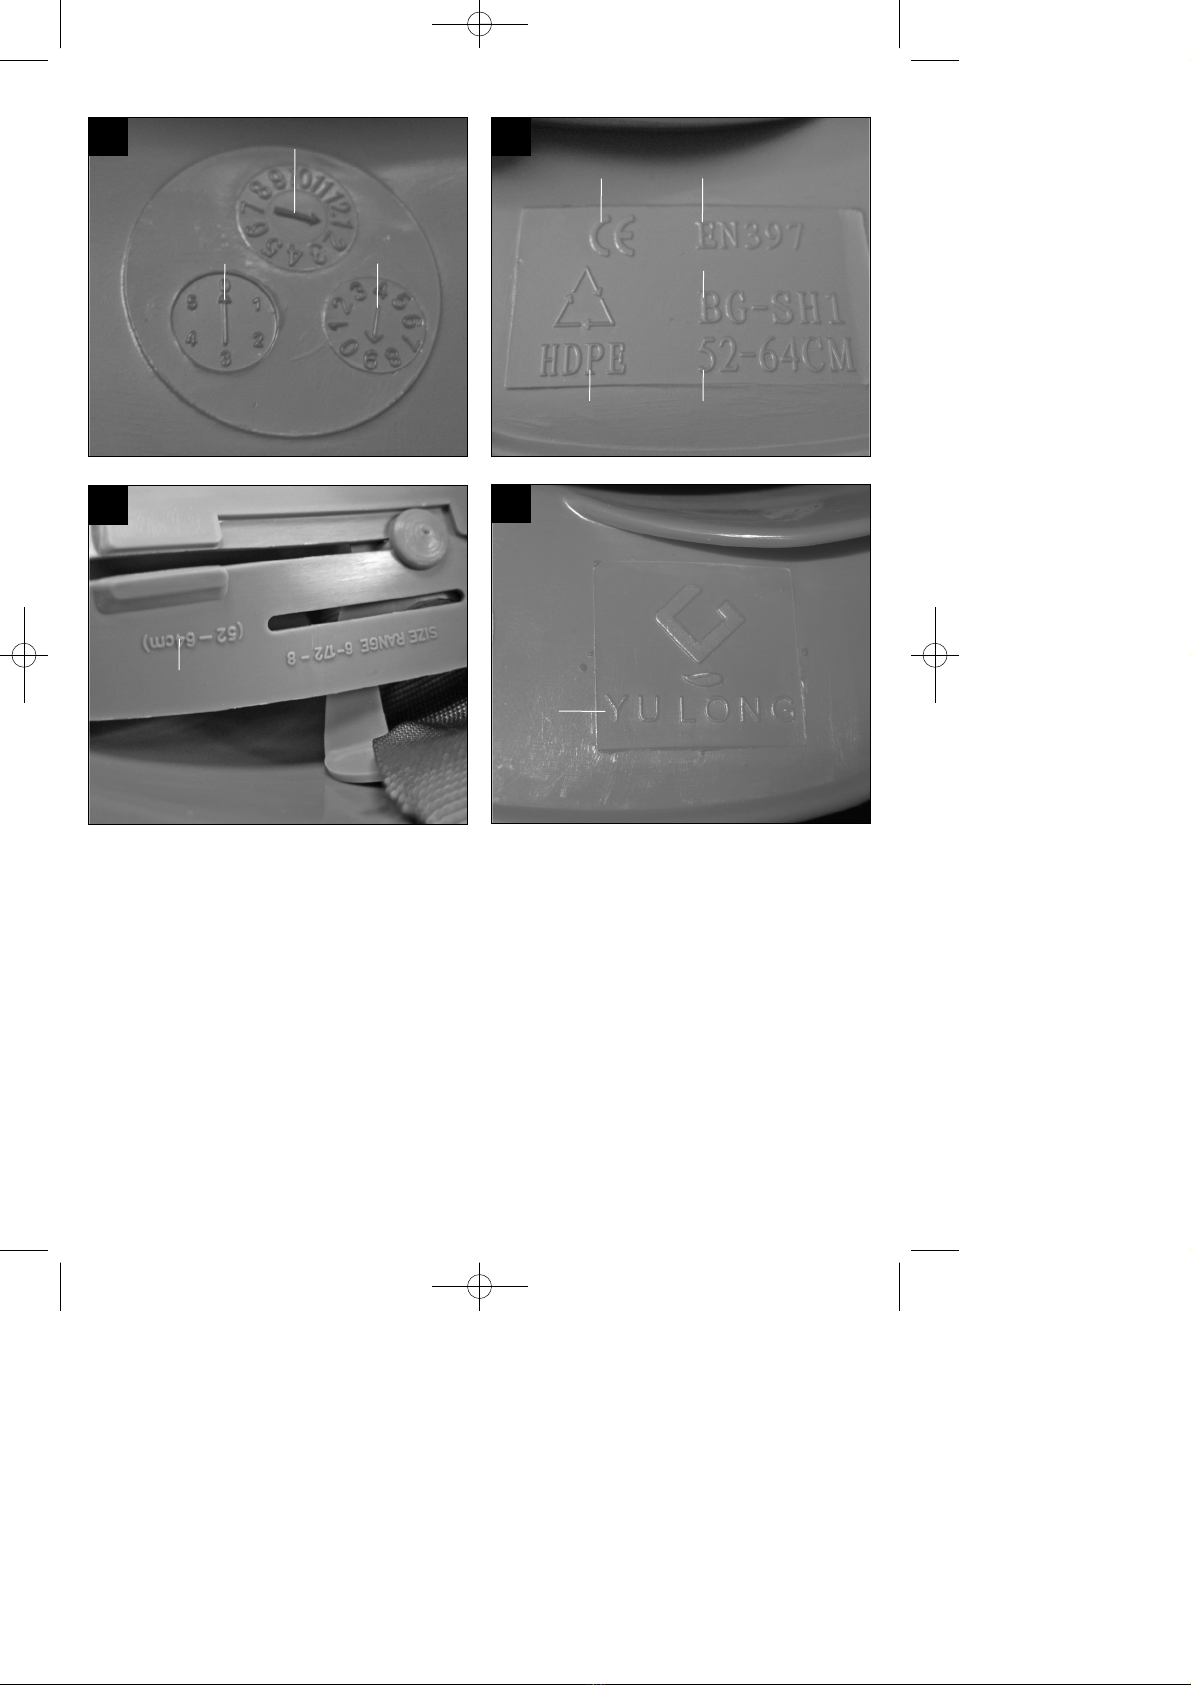
Description of the symbols on the helmet
(Figures 7-9)
D = Month of manufacture
E = Decade of manufacture (for example 2009)
F = Year of manufacture (for example 2009)
G = CE mark
H = Applied standard
I = Material
J = Manufacturerʼs type
K = Helmet size
L = Helmet size
M = Manufacturer
2. Layout and items supplied (Fig. 1/2)
1. Exterior shell
2. Visor
3. Ear protectors
4. Ear protector adjuster
5. Neck strap adjuster
6. Four-point strap
3. Intended use
The safety helmet protects the wearer from head
injuries caused by falling or swinging objects and by
blows against fixed objects.
The helmet may be used only for the tasks it is
designed to handle. Any other use is deemed to be a
case of misuse. The user / operator and not the
manufacturer will be liable for any damage or injuries
of any kind caused as a result of this.
Please note that our helmets have not been
designed for use in commercial, trade or industrial
applications. Our warranty will be voided if the
helmet is used in commercial, trade or industrial
businesses or for equivalent purposes.
4. Technical data
Head circumference: 52-64 cm
Weight: 720 g
Ear protection:
Frequency (Hz) 125
Average sound insulation (dB) 9,8
Standard deviation (dB) 3,0
Assumed sound protection (APV) (dB) 6,8
Frequency (Hz) 250
Average sound insulation (dB) 14,0
Standard deviation (dB) 1,2
Assumed sound protection (APV) (dB) 12,8
Frequency (Hz) 500
Average sound insulation (dB) 22,8
Standard deviation (dB) 2,2
Assumed sound protection (APV) (dB) 20,6
Frequency (Hz) 1000
Average sound insulation (dB) 30,4
Standard deviation (dB) 3,4
Anleitung_BG_SH_1_SPK1:_ 06.02.2009 7:00 Uhr Seite 9

GB
10
Assumed sound protection (APV) (dB) 27,0
Frequency (Hz) 2000
Average sound insulation (dB) 31,6
Standard deviation (dB) 3,3
Assumed sound protection (APV) (dB) 28,3
Frequency (Hz) 4000
Average sound insulation (dB) 33,6
Standard deviation (dB) 3,4
Assumed sound protection (APV) (dB) 30,2
Frequency (Hz) 8000
Average sound insulation (dB) 31,3
Standard deviation (dB) 2,7
Assumed sound protection (APV) (dB) 28,6
Recommended level range:
High (H) = 29 dB
Medium (M) = 22 dB
Low (L) = 14 dB
Core sound insulation (SNR) = 25 dB
ID numbers, names and complete addresses of
the respective test organizations:
Helmet
N.B. 0197
Tüv Rheinland Product Safety Gmbh
Am Grauen Stein
D-51105 Cologne
Face protection and hearing protection
N.B. 0194
Select International UK Ltd
23-25 Friar Lane
Lelcester
LE 1 5QQ. England
5. Assembly
See Fig. 3a-3h
6. Adjustments
6.1 Neck strap
The safety helmet can be adjusted to the
circumference of your head by turning the neck strap
adjuster (Fig. 2 / Item 5). Turning it clockwise will
reduce the circumference, turning it anti-clockwise
will increase the circumference. Only use the helmet
after it has been adjusted correctly.
To achieve the correct adjustment of the safety
helmet at maximum circumference, place it on your
head so that the 4-point strap (Fig. 2 / Item 6) is taut
on your head. Turn the neck strap adjuster clockwise
to tension the neck strap until the helmet sits
securely on your head without causing pressure.
6.2 Ear protection
The height and position of the ear protectors can be
adjusted. The height can be adjusted by sliding the
ear protection capsules (Fig. 4a). Their position can
be changed by turning them (Fig. 4b). To make it
easier to put the helmet on and take it off, the ear
protectors can be moved out of the way. If the
tension weakens, it can be adjusted by sliding the
ear protector adjuster (Fig. 4c/Item 4) towards the “+”
sign. The tension will be reduced if it is moved
towards the “-” sign.
6.3 Visor
The distance between your face and the visor can be
adjusted by moving the visor in the visor mounting as
shown in Fig. 5. If necessary the visor can be moved
out of the way by pulling it upwards.
6.4 Height adjustment
The height of the neck strap can be adjusted. To set
the required height, securely fit the retaining element
(Figure 6/Item A) to either the bottom position (Figure
6/Item B) or the top position (Figure 6/Item C).
Important: The retaining element must always be
set to the same height on both sides.
Anleitung_BG_SH_1_SPK1:_ 06.02.2009 7:00 Uhr Seite 10

7. Cleaning, storage and ordering of
spare parts
7.1 Cleaning
앬Clean the helmet at regular intervals using
lukewarm water and a little lubricant soap. Do
not use cleaning agents or solvents; these may
be aggressive to the plastic.
앬For regular cleaning and disinfection of the ear
protectors you can pull the insulating pads out of
the capsules and rinse them in lukewarm water.
The sealing rings can also be removed. They are
clipped to the ear protection capsules and can
simply be pulled off downwards.
앬Clean the visor at regular intervals using
lukewarm water and a little lubricant soap or
blow it out with compressed air.
7.2 Storage
앬Do not store the helmet in extremely hot
environments where it may be exposed to UV
radiation. This may reduce the service life of the
plastic. Store the helmet in a cool dark place
when it is not in use.
앬When the helmet is in storage, keep the ear
protectors in working position and make sure that
the sealing rings are not squashed. If the sealing
rings are under permanent strain, this will reduce
their effectiveness.
7.2.1 Lifespan
Due to aging of its materials, the helmet may be
used for no more than 5 years after manufacture.
The date of manufacture is indicated on the helmet
(Figure 7).
D = Month of manufacture
E = Decade of manufacture (for example 2009)
F = Year of manufacture (for example 2009)
7.3 Ordering replacement parts
Please quote the following data when ordering
replacement parts:
앬Type of machine
앬Article number of the machine
앬Identification number of the machine
앬Replacement part number of the part required
For our latest prices and information please go to
www.isc-gmbh.info
8. Disposal and recycling
The unit is supplied in packaging to prevent its being
damaged in transit. This packaging is raw material
and can therefore be reused or can be returned to
the raw material system.
The unit and its accessories are made of various
types of material, such as metal and plastic.
Defective components must be disposed of as
special waste. Ask your dealer or your local council.
11
GB
Anleitung_BG_SH_1_SPK1:_ 06.02.2009 7:00 Uhr Seite 11

Attention !
Lors de lʼutilisation dʼappareils, il faut respecter
certaines mesures de sécurité afin dʼéviter des
blessures et dommages. Veuillez donc lire
attentivement ce mode dʼemploi/ces consignes de
sécurité. Veillez à le conserver en bon état pour
pouvoir accéder aux informations à tout moment. Si
lʼappareil doit être remis à dʼautres personnes, veillez
à leur remettre aussi ce mode dʼemploi/ces
consignes de sécurité. Nous déclinons toute
responsabilité pour les accidents et dommages dus
au non-respect de ce mode dʼemploi et des
consignes de sécurité.
1. Consignes de sécurité
앬Utilisez le casque uniquement lorsquʼil est
correctement ajusté afin de bénéficier de sa
pleine protection.
앬Utilisez uniquement les pièces complémentaires
recommandées par le producteur. Ne modifiez le
casque dʼaucune manière pour y monter dʼautres
accessoires.
앬Maintenez le casque à distance de détergents ou
liquides alcoolisés tels des sprays, vernis, etc.
Ces derniers peuvent détériorer les matières
plastiques. Appliquez les étiquettes uniquement
avec des colles à base dʼeau, dʼacrylique ou de
caoutchouc. Ne jamais peindre/vernir le casque.
앬Les chocs et les coups peuvent provoquer des
détériorations extérieurement non visibles sur le
casque (p. ex. fissures) qui nʼoffre plus de
protection complète en cas de besoin.
Remplacez le casque dès quʼil a été soumis à de
fortes sollicitations.
앬Utilisez la protection de lʼouïe pendant la durée
des nuisances sonores. La pleine protection
nʼest garantie quʼen cas de port pendant toute la
durée.
앬Examinez le casque et les accessoires avant
chaque utilisation pour déceler dʼéventuelles
détériorations comme des fissures, fêlures,
éraflures, etc. Utilisez exclusivement des
casques et accessoires en excellent état.
Description des symboles sur le casque (fig. 7-9)
D = mois de fabrication
E = décennie de fabrication (p. ex. 2009)
F = année de fabrication (p. ex. 2009)
G = sigle CE
H = norme appliquée
I = matériau
J = type du producteur
K = taille du casque
L = taille du casque
M = producteur
2. Description et volume de livraison
(figures 1/2)
1. Coque extérieure
2. Visière
3. Protection de lʼouïe
4. Réglage de la protection de lʼouïe
5. Réglage de la bande cervicale
6. Sangle 4 points
3. Utilisation conforme à lʼaffectation
Ce casque de protection protège la personne qui le
porte contre les blessures au niveau de la tête dues
à la chute ou à lʼoscillation dʼobjets et à des chocs
contre des objets fixes.
Le casque doit exclusivement être employé
conformément à son affectation. Chaque utilisation
allant au-delà de cette affectation est considérée
comme non conforme. Pour les dommages en
résultant ou les blessures de tout genre, le
producteur décline toute responsabilité et
lʼopérateur/lʼexploitant est responsable.
Veillez au fait que nos casques, conformément à leur
affectation, nʼont pas été construits pour être utilisés
dans un environnement professionnel, industriel ou
artisanal. Nous déclinons toute responsabilité si le
casque est utilisé professionnellement,
artisanalement ou dans des sociétés industrielles,
tout comme à toute activité équivalente.
12
F
Anleitung_BG_SH_1_SPK1:_ 06.02.2009 7:00 Uhr Seite 12

F
13
4. Caractéristiques techniques
Tour de tête : 52-64 cm
Poids : 720 g
Protection de lʼouïe :
Fréquence (Hz) 125
Isolation acoustique moyenne (dB) 9,8
Tolérance standard (dB) 3,0
Isolation phonique admise (APV) (dB) 6,8
Fréquence (Hz) 250
Isolation acoustique moyenne (dB) 14,0
Tolérance standard (dB) 1,2
Isolation phonique admise (APV) (dB) 12,8
Fréquence (Hz) 500
Isolation acoustique moyenne (dB) 22,8
Tolérance standard (dB) 2,2
Isolation phonique admise (APV) (dB) 20,6
Fréquence (Hz) 1000
Isolation acoustique moyenne (dB) 30,4
Tolérance standard (dB) 3,4
Isolation phonique admise (APV) (dB) 27,0
Fréquence (Hz) 2000
Isolation acoustique moyenne (dB) 31,6
Tolérance standard (dB) 3,3
Isolation phonique admise (APV) (dB) 28,3
Fréquence (Hz) 4000
Isolation acoustique moyenne (dB) 33,6
Tolérance standard (dB) 3,4
Isolation phonique admise (APV) (dB) 30,2
Fréquence (Hz) 8000
Isolation acoustique moyenne (dB) 31,3
Tolérance standard (dB) 2,7
Isolation phonique admise (APV) (dB) 28,6
Plage recommandée :
Haute (H) = 29dB
Moyenne (M) = 22dB
Basse (L) = 14dB
Isolation phonique principale (SNR) =25dB
Numéros dʼidentification, nom et adresses
complètes des instituts de contrôle respectifs :
Casque
N.B. 0197
Tüv Rheinland Product Safety Gmbh
Am Grauen Stein
D-51105 Cologne
Protection du visage et protection de lʼouïe
N.B. 0194
Select International UK Ltd
23-25 Friar Lane
Lelcester
LE 1 5QQ. England
5. Montage
Voir. fig. 3a-3h
6. Possibilités de réglage
6.1 Bande cervicale
En tournant le réglage de la bande cervicale (figure
2/pos. 5), vous pouvez adapter le casque de
protection au tour de tête. Tourner dans le sens des
aiguilles dʼune montre diminue la circonférence,
tourner dans le sens contraire à celui des aiguilles
dʼune montre augmente la circonférence. Utilisez le
casque uniquement lorsquʼil est réglé correctement.
Pour obtenir un réglage correct, placez le casque en
cas de tour de tête maximal de sorte que la sangle 4
points (figure 2/pos. 6) repose, tendue, sur la tête.
En tournant le réglage de la bande cervicale dans le
sens des aiguilles dʼune montre, tendre jusquʼà ce
que le casque soit solidement fixé sur la tête, mais
sans serrer.
6.2 Protection de lʼouïe
La hauteur et la position de la protection de lʼouïe
sont réglables.
La hauteur se règle en déplaçant la coquille de la
protection de lʼouïe (figure 4A). La position peut être
modifiée par rotation (figure 4b). Pour mettre et
enlever le casque en tout confort, la protection de
lʼouïe peut être rabattue vers lʼextérieur en tirant
dessus. Lorsque lʼeffort de serrage se relâche, elle
peut être rajustée en déplaçant le réglage de la
protection de lʼouïe (figure 4c/pos. 4) dans la
direction « + ». Dans la direction « - », lʼeffort de
serrage diminue.
Anleitung_BG_SH_1_SPK1:_ 06.02.2009 7:00 Uhr Seite 13

F
14
6.3 Visière
La distance du visage à la visière est réglée par
déplacement de la visière dans la fixation de la
visière, comme indiqué dans la figure 5. Si
nécessaire, la visière peut être rabattue vers le haut
en tirant dessus.
6.4 Réglage de la hauteur
Le bandeau de la nuque est réglable en hauteur.
Pour régler la hauteur désirée, arrêter les tourillons
de retenue (figure 6/pos. A) soit en position inférieure
(figure 6/pos. B) soit en position supérieure (figure
6/pos. C). Attention : Les tourillons de retenue
doivent toujours être arrêtés à la même hauteur des
deux côtés.
7. Nettoyage, stockage et commande
de pièces de rechange
7.1 Nettoyage
앬Nettoyez régulièrement le casque avec de lʼeau
tiède et un peu de savon noir. Nʼutilisez aucun
produit de nettoyage ni détergent ; ils peuvent
attaquer les plastiques.
앬Pour le nettoyage et la désinfection réguliers de
la protection de lʼouïe, vous pouvez retirer les
coussins isolants des coquilles de protection de
lʼouïe et les nettoyer avec de lʼeau tiède. Les
bagues dʼétanchéité peuvent également être
enlevées, elles sont clipsées sur les coquilles de
la protection de lʼouïe et peuvent être retirées
simplement.
앬Nettoyez régulièrement la visière avec de lʼeau
tiède et un peu de savon noir ou souffler avec de
lʼair comprimé.
7.2 Stockage
앬Nʼentreposez pas le casque dans un
environnement extrêmement chaud et exposé
aux rayons UV. Ceci peut réduire la durée de vie
des matières plastiques. En cas de non-besoin,
entreposez le casque à un endroit frais et
sombre.
앬Lors du rangement, tenez la protection de lʼouïe
en position de fonctionnement et assurez-vous
que les bagues dʼétanchéité ne sont pas
écrasées. Une charge permanente sur les
bagues dʼétanchéité altère leur performance.
7.2.1 Durée de conservation
En raison du vieillissement des matériaux employés,
le casque doit être utilisé au maximum pendant 5
ans après sa fabrication. La date de fabrication est
indiquée sur le casque (figure 7).
D = mois de fabrication
E = décennie de fabrication (p. ex. 2009)
F = année de production (p. ex. 2009)
7.3 Commande de pièces de rechange :
Veuillez indiquer ce qui suit pour toute commande de
pièces de rechange ;
앬Type de lʼappareil
앬Référence de lʼappareil
앬Numéro dʼidentification de lʼappareil
앬Numéro de la pièce de rechange requise
Vous trouverez les prix et informations actuelles à
lʼadresse www.isc-gmbh.info
8. Mise au rebut et recyclage
Lʼappareil se trouve dans un emballage permettant
dʼéviter les dommages dus au transport. Cet
emballage est une matière première et peut donc
être réutilisé ultérieurement ou être réintroduite dans
le circuit des matières premières. Lʼappareil et ses
accessoires sont en matériaux divers, comme par
ex. des métaux et matières plastiques. Eliminez les
composants défectueux dans les systèmes
dʼélimination des déchets spéciaux. Renseignez-
vous dans un commerce spécialisé ou auprès de
lʼadministration de votre commune !
Anleitung_BG_SH_1_SPK1:_ 06.02.2009 7:00 Uhr Seite 14

I
15
Attenzione!
Nellʼusare gli apparecchi si devono rispettare diverse
avvertenze di sicurezza per evitare lesioni e danni.
Quindi leggete attentamente queste istruzioni per
lʼuso/le avvertenze di sicurezza. Conservate bene le
informazioni per averle a disposizione in qualsiasi
momento. Se date lʼapparecchio ad altre persone,
consegnate queste istruzioni per lʼuso/le avvertenze
di sicurezza insieme allʼapparecchio. Non ci
assumiamo alcuna responsabilità per incidenti o
danni causati dal mancato rispetto di queste
istruzioni e delle avvertenze di sicurezza.
1. Avvertenze di sicurezza
앬Usate lʼelmetto sempre regolato correttamente,
in modo da ottenere il massimo effetto di
protezione.
앬Usate solo accessori consigliati dal costruttore.
Non modificate lʼelmetto in alcun modo per il
montaggio di altri accessori.
앬Tenete lʼelmetto lontano da solventi o liquidi che
contengono alcool quali spray, vernici, ecc. che
potrebbero danneggiarne la plastica. Applicate
solo etichette con collanti a base di acqua,
acrilico o gomma. Lʼelmetto non deve venire
dipinto/verniciato.
앬A causa di colpi o scosse lʼelmetto potrebbe non
garantire più la massima protezione in caso di
emergenza anche se non presenta danni visibili
(ad es. rotture capillari). Sostituite lʼelmetto dopo
lʼesposizione a forti sollecitazioni.
앬Usate le cuffie antirumore per lʼintera durata
dellʼesposizione al rumore. La massima
protezione viene assicurata solo se si indossano
per lʼintera durata dellʼesposizione.
앬Prima di ogni utilizzo controllate che lʼelmetto e
gli accessori non presentino danni quali
incrinature, crepe, escoriazioni, ecc. Utilizzate
solo elmetti e accessori in perfetto stato.
Descrizione dei simboli sul casco (Fig. 7-9)
D = Mese di produzione
E = Decennio di produzione (per es. 2009)
F = Anno di produzione (per es. 2009)
G = Marchio CE
H = Norma applicata
I = Materiale
J = Tipo del produttore
K = Misura del casco
L = Misura del casco
M = Produttore
2. Descrizione ed elementi forniti
(Fig. 1/2)
1. Calotta esterna
2. Visiera
3. Cuffie antirumore
4. Rotella di regolazione delle cuffie antirumore
5. Rotella di regolazione dellʼarchetto di sostegno
alla nuca
6. Cinghia a 4 punti
3. Utilizzo proprio
Lʼelmetto di protezione protegge da lesioni alla testa
causate da oggetti in caduta o pendenti e da urti
contro oggetti fissi.
Lʼelmetto deve venire usato solamente per lo scopo
a cui è destinato. Ogni altro tipo di uso che esuli da
quello previsto non è un uso conforme.
Lʼutilizzatore/lʼoperatore, e non il costruttore, è
responsabile dei danni e delle lesioni di ogni tipo che
ne risultino.
Tenete presente che i nostri elmetti non sono stati
costruiti per lʼimpiego professionale, artigianale o
industriale. Non ci assumiamo alcuna garanzia
quando lʼelmetto viene usato in imprese commerciali,
artigianali o industriali, o in attività equivalenti.
4. Caratteristiche tecniche
Circonferenza testa: 52-64 cm
Peso: 720 g
Cuffie antirumore
Frequenza (Hz) 125
Attenuazione acustica media (dB) 9,8
Scarto standard (dB) 3,0
Protezione contro i rumori ottenuta (APV) (dB) 6,8
Frequenza (Hz) 250
Attenuazione acustica media (dB) 14,0
Scarto standard (dB) 1,2
Protezione contro i rumori ottenuta (APV) (dB) 12,8
Frequenza (Hz) 500
Attenuazione acustica media (dB) 22,8
Scarto standard (dB) 2,2
Protezione contro i rumori ottenuta (APV) (dB) 20,6
Anleitung_BG_SH_1_SPK1:_ 06.02.2009 7:00 Uhr Seite 15

I
16
Frequenza (Hz) 1000
Attenuazione acustica media (dB) 30,4
Scarto standard (dB) 3,4
Protezione contro i rumori ottenuta (APV) (dB) 27,0
Frequenza (Hz) 2000
Attenuazione acustica media (dB) 31,6
Scarto standard (dB) 3,3
Protezione contro i rumori ottenuta (APV) (dB) 28,3
Frequenza (Hz) 4000
Attenuazione acustica media (dB) 33,6
Scarto standard (dB) 3,4
Protezione contro i rumori ottenuta (APV) (dB) 30,2
Frequenza (Hz) 8000
Attenuazione acustica media (dB) 31,3
Scarto standard (dB) 2,7
Protezione contro i rumori ottenuta (APV) (dB) 28,6
Livello di rumore consigliato:
alto (H) = 29dB
medio (M) = 22dB
basso (L) = 14dB
Riduzione semplificata del livello del rumore
(SNR) = 25dB
Codici di identificazione, nomi ed indirizzi
completi dei rispettivi organismi di controllo:
Casco
N.B. 0197
Tüv Rheinland Product Safety Gmbh
Am Grauen Stein
D-51105 Cologne
Protezione del viso e cuffie antirumore
N.B. 0194
Select International UK Ltd
23-25 Friar Lane
Lelcester
LE 1 5QQ. England
5. Montaggio
Si veda Fig. 3a-3h
6. Possibilità di regolazione
6.1 Archetto di sostegno alla nuca
Ruotando la rotella di regolazione dellʼarchetto di
sostegno (Fig. 2/pos. 5) lʼelmetto viene adattato alla
circonferenza testa. Ruotandola in senso orario la
circonferenza diminuisce, in senso antiorario
aumenta. Usate lʼelmetto solo se regolato
correttamente.
Per una regolazione corretta allargate la
circonferenza dellʼelmetto al massimo in modo che la
cinghia a 4 punti (Fig. 2/pos. 6) sia tesa nel punto in
cui poggia sulla testa. Ruotando la rotella di
regolazione dellʼarchetto di sostegno in senso orario
tendete lʼarchetto in modo che lʼelmetto poggi
saldamente sulla testa, ma non faccia pressione.
6.2 Cuffie antirumore
Le cuffie antirumore hanno altezza e posizione
regolabili. Lʼaltezza viene regolata spostando verso
lʼalto o verso il basso lʼarchetto delle cuffie (Fig. 4a).
La posizione può essere modificata, invece,
ruotando la rotella (Fig. 4b). Per poter indossare e
sfilare lʼelmetto in modo confortevole, è possibile far
rientrare le cuffie spingendo verso lʼesterno. Se la
forza di bloccaggio diminuisce, è possibile regolarla
nuovamente in direzione „ + “ ruotando la rotella di
regolazione delle cuffie (Fig. 4c/pos. 4). In direzione „
- “ la forza di bloccaggio viene diminuita.
6.3 Visiera
La distanza tra il viso e la visiera può essere regolata
facendo scorrere avanti o indietro la visiera nel punto
di fissaggio, come mostrato in Fig. 5. Se necessario
è possibile far rientrare la visiera spingendo verso
lʼalto.
6.4 Regolazione dellʼaltezza
Lʼaltezza della fascia girotesta può essere regolata.
Per effettuare la regolazione allʼaltezza desiderata
bloccate i perni di fissaggio (Fig. 6/Pos. A) nella
posizione inferiore (Fig. 6/Pos. B) o in quella
superiore (Fig. 6/Pos. C). Attenzione: i perni di
fissaggio devono essere bloccati sempre alla stessa
altezza su entrambi i lati.
Anleitung_BG_SH_1_SPK1:_ 06.02.2009 7:00 Uhr Seite 16

7. Pulizia, conservazione e ordinazione
dei pezzi di ricambio
7.1 Pulizia
앬Pulite lʼelmetto regolarmente con acqua tiepida e
un poʼ di sapone. Non usate detergenti o solventi
perché potrebbero danneggiare la plastica
dellʼelmetto.
앬Per pulire e disinfettare regolarmente le cuffie
antirumore è possibile sfilare le spugnette
dallʼarchetto e lavarle con acqua tiepida. È
possibile rimuovere anche gli anelli di tenuta
applicati sullʼarchetto spingendoli semplicemente
verso il basso.
앬Pulite regolarmente la visiera con acqua tiepida
e un poʼ di sapone o con aria compressa.
7.2 Conservazione
앬Non conservate lʼelmetto in ambienti troppo caldi
o esposti ai raggi UV. Ciò potrebbe diminuire la
durata della plastica. Quando non viene usato,
conservate lʼelmetto in un luogo buio e fresco.
앬Quando conservate lʼelmetto lasciatelo nella
posizione di esercizio e assicuratevi che gli anelli
di tenuta non vengano schiacciati. Se lʼelmetto
viene sottoposto a lungo a sollecitazioni, la sua
efficacia viene compromessa.
7.2.1 Durata
A causa dellʼinvecchiamento dei materiali impiegati, il
casco non deve essere usato oltre 5 anni dalla
produzione. Per la data di produzione si veda il
casco (Fig. 7).
D = Mese di produzione
E = Decennio di produzione (per es. 2009)
F = Anno di produzione (per es. 2009)
7.3 Commissione dei pezzi di ricambio
Volendo commissionare dei pezzi di ricambio, si
dovrebbe dichiarare quanto segue:
앬modello dellʼapparecchio
앬numero dellʼarticolo dellʼapparecchio
앬numero dʼident. dellʼapparecchio
앬numero del pezzo di ricambio del ricambio
necessitato.
Per i prezzi e le informazioni attuali si veda
www.isc-gmbh.info
8. Smaltimento e riciclaggio
Lʼapparecchio si trova in una confezione per evitare i
danni dovuti al trasporto. Questo imballaggio
rappresenta una materia prima e può perciò essere
utilizzato di nuovo o riciclato.
Lʼapparecchio e i suoi accessori sono fatti di
materiali diversi, per es. metallo e plastica.
Consegnate i pezzi difettosi allo smaltimento di rifiuti
speciali. Per informazioni rivolgetevi ad un negozio
specializzato o allʼamministrazione comunale!
17
I
Anleitung_BG_SH_1_SPK1:_ 06.02.2009 7:00 Uhr Seite 17

Obs!
Innan maskinen kan användas måste särskilda
säkerhetsanvisningar beaktas för att förhindra olyckor
och skador. Läs därför noggrant igenom denna
bruksanvisning och dessa säkerhetsanvisningar.
Förvara dem på ett säkert ställe så att du alltid kan
hitta önskad information. Om maskinen ska överlåtas
till andra personer måste även denna bruksanvisning
och dessa säkerhetsanvisningar medfölja. Vi övertar
inget ansvar för olyckor eller skador som har uppstått
om denna bruksanvisning eller
säkerhetsanvisningarna åsidosätts.
1. Säkerhetsanvisningar
앬Använd endast hjälmen om den är rätt inställd så
att den verkligen ger fullgott skydd.
앬Använd endast sådana tillbehör som
rekommenderas av tillverkaren. Hjälmen får
aldrig ändras för att andra tillbehörsdelar ska
kunna monteras.
앬Utsätt inte hjälmen för vätskor som innehåller
lösningsmedel eller alkohol, t ex spray, lack eller
liknande. Det finns risk för att plastdelarna
skadas. Sätt endast på dekaler om limmet är
baserat på vatten, akryl eller gummi. Hjälmen får
inte målas eller lackeras.
앬Om hjälmen utsättas för stötar eller slag är det
möjligt att yttre, osynliga skador uppstår (t ex
hårfina sprickor). Hjälmen erbjuder då inte längre
fullgott skydd i en nödsituation. Byt genast ut
hjälmen om den har utsatts för en kraftig
belastning.
앬Använd hörselskydd medan bullret ligger på en
hög nivå. Hörselskyddet kan endast skydda dig
permanent om du ständigt använder det.
앬Granska hjälmen och tillbehöret varje gång före
användning och kontrollera om sprickor eller
skrapskador har uppstått. Använd endast intakta
hjälmar och tillbehör.
Beskrivning av symbolerna på hjälmen (bild 7-9)
D = tillverkningsmånad
E = tillverkningsdecennium (t ex 2009)
F = tillverkningsår (t ex 2009)
G = CE-märkning
H = tillämpad standard
I = material
J = tillverkartyp
K = hjälmstorlek
L = hjälmstorlek
M = tillverkare
2. Beskrivning och leveransomfattning
(bild 1/2)
1. Hjälmskal
2. Visir
3. Hörselskydd
4. Reglage till hörselskydd
5. Reglage till nackband
6. 4-punkts-hjälminredning
3. Ändamålsenlig användning
Skyddshjälmen skyddar användaren mot skador på
huvudet som kan uppstå av föremål som faller ned
eller som pendlar. Hjälmen skyddar även mot slag
och stötar mot fasta objekt.
Hjälmen får endast användas till sitt avsedda
ändamål. Användningar som sträcker sig utöver
detta användningsområde är ej ändamålsenliga. För
materialskador eller personskador som resulterar av
sådan användning ansvarar användaren själv.
Tillverkaren övertar inget ansvar.
Tänk på att våra hjälmar endast får användas till
ändamålsenligt syfte och inte har konstruerats för
yrkesmässig, hantverksmässig eller industriell
användning. Vi ger därför ingen garanti om hjälmen
används inom yrkesmässiga, hantverksmässiga eller
industriella verksamheter eller vid liknande
aktiviteter.
4. Tekniska data
Huvudomfång: 52-64 cm
Vikt: 720 g
Hörselskydd:
Frekvens (Hz) 125
Genomsnittlig bullerdämpning (dB) 9,8
Standard-avvikelse (dB) 3,0
Förväntad dämpning (APV) (dB) 6,8
Frekvens (Hz) 250
Genomsnittlig bullerdämpning (dB) 14,0
Standard-avvikelse (dB) 1,2
Förväntad dämpning (APV) (dB) 12,8
Frekvens (Hz) 500
Genomsnittlig bullerdämpning (dB) 22,8
Standard-avvikelse (dB) 2,2
18
S
Anleitung_BG_SH_1_SPK1:_ 06.02.2009 7:00 Uhr Seite 18

Förväntad dämpning (APV) (dB) 20,6
Frekvens (Hz) 1000
Genomsnittlig bullerdämpning (dB) 30,4
Standard-avvikelse (dB) 3,4
Förväntad dämpning (APV) (dB) 27,0
Frekvens (Hz) 2000
Genomsnittlig bullerdämpning (dB) 31,6
Standard-avvikelse (dB) 3,3
Förväntad dämpning (APV) (dB) 28,3
Frekvens (Hz) 4000
Genomsnittlig bullerdämpning (dB) 33,6
Standard-avvikelse (dB) 3,4
Förväntad dämpning (APV) (dB) 30,2
Frekvens (Hz) 8000
Genomsnittlig bullerdämpning (dB) 31,3
Standard-avvikelse (dB) 2,7
Förväntad dämpning (APV) (dB) 28,6
Rekommenderat bullerområde:
Högt (H) = 29°dB
Medium (M) = 22°dB
Lågt (L) = 14°dB
Genomsnittlig dämpning (SNR) =25 dB
Identifikationsnummer, namn och komplett
adress till resp. prövningsorgan:
Hjälm
N.B. 0197
Tüv Rheinland Product Safety Gmbh
Am Grauen Stein
D-51105 Cologne
Ansiktsskydd och hörselskydd
N.B. 0194
Select International UK Ltd
23-25 Friar Lane
Lelcester
LE 1 5QQ. England
5. Montera hjälmen
Se bild 3a-3h
6. Inställningsmöjligheter
6.1 Nackband
Vrid runt reglaget till nackbandet (bild 2/pos. 5) för att
anpassa skyddshjälmen till storleken på ditt huvud.
Vrid runt medsols för att minska omfånget och
motsols för att öka omfånget. Använd endast
hjälmen om den har ställts in rätt.
För att kunna ställa in skyddshjälmen rätt måste du
första vrida till maximalt omfång. Sätt sedan hjälmen
på huvudet så att 4-punkts-hjälminredningen (bild
2/pos. 6) ligger stramt mot huvudet. Vrid sedan runt
reglaget till nackbandet i medsols riktning tills
hjälmen sitter fast ordentligt på huvudet, men utan att
bandet trycker emot.
6.2 Hörselskydd
Hörselskyddets höjd och läge kan ställas in. Ställ in
höjden genom att förskjuta hörselkåpan (bild 4a). Det
är även möjligt att vrida till en annan position (bild
4b). För att underlätta när hjälmen ska tas på eller av
kan hörselskyddet dras ut och sedan fällas ut. Om
spännkraften avtar kan den justeras genom att
reglaget till hörselskyddet (bild 4c/pos. 4) skjuts mot
“+”. Om hörselskyddet skjuts mot “-” kommer
spännkraften att sänkas.
6.3 Visir
Avståndet mellan visiret och ansiktet kan justeras in
genom att visiret skjuts i sitt fäste enligt
beskrivningen i bild 5. Vid behov kan visiret även
fällas upp.
6.4 Höjdinställning
Nackbandet kan ställas in i höjdled. För att ställa in
den avsedda höjden kan fäststiftet (bild 6/pos. A)
spärras antingen i det nedre läget (bild 6/pos. B) eller
i det övre läget (bild 6/pos. C). Obs! Fäststiften
måste alltid spärras på samma höjd på båda sidor.
S
19
Anleitung_BG_SH_1_SPK1:_ 06.02.2009 7:00 Uhr Seite 19

20
S
7. Rengöring, förvaring och
reservdelsbeställning
7.1 Rengöring
앬Rengör hjälmen regelbundet med ljummet vatten
och en aning såpa. Använd inga rengörings- eller
lösningsmedel. Dessa kan skada maskinens
plastdelar.
앬Rengör och desinficera hörselskydden
regelbundet. Kuddarna kan dras ut ur
hörselkåporna och sedan rengöras med ljummet
vatten. Även tätningsringarna kan dras av.
Dessa är klämda i hörselskyddskapslarna och
kan helt enkelt dras nedåt.
앬Rengör visiret regelbundet med ljummet vatten
och en aning såpa, eller blås av med tryckluft.
7.2 Förvaring
앬Förvara inte hjälmen i extremt varm omgivning
eller på platser där den är utsatt för UV-strålning.
Detta kan förkorta plastdelarnas livslängd.
Förvara hjälmen mörkt och svalt när den inte
används.
앬När hjälmen förvaras måste hörselskyddet
befinna sig i användningsläge. Tätningsringarna
får inte vara inklämda. Om tätningsringarna
belastas permanent kan deras verkan försämras.
7.2.1 Hållbarhet
Eftersom materialen åldras får hjälmen inte
användas längre än max. 5 år efter tillverkningen.
Tillverkningsdatumet anges på hjälmen (bild 7).
D = tillverkningsmånad
E = tillverkningsdecennium (t ex 2009)
F = tillverkningsår (t ex 2009)
7.3 Reservdelsbeställning
Lämna följande uppgifter vid beställning av
reservdelar:
앬Maskintyp
앬Maskinens artikel-nr.
앬Maskinens ident-nr.
앬Reservdelsnummer för erforderlig reservdel
Aktuella priser och ytterligare information finns på
www.isc-gmbh.info
8. Skrotning och återvinning
Produkten ligger i en förpackning som fungerar som
skydd mot transportskador. Denna förpackning
består av olika material som kan återvinnas. Lämna
in förpackningen till ett insamlingsställe för
återvinning.
Produkten och tillbehören består av olika material
som t ex metaller och plaster. Lämna in defekta
komponenter till ett godkänt insamlingsställe i din
kommun. Hör efter med din kommun eller med
försäljaren i din specialbutik.
Anleitung_BG_SH_1_SPK1:_ 06.02.2009 7:00 Uhr Seite 20
Other manuals for BG-SH 1
2
Table of contents
Languages:
Other EINHELL Motorcycle Accessories manuals