Elabs MP500 User manual


MP500 HD Media Player Manual Page 2of 62 Rev. 110
Table of Contents
IMPORTANT SAFETY INSTRUCTIONS ......................................................................... 3
Chapter 1 –INTRODUCTION ............................................................................................. 4
Introduction to the MP500 HD Media Player....................................................................... 4
Package Contents.................................................................................................................. 4
Chapter 2 –INSTALLATION............................................................................................... 5
Detailed Player View............................................................................................................ 5
MP500 Connections.............................................................................................................. 7
Mounting............................................................................................................................... 8
Hardware and Software Requirements ................................................................................. 9
Hardware........................................................................................................................... 9
Software............................................................................................................................ 9
CE Labs Quick Sign Pro®............................................................................................ 9
Firewall Issues............................................................................................................ 11
Disabling Checksum Offloading................................................................................. 12
CE labs CCM for Windows®..................................................................................... 13
MP400A Utility for Windows® ................................................................................. 16
Chapter 4 –OPERATION................................................................................................... 17
Initial Startup Procedure..................................................................................................... 17
Theory of Operation............................................................................................................ 17
OSD / On Screen Display menu ......................................................................................... 18
Chapter 5 –ATSC RF Modulator (optional: Order MP500M)....................................... 21
Internal Mini-PCI Digital RF Modulator Option:........................................................... 21
ATSC Modulator Technical Specifications.................................................................... 23
Seamless Play mode Requirements: ........................................................................... 25
Chapter 6 –Using Extended Applications (XApp)............................................................ 25
Using USB File Loader XAPP: ...................................................................................... 26
Using Call Home XAPP: ................................................................................................ 27
Web Interface Screenshot ............................................................................................... 29
Using RS232 Command XAPP:..................................................................................... 30
Using X6 Switcher XAPP:.............................................................................................. 37
Chapter 7 –MP500 SPECIFICATIONS............................................................................ 38
MP500 Quick Facts............................................................................................................. 43
Troubleshooting Tips:......................................................................................................... 43
WARRANTY ..................................................................................................................... 45
APPENDIX............................................................................................................................ 46
Software Installation....................................................................................................... 46
Software Installation....................................................................................................... 46
CE Labs Quick Sign Installation Procedure ............................................................... 46
CCM for Windows Installation Procedure ................................................................. 48
MP400A Utility Installation Procedure...................................................................... 51
General Purpose Input/Output (GPIO) Options.............................................................. 53
The Standard Video Encoding Guide (abridged)............................................................ 56
MP500 Multi-Layer Video / Photo / HTML................................................................... 59

MP500 HD Media Player Manual Page 3of 62 Rev. 110
IMPORTANT SAFETY INSTRUCTIONS
1. Read these instructions.
2. Keep these instructions.
3. Heed all warnings.
4. Follow all instructions.
5. Do not use this apparatus near water.
6. Clean only with dry cloth.
7. Do not block any ventilation openings. Install in accordance with the manufacturer’s
instructions.
8. Do not install near any heat sources such as radiators, heat registers, stoves, or other
apparatus (including amplifiers) that product heat.
9. Do not defeat the purpose of the polarized or grounding-type plug. A polarized plug has
two blades with one wider that the other. A grounding type plug has two blades and a
third grounding prong. The wide blade or the third prong are provided for your safety. If
the provided plug does not fit into your outlet, consult an electrician for replacement of
the obsolete outlet.
10. Protect the power cord from being walked on or pinched particularly at plugs,
convenience receptacles, and the point where the exit from the apparatus.
11. Only use the attachments/accessories specified by the manufacturer.
12. Use only with the cart, stand, tripod, bracket, or table specified by
the manufacturer, or sold with the apparatus. When a cart is used,
use caution when moving the cart/apparatus combination to avoid
injury from tip-over.
13. Unplug this apparatus during lightning storms or when unused for
long periods of time.
14. Refer all servicing to qualified service personnel. Servicing is
required when the apparatus has been damaged in any way such
as power supply cord or plug is damaged, liquid has been spilled
or objects have fallen into the apparatus, the apparatus has been
exposed to rain or moisture, does not operate normally, or has
been dropped.
WARNING: To Reduce The Risk Of Fire Or Electric Shock, Do Not Expose This
Apparatus To Rain Or Moisture
CAUTION: To reduce the risk of electric shock, do not remove cover or back. No
user serviceable parts inside. Refer servicing to qualified personnel.

MP500 HD Media Player Manual Page 4of 62 Rev. 110
NOTICE:
We try to include the latest up to date information, but this document will require periodic updates. We
recommend you check at our web site, www.celabs.net, for the latest information available.
Getting Started
Chapter 1 –INTRODUCTION
Introduction to the MP500 HD Media Player
The MP500 is a high quality advertising solution that allows users to play content from
multiple sources such as a solid state memory device, hard drive, or IP streams from
Ethernet or ATSC tuner (MP500T model). It has an extremely effective performance
versus cost ratio and provides a great return on investment.
The MP500T is a commercial grade, application specific graphics processor, specifically
designed for driving digital signage. Do not let the small size fool you, the powerful
internal video processor rivals the performance of a PC costing many times more. The
graphics capability is on par with a BluRay player but with much greater reliability
because there are no moving parts.
Package Contents
The packing box should contain the following items:
MP500 Media Player
12 Volt DC Universal Input Power Supply
Remote Control
Two AAA batteries
HDMI cable
(optional) DB-15 to RCA Component Video Cable
(optional) L/R Stereo Audio Cable
CD containing
oInstallation Software
oMP500 Manual (this document)
oQuick Start Guide
oSample Media Clips
Quick Start Guide
MP500 HD Media Player Manual Page 5of 62 Rev. 110
Chapter 2 –INSTALLATION
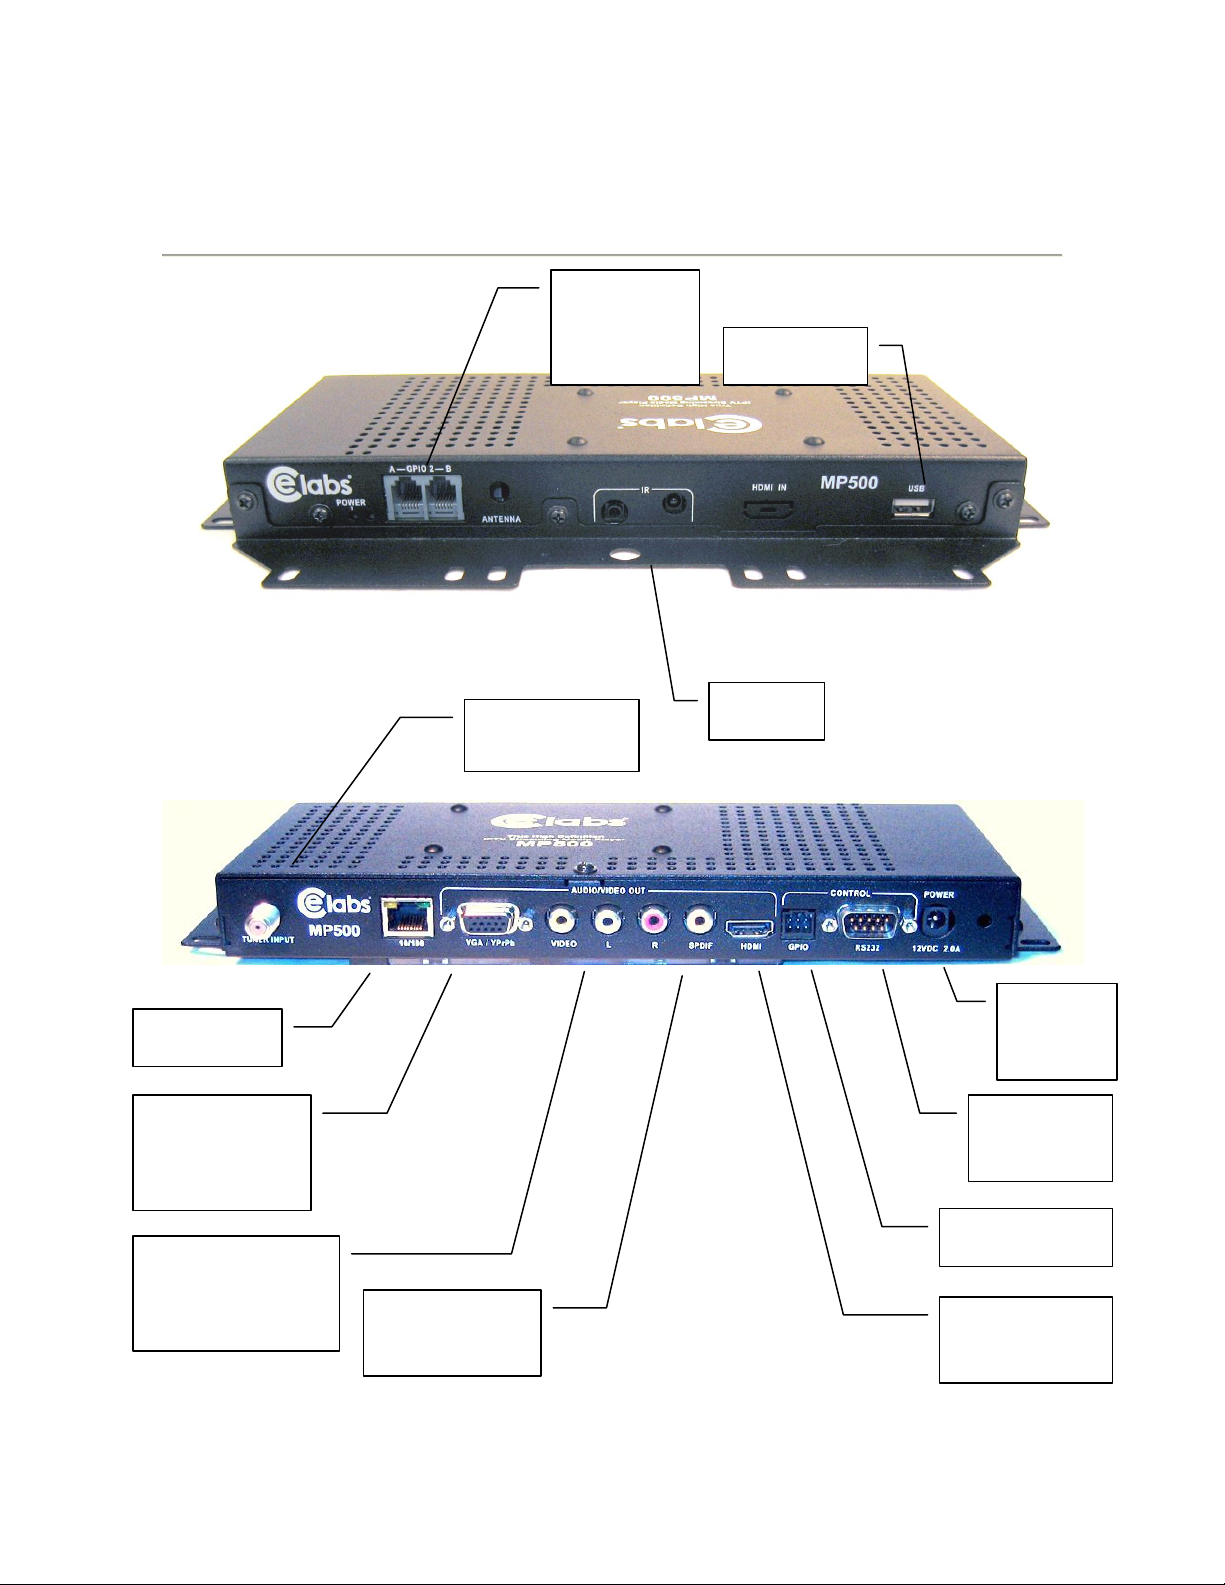
Detailed Player View
USB IN
IR IN
GENERAL
PURPOSE
INPUT /
OUTPUT
ETHERNET
RF INPUT
(MP500T only)
VGA /
COMPONENT
VIDEO OUPUT
COMPOSITE
VIDEO
R/L AUDIO OUT
DIGITAL
AUDIO OUT
HDMI VIDEO
OUPUT
AUX GPIO
RS-232
CONTROL
12V DC
INPUT
750mA
POWER LED

MP500 HD Media Player Manual Page 6of 62 Rev. 110
Detailed Player View (option -25)
The -25 option unit is the same as the -20 with the exception of the GPIO ports. The front panel ports are
deleted and the 6 individual ports are added on the side. See the GPIO section in this document for a description
of the connector pinout.
The unit includes a remote control for accessing the On Screen Display. Press
the MENU button to bring up the OSD menu.
All of the grey buttons function with the exception of:
TV MODE, PBC, and SETUP
In the blue button section you may use: Play, Stop, FWD, and NEXT

MP500 HD Media Player Manual Page 7of 62 Rev. 110
MP500 Connections
The MP500 is capable of driving a wide variety of displays at up to 1080P resolution at bit rates up to 40 Mbps (mpeg2 file
type). Depending upon your application, connect the following cables to operate the unit.
Display cable –Depending on the application, plug in the cable from the media player to the display, switch, or
first distribution amplifier. The HDMI and Component outputs are both active simultaneously.
oThe component video output (for connection to CElabs AV901HD distribution amplifier) uses a DB-15
to RCA cable to break out the video signal. The L/R audio ports can be used in conjunction with the
component or the composite video ports.
oIF the TV wall uses CElabs HDMI distribution amplifiers, connect the HDMI cable.
oIf your application uses an older monitor or if you need to drive a modulator, the composite video port is
always on regardless of the output resolution.
oThe DB-15 VGA/YPrPb port is primarily used for outputting component video. The unit is capable of
outputting VGA signals at various resolutions but only with a simultaneous HDMI connection.
Switching between the HDMI/Component and VGA requires the use of the CElabs QuickSign software
application.
Note: Video output resolution has been pre-set at the factory for 1080i (in most applications) on the HDMI and Component
Video Outputs (unless another resolution is requested). Standard 480i video is available on the composite video port at all
times. The output and resolution can be specified at time of order and pre-set to your requirements.
Audio cable –The analog audio output is via two RCA jacks on the rear panel. Connect a patch cable from the
rear jacks to the display or audio system as desired.
Note: If HDMI cables being used, separate audio cables are not required as long as the monitor has internal
speakers..
SPDIF –Digital PCM Stereo audio is available on the SPDIF RCA connector.
Tuner Input (ATSC Tuner Option on the MP500T) - Connect the F-connector cable from the off-air antenna or
High Definition modulator to the Tuner Input. Tighten the F-connector securely. Ensure the RF level at the input
is greater than -25dBmV (unit mutes @ -30dBmV). The ATSC channel may be changed by remote PC application
or by IR remote control. Press the up or down arrow keys to increase or decrease the channels one at a time. You
may also type in the channel number directly on the remote. Typing the –1, -2, or -3 first is necessary. Example:
To tune to channel 14-1, type 1 then 4 then 1 and press the Enter key.
Power –The MP500 uses a 12VDC, 2A power supply. Total power consumption is approximately 7 Watts which
leaves a large reserve in the power supply. Insert the power supply 12 VDC plug into the MP500 power jack.
Insert the AC Plug of the power supply into an electrical outlet. After a few seconds, the front panel green LED
will light (you may also notice a red LED that is illuminated during the boot process. The red LED will flash
during normal operation).
Please wait for approximately 1 minute until the unit completes the boot-up process. The media player can be
configured to have a default start-up item such as a video file or ATSC RF channel (ATSC option). If the default
startup item has been configured, Video should start playing automatically when the unit has completed its boot-
up process.
IR Remote- The IR remote is used to access the unit’s On Screen Display menu. If you need to determine the IP
address for the unit, go to the network settings window. In certain applications, with channel setting pre-set at the
factory, the infrared remote is not needed. There are applications for the MP500 that use of the remote could be
helpful. Please store the remote in a safe location for possible later use.
GPIO - These ports are generally used to interface with pushbuttons that can be used to trigger certain videos.
Refer to the GPIO section later in this manual for a full description.
RS-232 –The media player may be controlled via the serial port. Refer to the “Using the RS-232 XApp” section.
IR Jack –A remote IR receiver may be plugged into the front panel IR jack. This allows use of the Remote
Control even when the unit may be installed in an enclosure or behind a TV where IR access is difficult.

MP500 HD Media Player Manual Page 8of 62 Rev. 110
Mounting
The media player should be located in a well ventilated air conditioned space for best operation. Several
mounting options are available to the installer. In addition to the two mounting ears integrated into the main
chassis, an optional detachable bracket is available that has hole spacing for standard VESA mounting patterns.
There is also a larger 0.368” hole centrally located in case the unit should need to be attached to a larger bolt.
See photo for hole locations. The dimensions given are measured from center to center of the mounting holes.
2.95”
10.9”
The unit has ventilation holes along the sides and top. Theses
should remain uncovered during operation. There are no
ventilation openings on the bottom of the chassis, so it may be
bolted directly to a shelf or monitor.
This hole pattern will fit 75,
100, and 200mm spacing.
MP500 HD Media Player Manual Page 9of 62 Rev. 110
Chapter 3 –CONTROL SOFTWARE
Hardware and Software Requirements
Hardware
Platform Pentium4 2.0GHz Class Processor or better
Operating System Windows XP Pro / Vista Premium or better
RAM 512 Mbyte or more
Ports Ethernet 10/100
Communications Players use ports 80 and 161 for HTTP and SNMP
respectively
Software
CE Labs Quick Sign Pro®
The MP500 can be remotely controlled from within a LAN (restricted to local sub-net) via the CE labs Quick
Sign Pro® software. This application allows you to scan your network to discover installed players or you can
manually add them. Once the player is input, the software may be used to check status, set video resolution, add
or delete content, create playlists, etc.
Please refer to the Help tab in Quick Sign Pro for a complete reference of available command options.
The Quick Sign Pro
software is available at no
cost with the media
player. It may have been
included in the box or it
can be downloaded from
www.celabs.net/sw/qspro .
The help tab in Quick
Sign Pro will show you
how to use the software to
get started controlling
your players. Please see
Appendix for Installation
details.
Quick Sign Pro has the ability to create and manage multilayer screens via templates. See next page for details.
MP500 HD Media Player Manual Page 10 of 62 Rev. 110
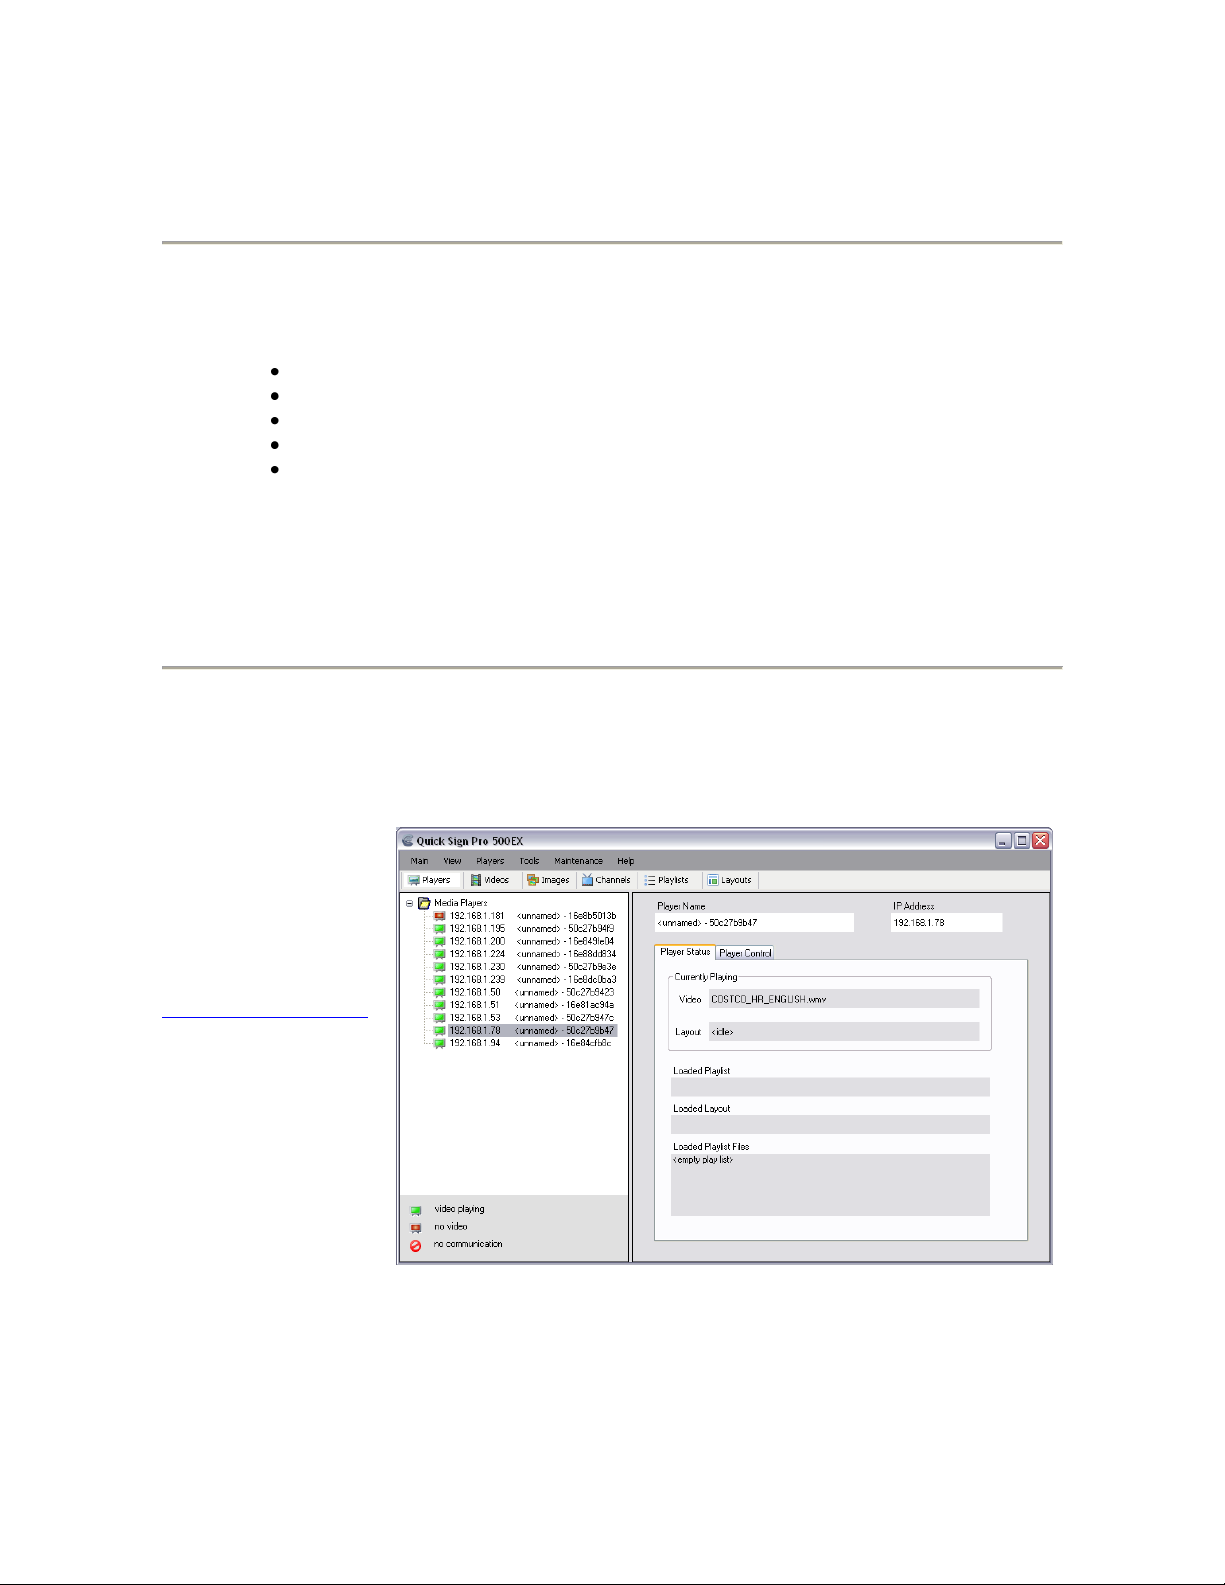
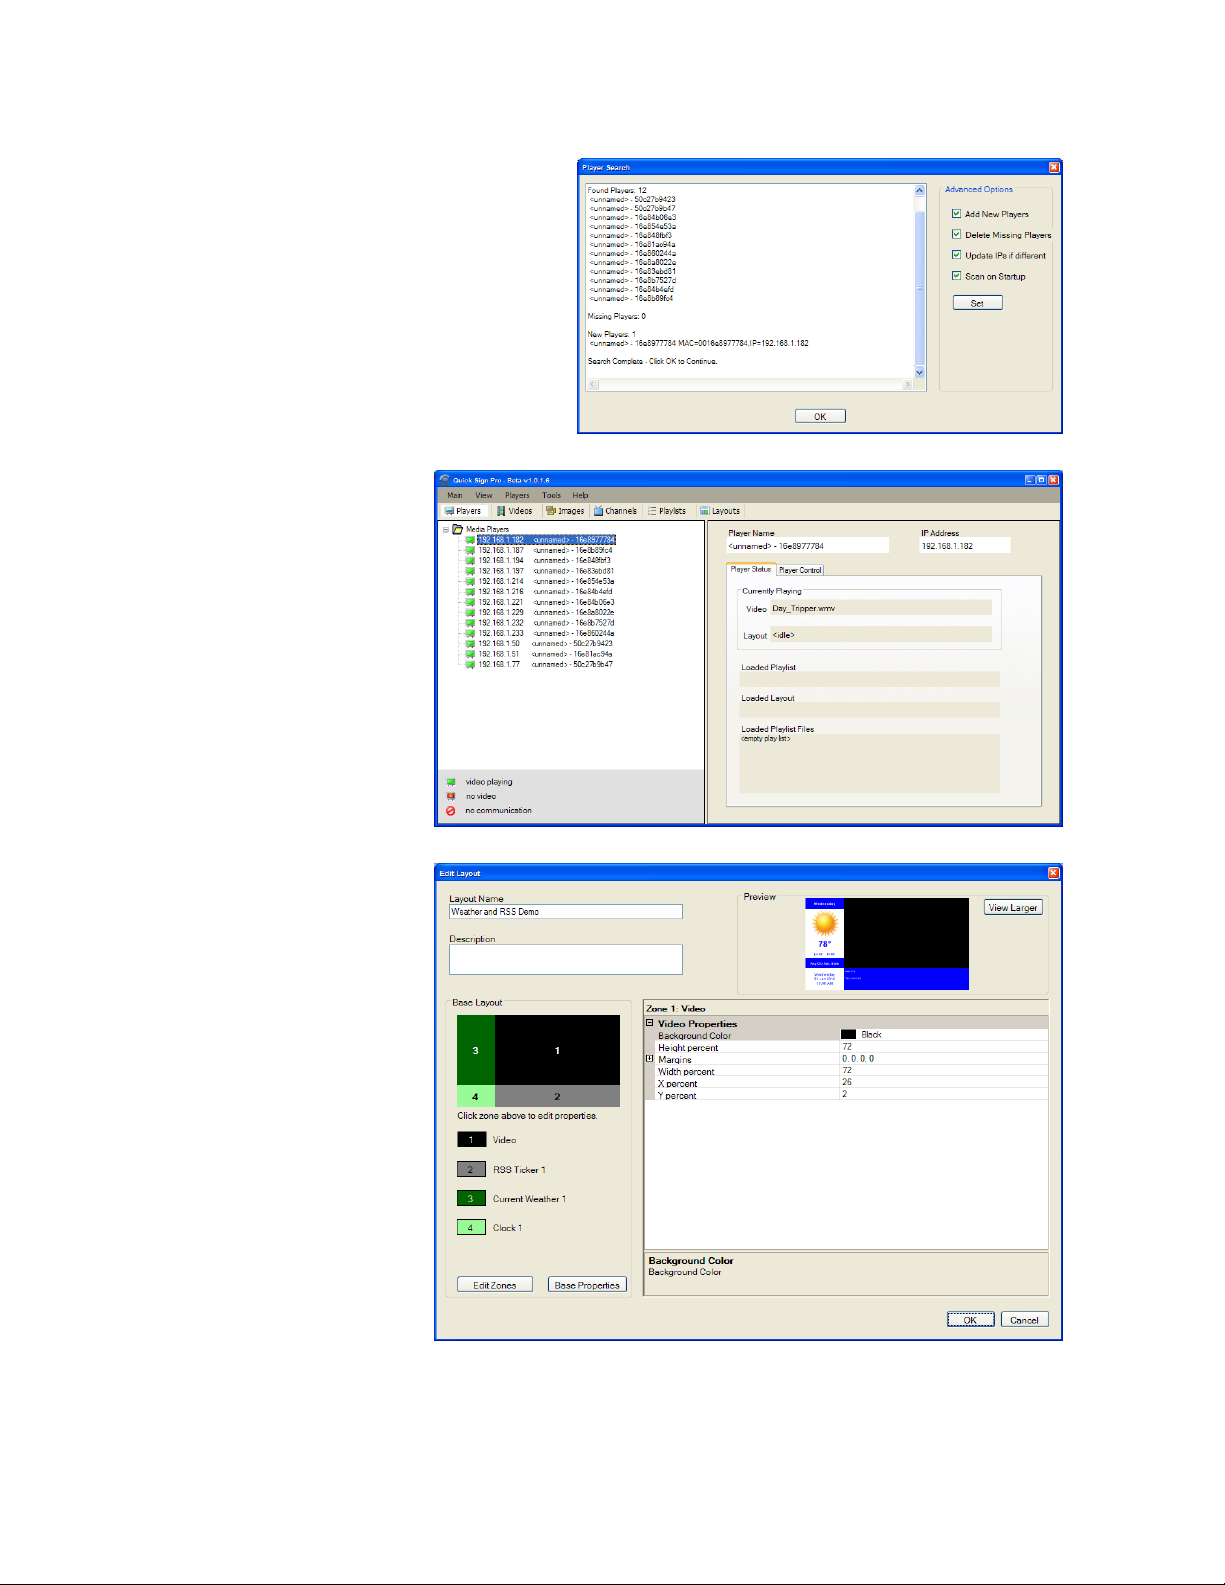
Software (continued)
The first screen you see on Quick Sign Pro is
Player Search. Click OK to add the discovered
players to the Media Player database.
The main screen with Player
Status selected will show you
what is loaded and playing on
the selected media player.
The image to the right is
showing the template edit
screen. There are a couple of
samples you can import or you
may create your own template
with graphics of your choice.
Please see the help files in Quick Sign Pro for additional information on the program operation.

MP500 HD Media Player Manual Page 11 of 62 Rev. 110
Software (continued)
Firewall Issues
Quick Sign uses HTTP protocol when downloading files to the media players. If Quick Sign fails to download
files to the players, a PC firewall or a firewall in the router may be blocking this operation.
Virus protection programs may block this operation also.
Unblocking the Computer Firewall
When Quick Sign is first started, you will be prompted to unblock the firewall for Quick Sign. Please accept to
unblock. This does not pose much of security issue due to the fact that you are only unblocking the Quick Sign
application as opposed to the whole computer and it will only download video files that you have specified.
Usually no further action will be needed and Quick Sign will function properly.
Manually Unblocking the Computer Firewall
If video files fail to download, you may need to verify that the firewall is indeed off for Quick Sign.
You can turn the firewall completely off, or can turn off just for Quick Sign.
Windows7 / VISTA Operating System
To turn firewall completely off (not recommended):
1. Control Panel->Security->Windows Firewall-> Turn Windows Firewall on or Off
2. Select Off
3. Click OK
To allow just Quick Sign through the Firewall:
1. Control Panel->Security-Windows Firewall-> All a program through Windows Firewall
2. Click Add Program
3. Browse to C:\Program Files\CE labs\Quick Sign Pro\QuickSignPro.exe for Quick Sign Pro
(Typical, may be different location on some PCs)
QS300 and QS400 typical locations:
Quick Sign 300: C:\Program Files\CE labs\CCM Quick Sign 300\CCM Quick Sign for HD300ZX.exe
Quick Sign 400: C:\Program Files\CE labs\CCM Quick Sign 400\CCMQuickSign.exe
4. Click OK
Now add port 7898 TCP
1. Click Add Port
2. Set Name: http port:7898 TCP.
3. Click OK
XP Operating System
To turn firewall completely off (not recommended):
1. Control Panel-> Security Center->Windows Firewall-> Turn Windows Firewall on or Off
2. Select Off
3. Click OK

MP500 HD Media Player Manual Page 12 of 62 Rev. 110
Software (continued)
To allow just Quick Sign through the Firewall:
1. Control Panel-> Security Center->Windows Firewall
2. Click Exceptions Tab
3. Click Add Program
4. Browse to C:\Program Files\CE labs\Quick Sign Pro\QuickSignPro.exe for Quick Sign Pro
(Typical, may be different location on some PCs)
QS300 and QS400 typical locations:
Quick Sign 300: C:\Program Files\CE labs\CCM Quick Sign 300\CCM Quick Sign for HD300ZX.exe
Quick Sign 400: C:\Program Files\CE labs\CCM Quick Sign 400\CCMQuickSign.exe
5. Click OK
Now add port 7898 TCP
1. Click Add Port
2. Set Name: http port:7898 TCP.
3. Click OK
Virus Protection Programs
If you are running a virus protection program, the settings may need to be altered to allow Quick Sign to use the
HTTP protocol (TCP/IP). Virus protection programs vary widely so no details are provided here.
Disabling Checksum Offloading
If you have a large number of download failures with Quick Sign during Load/Play, the procedure below may
help. Note that if the downloads are always failing, you likely have firewall issue. Please refer to Quick Sign
help on disabling the firewall in that case.
Rarely with some newer network cards, Quick Sign will have an usually high number of download errors. We
have found that by disabling “Checksum Offloading” on the network card often corrects these errors.
VISTA/Windows 7
1. Go to Control Panel → Hardware and Sound
2. Click on Device Manager. (For Windows 7 , Device Manager is located under Device and Printers)
3. Select the network device under Network adapters and right click and select properties.
4. Find the “Checksum Offloading” or maybe “IP4 Checksum Offloading” and select disable.
5. Click OK
XP
1. Go to Control Panel → System
2. Click on Hardware Tab.
3. Click Device Manager.
4. Select the network device and right click and select properties.
5. Find the “Checksum Offloading” or maybe “IP4 Checksum Offloading” and select disable.
6. Click OK.

MP500 HD Media Player Manual Page 13 of 62 Rev. 110
CE labs CCM Content Manager for Windows®
The MP500 can be remotely controlled over the internet via the CE labs CCM for Windows enterprise software.
In most cases, this will require forwarding a port on the local router for each player. The MP500 may also be
ordered with a custom application to allow the unit to “call home” to a specified MP500 Content Manager
Server. The CE Labs Content Manager (CCM) allows users to upload media files, create content playlists,
control player parameters and download media/playlist information to the MP400A/MP500 media player over a
local network, private network, or the internet.
The CE Labs Content Manager (CCM) provides a web interface and application for loading videos to media
players. The web Interface is accessed using any standard web browser such as Internet Explorer, Firefox,
Chrome, or Safari.
From the interface, users manage the video content to be distributed to media players in the system. Users can
create and set playlists to be played on the players. Additionally, the interface provides a number of monitoring
capabilities. For a list of operations and features, see Key Features in the CCM Help Tab
.
Key Features:
Manage 1 to several hundred or more media players
Add, edit, and remove players
Assign names and locations
View player status
Organize into player groups
Assign descriptive information to each player
Create video content packages
Create content packages that group playlists and
schedules together
Easily add, edit, or remove playlists and schedules
Assign content packages to players
Assign descriptive information to the content package
Upload video files to be distributed to players
Organize and manage uploaded videos
Preview images of videos
Layout support
Layouts provide a way to show text, images, and RSS
feed info around a predefined video area.
Upload layouts created with Quick Sign Pro.
Schedule layouts to appear on media player.
Quickly create video playlists
User-friendly play list editor
Create any number of playlists
Easily schedule video content
Schedule play lists by start dates and times
Schedule by day of week
Easily set schedules by selecting playlist and
clicking on calendar dates
Schedule playlists with layouts
Automatic Operation
Periodic status check
Download video files as needed per user selectable
download times
Playlists run as scheduled
Monitor Player Status
Updated about every 10 minutes
View playing content and playlist names
View downloading status
View online/offline status
Reporting
Play count logging
File downloads times and total bandwidth usage
Specify report for individual players or player group
Specify start and stop dates
Export reports to Microsoft Excel
MP500 HD Media Player Manual Page 14 of 62 Rev. 110
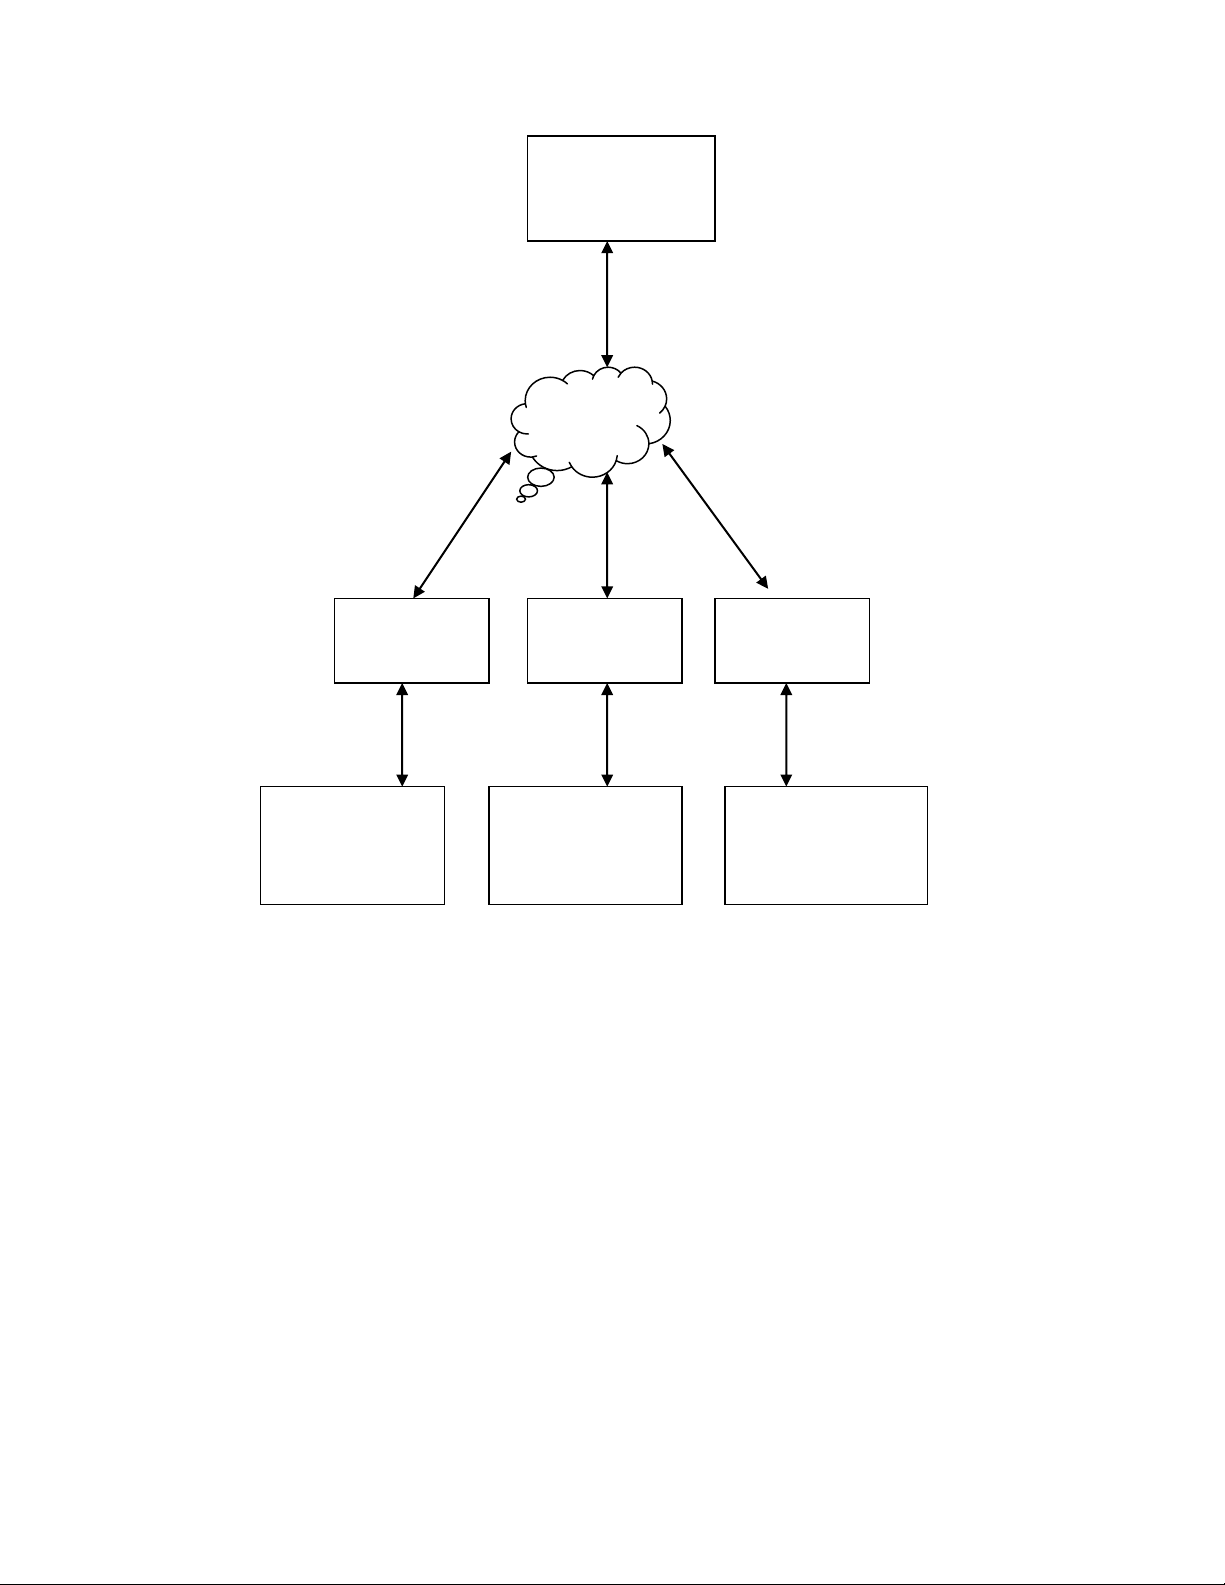
MP500 with
Call Home
XApp
Client Player
1
Internet
MP500 with
Call Home
XApp
Master Player
MP500 with
Call Home
XApp
Client Player
2
TV 1
TV 2
TV 3
Server
Running CCM2
Call Home
Content Manager
The Call Home type system allows the players to be preconfigured with the IP address of the Call Home
Content Manager and placed anywhere that has visibility to the Internet. This arrangement does not require port
forwarding on the local router and eliminates many of the hassles with firewalls.

MP500 HD Media Player Manual Page 15 of 62 Rev. 110
Main CCM Screen:
Getting Started:
After setting up one or more media players, you are ready to begin adding players to the system and assigning
content so that video and playlists can be loaded. The best process to add players is to allow them to call into
the server and click on the add button that appears on the MONITOR page. The players can be manually added
if you know their MAC address.
Getting Started Steps
Step 1: Add Media Players
Step 2: Create Player Groups
Step 3: Upload Video Files
Step 4: Create a Configuration
Step 5: Assign Configurations to Players
Step 6: Create a Content Package
Step 7: Create Playlists and Schedules
Step 8: Assign Content to Players
Step 9: Monitor Players
Step 10: Collect logs and produce reports.
Please refer to the CE labs CCM Content Manager help files for further information on software operation.

MP500 HD Media Player Manual Page 16 of 62 Rev. 110
MP400A Utility for Windows®
An additional utility program named MP400A Utility can be used for additional control and monitoring
capabilities associated with the player in conjunction with CCM. The MP400A Utility is generally used only for
troubleshooting and testing. The Utility will only work on a local LAN or over the Internet if the proper ports
have been forwarded at the intended destination to allow visibility to the players.
In a typical configuration, the MP400A Utility resides in a Windows server that is accessed using Remote
Desktop (a Windows component). The utility commands the media players and checks status as needed. When
commanded, the media players download video files from the server.
Please refer to the MP400A help files for further information on software operation.

MP500 HD Media Player Manual Page 17 of 62 Rev. 110
Chapter 4 –OPERATION
Initial Startup Procedure
Once the unit has been mounted and configured with the appropriate cabling, connect the power supply to a
suitable AC outlet. The green power LED on the front of unit will illuminate and also the red health LED (just
to the right of the power led) will be on as well for about 30 seconds. At this point in the boot process, the red
LED will go off, but will flash every 5 seconds. This indicates a normal condition. The media player may take
anywhere from 1 to 1.5 minutes to fully boot to the operational state depending upon the startup configuration.
Theory of Operation
Once connected and powered on, the unit is ready to use. The MP500 can be configured with a default startup
item that will automatically start immediately after booting. The unit will play this item until instructed to play
something else. If no startup item has been defined, the screen may only show the CE labs logo.
The player works well with a variety of media files at high bit rates, but please adhere to the media creation
standards in the appendix at the end of this document. Also, be aware of the bit rate versus the speed of the CF
card if you are using local storage. If the video experiences freeze frames or stuttering, the bit rate may be too
fast for the card installed in the player.
The media player can play content from many sources:
Real Time Source
oRF ATSC Tuner (MP500T only)
oEthernet RTSP IP Stream
Local Storage Source
oInternal Storage Card (optional)
oInternal Storage Hard Drive (optional)
oUSB Port
The player may be used as a stand-alone High Definition source (once content is loaded on the internal storage
device) or greater versatility is allowed when the player is connected to a network. The primary focus of the
MP500 is media playback and control device that is part of a network of media players. The network interface is
the only way to accomplish some of the configuration of the media player (video resolution, GPIO content
assignment, playlist assignment, etc).

MP500 HD Media Player Manual Page 18 of 62 Rev. 110
OSD / On Screen Display menu
Point the remote control at the unit and press the MENU
button.
The following menu will appear.
Pressing ENTER while the FILE BROWSER is
highlighted will bring up this menu and allow you
to directly launch any content that is locally stored
on the unit CF card.
The PLAYLIST folder contains playlists that have
been created and stored on the internal drive (CF
or Hard Drive). Pressing play will sequentially
play all files in that playlist. If the playlist was
created with a loop command at the end, the files
will loop around and play again continuously.
The Video folder contains individual video files.
Pressing play on one of these files will cause them
to play one time.
HTML, Picture, and Audio work similar to the
Video folder function with the corresponding
formats.
Going back to the main menu screen and pressing
Information will show you the present firmware
and software revisions as well as the current
Network configuration.

MP500 HD Media Player Manual Page 19 of 62 Rev. 110
Many of the control functions are accessible via
network control. In order to determine the IP Address
of the unit, press MENU on the Remote Control while
pointing at the IR input on the front of the unit. Press
the down arrow key and then ENTER on
INFORMATION. If you need the unit to be on a
different address, it may be changed in the
NETWORK SETTINGS menu as shown below. The
Network Settings are accessed through the Player
Setup menu.
In most installations, it is best to use DHCP and let
the local router assign an IP address to the media
player. The unit may be given a permanent fixed
address by un-checking the USE DHCP box on this
screen and updating the IP ADDRESS, MASK, and
GATEWAY fields.
You must highlight Save Changes and press ENTER
on the remote control for these settings to be
remembered once you exit this screen.
Warning: Verify that there are no
other devices on your subnet with this
IP Address. Two devices with the
same address will cause erratic
behavior.
To adjust the appearance of the video on the monitor, navigate to the Player Setup menu, and press VIDEO SETTINGS.
Move the highlight curser to the parameter to adjust
and use the right or left arrow on the remote to change
the value. Watch the monitor to see if the change is
acceptable.
The Color Profile adjustment allows you to choose
from preset video configurations that were derived
from typical brands of monitors.
The size controls allow you to customize the picture
size to fit the video monitor.
These settings are saved automatically.
Press the MENU button to exit this screen.
MP500 HD Media Player Manual Page 20 of 62 Rev. 110
The next item on Player Setup is HARD DISK
REPAIR. This is used to format a new CF card or
repair the internal CF card should it become
corrupted. When prompted for the pass code, enter
“8324”.
DANGER: Formatting the CF card will erase
the OSD menu. This will have to be reloaded
using the Quick Sign Pro software.
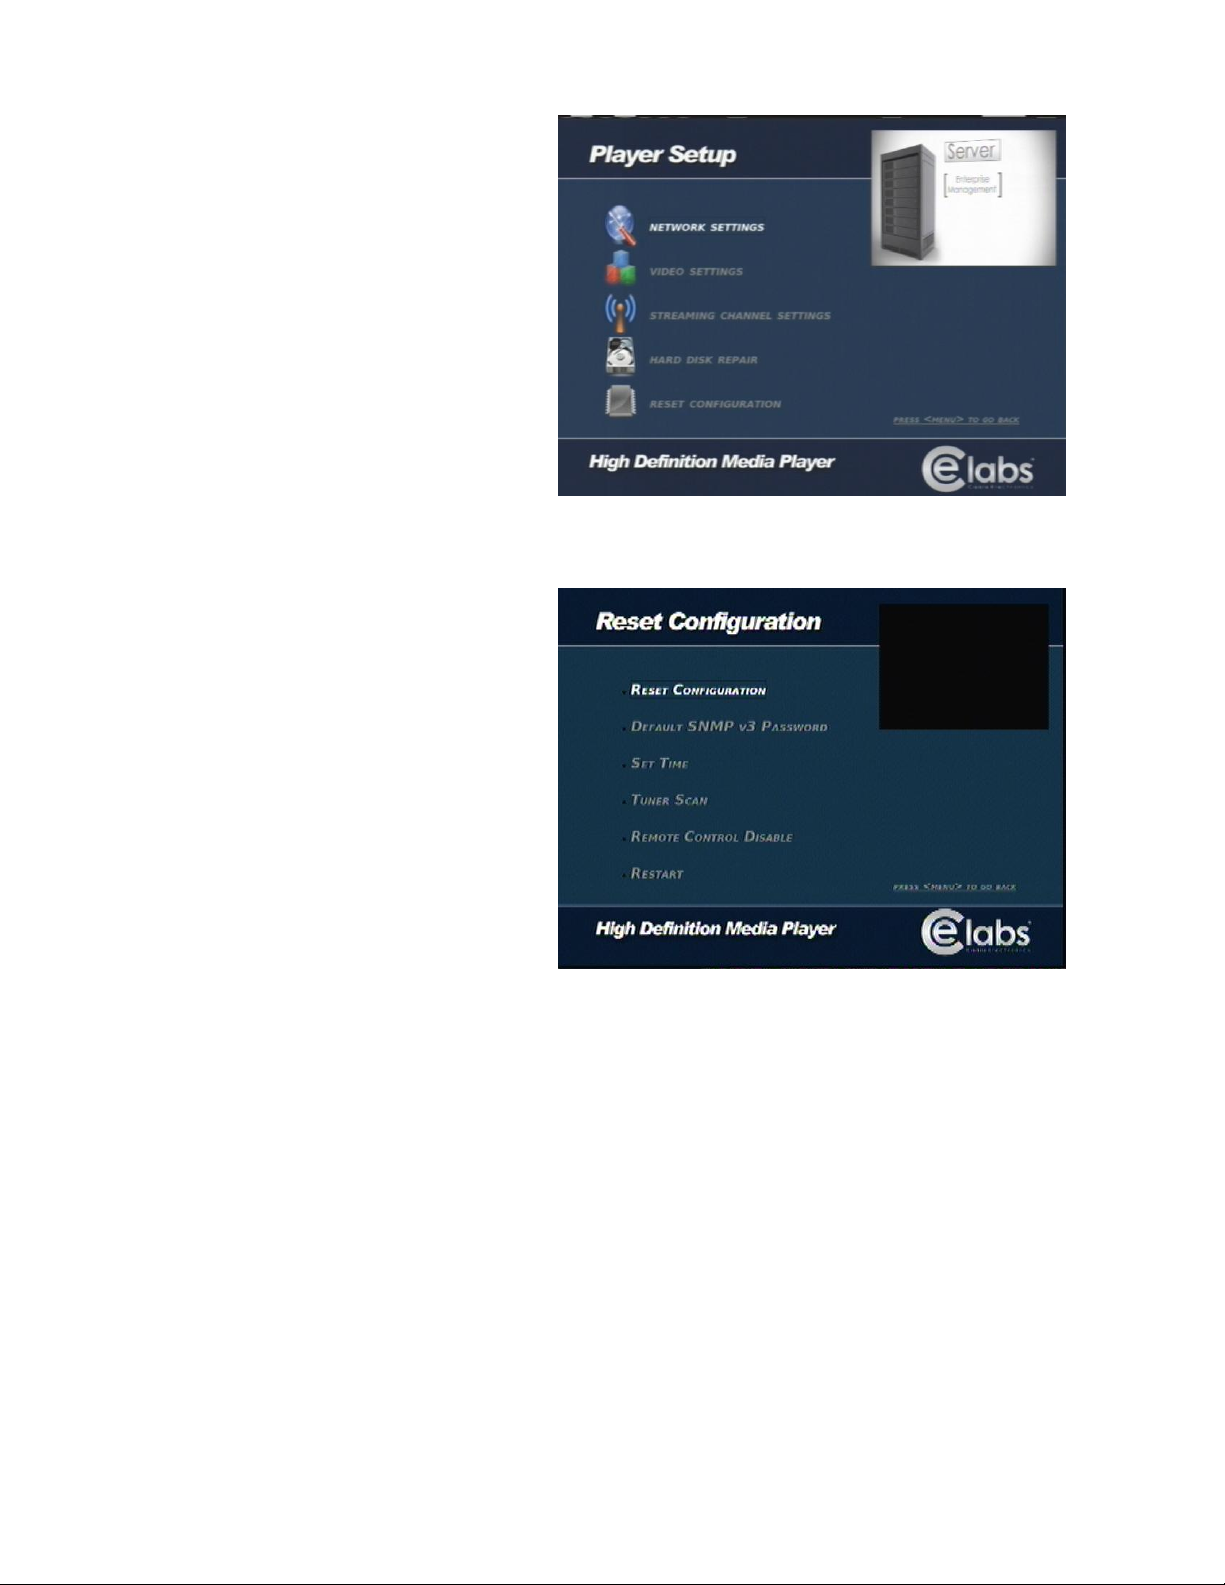
The last item on the setup menu is RESET
CONFIGURATION. This is used to replace default
values, setup a password for SNMP version 3, Set
the Real Time Clock, (option: Tuner scan of
available RF channels if the unit is a MP500T),
disable the IR remote number buttons, or to reboot
the unit.
Other manuals for MP500
1
Table of contents
Other Elabs Media Player manuals


