Eleckey E6 Operating and maintenance manual
1/18
Owner’s Detailed Manual
Thank you for purchasing ELECKEY E6.
Please refer to this guide for all operation.
Please contact us freely if you need any help.
Email: eleckey@ieleckey.com

2/18
Table of Contents
Layout......................................................................................................................................3
Quick guide..........................................................................................................................4‐5
Menu operation.................................................................................................................6‐10
Audio Recording System.......................................................................................................10
Supplement lamp..................................................................................................................10
Automatic Recording............................................................................................................ 10
Emergency Record Lock........................................................................................................11
Auto LCD OFF........................................................................................................................ 11
In case of emergency............................................................................................................11
Playback on dash cam......................................................................................................11‐15
Take a photo with dash cam............................................................................................11‐15
Lock or Delete the video file manually................................................................................. 16
Parking Mode........................................................................................................................17
Reset..................................................................................................................................... 18
Installation............................................................................................................................ 18
Warranty...............................................................................................................................18
Contact us............................................................................................................................. 18

3/18
Layout
4/18
Quick Guide
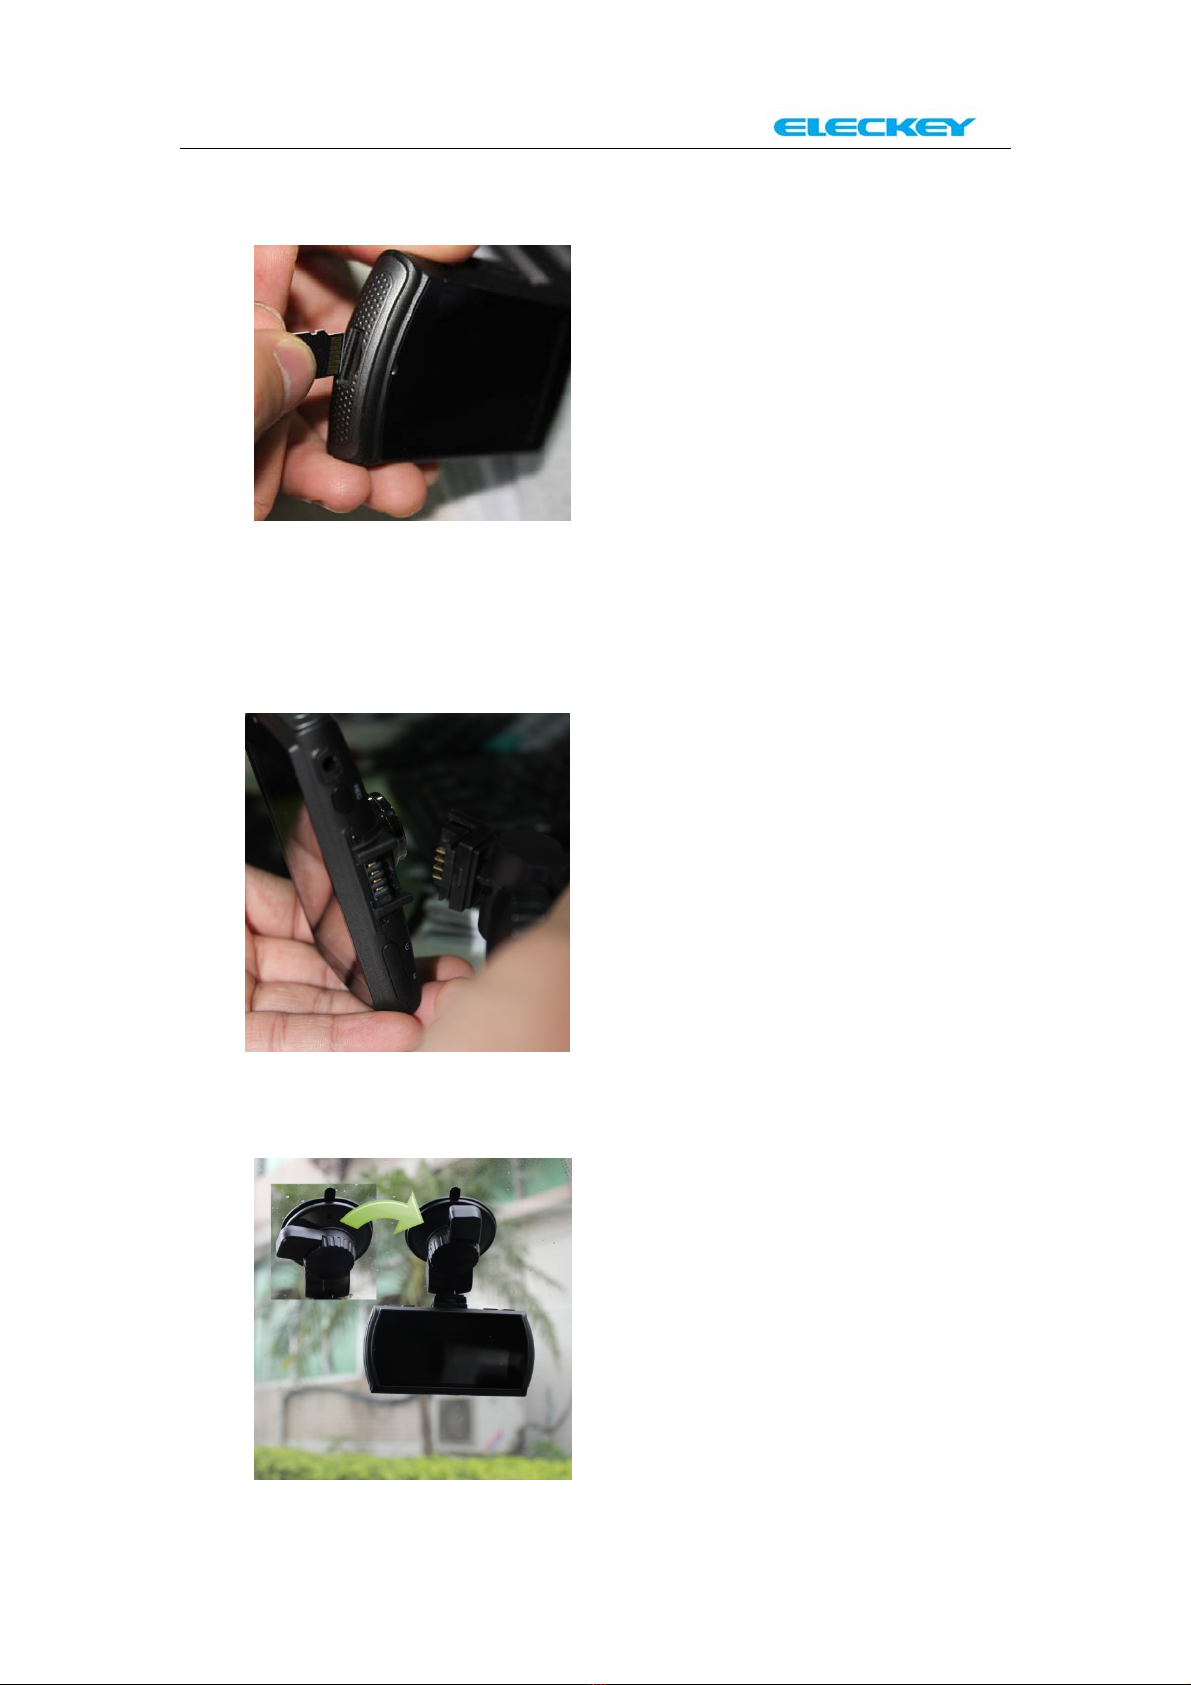
1. Install microSD card into the card slot with correct direction.
Reminder:
No memory card, Samsung Evo 32GB card is recommended. If you
are using a 64GB card, please format it to FAT32 before use.
2. Slide the camera to the fixed plate and adjust proper vertical
and horizontal positions.
3. Remove protection tape from the fixed plate and install plate on
the windshield glass. (Rotate the position which showed on the
below picture to make it locked)

5/18
4. Connect the power cord to charging port of the camera.
5. Connect the car charger to the cigarette lighter socket in your
car. And then start your vehicle.
Wish you enjoy with E6 recording system. Signals of “Automatic
Recording Mode” show as below picture.

6/18
Menu Operation
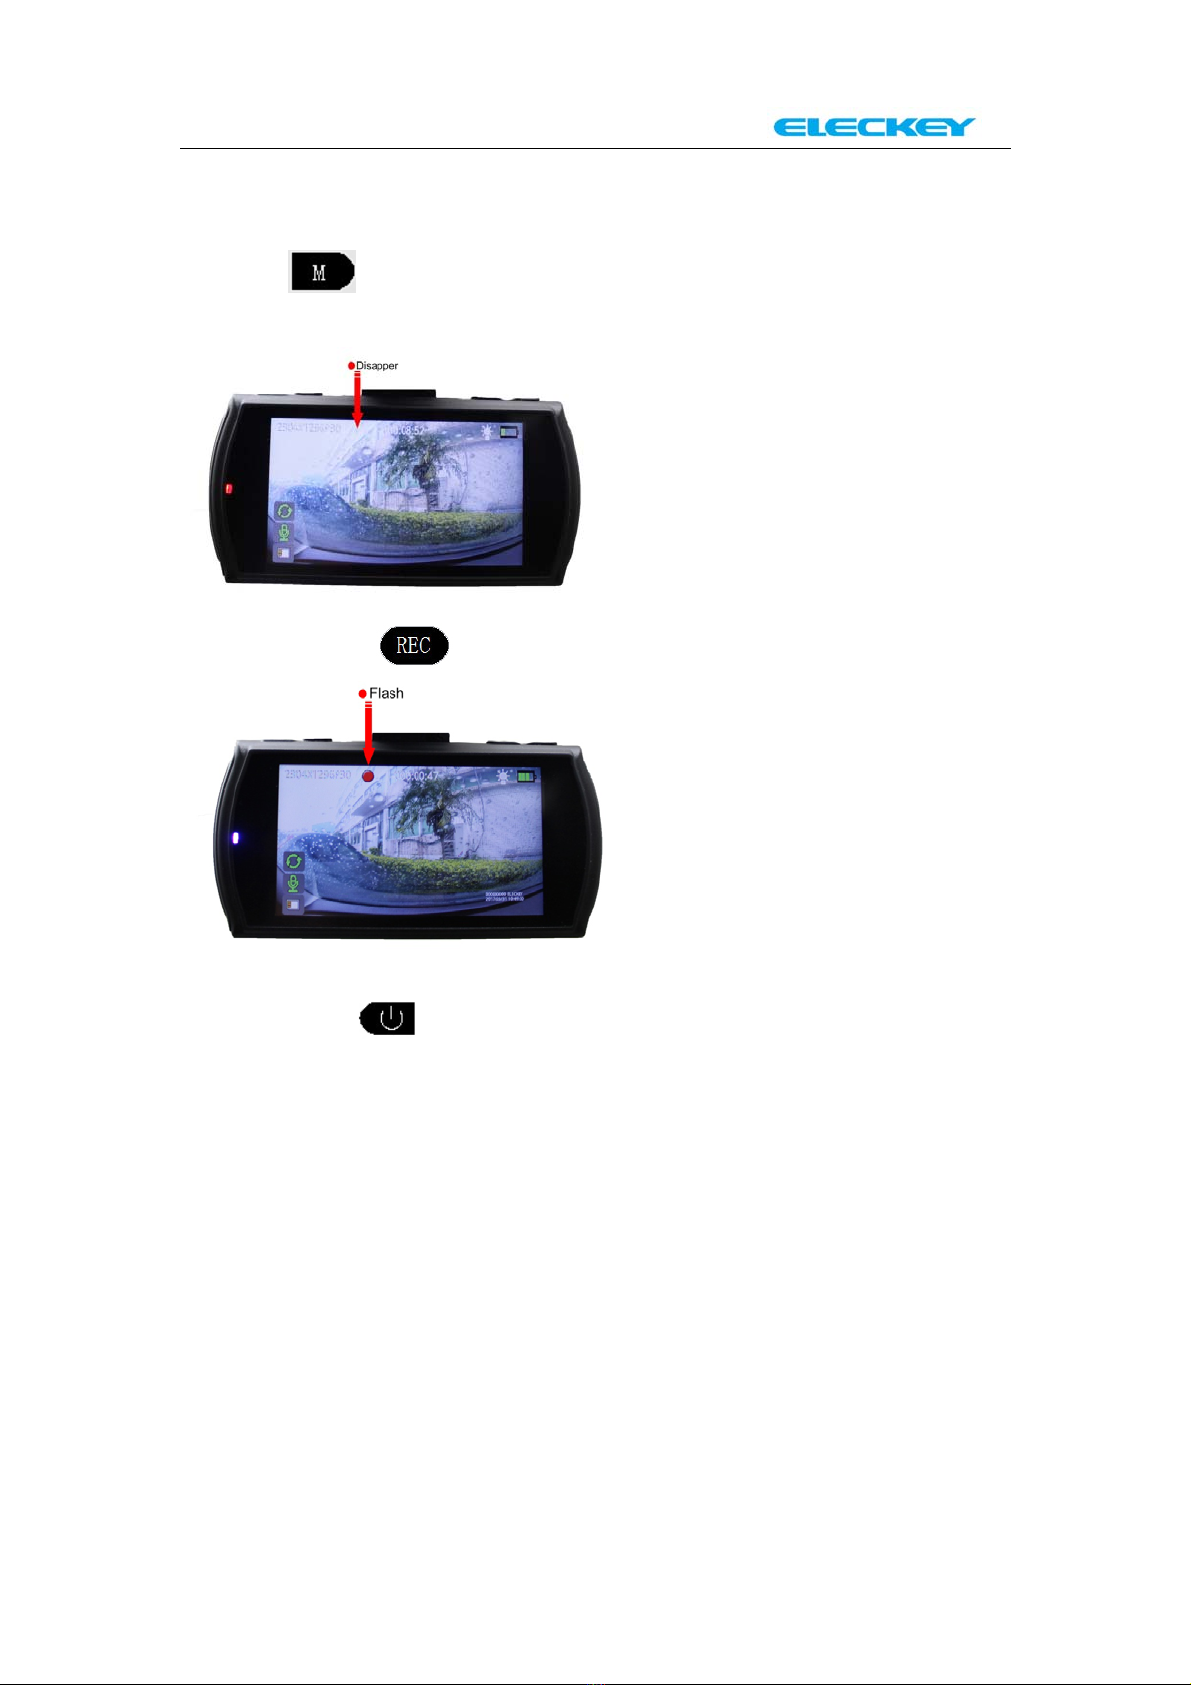
E6 is turning into the “Automatic Recording Mode” when the power is
connected.
Under the “Automatic recording mode”, red led signal will flash on
the LCD.
Press to stop recording. ( red led signal will disappear)
And then press to active the Menu selection.

7/18
RESOULTION
2304*1296/30F
1920*1080/30F
1920*1080/30F(HDR)
1280*720/60F
1280*720/30F
2560*1080/30F
Default setting: 2304*1296/30F
VIDEO QUALITY
QUALITY:S.Fine / QUALITY: Fine / QUALITY:Normal
Default setting: QUALITY:S.Fine
RECORD OVERWRITE
1MIN /3MIN/5MIN/OFF
Default setting: 1MIN
MOTION DETECTION
OFF /ON
Default setting: OFF
POWER ON RECORD
ON/OFF
Default setting: ON
POWER OFF DELAY
30SEC /OFF/10SEC/20SEC
Default setting: 30SEC
POWER ON DELAY
OFF/10SEC/20SEC/30SEC
Default setting: OFF
MIC
ON/OFF
Default setting: ON
TIME LAPSE
OFF/1SEC/5SEC/30SEC
Default setting: OFF
LANGUAGE
Default setting: ENGLISH
8/18
CAR NUMBER SET
TV TYPE
NTSC/PAL
Default setting: NTSC
AUTO POWER OFF
3MIN/5MIN/OFF
Default setting: 3MIN
AUTO LCD OFF
3MIN/OFF/30SEC/60SEC
Default setting: 3MIN
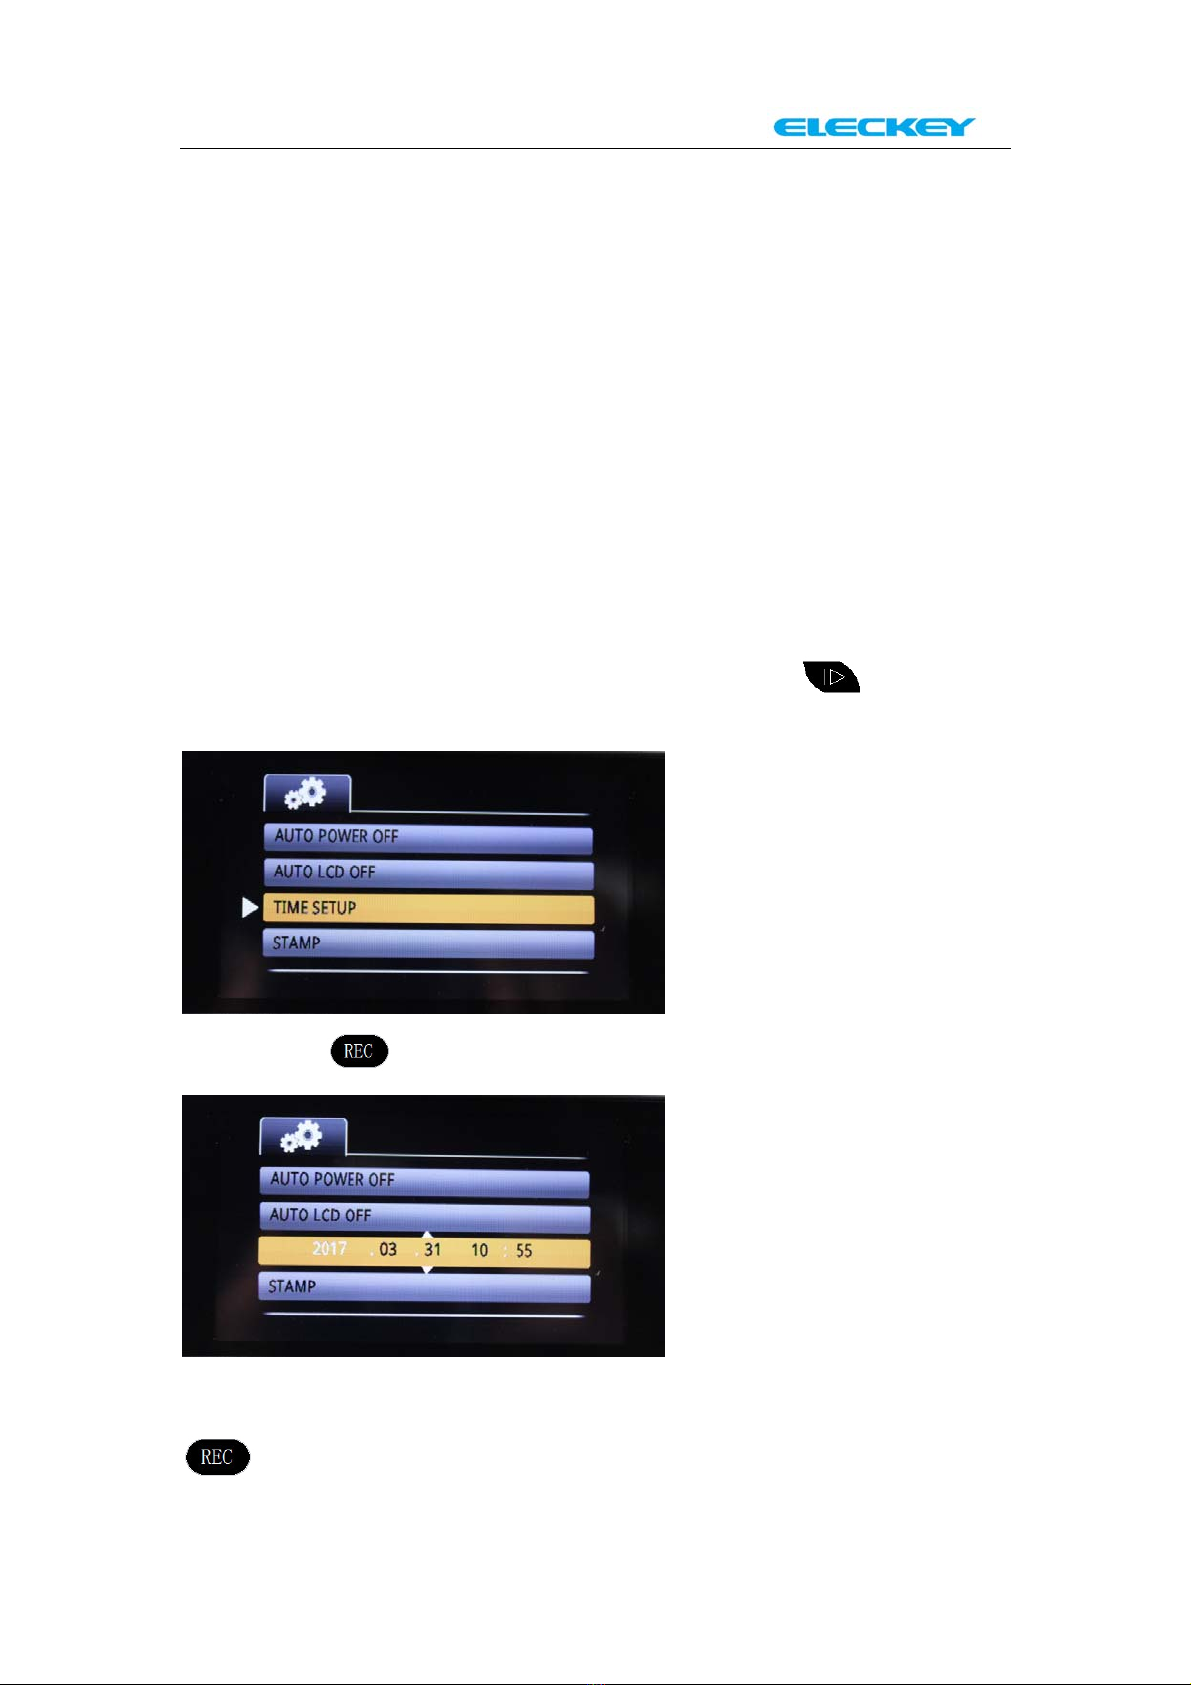
TIME SETUP
Please active the Menu selection and then press to find the
“TIME SETUP”
Then press to active “TIME SETUP” operation.
Please set the Year, Month, Date and Time one by one. You can change
the setting by “up” and “down” button; And you can confirm it by
button.

9/18
STAMP
Default setting: DATE/TIME STAMP
BEEP SOUND
VOLUME:100%
OFF
VOLUME:20%
VOLUME:40%
VOLUME:60%
VOLUME:80%
Default setting: VOLUME:100%
FLICKER
50Hz /AUTO/60Hz
Default setting: 50Hz
CONTRAST
STANDARD /HARD/SOFT
Default setting: STANDARD
SHARPNESS
STANDARD /HARD/SOFT
Default setting: STANDARD
WHITE BALANCE
AUTO/SUNNY/CLOUDY/FLUORESCENT/INCANDESCENT
Default setting: AUTO
EV SETTING
0/0.3/0.7/1/1.3/1.7/2/-2/-1.7/-1.3/-1/-0.7/-0.3
Default setting: 0
G-SENSOR SET
OFF/1/2/3/4/5/6/7
Default setting: OFF
Recommended setting: 5 (Please set it to 5 before using)
WDR
ON/OFF
Default setting: ON
LDWS DETECT

10 /18
OFF/ON
Default setting: OFF
LDWS CALIBRATION
NO/YES
Default setting: NO
DEFAULT SETTING
NO/YES
Default setting: NO
FORMAT
NO/YES
Default setting: NO
FIRMWARE VERSION
Default setting: ELB03FMHZDNE.170221.V1.1
After finishing the setting, press to go back to “Recording
pause mode”.
And then press to start “Automatic Recording Mode”.
Audio Recording System
Under the “Automatic recording mode”, if press “down” button,
the audio recording system will pause. And you press “down” button
again, it will start.
Supplement lamp
Under the “Automatic recording mode”, if press “up” button, the
supplement lamp will turn on. And you press “up” button again, it will
turn off.
Automatic Recording
The E6 is automatically configured to start recording anytime the
power is received through the cigarette lighter plug. The camera will
shut off a few seconds after power is turned off. It is set to
automatically loop the SD card as well. The previous file will be
automatically overwritten with the newest once the SD card is full.

11 /18
Emergency Record Lock
Seamless loop recording plus G-Sensor data protection automatically
detect any impact and lock the important video segments so they are
not overwritten or corrupted, preserving a complete record of the
event, you will never miss an important moment.
Note: Please set the value of G-sensor to 5 before using.
Auto LCD OFF
Auto LCD OFF after the recording begins so you won't be disturbed by
another glowing rectangle on your windshield.
In Case of Emergency
The E6 is equipped with a built-in battery. In case of emergency, and
in the event of a power loss, this will ensure the camera finishes
recording the file and does not corrupt the SD card.
In the event of an accident, or some other emergency case—the
quickest and easiest way to ensure you save the file is to power down
the camera by disconnecting the power cord. The camera will shut off
after a few seconds. The SD card can then be viewed with the supplier
USB memory card adapter.
Playback on dash cam and
Take a photo with dash cam
The dash cam under the “Automatic recording mode”
Press to stop recording. “Recording pause mode”

12 /18
Press to start “Photo Mode”
You can take a photo by pressing under “Photo Mode”
Press again under “Photo Mode”
The system will log into “system files” Page as below picture.

13 /18
And then Press to start “Preview Mode”
You can select the video or picture by “up” and “down” button.
Please select the last file which is shown on the screen and then press
“down” button. The recording video files will show on the
screen now.(They are hidden before this step)
Please select the video that you want to view. And then press
to start “Full screen Mode”.
14 /18
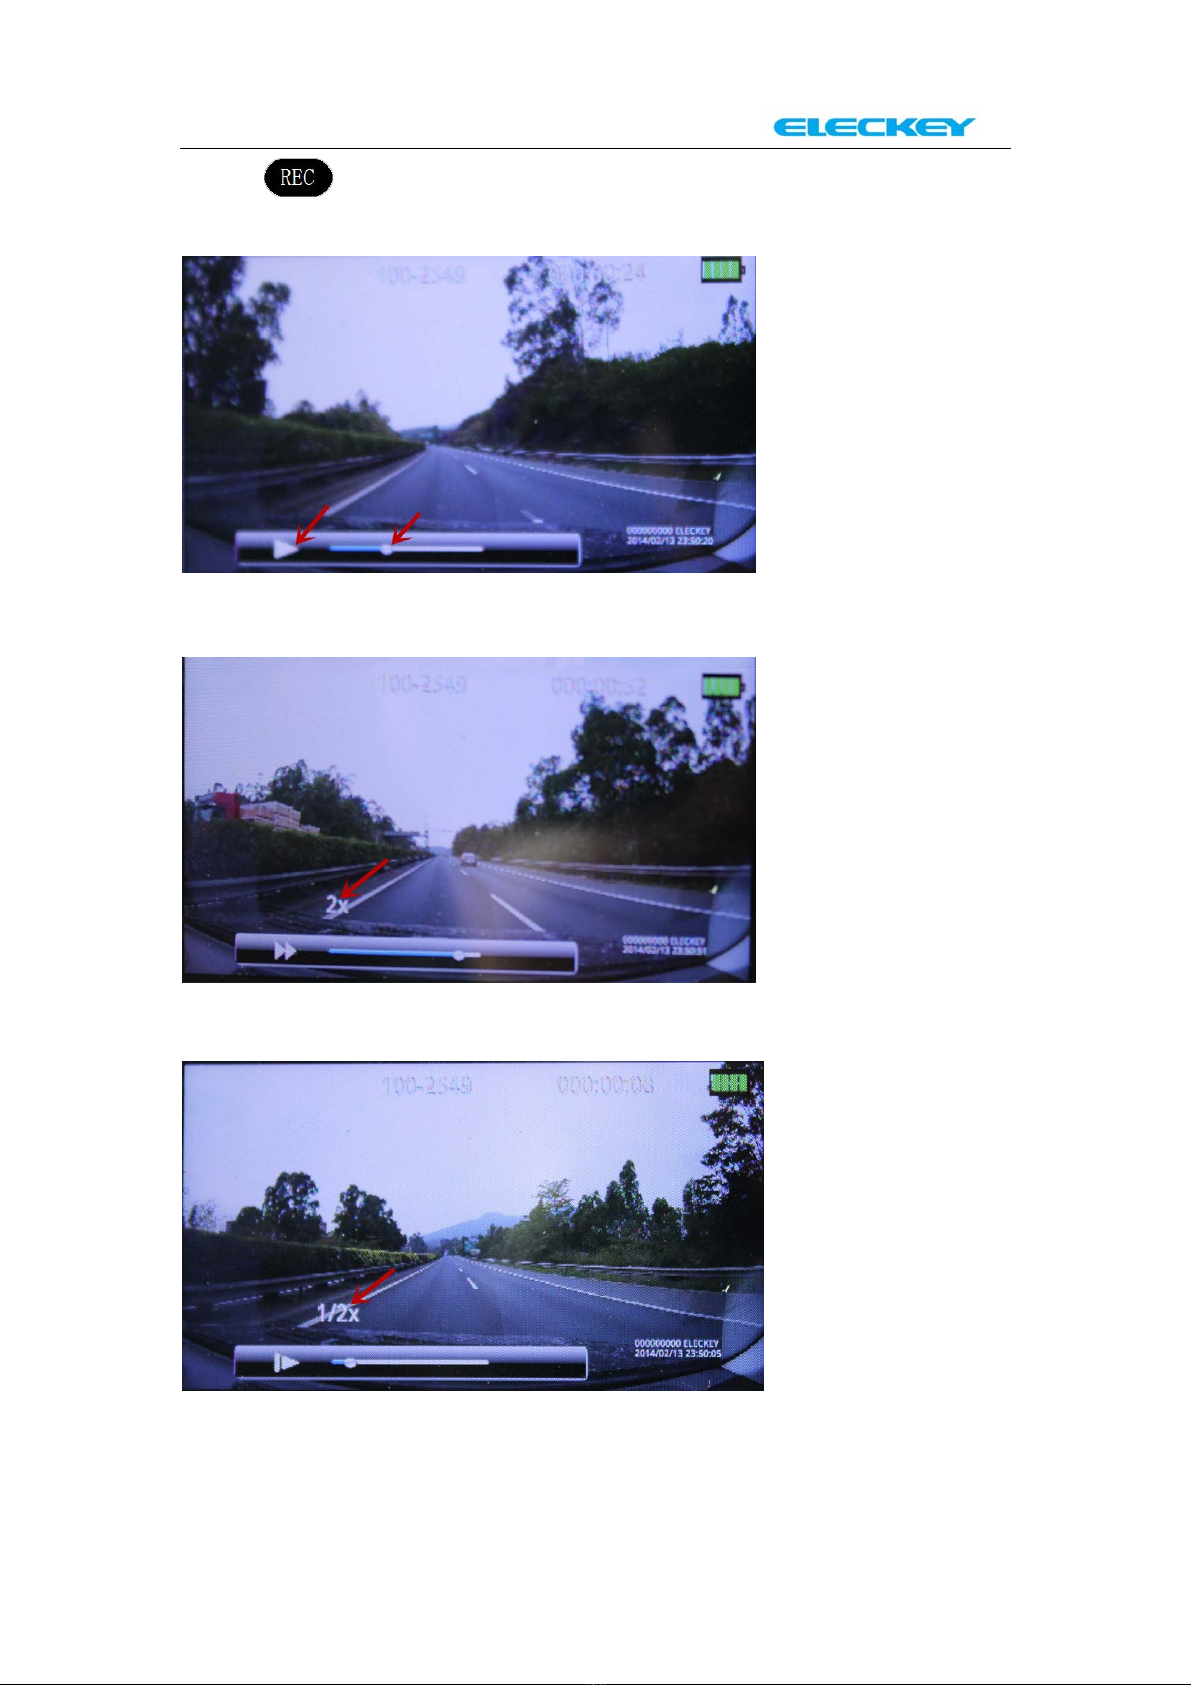
Press again under “Full screen Mode” to start the “playback
mode”.
Press “down” under “playback mode” to start “Fast forward”.
And press ”up” under “playback mode” to start “Slow motion”.
15 /18
Finish viewing and want to go back to “Automatic recording
mode”
1.Press under “system files” Page or “Preview mode”, the
system will go back to “Recording Pause Mode”.
And then press to start “Automatic recording Mode”.
2. Long press for 3 seconds to turn the dash cam off;
Pull out the charging cable from the dash cam. And then connect the
charging cable to the dash cam again to start the machine and the
system will automatically go to “Automatic recording Mode”.
NOTE: This step is fit for any status when you want to go back to
“Automatic recording mode”
16 /18
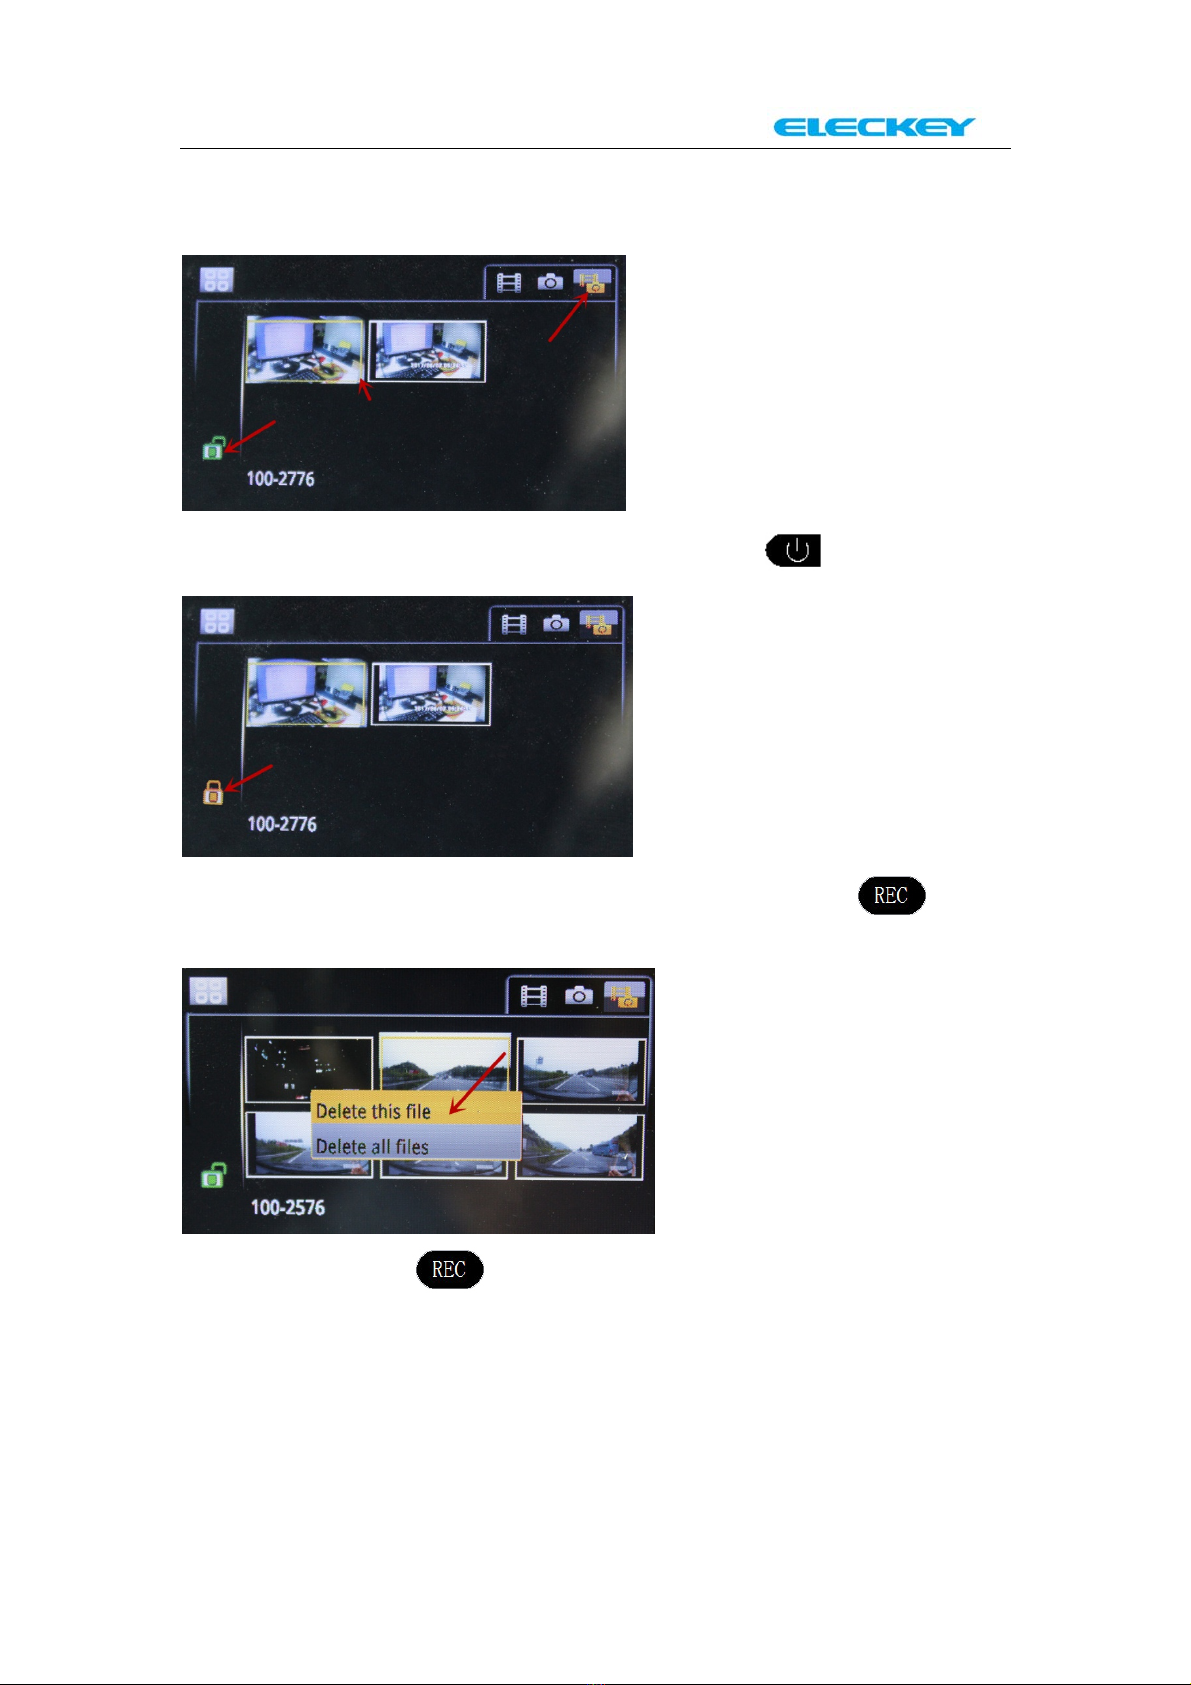
Lock or Delete the video file manually
Under the “Preview mode”
You can lock the selected video file by pressing
You can delete the selected video file by long press for 2
seconds.
And then press the again to delete the file.

17 /18
Parking Mode(Not commonly use)
To use the parking mode, please connect it with an external battery
because the battery of dash cam itself is small-capacity.
Please connect the external battery to the dash cam and start the
machine.
And then active the Menu selection and then press to find the
“MOTION DETECTION”
And then press to active “MOTION DETECTION” operation.
Please select “ON” and confirm it by pressing again. Then
press , the system will go into “Parking mode” as below picture.
Under the “Parking mode”, the camera will auto record when people or
things come closer to your car from in front. And it will automatically
stop recording when it senses no movement in 10 seconds.
You want to finish “Parking mode” and go back to normally
“Automatic recording mode”.
Long press for 3 seconds to turn the dash cam off;
Disconnect the charging cable from the external battery. And then
connect the charging cable to the dash cam again from car cigarette
lighter to start the machine and the system will automatically go to
“Automatic recording mode”.

18 /18
Reset
Please reset all the setting by pushing the below position in case of
system crash.
Installation
We recommend you install the dash cam behind of the rearview mirror
as below picture so that you never see the LED indicator when driving.
Wish you a wonderful experience with E6.
Warranty
We ELECKEY provide free warranty service for parts and labor within
12 Months from the date of purchase.
Contact Us
If you have any questions or comments, please feel free to contact us!
Email: eleckey@ieleckey.com
Web: www.ieleckey.com
Table of contents


