Electric Eel Ecam Ace User manual

1
eCAM Ace Color Video Inspection System
OPERATOR’S MANUAL
For Safe and Effective Operation:
Before operation of your system, it is advised
that this manual be read carefully.

2
CONTENTS
PAGE 3 LIMITED WARRANTY
PAGE 4 LIMITATION OF WARRANTY / SERVICE / FREIGHT
PAGE 5 NON-WARRANTY CHARGES PRODUCT FEATURES
PAGE 6 USER INSTRUCTIONS
PAGE 7/8 INSPECTION PROCEDURE
PAGE 9-11 FEATURE IDENTIFICATION
PAGE 12 TROUBLESHOOTING
PAGE 13 MAINTENANCE
PAGE 14 USA REPAIR FACILITIES
PAGE 15 CANADA REPAIR FACILITIES

3
LIMITED WARRANTY
This Limited Warranty provides one full year of coverage under our manu-
facturer’s standard new product warranty. Electric Eel warrants to the origi-
nal purchaser of our products that the product shall function as designed for
a period of one year from the original date of purchase under normal and
proper usage. This one year Limited Warranty covers malfunctions result-
ing from defects in materials or workmanship only. If the product fails to
function as designed under normal and proper usage due to defects in mate-
rials or workmanship during the period of this Limited Warranty, we will
repair, adjust or replace defective parts as Electric Eel deems appropriate.
This Limited Warranty applies only to Electric Eel camera systems that are
distributed in the United States and Canada that are purchased from Elec-
tric Eel or an Electric Eel authorized dealer as identified on our website.
The Limited Warranty is not transferable under any circumstances. This
Limited Warranty does not apply to Electric Eel branded products imported
and/or sold by unauthorized dealers, distributors or other sellers.
NOT COVERED BY WARRANTY
This one year Limited Warranty does not cover damage or malfunctions
stemming from other than normal and proper usage or from products not
meeting the requirements of end users. This Limited Warranty also does
not cover the following: (a) intentional or accidental misuse or abuse
(including, but not limited to, damage to push rod from excessive force),
(b) failure to follow operating or maintenance instructions, (c) repairs by
any individual or entity other than an authorized repair center, (d) use of
product components, accessories or consumables not manufactured by
Electric Eel (e) product tampering, (f) droppage, (g) battery leakage if
equipped, (h) media cards, (i) excessive light damage to the camera ele-
ment or (j) damage resulting from being used in extreme environments or
due to weather events. Wear and tear are not covered.
Electric Eel's responsibility under this Limited Warranty is limited to the
repair, adjustment or replacement of defective parts as determined by Elec-
tric Eel in its sole discretion. Electric Eel shall not be held liable for any
damages, including but not limited to direct, indirect, special, or conse-
quential damages arising out of, resulting from, or in any way connected to
the use of Electric Eel products. Electric Eel assumes no responsibility for
other’s use or misuse of its products. Electric Eel assumes no responsibil-
ity for warranties either expressed or implied beyond that which is con-
tained herein.

4
LIMITATION OF LIABILITY
By purchasing an Electric Eel product you accept the terms of this limited
warranty. You also agree that Electric Eel shall have no liability to you or
any end user for any damages resulting from delay or loss of use of the prod-
uct due to failure of the product within the warranty period, or otherwise, or
in service or repair. Electric Eel shall have no liability for general, special,
incidental or consequential damages arising out of the use or misuse of Elec-
tric Eel products.
You also agree that the application and use of a Electric Eel product is be-
yond our control and is the sole responsibility of the user. By receiving and
using one of Electric Eel’s products, you hereby acknowledge and agree
that: you have selected the correct product for your intended use and will
examine the product you are purchasing when it arrives to ensure that it
meets your needs, you will properly test the product prior to its actual use,
you and/or your organization have proper practices in place for the safe use
of this equipment and that end users have been trained on its safe operation
Electric Eel products are not intrinsically safe, not explosion proof and mis-
use of the product may cause physical or psychological injury, pain, suffer-
ing, illness, disfigurement, temporary or permanent disability, economic or
emotional loss, and death; and Electric Eel shall not be held liable for any
damages, including but not limited to direct, indirect, special, or consequen-
tial damages arising out of, resulting from, or in any way connected to the
improper or incorrect use of the product and assumes no responsibility for
other’s use of the product.
SERVICE
If the product requires service, please contact the Electric Eel service centre
one of our authorized repair centers. Some service locations are listed in this
document (Pages 18 & 19). Other repair centers can be found at
www.hathorncorp.com/find-a-repair-center.
After requesting a Return Merchandise Authorization (RMA) ship the item
PREPAID and INSURED to the appropriate service center. Electric Eel is
not responsible for damages or loss incurred in connection with mailing and/
or transportation of product.
NON-WARRANTY CHARGES
Repairs centers will charge direct for non-warranty repairs and may require
payment prior to repair.

5
PRODUCT FEATURES
With the eCam Ace reel you can complete pipe inspections
without the use of a traditional monitor and with the ease
of a system that runs on external 18V Milwaukee compati-
ble batteries (not included) or the 12V AC/DC adapter.
• NO cords and NO heavy monitor cases
• Powerful SONDE transmitter that works with
any 512Hz locator
• Auto-iris camera element that automatically ad-
justs picture lighting, no LED light dimming
required
• If you opted for the WiFi option then you can
easily transfer wireless video from reel to any
mobile device or tablet. The system connects
up to four Wi-Fi enabled devices at once.
• 6” wheels for easy transport of system

6
USER INSTRUCTIONS
Setting Up the eCam Ace for Use
Connect DC power plug to the jack on the reel hub, then
plug the AC power plug into the outlet. Press the power but-
ton on the monitor. At this point you should have lights on
the camera and a picture on the monitor. You are now ready
to perform the inspection procedure.
Alternatively, you may wish to use 18V Milwaukee compat-
ible batteries for ultimate portability. Standard 3.0Ah bat-
teries should allow the user to run for 4-6 hours in a single
charge. Batteries are sold separately.
Locating Sonde
With the eCam Ace the 512hz locating sonde is always on.
Use any brand of 512hz locator to find the sonde when un-
derground. Sondes are locatable up to 15ft. underground
dependent upon thickness of concrete and presence of steel/
cast iron pipe.
Video Output Jack
A video output jack is located on the lower lip of the LCD
monitor. This may be used to supply video to an external
monitor or recording device.

7
INSPECTION PROCEDURE
Skids or sleeves should ALWAYS be used to protect the
camera head. Depending on the size of the pipe you are in-
specting, you may need to use a skid so the camera is cen-
tered or off the floor of the line. Care should be taken so the
skids do not snag in the line.
Under normal operating situations, the camera is used with a
smaller protective sleeve in lines under 4” in diameter or a
larger finned sleeve in 4” lines and larger.
1. Slowly push the camera into the pipe and negotiate the
camera into position to feed down the pipe making sure
the flex neck does not kink or double back on itself.
2. Push the camera slowly and carefully during the in-
spection taking note of the pipe condition for possible
hazards that may entangle or damage the camera on en-
try or retrieval.
3. When negotiating a corner, care should be taken not to
butt the nose of the camera against the sidewall with
any force. It would be better to let the camera “work”
its way around the corner. If resistance is encountered
when turning the corner and there is no visible signs of
blockage, turning the push rod or pulling the camera
back and forth sometimes helps.
4. Should resistance become extreme, or the camera get
entangled or stuck, slowly push it back and forth to free
it. Sometimes turning the push rod may also help. If the
camera is visible, you may be able to free it with your
hand or some other means.

8
5. Upon completion of the inspection and retrieval of the
camera, it may be necessary to ‘manipulate’ the camera
around the initial bend (clean out) in the pipe with a
pole or other device if required.
6. NEVER use the camera to unclog a drain or clear de-
bris in the pipe. Doing so can cause damage to the
camera head or lens.
7. NEVER force the camera down a pipe as this may
cause a kinked cable which will require expensive re-
pairs.
8. NEVER use a pressure washer to clean any part of the
eCam system. High pressure water can cause degrada-
tion of the electronic parts causing damage.
9. NEVER unspool all of the rod from a reel. Always
leave a few turns of rod on the reel to aid with re-
spooling.

9
FEATURE IDENTIFICATION
18V Baery
Cradle and AC/
DC Adapter
Power Input
Sunshade and
Screen Protector
6” Wheels

10
LED Lights
Sapphire Camera Lens
Plasc Skid/Sleeve
RCA Video
Out Jack
5.4” LCD
Screen
Screen
ON/OFF
11
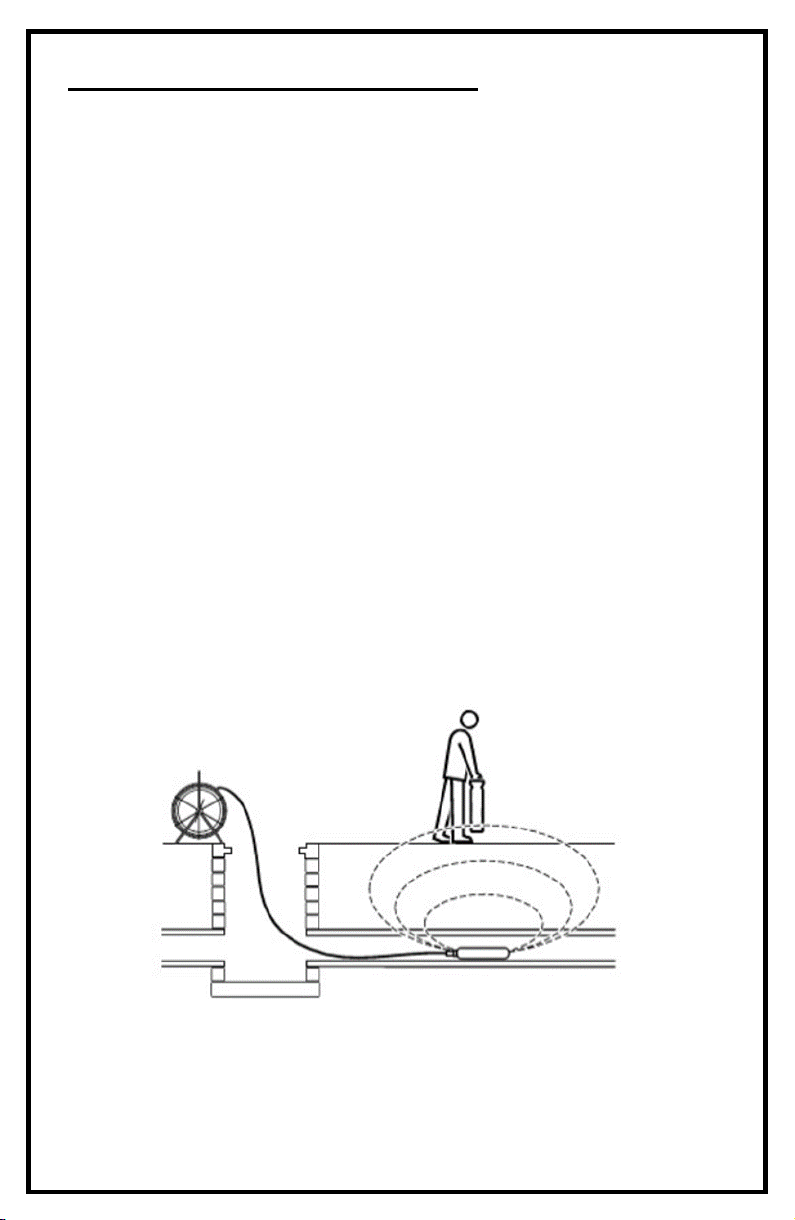
LOCATING THE 512 Hz SONDE
Insert the sonde in the drain and locate it while it is still
just in view at the drain or duct entrance. Hold the locator
vertical directly over the sonde with the antenna in line
with the sonde. Adjust the locator sensitivity so the bar
graph reads between 60% and 80%. Push the sonde along
the pipe to the desired area.
1. Approach the peak of the signal working perpendicu-
lar to the pipe. Move the locator backwards and for-
wards and stop when the bar graph indicates a Peak.
2. Push the camera 4-6 ft. further, pinpoint, and mark
the position. Repeat this pinpoint procedure at similar
intervals along the line of the drain or duct until the
survey is completed.
3. Most locators will automatically display the depth of
a located sonde providing the locator is correctly ori-
ented and positioned above the sonde.

12
TROUBLESHOOTING
CONTACT YOUR LOCAL REPAIR CENTER ON PAGE 14/15
OF THIS DOCUMENT

13
MAINTENANCE
Inspection Camera - After every use, the camera
should be cleaned and checked for possible damage.
External scuffing of the camera case is normal and
should be of no concern. The camera view port is made
of sapphire and should be cleaned with a soft, damp
cloth. Grease, dirt or scratches will affect the quality of
the video and if the lens is badly scratched it should be
replaced.
LED Light Replacement - The camera heads use LED
lighting and cannot be replaced by the operator. These
lights use very little power and unless physically dam-
aged or extreme voltage is applied to them, should last
indefinitely. If replacement is necessary, the camera
should be returned to the factory.
Reel and Cable Assembly Maintenance - The reel and
cable assembly should be kept clean from dirt, slime,
grit, etc. When winding the cable back onto the reel af-
ter an inspection, it is good practice to use a clean cloth
to wipe off any debris.
WARNING
NEVER USE A POWER WASHER TO CLEAN
THIS EQUIPMENT. PRESSURIZED WATER
MAY GET INTO UNSEALED AREAS SUCH
AS THE REEL HUB ASSEMBLY AND SLIP
RING HOUSING CAUSING DAMAGE AND
VOIDING WARRANTY.

14
REPAIR FACILITIES - USA
Repairs, warranty or otherwise, returned to must be submitted
with a “Return Maintenance Authorization.” For “RMAs”
please contact:
Hathorn USA
Address: 739 North Wilson Road, Columbus, OH, 43204
Phone: 1-855-863-9226 FAX: 1-905-604-3400
Email: [email protected]
Website: www.hathorncorp.com
Kaiser Premier USA – Mobile Repairs South West
Address: 6108 Wild Fox Court, Elk Grove, CA 95757
Phone: 1-916-995-2743
Email: [email protected]om
Website: www.kaiserpremier.com
Utility Equipment Technology Ltd.
Address: 382 Stevens Rd., Rockwall, TX 75032
Phone: 1-972-771-8958 FAX: 1-972-772-8195
Email: utilityequipment@gmail.com
Website: www.utilityequipmenttechnology.com
Dynamic Repairs
Address: 40 Arnot St., Unit 20, Lodi, NJ 07644
Phone: 1-973-478-0893 FAX: 1-973-478-0895
Email: dynamiccablerepairs@yahoo.com
Website: www.dynamicrepairs.net
Visual Imaging Resources
Address: 12600 Newburgh Rd, Livonia, MI 48150
Phone: 734-744-5557
email: [email protected]
Website: www.visualimagingresources.com
Note: For other repair center locations please visit
www.hathorncorp.com/find-a-repair-center.

15
REPAIR FACILITIES - CANADA
Repairs, warranty or otherwise, returned must be submitted with a
“Return Maintenance Authorization.” For “RMAs” please
contact:
Hathorn Canada - Ontario, Manitoba & Eastern Canada
Address: 255 Shields Court, Unit C, Markham, ON L3R 8V2
Phone: 1-905-604-7040 FAX: 1-905-604-3400
Email: [email protected]
Website: www.hathorncorp.com
Access Spec Telecommunications - Quebec
Address: 328 Rue St Paul, Repentigny, QC J5Z 4H9
Phone: 1-450-581-7009
Email: [email protected]
Website: www.accessspec.com
The Drain Camera Shop – British Columbia
Address: PO Box 102-B, Mill Bay, BC V0R 2P0
Phone: 1-250-514-5976
Email: [email protected]
Website: www.thedraincamerashop.com
FixedRight – Alberta and Saskatchewan
Address: 8812-185 St. NW, Edmonton, ALB T5T 1W5
Phone: 1-780-690-9080
Email: [email protected]
Website: www.fixedright.ca
Note: For other repair center locations please visit
www.hathorncorp.com/find-a-repair-center.

16
Electric Eel Manufacturing Co. Inc
501 West Leel Lane
Springeld, Ohio 45506
1-800-833-1212
Other manuals for Ecam Ace
1
Table of contents
Other Electric Eel Analytical Instrument manuals


