manuals.online logo
Brands
  1. Home
  2. •
  3. Brands
  4. •
  5. ElectrIQ
  6. •
  7. Juicer
  8. •
  9. ElectrIQ VRTSL150 User manual

ElectrIQ VRTSL150 User manual

Other ElectrIQ Juicer manuals

ElectrIQ IQ-Juicer PREMIUM User manual

ElectrIQ

ElectrIQ IQ-Juicer PREMIUM User manual

ElectrIQ WF1000 User manual

ElectrIQ

ElectrIQ WF1000 User manual

ElectrIQ WF1000 User manual

ElectrIQ

ElectrIQ WF1000 User manual

ElectrIQ HSL600 User manual

ElectrIQ

ElectrIQ HSL600 User manual

Popular Juicer manuals by other brands

SSW Vitalo Use and care

SSW

SSW Vitalo Use and care

Gastroback DESIGN JUICER BASIC operating instructions

Gastroback

Gastroback DESIGN JUICER BASIC operating instructions

Kenwood AT641 manual

Kenwood

Kenwood AT641 manual

GE 169201 owner's manual

GE

GE 169201 owner's manual

Exquisit ZP 3001 WET instruction manual

Exquisit

Exquisit ZP 3001 WET instruction manual

Sam Cook MASTERCHEF EXECUTIVE PSC-50 user manual

Sam Cook

Sam Cook MASTERCHEF EXECUTIVE PSC-50 user manual

Philips HR1851 user manual

Philips

Philips HR1851 user manual

Termozeta spremiagrumi Instruction booklet

Termozeta

Termozeta spremiagrumi Instruction booklet

Bella WHOLE FRUIT JUICER instruction manual

Bella

Bella WHOLE FRUIT JUICER instruction manual

HAEGER Little Juice CJ-025 006A User instructions

HAEGER

HAEGER Little Juice CJ-025 006A User instructions

Havells Fusion operating instructions

Havells

Havells Fusion operating instructions

Siemens MK554 SERIES operating instructions

Siemens

Siemens MK554 SERIES operating instructions

Beper 90.302B use instructions

Beper

Beper 90.302B use instructions

NATURSAFT 015.401.3 instruction manual

NATURSAFT

NATURSAFT 015.401.3 instruction manual

Moulinex BKB 2 user guide

Moulinex

Moulinex BKB 2 user guide

Royal Catering RCJU-01 user manual

Royal Catering

Royal Catering RCJU-01 user manual

camry CR 4002 user manual

camry

camry CR 4002 user manual

croydon ES4AB-250001 A2 instruction manual

croydon

croydon ES4AB-250001 A2 instruction manual

manuals.online logo
manuals.online logoBrands
  • About & Mission
  • Contact us
  • Privacy Policy
  • Terms and Conditions

Copyright 2025 Manuals.Online. All Rights Reserved.

1
VRTSL150 Premium Slow Juicer
USER MANUAL
Thank you for choosing ElectriQ.
Please rea this user manual before using this slow juicer
an keep it safe for future reference.
Visit our page www.electrIQ.co.uk for our entire range of Intelligent Electricals
2
Contents
Features 3
Safety Instructions 4
Package content an parts 5
Assembly an Operation 6
Fruits an Vegetables Nutrition Tables 12
Cleaning an maintenance 15
Troubleshooting 17
Recipes 18
3
FEATURES
ElectrIQ VRTSL150 slow juicer an smoothie maker
Col press juicer with high juice extraction
Low gear spee at only 55 RPM
High juice yiel an less waste
Fine an coarse juicing screens
Self-cleaning bla e
Smart mixer system
Quiet an energy efficient
Easy to assemble an store
Healthier juice
Large juice an pulp containers
ElectriQ extracts more juice, preserves nutrients, taste an colours while pro ucing
healthier juice
ElectrIQ slow masticating vertical juicer VRTSL150 juices fruits, vegetables, grasses,
leafy greens or creates elicious nut milks with minimal effort.
Features a 150 watt energy powerful motor that spins at only 55 RPM ensuring
fruits an vegetables are mechanically presse without a ing friction heat,
preventing juice oxi ation while retaining maximum nutrients.
Vertical mo ern space saving esign
Low noise ue to slow pressing system
Inclu es as stan ar two juicing screens catering for smooth juice lovers or pulp
an fiber fanatics. Self-cleaning bla e allows cleaning the unit between juicing
ifferent ingre ients without isassembly.
Smart juice mixer allowing to blen few fruits seamlessly
BPA Free Plastic
Super strong HD plastic auger an juicing screens
Easy to clean an ishwasher safe
Note: Due to continuous pro uct evelopment, pro ucts may not exactly
correspon to the illustrations in this manual.
4
SAFETY INSTRUCTIONS
Important
• Carefully rea the instructions before operating the unit
• This appliance is for in oor use only.
• Rating: This unit must be only connecte to a 220-240 V / 50 Hz earthe outlet. Always
check the rating label against your electrical supply.
• If you are in any oubt about the suitability of your electrical supply have it checke
an , if necessary, reteste by a qualifie electrician.
• This juicer has been teste an is safe to use. However, as with any electrical
appliances - use it with care.
• Disconnect the power plug from socket before ismantling, assembling or cleaning.
• Do not clean the unit by spraying it or immersing it in water.
• Never operate this appliance if the cor or plug is amage . Ensure the power cor is
not stretche or expose to sharp object/e ges.
• Do not pull the mains cable to isconnect the mains plug from the mains.
• Do not use the appliance if any part or any accessory is amage or efective.
• A amage supply cor or plug shoul be replace by the manufacturer or a qualifie
electrician in or er to avoi a hazar .
• Avoi touching any moving parts of the appliance.
• Never insert fingers, or any other objects apart from the foo pusher though the
fee er
• This appliance is not inten e for use by persons (inclu ing chil ren) with re uce
physical, sensory or mental capabilities. It is also not inten e for use by those with a lack of
experience an knowle ge, unless they have been given supervision or instruction concerning
the use of the appliance by a person responsible for their safety.
• Do not leave chil ren unsupervise with this appliance.
• Any service other than regular cleaning shoul be only performe by an authorize
service representative. Failure to comply coul result in a voi e warranty.
• Do not use the appliance for any other purposes than its inten e use.
• Always place the unit on a ry an stable surface. Do not shake while is in use.
• Do not use the appliance in places with high humi ity (>80%RH)
• Do not immerse the appliance in water or other liqui s. If the appliance is immerse
in water or other liqui s by mistake, o not touch the appliance with your han s. Imme iately
remove the mains plug from the wall socket. If the appliance is immerse in water or other
liqui s, iscar it.
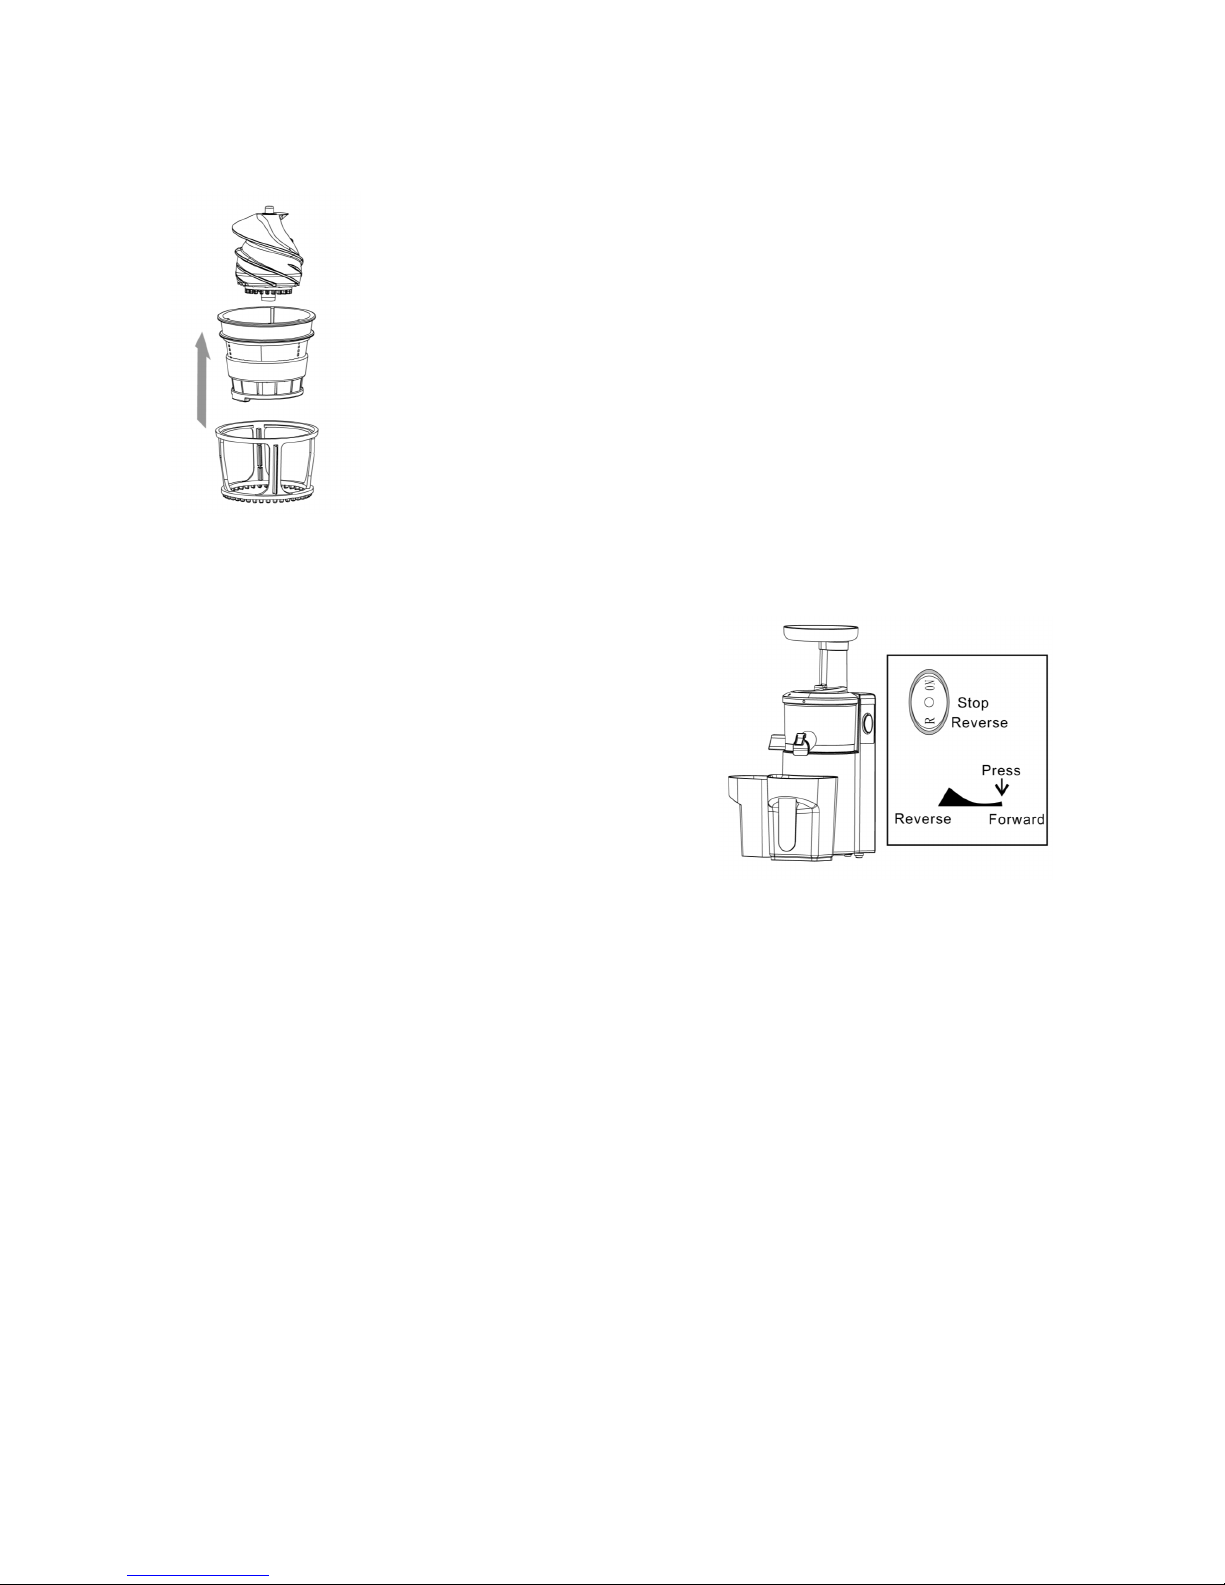
Unit Safety Protection an Performance Tips
• Make sure the unit is correctly assemble an the safety locks engage
• Do not run the juicer empty
• When juicing take regular breaks to avoi motor overheating, o not run for more
than 30 minutes continuously
• Fruits an vegetables must be slice to prevent overloa ing the motor. Root
vegetables such as carrots must be cut in strips less than 2cm in iameters
• Always clean the juicer imme iately after use.
5
PACKAGE CONTENTS
1x Col Press Juicer with 2 juicing screens
1x User Manual
1x Juice Tank
1x Pulp Tank
1x Cleaning Brush
Account for all parts before isposing packing. Safely ispose of all plastic bags an other
packaging components. They may be potentially angerous to chil ren.
Quick Reference Gui e
1. Fee ing tube
2. Auger
3. Fine juicing screen
4. Pusher
5. Coarse juicing screens
6. Self-cleaning bla e
7. Cleaning brush
8. Juice collector
9. Pulp ispenser
10. Juice outlet
11. Smart juice mixer
12. On/ Reverse button
13. Juicer bo y
14. Pulp Collector
15. Juice Jug
6
Initial use
Preparation
• Clean the appliance an accessories before first use
• Wash the juicing bowl, juicing screens, auger, pusher, juice cup an pulp cup
in warm soapy water with a soft cloth or nylon brush. Rinse an ry thoroughly.
Also refer to the section "Cleaning an maintenance"
Assembly an Operation
Before assembly or isassembly, switch off the appliance, remove the mains plug
from the wall socket an wait until the appliance has coole own.
This appliance has a built-in safety lock; this feature ensures that you can only
switch on the appliance if you have assemble the juicer correctly on the motor
unit. When assemble correctly, the built-in safety lock will be unlocke .
Assembling the Juicer
Before you assemble the juicer, ensure that the power cor is unplugge .
1.
Place the motor base on a flat ry surface such as a countertop.
2.
Un erneath the juice bowl is the pulp extraction silicon, which is use to
remove the pulp from the spout of the juicing bowl. Ensure that the silicon is
firmly inserte into the whole otherwise the juicer will not function properly.
7
1. While power is still isconnecte place the juice
collector on the top of the motor base. Make sure the 3
holes at the bottom of the collector are aligne than
rotate in a clockwise irection until it locks into position
2. Install the smart mixer by
clicking it on the juice outlet
3. Select your favourite juicing
screen an insert it in the cleaning
bla e
4. Place the assemble parts into the
juicer collector
5. Note that the triangle mark on the
juicing bla e (strainer) nee s to align
with the triangle mark on the juice
collector. Ensure that the strainer is
completely pushe own.
6. Place the Auger into the strainer.
Ensure that the Auger is in position by
pressing own on it, an feeling the auger
clicks into place.
7. Place the assemble fee er/ bo y
cover onto the juice collector. Align the
mark on the cover with the mark on the
juice collector bowl an turn it clockwise
to the locke status. It shoul click into
position as in the pictures bellow.
8
8. Place the pulp cup so it fits in position on the left han
si e of the juicer’s main bo y. Place the juice jug un er the
juice outlet. Sli e the foo pusher own the fee er. The pusher
can only fit one way. You are rea y to juice now.
IMPORTANT: If the Juice bowl an li cover are not correctly
assemble , the juicer will not operate. This is a safety feature.
Please follow the step by step proce ure above to make sure
the juicer operates correctly.
Using your Juicer
1.
Clean fruit an vegetables thoroughly, rea y for juicing.
2.
If juicing fruit with stones or har see s, pit the fruit. Remove any
har ine ible skins, i.e. skin of melons, pineapples an mangoes prior to
juicing.
3.
If citrus fruits are being use , remove the skin prior to juicing.
4.
If pieces of fruit or vegetables are very large, chop them to a size that
will fit own the juicer’s fee er. Cut har vegetable as carrots in long slim
stripe.
5.
Fibrous fruits or vegetables must be cut in small pieces. Remove
pineapple core before juicing an mix with soft fruits.
6.
Ensure the juicer is locke in position.
7.
Press the power switch to On to start juicing.
8.
Press the foo pusher slowly own until all fruit or vegetables have
gone through the juicer.
9.
Do not press the foo pusher rapi ly as the juicer will not be as
effective.
10.
The juice from the fruit an /or vegetables will flow irectly into the
juice collector an the pulp will be collecte in the pulp bin.
9
11.
Use the smart juice mixer to get the best juice mixing results when
using several fruits. Do not forget to open the juicer mixer cap before the
juice collector bowl is full to avoi spillage.
12.
If the juicer stops su enly uring the operation, return the button to
mi le position, than after few secon s press reverse. This will etach an
push upwar s the pulp trappe in-between auger an cleaning bla e.
Repeat the operation 2-3 times until the juicer is working normal. Keep the
juicer top in place with your han while oing this. If simple reverse oes not
work isassemble the unit an clean the juice collecting bowl, strainer an
cleaning bla e.
13.
When juicing is complete, ensure that the juicer’s control button is
set to the mi le OFF position, the power is turne off at the outlet an the
juicer can be unplugge . It is now safe to isassemble the unit.
14.
If the Juice collector is stuck an oes not etach easily from the
base; plug in an press the reverse button “R” for 3-5 secon s. Repeat this
process 2-3 times. Then push the bowl upwar while turning.
15.
The juicer is equippe with a self-cleaning bla e that
insures continuous juicing operation.
CAUTION: o not put your han or any other
object in the fee er uring operation.
Disassemble your juicer
Ensure the juicer is turne off an the power
cor is unplugge from the power outlet.
Reverse the assembly operation.
1.
Remove the juice collector li by
turning it to the open position (anti-clockwise).
2.
Li will click out of the locke position
3.
Turn the juice collector anti-clockwise
4.
Remover the assemble juicing screen an
self-cleaning bla e
10
5.
Remove the auger, the juicing screen, the cleaning bla e.
6.
The juice collector, auger, strainer (juicing bla e) an
cleaning bla e can also be remove together. Grip the juice
bowl an turn it to the open position (anti-clockwise) slightly, it
will click out of position. The juicing bowl an all the internals
can now be lifte off the motor base for cleaning.
Switching On / Off
Turn the power button to ON position. The juicer
will start col pressing your fruits, vegetables or
leafy greens. The slow juicer is quiet an the auger
rotates to aroun 55 RPM (the slower the better).
You can use Reverse setting on the button if the
auger gets blocke .
Notes:
Do not leave the juicer switche on continuously for more than 20-25 minutes - If
the appliance stops working, possibly ue to its thermal protection system, switch
off the appliance an allow it to cool own for 20-30 minutes before switching it on
again.
Juicing
Cut foo items into pieces for optimal extraction. Do not place grains, ice or frozen
fruit into the juicer. Do not push the foo own with excessive force. The pusher is
esigne to gently push foo own the fee er if foo becomes stuck. Insert
ingre ients at a regular spee , allowing all the pulp to be extracte . For maximum
efficiency, o not rush this process.
When juicing leafy greens or wheat grass, it is suggeste that you mix it with fruits or
other har vegetables for optimal results. Soak nuts in water for minimum 10 hours