manuals.online logo
Brands
  1. Home
  2. •
  3. Brands
  4. •
  5. ElectrIQ
  6. •
  7. Vacuum Cleaner
  8. •
  9. ElectrIQ eIQ-RoboVac User manual

ElectrIQ eIQ-RoboVac User manual

eIQ-RoboVac Robotic Vacuum Cleaner
USER MANUAL
Thank you for choo ing ElectrIQ.
Plea e read thi u er manual before u ing thi robotic vacuum cleaner
and keep it afe for future reference.
Vi it our page www.electrIQ.co.uk for our entire range of Intelligent Electrical
FEATURES
ElectrIQ bring you an ea y to u e robot vacuum cleaner that work both on hard
floor urface and carpet .
You can now enjoy your per onal time while the robot will clean for you.
Slim profile at only 5.5 cm thi time aving device will get in hard to reach place ,
including under furniture.
Simple operation include one touch etting to et your cleaning time from 10
minute , 30 minute to thorough cleaning of maximum 90 minute .
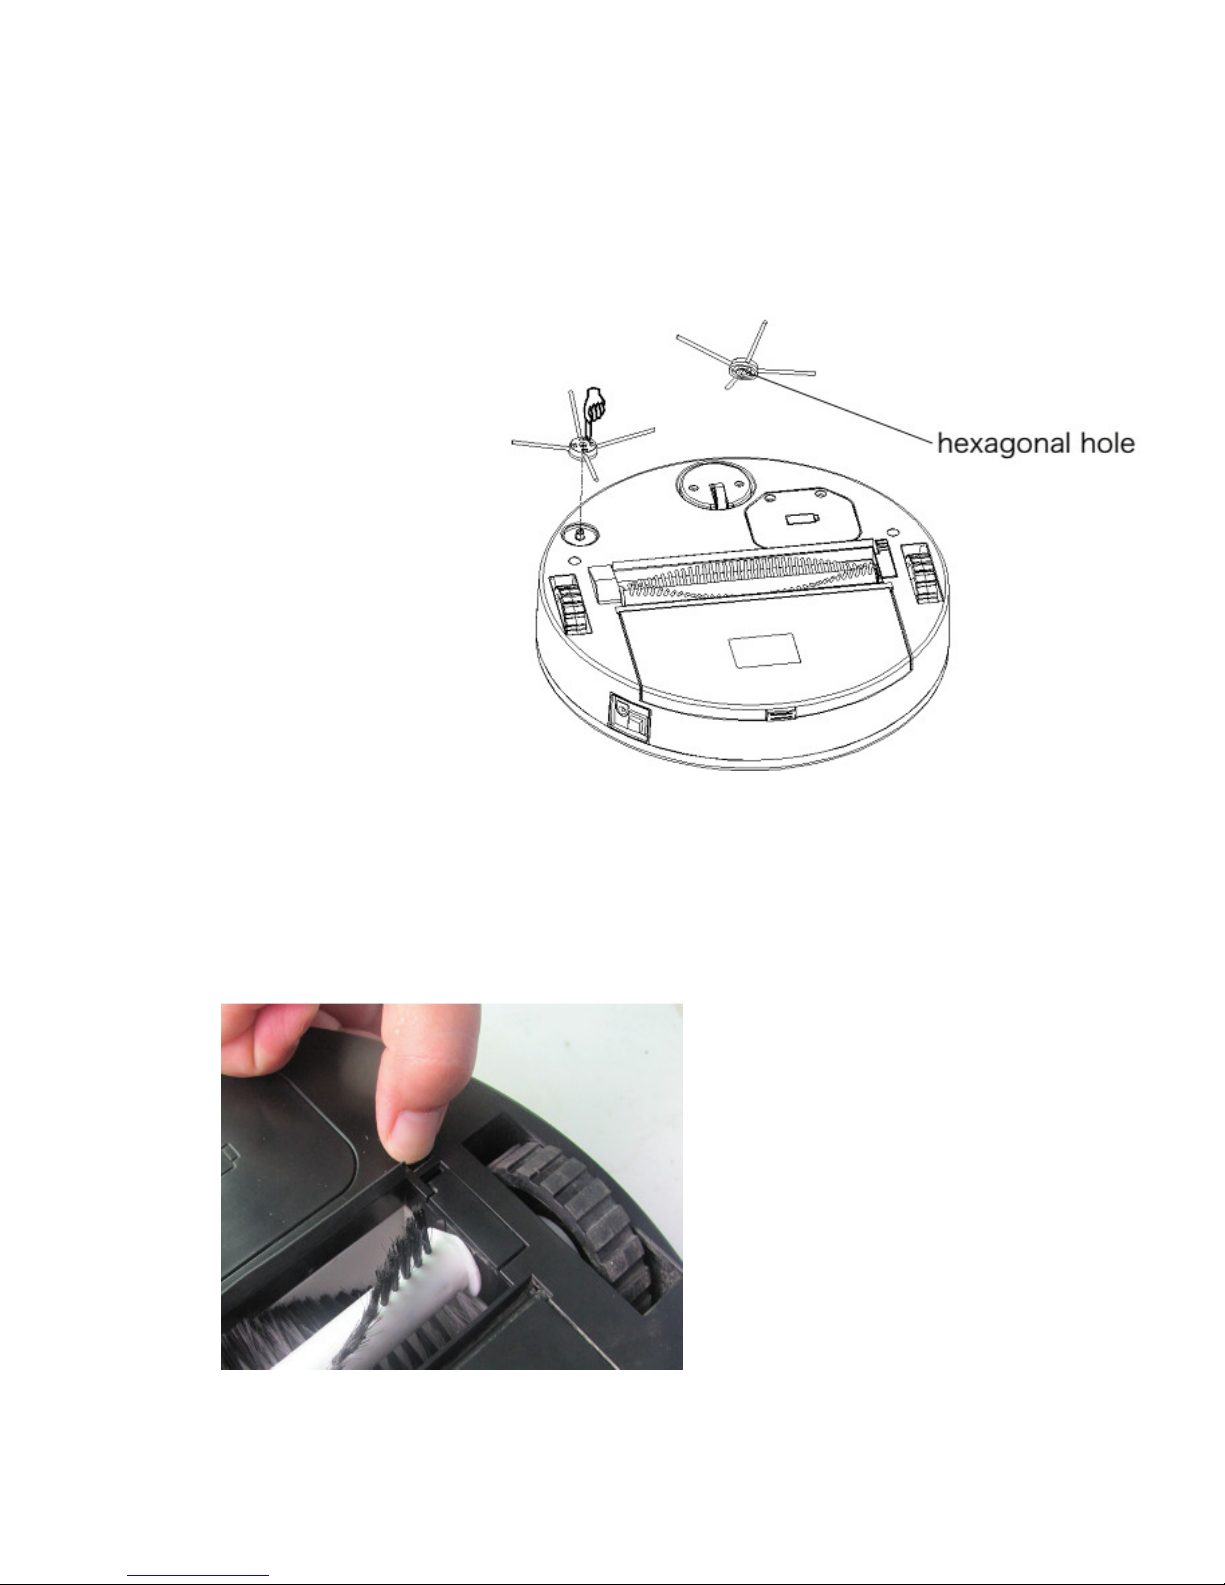
Side bru h around the outer edge en ure that dirt i collected even from hard to
reach area . Middle bru h will en ure carpet i wept and dirt and debri i efficiently
collected.
Anti-bump en or will en ure robot top before bumping into object .
Ideal for hard floor and low and medium pile carpet.
Ea y to u e due to automated cleaning pattern one touch tart button
Single area cleaning only, not to be u ed on uneven urface.
With carry handle and ea y to empty bag le rubbi h container.
Not to be u ed next to tep .
SAFETY INSTRUCTIONS
Important
• Carefully read the in truction before operating the unit
• Thi appliance i for indoor u e only.
• Rating: Thi unit mu t be only connected to a 220-240 V / 50 Hz earthed outlet.
Alway check the rating label again t your electrical upply.
• If you are in any doubt about the uitability of your electrical upply have it
checked and, if nece ary, rete ted by a qualified electrician.
• Thi robotic vacuum cleaner been te ted and i afe to u e. However, a with any
electrical appliance - u e it with care.
• Di connect the power plug from unit before di mantling, a embling or cleaning.
• Do not clean the unit by praying it or immer ing it in water.
• Never operate thi appliance if the cord or power upply i damaged. En ure the
power cord i not tretched or expo ed to harp object / edge .
• Do not pull the main cable to di connect the power upply from the main .
• Do not u e the appliance if any part or any acce ory i damaged or defective.
• A damaged power upply hould be replaced only with original part from the
manufacturer
• Avoid touching any moving part of the appliance.
• Never in ert finger , or any other object while machine i in operation.
• Thi appliance i not intended for u e by per on (including children) with
reduced phy ical, en ory or mental capabilitie . It i al o not intended for u e by
tho e with a lack of experience and knowledge, unle they have been given
upervi ion or in truction concerning the u e of the appliance by a per on
re pon ible for their afety.
• Do not leave children un upervi ed with thi appliance.
• Any ervice other than regular cleaning hould be only performed by an
authorized ervice repre entative. Failure to comply could re ult in a voided
warranty.
• Do not u e the appliance for any other purpo e than it intended u e.
• Do not u e the appliance in place with high humidity (>80%RH)
• Do not immer e the robot in water or other liquid . If the robot i immer ed in
water or other liquid by mi take, do not touch it with your hand . If the appliance i
immer ed in water or other liquid , di card it.
Unit Safety Protection and Performance Tips
• Make ure unit i a embled correctly before u e
• Charge for 24 hour before operating fir t time
• Clean robot and bru he regularly. Empty and hoover the du t container
• If the robot become entangled, remove bru he , clean the debri and
rea emble
Product Features
1. Swivel ca ter
2. Robot body
3. Side bru h
4. Right wheel
5. Charging port
6. On / Off button
7. Battery cover
8. Middle bru h holder
9. Left wheel
10. Middle bru h relea e catch
11. Bru h wheel
12. Du tbin
13. Du tbin relea e button
14. Fault indicator light
15. Light-Sen or
16. Work indicator light
17. Work mode election
18. Handle
19. Ob tacle en or
Assem ly
Installing the side rush
There i a hexagonal hole at
the bottom of the ide
bru h, align the bru h and
pre again t until click in.
Removing and reinstalling the middle rush
Remove the charging plug and
turn off the robot by pre ing
the power on / off button on the
ide of the robot.
Turn the robot up ide down on a
flat urface. Pre the middle
bru h relea e catch, take out
both bru h and wheel.
Clean the bru h and the ide
wheel and rever e procedure to
rein tall.
Operation
1. A emble the robot and in tall the ide bru h a per in truction
2. Place the robot in the middle of the area to clean.
3. Turn on the robot by u ing the ide red button.
4. Select the de ired operation mode 10min, 20 min, Max. The robot will operate
according to the election
5. Pre any election button to top the robot while in operation.
6. If the robot hut down while working and the red indicator light fla he , plea e
check if the bru h wheel i trapped. Remove the bru h wheel and clean it. Then
re tart the robot on the even urface.
7. If the robot hut down while working and the green indicator light fla he , plea e
charge the robot. Green indicator light keep fla hing while charging and than tay
on olid green when fully charged.
8. When the robot fini he the cleaning cycle, plea e lift it by handle over a large
du tbin, pre the rubbi h relea e button, and empty the rubbi h collection
container. Plea e vacuum, bru h or wipe the remaining du t in the collector and
clean the middle bru h. Now robot i ready for a new cycle and can be recharged.
9. If the robot hut down while working and the red and green indicator light fla he
at the ame time, pre the ide button for 5 econd to turn off the robot, and then
pre ide button to re tart the robot. Check if any debri are blocking the bru he .
If thi fail to, plea e contact the ervice centre.
Note :
1. The robot uitable for hard floor and low to medium pile carpet.
2. Thi robot i not uitable for uneven urface. Do not u e in mixed carpet, hard
floor area !
3. Plea e note that thi robot will collect du t and mall particle . It will not
clean paper, pla tic bag and other large debri . It will get entangled in wire ,
o plea e de-clutter floor urface before u ing
4. Do not leave bottle or other breakable on the floor
5. Do not u e on wet or grea y du t.
6. Do not u e next to tep or on balconie . Thi robot doe not have tep
avoidance en or .
Charging
If the robot hut down while working and the green indicator fla he , plea e charge
the robot immediately..
1. Plug the charger in the power outlet.
2. Plug the lead in charging port next to red power on / off button.
3. The green indicator fla he with a ound, it mean the robot i charging normally.
4. The green indicator keep fla hing with a ound, it mean the robot i fully
charged.
5. When fully charged plug out the charger and power cord.
Notes:
1. Charge the robot for at lea t 24 hour before the fir t u e.
2. Each time the robot i fully depleted charge for at lea t 4 hour .
3. Never u e the robot in temperature le than 0℃ or over 40℃ as this will
reduce the battery life and performance.
4. It i normal for the temperature of the charger to increa e during the charging
proce
Battery replacement
The robot battery i u er replaceable.
If the battery top keeping it hold plea e re-order
replacement from the manufacturer or ervice
centre.
1. Make ure unit i unplugged and powered off
2. Open the battery cover (a in picture) and take
out of battery and ave the crew .
3. Remove the connector. Pre the lock on the
connector and pull off.
3. Replace with new battery: pu h down the lock
and pu h the right part to the left until you hear it
clicking into place.
4. Clo e the battery cover and ecure it with the
crew you have.
Clean and Maintainance
1. Make ure the unit i unplugged before cleaning.
2. Before fir t u e and continuing after each u e, wipe off unit with a damp
cloth and dry thoroughly.
3. Clean all the bru he and empty the rubbi h container. Vacuum or wipe with
a cleaning wipe the in ide of the container.
4. DO NOT immer e the robot or the power upply in any liquid.
5. Rea emble the unit following the in truction and charge it before the next
u e.
6. Store the robot in a cool and dry place.
Product specifications
Power upply
Input: 110-240VAC 50-60Hz
Output: 9VDC, 400MA
Rechargeable battery NICD 7.2V,1300MAH
Charging time 3hr
Operating Time Max 90 min.
Cleaning Efficiency 98%
Du tbin capacity 0.3 l
Dimen ion 286x286x65mm
Trou leshooting
Plea e read thi in truction manual carefully before you end the robot to the
ervice centre.
Pro lem Cause Solution
Abnormal ound The robot i trapped Clear the debri around
the bru he and wheel .
Only work for a hort
period after battery i fully
charged
The robot i trapped or
battery i defective battery
Remove bru he and clean
them. If till doe not work
re-order new battery.
Robot top working after
a while and fla he down
while working and red
light fla he
Check if the robot i
trapped
Remove bru he and clean
them. Make ure robot
i working on even urface
Robot hut down while
working and green light
fla he
In ufficient battery power Charge the battery
Both red and green light
are fla hing
Faulty PCB
Faulty Motor
Faulty battery
Pre off button for 5
econd . Re tart after 5
minute .
Return to ervice centre if
re- tart procedure doe
not re olve the i ue.
ElectrIQ UK SUPPORT
www.ElectrIQ.co.uk/support
If the unit still fails to operate call: 0871 620 1057 or
complete the online form
Office hours: 9AM - 5PM Monday to Friday
www.ElectrIQ.co.uk
Unit 2, The Nursery
Berristow Lane
South Normanton
Der yshire, DE55 2FX

Other ElectrIQ Vacuum Cleaner manuals

ElectrIQ iQLEAN-GR01 User manual

ElectrIQ

ElectrIQ iQLEAN-GR01 User manual

ElectrIQ iQLEAN-CR01 User manual

ElectrIQ

ElectrIQ iQLEAN-CR01 User manual

ElectrIQ iQLEAN-CR01 User manual

ElectrIQ

ElectrIQ iQLEAN-CR01 User manual

ElectrIQ iQlean-LR02C30 User manual

ElectrIQ

ElectrIQ iQlean-LR02C30 User manual

ElectrIQ iQLEAN-LR01 User manual

ElectrIQ

ElectrIQ iQLEAN-LR01 User manual

ElectrIQ eiQ-R900M User manual

ElectrIQ

ElectrIQ eiQ-R900M User manual

ElectrIQ eiQ-C11E User manual

ElectrIQ

ElectrIQ eiQ-C11E User manual

ElectrIQ CLARA User manual

ElectrIQ

ElectrIQ CLARA User manual

ElectrIQ eiQ-RBV10 User manual

ElectrIQ

ElectrIQ eiQ-RBV10 User manual

ElectrIQ eiQ-C22EW User manual

ElectrIQ

ElectrIQ eiQ-C22EW User manual

Popular Vacuum Cleaner manuals by other brands

Hyundai HYVI 20 user manual

Hyundai

Hyundai HYVI 20 user manual

cecotec CONGA ROCKSTAR MULTICYCLONIC XL ANIMAL instruction manual

cecotec

cecotec CONGA ROCKSTAR MULTICYCLONIC XL ANIMAL instruction manual

Thomas Eco Power Instructions for use

Thomas

Thomas Eco Power Instructions for use

Panasonic Quickdraw MC-V7531 operating instructions

Panasonic

Panasonic Quickdraw MC-V7531 operating instructions

Kärcher NT 48/1 manual

Kärcher

Kärcher NT 48/1 manual

Nilfisk-Advance cfm 125 instruction manual

Nilfisk-Advance

Nilfisk-Advance cfm 125 instruction manual

SNOWJOE Sunjoe 24V-WDV6000 Operator's manual

SNOWJOE

SNOWJOE Sunjoe 24V-WDV6000 Operator's manual

AEG X FORCE VX6 manual

AEG

AEG X FORCE VX6 manual

Kenmore 216.31701 owner's manual

Kenmore

Kenmore 216.31701 owner's manual

Argos VU-101 instruction manual

Argos

Argos VU-101 instruction manual

Panasonic MCUG371 - UPRIGHT VAC - MULTI LANGUAGE operating instructions

Panasonic

Panasonic MCUG371 - UPRIGHT VAC - MULTI LANGUAGE operating instructions

Makita 406 instruction manual

Makita

Makita 406 instruction manual

Crown CMVC-414 Operation instructions

Crown

Crown CMVC-414 Operation instructions

UFESA AS2205 operating instructions

UFESA

UFESA AS2205 operating instructions

Kenmore ELITE CROSSOVER ULTRA 125.10335610 Use & care guide

Kenmore

Kenmore ELITE CROSSOVER ULTRA 125.10335610 Use & care guide

Perel TC90700 user manual

Perel

Perel TC90700 user manual

Fakir prestige TS 700 user manual

Fakir

Fakir prestige TS 700 user manual

Black & Decker DV7210ECN Original instructions

Black & Decker

Black & Decker DV7210ECN Original instructions

manuals.online logo
manuals.online logoBrands
  • About & Mission
  • Contact us
  • Privacy Policy
  • Terms and Conditions

Copyright 2025 Manuals.Online. All Rights Reserved.