Electro-Air EAHEPA650 User manual
OWNER’S MANUAL
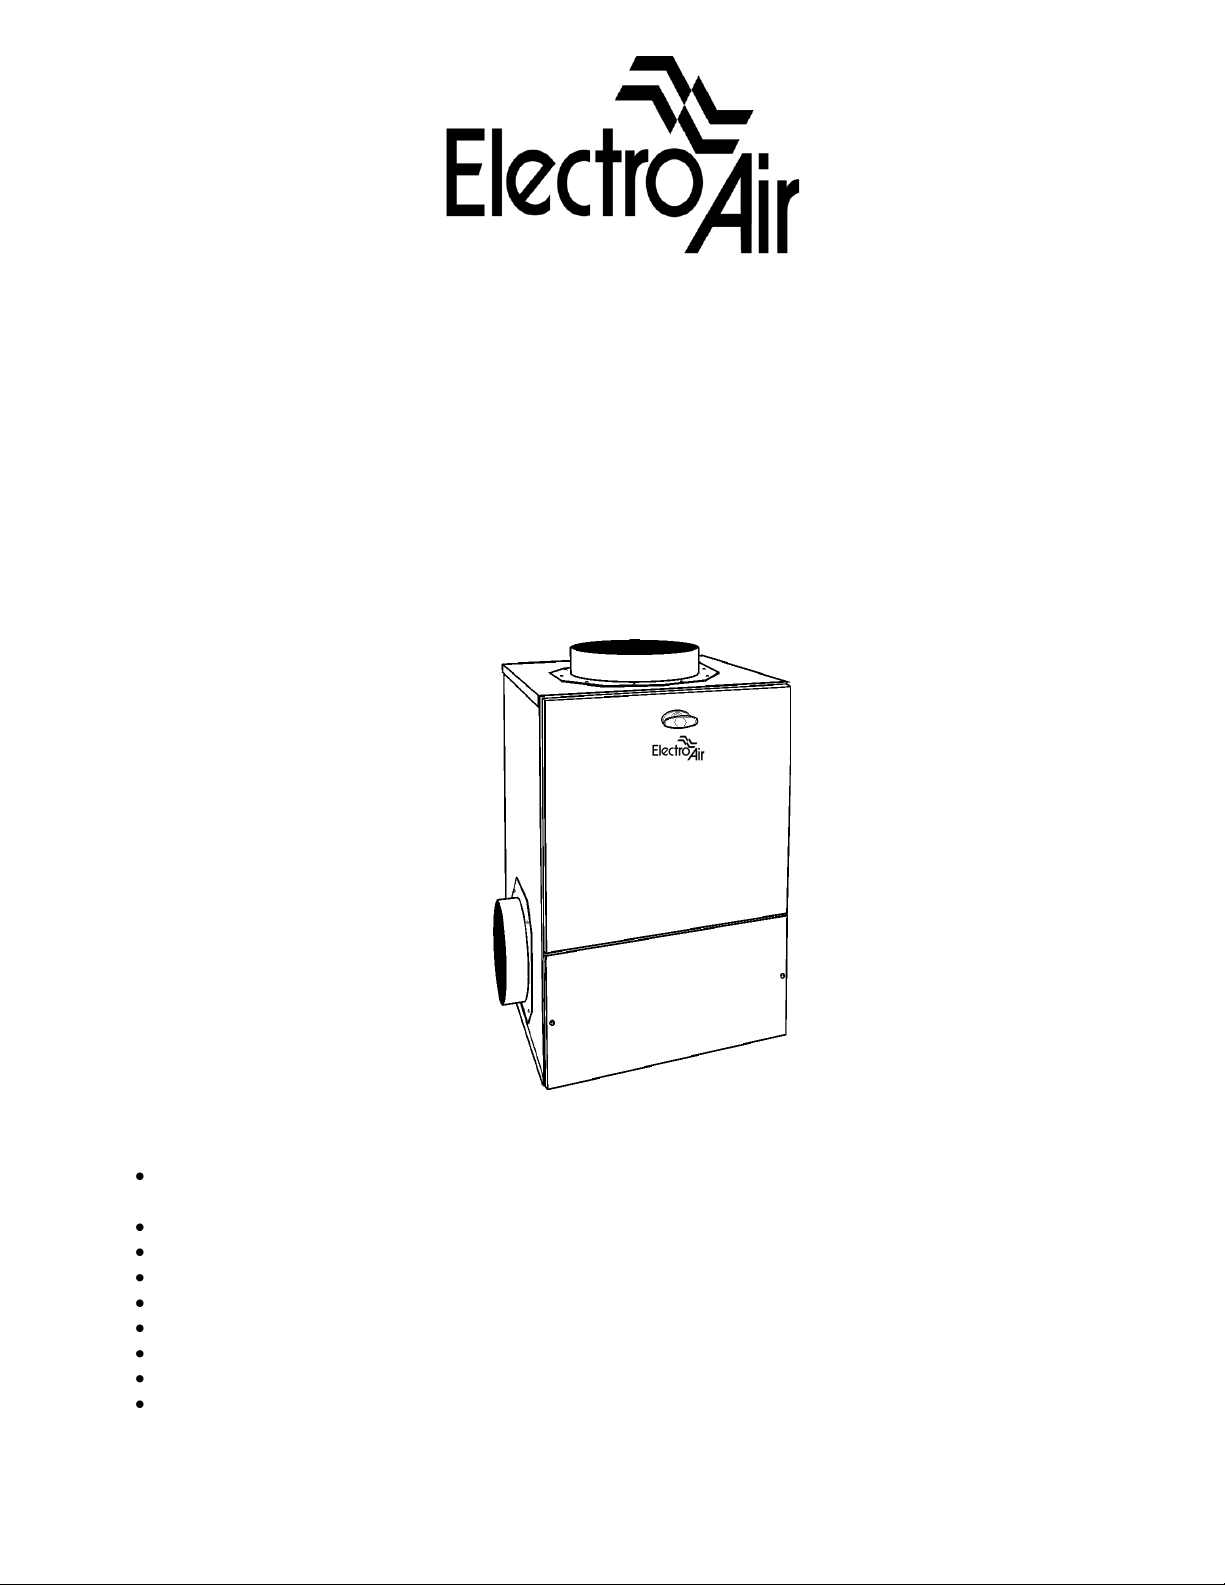
MODEL EAHEPA650
WHOLE-HOUSE HEPA AIR CLEANER
IMPORTANT: PLEASE READ MANUAL BEFORE OPERATING UNIT
Features
Long-life, True HEPA (High Efficiency Particulate Air) Filter is 99.97% efficient at removing particles
0.3 micron
Activated Carbon Prefilter removes lint and unpleasant odors, to extend life of HEPA Filter
Carbon VOC After Filter removes additional unpleasant odors and gases (optional)
Easy-to-change filters
Heavy gauge steel cabinet and powder-coat paint finish provide rigid installation and durability
Powerful motor delivers 540 CFM of filtered air
Small footprint for easier, more convenient installation
Three air outlets for versatility
Versatile installation can be freestanding, floor, ceiling or wall mounted
SAFETY CONSIDERATIONS
Read and follow instructions carefully. Follow all local
electrical codes during installation. All wiring must
conform to local and national electrical codes.
Improper wiring or installation may damage the HEPA
Air Cleaner.
Understand the signal words WARNING and
CAUTION which are present in the Owner’s Manual.
WARNING and CAUTION signify a hazard which could
result in property damage, personal injury or death.
Only a heating/air conditioning installer or qualified
service person should install, repair, or service
your Whole-House HEPA Air Cleaner.
Homeowners or untrained personnel can perform
the basic maintenance functions of replacing
filters.
When working on air cleaning equipment, observe
precautions in the Owner’s Manual, labels attached
to the unit, and other safety precautions that may
apply. Follow all safety codes. Wear safety glasses
and work gloves.
WHAT THE HEPA AIR CLEANER DOES
The Whole-House HEPA Air Cleaner has been
designed to remove particulate such as atmospheric
and household dust, coal dust, insecticide dust, mites,
pollen, mold spores, fungi, bacteria, viruses, pet
dander, cooking smoke and grease, tobacco smoke
and more. It also removes odors with the Carbon
Prefilter.
BENEFITS
Helps provide relief from allergies, asthma, and
other respiratory illness.
Helps reduce housekeeping time and redecorating
costs.
Provides a healthier, more comfortable
environment, year-round.
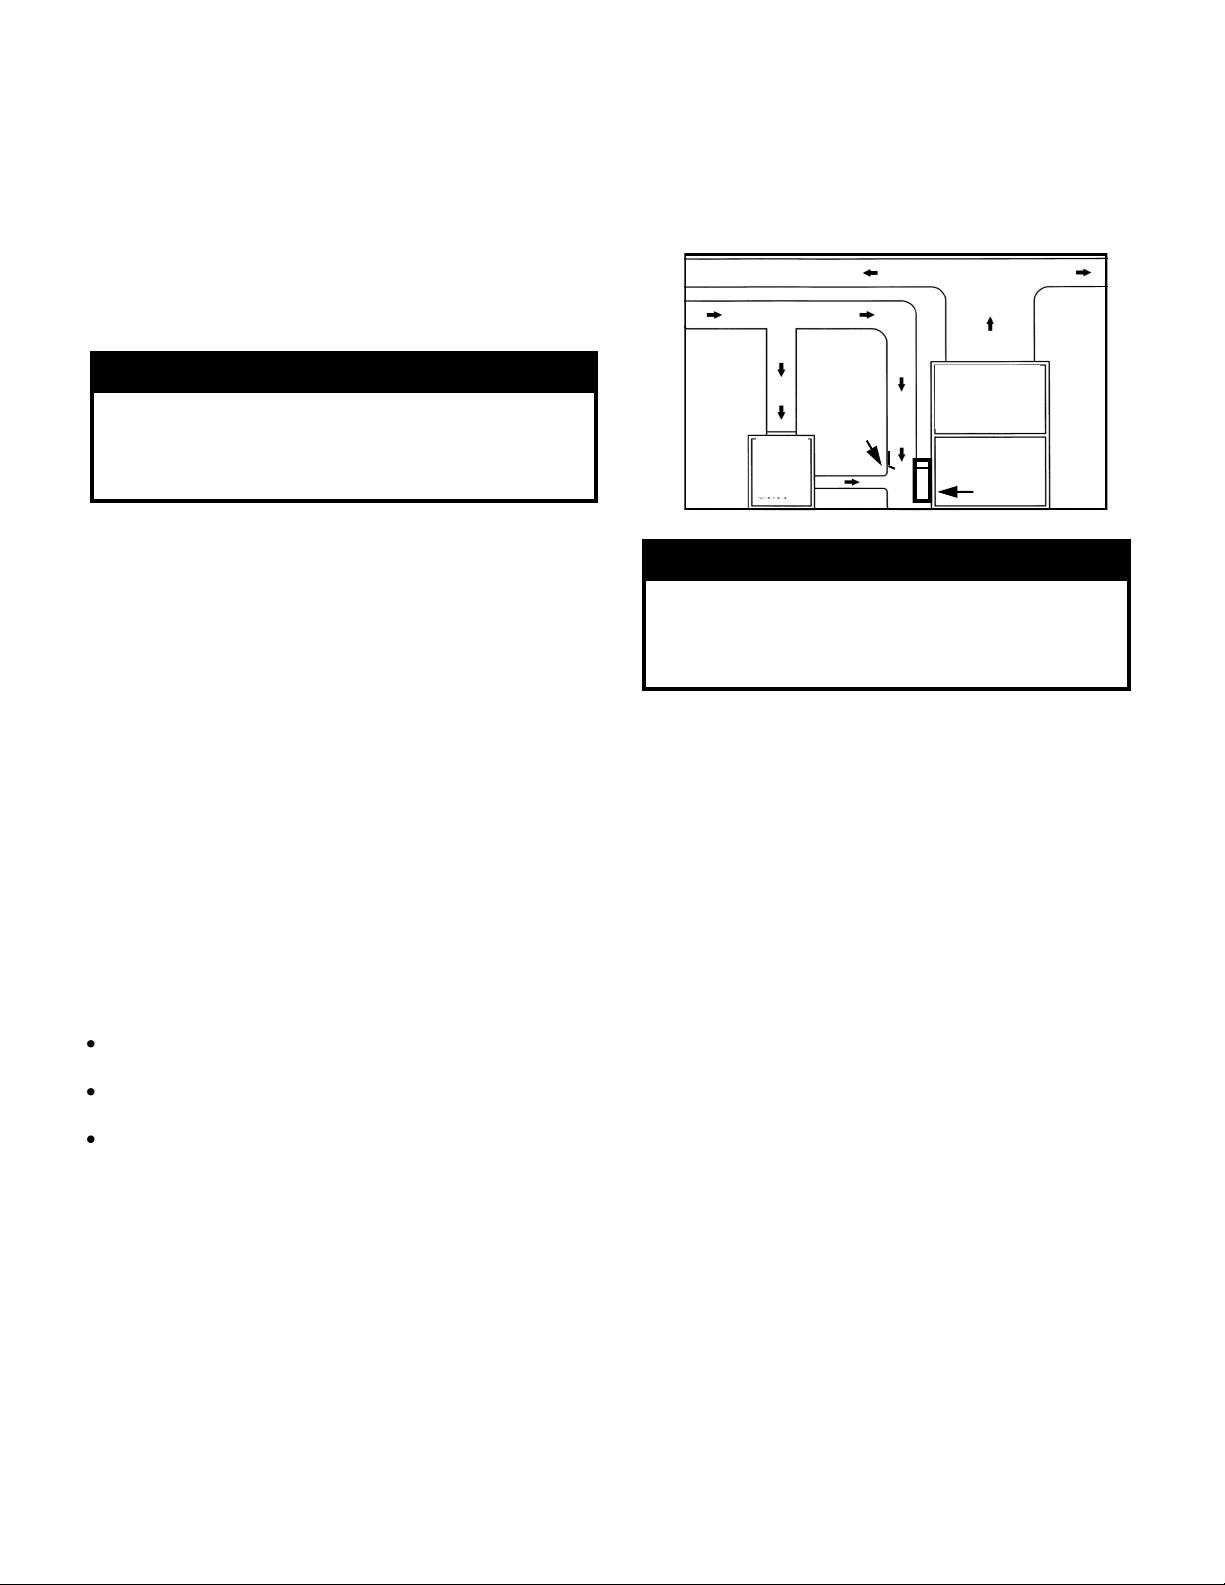
HOW IT WORKS
Millions of airborne pollutants are carried through the
return air ducts of the heating/cooling system. The
HEPA Air Cleaner has been designed to be ducted to
the return air duct. A portion of this return air is by-
passed through a 12 inch intake duct on the top of the
unit and passes through a 2-stage filtration system.
The Activated Carbon Prefilter (activated carbon
impregnated polyester filter) first removes lint and
odors before they enter the HEPA filter.
Smaller particles then pass through a long-life, HEPA
(High Efficiency Particulate Air) Filter which captures
99.97% of particles 0.3 micron (1/84,000 of an inch)
and larger. This HEPA filter has more than 133 ft² of
collection surface area.
Clean air is discharged through an 8 inch duct, back
into the return air duct.
INSTALLATION
LOCATION
The HEPA Air Cleaner should be located as close to
the return air duct as possible. This allows for shorter
lengths of ducting which helps keep the static pressure
lower. The unit can be adapted to mount on a wall or
be suspended from the ceiling. Care should be taken
to keep the unit away from an area where there is a
possibility of moisture leaking on to it. Ensure there is
36 inches in front of the unit to remove the filters for
cleaning or replacing.
NOTE: If the unit is going to be mounted on it’s back
you must contact the distributor for special mounting
kit.
GENERAL INSTALLATION STEPS
1. Remove any packaging or plastic from filters
before installing. See Maintenance for instructions
to remove the filters.
2. When the unit is shipped, the intake and exhaust
collars are reverse mounted to prevent damage in
shipping. The intake collar must be removed and
reattached with the collar ring facing out. The
exhaust collar can be mounted on one of three
sides of the unit with the ring out. The other two
sides will be covered with the exhaust covers.
These covers must be installed for the unit to
operate properly.
3. An inlet collar is provided on the unit to allow a
flexible 12 inch intake duct, from the cold air return,
to be attached. The 12 inch intake must be drawn
from the cold air return duct at a location that will
be ahead of the clean exhaust air, that will be
returned to the duct from the Air Cleaner.
WARNING
Before beginning any installation or modification, be
certain that the main line electrical disconnect switch is
in the OFF position. Electric shock could result. Tag
disconnect switch with suitable warning labels.
WARNING
This unit must be installed on the return air side of
the system only. Do not connect to supply side.
Do not install in a cooking area or connect directly to
any appliance.
HEPA
UNIT
HEATING
COOLING
SYSTEM
RETURN AIR
SUPPLY AIR
DEFLECTOR
AIR CLEANER
4. A duct adapter and a length of 12 inch flexible hose
or duct is required to attach between the 12 inch
intake collar and the existing cold air return duct.
When running the hose, make sure that there are
no kinks or sharp bends that will impede the air
flow to the unit. Secure and seal the hose and
connections to prevent air leakage.
5. The 8 inch exhaust collar can be conveniently
mounted on one of three sides of the unit. A duct
adapter and a length of 8 inch flexible hose or duct
is required to attach between the exhaust collar
and the existing cold air return. The exhaust hose
should be attached to the return air duct, close to
the furnace. The ideal location is low on the return
air boot pointing at the furnace. To prevent air
shear inside the duct, it is recommended that you
install a deflector inside the boot, so the discharged
air is deflected down into the boot. When running
the hose, make sure that there are no kinks or
sharp bends that will impede the air flow from the
unit. Secure and seal the hose and connections to
prevent air leakage.
6. It is important to maintain some distance between
the intake and the exhaust openings in the return
air duct. Failure to do this may result in short
cycling between the intake and the clean air
discharge. It is recommended you leave 10 feet
between the intake and the exhaust; however, as
little as 6 feet will work effectively. If the distance is
smaller than 6 feet, it is important that an air
deflector is installed in the duct.
7. If outside air is introduced into the return air duct,
either through a HRV (Heat Recovery Ventilator) or
direct, it should be added to the system before the
intake inlet to the Air Cleaner.
OPERATING INSTRUCTIONS
The HEPA Air Cleaner is designed to run continuously
to provide clean, filtered air 24 hours a day. The fan on
the heating/cooling system, to which the HEPA Air
Cleaner is dependent on for circulated air, should be
on ‘continuous’.
Note: If the system fan setting is on ‘automatic’, it is
recommended the HEPA Air Cleaner be operated
through an air switch or relay to turn the Air Cleaner
off, when there is no system fan on.
The unit plugs into a regular 120 volt outlet and is
controlled by a switch located on the rear panel, near
the cord.
Note: Do not allow the cord to be placed where it may
be walked on or allow anything to roll over it.
The door must be secured for the Air Cleaner to
operate. All filters must be in place for the unit to
operate properly.
MAINTENANCE
For efficient operation, the filters must be changed on a
regular basis. If you notice a reduction in air flow from
the system, check the filters.
1. To access the filters, turn the Air Cleaner OFF at
the switch and remove the front door.
2. Release the filter hold down bar by pulling it
forward one side at a time.
3. Carefully remove filters to avoid spilling of collected
contaminants. Dispose of filters in a plastic bag
and discard with regular household trash.
4. Remove plastic from new filters before installing.
Discard plastic safely. Take care not to damage the
filters.
5. Date the replacement filter in the space provided.
6. Place the Carbon prefilter around the HEPA filter
and secure with the Velcro.
7. Ensure the open end of the HEPA filter is toward
the motor.
8. Replace the filter hold down bar by placing one
side under the bracket on the side of the cabinet.
Once you have one side started force the bar
under the bracket on the other side of the cabinet.
This insures the filter has a good seal.
9. Use genuine replacement filters only. Call the
original installer for parts.
Note: When the filters are new, you may notice a new
smell from the system. This is normal and will dissipate
within a few days.
Carbon Prefilter (Part #W6-0855):This must be
replaced every 3 - 6 months and may be vacuumed
between changes. Use a soft brush attachment when
cleaning. If there are heavy odors in the home from
cooking, smoking, painting or other sources, the filter
will require changing more often.
HEPA Filter (Part #W6-0840):Replace every 2-4
years. The life of this filter depends on the amount of
contaminants in the air and the frequency in which the
prefilter has been changed. Renovations in the home
that create wood, drywall dust or similar contaminants
will shorten the life expectancy of the HEPA filter. To
improve airflow, the HEPA filter can be vacuumed
between changes, preferably outdoors. Use a soft
brush attachment for vacuuming this filter.
Note: Handle the HEPA filter by the frame only. The
paper is fragile and a puncture or tear will reduce
efficiency.
VOC After Filter (Part #W6-0810 optional): This filter
is positioned inside the HEPA filter, and must be
replaced every 6-12 months. If there are heavy odors
in the home from cooking, smoking, painting or other
sources, the filter may require changing more often.
WARNING
Never use the unit without all of the filters in place.
CAUTION
Make sure to turn Air Cleaner OFF before performing
any maintenance or removing any components.

TECHNICAL DATA
EA650
01/14
WHOLE-HOUSE HEPA AIR CLEANER
LIMITED FIVE (5) YEAR WARRANTY
FIVE YEAR WARRANTY - This ELECTRO-AIR product is warranted to be free from electrical and mechanical defects in material and
workmanship, under normal use and maintenance, within its listed capacity, for a period of FIVE (5) years from the date of purchase. The
warranty does not include the Carbon Prefilter, HEPA or VOC Filter. The ELECTRO-AIR product must not have been moved from the site of
original installation. A new or remanufactured part to replace the defective part will be provided without charge for the part itself, through an
authorized ELECTRO-AIR service dealer, provided the defective part is returned to the distributor prepaid. The replacement part assumes the
unused portion of the warranty. Proof of Purchase and Installation must be provided. Failing this, ELECTRO-AIR will guarantee the unit for a
period of sixty (60) months from the date of manufacture, according to the manufacturer’s records and conditions stated in this warranty.
LIMITATIONS OF WARRANTY - All implied warranties (including implied warranties of merchantability) are hereby limited in duration to the
period for which the limited warranty is given. The expressed warranties made in this warranty are exclusive and may not be altered, enlarged, or
changed by any distributor, dealer or other person whatsoever.
ELECTRO-AIR CANADA WILL NOT BE RESPONSIBLE FOR:
1. Normal maintenance as outlined in the Owner’s Manual including cleaning and/or replacement of filters.
2. Damage or repairs needed as a consequence of any misapplication, negligent handling, improper servicing, unauthorized alteration, or
improper operations.
3. Damage or repairs required as a consequence of faulty installation or application by others.
4. Failure to start due to voltage conditions, blown fuses, open circuit breakers or other damages due to the inadequacy or interruption of
electrical service.
5. Damage as a result of floods, winds, fires, lightning, accidents, corrosive atmosphere, or other conditions beyond the control of ELECTRO-
AIR CANADA.
6. Parts, including filters, not supplied or designated by ELECTRO-AIR CANADA.
7. ELECTRO-AIR CANADA products installed outside of Canada.
8. Any personal injury, special indirect or consequential property or commercial damage of any nature whatsoever.
Model No. Serial No.
Date of Installation Installed By
Owner’s Name & Address
ELECTRO-AIR CANADA
351 North Rivermede Road, Concord, Ontario, Canada L4K 3N2
Tel: (416) 213-5636 Toll Free 1-800-267-8305 Fax: (416) 213-5593
Dimensions Length
Width
Height
18 in
18 in
31 in
45.7 cm
45.7 cm
78.7 cm
Intake 12 in 30.5 cm
Outflow 8 in 20.3 cm
Unit Weight 57 lbs 25.9 kg
Input Voltage 120 V 60 Hz
Power Consumption 215 Watts
Air Flow 540 CFM 918 m³/hr
Power Cord 9.0 ft 2.74 m
Filter Dimensions Carbon Prefilter
HEPA Filter
Carbon VOC After Filter (option)
47 x 15.5 x 0.25 in
16 (H) x 14.25 (Dia) x 2.375 in
26.63 x 15.5 x 0.5 in
119.4 x 39.4.2 x 0.63 cm
40.6 x 36.2 x 6 cm
67.6 x 39.4 x 1.3 cm
Carbon Prefilter Collecting Surface Area 4.98 ft² 0.46 m²
HEPA Collecting Surface Area 133 ft² 12.4 m²
Carbon VOC After Filter (optional) Surface Area 2.87 ft² 0.27 m²
Other Electro-Air Air Cleaner manuals

Electro-Air
Electro-Air SC-924A Manual

Electro-Air
Electro-Air EAHEPA550-3 User manual

Electro-Air
Electro-Air 10C26S-010 User manual

Electro-Air
Electro-Air EAHEPA450 User manual

Electro-Air
Electro-Air UST 16C26S-010 User manual

Electro-Air
Electro-Air EAP900 User manual

Electro-Air
Electro-Air MPRS1000 SOURCER Manual

Electro-Air
Electro-Air SC-500 05C11E-01002 User manual

Electro-Air
Electro-Air EANC1620-A User manual

Electro-Air
Electro-Air DM900UV-VO-WHT-VS User manual


