AM / FM
DIMMER/GRADATEUR
IC STATEMENT
CAN ICES-3 (B)/NMB-3(B)
Operation is subject to the following two conditions:
(1) This device may not cause interference, and
(2) This device must accept any interference, including interference that may cause undesired operation of
the device.
Changes or modications not expressly approved by the party responsible for compliance could void the
user’s authority to operate the equipment.
DÉCLARATION IC
CAN ICES-3 (B)/NMB-3(B)
Son fonctionnement est soumis aux deux conditions suivantes:
(1) Cet équipement ne doit pas causer d’interférences, et
(2) Cet équipement doit accepter toute interférence, y compris les interférences capables de causer un
mauvais fonctionnement de l’appareil.
Tout changement ou modication apportées à l’équipement sans l’approbation du fabricant peut annuler
l’autorisation de l’utilisateur à utiliser cet équipement.
Support & Live Web Chat / Soutien & Clavardage en direct - www.electrohome.com/support
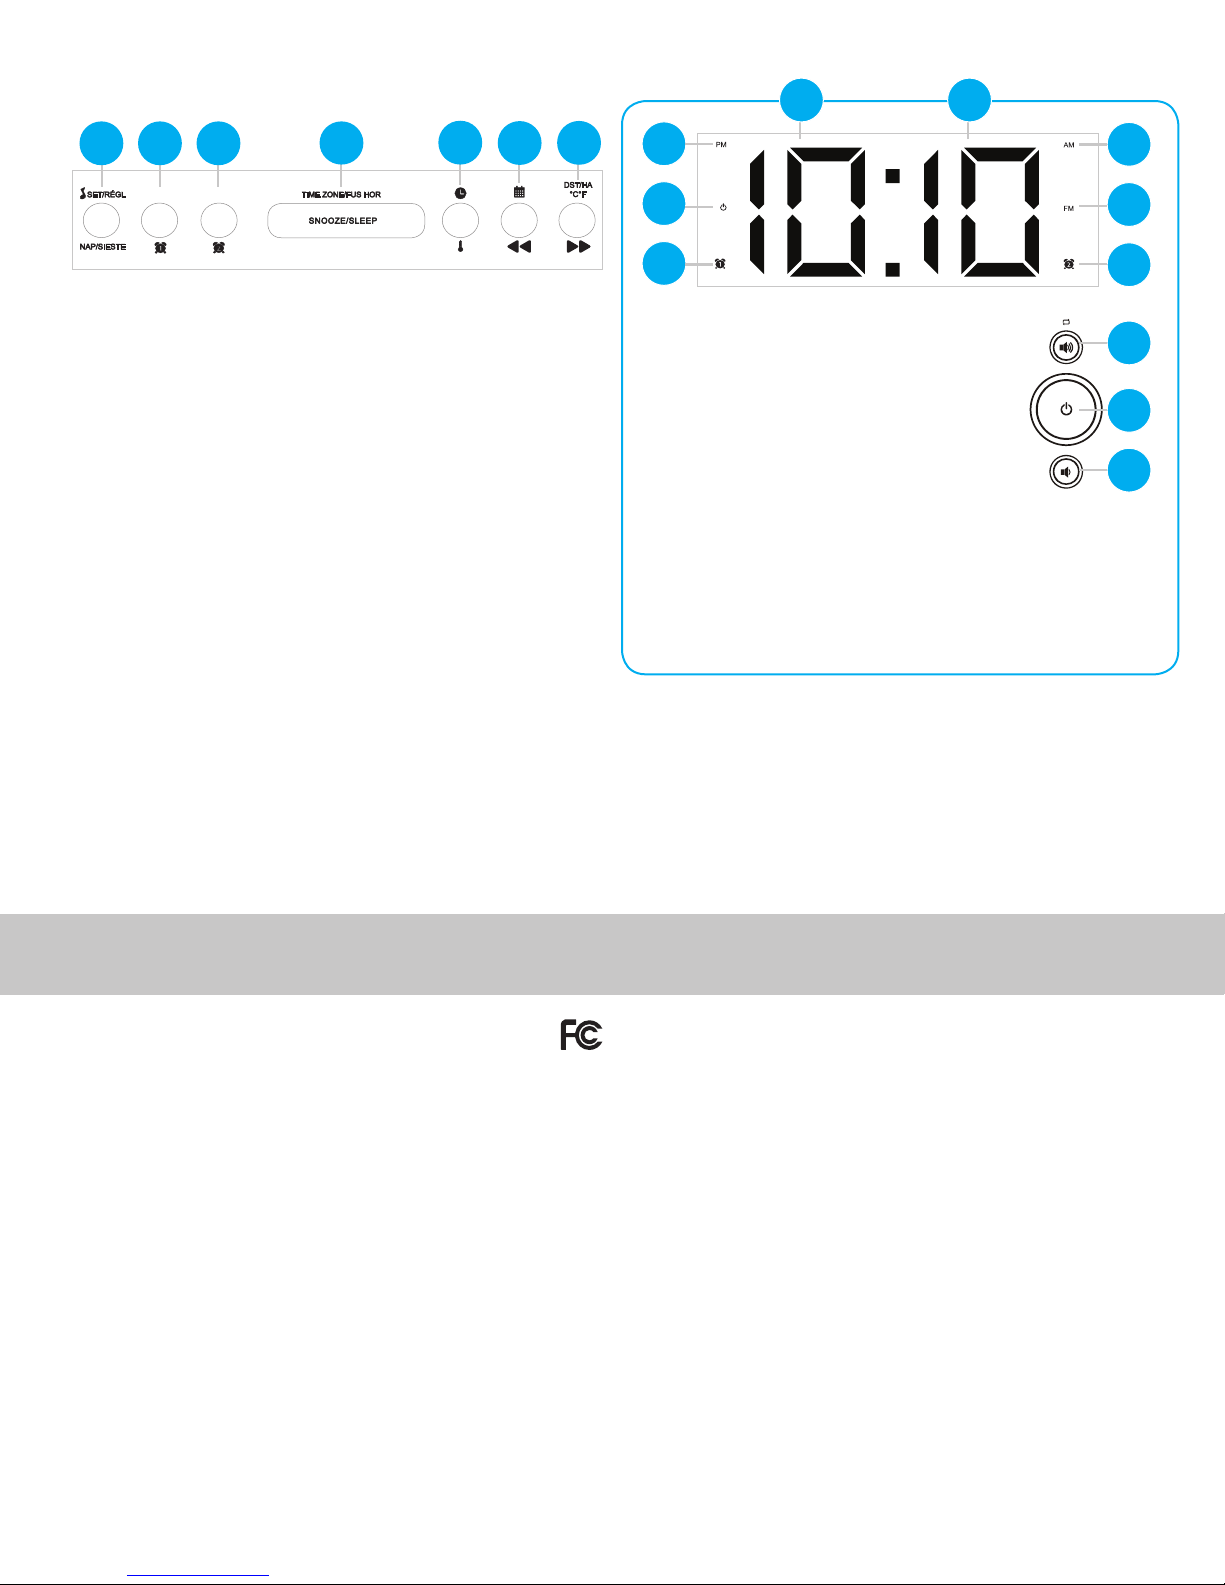
PRODUCT INFORMATION / INFORMATIONS DU PRODUIT
1. Indicates time is set to PM
2. STANDBY
3. Alarm 1
4. Displays the hour
5. Displays the minutes
6. AM Band is selected
7. FM Band is selected
8. Alarm 2
9. Volume +/Cycle display
10.Power ON/OFF
11. Volume -
1. Indique réglage PM
2. Mise en veille
3. Alarme 1
4. Ache l’heure
5. Ache les minutes
6. Bande AM est sélectionnée
7. Bande FM est sélectionnée
8. Alarme 2
9. Volume +/ Cycle d’achage
10.10. Alimentation
11. 11. Volume -
1. Set Radio Presets / Nap function
2. Toggle AM & FM Radio band / Set ALARM 1
3. Set ALARM 2
4. Set TIME ZONE / SNOOZE / SLEEP / LED
Brightness
5. Set TIME / Y-M-D / 24h-12h Clock ;
View Temperature
6. View D-M-Y / Tune-Scan Radio (BACK)
7. Set DST / Tune-Scan RADIO (FORWARD) /
Select °C OR °F
1. Sauvegarde de stations radio préréglées /
Fonction sieste
2. Bascule les bandes radio AM - FM / Régler
ALARME 1
3. Régler ALARME 2
4. Régler FUSEAU HORAIRE / MINUTERIE
SOMMEIL / SOMNOLENCE / Luminosité DEL
(gradateur)
5. Régler l’HEURE / A-M-J / Horloge 24h-12h ;
Achage de température
6. Achage ANNÉE-MOIS/JOUR / Syntoniser-
Balayer stations de radio (ARRIÈRE)
7. Régler HA / Choisir °C OU °F / Syntoniser-
Balayer stations de radio (AVANT)
1 2 467
For additional product information, please consult the manual at / Pour plus de renseignements sur le produit,
consultez le manuel à www.electrohome.com/support
27
1
8
3
6
This device complies with part 15 of the FCC Rules. Operation is subject to the following
two conditions: (1)This device may not cause harmful interference. (2) This device must accept
any interference received, including interference that may cause undesired operation.
FCC WARNING
This equipment has been tested and found to comply with the limits for a Class B digital device, pursuant
to Part 15 of the FCC Rules. These limits are designed to provide reasonable protection against harmful
interference in a residential installation.
This equipment generates, uses and can radiate radio frequency energy and, if not installed and used in
accordance with the instructions,may cause harmful interference to radio communications. However, there
is no guarantee that interference will not occur in a particular installation. If this equipment does cause
harmful interference to radio or television reception, which can be determined by turning the equipment o
and on, the user is encouraged to try to correct the interference by one or more of the following measures:
• Reorient or relocate the receiving antenna.
• Increase the separation between the equipment and the receiver.
• Connect the equipment into an outlet dierent from that to which the receiver is connected.
• Consult the dealer or an experienced radio/TV technician for help.
Cet appareil est conforme à la partie 15 des règles de la FCC. Son fonctionnement est soumis aux deux conditions
suivantes: (1) Ce dispositif ne doit pas causer d’interférences nuisibles. (2) Cet appareil doit accepter toute
interférence reçue, y compris les interférences pouvant entraîner un fonctionnement indésirable.
AVERTISSEMENT DE LA FCC
Cet équipement a été testé et s’est avéré conforme aux limites pour un appareil numérique de classe B,
conformément à la Partie 15 des règlements de la FCC. Ces limites sont conçues pour fournir une protection
raisonnable contre les interférences nuisibles dans une installation résidentielle.
Cet équipement génère, utilise et peut émettre des fréquences radio et, s’il n’est pas installé et utilisé
conformément aux instructions, il peut causer des interférences nuisibles pour les communications radio.
Cependant, il n’existe aucune garantie que des interférences ne se produiront pas dans une installation
particulière. Si cet équipement provoque des interférences nuisibles à la réception radio ou de télévision,
ce qui peut être déterminé en l’éteignant et rallumant, l’utilisateur est encouragé à essayer de corriger
l’interférence par une ou plusieurs des mesures suivantes::
• Réorienter ou déplacer l’antenne
• Augmentez la distance entre l’équipement et le récepteur.
• Branchez l’appareil sur une prise diérente de celle à laquelle le récepteur est branché.
• Consultez votre revendeur ou un technicien radio / TV pour de l’aide.
• Please retain your original receipt or a copy for warranty service • Veuillez conserver votre reçu original ou une copie pour obtenir le service sous garantie
35
9
10
11
Do not return this product to the store!
Contact Customer Support anytime for assistance.
Product warranty information
We take quality very seriously.This is why all of our ELECTROHOME® products
come with a one-year warranty from the original purchase date against defects in
workmanship and materials. If you have warranty or support issues please contact us
using the following method:
Ne retournez pas ce produit au magasin!
Contactez le soutien à la clientèle n’importe quand pour de l’aide.
Informations de la garantie du produit
Nous prenons la qualité très sérieusement. C’est pourquoi tous nos produits
ELECTROHOME® ont une garantie d’un an à partir de la date originale d’achat contre
les défauts de fabrication et de matériaux. Si vous avez des questions concernant la
garantie ou le soutien, veuillez nous contacter en utilisant la méthode suivante:
4 5


