manuals.online logo
Brands
  1. Home
  2. •
  3. Brands
  4. •
  5. Electrolux
  6. •
  7. Hand Mixer
  8. •
  9. Electrolux Assistent Hand Mixer 310 User manual

Electrolux Assistent Hand Mixer 310 User manual

This manual suits for next models

1

Other Electrolux Hand Mixer manuals

Electrolux EHM33 Series User manual

Electrolux

Electrolux EHM33 Series User manual

Electrolux INSTANTMIX EST4 Series User manual

Electrolux

Electrolux INSTANTMIX EST4 Series User manual

Electrolux Love Your Day EHM3407 User manual

Electrolux

Electrolux Love Your Day EHM3407 User manual

Electrolux EHM3300 User manual

Electrolux

Electrolux EHM3300 User manual

Electrolux AEG HM 310 Assistent User manual

Electrolux

Electrolux AEG HM 310 Assistent User manual

Electrolux EHM450 User manual

Electrolux

Electrolux EHM450 User manual

Electrolux ESTM966 User manual

Electrolux

Electrolux ESTM966 User manual

Electrolux EHM3310 User manual

Electrolux

Electrolux EHM3310 User manual

Electrolux 11 Series User manual

Electrolux

Electrolux 11 Series User manual

Electrolux ESTM9804S User manual

Electrolux

Electrolux ESTM9804S User manual

Electrolux EASYCOMPACT ESTM5 Series User manual

Electrolux

Electrolux EASYCOMPACT ESTM5 Series User manual

Popular Hand Mixer manuals by other brands

Oster 2499 user manual

Oster

Oster 2499 user manual

Aurora AU 4090 manual

Aurora

Aurora AU 4090 manual

Philips Essence 5000 Series quick start guide

Philips

Philips Essence 5000 Series quick start guide

emerio HM-110921.1 instruction manual

emerio

emerio HM-110921.1 instruction manual

KitchenAid KHMB732 manual

KitchenAid

KitchenAid KHMB732 manual

ARDES ARSBAT01 Instructions for use

ARDES

ARDES ARSBAT01 Instructions for use

ECG RS 840 instruction manual

ECG

ECG RS 840 instruction manual

TEFAL PREP'LINE HT4111 manual

TEFAL

TEFAL PREP'LINE HT4111 manual

Oster 2534 user manual

Oster

Oster 2534 user manual

Clatronic ProfiCook SM 3044 instruction manual

Clatronic

Clatronic ProfiCook SM 3044 instruction manual

KitchenAid 5KHM5110 owner's manual

KitchenAid

KitchenAid 5KHM5110 owner's manual

Oster 2574 user manual

Oster

Oster 2574 user manual

DCOOK 5425945 instruction manual

DCOOK

DCOOK 5425945 instruction manual

Gorenje ME510W Instructions for use

Gorenje

Gorenje ME510W Instructions for use

Oster 2534 user manual

Oster

Oster 2534 user manual

Sunbeam 2484 instruction manual

Sunbeam

Sunbeam 2484 instruction manual

Currys Essentials C12HMW17 instruction manual

Currys

Currys Essentials C12HMW17 instruction manual

Gorenje MRP 330 EA Instruction manuals

Gorenje

Gorenje MRP 330 EA Instruction manuals

manuals.online logo
manuals.online logoBrands
  • About & Mission
  • Contact us
  • Privacy Policy
  • Terms and Conditions

Copyright 2025 Manuals.Online. All Rights Reserved.

Gebrauch sanw eisung.................................3
Operating instructions..............................7
M ode d'em ploi...........................................11
Gebruik saanw ijzing..................................15
Instruzioni per l’uso .................................19
Instrucciones de uso................................23
Instrucções de utiliyacçâo.....................27
Bruk sanvisning..........................................31
Käyttöoh je ..................................................35
Brugsanvisning..........................................39
Bruk sanvisning..........................................43
Instruk cja obsługi.....................................47
Návod k použití.........................................51
Návod na používanie ...............................55
H asználati útm utató................................59
Kullanm a k ılavuzu ....................................63
Upute za uporabu ....................................67
Tolm uim eja k asutusjuh end ....................71
Ek spluatācijas instruk cija.......................75
Naudojim o instruk cija.............................79
Upute za rad ..............................................83
Uputstvo za upotrebu .............................87
Ins trucţiuni de utilizare ....................9 1
инструкции за употреба ................ 9 5
D
GB
F
NL
I
E
P
S
FIN
PL
Assistent H and M ixer 310
DK
N
CZ
H
RO
SK
SLO
EST
LV
LT
H R
SCG
BG
TR
2
3
Seh r geeh rte Kundin,
seh r geeh rter Kunde,
lesen Sie bitte diese Gebrauch sanw eisung
sorgfältig durch . Beach ten Sie vor allem die
Sich erh eitsh inw eise auf den ersten Seiten
dieser Gebrauch sanw eisung! Bew ah ren Sie
bitte die Gebrauch sanw eisung zum späteren
Nach sch lagen auf. Geben Sie diese an
eventuelle Nach besitzer des Gerätes w eiter.
M it dem W arndreieck und/oder durch
Signalw örter (W arnung!, Vorsich t!,
Ach tung!) sind H inw eise h ervorgeh oben, die
für Ih re Sich erh eit oder für die
Funk tionsfäh igk eit des Gerätes w ich tig sind.
Bitte unbedingt beach ten.
Dieses Z eich en leitet Sie Sch ritt für Sch ritt
beim Bedienen des Gerätes.
Nach diesem Z eich en erh alten Sie ergänzende
Inform ationen zur Bedienung und prak tisch en
Anw endung des Gerätes.
M it dem Kleeblatt sind Tipps und H inw eise
zum w irtsch aftlich en und um w eltsch onenden
Einsatz des Gerätes gek ennzeich net.
Gerätebesch reibung
(Bild 1)
A Ausw urftaste
B Ein- /Aussch alter
C Sch alter Gesch w indigk eitsbereich
D Taste Pulse
E H andm ixer
F Ansch lußleitung m it Cordfix
G Sch lagbesen
H Kneth ak en
J Typsch ild (Geräteunterseite)
Sich erh eitsh inw eise
Die Sich erh eit von Electrolux- Elek trogeräten
entsprich t den anerk annten Regeln der
Tech nik und dem Gerätesich erh eitsgesetz.
Dennoch seh en w ir uns als H ersteller
veranlasst, Sie m it den nach - folgenden
Sich erh eitsh inw eisen vertraut zu m ach en.
Allgem eine Sich erh eit
•Das Gerät darf nur an ein Strom netz
angesch lossen w erden, dessen Spannung und
Freq uenz m it der Angabe auf dem Typsch ild
übereinstim m t!
•Neh m en Sie das Gerät niem als in Betrieb,
w enn
– die Ansch lußleitung besch ädigt ist,
– as Geh äuse besch ädigt ist.
•Den Netzsteck er nie an der Ansch lußleitung
aus der Steck dose zieh en.
•W enn die Ansch lußleitung dieses Gerätes
besch ädigt w ird, m uss sie durch den H ersteller
oder seinen Kundendienst oder eine äh nlich e
q ualifizierte Person ersetzt w erden, um
Gefäh rdungen zu verm eiden.
•Reparaturen an diesem Gerät dürfen nur von
Fach k räften durch gefüh rt w erden. Durch
unsach gem äße Reparaturen k önnen
erh eblich e Gefah ren entsteh en. W enden Sie
sich im Reparaturfall an den Electrolux-
Kundendienst oder an Ih ren Fach h ändler.
•Dieses Gerät ist nich t dazu bestim m t, von
Personen (einsch ließlich Kinder), die aufgrund
Ih rer Unerfah renh eit oder Unk enntnis nich t in
der Lage sind es sich er zu bedienen oder von
Personen (einsch ließlich Kinder) m it
eingesch ränk ten ph ysisch en, sensorisch en
oder geistigen Fäh igk eiten, benutzt oder
betrieben zu w erden, es sei denn sie w urden
durch eine für sie verantw ortlich e Person
angew iesen w ie das Gerät sich er zu benutzen
ist und anfäglich von ih r beaufsich tigt.
Sich erh eit von Kindern
•Lassen Sie das Gerät nich t unbeaufsich tigt
laufen und w ah ren Sie gegenüber Kindern
eine besondere Aufsich tspflich t!
•Kinder m üssen beaufsich tigt w erden um
sich erzustellen, dass sie nich t m it dem Gerät
spielen.
Das sollten Sie beim Betrieb des
Gerätes beach ten
•W erfen Sie die W erk zeuge nie bei laufendem
Gerät aus.
•Greifen Sie nie bei laufendem Gerät m it den
Fingern in den Bereich der Teigh ak en bzw . der
Rüh rbesen. Es besteh t Verletzungsgefah r!
•Neh m en Sie das Gerät nie m it nassen H änden
in Betrieb.
D
4
•Plastik teile dürfen nich t auf oder in
unm ittelbarer Näh e von H eizk örpern
getrock net w erden.
•M it dem Gerät dürfen k eine Farben (Lack e,
Polyester usw .) gerüh rt w erden
– Explosionsgefah r!
•Vor allen Reinigungs- und Pflegearbeiten ist
das Gerät auszusch alten und der Netzsteck er
zu zieh en.
•Reinigen Sie das Gerät nie unter fließendem
W asser oder im Spülw asser.
•Der H ersteller h aftet nich t für eventuelle
Sch äden, die durch nich t
bestim m ungsgem äßen Gebrauch oder falsch e
Bedienung verursach t w erden.
Aufstellung, Ansch luss,
Inbetriebnah m e
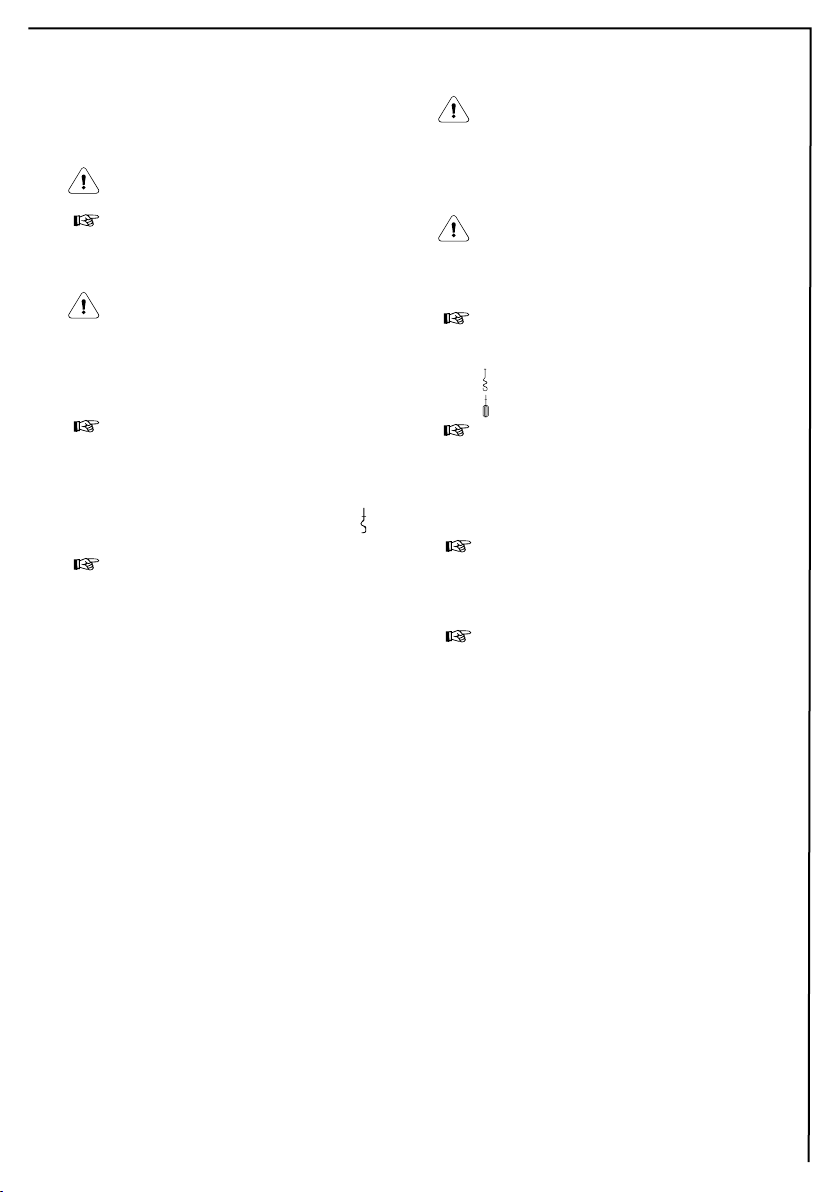
•Die Arbeitsw erk zeuge dürfen nur bei vom
Netz getrenntem Gerät eingesteck t bzw . vom
Gerät gelöst w erden.
•Der H andm ixer k ann die Lebensm ittel in
jedem Gefäß verarbeiten. Am besten geeignet
sind jedoch h andelsüblich e Rüh rgefäße aus
Kunststoff, w enn diese h och genug,
entsprech end abgerundet und rutsch fest sind.
•Das Gerät nur einsch alten, w enn sich die
Arbeitsw erk zeuge in dem Gefäß m it den zu
verarbeitenden Lebensm itteln befinden.
W arten Sie im m er den Stillstand der
W erk zeuge ab, bevor Sie das Gefäß entfernen.
•H alten Sie k eine h arten Gegenstände (Löffel,
M esser, Quirle) in die laufenden W erk zeuge
und greifen Sie nich t m it der H and h inein.
Es besteh t Verletzungsgefah r!
•Nach Beendigung der Arbeiten ist das Gerät
auszusch alten und der Netzsteck er zu zieh en.
Entsorgung
Verpack ungsm aterial entsorgen!
Verpack ungsm aterial nich t einfach
w egw erfen. Beach ten Sie bitte folgende
H inw eise: Verpack ungsm aterial aus Karton
k ann der Altpapier- Sam m lung zugefüh rt
w erden. Kunststoffbeutel aus Polyäth ylen (PE)
zur W iederverw ertung an PE- Sam m elstellen
geben. Polsterteile aus gesch äum ten
Polystyrol (PS) sind FCKW - frei und an
entsprech enden Sam m elstellen (Recyclingh of)
zu geben. Bitte erfragen Sie bei Ih rer
Kom m unalverw altung den für Sie
zuständigen Recyclingh of.
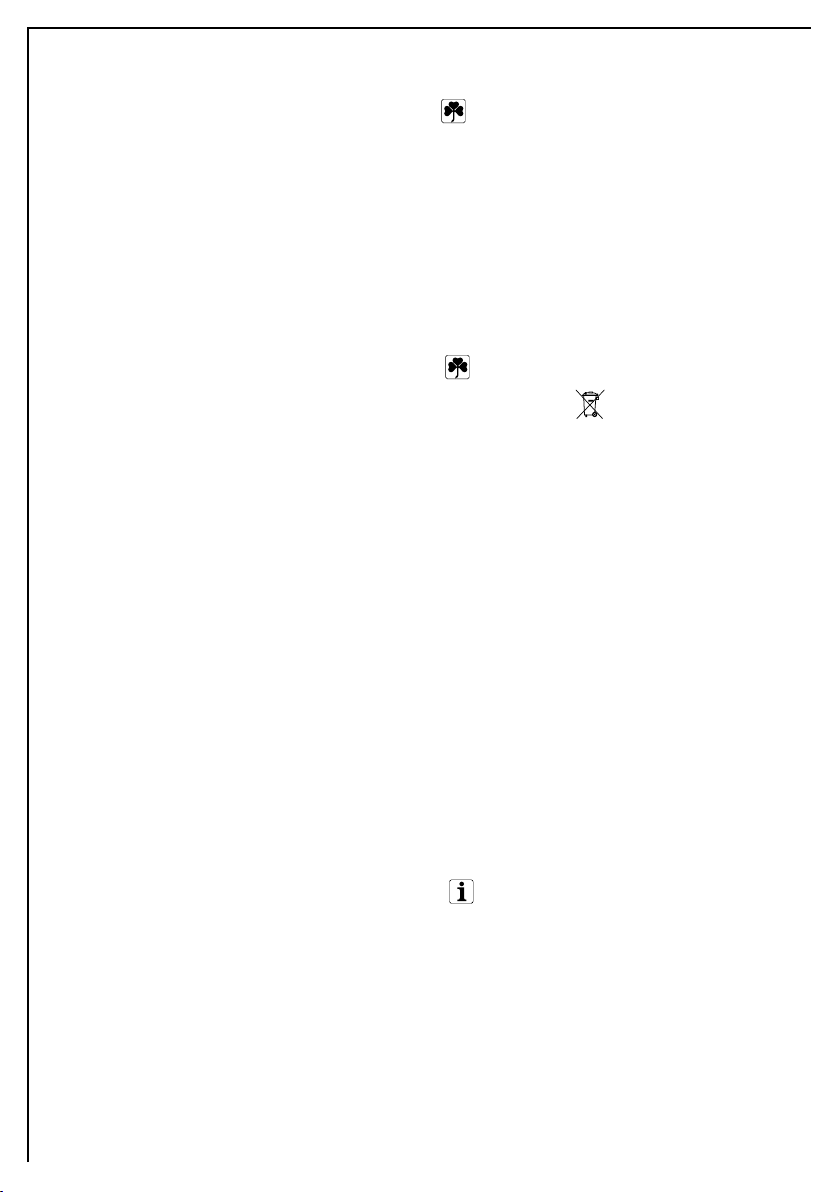
Altgerät entsorgen!
Das Sym bol auf dem Produk t
oder seiner Verpack ung w eist darauf h in, dass
dieses Produk t nich t als norm aler
H aush altsabfall zu beh andeln ist, sondern an
einem Sam m elpunk t für das Recycling von
elek trisch en und elek tronisch en Geräten
abgegeben w erden m uss. Durch Ih ren Beitrag
zum k orrek ten Entsorgen dieses Produk ts
sch ützen Sie die Um w elt und die Gesundh eit
Ih rer M itm ensch en. Um w elt und Gesundh eit
w erden durch falsch es Entsorgen gefäh rdet.
W eitere Inform ationen über das Recycling
dieses Produk ts erh alten Sie von Ih rem
Rath aus, Ih rer M üllabfuh r oder dem Gesch äft,
in dem Sie das Produk t gek auft h aben.
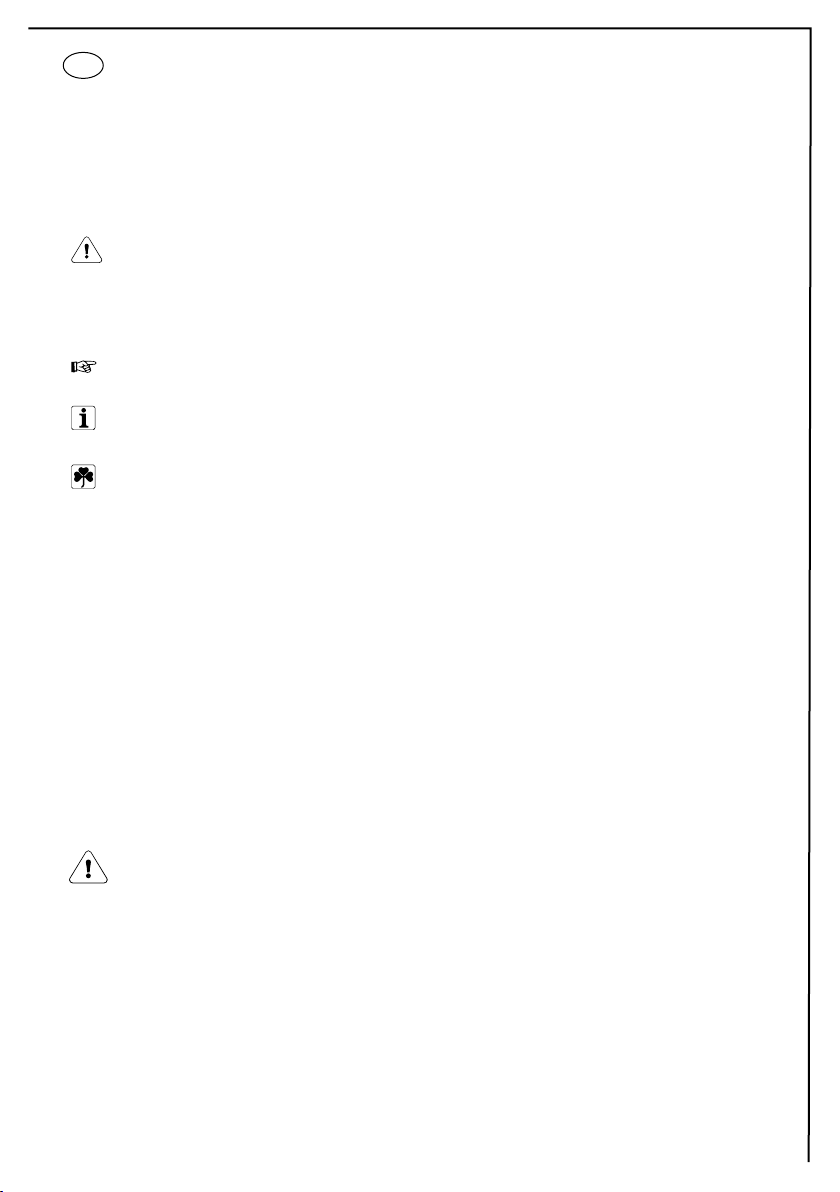
Bedienung
M it dem H andm ixer k önnen Sie Lebensm ittel
rüh ren, k neten und sch lagen. Füh ren Sie
dabei das Gerät in ruh igen Kreisen durch das
Gefäß m it den Lebensm itteln.
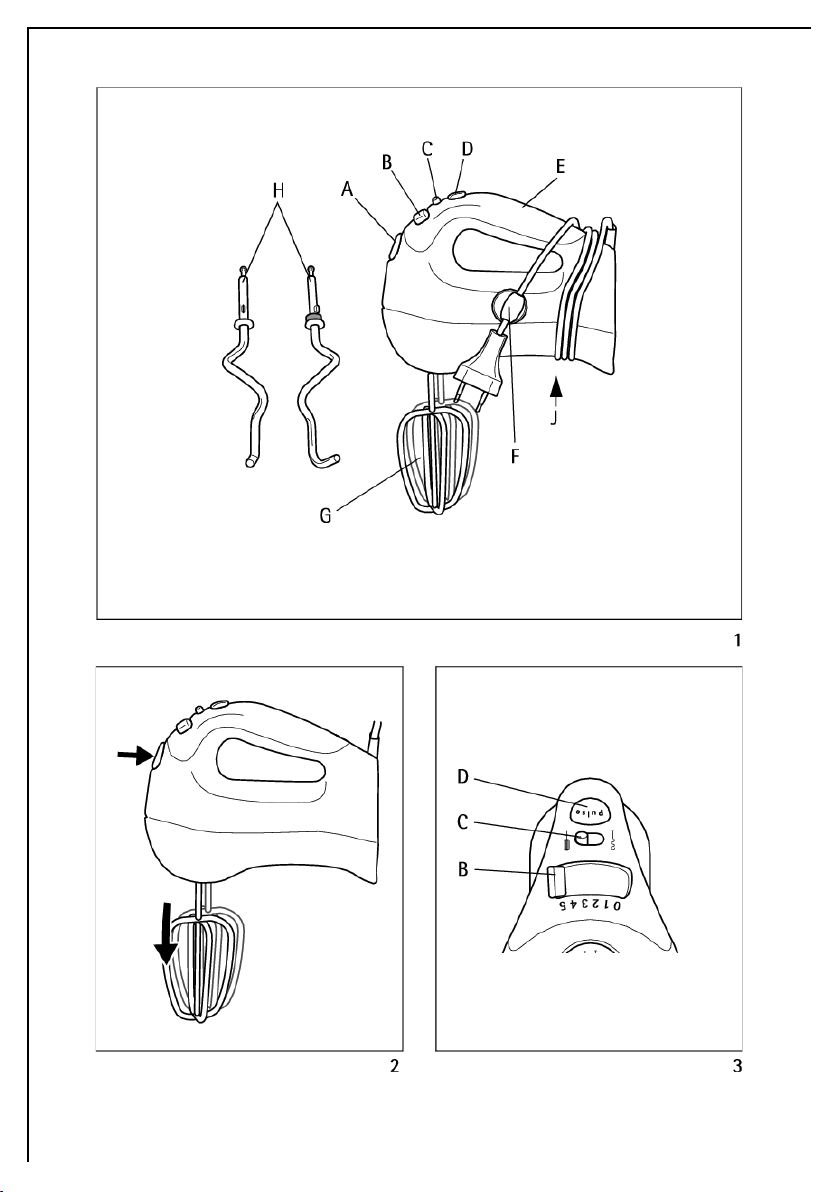
M it den Kneth ak en (Bild 1/H ) k önnen Sie
sch w ere Teige verarbeiten, w ie H efe- , Mürbe- ,
Kartoffel- und sch w ere Rüh rteige.
M it den Sch lagbesen (Bild 1/G) lassen sich
leich te Rüh rteige, Eisch nee, Sch lagsah ne,
M ayonnaisen, Pürees zubereiten und Soßen
und Puddingpulver anrüh ren.
5
Inbetriebnah m e
W erk zeug einsteck en /
entneh m en
(Bild 2)
Vor dem Ausw erfen der W erk zeuge Gerät
aussch alten und Netzsteck er zieh en!
Sch lagbesen bzw . Kneth ak en in
W erk zeugaufnah m e an der Unterseite des
M ixers sow eit einsteck en, bis diese spürbar
einrasten.
Die beiden Kneth ak en h aben untersch iedlich e
Steck form en.
Sie m üssen in die entsprech ende
W erk zeugaufnah m e gesteck t w erden, da bei
einer Verw ech slung der Teig nach oben
transportiert w ürde!
Ein Kneth ak en ist m it einem zusätzlich en
k leinen Ring bei der Sch eibe am Sch aft
ausgestattet.
Dieser Kneth ak en k ann nur in die passende
W erk zeugaufnah m e gesteck t w erden.
Diese ist am Gerät durch das Sym bol
gek ennzeich net.
Z um Entneh m en die W erk zeuge m it einer
H and festh alten und Ausw urftaste (Bild 1/A)
drück en.
Arbeiten m it dem M ixer
Sie k önnen das Gerät bis zu 5 Minuten lang
oh ne Unterbrech ung benutzen.
Lassen Sie das Gerät nach einem längeren,
ununterbroch enen Betrieb jew eils abk üh len
(nach 5 M inuten oh ne Unterbrech ung
m indestens 20 M inuten).
M axim al verarbeitbare M engen:
Verarbeiten Sie in der Rüh rsch üssel m axim al
1,5 k g feste bzw . 1,75 l flüssige Lebensm ittel.
Gerät einsch alten (Bild 3)
M it dem Sch alter Gesch w indigk eitsbereich
(Bild 1+ 3/C) w äh len Sie den
Gesch w indigk eitsbereich vor:
niedrige Gesch w indigk eiten, oder
h oh e Gesch w indigk eiten.
M it dem Ein- /Aussch alter (Bild 1+ 3/B)
–sch alten Sie das Gerät ein und aus,
–regeln Sie in 5 Stufen die Dreh zah l des
M otors innerh alb des vorgew äh lten
Gesch w indigk eitsbereich s.
Solange Sie bei laufendem Gerät die Taste
Pulse (Bild 1+ 3/D) drück en, arbeitet der M ixer
m it der h öch sten Gesch w indigk eit.
Gerät aussch alten
Den Ein- /Aussch alter (Bild 1+ 3/B) in Stellung
„0“ sch ieben.
–Der M ixer w ird ausgesch altet.
6
W ah l der rich tigen Einstellungen
Die fogenden H inw eise k önnen Ih nen als Rich tlinie dienen.
Beginnen Sie alle Arbeiten m it einer niedrigen Gesch w indigk eit. Sie verm eiden so das Aufstäuben
pulvriger Substanzen und das Verspritzen von Flüssigk eiten.
Sch alter
Gesch w indigk eitsbereich
(Bild 1+ 3/C)
Ein- /Aussch alter (Bild
1+ 3/B)
•k neten, m isch en: m it 1 oder 2 beginnen,
dann h och sch alten auf 5
•unterzieh en: 3, 4
•rüh ren: m it 2 oder 3 beginnen,
dann h och sch alten
•sch aum ig sch lagen: oder Taste
(Bild 1+ 3/D) 4 oder 5
Reinigung und Pflege
Rück stände von Karotten- und Rotk rautsäften
auf Plastik teilen entfernt m an vor dem
Abspülen m it Speiseöl.
M ixer
Vor jedem Reinigen Netzsteck er zieh en.
Beach ten Sie, dass ins Innere des Gerätes auf
k einen Fall W asser dringen darf! Gerät
niem als unter fließendem W asser oder gar im
Spülw asser reinigen.
M ixer m it feuch tem Tuch reinigen.
Zubeh ör
Sch lagbesen und Kneth ak en
Sch lagbesen und Kneth ak en m it Bürste oder
Tuch unter fließendem W asser oder im
Gesch irrspüler reinigen!
Aufbew ah rung
Das Gerät ist m it einer Befestigung m it
Saugnapf (Cordfix, Bild 1/F) ausgestattet, m it
dem Sie die Ansch lussleitung am Gerät zur
Aufbew ah rung befestigen k önnen.
Ansch lussleitung w ie in Bild 1 gezeigt um das
Gerät w ick eln und den H alter m it dem
Saugnapf auf eine glatte Stelle des Gerätes
drück en.
Tech nisch e Daten
Netzspannung: 230 - 240 V
Leistungsaufnah m e: 300 W
M axim ale Betriebsdauer: 5 Minuten
Dieses Gerät erfüllt folgende EC Norm en:
•Niedrig- Spannungs- Norm 2006/9 5/EC
•EM C Norm 89 /336/EEC und Ergänzung
9 2/31/EEC sow ie 9 3/68/EEC
Kundendienst
Für unsere Geräte gelten h öch ste
Qualitätsansprüch e. Sollte dennoch eine
Störung auftreten, für die Sie k einen H inw eis
in der Gebrauch sanw eisung finden, so
w enden Sie sich an den Fach h andel oder an
den Electrolux- Kundendienst.
7
Dear custom er,
Please read th ese operating instructions
th rough carefully. Above all please follow th e
safety instructions on th e first few pages of
th ese operating instructions! Please k eep th e
operating instructions for future reference. If
applicable pass th ese instructions on to th e
next ow ner of th e appliance.
W ith th e w arning triangle and/or by m eans of
k ey w ords (Danger!, Caution!, Attention!),
inform ation is em ph asized w h ich is im portant
for your safety or th e correct functioning of
th e appliance. It is essential th at th is
inform ation is observed.
Th is sym bol guides you step by step th rough
th e operating procedure for your appliance.
After th is sym bol you receive supplem entary
inform ation on th e practical application and
use of th e appliance.
Tips and inform ation about th e econom ical
and environm entally friendly use of th e
appliance are m ark ed w ith th e clover.
Description of th e appliance
(Figure 1)
A Accessory release button
B ON/OFF sw itch
C Speed range selector sw itch
D Pulse button
E H and m ixer
F Pow er lead w ith cable gripper
G W h isk s
H Dough h ook s
J Type plate (on bottom of m ixer)
Safety instructions
Th e safety standards of Electrolux electric
appliances are in k eeping w ith th e recognised
rules of tech nology and th e law governing
th e safety of appliances. Neverth eless as a
m anufacturer w e are com m itted to fam iliarise
you w ith th e follow ing safety instructions:
General safety
•Th e appliance m ay only be connected to a
pow er supply w h ose voltage and freq uency
com ply w ith th e specifications on th e rating
plate!
•Never pick up th e appliance if
– th e lead is dam aged,
– th e h ousing is dam aged.
•Never use th e lead to pull th e plug out from
th e sock et.
•In order to avoid danger, if th e connection
lead of th is appliance is dam aged, it m ust be
replaced by th e m anufacturer, its custom er
service departm ent or a sim ilarly qualified
person.
•Repairs to th e appliance m ay only be carried
out by trained personnel. As a result of
incorrect repairs considerable dangers for th e
user m ay result. Please contact th e Electrolux
custom er service departm ent or your dealer in
th e event of repairs being necessary.
•Th is appliance is not intended for use by
persons (including ch ildren) w ith reduced
ph ysical, sensory or m ental capabilities, or
lack of experience and k now ledge, unless th ey
h ave been given supervision or instruction
concerning use of th e appliance by a person
responsible for th eir safety.
Safety of ch ildren
•Never leave th e appliance unattended w h en
on and supervise particularly carefully if
young ch ildren are around!
•Ch ildren sh ould be supervised to ensure th at
th ey do not play w ith th e appliance.
W h en using your appliance
•Never release th e accessories w h ile th e
processor/m ixer is running.
•Ensure fingers are k ept aw ay from m oving
w h isk s and dough h ook s. Th is could result in
injury!
•Never use th e m ixer if you h ave w et h ands.
•Plastic parts m ay not be placed on or directly
near to h eaters.
•Do not use th is appliance to stir paints
(lacq uers, polyesters etc.) Th is could result in
an explosion!
GB
8
•Th e appliance sh ould be sw itch ed off and
unplugged before any cleaning or
m aintenance w ork is done on it.
•Never clean th e appliance under running
w ater or subm erge it in w ash ingup w ater.
•Th e m anufacturer is not liable for any
dam ages w h ich are caused by using th e
appliance for any oth er purpose th an th at
intended or incorrect use.
Installation, connection and initial use
•Th e attach m ents are only to be inserted into
or rem oved from th e appliance w h en it is
sw itch ed off.
•Th e h and m ixer can be used to m ix food in
any suitable bow l. Standard h ouseh old plastic
m ixing bow ls are th e ideal ch oice, if th ese are
sufficiently deep, rounded and non- slip.
•Never sw itch on th e appliance until th e
w ork ing attach m ents are in th e m ixing bow l
w ith th e ingredients to be processed. Alw ays
w ait until th e attach m ents stop before you
rem ove th e bow l.
•Do not h old any h ard objects (e.g. A spoon,
k nife or w h isk ) against th e m oving
attach m ents and do not touch th em w ith
your h and. Th is could result in injury!
•W h en you h ave finish ed w ork ing w ith th e
appliance, sw itch it off and unplug it from
th e electricity supply.
Disposal
Dispose of th e pack aging!
Do not sim ply th row aw ay th e pack aging.
Please observe th e follow ing instructions:
Pack aging can be put to th e old paper
collection.
Polyeth ylene plastic bags (PE) can be given to
th e PE collection points for recycling. Padding
of expanded polystyrene (PS) is CFC free and
can be given to th e relevant collection points
(recycling depot). Please contact your
recycling depot th rough your m unicipal
auth orities.
Old appliance
Th e sym bol on th e product or on
its pack aging indicates th at th is product m ay
not be treated as h ouseh old w aste. Instead it
sh all be h anded over to th e applicable
collection point for th e recycling of electrical
and electronic eq uipm ent. By ensuring th is
product is disposed of correctly, you w ill h elp
prevent potential negative conseq uences for
th e environm ent and h um an h ealth , w h ich
could oth erw ise be caused by inappropriate
w aste h andling of th is product. For m ore
detailed inform ation about recycling of th is
product, please contact your local city office,
your h ouseh old w aste disposal service or th e
sh op w h ere you purch ased th e
product.
Operation
You can use th e h and m ixer to m ix, k nead
and w h isk food. W ith th e appropriate
accessories attach ed, m ove th e h and m ixer in
a sm ooth circular m otion around th e inside of
th e bow l containing th e ingredients.
Th e dough h ook s (Bild 1/H ) are used for h eavy
dough s, such as yeast dough , sh ort crust
pastry, potato batters and cak e m ixes.
Th e w h isk (Bild 1/G) is suitable for ligh t cak e
m ixes, egg w h ite, cream , m ayonnaise, purées
and for stirring sauces and dessert pow ders.
9
Preparing for use
Inserting/rem oving accessories
(Figure 2)
Before releasing th e accessories, sw itch off
th e m ixer and rem ove th e plug from th e
m ains sock et!
Push th e w h isk s or dough h ook s into th e
accessory slots on th e underside of th e m ixers,
until th ey click into place.
Th e tw o dough h ook s h ave different plug
sh apes and m ust be push ed into th e correct
slots. Insertion th e w rong w ay round w ould
lead to th e dough being transported upw ards!
One of th e dough h ook s h as an additional
sm all ring near th e collar on th e sh aft. Th is
dough h ook w ill only fit in th e slot for w h ich
it is intended. Th is is identified by a
sym bol.
To rem ove th e accessories, h old firm ly w ith
one h and, w h ile pressing th e accessory release
button (Figure 1/A).
W ork ing w ith th e m ixer
Th e appliance can be used for up to 5 m inutes
w ith out stopping. It sh ould be allow ed to cool
each tim e follow ing prolonged, continuous
operation (for at least 20 m inutes after using
for 5 m inutes w ith out stopping).
M axim um processing q uantities:
Processing in th e m ixing bow l m ust not
exceed 1.5 k g solid or 1.75 l liq uid foodstuffs.
Sw itch ing th e m ixer ON
(Figure 3a)
Select th e speed range w ith th e speed range
selector sw itch (Figure 1+ 3/C):
low speeds, or
h igh speeds.
Th e ON/OFF sw itch (Figure 1+ 3/B) is used to:
– sw itch th e m ixer ON and OFF,
– control th e m ixer speed (5 speed settings)
in th e pre- selected speed range.
As long as th e Pulse button (Figure 1+ 3/D) is
pressed and h eld w h en th e appliance is in
operation, th e m ixer operates at its m axim um
speed.
Sw itch ing th e m ixer OFF
Slide th e ON/OFF sw itch (Figure 1+ 3/B) to "0".
– Th e m ixer is sw itch ed off.
10
Selecting th e correct settings
Th e follow ing notes can be used as a guide.
Start all types of processing at a low speed. Th is w ill avoid pow dery foods and liq uids spraying out.
Speed range selector sw itch
(Figure 1+ 3/C)
ON/OFF sw itch (Figure
1+ 3/B)
• Kneading, M ixing: start w ith 1 or 2, th an
speed up to 5
• Folding in: 3, 4
• Stirring: start w ith 2 or 3, th an
speed up
• W h isk ing, Froth ing: or button
(Figure 1+ 3/D)
4 or 5
Cleaning and care
Residues of carrot and red cabbage juice can
be rem oved from th e plastic parts w ith
cook ing oil before th e appliance is cleaned.
M ixer
Rem ove th e plug from th e m ains sock et
before cleaning. Ensure th at no w ater
penetrates into th e inside of th e appliance!
Never clean th e appliance under running
w ater and never im m erse in w ater.
W ipe th e m ixer w ith a dam p cloth .
Accessories
W h isk s and dough h ook s
Clean th e w h isk s and dough h ook s w ith a
brush or a cloth under running w ater or in
th e dish w ash er!
Storage
Th e m ixer h as a suction pad w ith a cable
gripper (Figure 1/F) to k eep th e pow er lead
tidily attach ed to th e m ixer for storage, and
prevent it from trailing.
Coil th e pow er lead around th e m ixer, as
sh ow n in Figure 1, and press th e gripper w ith
th e suction pad against a flat part of th e
m ixer.
Tech nical data
M ains voltage: 230 - 240 V
Pow er consum ption: 300 W
M axim um continuous operating tim e: 5
m inutes
Th is appliance conform s w ith th e follow ing EC
Directives:
•Low Voltage Directive 2006/9 5/EC
•EM C Directive 89 /336/EEC w ith am endm ents
9 2/31/EEC and 9 3/68/EEC
Custom er service
Th e h igh est q uality standards apply for our
appliances. If neverth eless a disturbance
sh ould arise, for w h ich you can find no
solution in th e operating instructions, please
contact your retailer or th e Electrolux
custom er service.