ELEKTRA Crema Caffe User manual

GB
PROFESSIONAL ESPRESSO COFFEE MACHINES
INSTRUCTION MANUAL


GB
PROFESSIONAL ESPRESSO COFFEE MACHINES
INSTRUCTION MANUAL

4
CONTENTS
GENERAL INSTRUCTIONS
A INTRODUCTION
C DESCRIPTION OF THE APPLIANCE
B GENERAL RECOMMENDATIONS AND SAFETY REGULATIONS
9
14
10
1
2
3
4
5
6
7
8
9
10
11
12
13
14
15
16
17
18
19
20
21
22
23
24
25
26
27
DISPLAY OF FUNDAMENTAL PARAMETERS
COFFEE DISPENSING
DISPENSING OF HOT WATER AND STEAM
PREPARING THE MILK
ELIMINATION OF CALCIUM AND MAGNESIUM SALTS
FROM THE WATER
ELIMINATION OF CALCIUM AND MAGNESIUM SALTS
FROM THE WATER
AUTOMATIC REGENERATION OF THE WATER SOFTENER RESINS
ELIMINATION OF CHLORINE AND ORGANIC COMPOUNDS
FROM THE WATER
CONTROL OF WATER LEVEL IN THE BOILER
CONTROL OF WATER TEMPERATURE IN THE BOILER
STABILIZING THE BREWING TEMPERATURE
MEASURING THE BREWING PRESSURE
MEASURING THE WATER SUPPLY PRESSURE
PROTECTING THE HEATING ELEMENTS
PROTECTING FROM OVERHEATING
UPPER CUP TRAY
UPPER CUP HEATER TRAY
BODY LIGHTING
BODY LIGHTING
BODY LIGHTING
USER ALERTS
MILK FROTHER ALERTS TO THE USER
USER ALERTS
SOUND EMISSION
(S-C-B)
(A-K)
(A-S-K-C-B)
(A-S-K-C-B)
(A-K with MFS)
(A-S-K-C-B)
(A-K with WTS)
(A-K with WTS)
(A-K with WTS)
(A-S-K-C-B)
(A-S-K-C-B)
(A-S-K-C-B)
(A-S-K-C-B)
(A-K with WTS)
(A-K with WTS)
(K)
(A-S-C-B)
(A-S-K-C-B)
(S-C-B)
(A-K with CHS)
(K with BLS)
(C)
(A)
(S-C-B)
(A-K with MFS)
(A-K)
(A-S-K-C-B)
14
14
14
14
14
15
15
15
15
15
16
16
16
16
16
16
16
17
17
17
17
17
17
18
19
19
19
D GENERAL ADJUSTMENTS 20
1
2
3
4
COFFEE BREWING DOSES PROGRAMMING
GROUP 1 DOSES COPYING ON GROUP 2 AND GROUP 3
COFFEE DELIVERY STOP MANAGEMENT
GENERAL BASIC PROGRAMMING
4.1 COFFEE BREWING DOSES PROGRAMMING
4.2 GROUP 1 DOSES COPYING ON GROUP 2 AND GROUP 3
4.3 COFFEE DELIVERY STOP MANAGEMENT
4.4 SEMIAUTOMATIC GROUPS CLEANING
(S-C-B)
(S-C-B)
(S-C-B)
(A-K)
(A-K)
(A-K)
(A-K)
(A-K)
20
21
22
22
23
23
23
23
E TYPE APPOVALS 24
1EUROPEAN TYPE APPROVALS (A-S-K-C-B) 24

5
1
2
3
4
5
6
7
8
9
10
11
12
13
14
SWITCHING ON
USE OF THE WORKING AREAS
COFFEE DISPENSING WITH MANUAL DOSING
COFFEE DISPENSING WITH AUTOMATIC DOSING
COFFEE DISPENSING WITH AUTOMATIC DOSING BUT WITH
POSSIBILITY OF STOPPING IT MANUALLY
WARMING THE CUPS
WARMING THE CUPS
MAKING THE COFFEE
PREPARING FROTHY MILK WITH MANUAL STEAM VALVE
PREPARING HOT MILK WITH AUTOMATIC MILK FROTHER
PREPARING FROTHY MILK WITH AUTOMATIC MILK FROTHER
MAKING TEA - CAMOMILE TEA - ETC
(A-S-K-C-B)
(B)
(S-C)
(A-K)
(A-S-K-C-B)
(A-S-K-C-B)
(A-S-K-C-B)
(S-C-B)
(A-K with CHS)
(A-S-K-C-B)
(A-S-K-C-B)
(A-K with MFS)
(A-K with MFS)
(A-S-K-C-B)
27
27
27
28
28
28
28
28
29
29
29
30
30
30
1
2
3
4
5
6
7
8
9
10
DAILY CLEANING OF THE GROUPS AND FILTERHOLDERS
DAILY CLEANING OF STEAM WANDS
CLEANING THE AUTOMATIC MILK FROTHER WAND
DAILY CLEANING OF THE MILK FROTHER SPRAY NOZZLE
WEEKLY CLEANING OF THE GROUPS
WEEKLY CLEANING OF THE FILTERS AND FILTERHOLDERS
WEEKLY CLEANING OF LOWER DRIP TRAY
WEEKLY CLEANING OF BODY
REGENERATING THE WATER SOFTENER RESINS
(A-S-K-C-B)
(A-S-K-C-B)
(A-K with MFS)
(A-K with MFS)
(S-C-B)
(A-K)
(A-S-K-C-B)
(A-S-K-C-B)
(A-S-K-C-B)
(A-K with WTS)
33
33
33
34
34
34
35
35
35
35
1
2
3
4
5
6
7
8
9
10
11
12
WARNING: BUFFER BATTERY ABOUT TO GO FLAT
STEAM DOES NOT COME OUT OF THE WAND WHEN
THE MACHINE IS HOT
WARNING: WATER LEVEL CONTROL SYSTEM FAULT
WATER COMES OUT OF THE STEAM WAND
FLASHING OF THE PUSHBUTTON LED DURING DISPENSING
WARNING OF NOT SATISFACTORY BREWING AND FLASHING OF
THE DISPENSING PUSHBUTTON LED
WATER DOES NOT COME OUT OF THE DISPENSING GROUP
WHEN THE MANUAL BUTTON IS USED
ONE DISPENSING GROUP STARTS UP ON ITS OWN
WARNING: INADEQUATE WATER SUPPLY PRESSURE
WARNING: NO WATER IN THE BOILER
WARNING: BREWING TEMPERATURE CONTROL FAULT
ONE DISPENSING GROUP DOES NOT HEAT SUFFICIENTLY
(A-S-K-C-B)
(A-S-K-C-B)
(A-S-K-C-B)
(A-S-K-C-B)
(S-C-B)
(A-K)
(A-S-K-C-B)
(B)
(A-K with WTS)
(A-S-C-B)
(A-S-K-C-B)
(A-S-K-C-B)
36
36
37
37
37
38
38
38
38
39
39
39
OPERATION INSTRUCTIONS
A USE 27
B
C
MAINTENANCE AND CLEANING
TROUBLESHOOTING
33
36

6
13
14
15
16
17
18
19
20
21
THE GAUGE SHOWS A BOILER PRESSURE NOT
BETWEEN 0.6 AND 1.6 BAR
THE GAUGE SHOWS A BREWING PRESSURE NOT
BETWEEN 8 AND 9 BAR
WARNING: MILK FROTHER FAULT
THE MILK FROTHER DOES NOT FROTH THE MILK
CHANGING THE ACTIVATED CARBON CARTRIDGE
WARNING: WATER SOFTENING SYSTEM FAULT
NO SALT LOADING
THE WATER SOFTENER AND ACTIVATED CARBON CARTRIDGE
CAPS DO NOT OPEN
THE DRIP TRAY IS FULL AND OVERFLOWING WITH WATER
(S-C-B)
(S-C-B)
(A-K with MFS)
(A-K with MFS)
(A-K with WTS)
(A-K with WTS)
(A-K with WTS)
(A-K with WTS)
(A-S-K-C-B)
39
40
40
40
41
41
42
43
43
D DISPOSAL OF THE APPLIANCE 45
TECHNICAL INSTRUCTIONS
B INSTALLATION
A UNPACKING
48
47
1
2
3
4
5
6
7
8
9
10
11
12
ADJUSTING THE FEET
WATER CONNECTIONS
WATER CONNECTIONS
WATER SOFTENER CONNECTION
CONNECTION WITHOUT WATER SOFTENER
DRAIN CONNECTION
DRAIN CONNECTION
ELECTRICAL CONNECTIONS
9.1 SINGLE-PHASE 230VAC CONNECTION
9.2 THREE-PHASE 400VAC N3 CONNECTION
FILLING THE HYDRAULIC CIRCUITS
FLUSHING THE MACHINE
(A-K)
(A-S-K-C-B,no A-K with
WTS)
(A-K with WTS)
(A-S-K-C-B,no A-K with
WTS)
(A-K with WTS)
(A-K with WTS)
(A-S-K-C)
(B)
(A-S-K-C-B)
(A-S-K-C-B,no A-K with
WTS)
(A-K with WTS)
(S)
48
48
48
49
50
50
50
51
51
51
51
52
52
52

7
1
2
3
4
5
BASIC PROGRAMMING BY THE MAINTENANCE TECHNICIAN
1.1 TIME SETTING
1.2 NIGHT CYCLE PROGRAMMING
1.3 BREWING TEMPERATURE SETTING
1.4 HEATING ELEMENT SAFETY DEVICE RESET
BASIC PROGRAMMING BY THE MAINTENANCE TECHNICIAN
2.1 LANGUAGE SELECTION
2.2 TIME AND DATE SETTING
2.3 NIGHT CYCLE PROGRAMMING
2.4 MEASURED WATER HARDNESS STORING
2.5 WATER SOFTENER TYPE SELECTION
2.6 BREWING TEMPERATURE SETTING
2.7 HOT MILK TEMPERATURE SETTING
2.8 FROTHY MILK TEMPERATURE SETTING
2.9 AMOUNT OF FROTH IN MILK SETTING
2.10 WATER TREATMENT CIRCUIT RINSE
2.11 HEATING ELEMENT SAFETY DEVICE RESET
2.12 SCHEDULED MAINTENANCE ALERTS RESET
2.13 ACTIVE CARBON CARTRIDGE REPLACEMENT ALERT RESET
2.14 COFFEE PRODUCTION DISPLAY AND RESET
2.15 WATER CONSUMPTION DISPLAY AND RESET
BREWING PRESSURE ADJUSTING
BREWING WATER SALINITY ADJUSTING
SPECIAL PROGRAMMING
(S-C-B)
(S-C-B)
(S-C-B)
(S-C-B)
(S-C-B)
(A-K)
(A-K)
(A-K)
(A-K)
(A-K with WTS)
(A-K with WTS)
(A-K)
(A-K with MFS)
(A-K with MFS)
(A-K with MFS)
(A-K with WTS)
(A)
(A-K)
(A-K with WTS)
(A-K)
(A-K)
(A-S-K-C-B)
(A-K with WTS)
(A-K)
54
55
56
58
59
60
61
61
61
61
61
62
62
62
62
63
63
63
63
63
63
64
64
64
1
2
CLEANING THE WATER SOFTENER
REGENERATING THE WATER SOFTENER RESINS
(A-S-K-C-B,no A-K with
WTS)
(A-S-K-C-B,no A-K with
WTS)
66
66
C
D
ADJUSTMENTS
MAINTAINANCE OF WATER SOFTENER
54
66

8
GENERAL INSTRUCTIONS
THESE INSTRUCTIONS ARE INTENDED FOR
BARMAN / ESPRESSO COFFEE MACHINE OPERATOR
AND
INSTALLATION / MAINTENANCE TECHNICIAN

9
This manual applies to the entire range of professional coffee machines manufactured
by ELEKTRA.
Each topic has been specifically treated in a separate paragraph for each model belonging
to the range, indicating the title of the paragraph itself and the models to which it refers,
using the letters shown below:
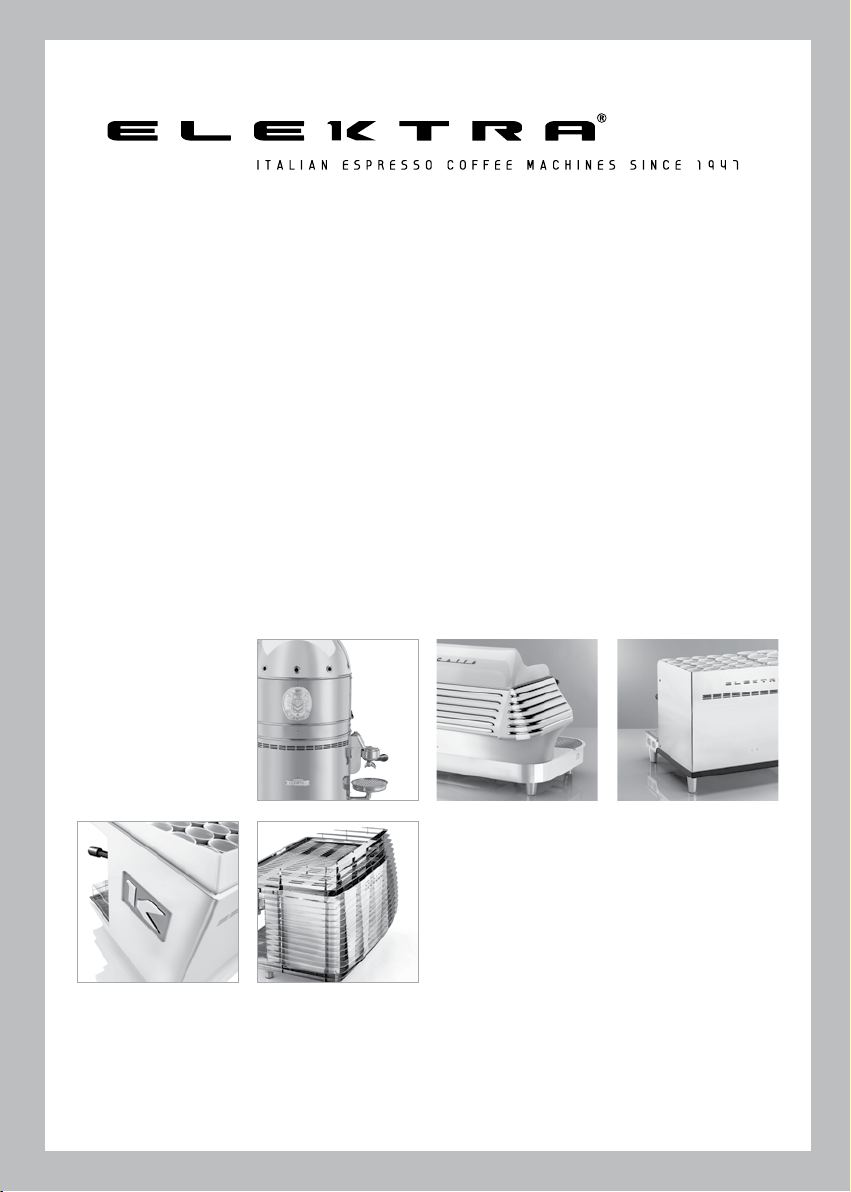
- A = ALETTA model (Aletta)
- S = SIXTIES model (Deliziosa and Compact)
- K = KUP model (KUP2 and KUP3)
- C = CLASSIC model (Barlume 2-3 units)
- B = BELLE EPOQUE model (Vertical 2-3 units)
Models ALETTA and KUP are equipped of the following accessories listed in this handbook
with correspondent abbreviations:
- CHS = Electrical cup heating
- BLS = Body lighting
- MFS = Automatic milk frothing
- WTS = Automatic water treatment system
The manual is divided in three parts as displayed below:
GENERAL INSTRUCTIONS
These instructions are intended for
barman/espresso coffee machine operator
and
installation/maintenance technician
OPERATION INSTRUCTIONS
These instructions are intended for
barman/espresso coffee machine operator
TECHNICAL INSTRUCTIONS
These instructions are intended for espresso coffee machine
installation/maintenance technician
The instructions reported in this manual are also available
in pdf format on the website www.elektrasrl.com
ATTENTION: USA - CANADA REQUIREMENTS
These instructions include some particular specifications
for the US and Canadian markets.
INTRODUCTIONA
GENERAL INSTRUCTIONS
THESE INSTRUCTIONS ARE INTENDED FOR
BARMAN / ESPRESSO COFFEE MACHINE OPERATOR
AND
INSTALLATION / MAINTENANCE TECHNICIAN

10
GENERAL RECOMMENDATIONS
AND SAFETY REGULATIONS
B
This booklet is an essential and integral part of the product
and must be given to the user.
It contains basic safety instructions that must be followed for
the installation, operation and maintenance of the appliance.
Save these instructions.
After having unpacked the appliance, make sure it is intact.
If in doubt, do not use the appliance and contact a qualified
engineer.
The packing elements (plastic bags, polystyrene foam, nails,
etc.) should not be left within reach of children since they are
potential sources of danger.
The appliance should be installed by a qualified engineer
accordingtothemanufacturer’sinstructionsandincompliance
with current safety regulations.
Incorrect installation could cause injury to persons or animals
and damage to property, for which the manufacturer cannot
be held liable.
The company Elektra declines any and all responsibility for
tampering or interventions carried out by non authorized
persons. Such intervention automatically renders the
guarantee null and void .
The appliance must be installed only in places where its use
and maintenance can be carried out by qualified personnel.
Before carrying out the electrical connection of the appliance,
check that the mains electricity supply corresponds to the
data given on the rating plate.
The rating plate is located on the front of the espresso coffee
machine (A-S-K-C) or inside the cup heater tray (B).
The wiring diagram is given on an adhesive tag applied to the
end of the power cable.
1
2
3

11
This appliance is only electrically safe when it has been
connected to an efficient grounding system in compliance
with current safety regulations .
Make sure that this fundamental safety requirement has
been observed and if in doubt request a thorough check of
the system by a qualified electrician.
The manufacturer cannot be held liable for any damage that
may be caused by failure to ground the appliance.
If the appliance does not have power cable with plug,
at installation the appliance should be connected to the
electricity supply through a multipolar linked switch having a
contact separation of at least 3 mm in all poles, in compliance
with current safety regulations.
Check that the current carrying capacity of the system is
adequate for the maximum rated output of the appliance
(as indicated on the rating plate and, in particular, that the
section of the cables is adequate for the power absorbed by
the appliance.
Unwind the whole power supply cable to prevent dangerous
overheating.
It is forbidden the use of adapters, multiple current taps or
extension cables.
This appliance should not be installed in kitchens.
For the operations of connection to the water supply network,
comply with the provisions in this manual.
This appliance should only be used for the purpose for
which it was designed. Any other use is to be considered as
unsuitable and therefore dangerous.
The manufacturer cannot be held liable for any damage or
injury caused by improper, wrong or unreasonable use.
4
5

12
The use of the appliance entails compliance with the
following fundamental rules:
- the appliance should be used in environments where the
temperature does not fall below 5 °C or rise above 40 °C;
- do not obstruct the intake and outlet grilles. In particular
do not cover the upper cup tray with a cloth or such like.
- the appliance has a water circuit containing water, which
must not be allowed to freeze otherwise the appliance could
be damaged;
- the appliance should not be cleaned using water jets or
installed in a place where water jets could be used
for cleaning;
- the appliance should be installed on the level - it must not
slope - high enough in order to have the cup heater tray
at more than 1.5 meter from the floor.
- do not touch the appliance when hands or feet are wet
or damp;
- do not operate the appliance barefoot;
- do not tug the power supply cable;
- do not expose the appliance to the elements (rain, sun, etc.):
it is not suitable for outdoor use;
- The equipment can be used by children aged 8+ and people
with reduced physical, sensory or mental capabilities, or lack
of experience or knowledge required, provided they are
under supervision or after they have received the same
instructions for a safe use of the equipment and for
understanding the dangers inherent in it.
Children should not play with the equipment.
The cleaning and maintenance intended to be performed by
the user, should not be performed by children without
supervision .

13
Disconnect the appliance from the mains electricity supply
before carrying out any maintenance, by switching off at the
mains switch or disconnecting the plug from the socket.
Every time maintenance jobs are carried out on joints for
connection to the water supply, you must strictly use new
joints and the old joints must never be reused.
To clean the appliance, follow the instructions in this booklet.
In the event of failure or malfunctioning of the appliance,
switch it off and under no circumstances try to repair it
yourself.
Always request service by a qualified technician.
Any repair, electrical or mechanical adjustment should only
be carried out at the factory or by an authorized service cen-
ter using only original spare parts.
Failure to comply with these instructions could jeopardize
the safety of the appliance.
The supply cable of this appliance should not be replaced by
the user.
Should the cable be damaged, switch off the appliance and
apply solely to a qualified electrician for replacement.
Should the machine be used no longer, it must be made
inoperative by cutting the supply cable after having discon-
nected it from the electrical power supply.
Make sure that all those parts which could be possible
sources of danger are made harmless.
Warning: hot surfaces .
6
7
8
9

14
DESCRIPTION OF THE APPLIANCE
The main functions of the machine, and its relative parts, are described below,
with a view to ensuring its maximum performance.
DISPLAY OF FUNDAMENTAL PARAMETERS (S-C-B)
The following operating parameters can be read on the dual pressure gauge:
- Boiler pressure.
- Water supply pressure (with pump off).
- Brewing pressure (with pump on).
DISPLAY OF FUNDAMENTAL PARAMETERS (A-K)
When “Enter” is pressed, the following operating parameters are displayed for a given time,
one after the other:
- Boiler pressure.
- Set increase (or decrease) of brewing temperature.
- Water supply pressure (with pump off). (A-K with WTS)
- Brewing pressure (with pump on). (A-K with WTS)
- Volume of softened water still available before the next salt load. (A-K with WTS)
COFFEE DISPENSING (A-S-K-C-B)
Independent dispensing groups with predosed or manual selections.
Filterholders for one or two cups.
DISPENSING OF HOT WATER AND STEAM (A-S-K-C-B)
The machine has one or two steam valves and one hot water valve equipped with swivel
wands which allows the use of large milk or water containers thus guaranteeing good
general ergonomics.
Valves marked with the symbol are operated by a joy-stick (A-S-K), with movement
in any direction opening the valve. Valves marked with the symbol are operated
by a control knob (C-B), with anti-clockwise rotation opening the valve.
Steam valves are marked with the symbol ,
and hot water valves are marked with the symbol .
PREPARING THE MILK (A-K with MFS)
The system named MFS (Milk Frothing System) is an automatic milk frother that lets
you prepare hot milk at a set temperature or hot frothy milk at a set temperature
and set amount of froth.
It is composed of a special steam wand and two pushbuttons equipped with alert leds,
one for each milk type preparation.
1
2
3
4
5
C

15
ELIMINATION OF CALCIUM AND MAGNESIUM SALTS FROM THE WATER
(A-S-K-C-B)
This enables the elimination of scale deposits in the machine thanks to a water softener that
softens the water, eliminating the calcium and magnesium salts contained in it.
The water softener is not incorporated in the machine and has an independent manual
or automatic function.
ELIMINATION OF CALCIUM AND MAGNESIUM SALTS FROM THE WATER
(A-K with WTS)
This enables scale deposits to be removed from the machine.
It consists of an ion exchange resin water softener, completely and automatically managed
by the machine.
AUTOMATIC REGENERATION OF THE WATER SOFTENER RESINS
(A-K with WTS)
When the resins in the water softener are used up, all the operator has to do, on receiving
the automatic prompt from the machine, is to load the salt.
During regeneration, the system automatically excludes the water treatment circuit from
the machine water supply, allowing the machine to operate without it.
ELIMINATION OF CHLORINE AND ORGANIC COMPOUNDS FROM
THE WATER (A-K with WTS)
Removes the bad taste and deposits caused by the Chlorine and eliminates bacteria,
making the water purer.
It consists of a silver-loaded activated carbon cartridge fitted inside the machine,
at the water supply inlet.
The system signals the exhaustion of the cartridge in relation to the volume of water
that it has treated and excludes it automatically from the machine water supply circuit,
allowing the machine to continue operating without it.
CONTROL OF WATER LEVEL IN THE BOILER (A-S-K-C-B)
This is done by means of a level probe which controls the water level in the boiler,
topping it up automatically when required.
6
7
8
9
10

16
CONTROL OF WATER TEMPERATURE IN THE BOILER (A-S-K-C-B)
Water temperature in the boiler is controlled by a sensor that switches the heating elements
on and off. Consequently, it also controls the pressure in the boiler.
STABILIZING THE BREWING TEMPERATURE (A-S-K-C-B)
Each dispensing group has a heating circuit for brewing water that functions with a heat
exchanger.
This circuit ensures that the dispensing group remains at a constant and optimal
temperature even when it is not being used thanks to the effect of the natural circulation
of hot water flowing through the circuit itself.
MEASURING THE BREWING PRESSURE (A-S-K-C-B)
This enables the manual regulation of pump pressure during coffee dispensing.
The pressure is displayed on the gauge clearly visible in the working area.
On the ALETTA and KUP models, the gauge is fitted inside the machine.
MEASURING THE BREWING PRESSURE (A-K with WTS)
Through the reading of the display, this enables the manual regulation of pump pressure during
coffee dispensing.
MEASURING THE WATER SUPPLY PRESSURE (A-K with WTS)
Enables automatic protection in the event of a water supply stoppage.
PROTECTION OF THE HEATING ELEMENTS (K)
It is formed by a thermostat with manual reset which regulates the power supply
of the heating elements.
PROTECTION OF THE HEATING ELEMENTS (A-S-C-B)
This consists of a safety level probe and, in succession, by a thermostat with manual reset
that trigger the cutting off of power to the heating elements.
The first resetting takes place through Basic Programming.
See chapter “C - ADJUSTMENTS”, paragraphs 1.4 o 2.11.
11
12
13
14
15
16
17

17
PROTECTION FROM OVERHEATING (A-S-K-C-B)
In each of following cases:
- Excessive duration of heating.
- Exceeding of maximum allowable temperature value,
the heating elements are disabled and a major fault is reported.
UPPER CUP TRAY (S-C-B)
These models are equipped with cup heater trays with the capacity to contain a large
number of cups on various levels and to keep them warm in order to guarantee an excellent
cup of coffee.
The heat is generated by a natural flow of hot air from the inside of the machine.
UPPER HEATING CUP HOLDER (A-K with CHS)
Models with some big cup holders provided with electric heating with automatic temperature
control.
The heating can either be enabled or disabled.
BODY LIGHTING (K with BLS)
Bodywork sides enlightened by multi-color led lights which enhance machine’s appeal.
The lighting is turned on via the pushbutton marked with the symbol and is thus indepen-
dent from machine switch on.
By pressing the second button with a symbol you can switch from a slow colors rotation
to a fix color of your own choice.
BODY LIGHTING (C)
The machine is equipped with lighting on the sides and back of the body, which highlights
its design features.
Turns on automatically when the machine is switched on.
BODY LIGHTING (A)
The machine is equipped with lighting on the sides and back of the body, which highlights
its design features.
The lighting is turned on via the pushbutton marked with the symbol and is thus
independent from machine switch on.
18
19
20
21
22
23

18
USER ALERTS (S-C-B)
The machine can give the user a series of alerts through different LED light on/off
combinations for each coffee dispensing button, on each of the two or three groups
on the machine.
In model Deliziosa the leds of the second pushbutton are located directly on the electronic
unit and can be seen when the upper grille and cup heater is removed.
Symbols are used in this manual to indicate these alerts as follows:
Group 1 Group 2 Group 3
Led all off:
Led of the single long coffee button of group 1 on with fixed light:
Led of the single long coffee button of group 1 flashing:
Led of the single long coffee button of group 1 slowly fading light:
Slow flashing led sequence:
Fast flashing led sequence:
24

19
MILK FROTHER ALERTS TO THE USER (A-K with MFS)
The MFS milk frother provides the user with a series of alerts via different led lighting
combinations on the two pushbuttons for hot milk , and frothy milk .
Some of these alerts are combined with corresponding messages on the display as shown in
paragraph 26.
Symbols are used in this manual to indicate these alerts as follows:
Both leds off:
Frothy milk led on:
Both leds flashing:
Both leds slowly fading:
USER ALERTS (A-K)
The machine can give the user a series of alerts written in the selected language through
an alphanumeric display arranged along two rows with sixteen characters each.
The writing may be fixed, scrolling or fixed but divided over two or more screen displays
if very long: wait and read the complete written message to ensure you fully understand
the alert.
Some of these messages are combined with corresponding led alerts as shown
in paragraphs 24 and 25.
SOUND EMISSION (A-S-K-C-B)
The sound emission levels of each machine model are the following:
- Aletta model (A):
Weighted sound emission level A: 80dB uncertainty 1dB
- Sixties model (S):
Weighted sound emission level A: 80dB uncertainty 1dB
- KUP model (K):
Weighted sound emission level A: 80dB uncertainty 1dB
- Classic model (C):
Weighted sound emission level A: 80dB uncertainty 1dB
- Belle Epoque model (B):
Weighted sound emission level A: 82dB uncertainty 1dB
25
26
27

20
COFFEE BREWING DOSES PROGRAMMING (S-C-B)
In order to program the coffee brewing doses switch the machine on by pressing the button
marked with the symbol keeping contemporaneusly pressed both the “double long coffee”
button and the “manual coffee” button of group 1.
All the buttons are programmed making one or two sample coffees with the desired dose,
as per following procedure:
1 - The group 1 selection is displayed as shown below:
2 - Press the “ENTER” key to display the group 1 single short coffee selection as shown
below (pressing on the contrary the “+” key you select group 2 - see step 14;
if the machine has only one group you will remain at step 1):
3 - Press the “ENTER” key to display the group 1 single short coffee sample request
as shown below (pressing on the contrary the “+” key you select group 1 single long coffee
- see step 5):
4 - Make a sample coffee by pressing the group 1 single short coffee button. Press the
button again when the desired dose has been reached: the pushbutton led goes off,
the dose is stored and you pass automatically to the group 1 single long coffee selection.
5 - The group 1 single long coffee selection is displayed as follows:
6 - Press the “ENTER” key to display the group 1 single long coffee sample request
as shown below (pressing on the contrary the “+” key you select group 1 double short
coffees - see step 8):
7 - Make a sample coffee by pressing the group 1 single long coffee button. Press the button
again when the desired dose has been reached: the pushbutton led goes off, the dose is
stored and you pass automatically to the group 1 double short coffees selection menu.
8 - The group 1 double short coffees selection is displayed as follows:
GENERAL ADJUSTMENTSD
1
Table of contents
Other ELEKTRA Coffee Maker manuals

ELEKTRA
ELEKTRA Professional espresso coffee machines User manual

ELEKTRA
ELEKTRA INDIE User manual

ELEKTRA
ELEKTRA Espresso Equipment Troubleshooting guide

ELEKTRA
ELEKTRA SIXTIES User manual

ELEKTRA
ELEKTRA INDIE User manual

ELEKTRA
ELEKTRA Nivola W Installation guide

ELEKTRA
ELEKTRA casa User manual

ELEKTRA
ELEKTRA Micro Casa Semiautomatica Installation guide

ELEKTRA
ELEKTRA ITALIAN ESPRESSO COFFEE MACHINES User manual

ELEKTRA
ELEKTRA KUP User manual