ELEKTRA Nivola W Installation guide

ITALIAN ESPRESSO COFFEE MACHINES
Elektra
training
manual
SHARING THE PASSION
8
book eight
ITALIAN ESPRESSO COFFEE MACHINES
Elektra
manual
Nivola
Elektra srl - Via A. Volta, 18 - 31030 Dosson di Casier ( Treviso ) Italy - Tel. +39.0422.490.405 r.a. - Fax +39.0422.490.620
Nivola
AD: Holbein & Partners - Edition January 2006

02
CONTENTS
1.Overview
4.Assembly
Models
Specifications
Features
Available accessories
The indicator lamps
Clock
Preparing the Nivola for first time use
Regular use
Cup heating tray
Operating principle
Procedure
Daily
Water reservoir
Weekly
2.Package contents
3.Nivola parts
5.Operating
instructions
6.Making coffee
7.Frothing or
heating milk
8.Maintenance
3
3
3
3
4
5
6
6
6
7
8
8
8
9
10
11
11
03
1.OVERVIEW
Models
Specifications
Features
The Nivola is available
in two versions:
W (for use with ground coffee)
W-P (for use with coffee pods)
1.
2.
Weight
Water tank capacity
Height
Width
Depth
9 kg
1.5 litres
37,5 cm
30 cm
35 cm
Available
accessories
Coffee grinders, two models:1.
Copper and brass
finish (model MS)
Chrome finish
(model MSC)
Cups, two types:2.
TC (Cappuccino – Ivory) TE (Espresso – Ivory)
Cleaning brush (SPA)3.
Mirror-finished hand polished
aluminium
Semi-automatic operation
Single knob for both steam
and coffee functions
Durable steam release
solenoid valve
Warning light and buzzer
if reservoir short of water
Operates only when water at
correct temperature
Clock
Cup heating tray
1.
2.
3.
4.
5.
6.
7.
8.
1.
2.

04
2.PACKAGE CONTENTS
Handle with double spout Single and double filter baskets
Dosing spoon Tamper
Top open, showing important warning
notice. See page 6.
Nivola wrapped in plastic
Instruction manual, containing guarantee
Metal drip tray cover
Guarantee card with machine serial number
already recorded
05
3.NIVOLA PARTS
cup heating tray
1.5l water reservoir
undo screw
to remove reservoir
steam off coffee
control knob
on/off switch
red
stand-by
indicator
red
water level
warning green power on indicator
filter basket
coffee
handle
metal drip
tray cover
plastic drip
tray
ejector cover
steam
wand parts
steam
ejector
rubber seal
plastic
spacer
knurled knob

06
4.ASSEMBLY
The green light — indicating
the power switch is on and
that power is available to the
machine. This light is on during
all phases of the machine’s
operation.
Red stand-by light.
This light shows that the water
in the boiler is not at the
correct temperature to make
coffee. It will come on when
the machine is first turned on
and turn off when the boiler
has reached the correct
operating temperature.
Thereafter it will light if the
boiler is not up to temperature
when either the steam or
coffee functions are selected.
•
•
Place plastic drip tray
into position.
Place metal drip tray cover
into plastic drip tray.
1.
2.
The indicator lamps Red water level warning light.
Comes on if the reservoir
water level is too low.
A buzzer will also sound.
Fill the reservoir with fresh,
cold water to within two
centimetres of the top.
•
Clock To remove the clock:
carefully twist the plastic cover
clockwise to remove.
gently prise clock assembly
from Nivola. The clock is a
push-fit.
•
•
To change the time, remove the
plastic sleeve from around the
clock to expose the adjusting
knob. The clock’s battery is acces-
sible from the back of the clock.
When replacing the plastic cover,
align the clips correctly to the
slots (there’s only one way they
line up), then gently turn the cover
anticlockwise.
Red
Stand-by indicator.
Boiler water is not
up to correct
temperature.
Red
Water level in
reservoir is too
low. Fill reservoir.
Green
Power on indicator.
Place filter basket into coffee
handle.
Attach coffee handle to group
head.
3.
4.
5.OPERATING INSTRUCTIONS
The following procedure must be
carried out when the Nivola is
being used for the first time, or if it
has not been used for some time.
This procedure primes the water
circuit, including the pump.
Preparing
the Nivola for first
time use
07
5.OPERATING INSTRUCTIONS
With machine switched off
at its power switch, plug
machine into power outlet and
turn on at power outlet.
Do not turn on power
at machine’s on-off switch.
Remove cup heating tray and
fill reservoir with cold fresh
water to about two centime-
tres below the rim.
Immerse steam wand in a
container of cold water so its
two steam outlet holes are
covered by the water.
The breather hole on the top
should be uncovered.
Turn control knob anticlock-
wise to the steam position.
Turn on the machine at its on-
off switch. The indicators will
light and the buzzer will sound
for five seconds to indicate the
boiler is empty. The machine
will then go through a 24 sec-
ond start cycle to prime the
water circuit. When the cycle is
finished, the red stand-by light
will go out.
Turn the control knob to the off
position. The red stand-by light
will come on, indicating the
machine is heating the water
in the boiler in preparation for
making coffee.
1.
2.
3.
4.
5.
6.
power on-off
switch should
be OFF
(outwards
position)
small breather
hole
steam outlet
holes
steam
Press ON
Regular use Remove cup heating tray.
Fill reservoir with fresh cold
water to about two centime-
tres below the rim.
Ensure control knob is OFF
(middle setting).
1.
2.
3.
Turn power on at power outlet.
Turn machine on at its on-off
switch.
When the red stand-by light
goes out, the machine is
ready to make coffee.
4.
5.
6.
When the boiler reaches its
correct operating temperature
the stand-by light will go out,
indicating that the machine is
ready to make coffee.
7.

08
5.OPERATING INSTRUCTIONS
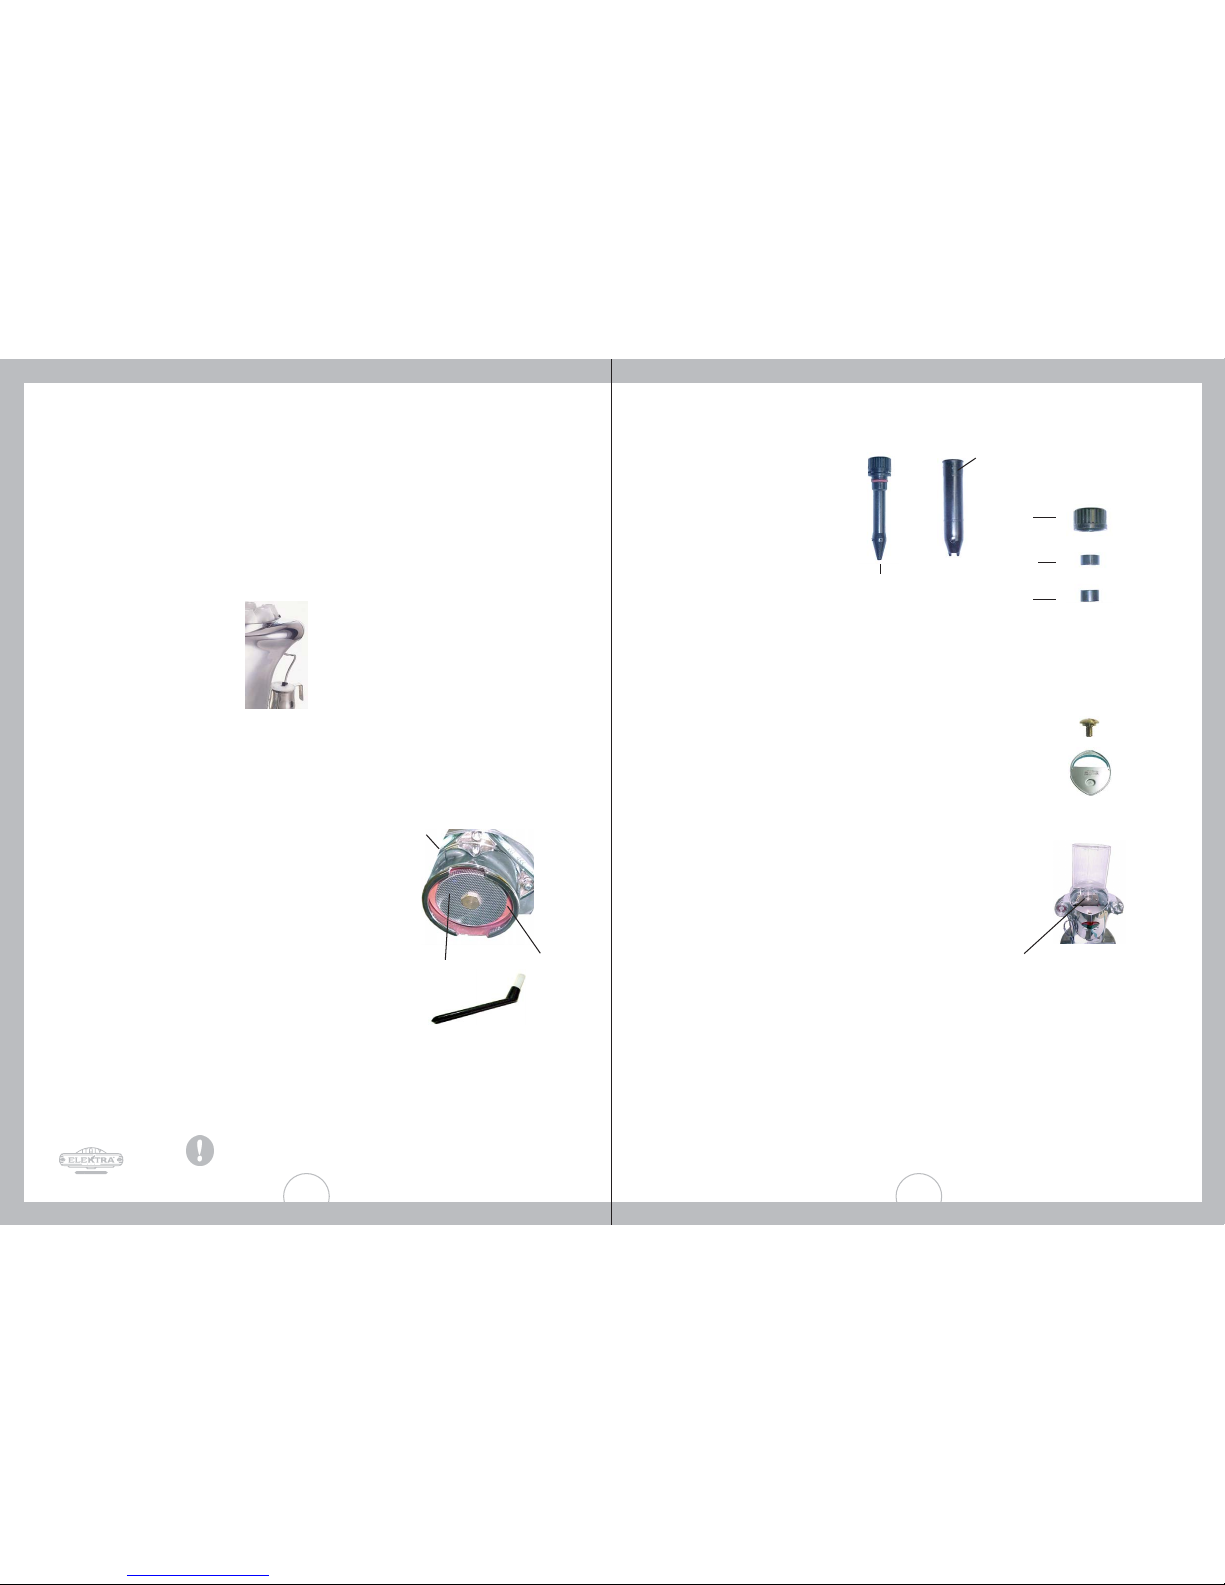
Cup heating tray The Nivola features a cup warming
tray for up to six cups.
Under normal use, the machine
would be left on during the day,
allowing the cup warming surface
to reach a suitable temperature.
Place cups upside down on the
tray, as shown.
Operating principle When the coffee function is
selected, if the boiler water is at
the correct temperature, an elec-
tric pump inside the machine is
switched on, pumping water from
the reservoir into the bottom of
the boiler.
The pump operates at a high
pressure, so when cold water is
pumped into the boiler, the boiler
pressure rises. This causes the hot
water at the top of the boiler to
flow through the coffee grounds in
the filter basket, into the cup.
When the steam function is select-
ed, the boiler water temperature
needs to be high enough to pro-
duce steam, sometimes causing
the red stand-by light to come on
while the boiler temperature rises.
The steam is directed to the steam
wand with an electrically powered
solenoid valve that is operated
when the steam function is
selected, but only when the boiler
temperature is high enough to
produce steam. After using the
steam wand, the boiler is refilled
automatically by the pump, which
will come on briefly when the
control knob is returned to the
off position.
6.MAKING COFFEE
freshly ground coffee.
filter basket filled with grounds
to correct level, and evenly
tamped.
•
•
The main requirements for making
good coffee are:
correct temperature of the
water passing through the
grounds.
cups, coffee handle and
machine correctly heated.
•
•
Procedure Ensure machine is warmed up,
in particular the coffee handle
and filter basket. This can be
done by placing the handle
(fitted with a filter basket) into
the machine, selecting the
coffee function and allowing
hot water to flow through the
handle for five seconds or so.
This procedure will also help
warm up the machine by
causing the boiler’s heating
element to operate.
1.
09
6.MAKING COFFEE
Remove the handle from
the machine and:
2.
To make a single cup — fit the
single cup filter basket to the
handle, add one heaped
espresso dosing spoon of cof-
fee grounds to the basket, and
tamp down firmly.
The tamped grounds should
be approximately 4mm from
the top of the basket.
To make a double cup — fit the
double cup filter basket to the
handle, add one level espres-
so dosing spoon of coffee
grounds to the filter basket
and tamp down firmly. Add
another level dosing spoon of
coffee grounds and tamp
firmly. The tamped grounds
should be around 4mm from
the top of the basket, as below.
Wipe the top of the basket to
remove any coffee grounds.
This is important, as the rim of
the filter basket forms a seal
with a rubber ring inside the
group head. Coffee grounds
can prevent a good seal and
will build up inside the group
head, possibly causing the
rubber sealing ring to be
released from inside the group
head.
•
•
3.
Fit the coffee handle into the
group head, then pull the han-
dle horizontally to the right.
As the rubber ring settles in
with use, the handle will need
to be moved further. The aim is
to obtain a sufficiently tight
seal (but not too tight) so there
are no leaks while coffee is
being extracted.
Place coffee cup(s) onto drip tray.
Turn the control knob to the
coffee position (right) to extract
coffee to the desired level.
4.
5.
6.
The tamped coffee grounds should be around
4mm from the top of the filter basket.
4mm
Note: If the stand-by light comes on, wait
until it’s extinguished, when the machine will
start automatically.
When the required coffee level
is reached, turn the control
knob to the off (centre)
position to stop coffee flow.
Remove the handle by slowly
and carefully pulling it horizon-
tally to the left.
Dump the used coffee cake.
Rinse the handle (and filter-
basket), and replace
handle/basket in machine to
keep it warm.
7.
8.
9.
10.
7.FROTHING OR HEATING MILK
Immerse steam wand into milk
ensuring the small breather
hole on the top of the wand
is not covered.
Turn the control knob to the
steam function. (The stand-by
light will come on to allow the
boiler to reach the correct
operating temperature and
pressure. As soon as it goes
out, steaming will start
automatically.)
3.
4.
The Nivola will not allow you to
extract coffee and use the steam
wand together. Therefore froth or
heat milk before extracting coffee.
Purge the steam wand of
condensation by releasing
steam into a container.
Fill a stainless steel jug with
the required amount of milk.
1.
2.

10
8.MAINTENANCE
Daily
7.FROTHING OR HEATING MILK
Froth and/or heat the milk
until it reaches the desired
temperature. Judge the
temperature by holding your
hand against the jug.
When the temperature is too
hot to the touch, wait two sec-
onds or so, then turn off the
steam and remove the jug. It is
important to not boil the milk!
5.
6.
As soon as possible remove
the plastic ejector cover from
the steam wand and rinse it
thoroughly under running
water. Also wipe the exposed
steam ejector and metal wand
with a clean damp cloth to
remove milk before it dries.
Pour milk into coffee and
enjoy.
7.
8.
Use a sponge, cloth or brush to
clean the shower head and
inside the group head.
Run a small amount of water
through the group head to
flush out any coffee grounds.
Unscrew the steam nozzle
from the steam wand, sepa-
rate the parts and wash with
hot soapy water. Be sure not to
lose the small rubber seal or
plastic spacer.
Wash filter baskets and han-
dles in warm soapy water and
rinse thoroughly under hot
running water.
Remove metal and plastic drip
trays and wash thoroughly.
Use a clean, wet paper towel
or soft cloth to remove marks
on the case and polish with a
clean, dry paper towel or soft
cloth.
1.
2.
3.
4.
5.
6.
Looking into the group head.
Clean all parts, including the rubber sealing
ring and the surface of the shower head.
group head
shower head rubber sealing ring
Do not use alcohol, solvents or
abrasives of any sort on the case.
11
knurled
knob
plastic
spacer
rubber
seal
small breather hole
small hole in steam
ejector
Clean all parts and reassemble them in the
correct order. Ensure the small holes in the
steam ejector and ejector cover are not
blocked.
8.MAINTENANCE
Water reservoir The water reservoir can be
removed for cleaning.
Unplug the Nivola from
the power outlet.
Remove cup heating tray.
Undo and remove brass screw
(can be left finger tight).
Lift and remove the aluminium
protection cover.
Lift plastic reservoir out of
Nivola and, if necessary,
unplug the lead from the
bottom of the reservoir.
(This lead connects to a water
level sensor in the reservoir.
It’s therefore essential to
reconnect the lead before the
reservoir is put back.)
•
•
•
•
•
plug connecting sensor lead
to reservoir
aluminium protection cover
reservoir lifted out of Nivola
brass screw
Removing the reservoir for
cleaning. Make sure the sensor
lead is reconnected when
replacing the reservoir.
Weekly With a dishwasher:•
You can wash the coffee baskets,
drip tray, warming tray and drip
tray cover in a dishwasher.
To wash the coffee handle in a
dishwasher, first unscrew and
remove the bakelite handle.
With commercial espresso
machine cleaning chemical:
•
Remove coffee basket from
coffee handle and place into
the solution to soak for 20
to 30 minutes.
Rinse and wash all parts with
warm soapy water.
Rinse thoroughly in hot water.
2.
3.
4.
Remember to clean the coffee
handle, cup warming tray, drip
tray, underneath the drip tray,
and the metal drip tray cover.
Put three teaspoons of
cleaning chemical into half
a litre of hot water.
1.
This manual suits for next models
1
Table of contents
Other ELEKTRA Coffee Maker manuals

ELEKTRA
ELEKTRA Micro Casa Mini Verticale Installation guide

ELEKTRA
ELEKTRA Espresso Equipment Troubleshooting guide

ELEKTRA
ELEKTRA S1CB Chrome Installation guide

ELEKTRA
ELEKTRA Micro Casa Semiautomatica Installation guide

ELEKTRA
ELEKTRA INDIE User manual

ELEKTRA
ELEKTRA Professional espresso coffee machines User manual

ELEKTRA
ELEKTRA KUP User manual

ELEKTRA
ELEKTRA SIXTIES User manual

ELEKTRA
ELEKTRA INDIE User manual

ELEKTRA
ELEKTRA Crema Caffe User manual