ELME FC1 User manual

un


- 1 -
Index
A quality choice
2
General instructions and warnings ...
3
..............................
4
Technical ...............................
4
Illuminating lamp replaci..................................
4
Installing the new machine
5
Cleaning
6
First Class Millennium ..
7
How to start the production of slush, sherbets or
cold drinks with FC Millennium
11
Old machine disposal
12
FCW installation ............................
13
Pressure switch refit procedure
13
Cotter pin substitution ..
14
Problem Solving
16
Warranty certificate
20
Millennium Electric system
21
Refrigerating system
22
Exploded view
23
Codes description
24

- 2 -
ENGLISH
A quality choice
Elmeco business is
managed in according
with rulesof Vision 2000
and ISO14001
Elmeco
200014001
These instructions are
also available in
electronic format on
our website.
Choosing Elmeco, and in
particular First Class, the new
and only multifunctional
machine with double augers,
demonstrates your attention to
innovation. Thanks for
understanding the importance of
working with a company that
does not consider “quality” as an
abstract word. For Elmeco
quality is a concrete
commitment. It actually means
to clinch the attention to the
innovation that characterized us
as the creators of the first slush
machine and that today confirms
our leadership in the technical
forefront. For our company
“Quality” also means working
trying to always improve from a
management and organizational
point of view following the
Vision 2000 certification, and it
finally means to care about the
customers and to dedicate
investments and resources to
continuously meet their needs.
On the other hand, for those who
decided to choose Elmeco,
quality means being able to work
with reliable and lasting
products, to count on a precise
and qualified assistance in order
to work with increasing
satisfaction and earnings.
Elmeco
a
Elmeco
2000
.
Elmeco
a
.
- 3 -
ENGLISH
General instruction and
warnings
This appliance is not intended for use
by persons (including children) with
reduced physical, sensory or mental
capabilities, or lack of experience and
knowledge, unless they have been
given supervision or instruction
concerning use of the appliance by a
person responsible for their safety.
Children should be supervised to
ensure that they do not play with the
appliance.
Before switching on themachine
carefully read the information in this
service manual; this way you will be
able to install, use and maintain the
machine. Keep the use and assembly
instructions, even for the next buyer.
The manufacturer declines any
responsibility for damages deriving
from the non-observance of the
following instructions.
Install the machine according to the
assembly instructions. The power
supply must correspond to the data on
the plate on the front side of the
machine behind the drip tray (pic. 1).
WARNING: When positioning the
appliance, ensure the supply cord is
not trapped or damaged.
WARNING: Do not locate multiple
portable socket-outlets or portable
power supplies at the rear of the
appliance.
.
.
.
(
- 4 -
ENGLISH
During maintenance and cleaning, or
in case of bad functioning, disconnect
the machine from the power plug (by
pulling the plug and not the cable) (pic.
2 and 3 pag.3).
Only specialized and authorized staff
can repair the machine. Not perfect
repairing can be dangerous for the
user. Contact Elmeco for information
concerning the closer authorized
assistance centre.
For correct operation use the machine
at maximum temperature of 43°C and
minimum 27°C.
For safe operation the maximum tilt of
the appliance is 1,5 degree towards
the front side (outlet).
The appliance is not suitable for
installation in an area where a water
jet could be used.
The appliance is only to be installed in
locations where its use and
maintenance is restricted to trained
personnel.
pag 3).
Elmeco
.
°C °C.
).
a
.
.
Important security
rules
•Do not touch the machine when
you have wet hands and/or feet.
•Do not use the machine with bare
feet.
•Do not allow children or
incompetent people to use the
machine.
•Do not leave the machine
exposed to atmospheric agents.
•Do not pull the power supply cable
to disconnect the machine from
the electric power.
•Do not remove the panels before
disconnecting the machine from
the electric power.
•This appliance is intended to be
used in household and similar
applications such as
staff kitchen areas in shops,
offices and other working
environments;
farm houses and by clients in
hotels, motels and other
residential type environments;
bed and breakfast type
environments;
catering and similar non-retail
applications.
•"
.
•"
.
•"
.
•"
.
•"
.
•"
.
•
:
.
Technical assistance
The repairing of the machine must be
carried out by an authorized service
centre, using only original spare parts.
If the supply cord is damaged, it must
be replaced by the manufacturer, its
service agent or similarly qualified
persons in order to avoid a hazard
.
a
Illuminating lamps
replacing
In case of replacing of the lamp follow
the procedure:
1. Switch off the machine;
2. Remove the top light complete
cover from the transparent tank;
3. Separate the top light from the
transparent lamp glass;
4. Change the old illuminating lamp
with new one (12Vac -10watt);
5. Assembly the top light with the
transparent lamp glass;
6. Reposition the top light complete
cover on the transparent tank.
1 2
3
4
Vac -10 5 6
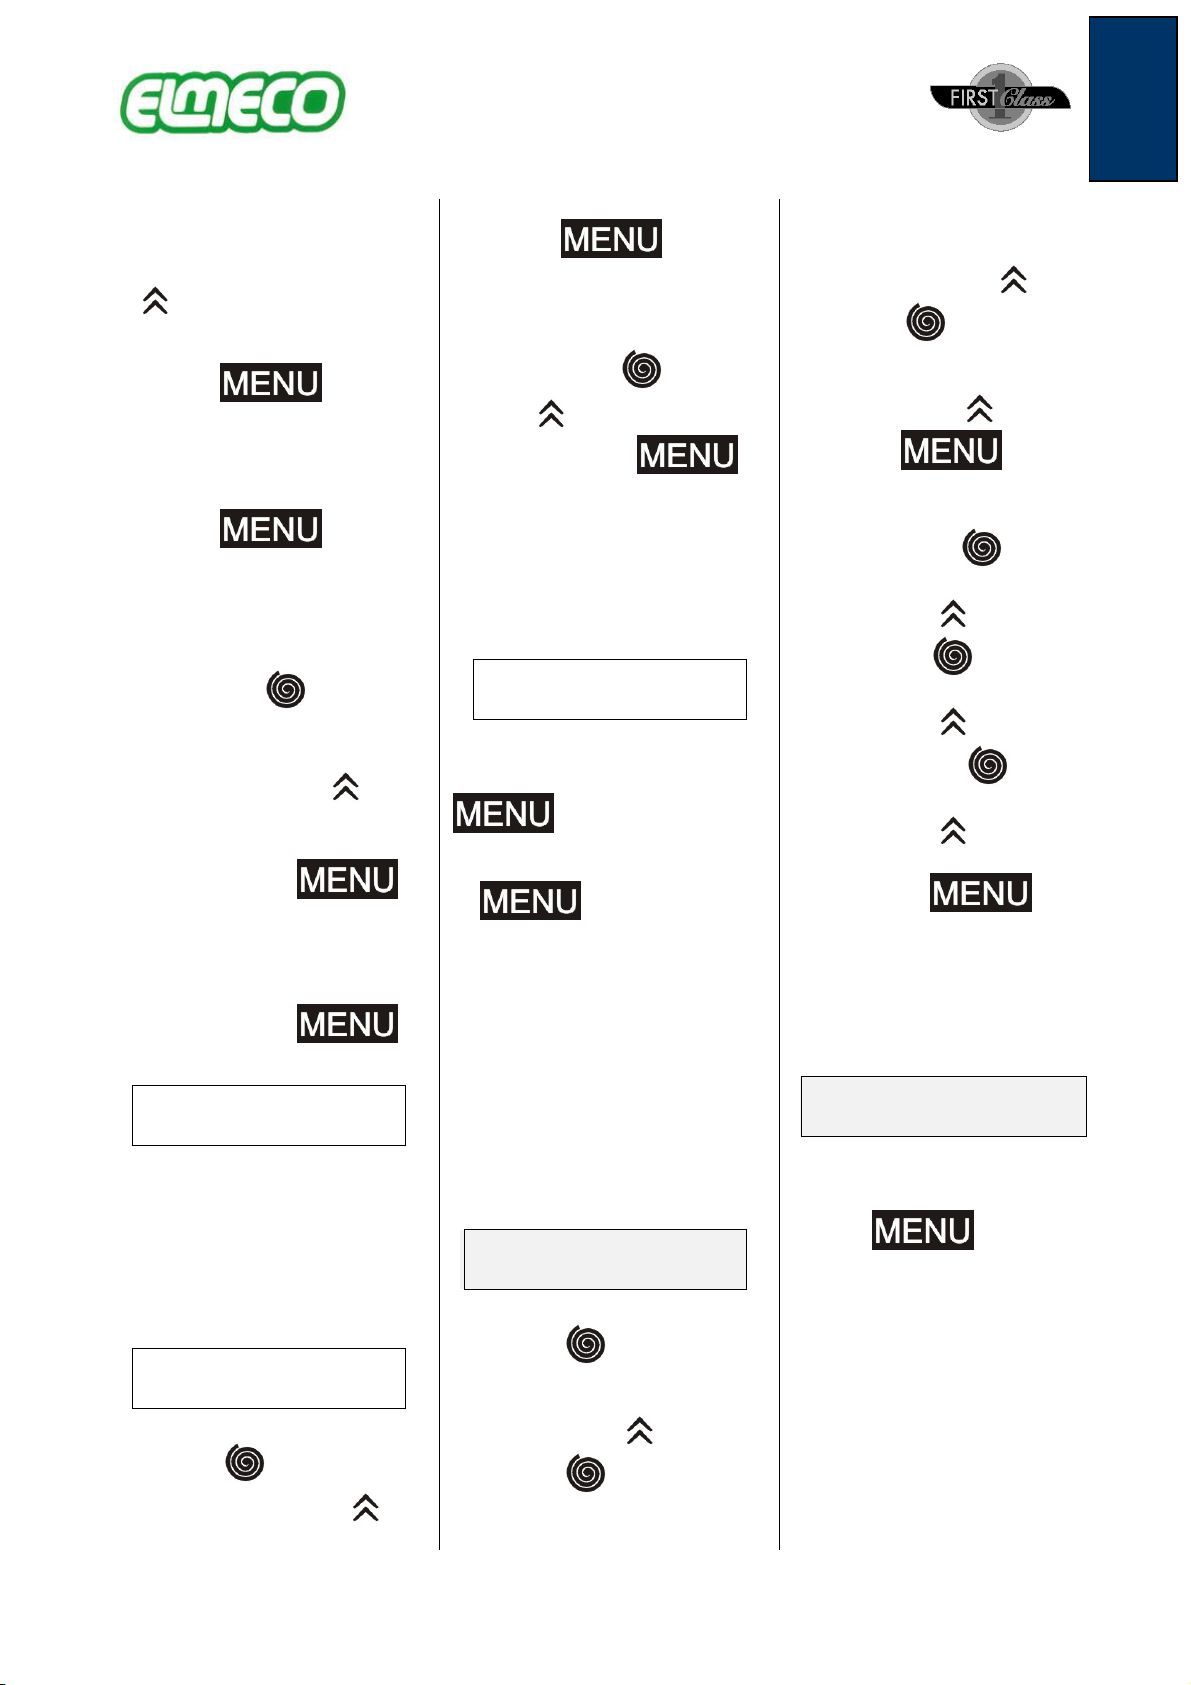
The Supplier is reserved to bring alterations without notice.
The relevant data the power are indicative. To do reference to the data of plate data restored on the machine.
450 w
0,61 hp
900 w
1200 w
0,61 hp
0,61 hp
MODEL
HEIGHT
VOLTAGE HZ
POWER
CAPACITY
WEIGHT
DEPTH
WIDTH
32 kg
71 lb
54 kg
119 lb
67 kg
148 lb

- 5 -
ENGLISH
Installing the new machine
This machine for the production of cold
drink, slush, and sherbets grants the
absolute homogeneity of the product
and the possibility to regulate its
density thanks to an innovative
electronic control. Before installing the
machine, verify that:
•First Class is not placed by an heat
source;
•The machine has not been
damaged during transportation. In
case of doubt, contact the supplier;
•The power supply system is
endowed with a grounding that
respects the rules of law;
•The power supply system capacity
is adequate to the maximum power
of the machine, as indicated on the
plate (pic. 4 pag.3).
In case of doubt, contact only qualified
staff.
In order to install the machine,
carefully read the following
instructions.
:
•"
•"
•"
a
•"
).
.
.
Warnings
This machine is only for the use it has
been manufactured for. Any other
usage is to be considered as improper
and dangerous.
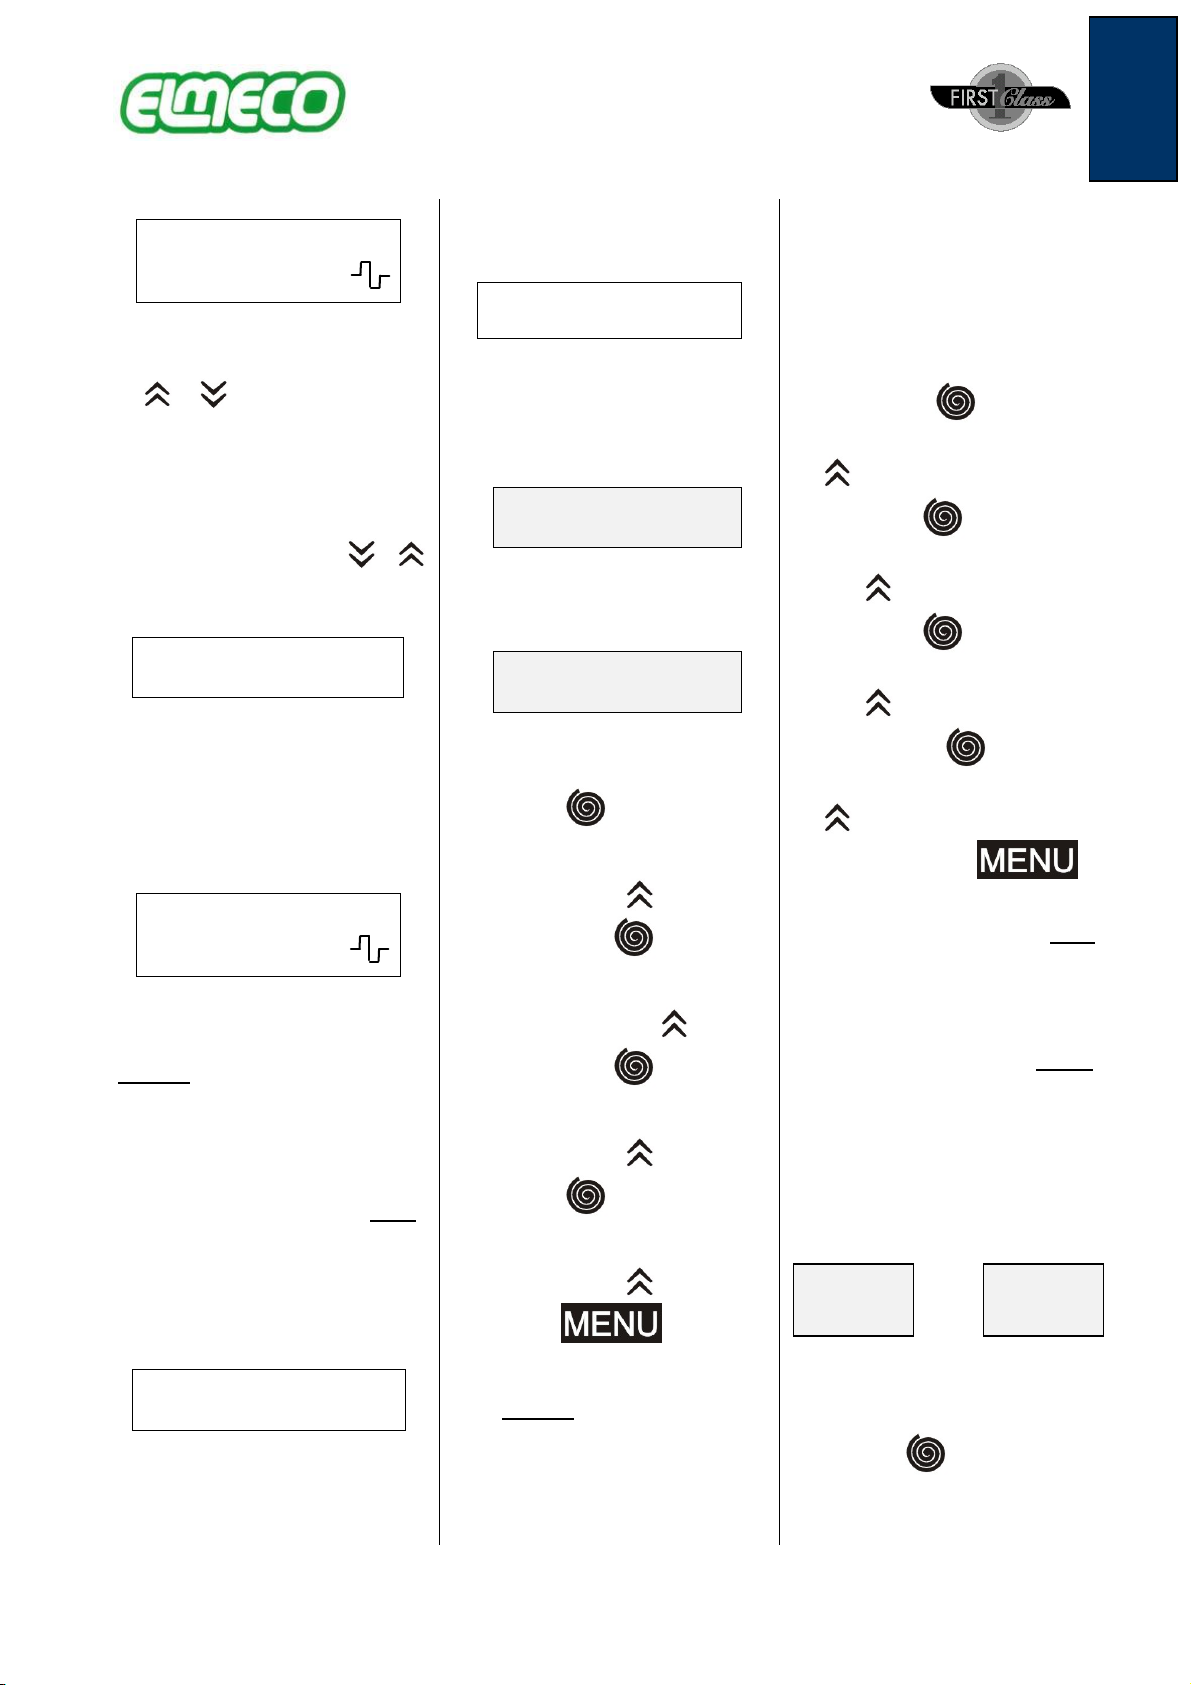
Machine description (pic. 1 pag.3):
•Top light
•Transparent tank
•Auger ring nut
•Hooks for the tank removal
•Control electronic board
•Supply outlet
•Main switch
•Pressure switch light
•Drip tray
•Plate data
.):
•"
•"
•"
•"
•"
•"
•"
•"
•"
•"
Installation
It is suggested that the machine is
installed only by qualified staff. A
wrong installation can cause damage
to people or things, for which things
the manufacturer declines any
responsibility. Once the machine is
unpacked, verify the integrity of the
machine. The packaging elements
(plastic bags, expanded polystyrene,
nails, etc.) must not be left at children
reach as they might be dangerous.
Remove the protection plastic stripes
also from the internal side of the grids.
We do not recommend to connect the
machine through adaptors, multiple
plugs and/or extensions. If necessary,
use only materials that conform to the
safety rules in force, as for the current
intensity up to what indicated onthe
plate (pic. 4 pag.3).
Place the machine so as to avoid any
heat source to be close to the grids.
Verify that there is a free space of 25
cm at least around the machine (pic. 5
in appendix-25).
After connecting the machine to the
power supply and switching on the
main switch, verify that air comes out
from the side grids (pic. 6 in appendix-
25).
polystyrene
.
(
a
Lid stickers
All refrigerators are equipped with 2
stickers for each single lid. The
stickers must be applied as showed in
the pictures:
:
Right usage
Before switching on themachine, it is
necessary to clean it as indicated in
".

- 6 -
ENGLISH
Cleaning
Cleaning is very important for the life
and maintenance of the machine; we
recommend to periodically clean the
parts that are in contact with the
product using the following procedure.
Warning! The appliance must not be
cleaned by a water jet.
Warning! Switch off the main switch
and disconnect the power plug (pic.
7 in appendix-25) before starting
any operation.
Use a solution of cold water and
sodium hypochlorite (bleach) with a 10
grams (1/2 spoon) for 1 liter of water
ratio. Rinse with lukewarm water.
Warning! A greater quantity of
beach could damage the material of
the auger.
Warning! If the plastic parts are
washed in the dishwashing
machine, verify that the temperature
is not higher than 60°C or 140°F,
because they could be damaged.
Do not use any abrasive powder.
.
.
.
a
hypochlorite ( a 10
.
.
°C
°F .
.
Tank cleaning procedure
See the picture at the end of this
manual.
•Empty the tanks by opening the
outlets and blocking them (pic. 8
in appendix-25), moving the little
letter from the left to the right.
•Remove the lamp (pic. 9 in
appendix-25), pour water in the
tanks and then empty them.
•Remove the auger ring nut (pic.
10 and 11 in appendix-25).
•Remove the tank unscrewing the
hooks grips (pic. 12 in appendix-
25), if present, and opening the
hooks (pic. 13 in appendix-25); lift
the tank as shown in pic. 14 and
15 in appendix-25.
•Unscrew the ring nut (pic. 16 in
appendix-25) in order to remove
the vertical auger (pic. 17 in
appendix-25).
•Remove the horizontal auger; this
way the inox side of the tank is
completely open and ready to be
cleaned (pic. 18 and 19 in
appendix-25).
•Remove the outlet (pic. 20, 21, 22,
23 in appendix-25) and the tank
gasket (pic. 24 in appendix-25):
•Remove the lever cover (pic.
20 in appendix-25) by
and remove the lever (pic. 21
in appendix-25);
•Rotate the ring nut clockwise
(pic. 22 e 23 in appendix-25)
and pull the outlet.
•Dip the dismantled parts in the
solution of water and bleach.
•Wash and dry.
•Wet the gasket before inserting it
in place (pic. 24 in appendix-25),
be careful to place the gasket joint
in one of the back corners of the
tank in the proper allocation.
•Reassemble everything.
•When you put the tank back in its
place verify that the low tension
contact wires are in the guides of
the terminal board. If they are not,
the lamp and the augers will not
work (pic. 25 in appendix-25).
•Connect the machine to the power
supply. Warning!
Any time the covers (lamp) are
removed, for security reasons, the
augers and the cooling system will
stop working.
.
•"
.
•"
.
•" ).
•"
.
•"
).
•"
inox
).
•" ):
•"
•"
e 23
.
•"
.
•"
.
•"
.
•"
.
•"
).
•"
.
!
.

- 7 -
ENGLISH
Condenser cleaning
procedure
Remove the side panel of the 2 or 3
tanks machine, or the back panel of
the one tank machine by unscrewing
the screws on the bottom and clean
the radiator with a soft brush or (if
possible) with compressed air.
a
.
Outlet restriction
First Class has an accessory called
Restriction (pic. 28 in appendix-25), it
is a shaped piece that is applied on the
ending part of the transparent tank
outlet. It has the following advantages:
•The product, liquid (clod drink) or
semi-liquid (low density slush), is
canalized directly in the glass;
•The restriction is easy to pull out,
therefore, it is possible to easy
wash the ending part of the outlet
without having to dismantle the
whole transparent tank, with a
consequent decrease of the
machine cleaning times. In
summary, the only part which is
not refrigerated, where an
accumulation of the product is
more likely to happen, can be now
removed and washed.
This restriction has some gaskets
(O-ring) that must be wet with water
before inserting them on the outlet
terminal part. This is to make the
introduction easier and to avoid that O-
ring goes outside their proper
locations.
On the restriction there is the image of
an arrow and of a glass that, while
inserting it, must face the operator.
a
•
•
a
. a
.
First Class Millennium
controls and signals
When you switch on the electronic
board, the display will show
SLUSH / MACHINE
V.30E
Where 0.15 indicates the tank review
number.
FC Millennium has a BASIC version
that only has the electronic board like
the one shown before, and an
ADVANCED version that has an
additional electronic kit in the machine
with additional features connected to
time.
Warning: The screen with the “/”
symbol indicates that the values are
shown alternatively.
After the screen shown above the
initial screen will be displayed:
.
a
san
.
.
:
StandBy
Press
WARNING: The electronic board will
keep the settings it had when the
machine was switched off.
.
When the tank is in stand-by mode,
the augers and the cooling system are
off. The augers and the gear motor
can be turned on by pressing the
button. The screen will show:
:
Motor on
Press < <> >
If you press the button, the
screen will display as follows:
::

- 8 -
ENGLISH
COLD
Y
(where Y is a variable number
between 2 and 5 for Cold Drink Mode,
which indicates the temperature in °C
at which the product must be
prepared).
Using and you can increase
or decrease the temperature of the
product. The recommended
temperature is 4°C.
If you press the button, the
screen will display as follows:
( a
°C
).
°C.
SLUSH
*X
(where X is a variable number
between 1 and 9 and indicates the
density of the slush). If you use the
and buttons it is possible to
increase or decrease the slush density
value.
(a
.
Warning: If, when the electronic
board is in Slush Mode, the product
temperature is greater than 5°C, the
following screen will be displayed:
°C
:
Auto / Setting / Wait
*X
This screen indicates that the
calibration process is taking place. The
calibration process will take one
minute to complete.
.
If you press the button (Cooling
off- cold drink- slush) you can switch
the machine functioning modes
alternatively. Each time you press the
button, the different screens of cold
drink slush and cooling off alternate.
In this latter position only the augers
rotate and no other action is taken.
.
If you press the auger rotation key
, the display will appear as
follows:
::
StandBy
Press
By holding the button for
one second you will enter the
selection menu.
Please note that unless you give any
further instruction to the electronic
board in more 10 seconds time, the
display will automatically go back to
the initial screen.
.
.
This screen allows you to turn ON or
OFF the light in the lid, by pressing the
and buttons of the electronic
board.
.
LAMP
OFF / ON
In this screen you can activate or
deactivate the bypass function by
pressing the increase and
decrease keys.
..
ByPass
OFF / ON
This screen allows you to turn ON or
OFF the Low Level control function
to no.1, when the level probe is not
covered with product for more than 20
minutes); you can do that by pressing
the increase key or the decrease
key.
.
LowLevel
OFF / ON
If you add some product (liquid that
touches the level probe), the function
will be deactivated and the slush
preparation will reach the density value
that was previously set on the
electronic board. When this function is
active, you will see the following
display:
:
- 9 -
ENGLISH
Please/refill/LOWLEVEL
*1L
This screen allows you to activate
(LOCK) or deactivate (UNLOCK) the
by pressing
the or buttons. This function is
suitable in self-service places, in order
to avoid people from changing the
values set.
.
KeyBoard
UNLOCK / LOCK
When the keyboard is locked, the
the display as shown on the screen
below:
a "
:
SLUSH
*X
If the machine is turned OFF and ON,
the electronic board will be in LOCK
position again.
Warning: The keyboard lock can be
activated if the electronic board is
in “Standby" or “MotorOn” mode.
.
"MotorOn".
Turning OFF and ON of the washing
function.
..
Washing
OFF / ON
If the function is active, the electronic
board will show the screen below:
::
Washing
In this condition all buttons and the
cooling functions are NOT active, a pat
from the MENU button.
, a
.
TIME
hh:mm
This screen shows the time set on the
machine.
.
TIME
hh:mm
If it is different from the place where
the machine is installed, you can
change it by following the steps below:
1) press the button;
2) the first value will start to blink. If
you want to change the value, you
need to press the button;
3) if you press the button;
4) the second value will start to blink.
If you want to change the value,
you need to press the button;
5) if you press the button;
6) the third value will start to blink. If
you want to change the value, you
need to press the button;
7) press the button;
8) the fourth value will start to blink. If
you want to change the value, you
need to press the button;
9) press the button to
exit this function. The time will be
saved.
Warning: During the time
adjustment, the date (MM/DD/YY)
will appear on the upper line. It can
be different from the date of the
place where the machine is
installed, but the machine will work
without any problem.
NOTE: First Class Millennium
BASIC does not display this screen
and all other screens here reported
in the dotted square. These will only
be active in the ADVANCED version.
:
1; 2
3 4
;
5; 6
;
7; 8
;
9
..
.
.
Defrost function: On the screen you
can see the defrost ON and OFF time.
.
If the two values are the same, the
function is deactivated. In order to
change the ON and OFF time, follow
the steps below:
1) press the button;
DEFROST
ON 00:00
DEFROST
OFF 00:00
- 10 -
ENGLISH
2)
start to blink. If you want to change
the value, you need to press the
button;
3) repeat the steps 1) and 2) until all
ON values are set;
4) press the button to
exit the
5) . repeat the steps 1) and 2) until all
OFF values are set;
6) press the button to
exit the change function. The time
will be then saved.
:
1; 2
; 3
;
4
5.
;
6
..
Max Temp
NO/YES
In this screen you can activate or
deactivate the Critical Temperature
Control function. When the critical
temperature value is (NO), the function
is deactivate.
..
Max Temp
NO/YES
If you want to activate it, you need to:
1) press the button;
2) set the value pressing the
button;
3) press the button to
exit the change function.
:
1;
2
;
3
.
When you switch the machine on, if
the product temperature is greater
than the one set, the display will blink
and show:
:
Product
T > 4
temperature. In order to stop the
warning signal, please press the
button.
"
.
In this screen you can activate or
deactivate the Cleaning warning
function. This function is used if the
user wants the machine to show a
clear warning on the display that
reminds to clean the machine. If the
Cleaning warning function is on (000d-
---) it is deactivated.
a
d ----)
..
CLEANING
000d - ---
In order to activate it:
1) press the button;
the first value will start to blink. If
you want to change the value, you
need to press the button;
2) press the button again;
3) the second value will start to blink.
If you want to change the value,
you need to press the button;
4) press the button;
5) the third value will start to blink. If
you want to change the value, you
need to press the button;
6) press the button to
exit the change function.
:
1;
;
2; 3
;
4
; 5
; 6
..
When the machine is turned on and
the values (---) are zero, the display
will blink showing the cleaning
warning:
::
CLEANING
REQUIRED
Clean the tank as described in the
usage manual pag. 6;
In order to stop the warning signal,
press the button; thus the
countdown will start again for the next
warning.
000d = time in days for the cleaning
warning to appear
- --- = countdown (day to the
warning)
- 11 -
ENGLISH
EXEMPLES:
100d = after 100 days the machine
will inform that it must be cleaned up
050d = after 50 days the machine
will inform that it must be cleaned up
007d = after 07 days the machine
will inform that it must be cleaned up.
.
000 d =
- --- =)
:
100 d =
050 d =
007 d =
.
For machines with auto refill set up
ONLY! (This should be ON only if the
machine has the auto refill installed).
In this screen you can activate or
deactivate the auto refill control signal.
.
AUTOFILL
ON / OFF
Alarms functions
First Class Millennium is endowed with
a direct signalling of the problems
found. When the electronic board
blinks, it indicates that there is an
active alarm. To see what alarm is,
please press the button
for 1 second.
section, you can see a complete list of
all possible alarms at pag. 16. If more
than one alarm is active, these will be
indicated with more messages that
appear alternatively.
a
a
.
Operator security
If you open the tank lifting the lamp,
the augers will stop.
.
Self-diagnostics
Consult the Problem Solving
Section.
.
Configuration memory
All the functioning modes and the
regulations set are registered in a non-
volatile memory which is active even
without power; therefore, when you
switch on the machine, the tank keeps
the configuration it had when you
switched it off, a part from the
keyboard lock (as already said).
a
, a .(
Minimum level signal
All machines are endowed with a
probe that detects the product
minimum level in the tanks. When the
product is below this level, the light of
the lamp starts blinking. If the product
level does not change, the light will
stop blinking after a minute.
a
.
How to start the
production of slush,
sherbets or cold drink
with First Class
Millennium
Clean themachine as described in the
previous paragraph.
Remove the covers and pour the mix
in the tanks.
.
.
Warning: the temperature of the
poured product must not be lower
than 10 °C in order to allow a
correct calibration of the electronic
kit that will be indicated as
described in the previous
paragraph.
°C
a
.
Warning: Don’t fill the tank with
only water. In case of freezing
product switch off the board until
the product will be liquid.
.
Warning: The service area is
restricted to persons having
knowledge and practical experience
of the appliance, in particular as far
as safety and hygiene are
concerned.
.
Warning: When switching on the
machine, the poured product must
not be lower than 10 °C in order to
allow a correct calibration of the
electronic kit.
°C a
.
Switch on the main switch (see pic. 7
in appendix-25).
Switch on the auger switch .
- 12 -
ENGLISH
).
.
The following screen will be displayed:
:
Motor On
Press < <> >
Press the button to select
slushcold drink
".
slush
increase the product density with the
button and decrease it with the
button.
.
SLUSH
* 5
Slush.
It is possible to change the product
density from 1 to 9 using the or
buttons to increase or decrease it
respectively.
.
.
cold drink
increase the product temperature with
the button and decrease it with the
button.
. .
COLD
5
Cold drink.
It is possible to change the product
temperature from +02 °C to +05 °C
using the or buttons to
increase or decrease it respectively.
CC
Warning: The recommended
temperature value is 4°C.
°C.
Here you are the table with the
correspondence between the values
mode and the °C/°F degrees.
°C/ °F.
Warning: in order to have slush or
cold drink, you need a small
quantity of sugar per liter. The
recommended quantity is generally
reported in the usage instructions.
In case of natural products, we
suggest to use a quantity that goes
from 12 and 22%.
a
If the horizontal auger is
blocked because of ice blocks due to a
lack of sugar or to other reasons, such
as foreign bodies in the tank, the
vertical auger can undergo a break.
a
a.
Warning: If the temperatures exceed
35°C Elmeco is not responsible for
the refrigerator performance (that
will be slower) and for the
correspondence between the
temperature selected on the
electronic board and the drink
temperature.
°C Elmeco
.
Old machine disposal
The out-of-use machines must be
disabled. Disconnect the plug from the
electrical network and cut the cable.
.
Ecological instructions
All refrigerating machines must be
disposed by the communal disposal
service or by an equivalent private
authorized company. Take care not to
damage the rigid tubes of the
refrigerator until they are taken back in
order to be carefully and ecologically
disposed.
All packaging materials used can be
disposed without any danger.
.
.
°C
°F
2
2 6
35.6 42.8
3
3 7
37.4 44.6
4
4 8
39.2 46.4
5
5 9
41.0 48.2

- 13 -
ENGLISH
FCW installation (water
cooling system)
If the First Class you bought is
endowed with the water cooling
system, it is necessary to follow these
instructions.
On the machine front side (outlet side)
There are some water exit (left) and
entrance pipes (right) as shown in the
pic. f .
The quantity of water necessary for the
functioning can change according to
the product cooling phases, with
higher values when starting the slush
production and values that are close to
zero when you want to keep the slush.
We therefore recommend to connect
the machine to the water network with
the maximum capacity, thus the
pressure switch valve (pic. g) in the
machine will regulate the flux
according the real necessity.
Important:
It is not possible to connect the FCW
water entrance with the input of
another machine based on a water
cooling system (series).
It is not possible to connect several
machines based on the water cooling
system on the same outlet.
.
)
.
f.
. g)
..
:
a ).
.
Pressure switch refit
procedure
Warning! The following steps
must be performed by qualified
personnel.
When the pressure switch light, near
main switch in ON,
Pressure switch light
this indicates that the pressure switch
intervened to deactivate the
compressor. In order to refit this
device, it is important to follow the
instructions below:
1° Disconnect the power cable.
2° Push the pressure switch button
under the frame of the machine.
- 14 -
ENGLISH
In order to avoid this situation to
happen again, verify the correct
position of the machine asin the pic.5
pag.25 and/or clean the condenser as
described at pag.7.
,
::
1..
2
pag.7.
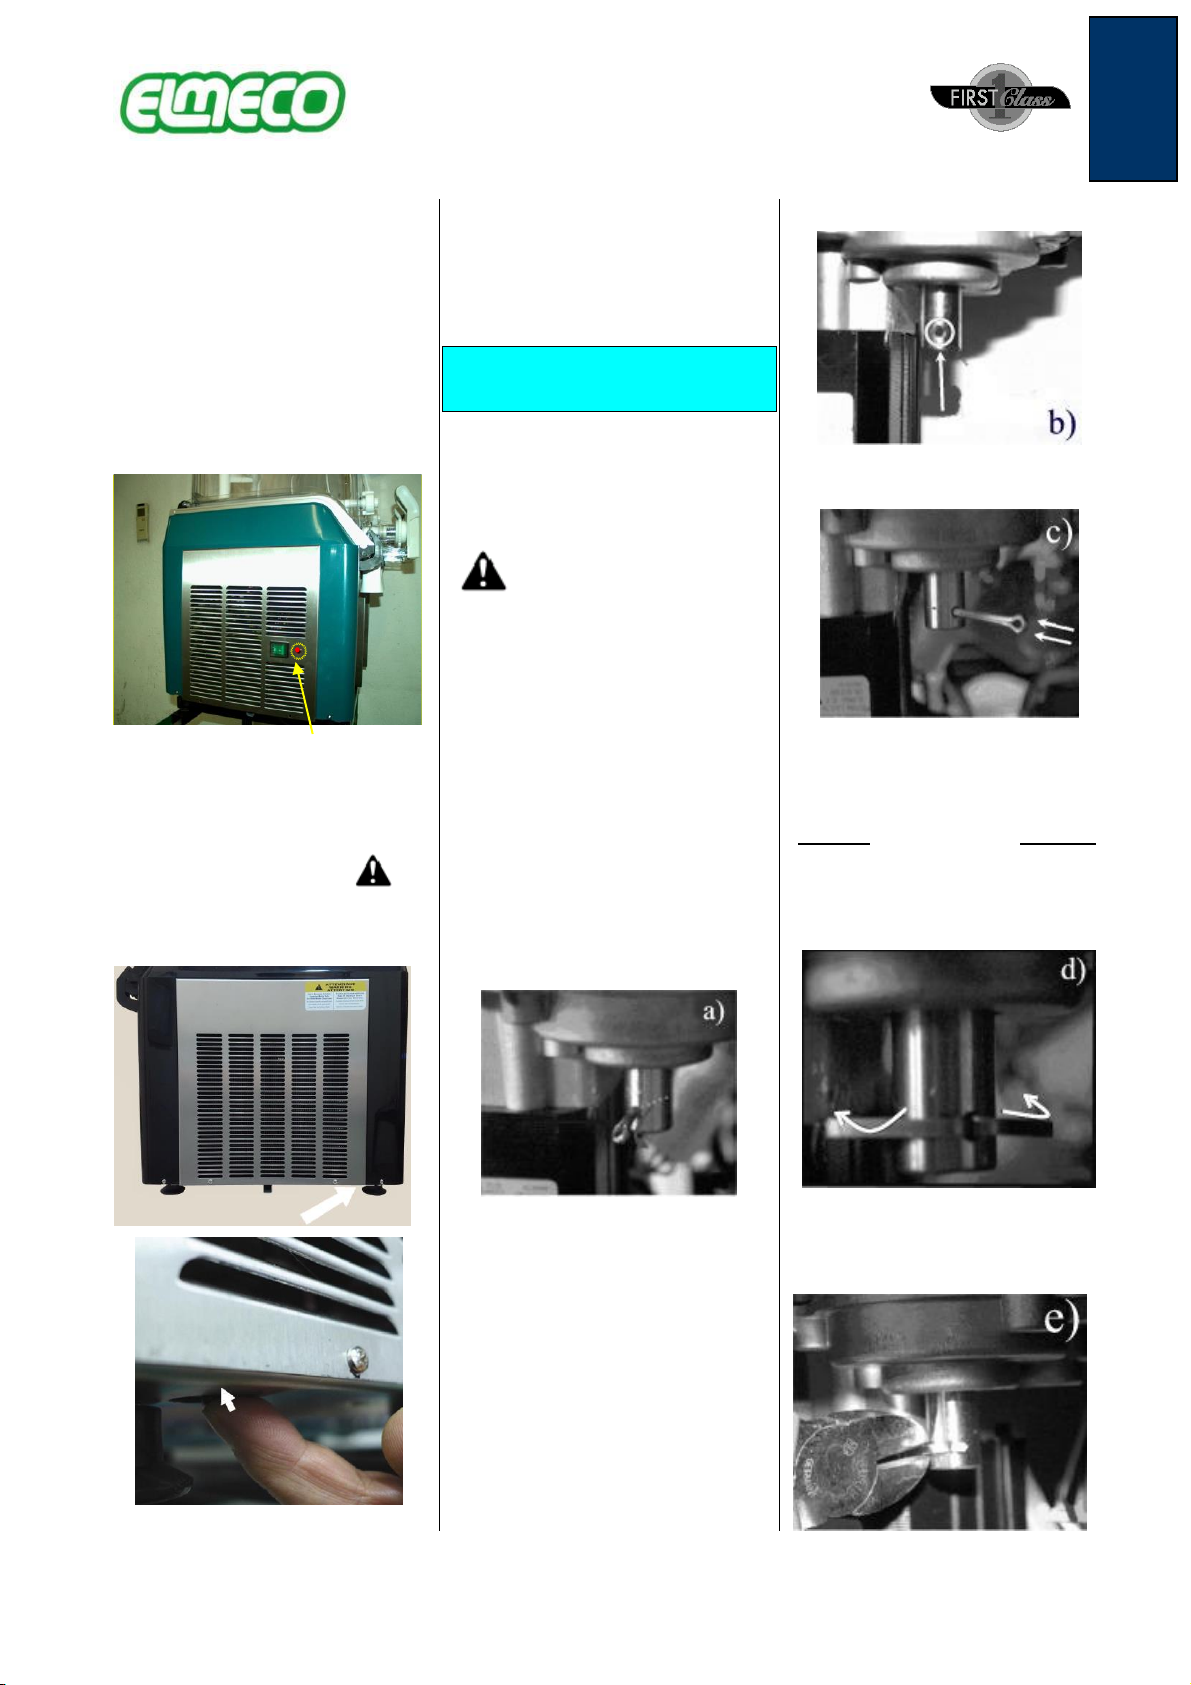
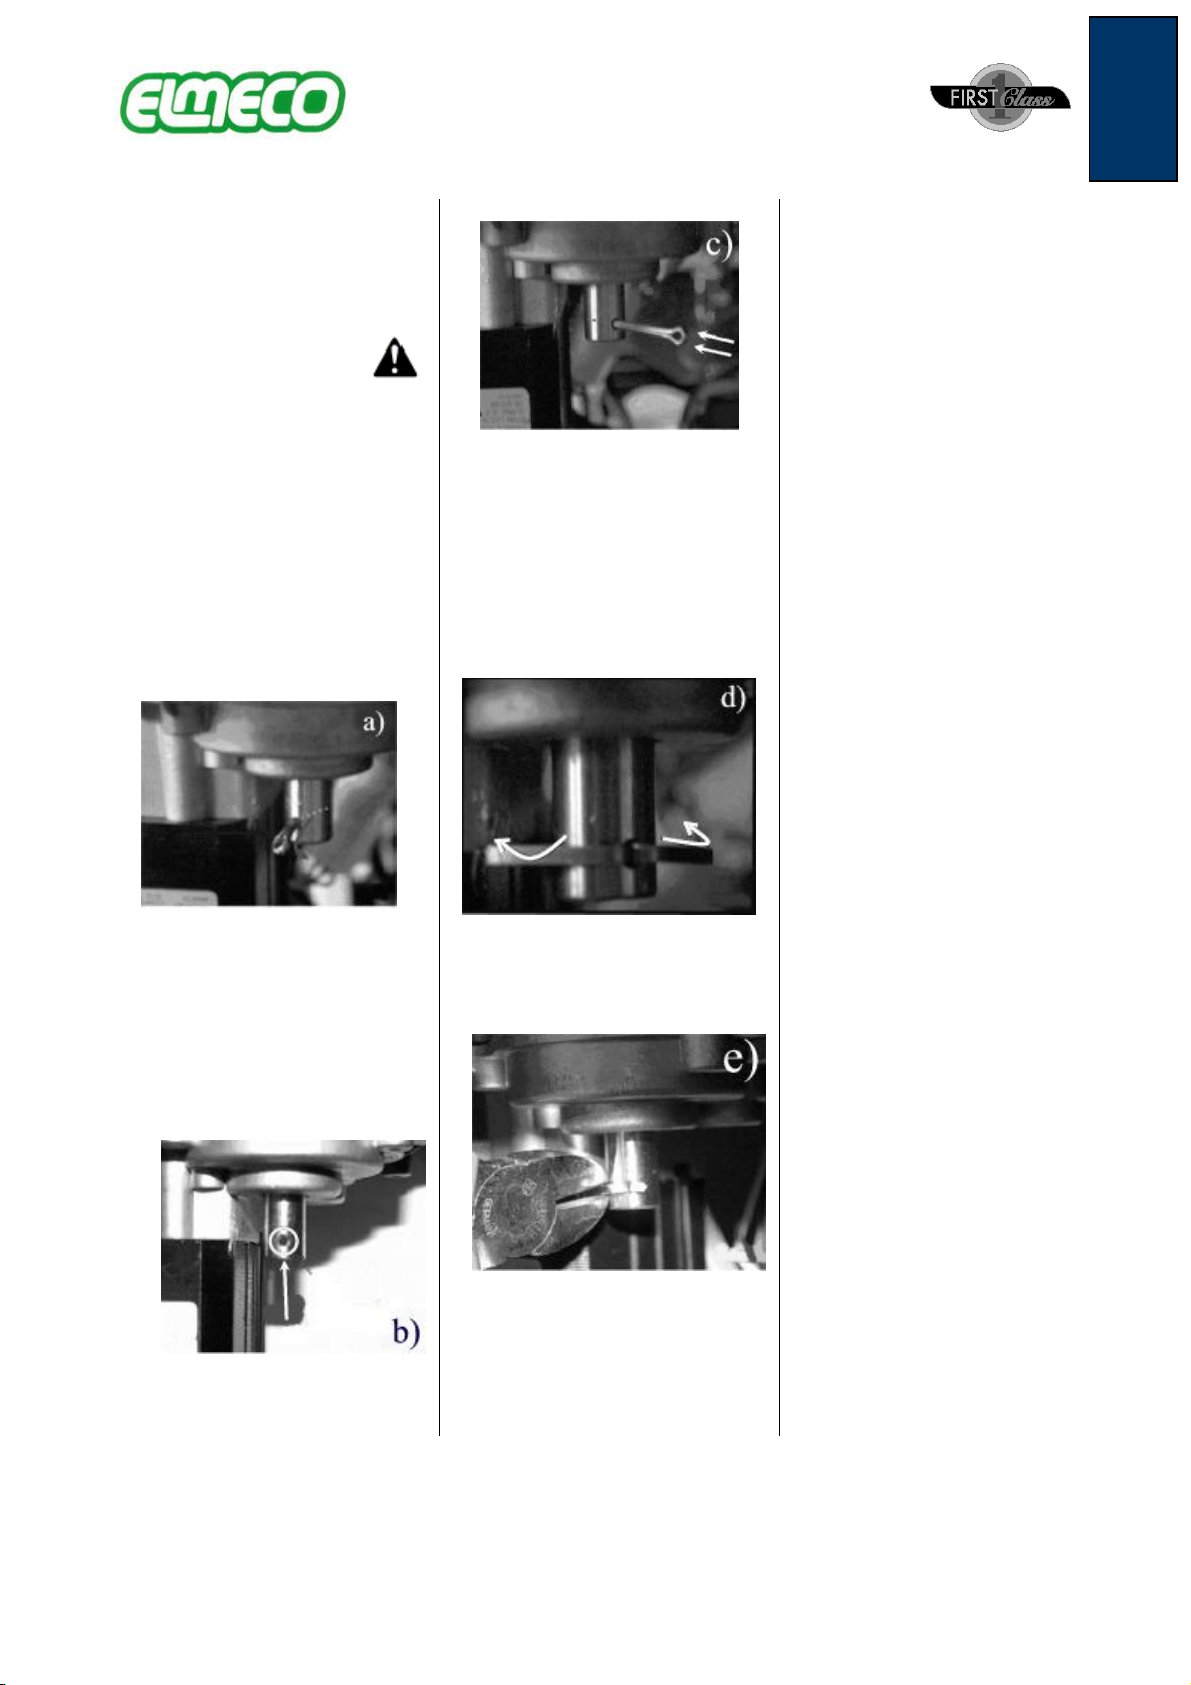
Cotter pin substitution
If the machine works but the augers do
not turn, it is possible that the cotter
pin, (item 35 of the exploded view in
appendix-23) that connects the gear
motor to the transmission shaft, broke
down.
Disconnect the power electric
cable
After removing the back and side
panels, you can see the breakdown
trying to lift the ring that fix the vertical
auger (item 28 of the exploded view in
appendix-23). It can happen that it is
blocked or that, if you lift it, it carries
away the transmission shaft with it
(item 29 of the exploded view in
appendix-23).
In the first case, it is necessary to
control that the transmission shaft
base is as high as the gear motor (exit
shaft). The lift pin could be in the hole
of the gear motor slow shaft but it
should be deformed or broken (see pic
.a)
In the second case, the hole in the
gear motor should be completely
empty and some remnants of the split
pin will certainly lie in the machine.
It is therefore necessary to install a
new split pin.
Place the transmission shaft so as its
hole is aligned with the one present on
the gear motor exit shaft; it should be
evident when they are aligned;
Insert the split pin as shown in the pic.
c;
verify that the head of the split pin, in
its rotation, does not touch the gear
motor and respects a minimum
distance.
Warning: do not reuse, in any case,
the old split pin
With the help of a pliers, fold the two
ends of the split pin downward as
indicated by the arrows in the pic. d;
Then, with nippers, cut the extremities
in excess in order to avoid a contact
with the gear motor during the rotation
(see pic. e).
- 15 -
ENGLISH
.
).
a)
.
a.
;
. c;
a.
a
. d;
a
a
. e).
- 16 -
ENGLISH
First Class Problem Solving
The electronic board displays "1
blinking"
Verifythat the cable connecting the electronic board to the gear motor magnetic revolution counter is
firmlyfixed to both elements. In case it needs to be substituted: disconnect the two connectors of the
old cable both from the reader and the electronic board; place the new cable with some insulating tape
or a small band on the existent electric installation.
Disconnect
the power electric cable
The electronic board displays "2
blinking"
Replace the cable that connects the thermostat probe to the electronic board verifying that there is not
oxide on it; if so, clean the contacts and if the problem still exists, it is necessary to substitute the
thermostat probe.
Disconnect
the power electric cable
The electronic board displays "8
blinking"
The electric power is not linear; there could a fluctuation of the entry tension due to tension changes, to
extensions or to multiple plugs to which First Class is connected. If the power tension is regular,
provide First Class with a single connection in order to solve the problem; if First Class in connected to
an autofill system, it is necessary to switch off and on First Class in order to make it work correctly
again.
Disconnect
the power electric cable
The tank does not make cold, the
cooling light is off
1. Switch off the slush machine with the main switch;
2. discharge the product, if it is cold, and put in the tank a product with a temperature higher than
15°C;
3. wait 5 minutes at least and switch on the machine again.
The electronics calibration is automatic.
The augers do not turn in the tank
and the electronic board does not
work properly.
The cotter pin (item 35 of the exploded view in appendix-23) broke down. For the cotter pin substitution
procedure see pag.14
Disconnect
the power electric cable
During the augers rotation you
can hear a creaking.
This noise derives from the vertical and horizontal augers gears. You can avoid this by simply go on
using the machine or putting some Vaseline on the plastic gears.
The machine does not make cold
and the slush and the pressure
switch light is ON.
The pressure switch intervened. In order to refit it see pag.13
Disconnect
the power electric cable
The MILLENNIUM electronic
board blinks. If you press the
MENU button for a second, it
ALARM THERMAL
Replace the cable that connects the thermostat probe to the electronic board verifying that there is not
oxide on it; if so, clean the contacts and if the problem still exists, it is necessary to substitute the
thermostat probe.
Disconnect
the power electric cable
The MILLENNIUM electronic
board blinks. If you press the
MENU button for a second, it
displays : "ALARM MOTOR"
Verifythat the cable connecting the electronic board to the gear motor magnetic revolution counter is
firmlyfixed to both elements. In case it needs to be substituted: disconnect the two connectors of the
old cable both from the reader and the electronic board; place the new cable with some insulating tape
or a small band on the existent electric installation.
Disconnect
the power electric cable
The MILLENNIUM electronic
board blinks. If you press the
MENU button for a second, it
displays : "ALARM VOLTAGE
The electric power is not linear; there could a fluctuation of the entry tension due to tension changes, to
extensions or to multiple plugs to which First Class is connected. If the power tension is regular,
provide First Class with a single connection in order to solve the problem; if First Class in connected to
an autofill system, it is necessaryto switch off and on First Class in order to make it work correctly
again.
Disconnect
the power electric cable
The MILLENNIUM electronic
board blinks. If you press the
MENU button for a second, it
displays : "ALARM LEVEL
Level probe (item 15 of the exploded view in appendix-23) missing or cover contact/level
probe/terminal board (item 37 of the exploded view in appendix-23) not correct.
Disconnect
the power electric cable
The MILLENNIUM electronic
board blinks. If you press the
MENU button for a second, it
displays : "ALARM REFILL
You can see this alarm only if the REFILL screen is ON. The alarm appear when the level probe does
not read the presence of the liquid in the tank, for longer than 2 minutes. In order to reset the alarm and
let the level control restart, switch off and on the electronic board with the button.
Disconnect
the power electric cable
The MILLENNIUM electronic
board blinks. If you press the
MENU button for a second, it
displays : "ALARM DATE
This alarm appear if the electronic board finds a problem on the date setting. In order to adjust the date
you need to use the programmer module.
NOTE. First Class Millennium Basic does not have this alarm.
Disconnect
the power electric cable
The MILLENNIUM electronic
board blinks. If you press the
MENU button for a second, it
displays: "ALARM SOLVED"
This window will show up when one or more alarms will be solved.
Disconnect
the power electric cable

- 17 -
ENGLISH
First Class Problem Solving
"
a
.
"
.
"
a
a autofill
.
e
1 2
aa°C3
.
.
.
a.
.
.
"
.
"
a
.
"
a
a autofill
.
"
.
"
. .
"
a
.
.
"
.
- 18 -
DICHIARAZIONE DI CONFORMITÀ
DECLARATION OF CONFORMITY
In accordo con la Direttiva Bassa Tensione 73/23 CEE, con la Direttiva 2004/108 CE (Direttiva EMC) e successivi emendamenti
integrate dalla marcatura Ce secondo la Direttiva 93/68 CEE.
According to the Low Voltage Directive 73/23/EEC, 2004/108 Direcive (EMC Directive) and subsequent amendments and
amended by the CE-marking Directive 93/68/EEC.
Tipo di apparecchio - Type of equipment: GRANITORE
Marchio Commerciale - Trademark ELMECO
Modello - Type designation FIRST CLASS 1 –FIRST CLASS 2 –FIRST CLASS 3
Costruttore - Manufacturer ELMECO
Indirizzo - Address VIA CIRCUMVALLAZIONE ESTERNA N. 12 80025 CASANDRINO (NA)
Telefono n° - Telephone no. 0039/081/5055724 - 5057068 - 5054028
Telefax n° - Telefax no. 0039/081/5055726
Le norme armonizzate o le specifiche tecniche (designazioni) che sono state applicate in accordo con le regole della buona arte in
materia di sicurezza in vigore nella CEE sono :
The following harmonized standards or technical specifications (designations) which comply with good engineering practice in
safety matters in force within the EEC have been applied :
Norme o altri documenti normativi Rapporto di collaudo-Schede Tecniche
standards or other normative documents Test report - Technical file
- EN 60335-1:2002 + A11:2004 + A1:2004 +A12:2006 +A2:2006 + A1/EC:2007 + A13:2008 + EC:2009 + EC:2010 +A14:2010
(Only cl. 19.11.4)
- EN 62233:2008
- EN 60335-2-24
- EN 55014-1:2006 + A1:2009
- EN 55014-2:1997 + A1:2001 +A2:2008
- EN 61000-3-2:2006 + A1:2009 + A2:2009
- EN 61000-3-3:2008
- EN 61000-3-11:2000
Informazioni ulteriori
Additional information
della CEE, si dichiara sotto la propria
responsabilità che gli apparecchi sono conformi alle esigenza essenziali previste dalle Direttive su menzionate.
As the manufacturer’s authorized established within ECC, We declare under out sole responsibility that the equipment follows the
provisions of the directive states above.
Data e luogo di emissione Nome e firma di persona autorizzata
Date and place of issue
NAPOLI
NAPLES
RUMOROSITÀ - NOISINESS - GERAUSCHPEGEL - BRUIT - RUIDOSO
Modello - Model - Muster - Modèle - Muestra
FC1
60.5 DB FC2
63.5 DB FC3
64 DB
Other manuals for FC1
3
This manual suits for next models
2
Table of contents
Other ELME Beverage Dispenser manuals


Popular Beverage Dispenser manuals by other brands


Perlick
Perlick HP15TS-3 A Series installation manual

Hoshizaki
Hoshizaki Lancer Mini Lady Installation, operation & service manual

Flavor Burst
Flavor Burst TS 80SS manual

Bartscher
Bartscher GE 21 instruction manual

Vinotemp
Vinotemp VT-WINED RAW4 owner's manual

FBD
FBD 77 Series Installation and operation manual