TABLE
OF
CONTENTS
MAIINGP
APUG:
dota
crhscdstancadioeduintaeact
entnncnnnesceacy
4
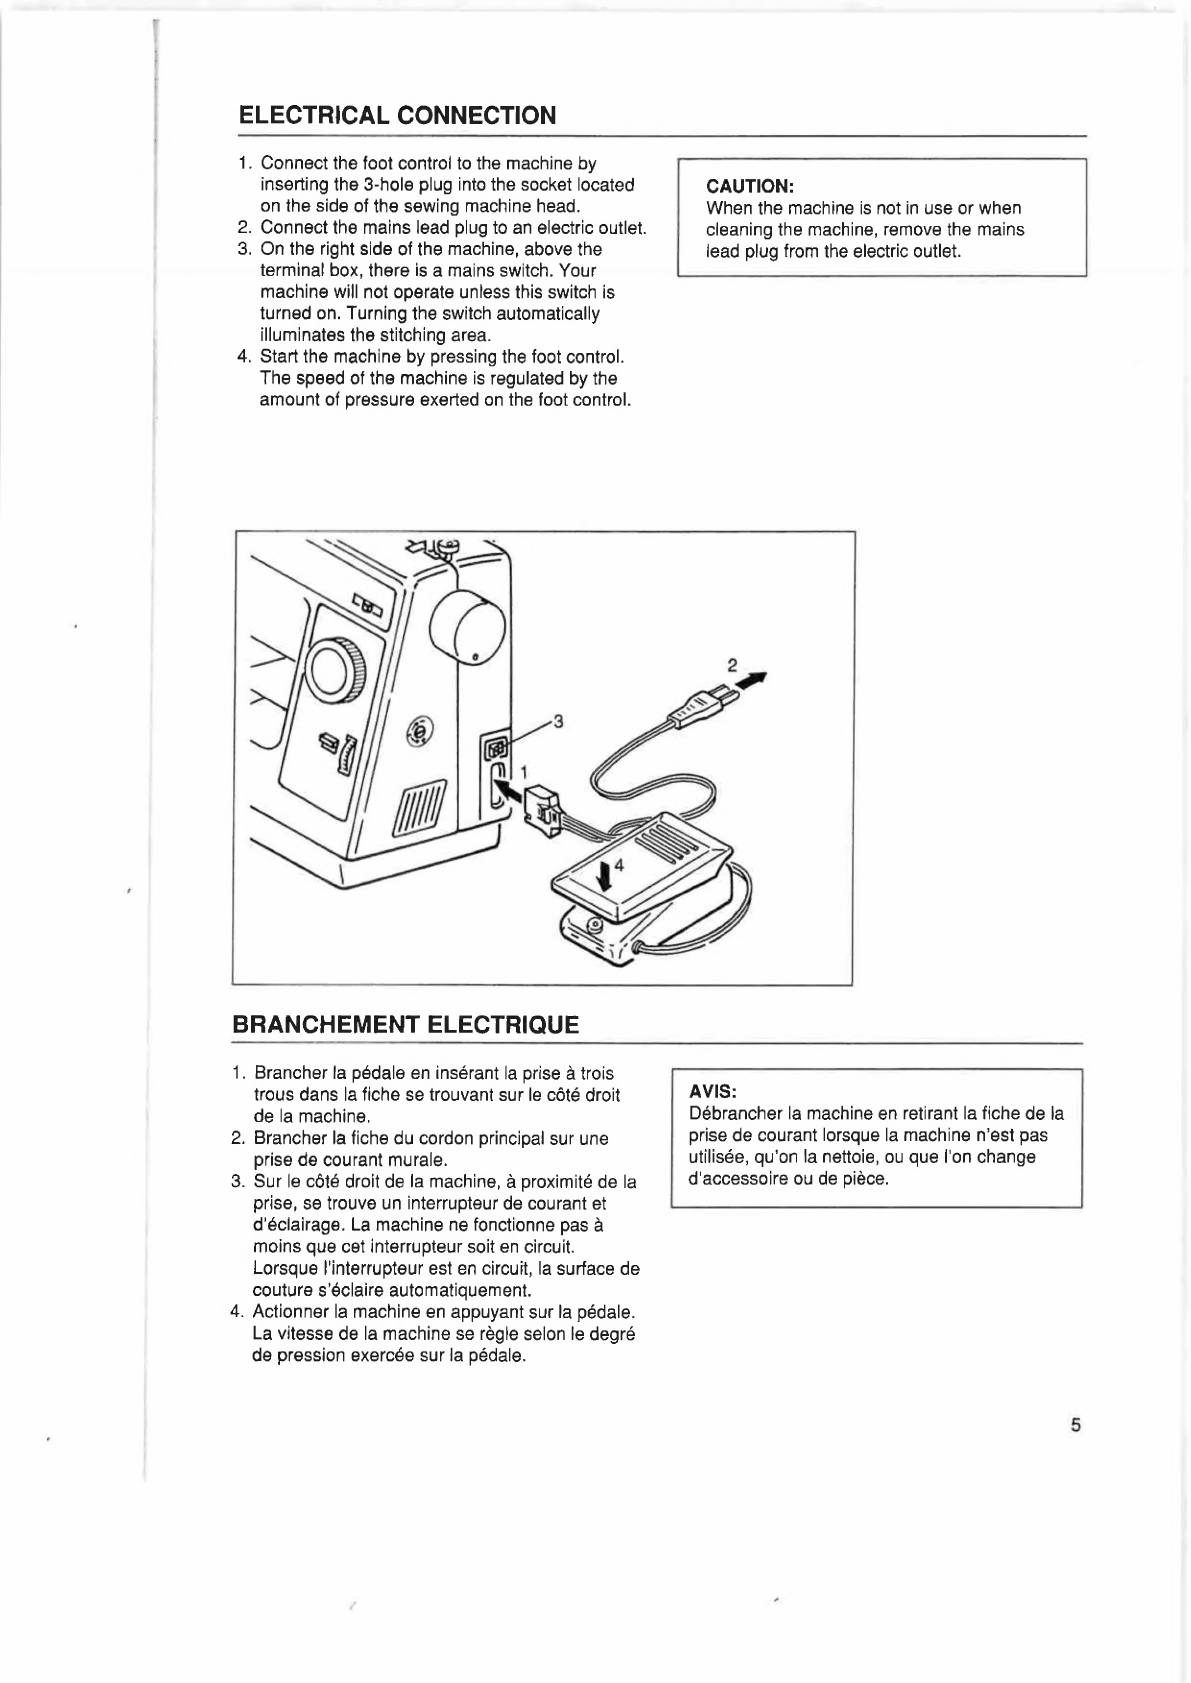
ELECTRICAC
CONNECTION
iain
cncsen
THE
2-IN-1
FREE-ARM
SEWING
SURFACE
.......
6
ACCESSORIES
sesurciponaietenitaeniiars
te
tiseek
Z
CHANGING
THE
PRESSER
FOOT
.........0...ee
8
INSERTING
THEINEEOLE
tra
ccccacsccrereranes
8
SELECTING
NEEDLES
a5
Gi
weenie
teen
9
SETTING
THE
BOBBIN
sages
cnccinwistccute
cence
10
THREADING
THE
MACHINE
........
ee
eeteeeees
12
DRAWING
UP
THE
LOWER
THREAD................
13
SELECTING
THE:STITCHES
saci
sarnacepscestervares
14
SETTING
THE
STITCH
WIDTihiaaicintoeticeeo:
14
SETTING
THE
STITCH
LENGTH
ui
eccccceceeecteccens
TS
PRESSURE
REGULATOR
Sita
sccscvsvercccsticietas
spon
REVERSE
‘STITCHING
wiivecsewsccsencativiinnlegectpalecdss
16
DARNING
PEA
TE
wcscsccastetcdeceicureies
vee
tchigiettaiecins
16
STARTING
TO
SEW
cndintansscctetnecrcenssungeteyecauvare:
17
REMOVING
THE
WORK
sesiciccccasctatsebncinrieccads
1
FASTENING
OFF
THE
ENDS
OF
SEAMSG..........
18
TURNING
CORNERS:
saizticiesocsecrscsstcarndsneeetaest
18
TABLE
DES
MATIERES
PARTIES
ESSENTIELLES
:
ccimcnscmencunicavans
4
BRANCHEMENT
ELECTRIQUE........0..
0c
eeeeee
5
TABLE
DE
COUTURE
A
DOUBLE
EMPLO)
........
6
ACCESS
OIAGSs
tirendent
dt
sera
ere
ameenanuntinan
7
CHANGEMENT
DOU
PIED
PRESSE-ETOFFE
......
8
MISE
EN
PLACE
DE
L’AIGUILLE
......
ee
8
PIES
sere
ateate
toi
itasinaleiel
eardceamcetarueanbace
ted
eens
9
BOBINAGE
DE
LA
CANETTE
ou...
eee
eceeeeeeeers
10
ENFILAGE
DU
FIL
SUPERIEUR
oes
12
REMONTER
LE
Fil
INFERIBUR
pdetsiniatccrea,
13
SELECTION
DES:
POINTS.
oii.
ccteatiivecnteuaicede
14
REGLAGE
DE
LA
LARGEUR
DE
POINT
............
14
REGLAGE
DE
LA
LONGUEUR
DU
POINT.
........
15
REGULATEUR
DE
PRESSION
witeicvsiedstevensstess
15
MARCHE
ARRIERE
ai
tuioceavueeuc
ange
asecateas
16
PLAQUETTE
DE
REPRISAGE
wsssciciseccstecacivuscss
16
DEBUT:
DE
LA
COUTURE
caiceitinsbetenteat
tees:
17
RETRAIT
DE
POUNVRAGE
idcantvicatiawuuns
17
ARRET
DES
COUTURES
wiss
csmshitieaiaemaeiun
18
ADJUSTING
THE
THREAD
TENSIONS
............
19
WHERE
TO
USE
EACH
STITCH...
eeeeeesrreees
20
SEWING
WITH
STRAIGHT
STITCHES..............
21
SEWING
WITH
ZIGZAG
STITCHES
.......
21
BLING
HEM
STITCHING
icc
sscicescsvenieetvcontuast
civancnas
22
ELASTIC
STITCH
SEWING
Fivacesscccsscestecssusanses
23
DECORATIVE
STITCH
PATTERNS
..............2.
23
OVERCASTING-OVERLOCKING
........ceceeeeeeees
24
THREE-StITGH
ZIGZA
GC
aisscactiel
eociennatantatedaiicanys
24
SEWING
BUTTONHOLES
sciences
cages
25
SEWING
ON
BUTTONS
‘sonsidicinmdiadadid
26
SEWING
ZIPPERS
citetiescennsissxevammenncentersrtnens
26
FREE-HAND
EMBROIDERY
wcemccscnatianssrs
27
DA
INTING
i
2ecsecat
atta
sectreu
et
sites
selena
tees
Ducre
aia
27
ADJUSTING
THE
FORWARD
AND
REVERSE
SLT
GHES
tietiasseyeiiivud
noi
vnonan
sacaean
i
vetes
28
MAINTENANCE
csiccccercdiinersamisencarveusnBbaseaviepen
29
PEEP
RUE
RINT
S
seccuiecseee
artes
ieolt
antes
ialts
31
COUTURE
A
ANGLE
DROIT...
eee
eeeee
18
REGLAGE
DE
LA
TENSION
DES
FILS
............
19
UTILISATION
DES
DIFFERENTS
POINTS.....
..
20
COUTURE
DRUM
B
cetcsiccusatteuseicvedyateileicaraamcuday
21
COUTURE
A
POINT.
ZIGZAG
wiesscsecacerrsssecasitacale
21
COUTURE
D'OURLETS
INVISIBLES
wic.:..c
ina:
22
COUTURE
A
POINTS
ELASTIQUES
..........0..
23
POINTS.
DECORATIES
tivtunsavencateicamonca
Sateen
23
SURFILAGE-OVEREOCK
ssiccctsascaceaterienennvden
24
ZIGZAG
PIQUE
erescatd
soe
cetreetascintd
uadrceoiatenieen
24
BOUTONNIERES
ssc
feiss)
vecthvsteaindexouresistdaaseads
25
POSE
DE
BOUTONS
tsccwsisintoactocisdverarnwtitas
26
PERMETURE
ECLAIR
vcxacccenmranieontucen:
26
BRGDERIE
A
MAIN
LIBRE
siissesocvsecncescccaireeisuens
27
RIBP
RIS
AGE
ricco
ietinie
bated
th
atnnioatenesabeptans
27
REGLAGE
FIN
DE
LA
LONGUEUR
DES
POINTS
cchicracteactacnivian
tetesancniianareraamhseeouaneys
28
BIN
RE
CIB
ieee
ietetencseuas
sci
eacattaa
tara
seuegcadswaneudnets
29
QUELQUES
CONSEILS
UTILES
.........cccecsseee
31