ELNA eXpressive 860 User manual

| Instruction Manual |
eXpressive 860
9
23 24 25
10


IMPORTANT SAFETY INSTRUCTIONS
When using an electrical appliance, basic safety precautions should always be followed, including the
following:
This sewing machine is designed and manufactured for household use only.
Read all instructions before using this sewing machine.
DANGER— To reduce the risk of electric shock:
1. An appliance should never be left unattended when plugged in. Always unplug this sewing
machine from the electric outlet immediately after using and before cleaning.
WARNING—To reduce the risk of burns, fire, electric shock, or injury to persons:
1. Do not allow to be used as a toy. Close attention is necessary when this sewing machine is used
by or near children.
2. Use this appliance only for its intended use as described in this owner’s manual.
Use only attachments recommended by the manufacturer as contained in this owner’s manual.
3. Never operate this sewing machine if it has a damaged cord or plug, if it is not working properly, if
it has been dropped or damaged, or dropped into water.
Return this sewing machine to the nearest authorized dealer or service center for examination,
repair, electrical or mechanical adjustment.
4. Never operate the appliance with any air opening blocked. Keep ventilation openings of this
sewing machine and foot controller free from accumulation of lint, dust and loose cloth.
5. Never drop or insert any object into any opening.
6. Do not use outdoors.
7. Do not operate where aerosol (spray) products are being used or where oxygen is being
administered.
8. To disconnect, turn all controls to the off (“O”) position, then remove plug from outlet.
9. Do not unplug by pulling on cord. To unplug, grasp the plug, not the cord.
10. Keep fingers away from all moving parts. Special care is required around the sewing machine
needle and/or cutting blade.
11. Always use the proper needle plate. The wrong plate can cause the needle to break.
12. Do not use bent needles.
13. Do not pull or push fabric while stitching. It may deflect the needle causing it to break.
14. Switch this sewing machine off (“O”) when making any adjustment in the needle area, such as
threading the needle, changing the needle, threading the bobbin or changing the presser foot, and
the like.
15. Always unplug this sewing machine from the electrical outlet when removing covers, lubricating, or
when making any other adjustments mentioned in this owner’s manual.
SAVE THESE INSTRUCTIONS
Please note that on disposal, this product must be safely recycled in accordance with relevant
National legislation relating to electrical/electronic products. If in doubt please contact your
retailer for guidance.
For Europe only:
This appliance can be used by children aged from 8 years and above and persons with reduced
physical, sensory or mental capabilities or lack of experience and knowledge if they have been given
supervision or instruction concerning use of the appliance in a safe way and understand the hazards
involved. Children shall not play with the appliance. Cleaning and user maintenance shall not be made
by children without supervision.
For outside Europe (except U.S.A and Canada):
This appliance is not intended for use by persons (including children) with reduced physical, sensory or
mental capabilities, or lack of experience and knowledge, unless they have been given supervision or
instruction concerning use of the appliance by a person responsible for their safety.
Children should be supervised to ensure that they do not play with the appliance.

TABLE OF CONTENTS
GETTING READY TO SEW
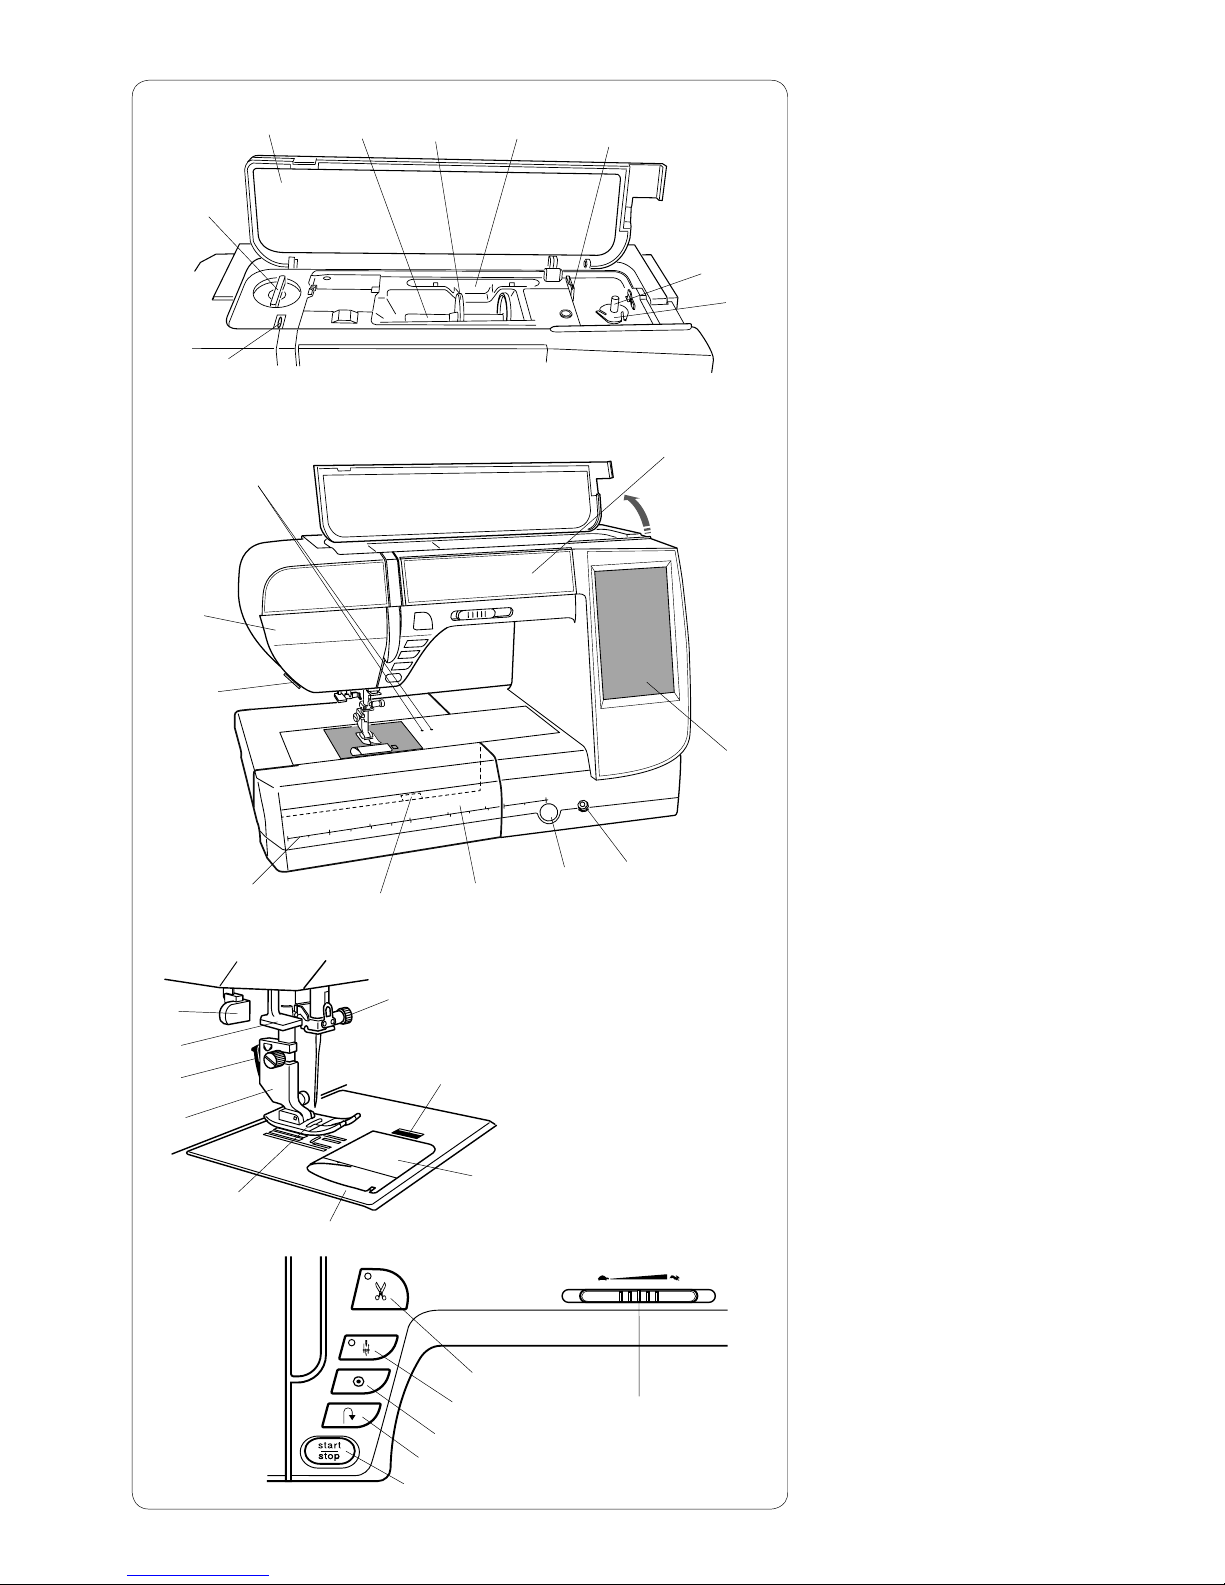
Names of Parts.................................................................. 1-2
Extension Table .................................................................... 2
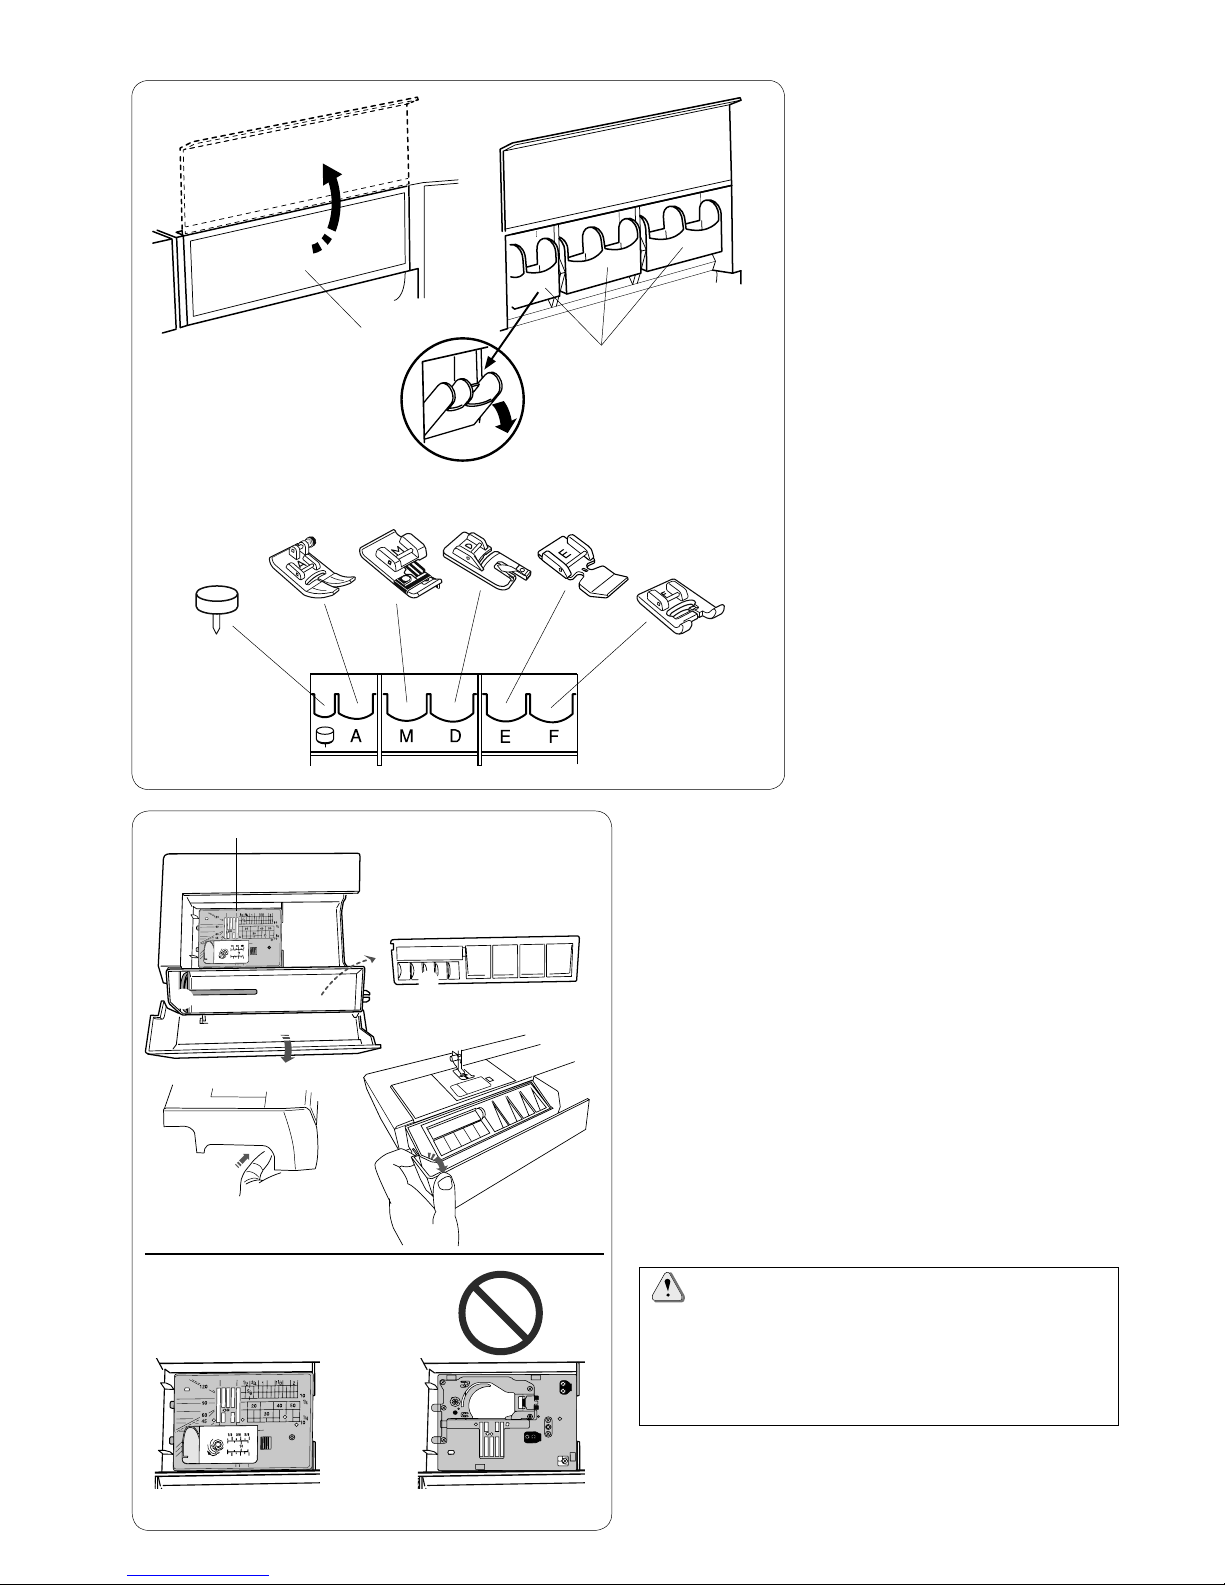
Accessory Storage ............................................................... 3
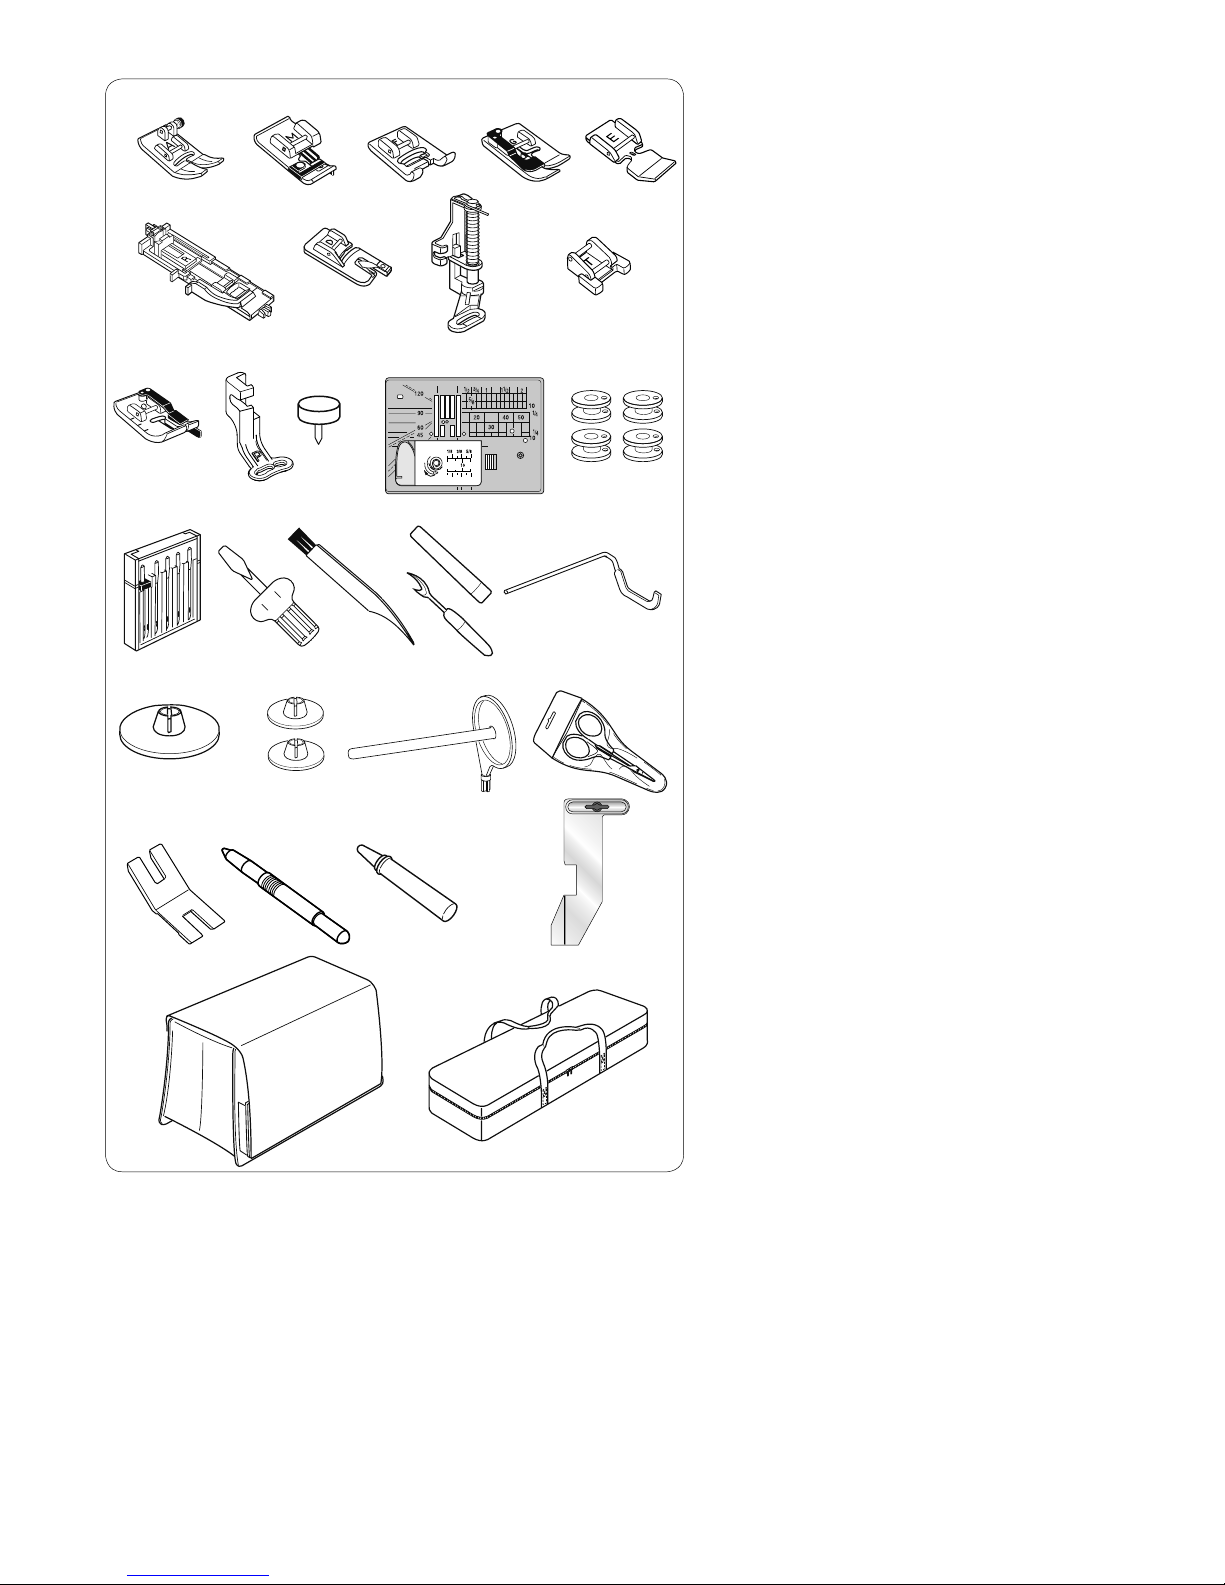
Standard Accessories........................................................ 4-5
Embroidery unit case............................................................ 5
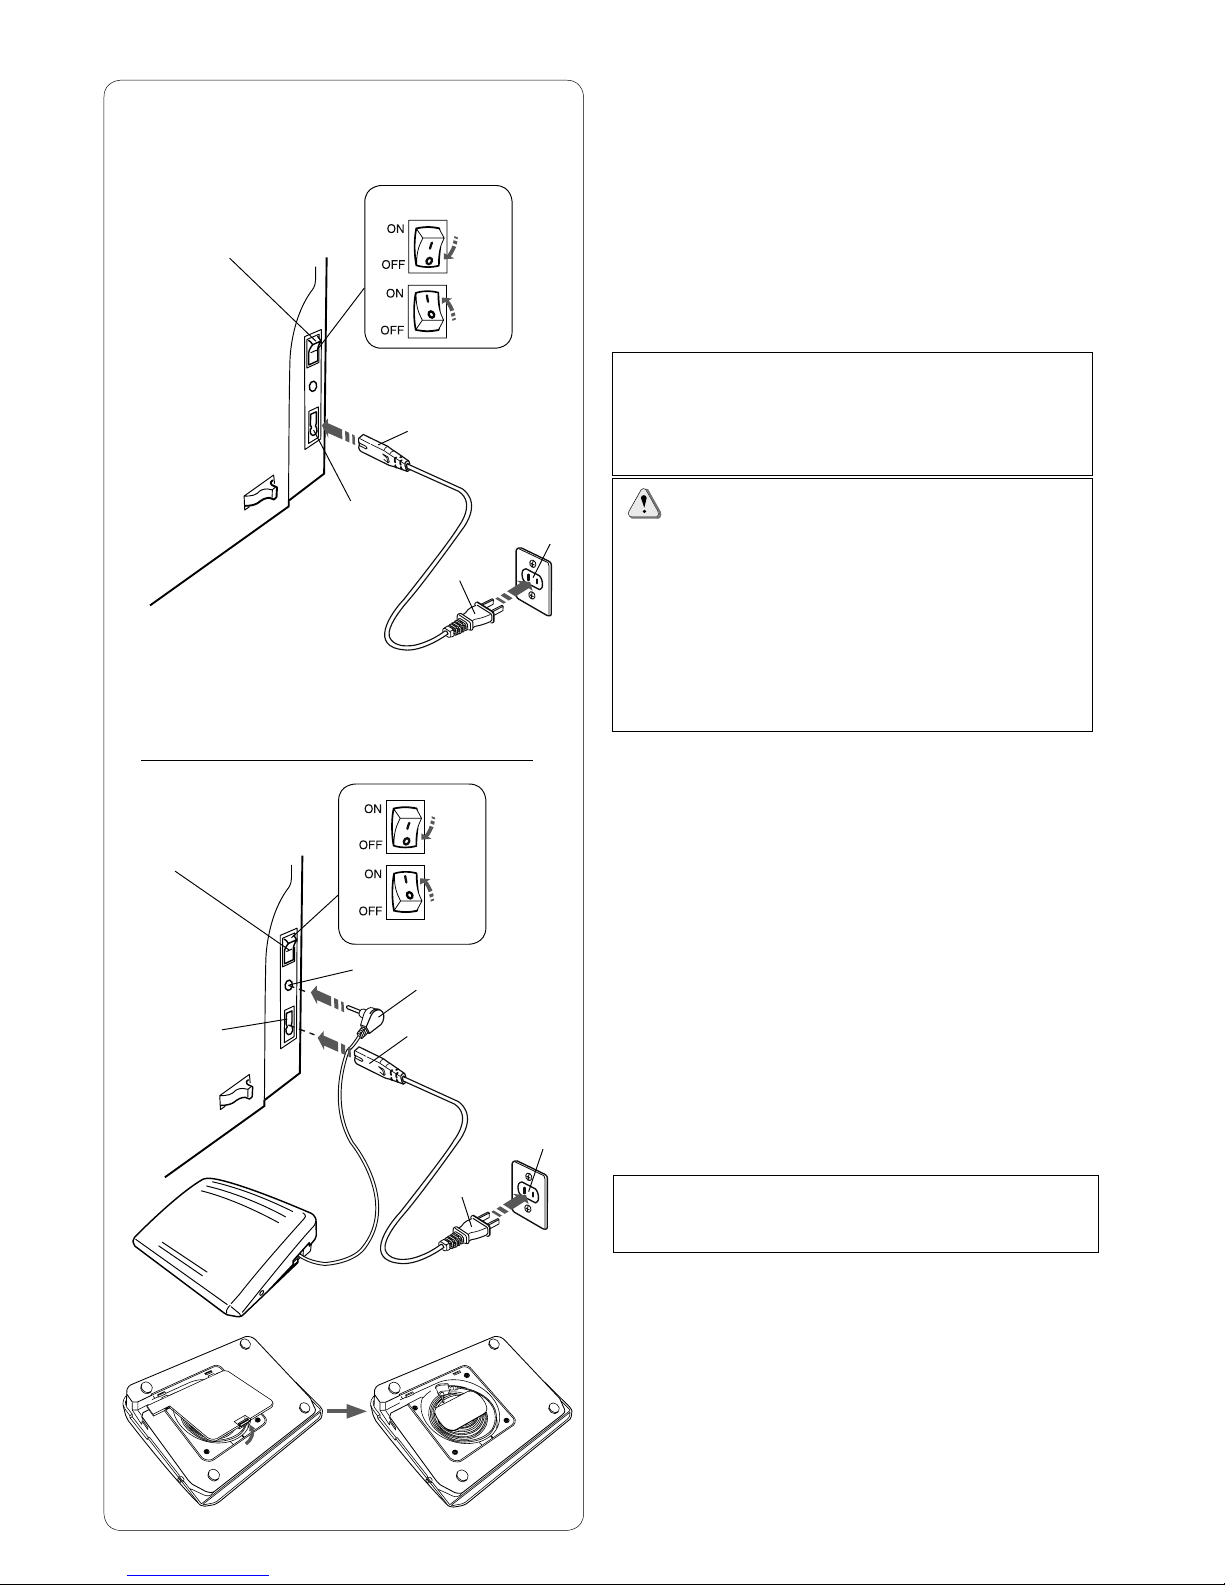
Connecting the Power Supply .............................................. 6
Controlling Sewing Speed .................................................... 7
Speed control slider........................................................... 7
Foot control........................................................................ 7
Machine Operating Buttons.................................................. 8
Touch Panel Keys ................................................................. 9
Setting the Spool of Thread................................................ 10
Winding the Bobbin ....................................................... 10-12
Removing the bobbin....................................................... 10
Winding the bobbin.......................................................... 11
Inserting the bobbin ......................................................... 12
Threading the Machine....................................................... 13
Needle threader.................................................................. 14
Drawing up the Bobbin Thread ........................................... 15
Replacing Needles ............................................................. 16
Needle Definitions .............................................................. 17
Replacing the Presser Foot ................................................ 18
Replacing the Foot Holder.................................................. 19
Replacing the Needle Plate................................................ 20
Raising and Lowering the Presser Foot.............................. 21
Knee lifter ........................................................................... 21
Adjusting the Foot Pressure ............................................... 22
Raising and Dropping the Feed Dog .................................. 22
Mode Selection................................................................... 23
ORDINARY SEWING MODE
Ordinary Stitch Patterns ................................................ 24-25
Function Keys in Ordinary Sewing Mode....................... 26-27
Utility Stitches..................................................................... 28
Straight stitches .................................................................. 28
Starting to sew................................................................. 28
Sewing from the edge of thick fabric................................ 28
Changing sewing direction............................................... 28
Turning a square corner................................................... 28
Securing seams............................................................... 29
Cutting threads ................................................................ 29
Using the seam guide lines ................................................ 29
Variety of straight stitches.............................................. 30-31
Zigzag stitches.................................................................... 31
Variety of overcasting stitches .................................... 32-33
Manual Stitch Settings................................................... 34-35
Cloth guide ......................................................................... 36
Buttonholes and Specialty Stitches .................................... 37
B1 Sensor (Square) buttonhole..................................... 38-39
Manual settings .................................................................. 40
B2 Automatic (square) buttonhole ................................. 41-42
Other buttonholes ............................................................... 43
Corded buttonhole .............................................................. 44
B7 Darning ......................................................................... 45
B9 Eyelet ............................................................................ 46
Decorative Stitches........................................................ 47-48
Circular Sewing .................................................................. 48
Quilting(Q) .......................................................................... 49
S1-S12 Decorative satin stitches........................................ 50
Created Stitches(CS).......................................................... 51
Twin Needle Sewing ........................................................... 52
Programming a Pattern Combination ................................. 53
Editing a pattern combination............................................. 54
Startover key ...................................................................... 55
Checking pattern combination length ................................. 55
Monogramming................................................................... 56
Function keys ..................................................................... 56
Manual thread tension........................................................ 57
Individual thread tension adjustment ............................... 57
Unified thread tension adjustment ................................... 57
Spacing............................................................................... 57
Reducing the size of letters ................................................ 57
Programming a monogram................................................. 58
Sewing Application ............................................................. 59
Seaming........................................................................... 60
Overedge ......................................................................... 61
Blind hem......................................................................... 62
Shell tuck ......................................................................... 63
Rolled hem....................................................................... 64
Zipper sewing ............................................................. 65-67
Gathering......................................................................... 68
Basting............................................................................. 68
Button sewing .................................................................. 69
Tacking............................................................................. 70
Applique........................................................................... 71
Patchwork ........................................................................ 72
Quilting........................................................................ 73-75
CUSTOMIZING MACHINE SETTINGS
Common Setting Mode ................................................. 76-79
Ordinary Sewing Setting Mode...................................... 80-82
Correcting Deformed Stitch Patterns.................................. 83
EMBROIDERY MODE
Embroidery Unit.................................................................. 84
Attaching the embroidery unit.......................................... 84
Extending the carriage arm ............................................. 85
Detaching the embroidery unit......................................... 86
Attaching the Embroidery Foot ........................................... 87
Foot pressure ..................................................................... 87
Attaching the Straight Stitch Needle Plate.......................... 88
Special Bobbin Holder for Embroidery ............................... 89
Embroidery Hoops.............................................................. 90
Stabilizers ........................................................................... 91
Setting the Fabric in an Embroidery Hoop.......................... 92
Attaching the Embroidery Hoop to the Machine................. 93
Selecting Built-in Embroidery Designs ............................... 94
Monogramming................................................................... 95
Function keys................................................................... 96
Programming a monogram .............................................. 97
2- Letter monogram ......................................................... 98
Editing a monogram......................................................... 99
Ready to Sew Window............................................... 100-103
Starting to sew embroidery............................................... 104
Fringe design ................................................................. 105
Applique designs .................................................... 106-107
Editing Mode.............................................................. 108-113
Free Arm Hoop (optional item) ......................................... 114
CUSTOMIZING MACHINE SETTINGS
Embroidery mode settings......................................... 115-117
FILE MANAGEMENT
Saving and Opening a File ............................................... 118
Saving a file ................................................................... 118
Creating a new folder..................................................... 119
Opening the file.............................................................. 120
Viewing file names......................................................... 120
Changing a name of the file or folder............................. 121
CARE AND MAINTENANCE
Cleaning the Hook Area ................................................... 122
Cleaning the Inside of the Thread Guide.......................... 123
Troubleshooting ......................................................... 124-125
STITCH CHART ....................................................... 126-128
DESIGN CHART ...................................................... 129-132

1
GETTING READY TO SEW
Names of Parts
Top cover
Spool pin
Spool holder (Large)
Touch panel stylus holder
Bobbin thread cutter B
Presser foot pressure dial
Bobbin winder spindle
Bobbin thread cutter A
Thread take-up lever
Foot storage compartment
Visual touch screen
Knee lifter socket
Feed balancing dial cap
Extension table
(accessory storage)
Needle plate release lever
Centimeter/inch quick
measurements
Thread cutter/holder
Face cover
Holes for circular pivot pin
Hook cover release button
Hook cover plate
Needle plate
Zigzag foot A
Presser foot holder
Lever
Needle threader
Buttonhole lever
Needle clamp screw
Start/stop button
Reverse button
Auto-lock button
Needle up/down button
Thread cutter button
Speed control slider
q
w
e
r
t
y
u
i
o
!0
!1
!2
!3
!4
!5
!6
!7
!8
!9
@0
@1
@2
@3
@4
@5
@6
@7
@8
@9
#0
#1
#2
#3
#4
w
qe
y
o
@4
@5 @0
@1
@2
@6
@8
@3
@7
#3
#2
#1
#0
@9
#4
u
!0
!2
!3
!4
!7
!8
t
!5
!1
i
r
!6
!9

2
Handwheel
Connector for external thread
cutter switch
USB port
Drop feed dog lever
Machine socket
Foot control jack
Power switch
Carrying handle
Presser foot lifter
Cover
Embroidery unit socket
Embroidery unit
Carriage arm
Carriage arm release lever
q
w
e
r
t
y
u
i
o
!0
!1
!2
!3
!4
!2
!1
!3
!4
q
w
r
i
o
ty
!0
e
u
The extension table provides an extended sewing area
and can be removed for free arm sewing.
To remove:
Draw the table to the left.
To attach:
Slide the table on the base and push it to the right.
Free arm sewing
The free arm is used for stitching sleeves, waistbands,
pant legs or any other tubular garments.
It is also useful for darning socks or elbows.
Extension Table

3
In extension table:
q Straight stitch needle plate
w Extra spool pin
e Bobbins
Other accessories can be stored in the compartment.
q
we
q
w
e
rt y
u
i
Accessories Storage
The accessories can be
conveniently stored in the foot
storage compartment and in the
extension table.
In front compartment:
Open the cover to the front.
Each pockets can be tilted forward
for easy access.
q Cover
w Pocket
e Circular pivot pin
r Zigzag foot A
t Overedge foot M
y Rolled hem foot D
u Zipper foot E
i Satin stitch foot F
CAUTION:
Do not store the needle plate upside down in the
compartment. Otherwise, the needle plate spring may
break.
q Correct
w Wrong
q w

4
Standard Accessories
Zigzag foot A (set on the machine)
Overedge foot M
Satin stitch foot F
Blind hemming foot G
Zipper foot E
Automatic buttonhole foot R
Rolled hem foot D
Darning foot PD-H
Button sewing foot T
1/4˝ seam foot O
Embroidery foot P
Circular pivot pin (set on the machine)
Straight stitch needle plate
Bobbin X 5 (1 set on the machine)
Needle set
Screwdriver
Lint brush
Seam ripper (buttonhole opener)
Quilting guide bar
Spool holder X 2 (large) (1 set on the
machine)
Spool holder X 2 (small)
Extra spool pin
Scissors
Button shank plate
Touch panel stylus
Bobbin holder cleaner
Cloth guide
Semi-hard fabric cover
Embroidery unit case
q
w
e
r
t
y
u
i
o
!0
!1
!2
!3
!4
!5
!6
!7
!8
!9
@0
@1
@2
@3
@4
@5
@6
@7
@8
@9
qw
!3
ert
y u i o
!0 !1
!5 !7
!2 !4
!6
@0 @1 @2
@7@6
@3
@5
!9
@4
!8
@8 @9

5
Embroidery hoop SQ14a (with template)
Embroidery hoop RE20a (with template)
Magnetic clamps (X4)
Bobbin holder for embroidery
Power supply cable
Knee lifter
Foot control
Instruction book
Key icon reference chart
Instructional DVD
Template CD
Stitch composer EX (with instruction)
q
w
e
r
t
y
u
i
o
!0
!1
!2
q w
e r
!0
t
y
ui o
!1 !2
To use:
Open the flaps.
Attach the supporter as shown.
Place the embroidery unit as shown so
the supporter prevents the embroidery unit
sways inside the case while carrying.
Embroidery unit case
Flaps
Supporter
Embroidery unit
q
w
e
qw
w
e

6
Connecting the Power Supply
zFirst make sure the power switch qis off.
xInsert the machine plug wof the power supply cable
into the machine socket e.
cInsert the power supply plug rinto the wall outlet t,
and turn the power switch qon.
q Power switch
w Machine plug
e Machine socket
r Power supply plug
t Wall outlet
NOTES:
Make sure to use the power supply cable that came
with the machine.
If you turn off the power switch, wait for 5 seconds
before turning it on again.
WARNING:
While in operation, always keep your eyes on the
sewing area, and do not touch any moving parts such
as the thread take-up lever, handwheel or needle.
Always turn off the power switch and unplug the
machine from the power supply:
- when leaving the machine unattended.
- when attaching or removing parts.
- when cleaning the machine.
Do not place anything on the foot control.
q
w
e
c
If you wish to use the foot control, pull out the cord from
the foot control and insert the pin connector into the jack
on the machine.
zFirst make sure the power switch qis off.
xInsert the machine plug wof the power supply cable
into the machine socket e.
cDraw out the cord from the foot control and insert the
pin connector rinto the jack ton the machine.
vInsert the power supply plug yinto the wall outlet u,
and turn the power switch qon.
q Power switch
w Machine plug
e Machine socket
r Pin connector
t Jack
y Power supply plug
u Wall outlet
NOTE:
The start/stop button does not work when the foot
control is connected.
Operating Instructions:
The symbol “O” on the switch indicates the “off” position
of the switch.
For the U.S.A. and Canada only
Polarized plug (one blade wider than the other):
To reduce the risk of electric shock, this plug is intended
to fit in a polarized outlet only one way. If it does not fit
fully in the outlet, reverse the plug. If it still does not fit,
contact a qualified electrician to install the proper outlet.
Do not modify the plug in any way.
r
t
z
c
r
q
t
z
v
e w
u
y
x
x

7
Controlling Sewing Speed
Speed control slider
You can limit the maximum sewing speed in both the ordi-
nary sewing mode and embroidery mode with the speed
control slider according to your sewing needs.
To increase the sewing speed, move the slider to the right.
To decrease the sewing speed, move the slider to the left.
The sewing speed can be changed while stitching.
q
w
e
Foot control
Pressing on the foot control can vary sewing speed.
The harder you press the foot control, the faster the
machine runs.
NOTES:
The machine runs at the maximum speed set by the
speed control slider when the foot control is fully
depressed.
This machine is equipped with an automatic shutdown
safety feature to prevent overheating whenever the
machine is running overloaded. Follow the safety
instructions that appear on the visual touch screen.
Cord storage
The cord of the foot control can be conveniently stored in
the cord storage under the base cover of the foot control.
q Base cover
w Cord
e Hooks
Operating Instructions:
Foot control model 21380 is for use with this sewing
machine.

8
q
w
e
r
t
Machine Operating Buttons
q Start/stop button
Press this button to start or stop the machine.
The machine starts running slowly for the first few
stitches, it then runs at the speed set by the speed control
slider. The machine runs slowly as long as this button is
pressed.
The button will turn red when the machine is running, and
green when it has been stopped.
Pressing and holding this button while sewing will slow
down the sewing speed and the machine will stop when
the button is released.
NOTES:
•Thestart/stopbuttoncannotbeusedwhenthefoot
control is connected to the machine.
•Youcanselectthedesiredstart-upspeedfrom
slow, normal or high (refer to page 80).
w Reverse button
When sewing stitch pattern U1, U4, U9, U10, U11, Q1-Q3
or BR1-5, the machine will sew in reverse as long as the
reverse button is pressed.
If stitch pattern U1, U4, U9, U10, U11, Q1-Q3 or BR1-5,
has been selected and the foot control is not connected,
the machine will start sewing in reverse as long as the
reverse button is pressed.
If you press the reverse button when sewing any other
patterns, the machine will immediately sew locking
stitches and automatically stop.
e Auto-lock button
When sewing stitch pattern U1, U4, U9, U10, U11,
Q1-Q3 or BR1-5, the machine will immediately sew locking
stitches and automatically stop when the auto-lock button
is pressed.
When sewing all other patterns, the machine will sew to
the end of the current pattern, sew locking stitches and
stop automatically.
The machine will trim the threads automatically after
locking the stitch when “Thread Cut after Auto-Lock”
option is turned on (refer to page 82).
r Needle up/down button
Press this button to bring the needle bar up or down.
The machine will stop with the needle in down position.
However, you can change the needle stop position in the
setting mode (refer to page 80).
NOTE:
The LED signal yis turned on when the down position
is selected and vice versa.
tThread cutter button
Press this button when you finish sewing to trim the
threads. The needle bar automatically rises after trimming
the threads (refer to page 29).
NOTES:
•TheLEDsignalublinks when the machine trims
threads.
•TheLEDsignaluturns on when “Thread Cut
after Auto-Lock” is ON in setting mode (refer to page
82).
•Usethethreadcutteronthefacecoverifthethread
is #30 or thicker.
u
y

9
qHome key
Press this key to return to the initial page of the ordinary
sewing mode or embroidery mode.
wMode switch key
Press this key to enter into embroidery mode or to return
to ordinary sewing mode.
eOpen file key
Press this key and the open file window will open.
You can open pattern combinations, monograms and
embroidery designs saved in the machine’s internal
memory or on a USB flash drive.
rSet mode key
Press this key to enter the setting mode. You can
customize the machine settings to your preference.
The machine settings for Common Settings, Ordinary
Sewing, Embroidery and Choose Language are available
in this mode (refer to page 76-82 and 115-117).
tLockout key
Press this key to lockout the machine when threading the
machine, replacing the accessories etc.
To reduce the risk of injury, all the buttons are
deactivated.
To unlock the machine, press this key again.
yPage keys
Press the page key to display the next page or previous
page. Press and hold the page key to turn the pages
continuously.
uTouch bar
Press on the bar and slide to the right or left to display
the next page or previous page.
Touch Panel Keys
CAUTION:
Do not press the touch panel or visual touch screen
with hard or sharp objects like pencils, screwdrivers
or the like. Use the touch panel stylus included in the
standard accessories.
q
w
e
r
t
y
u
y

10
Setting the Spool of Thread
Open the top cover.
Lift up the spool pin. Place the spool of thread on the
spool pin.
Attach the large spool holder, and press it firmly against
the spool of thread.
NOTE:
Use the small spool holder to hold narrow or small spools
of thread.
Extra spool pin
Use the extra spool pin when you need to wind the
bobbin without unthreading the machine while working on
a sewing project.
Insert the extra spool pin into the hole as shown.
Place a spool of thread on the extra spool pin and fix the
spool with the spool holder.
NOTE:
The extra spool pin is also used for twin needle
sewing.
Winding the Bobbin
Removing the bobbin
CAUTION:
Press the lockout key or turn the power switch off.
zSlide the hook cover release button to the right, and
remove the hook cover plate.
xRemove the bobbin from the bobbin holder.
NOTE:
Use the plastic bobbins (marked with a “J”) for
horizontal hook. Using other bobbins, such as pre-
wound paper bobbins, may cause stitching problems
and/or damage to the bobbin holder.
x
z

11
Winding the bobbin
x c
we
q
w
e
v
rt
b
n
zPull the thread from the spool.
Hold the thread with both hands and pass the thread
into the guide slot q.
qGuide slot
xDraw the thread to the left and forward around the
thread guide w.
Draw the thread to the rear and to the right around
and under the guide plate e.
Firmly pull the thread to the right while holding it with
both hands.
wThread guide
eGuide plate
cPut the bobbin on the bobbin winder spindle.
r Bobbin
t Bobbin winder spindle
vPass the thread to the bobbin.
Hold the thread with both hands and wind it around
the bobbin clockwise several times.
bInsert the thread into one of the slits uof the flange
plate yand pull the thread to cut.
y Flange plate
u Slit
nPush the bobbin to the right. The visual touch screen
will show the bobbin winding sign.
mStart the machine. When the bobbin is fully wound, it
will stop spinning automatically.
Stop the machine and return the bobbin winder to its
original position by moving the spindle to the left.
m
q
z
,
y
u
,Remove the bobbin. Cut the thread with bobbin thread
cutter B.
i Bobbin thread cutter B
i

12
z
x
c
v
Inserting the bobbin
zPress the lockout key.
Place a bobbin in the bobbin holder with the thread
running off counterclockwise as shown on the hook
cover plate.
q End of thread
w Bobbin holder
e Hook cover plate
xHold the bobbin with fingertip so it does not rotate.
Guide the thread into the front notch of the bobbin
holder.
Pull the thread to the left to pass it under the guide.
r Front notch
t Guide
cDraw the thread to the left to pass it into the guide
path marked “1”.
Make sure that the thread comes out from the side
notch of the bobbin holder.
y Guide path 1
u Side notch
NOTE:
If the thread does not come out from the side notch,
rethread from step z.
vContinue to draw the thread along the guide path
marked “2” and pull the thread to the right through the
slit. The thread will be cut to a proper length and held
in place.
i Guide path 2
o Slit (Thread cutter)
wq
e
r
t
y
Correct
u
uu
Wrong
i
o
b
!0
bSet the left edge of the hook cover plate into opening.
Push down the hook cover plate to fit in place.
! 0 Hook cover plate
NOTE:
Unless otherwise noted, you can start sewing without
drawing up the bobbin thread.
Refer to page 15 for how to draw up the bobbin
thread.

13
x
c
b
m
n
z
v
z
w
Threading the Machine
Press the needle up/down button to raise the take-up lever
to the highest position.
Press the lockout key to lockout the machine. Raise the
presser foot.
qLockout key
Pass the thread in order from zto m.
z Hold the thread with both hands and pass the thread
into the guide slot.
wGuide slot
x Hold the thread with both hands and draw the thread
around the corner of the guide.
Firmly pull the thread toward you along the right
channel until the thread snaps.
eCorner of the guide
rRight channel
c Draw the thread down along the right channel and
around the bottom of the thread guide plate.
Pull the thread up along the left channel.
rRight channel
tThread guide plate
yLeft channel
v While holding the thread at the spool, firmly draw the
thread up and to the back of the take-up lever. Draw
the thread forward to draw it into the eye of the take-up
lever.
uEye of the take-up lever
b Then pull the thread down along the left channel
and through the lower thread guide.
iLower thread guide
n Slide the thread behind the needle bar thread guide
from the left.
oNeedle bar thread guide
m Thread the needle with the needle threader (refer to
the next page).
c
vu
b
m
n
o
i
xe
r
r
t
y
q

14
Needle threader
NOTE:
The needle threader can be used with a #11 to #16
needle.
Thread size 50 to 90 is recommended.
Make sure the machine is locked out.
Lower the presser foot.
zPull down the needle threader knob as far as it will go.
The threader hook comes out through the needle eye
from behind.
qThreader knob
wThreader hook
x Draw the thread from the left to the right, under the left
guide, threader hook and right guide.
Draw the thread around the right guide toward you.
eLeft guide
rRight guide
cRaise the threader slowly so a loop of the thread is
pulled up through the needle eye.
tThread loop
vPull the thread loop to take the thread end out through
the needle eye to the rear.
Press the lockout key to unlock the machine.
NOTE:
The needle threader cannot be used with a twin
needle.
z
r
x
c
v
e
q
w
t

15
Drawing up the Bobbin Thread
After using auto thread cutting or threading the bobbin
holder, you can start sewing without drawing up the
bobbin thread.
However, you need to draw up the bobbin thread when
sewing gathering stitches etc.
zRemove the bobbin. Insert the bobbin into the bobbin
holder again and rethread the bobbin holder according
to the instructions on page 12, but leave a 10 cm (4˝)
tail of bobbin thread as shown.
q Bobbin thread
NOTE:
Do not cut the bobbin thread with the thread cutter.
wThread cutter
xRaise the presser foot. Hold the needle thread lightly
with your left hand.
e Needle thread
cPress the needle up/down button twice to lower and
raise the needle to pick up the bobbin thread.
r Needle up/down button
vPull both threads 10 cm (4˝) under and behind the
presser foot.
z
x
c
v
w
q
e
r

16
Replacing Needles
CAUTION:
Always make sure to press the lockout key to lockout the
machine or turn the power switch off before replacing the
needle.
Raise the needle by pressing the needle up/down button.
Press the lockout key.
qLockout key
Loosen the needle clamp screw by turning it counter-
clockwise.
Remove the needle from the clamp.
wNeedle clamp screw
Insert a new needle into the needle clamp with the flat
side of the needle to the rear.
eFlat side
When inserting the needle into the needle clamp, push it
up against the stopper pin and tighten the needle clamp
screw firmly with a screwdriver.
To check needle straightness, place the flat side of the
needle onto something flat (a needle plate, glass etc.)
The gap between the needle and the flat surface should
be consistent.
rGap
Never use a blunt needle.
r
e
w
Fine
Medium
Silk #80-100
Cotton #80-100
Synthetic #80-100
Heavy weight
Denim
Tweed
Coating
Quilting
Lawn
Georgette
Tricot
Sheeting
Jersey
Wool
Knit
#9/65-11/75
Blue tip needle
Thread Needle
Silk #50
Cotton #50-80
Synthetic #50-80
#11/75-14/90
Red tip needle
Silk #30-50
Cotton #40-50
Synthetic #40-50
#14/90-16/100
Purple tip needle
Fabric and Needle Chart
• Forgeneralsewing,useneedlesize
#11/75 or #14/90.
• Finethreadsandneedlesshouldbeused
for sewing fine fabrics.
• Ingeneral,usethesamethreadforboth
needle and bobbin.
• Useabluetipneedleforsewingne
fabrics, stretch fabrics and buttonholes to
prevent skipped stitches.
• Useapurpletipneedleforsewingthick
fabrics, denims, quilt layers and across the
hem to prevent skipped stitches.
• Useastabilizerorinterfaceforstretchor
fine fabrics to prevent seam puckering.
• Alwaystestthethreadandneedlesizeon
a small piece of the same fabric you will
use for actual sewing.
Fabric
NOTE:
1 x twin needle, 2 x blue tip needle (#11/75), 1 x red tip
needle (#14/90) and 1 x purple tip needle (#14/90) are
included in the needle case.
For embroidery:
• Ingeneral,useabluetipneedle.
• Usearedtipneedlefordensestitchembroidery.
q
Table of contents
Other ELNA Sewing Machine manuals

ELNA
ELNA eXplore 120 User manual

ELNA
ELNA Elinita EF72 User manual

ELNA
ELNA eXpressive 900 Technical manual

ELNA
ELNA 664 - User manual

ELNA
ELNA 6200 - User manual

ELNA
ELNA Sew Green User manual

ELNA
ELNA 505 User manual

ELNA
ELNA 6005 User manual

ELNA
ELNA XQUISIT 2 User manual

ELNA
ELNA Elnita ec 30 User manual