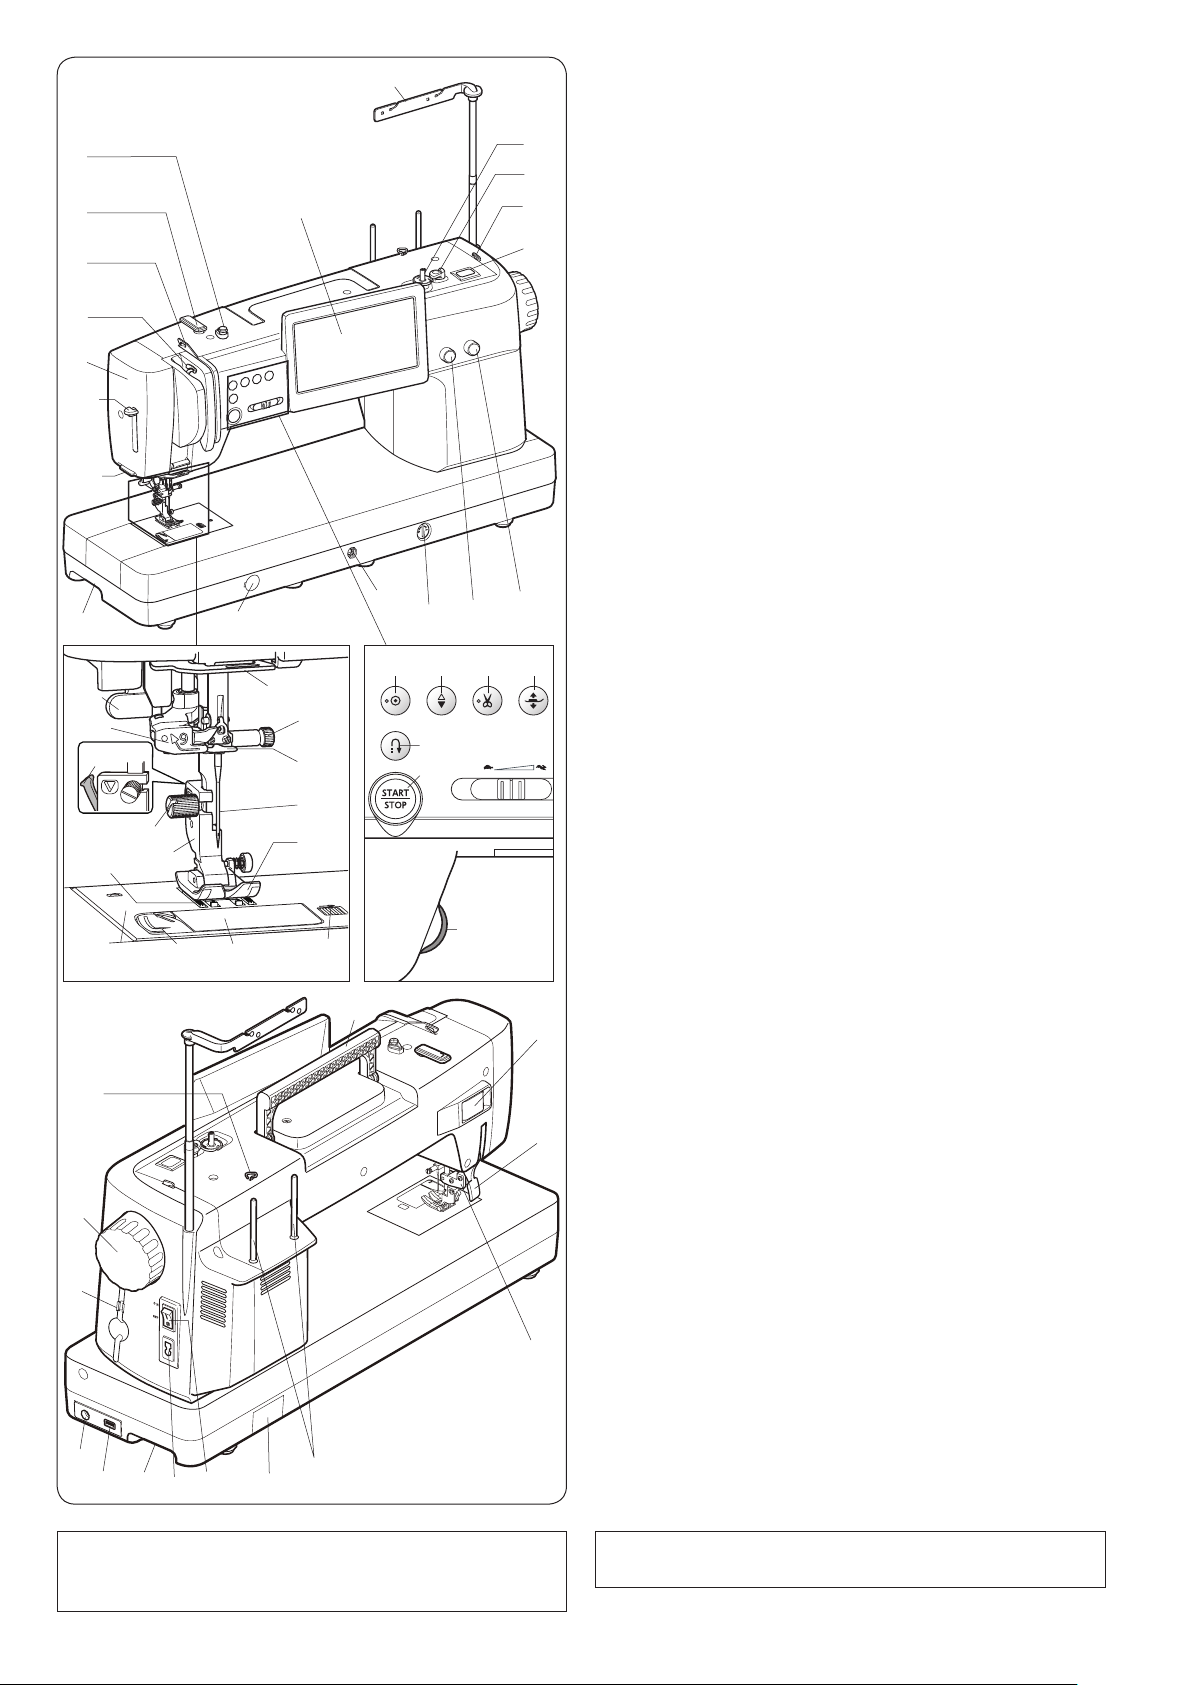
ELNA eXcellence 792PRO User manual

ⅠInstruction Book Ⅰ
eXcellence 792PRO

(1) (2)
WARNING:
This product contains a lithium button/coin cell battery.
If a new or used lithium button/coin cell battery is
swallowed or enters the body, it can cause severe
internal burns and can lead to death in as little as
2 hours. Always completely secure the battery
compartment. If the battery compartment does not
close securely, stop using the product, remove the
batteries, and keep it away from children. If you
think batteries might have been swallowed or placed
inside any part of the body, seek immediate medical
attention.
When you start the machine for the rst time, be sure to
remove the tape from the battery cover on the rear side
of the machine.
(1) Tape
(2) Battery cover
Set the clock after removing the tape from the battery
cover (refer to page 137).
Before You Use the Machine

1
IMPORTANT SAFETY INSTRUCTIONS
When using an electrical appliance, basic safety precautions should always be followed,
including the following:
This sewing machine is designed and manufactured for household use only.
Read all instructions before using this sewing machine.
DANGER— To reduce the risk of electric shock:
1. An appliance should never be left unattended when plugged in. Always unplug
this sewing machine from the electric outlet immediately after using and before
cleaning.
WARNING— To reduce the risk of burns, re, electric shock, or injury to persons:
1. Do not allow to be used as a toy. Close attention is necessary when this sewing machine is used
by or near children.
2. Use this appliance only for its intended use as described in this owner’s manual.
Use only attachments recommended by the manufacturer as contained in this owner’s manual.
3. Never operate this sewing machine if it has a damaged cord or plug, if it is not working properly, if
it has been dropped or damaged, or dropped into water.
Return this sewing machine to the nearest authorized dealer or service center for examination,
repair, electrical or mechanical adjustment.
4. Never operate the appliance with any air opening blocked. Keep ventilation openings of this
sewing machine and foot controller free from accumulation of lint, dust and loose cloth.
5. Never drop or insert any object into any opening.
6. Do not use outdoors.
7. Do not operate where aerosol (spray) products are being used or where oxygen is being
administered.
8. To disconnect, turn all controls to the off (“O”) position, then remove plug from outlet.
9. Do not unplug by pulling on cord. To unplug, grasp the plug, not the cord.
10. Keep ngers away from all moving parts. Special care is required around the sewing machine
needle and/or cutting blade.
11. Always use the proper needle plate. The wrong plate can cause the needle to break.
12. Do not use bent needles.
13. Do not pull or push fabric while stitching. It may deect the needle causing it to break.
14. Switch this sewing machine off (“O”) when making any adjustment in the needle area, such as
threading the needle, changing the needle, threading the bobbin or changing the presser foot, and
the like.
15. Always unplug this sewing machine from the electrical outlet when removing covers, lubricating,
or when making any other adjustments mentioned in this owner’s manual.
SAVE THESE INSTRUCTIONS
For Europe only:
This appliance can be used by children aged from 8 years and above and persons with reduced
physical, sensory or mental capabilities or lack of experience and knowledge if they have been given
supervision or instruction concerning use of the appliance in a safe way and understand the hazards
involved. Children shall not play with the appliance. Cleaning and user maintenance shall not be
made by children without supervision.
For outside Europe (except U.S.A.):
This appliance is not intended for use by persons (including children) with reduced physical,
sensory or mental capabilities, or lack of experience and knowledge, unless they have been given
supervision or instruction concerning use of the appliance by a person responsible for their safety.
Children should be supervised to ensure that they do not play with the appliance.
Please note that on disposal, this product must be safely recycled in accordance with relevant
National legislation relating to electrical/electronic products. If in doubt please contact your
retailer for guidance. (EEA (European Economic Area) and UK)

2
TABLE OF CONTENTS
ESSENTIAL PARTS
Names of Parts................................................................4
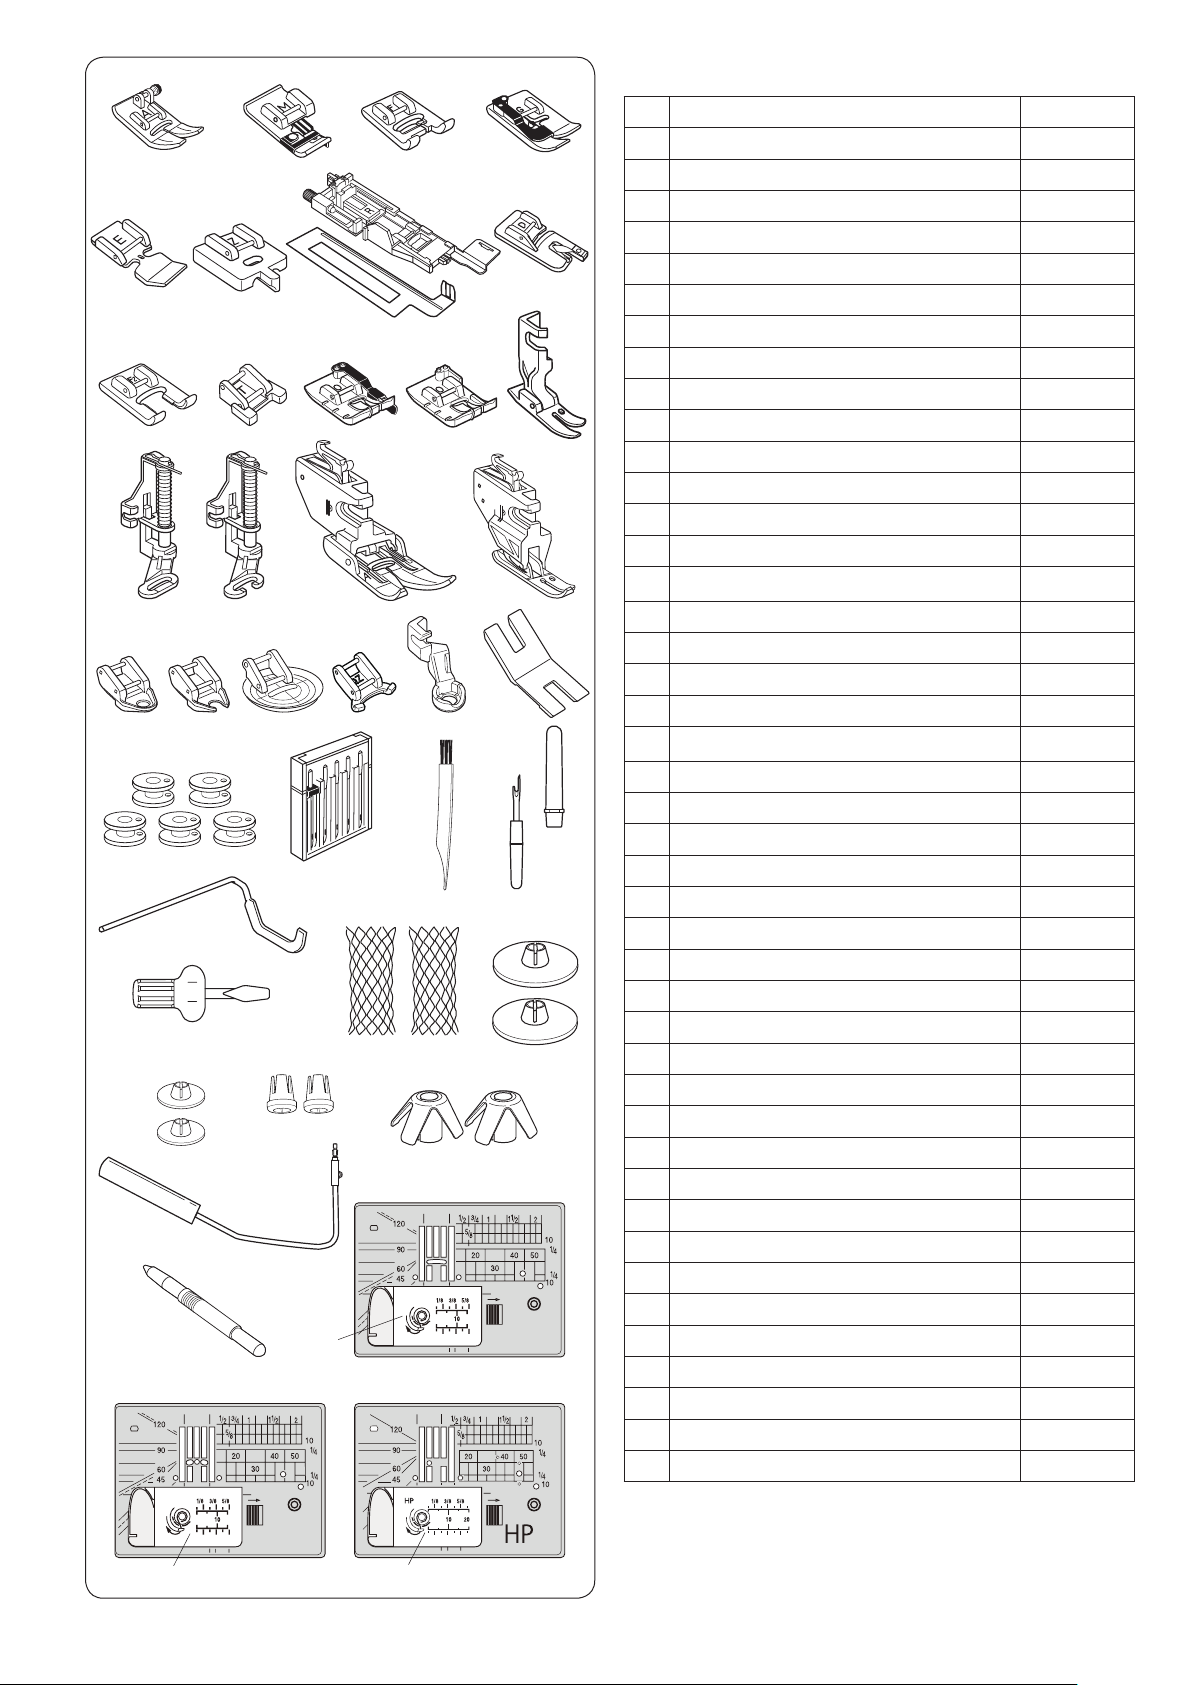
Standard Accessories...................................................... 5
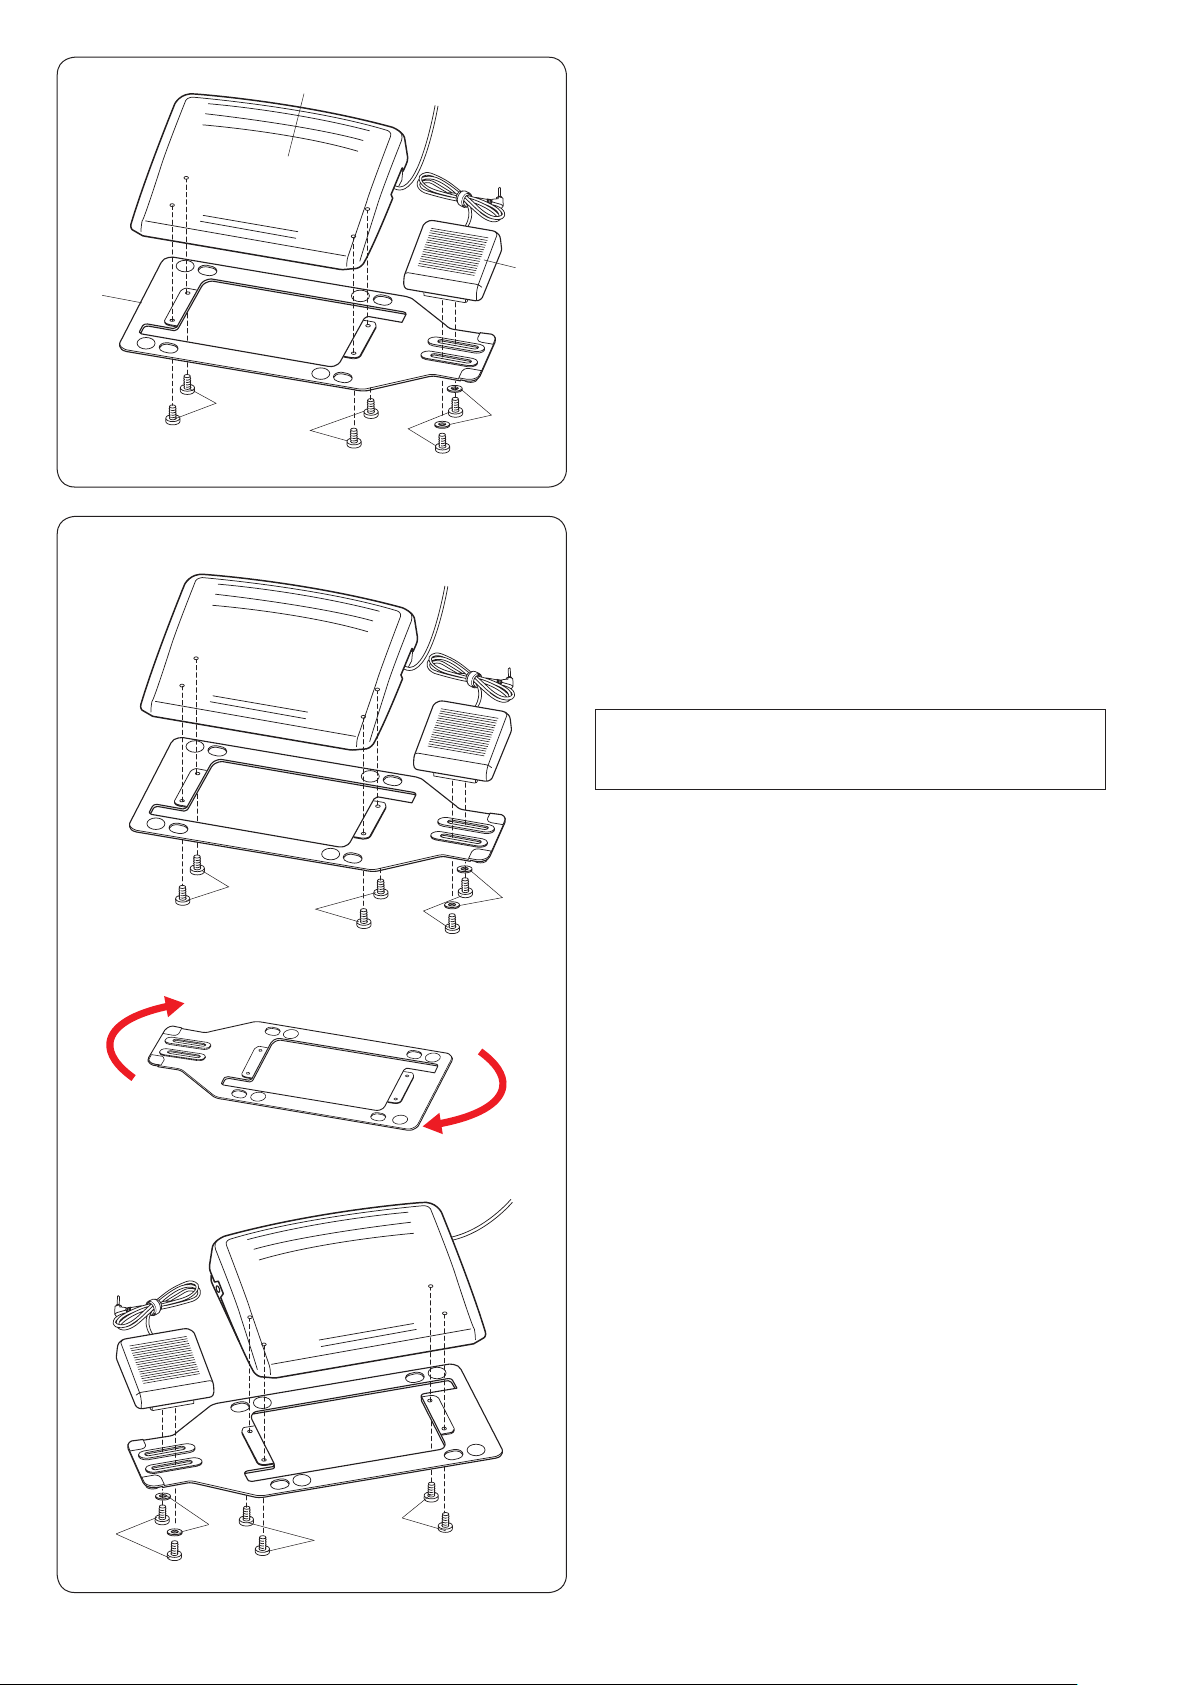
Foot Control and Thread Cutter Switch...........................8
Adjusting the Thread Cutter Switch Position ...................8
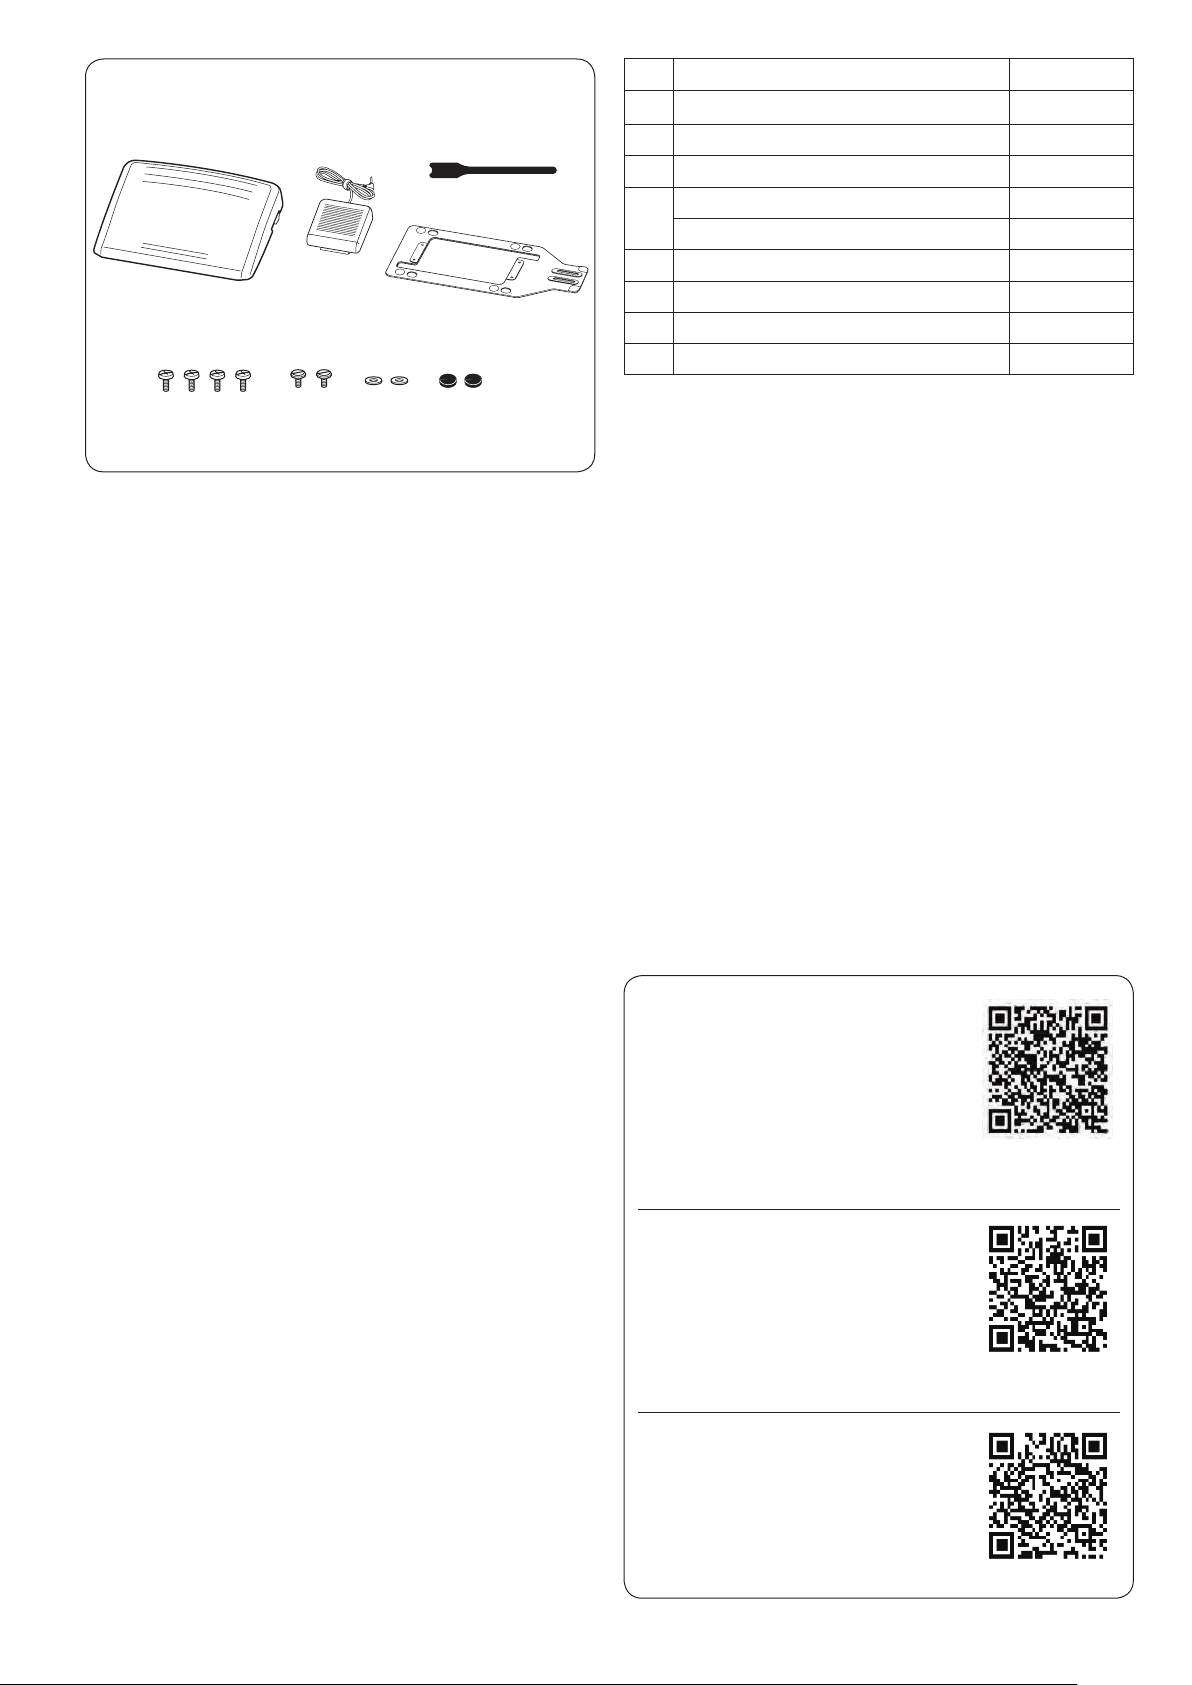
Extra Wide Table ...........................................................10
How to Carry the Sewing Machine ................................ 10
GETTING READY TO SEW
Connecting the Power Supply ....................................... 11
Using Start/Stop Button............................................... 11
Using Foot Control ......................................................12
Thread Cutter Switch.....................................................13
Controlling Sewing Speed .............................................14
Speed Control Slider ...................................................14
Foot Control.................................................................14
Machine Operating Buttons...........................................15
Bobbin Winding Button and Jog Dials ........................... 17
Thumb Wheel ................................................................17
Touch Panel Keys..........................................................18
On-screen Help .............................................................19
Raising and Lowering the Presser Foot ........................ 20
Knee Lifter .....................................................................20
Replacing the Presser Foot...........................................21
Removing and Attaching the Foot Holder...................... 22
Attaching Dual Feed Foot AD or Dual Feed Plus
Professional Foot HP2...................................................23
Attaching the Ruler Work Foot QR................................23
Attaching the Professional Grade Foot HP....................23
Attaching the Darning Foot PD-H or the Darning Foot
PD-H (open-toe) ............................................................24
Replacing Needles ........................................................24
Fabric and Needle Chart ............................................... 25
Using the Straight Stitch Needle Plate .......................... 25
Winding the Bobbin ....................................................... 26
Inserting the Bobbin ....................................................29
Threading the Machine..................................................30
Guide Sticker for Threading.........................................31
Built-in Needle Threader................................................32
Drawing Up the Bobbin Thread ..................................... 33
Replacing the Needle Plate...........................................34
ORDINARY SEWING MODE
Ordinary Stitch Patterns ................................................ 35
Function Keys................................................................37
Utility Stitches................................................................39
Straight Stitches ..........................................................39
Sewing from the Edge of Thick Fabric.........................39
Changing Sewing Direction .........................................39
Turning a Square Corner.............................................39
Securing Seams ..........................................................40
Cutting Threads...........................................................40
Needle Plate Guides......................................................40
Variety of Straight Stitches ............................................41
Sewing with the Dual Feed Drive .................................. 42
Dual Feed Plus Professional Foot HP2.........................43
Sewing with the Professional Grade Foot HP ............... 44
Floating Mode................................................................45
Variety of Zigzag Stitches .............................................. 46
Variety of Overcasting Stitches...................................... 47
Manual Stitch Settings...................................................48
Adjusting Thread Tension ............................................49
Adjusting Foot Pressure Control .................................50
Number of Locking Stitches ........................................50
Foot Up for Pivoting.......................................................50
Favorite Stitch Adjustment .............................................51
Cloth Guide....................................................................53
Other Utility Stitches......................................................54
BUTTONHOLES AND SPECIALTY
STITCHES
Variety of Buttonholes.................................................... 56
B1 Sensor (Square) Buttonhole.....................................57
Double Layer Buttonhole...............................................59
Manual Settings.............................................................60
Using the Stabilizer Plate .............................................. 61
B2 Automatic (Square) Buttonhole ................................ 62
Other Buttonholes..........................................................64
B13 Welted Buttonhole (Bound Buttonhole).................. 65
Corded Buttonhole.........................................................67
Specialty Stitches ..........................................................67
B14 Button Sewing........................................................67
B15 Darning...................................................................68
B16 Tacking ...................................................................69
B17 Fly Stitch ................................................................ 69
B18-B22 Eyelets............................................................69
DECORATIVE STITCHES
Decorative Stitches........................................................70
Quilting ..........................................................................79
Using the Quilting Guide Bar....................................... 79
Q1-Q3 Patchwork Piecing ...........................................79
Angle Scales on the Needle Plate............................... 79
Quilt Block Advisor.........................................................80
Q80-Q85 Hand-Look Quilt Stitches...............................82
Satin Stitches.................................................................82
Elongation Ratio ..........................................................82
Mirage Stitches..............................................................83
Created Stitches............................................................84
Twin Needle Sewing ...................................................... 85
PROGRAMMING A PATTERN
COMBINATION
Mirror Image of Patterns................................................87
Bridge Stitches ..............................................................87
Editing a Pattern Combination....................................... 88
Deleting a Pattern........................................................88
Inserting a Pattern .......................................................88
Startover Key...............................................................89
Checking Pattern Combination Length........................ 90
Tapering.........................................................................91
Tapered Stitch Sample 1 ............................................. 91
Auto-lock Stitch Function............................................. 92
Flipping the Tapered Pattern 1 ....................................92
Adjustment of Tapered Stitches................................... 93
Flipping the Tapered Pattern 2 ....................................94
Tapered Stitch Sample 2 ............................................. 95

3
TABLE OF CONTENTS
MONOGRAMMING
Function Keys................................................................97
Manual Thread Tension .................................................98
Individual Thread Tension Adjustment......................... 98
Unied Thread Tension Adjustment ............................. 98
Spacing..........................................................................98
Reducing the Size of Letters ......................................... 98
Programming a Monogram............................................99
Saving a Pattern Combination..................................... 101
Creating a New Folder ..............................................101
Deleting a File or Folder ............................................101
Changing a File Name or Folder Name ....................102
Opening a Pattern Combination ..................................102
HAND STITCH STYLE
Hand Stitch Style.........................................................103
SEWING APPLICATION
Variety of Sewing Applications.....................................104
Sewing.........................................................................105
Seaming Woven ........................................................105
Seaming Stretch/Knit................................................. 105
Curve......................................................................... 105
Topstitching ...............................................................105
Rolled Hem................................................................106
Overedge Woven.......................................................107
Overedge Stretch/Knit ...............................................107
Overedge Heavy .......................................................107
Blind Hem.................................................................. 108
Shell Tuck.................................................................. 110
Lapped Zipper ........................................................... 110
Invisible Zipper .......................................................... 113
Pouch Zipper ............................................................. 115
Gathering................................................................... 117
Easestitching ............................................................. 117
Basting ...................................................................... 118
Buttonhole ................................................................. 118
Button ........................................................................ 119
Tacking ......................................................................120
Eyelet ........................................................................121
Smocking...................................................................122
Fagoting ....................................................................122
Quilt .............................................................................123
Patchwork Piecing..................................................... 123
Free Motion ...............................................................124
Accurate Stitch Regulator Function/A.S.R. Foot
Holder........................................................................ 125
Changing the Foot Attachment..................................127
Ruler Work.................................................................128
Variable ZZ ................................................................129
Applique ....................................................................130
Straight Stitch (with Dual Feed)................................. 131
Decorative Quilt Stitch............................................... 131
Clasp Stitch ...............................................................131
Sashiko......................................................................132
Hand-Look QU ..........................................................132
INFORMATION AND CUSTOMIZING
Quick Stitch Select ...................................................... 133
Quilt Block Advisor.......................................................133
Manual Dual Feed Setting...........................................134
Machine Information....................................................135
Customizing Machine Settings .................................... 136
Machine Setting Mode.................................................137
Sewing Setting Mode...................................................139
Language Setting Mode .............................................. 141
CARE AND MAINTENANCE
Cleaning the Hook Area...............................................142
Correcting Distorted Stitch Patterns ............................ 143
Replacing the Coin Cell Battery for the Internal Clock 144
Replacing the Needle Plate for Emergency.................145
Problems and Warning Signals ...................................146
Troubleshooting...........................................................147
Formatting USB Flash Drives......................................149
Stitch Chart..................................................................151
Stitch Chart (Monogram) ............................................. 153
Table of contents
Other ELNA Sewing Machine manuals

ELNA
ELNA 9900 - LEAFLET User manual

ELNA
ELNA CE10 User manual

ELNA
ELNA 7300 - User manual

ELNA
ELNA 8007 Owner's manual

ELNA
ELNA eXpressive 830L User manual

ELNA
ELNA eXcellence 580+ User manual

ELNA
ELNA eXplore 120 User manual

ELNA
ELNA EnVision 8006 Wiring diagram

ELNA
ELNA 8200 User manual

ELNA
ELNA 2003 User manual