ELNA 6001 User manual

PDFMAILER.DE
INSTRUCTION BOOK
6001

PDFMAILER.DE
IMPORTANT SAFETY INSTRUCTIONS
Your Elna model 6001 sewing machine is designed and constructed for HOUSEHOLD use only. Read
all instructions before using this machine.
DANGER– To reduce the risk of electric shock:
1. Your sewing machine shouldnever be left unattended whenplugged in. Alwaysunplug the machine from
theelectricaloutlet immediatelyafterusingandbeforecleaning.
2. Alwaysunplug beforereplacing light bulb.Replace bulb with same type rated 12 Volts, 5 watts.
3. Donot reach for themachine if it hasfallen intowater. Unplugimmediately.
4. Donot placeor store machinewhere it can fall or bepulled intoa tub or sink. Do not place it in or drop it
intowater or other liquid.
WARNING– To reduce the risk of burns, fire, electrical shock or injury:
1. Do not allowmachine to be used as a toy. Supervision is necessary when this machine is used by or
nearchildren.
2. Use thissewing machineonly for its intendeduse as described inthis manual. Only use attachments
recommended by the manufacturer as described in thismanual.
3. Never operate this machine if it has a damaged cord or plug, is not working properly, has been dropped
or damaged or dropped into water. Return themachine tothe nearest authorized dealer or servicecen-
ter for examination,repair,electricalor mechanical adjustment.
4. Thismachine is equipped with a special connection cord which, if damaged, must bereplaced by an
identicalcord.This can be obtained from your dealer.
5. Never operate thesewing machine withany air opening blocked. Keep ventilation openingsof the sew-
ing machineand footcontrol free fromthe accumulationof lint,dustand fibers.
6. Never drop or insert any object intoany opening.
7. Do not use outdoors.
8. Do not operate where aerosol (spray) products are being used or where oxygen is being administered.
9. To disconnect, turn machineoff andremoveplug from outlet.
10. Do not unplug by pulling oncord. To unplug, grasp theplug, not the cord.
11. Keep fingersaway from all movingparts, especially the needle.
12. Always use the proper needleplate. The wrong platecan cause the needle to break.
13. Do not use bent needles.
14. Do not pull or push fabric while stitching. This may deflect the needlecausing it to break.
15. Switch thesewing machineoff when making anyadjustment in the needlearea, suchas threading
needle, changing needle, threading bobbin, changingpresser foot, etc.
16. Alwaysunplug the sewing machine from the electrical outlet whenremovingcovers, lubricatingor mak-
ing any other servicing adjustmentsmentioned in the instruction manual.
SAVE THESE INSTRUCTIONS
IMPORTANT
Be sure tokeep machineaway from staticelectricity, heat sources, humidityanddirect sunlight.
USAonly
Your machine comes equipped with a polarized plug (one prong wider than the other). A polarized plugre-
duces the risk of electricalshock.Thisplug is intended to fit intoapolarizedoutlet. If theplugdoesnot fit
fully intothe outlet, reverse the plug. If it still does not fit, contact a qualified electrician to install the proper
outlet. Do not modify the plug in any way.
Use only foot control 21249 (UL, CSA).
1

PDFMAILER.DE
TABLE OF CONTENTS
SECTION I – Machine Parts and Functions
Part Names .............................................................. 3
Accessory Storage ......... ..........................................4
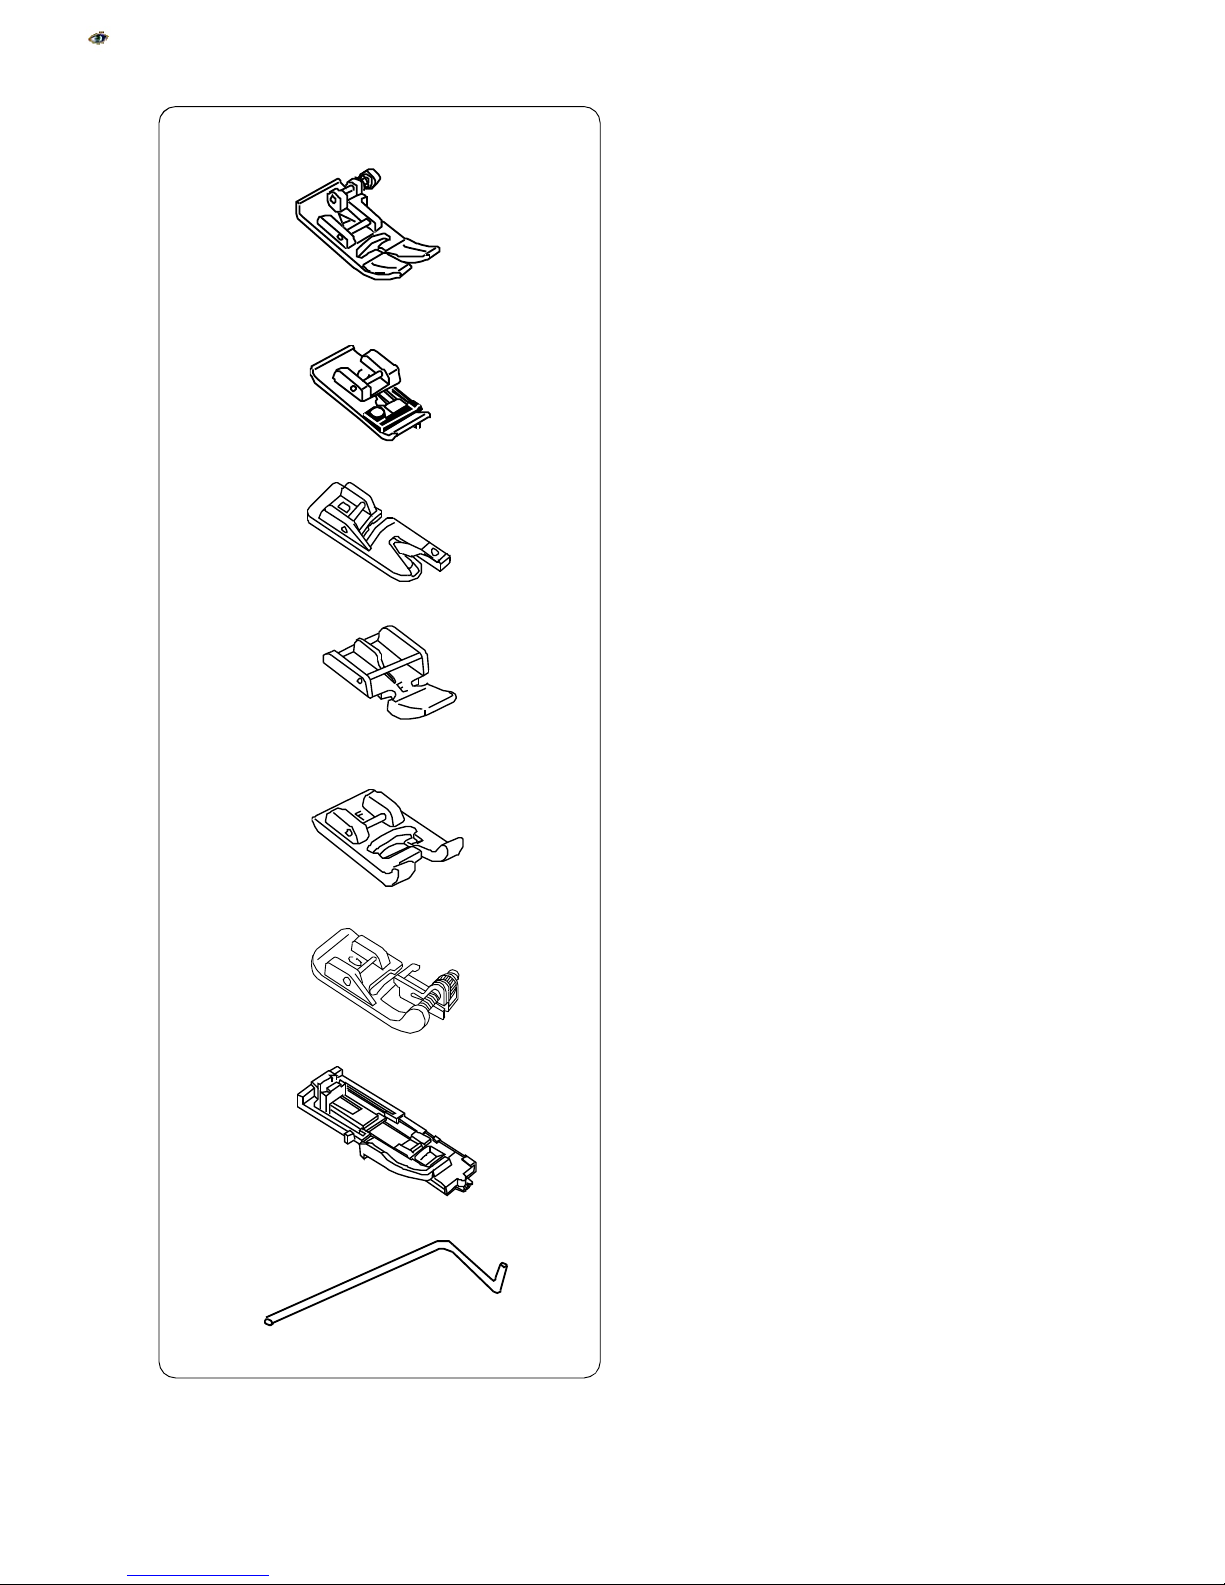
Presser Foot Definitions.......... .................................5
ExtensionTableand FreeArm.......... ........................6
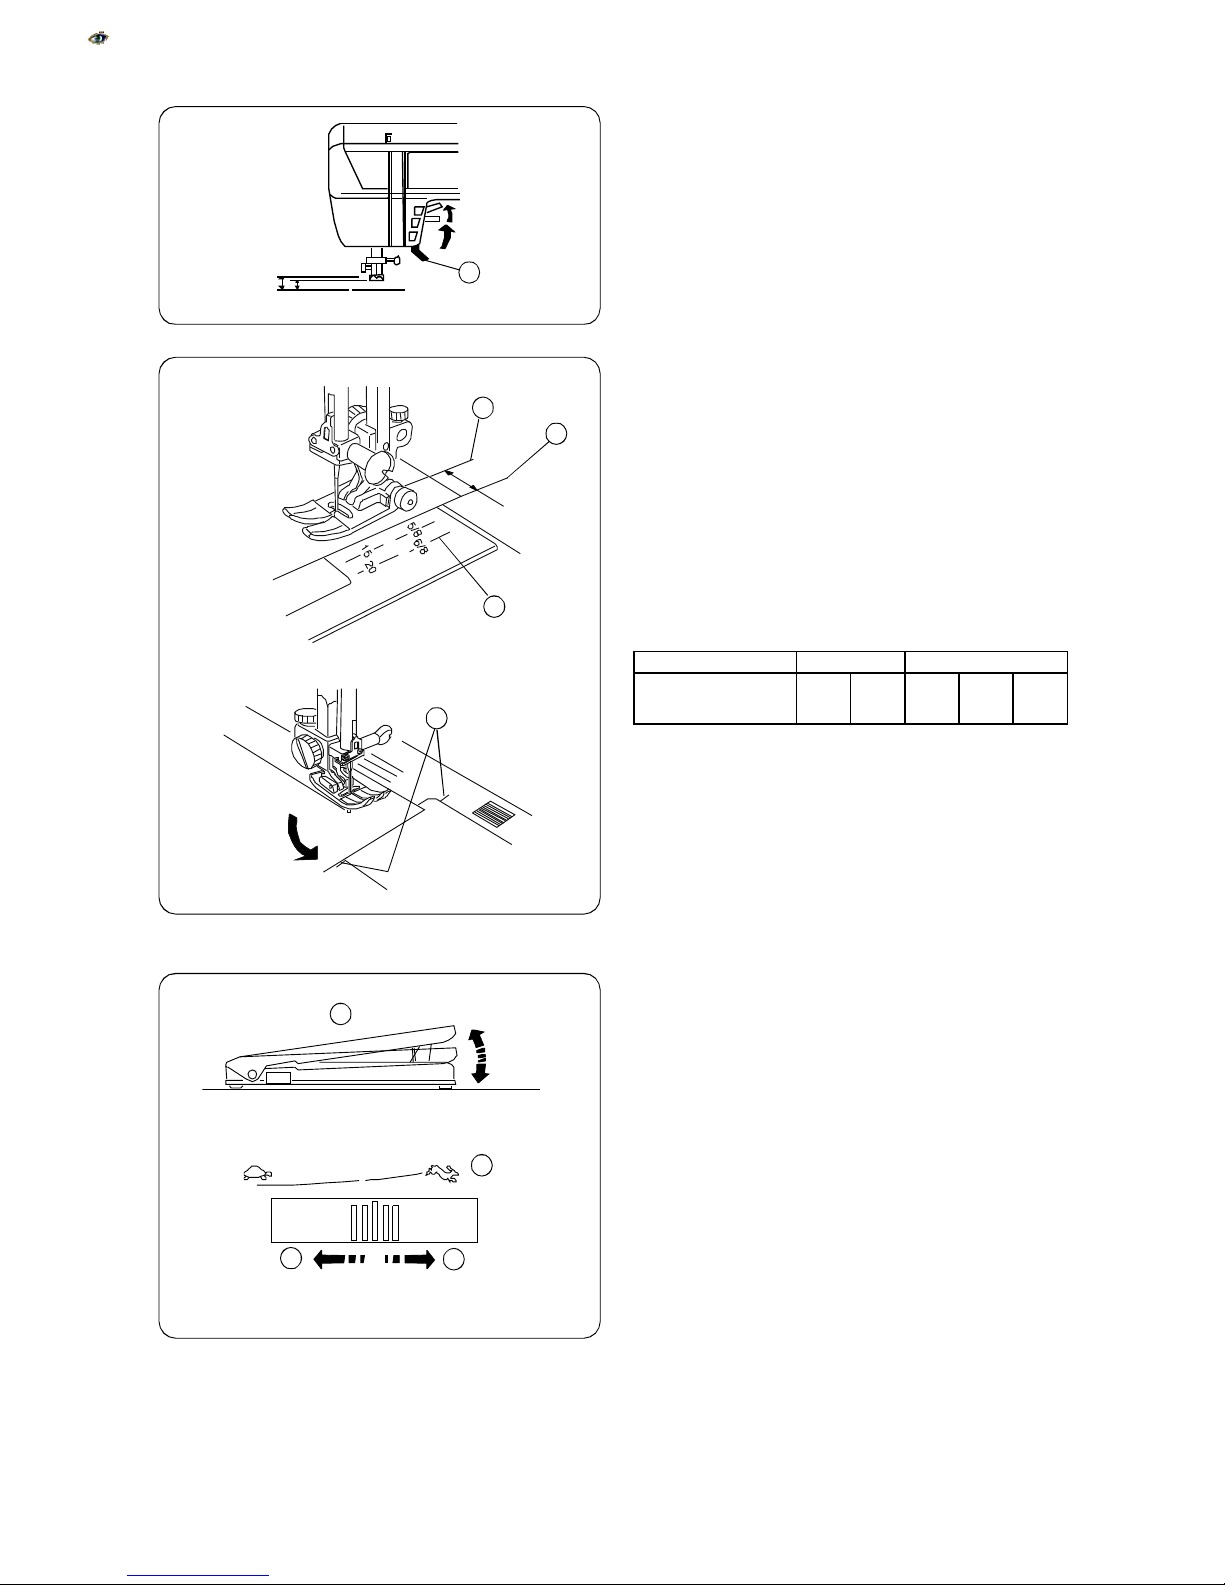
Using the Fine Adjustment Dial.......... .......................6
How to Drop the Feed Dog ....................................... 7
Foot Pressure Dial.................................................... 7
Attaching and Removing Presser Feet .................... 7
Attaching andRemoving Shank ............................... 7
Additional Presser Foot Clearance........................... 8
Seam Allowance Lines ............................................. 8
ControllingSewing Speed......................................... 8
AdjustingNeedleThreadTension ............................. 9
SECTION II – Getting Ready to Sew
Selecting the Correct Needle and Thread ............ 10
Changing Needles ................................................. 10
Needle Definitions...................................................11
Connecting Machine to Power Supply.................. 12
Main Function of Keys ...................................... 13-15
Winding a Bobbin .............................................. 16-17
Additional Spool Pin............................................... 17
Inserting the Bobbin ............................................... 18
Threading the Machine .......................................... 19
Built-in Needle Threader........................................ 20
Drawing Up the Bobbin Thread ............................. 21
SECTION III – Sewing
Example of How to Read the Machine Set-up
Information ............................................................ 22
Straight Stitch ......................................................... 22
Starting to Sew....................................................... 22
Finishing Off a Seam ............................................. 23
Changing Sewing Direction ................................... 23
Sewing on Heavy Fabrics...................................... 23
Gathering................................................................ 24
Zipper Insertion ................................................. 25-26
Pintucks .................................................................. 27
Quilt Guide ............................................................. 27
Rolled Hem (optional foot) ..................................... 28
Twin Needle Hem................................................... 29
Zigzag Stitch .......................................................... 30
Overcasting ............................................................ 30
Whip and Roll Hem ................................................ 31
Satin Stitch Applique .............................................. 31
How to Sew on a Button ........................................ 32
3-Step Zigzag ......................................................... 33
Mending a Tear....................................................... 33
Blind Hem Stitches ................................................ 34
Shell Tuck ............................................................... 35
Box Stitch ............................................................... 35
Triple Seam ............................................................ 36
Saddle Stitch .......................................................... 36
Stretch Seam ......................................................... 36
Decorative Stretch Stitches ................................... 37
Super Stretch Stitch ............................................... 37
Super Overlock Stitch ............................................ 38
Double Overlock Stitch .......................................... 38
Buttonhole Variations ........................................ 39-42
Corded Buttonhole ................................................. 43
Buttonhole Applique ............................................... 44
Fringing................................................................... 45
Hemstitches............................................................ 45
Drawn Work............................................................ 46
Picot Stitch ............................................................. 46
Patchwork............................................................... 47
Twin Needle Decorative Stitches .......................... 47
Single Pattern – Auto-Lock Key ............................ 47
Scallop Edges ........................................................ 48
Complete Pattern – Auto-Lock Key ....................... 48
Combining Patterns ............................................... 48
Smocking................................................................ 49
SECTION IV – Exclusive Optional Elna
Accessories
Elastic Gatherer Plate............................................ 50
Fagoting (Bridging) Plate....................................... 50
SECTION V – Taking Care of Your Machine
Cleaning the Bobbin Area...................................... 51
Cleaning the Hook Area and Feed Dog ........... 51-52
Replacing the Bobbin Case ................................... 52
Changing the Light Bulb ........................................ 52
TROUBLESHOOTING ..........................53
INDEX ...................................................54
NOTE: Information found in this instruction
manual is current at the time of printing. Elna
reserves theright to change and update specifi-
cations and information as needed.
2

PDFMAILER.DE
SECTION I
Machine Parts and Functions
Part Names
1. Footcompartment
2. Stitchcharts
3. Topcover
4. Thread tension dial
5. Foot pressure dial
6. Face plate
7. Threadcutter
8. Needle threader
9. Needleplate
10. Extension table (accessory storage box)
11. Bobbincoverplate
12. Bobbin cover plate release button
13. Fineadjustmentdial
14. Reversekey
15. Auto-lockkey
16. Up-down needle key
17. Speedcontrol lever
18. Front cover (lift cover toaccess selectionkeys)
19. Needleclamp screw
20. Needle
21. Presser foot
22. Shank
23. Thumbscrew
24. Threadtake-uplever
25. Carryinghandle
26. Flywheel (alwaysturn towards you)
27. Power switch
28. Machine sockets
29. Feeddog lever
30. Freearm
31. Buttonholelever
32. Presser foot lever
3
14
13
11
10
26
23
9
8
25
30
24
7
32
31
27
20
21
6
29
28
54
17
18
19
2
3
22
15
12
16
1

PDFMAILER.DE
Accessory Storage
Foot Compartment
1. Set of needles
2. Quiltguide
3. G:Blindhem foot
4. D:Hemmer foot(optional)
5. C:Overlockfoot(optional)
6. E:Zipper foot
7. A: Standardmetal foot
8. F:Satinstitchfoot
Extension Table (Accessory Storage Box)
Many sewing accessories are stored in the extension
table. Pull lid towardsyou toopen thestorage box.
9. Screwdriver
10. R:Automaticbuttonholefoot
11. Lint brush
12. Bobbins(5 total)
13. Seamripper
14. Large spool holder
15. Smallspoolholder
16. Additionalspoolpin
17. Spoolpinfelt
18. Spool stand
19. Footcontrol
20. Power supply cord
21. Carrying case
4
1
234
5
6
7
8
910
11 12
13 14
15 16 17
18
19
20
21

PDFMAILER.DE
Presser Foot Definitions
A: STANDARD METAL FOOT A
This footcomes attachedtoyour machine. It is
mainly used for straight stitches and zigzag stitches
longer than 1.0. The button locksthe foot in a hori-
zontal position helping to sewover multiple layered
seams.
C: OVERLOCK FOOT (optional)
Prevent fabricedges fromraveling by finishingthe
edge witha zigzag stitch. Thebrush on the foot
helpsthe stitch lie flatter andreduces puckering. Use
withmedium weight fabrics.
D: HEMMER FOOT (optional)
Insert the fabric into thespiral on this foot. The spiral
rollsthe fabric,creating arolled hem.An easy, pro-
fessional way to sewhems.
E: ZIPPERFOOT
Use when sewing zippers into place to avoid the foot
riding on topof the zipper coil. Attacheither to the
left or rightof theneedleto seweach sideof the zip-
per.
F: SATIN STITCH FOOT
The cutout onthe underside of the foot is designed
toaccommodatedense stitch formation. Ideal when
sewing satin and decorative stitches.
G: BLIND HEM FOOT, ADJUSTABLE
The adjustable guide on the foot helps ensure that
the needlecatches only oneor two fibersof the
hem,resulting inan invisible hemline.The guide can
also be adjusted to createpintucks.
R:AUTOMATIC BUTTONHOLEFOOT
Place button in foot to determine the buttonhole size.
The machine will automatically sewthe correspond-
ing buttonhole.
QUILT GUIDE
The quilt guide is helpful when sewingparallel,
evenly spaced rows of stitching.
5

PDFMAILER.DE
Extension Table (Accessory Storage Box)
and Free Arm
ExtensionTable
The extension table provides moresewing space to
makesewing easier. The extension can be easily
removed for freearmsewing.
Free arm sewing is good for circle areas like sleeves,
waistbands and pant legs. If socks, knee or elbow
areasneed mending, the freearm will be best to
use.
Pull the end of the extension table away from the
machine, as shown in the drawing.
Push the table back into place to reattach the exten-
sion table.
Using the Fine Adjustment Dial
Choice of fabrics andthreads may affect the stitch
formation whensewing decorative stitchesor button-
holes. The fine adjustment dial can be used to either
lengthen or shorten the stitch.
j
Fineadjustmentdial
k
Standardmark
l
Settingmark
To fine tune, useascrewdriver to move thesetting
mark.
•
If stitches aretoo short
m
, correct by turning the
dial in the direction of “+”.
•
If stitches aretoo short
n
, correct by turning the
dial in thedirection of “-.”
•
If left sideof buttonhole is lessdense
o
than
right side,correct byturning dial in direction of
“+”.
•
If rightside of buttonhole isless dense
p
than
left side, correct by turning dial indirection of “-.”
6
1
2
3

PDFMAILER.DE
How To Drop the Feed Dog
The feeddog drops out of position for special sewing
techniques: free motion embroidery, button sewing,
etc.
The feeddog must alwaysbe up for regular sewing.
Locate the feeddog lever on the back of the free
arm. Slide the lever either to theright (down)
j
or to
the left (up)
k
. To bring up the feeddog, hand turn
the flywheelafter sliding lever to the left.
Foot Pressure Dial
Set thepressure dial
j
at “3” for regular sewing.
Reduce thepressure to “2” for applique, cutwork,
drawn work, basting and embroidery.
Veloursandknits with a lot of stretch may requirea
“1” setting.
Attaching and Removing Presser Feet
Press the key until the needle is in theraised posi-
tion. Raise the presser foot and press the redbutton
j
on backof theshank. Thepresser foot will drop
off. Place the selectedpresser foot so the pin
l
on
the foot lies just under the groove
k
of the shank.
Lower the presser bar to attach the foot.
Attaching and Removing Shank
Turn the thumbscrew
j
counterclockwise with the
screwdriver toremovethe shank.
To attach, match the hole in the shank
k
with the
hole in the presser bar
l
. Put thumbscrewin hole
and turn clockwise to tighten.
7
1
2
21
1
23
1
2
3

PDFMAILER.DE
Additional Presser Foot Clearance
Youcanraise thepresser foot about 6.5mm (1/4”)
higherthanthenormaluppositionforeasyremoval
of the presser foot or toplace heavyfabricsunder
thepresser foot.Pullthepresser foot lever
•
upbe-
yondthenormalupposition.
Seam Allowance Lines
Thelinesontheneedleplateandbobbincoverplate
helpyoumeasureseamwidth.
Thenumber indicatesthedistancebetweenthecen-
terneedleposition3.5andtheseamallowanceline.
Millimeters Inches
Lines on needle
plate 15 20 (1/2”)
4/8” 5/8” (3/4”)
6/8”
•
Centerneedleposition
‚
Edge of fabric
ƒ
Needleplateguidelines
„
90
°
pivotangleguidelinefor5/8”
Controlling Sewing Speed
Sewingspeedcanbe variedwith the footcontrol
•
.
Theharder you presson the footcontrol, the faster
themachineruns.
Themaximumsewingspeedcanbevariedbysliding
thespeedcontrol lever
‚
.For a faster speed
ƒ
,
slide it totheright; for aslower speed
„
, slide it to
theleft.
8
1
12
3
4
1
2
3
4

PDFMAILER.DE
Adjusting the Needle Thread Tension
Choosing the Correct Tension - Straight Stitch
The idealstraight stitchwill have threads locked be-
tween the two layersof fabric, as shown left (magni-
fied toshowdetail). Needle threadtension can range
from 3 – 5 and isnormally set on 4
j
.
If you look at the needlethread
k
(top thread) and
bobbin thread
l
(bottom thread), you will notice that
there are no gaps. Eachstitch is smoothand even.
Occasionally the needle threadtension needs to be
adjusted.Examples:
−
stifforheavyfabric
−
sewing more than two layers of fabric
−
typeof stitch
−
thread
Whenadjusting needlethread tension, the higher
numbers tighten, the lower numbers loosen.
•Tension is too tight
The bobbin thread shows through on the topside of
the fabricand it will feelbumpy.
Turn the dial toa lower number to loosen the needle
thread tension.
•Tension is too loose
The needle thread shows through on the underside
of the fabric and it will feel bumpy.
Turn the dial to ahigher number to tighten the
needle thread tension.
•Adjusting Tension for Zigzag and Satin
Stitches
The upper thread tension should be slightly looser
when sewing a zigzag or a satinstitch. The upper
thread should appear slightlyon the underside of the
fabric.
9
1
2
3

PDFMAILER.DE
SECTION II
Getting Ready to Sew
Selecting the Correct Needle and Thread
There are many kinds of fabrics, threadsand
needles. It is important touse the correct ones to-
gether.
Alwayspurchase good quality thread. It should be
strong, smooth and even in thickness. Use the same
thread for needle and bobbin. Alwaystest thread and
needlesize onascrappiece of fabric.
Ingeneral, fine threads (the larger the number, the
finer the thread) and needles (the smaller the num-
ber, the finer theneedle) areused for sewing light-
weight fabrics andheavier threads and larger
needles are used for sewing heavyweight fabrics.
Therearemanyspecialty needlesavailablefrom
your sewing machine dealer.
Check your needles frequently for rough or blunt
tips. Snags andruns in knits, fine silks and silk-like
fabrics are permanent and are often caused by dam-
aged needles.
Changing Needles
1. Press the needle key toraise the needle.
Lower thepresser foot. Turn off thepower
switch. Turn the needleclamp screw
•
counter-
clockwise to loosen.
2. Removetheneedle from theclamp.Insert the
newneedle into needle clamp
‚
with the flat
side to theback, pushing it up as far as it will go.
Tightentheclampscrewfirmly.
3. To determine if the needleisdefective,place the
flat side of the needleonsomething flat
(aneedle plate, piece of glass, etc.). The gap
between the needle and the flat surface should
be consistent.
Never use a bent or blunt needle, as it may
cause skipped stitches or thread breakage. De-
fective needlescanruinthe fabric. Alwayspur-
chase good quality needles. Change needles
often.
Weight Fabric Needle Type Needle
Size
Very
Light Chiffon, Fine Lace,
Organdy Universal
Ball Point 9 (65)
9 (65)
Batiste, Lawn, Crepe
de Chine, Challis
Handkerchief Linen,
Crepe, Taffeta, Satin
Stretch
Universal
11 (75)
11 (75)
12 (80)
Single Knits, Jersey,
Swimwear, Tricot Stretch
Ball Point 11 (75)
11 (75)
Light
Leather, Suede Leather 11 (75)
Flannel, Velour, Velvet,
Velveteen, Corduroy,
Linen, Gabardine,
Wool, Terry, Burlap
Universal 14 (90)
Double Knits, Stretch
Velour, Stretch Terry,
Sweater Knits
Ball Point 14 (90)
Medium
Leather, Vinyl, Suede Leather 14 (90)
Denim, Sailcloth,
Ticking Denim 16 (100)
Coating, Polar Fleece,
Drapery and
Upholstery Fabrics
Universal 16 (100)
Heavy
Leather, Suede Leather 16 (100)
Canvas, Duck,
Upholstery Fabrics Universal 18 (110)Very
Heavy
Topstitching for
Special Finish Topstitching 11 (75)
14 (90)
10
1
2
1. 2.
3.

PDFMAILER.DE
Needle Definitions
The illustration identifies the main partsof a sewing
machineneedle.
1. Body
2. Shaft
3. Long groove (round side of needle)
4. Short groove(flat sideof needle)
5. Eye
6. Point
Universal – an all-purposeneedle that handles most
wovenand knit fabrics. Auniversalneedlesize 14/90
comes inserted inyour machine.
Ball point – the point spreads the fibers, preventing
tearsand is especiallysuited for knit fabrics. Not
recommendedforembroidery.
Denim –the sharppoint effectivelypierces densely
woven fabrics suchas denim and canvas.
Stretch – specially designed toprevent skipped
stitches in syntheticsuedes andelasticized knits
(swimwear).
Leather – the cuttingpoint createssmall holes in
leather and suede.
Topstitching – the extra sharp point penetrates layers
of fabrics; extra large eye and large groove accom-
modateheavyweight topstitching thread.
Twin/Double – 2 needlesare joined on a crossbar
and share a single shaft.Sews two parallel rows of
stitching. Availableinuniversalandballpoint.
11
1
2
3
4
5
6

PDFMAILER.DE
Connecting Machine To Power Supply
Before connecting the power cord, make sure the
voltage and frequencyshown on the machine are
identicaltoyour electricalpower.
To connect the foot control
…
, turnoff the power
switch
„
. Insert the foot control plug
•
andmachine
plug
‚
into the machine and the power supply plug
ƒ
intothe wallsocket.
Your machine may comeequipped with a polarized
plug (one prong wider than the other). Apolarized
plug reduces the risk of electrical shock. This plug is
intendedto fit intoapolarizedoutlet. If theplug does
not fit fully intothe outlet,reverse theplug. If itstill
doesnot fit, contact aqualified electrician toinstall
the proper outlet. Do not modify the plug inany way.
IMPORTANT:
Whenusingyoursewingmachinethe
first fewtimes, place waste fabric under the presser
foot and run the machine without thread for a few
minutes. Wipeaway excessoil.
For Your Safety
Do not use extension cords or plug adapters.
Do not touchplug with wet hands.
Always turnoff the power/light switch first and then
unplug fromtheelectricaloutlet.Examples:
•
when leaving the machine unattended
•
when cleaning the machine
Always turnoff the power/light switch:
•
when attaching or removing parts such as
needle, presser foot, needleplate
•
when threading needle or bobbin
Do not placeanything on the foot control.
Do not placeheavy items on cords. Do not subject
cords to heat. Do not use damaged cords. Have the
cordrepairedimmediately.
While the machine is inoperation, always keep your
eye on the sewing area and do not touch any mov-
ing parts such as the thread take-up lever, flywheel
or needle.
12
1
2
3
4
5

PDFMAILER.DE
1.
Up/Down Needle Key
If the needleisup when you press thiskey, the
needlewill go down to its lowestposition. The
needle will continue tostop in thedownposition.
If the needle is down when youpress this key,
the needle will go to itshighest position. The
needle will continue tostop in the up position.
2.
Auto-Lock Key
Press this key while sewing a straight stitch, zig-
zagstitch or 3-stepzigzag stitch and the ma-
chine will sewa fewstitches inplaceandstop
automatically.
* Press thiskey while sewing utility or decorative
stitches andthe machine will completethe stitch,
lockstitchandstop.
13
Lift front cover up and
away to reveal the
Selection Keys and LED
readout.
Switch on the machine.
(Test lights run in LED
readout.)
Main Function
1
2
3
4
56

PDFMAILER.DE
3.
Reverse Key
If you are sewing a straight stitch, zigzag stitch
or 3-step zigzag stitch, press and hold thiskey.
The machine will sewinreverse until yourelease
thekey.
* If you are sewing utilityor decorativestitches,
the machine will immediatelystop andsewa
locking stitch when you press this key.
4. Indicator Lights and LED Readout
a. When thislight islit, the readout displays the
selectedstitch.
b. When thislight islit, the readout displays the
selected stitch width/needleposition.
c. When this light islit, the readout displays the
selected stitch length.
5. Stitch Width and Needle Position Key
Press this key todisplay pre-programmed stitch
widthor needle position.
To decrease stitch width or moveneedle position
to the left, press – side of key.
To increase stitch widthor moveneedleposition
to the right, press + side of key.
The stitches listedbelowallowyou tomove the
needle to anyposition by pressing the – or +
side of the key. There are 15 needle positions for
straight stitches (0.0 – 7.0).
a Leftposition
b Center position
c Rightposition
14
1
a
b
c
abc
1516
30
31
45
46 60
1

PDFMAILER.DE
6. Stitch Length Key
Press this key todisplay pre-programmed stitch
length.
Depending on the stitch selected, stitch length
can be set between 0.0 and 5.0.
To decrease stitch length, press – side of key.
To increase stitch length, press + side of key.
•
The reverse stitch length will not sewany longer
than2.5mm(approx. 1/8”).
NOTE:
Fine fabricsshould havea stitch lengthbe-
tween 1.5and 2.5, medium fabricsbetween 2.0and
3.0andheavier fabrics between 3.0and 4.0.
7. Stitch Selection Keys
a. Press and hold this key to access
stitches 1 – 15.
b. Press and hold this key to access
stitches 16 – 30.
c. Press and hold this key to access
stitches 31 – 45.
d. Press and hold this key to access
stitches 46 – 60.
15
1
abcd
1.0 2.5 5.0
15 16 30 31 45 46 60
1

PDFMAILER.DE
Winding a Bobbin
To removebobbin, slide bobbin coverplaterelease
buttonto the right and lift away the bobbin cover
plate.
Lift out the bobbin.
•
Lift up the spool pin. Place the spool of thread on
the spool pin with the thread coming off the spool
as shown. Attach the spool holder and press it
firmly against thespool of thread.
NOTE:
Spoolholder needs to be changed according
to the type of thread spool
A. Large spool
B. Smallspool
k
Pull the thread towards the thread guides, under
the hook and wrap it around the guide as shown.
l
Pull the thread back around the bobbin winder
thread guide.
m
Pass the thread through the hole in the bobbin
from inside to the outside.
16
A
B
1
23
4

PDFMAILER.DE
n
Place the bobbin on the bobbin winder spindle
and push it tothe right. The LED readout will
display “SP.”
o
Holding the free end of the thread, press the foot
control. Stop the machine when it has made a
fewturns and cut the thread tail close to the
hole inthe bobbin. Press the foot control again.
When the bobbin isfully wound, it will stop auto
matically.
p
Movethe spindle tothe left toreturn the bobbin
winder to itsoriginal position. Cut the thread as
shown.
Additional Spool Pin
The additionalspool pin can be used to wind an ex-
tra bobbin without unthreading the machine.
PROCEDURE:
Insert the spool stand
k
and the ad-
ditional spool pin
l
in thehole
j
. Place the felt
m
andspool
n
on the pin with the threadcoming off
the spool as shown.
17
5
6
7
5
4
3
2
1

PDFMAILER.DE
Inserting the Bobbin
Place the bobbin in thebobbin case with the thread
runningcounterclockwise.
Guide the thread into notch A on the front side of the
bobbin case.
Hold the bobbin with your right hand andpull the
thread to the left, through the tension spring blades.
Continue pulling the thread lightlyuntil the thread
slips intonotch B.
Pull out about 15 cm (6”)of thread.
Replace the bobbin cover plate.
Refer to the chart shown on the bobbin cover plate
tocheck the threading.
18

PDFMAILER.DE
Threading the Machine
j
Raise thepresser foot.
k
Press the key until the needle is in an up posi-
tion.
l
Pull the thread around the upper thread guide.
m
Guide the thread down and around the check
spring holder.
n
Firmlypull thethread from right toleft, over the
take-up lever anddown intothe take-up lever
eye.
o
Proceed down through the lower thread guide.
p
Slide the thread to the left behind the needle bar
thread guide.
Thread theneedle from front toback manually or
use the built-in needle threader.
19
1
2
3
4
5
6
7
3
4
5
6
7
Other manuals for 6001
2
Table of contents
Other ELNA Sewing Machine manuals

ELNA
ELNA eXperience 660 User manual

ELNA
ELNA eXcellence 780 User manual

ELNA
ELNA eXperience 520 User manual

ELNA
ELNA 740 EXCELLENCE - User manual

ELNA
ELNA Lotus User manual

ELNA
ELNA EnVision 8006 User manual

ELNA
ELNA eXpressive920 User manual

ELNA
ELNA Elnita User manual

ELNA
ELNA eXplore 320 User manual

ELNA
ELNA 9600 "Haute Couture" User manual