ELNA 3210 User manual

ELNA
3210 - 3230
SERVICE MANUAL
07/03 Printed in Switzerland 395 903-12

Elna International Corps. SA 3210 / 3230 Service manual
Contents
What to do when 1-3
Service Access
Face Cover 4
Top Cover 4
Belt Cover 5
Base 5
Front Cover 6
Rear Cover 7
Mechanical Adjustment
Needle Thread Tension 8
Presser Bar Height and Alignment 9
Needle Swing in Straight Stitch Sewing 10
Needle Swing 11
Needle Position Misalignment 12
Needle Drop Position 13
Stretch Stitch Feed Balance 14
Feed Dog Height. 15
Needle Bar Height 16
Needle Timing to Hook 17
Clearance between Needle and Hook 18
Backlash Between Hook Gear and Lower Shaft Gear 19
Zero Feeding 20
Needle Stop Position (3230 only) 21
Buttonhole Feed Balance . 22
Buttonhole Length 23
Auto-Stop Buttonhole (Model 3230) 24
Replacement and Adjustment of Needle Threader Plate 25
Motor Belt Tension 26
B-Board and Connector Location (Model 3230) 27
Replacement of B-Board and Fuse (Model 3230). 28
Wiring of Terminal in Machine Socket 29
Content

Elna International Corps. SA 3210 / 3230 Service manual
CONDITION CAUSE HOW TO FIX REFERENCE
1. Skipped
stitches 1. Needle is not inserted
properly.
2. Needle is bent or worn.
3. Incorrectly threaded.
4. Needle or thread is
inappropriate for fabric
being sewn.
5. Sewing on stretch fabric.
6. Presser foot pressure is
too weak.
7. Inappropriate needle bar
height.
8. Inappropriate needle to
hook timing.
9. Inappropriate needle to
hook clearance.
Insert the needle properly.
Change the needle.
Rethread.
Use the recommended
sewing needle and thread.
Use a #11 blue tip needle.
Adjust the presser bar level
to make the pressure
stronger.
See mechanical
adjustment
"Needle Bar Height".
See mechanical
adjustment
"Needle Timing to Hook".
See mechanical
adjustment "Clearance
Between Needle and Hook
Page 16
Page 17
Page 18
2. Fabric not
moving 1. Presser foot pressure is
too weak.
2. Incorrect feed dog
height.
3. Feed dog is in down
position.
4. Thread on bottom side of
fabric is jammed up
5. Feed dog teeth are worn.
Adjust the presser bar level
to make the pressure
stronger.
See mechanical adjustment
''Feed Dog Height".
Raise the Feed dog level.
Make sure to bring both
needle and bobbin thread
under the foot when
starting sewing.
Change the feed dog.
Page 15
Page 01

Elna International Corps. SA 3210 / 3230 Service manual
CONDITION CAUSE HOW TO FIX REFERENCE
3 Needle thread
breaks
1. Initial sewing speed is
too fast.
2. Thread path is incorrect.
3. Needle is bent or dull.
4. Upper thread tension is
too strong.
5. Needle size is
inappropriate for fabric.
6. Needle eye is worn.
7. Needle hole in needle
plate is worn or burred.
Start with medium speed
Use the proper thread path.
Replace with a new needle.
Adjust needle thread
tension correctly.
Use appropriate needle for
fabric and thread in use.
Change the needle.
Repair the hole or replace
the needle plate.
4 Bobbin thread
breaks.
1. Incorrectly threaded
bobbin.
2. Too much thread is on
the bobbin.
3. Lint is stuck inside the
bobbin holder.
4. Thread quality is too low.
5. Thread is jamming
around the bobbin.
Thread bobbin correctly
Adjust the position of
stopper.
Clean the shuttle.
Change to a higher quality
sewing thread.
Clear out the jamming
thread.
5. Needle breaks. 1. Needle is hitting the
needle plate
2. Needle is bent or worn.
3. Needle is hitting the
shuttle.
4. The fabric moves while
the needle is piercing it,
or the needle zigzags
while in fabric.
5. Fabric is being pulled too
strongly while sewing.
See mechanical adjustment
“Needle Drop Position”
Change the needle
See mechanical adjustment
“Clearance between
Needle and Hook”
See mechanical adjustment
“Needle Swing”.
Guide the fabric gently
while sewing.
Page 13
Page 18
Page 11
Page 02

Elna International Corps. SA 3210 / 3230 Service manual
CONDITION CAUSE HOW TO FIX REFERENCE
6. Noisy
operation
1. Backlash between
shuttle hook gear is too
great.
2. Lower shaft gear is
loose.
3. Inappropriate belt
tension.
4. Not enough oil.
5. Upper shaft is loose.
See mechanical adjustment
“Backlash between Hook
Gear and Lower Shaft
Gear”.
Eliminate the looseness.
See mechanical adjustment
“Motor Belt Tension”.
Oil all moving parts.
Eliminate the looseness.
Page 19
Page 26
7. Deformed
pattern.
1. Inappropriate feed
balance.
2. Inappropriate zigzag
synchronization.
3. Upper thread tension is
too strong.
See mechanical adjustment
”Stretch Stitch Balance”
See mechanical adjustment
“Needle Swing”.
Adjust the needle thread
tension correctly.
Page 14
Page 11
8. Improper
buttonhole
results.
1. Buttonhole stitch balance
is not correct.
2. Changing to bar tack is
too early or will not work.
See mechanical adjustment
“Buttonhole Feed Balance”.
See mechanical adjustment
“Buttonhole Length”.
Page 22
Page 23
Page 03

Elna International Corps. SA 3210 / 3230 Service manual
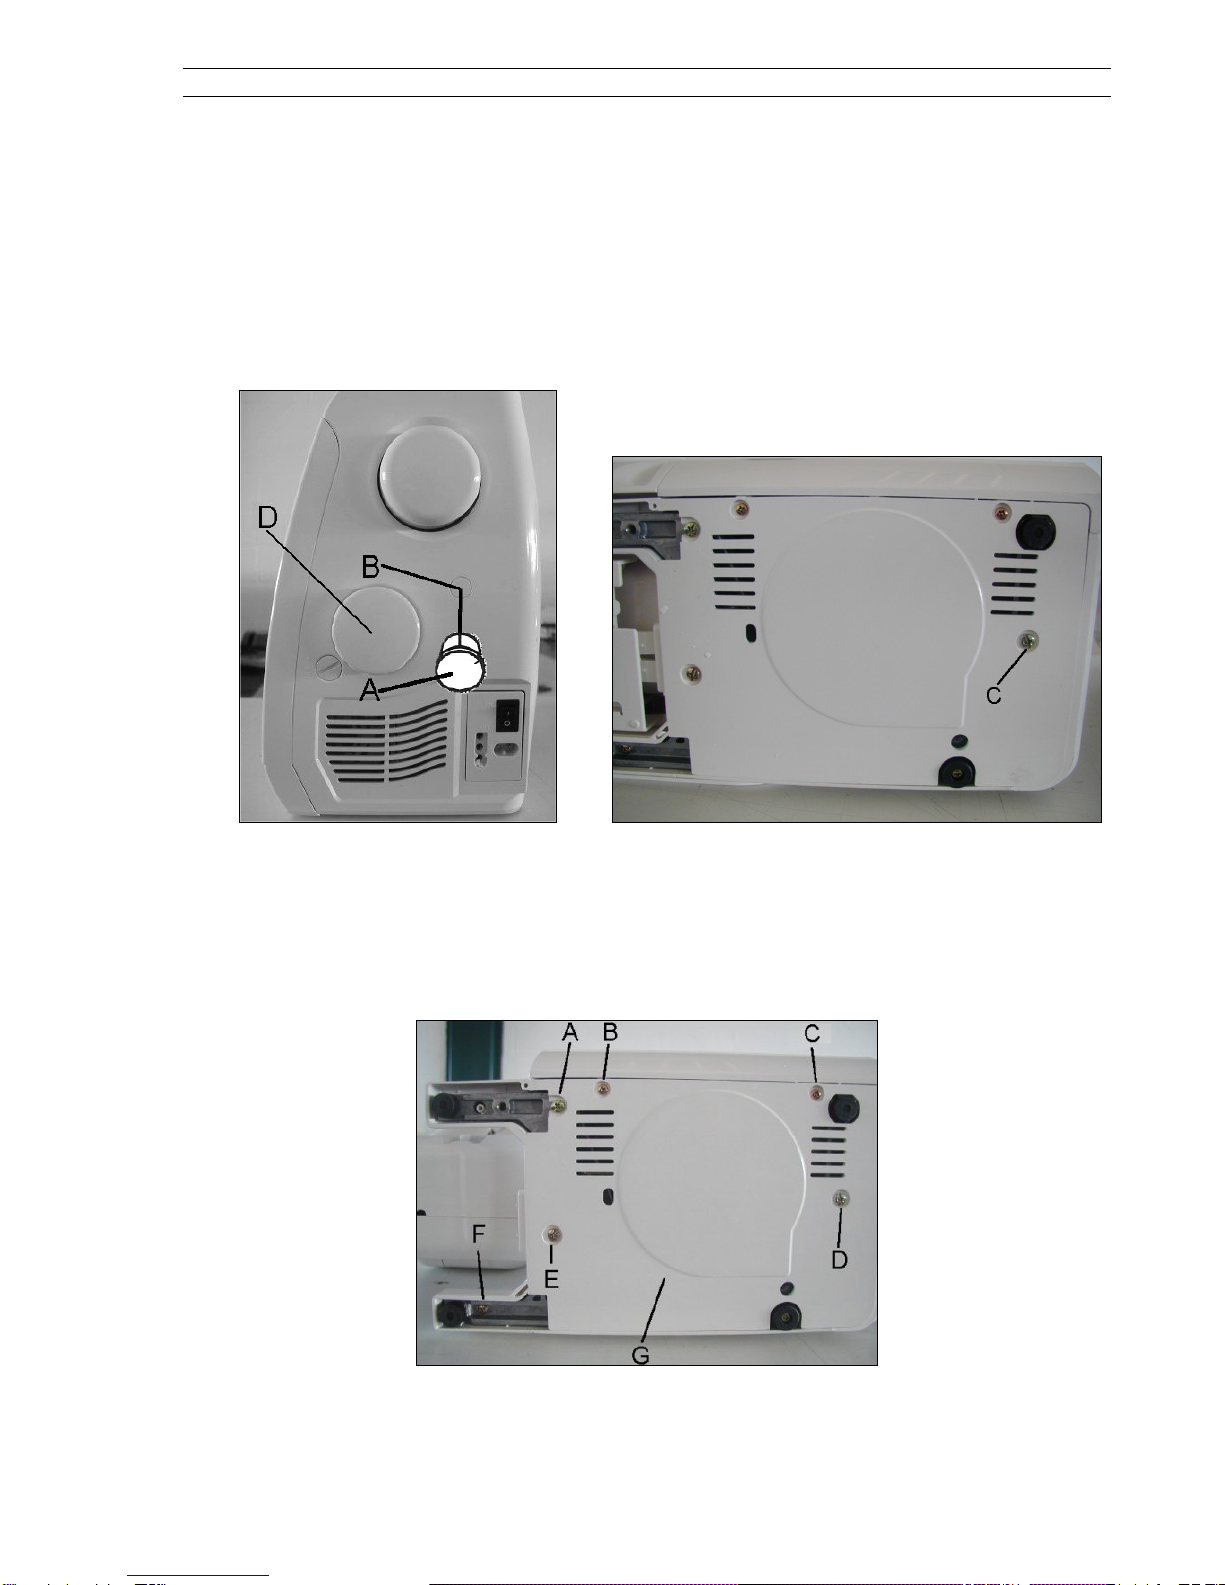
FACE COVER
To remove:
1. Remove the cap Aand the screw B.
2. Remove the face cover C.
To attach:
1. Follow the above procedure in reverse.
TOP COVER
To remove:
1. Remove the face cover (see here above).
2. Remove the two screws A
3. Remove the screws Band C
4. Remove the handle with the top cover.
To attach:
5. Follow the above procedure in reverse.
Page 04
Elna International Corps. SA 3210 / 3230 Service manual
BELT COVER
To remove :
1. Remove the face and top cover (see page 4).
2. Remove the cap A.
3. Remove the screw B
4. Pull out the stitch selector D
5. Remove the screw Cand remove the belt cover.
To attach: Follow the above procedure in reverse.
BASE
To remove :
1. Remove the screws Ato F.
2. Remove the base G.
To attach : Follow the above procedure in reverse.
Page 05
Elna International Corps. SA 3210 / 3230 Service manual
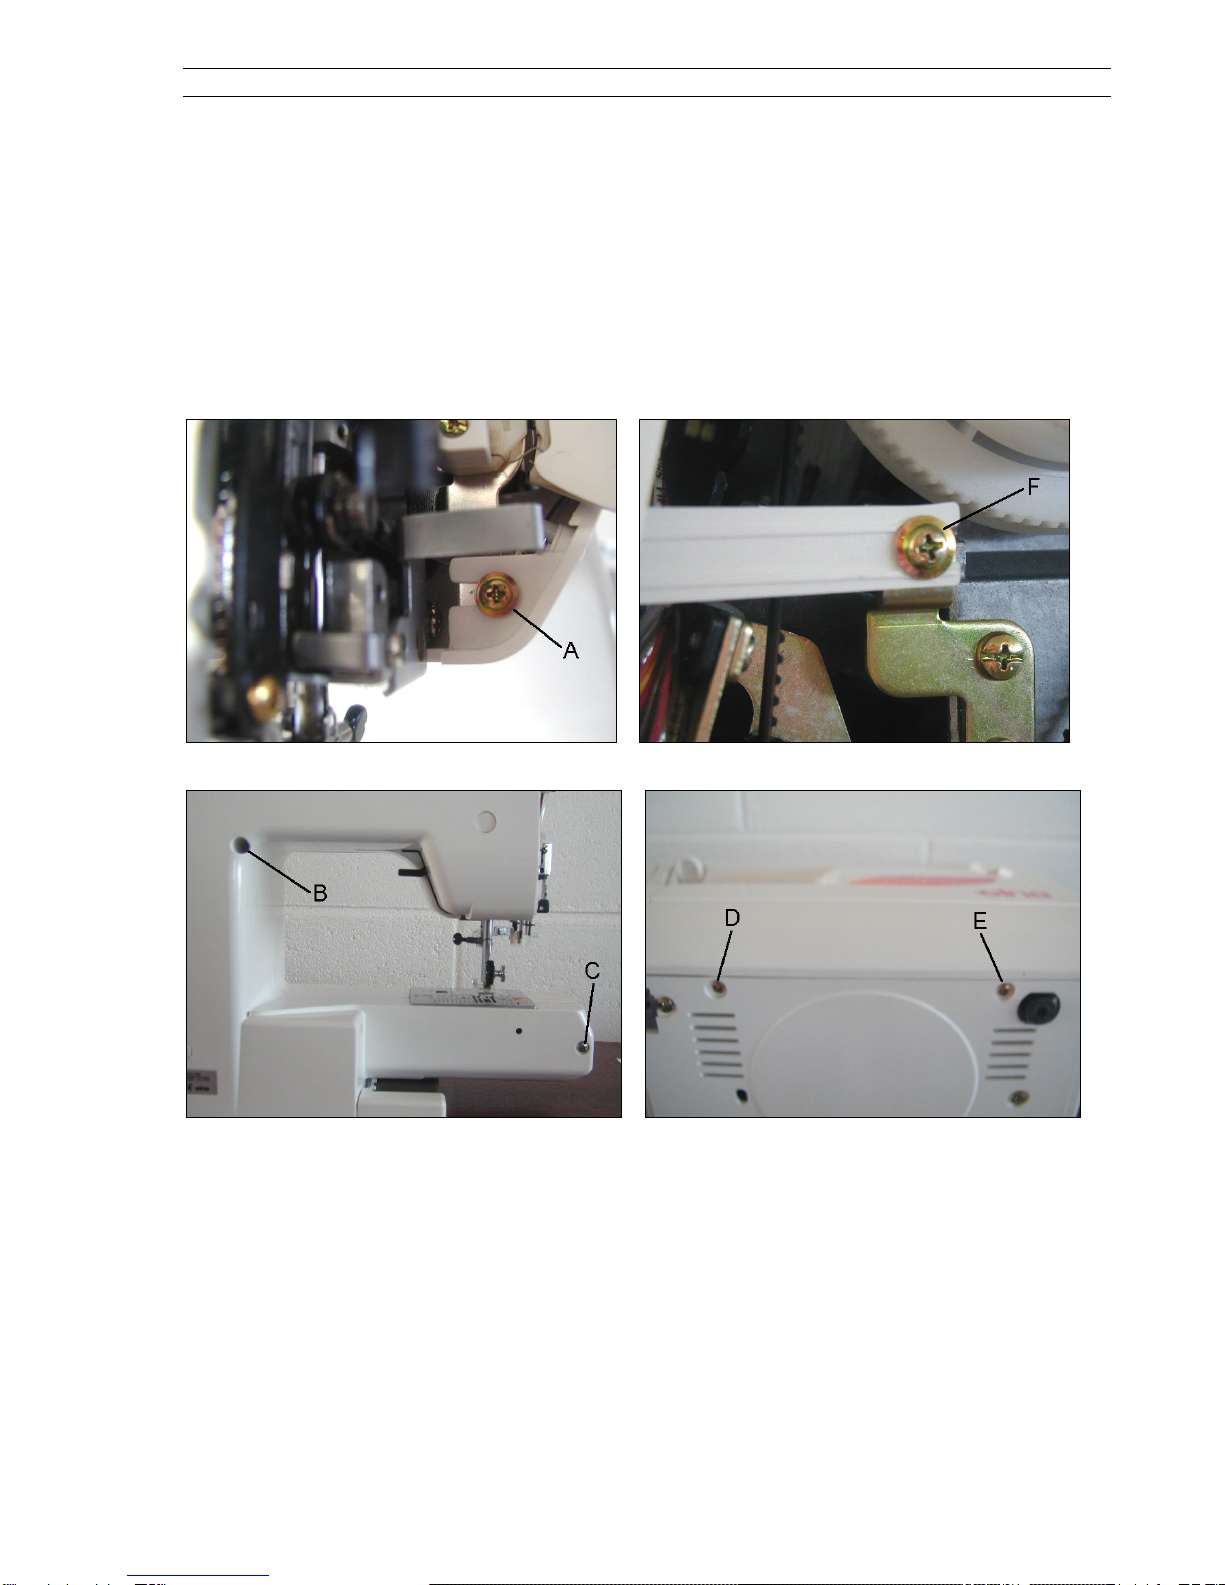
FRONT COVER
To remove :
1. Remove the face and belt cover (see pages 4 and 5)
2. Loosen the screw Aand F
3. Remove the screws B, C, Dand E.
4. Remove two connectors for model 3230.
5. Remove the front panel.
To attach : Follow the above procedure in reverse.
Page 06

Elna International Corps. SA 3210 / 3230 Service manual
REAR COVER
To remove:
1. Remove the face cover, top cover and belt cover (see pages 4 and 5)
2. Loosen the screw A
3. Remove the screws B, Cand D.
Page 07
Elna International Corps. SA 3210 / 3230 Service manual
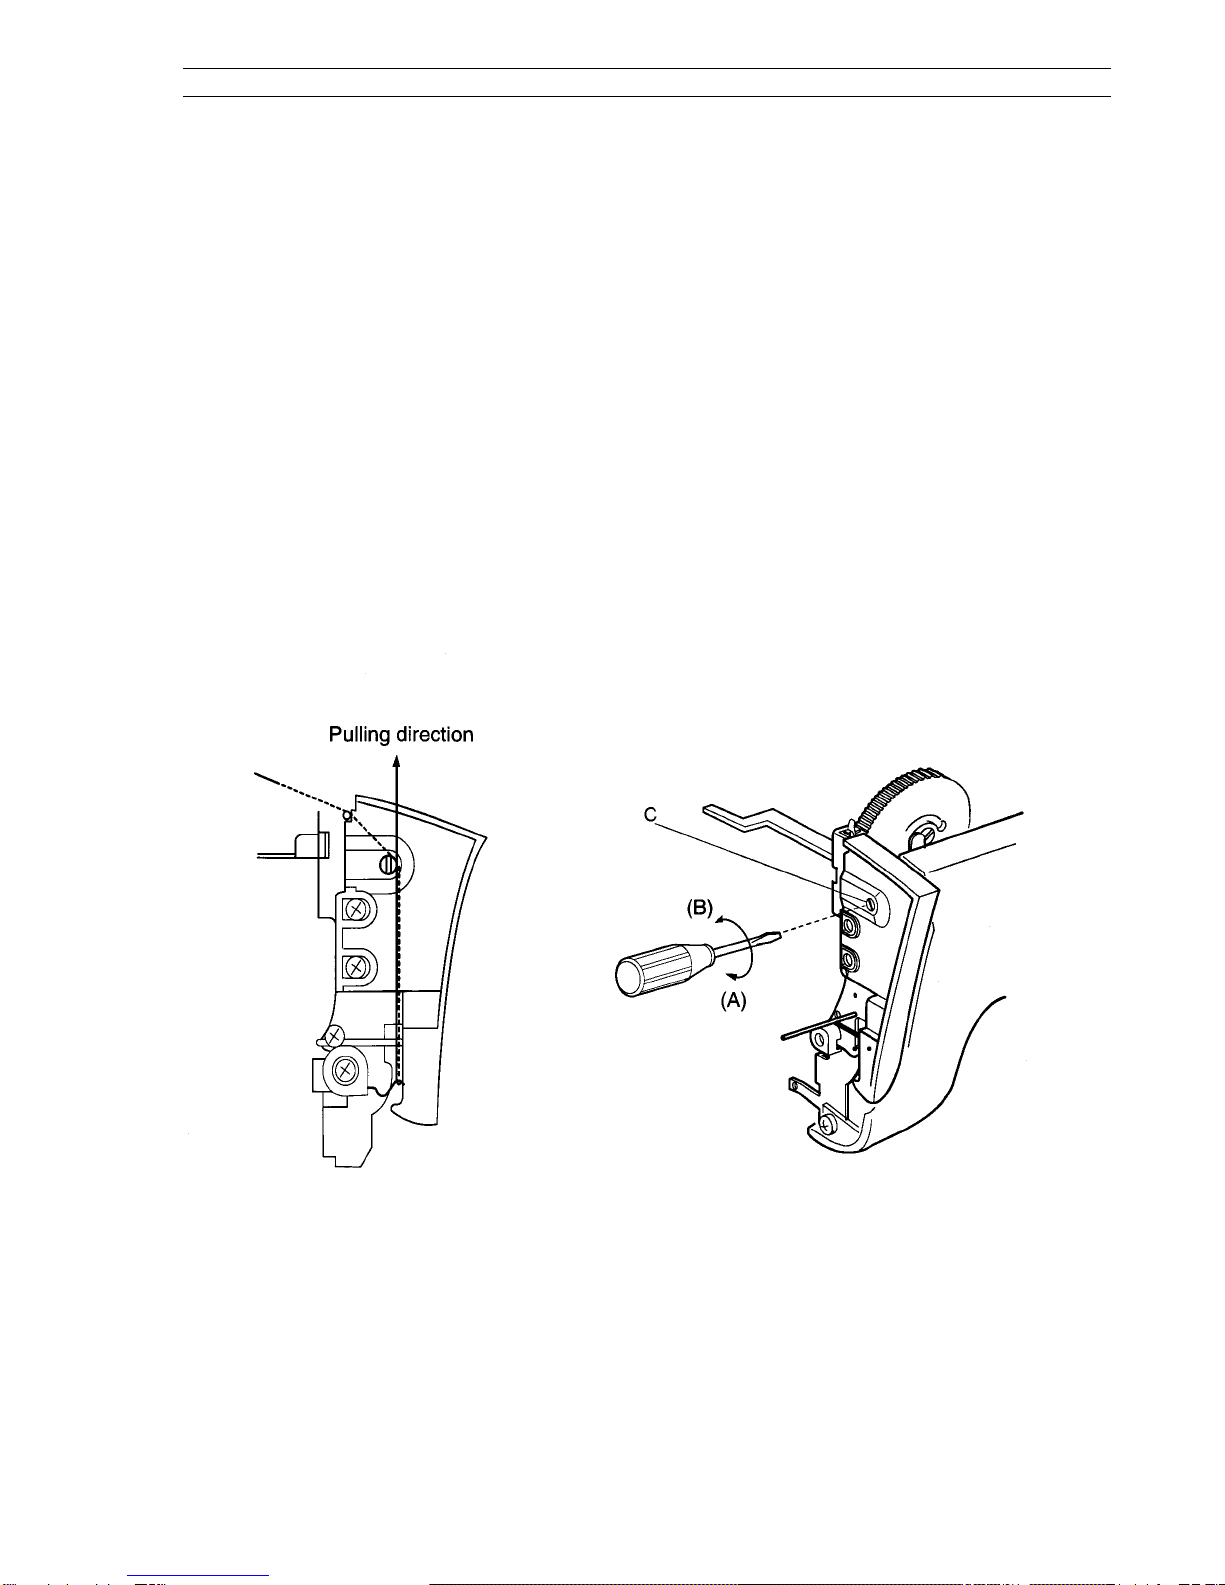
Needle Thread Tension
The standard tension should be 75 to 90 grams when the tension dial is set at "A" (Auto) for Model
3230 or at "4" for Model 3210, measured with a #50 white polyester thread being pulled at
approximately 50 mm/sec. If the tension is outside the standard range, adjust it as follows.
(Make sure the foot is lowered.)
Adjustment procedure:
1. Remove the face cover (see page 4).
2. If the thread tension is too tight: Turn the adjusting screw Cin the direction of A.
3. If the thread tension is too loose: Turn the adjusting screw Cin the direction of B.
4. Attach the front cover.
Page 08
Other manuals for 3210
4
This manual suits for next models
1
Table of contents
Other ELNA Sewing Machine manuals

ELNA
ELNA EN VISION CE 20 - LEAFLET User manual

ELNA
ELNA 8200 User manual

ELNA
ELNA 945 User manual

ELNA
ELNA T-34 User manual

ELNA
ELNA eXpressive 970 User manual

ELNA
ELNA eXplore 120 User manual

ELNA
ELNA lotus 2 User manual

ELNA
ELNA EN VISION CE 20 - LEAFLET User manual

ELNA
ELNA eXplore 160 User manual

ELNA
ELNA 654 - User manual


