ELNA eXpressive 830 User manual

eXpressive 830
| Instruction Manual |


IMPORTANT SAFETY INSTRUCTIONS
When using an electrical appliance, basic safety precautions should always be followed, including the
following:
This sewing machine is designed and manufactured for household use only.
Read all instructions before using this sewing machine.
DANGER— To reduce the risk of electric shock:
1. An appliance should never be left unattended when plugged in. Always unplug
this sewing machine from the electric outlet immediately after using and before
cleaning.
WARNING— To reduce the risk of burns, re, electric shock, or injury to persons:
1. Do not allow to be used as a toy. Close attention is necessary when this sewing machine is used
by or near children.
2. Use this appliance only for its intended use as described in this owner’s manual.
Use only attachments recommended by the manufacturer as contained in this owner’s manual.
3. Never operate this sewing machine if it has a damaged cord or plug, if it is not working properly, if it
has been dropped or damaged, or dropped into water.
Return this sewing machine to the nearest authorized dealer or service center for examination,
repair, electrical or mechanical adjustment.
4. Never operate the appliance with any air opening blocked. Keep ventilation openings of this sewing
machine and foot controller free from accumulation of lint, dust and loose cloth.
5. Never drop or insert any object into any opening.
6. Do not use outdoors.
7. Do not operate where aerosol (spray) products are being used or where oxygen is being
administered.
8. To disconnect, turn all controls to the off (“O”) position, then remove plug from outlet.
9. Do not unplug by pulling on cord. To unplug, grasp the plug, not the cord.
10. Keep ngers away from all moving parts. Special care is required around the sewing machine
needle and/or cutting blade.
11. Always use the proper needle plate. The wrong plate can cause the needle to break.
12. Do not use bent needles.
13. Do not pull or push fabric while stitching. It may deect the needle causing it to break.
14. Switch this sewing machine off (“O”) when making any adjustment in the needle area, such as
threading the needle, changing the needle, threading the bobbin or changing the presser foot, and
the like.
15. Always unplug this sewing machine from the electrical outlet when removing covers, lubricating, or
when making any other adjustments mentioned in this owner’s manual.
SAVE THESE INSTRUCTIONS
For Europe only:
This appliance can be used by children aged from 8 years and above and persons with reduced
physical, sensory or mental capabilities or lack of experience and knowledge if they have been given
supervision or instruction concerning use of the appliance in a safe way and understand the hazards
involved. Children shall not play with the appliance. Cleaning and user maintenance shall not be
made by children without supervision.
For outside Europe (except U.S.A and Canada):
This appliance is not intended for use by persons (including children) with reduced physical, sensory
or mental capabilities, or lack of experience and knowledge, unless they have been given supervision
or instruction concerning use of the appliance by a person responsible for their safety.
Children should be supervised to ensure that they do not play with the appliance.
Please note that on disposal, this product must be safely recycled in accordance with relevant
National legislation relating to electrical/electronic products. If in doubt please contact your
retailer for guidance. (European Union only)

2
TABLE OF CONTENTS
GETTING READY TO SEW
Names of Parts................................................................ 3
Standard Accessories ...................................................... 4
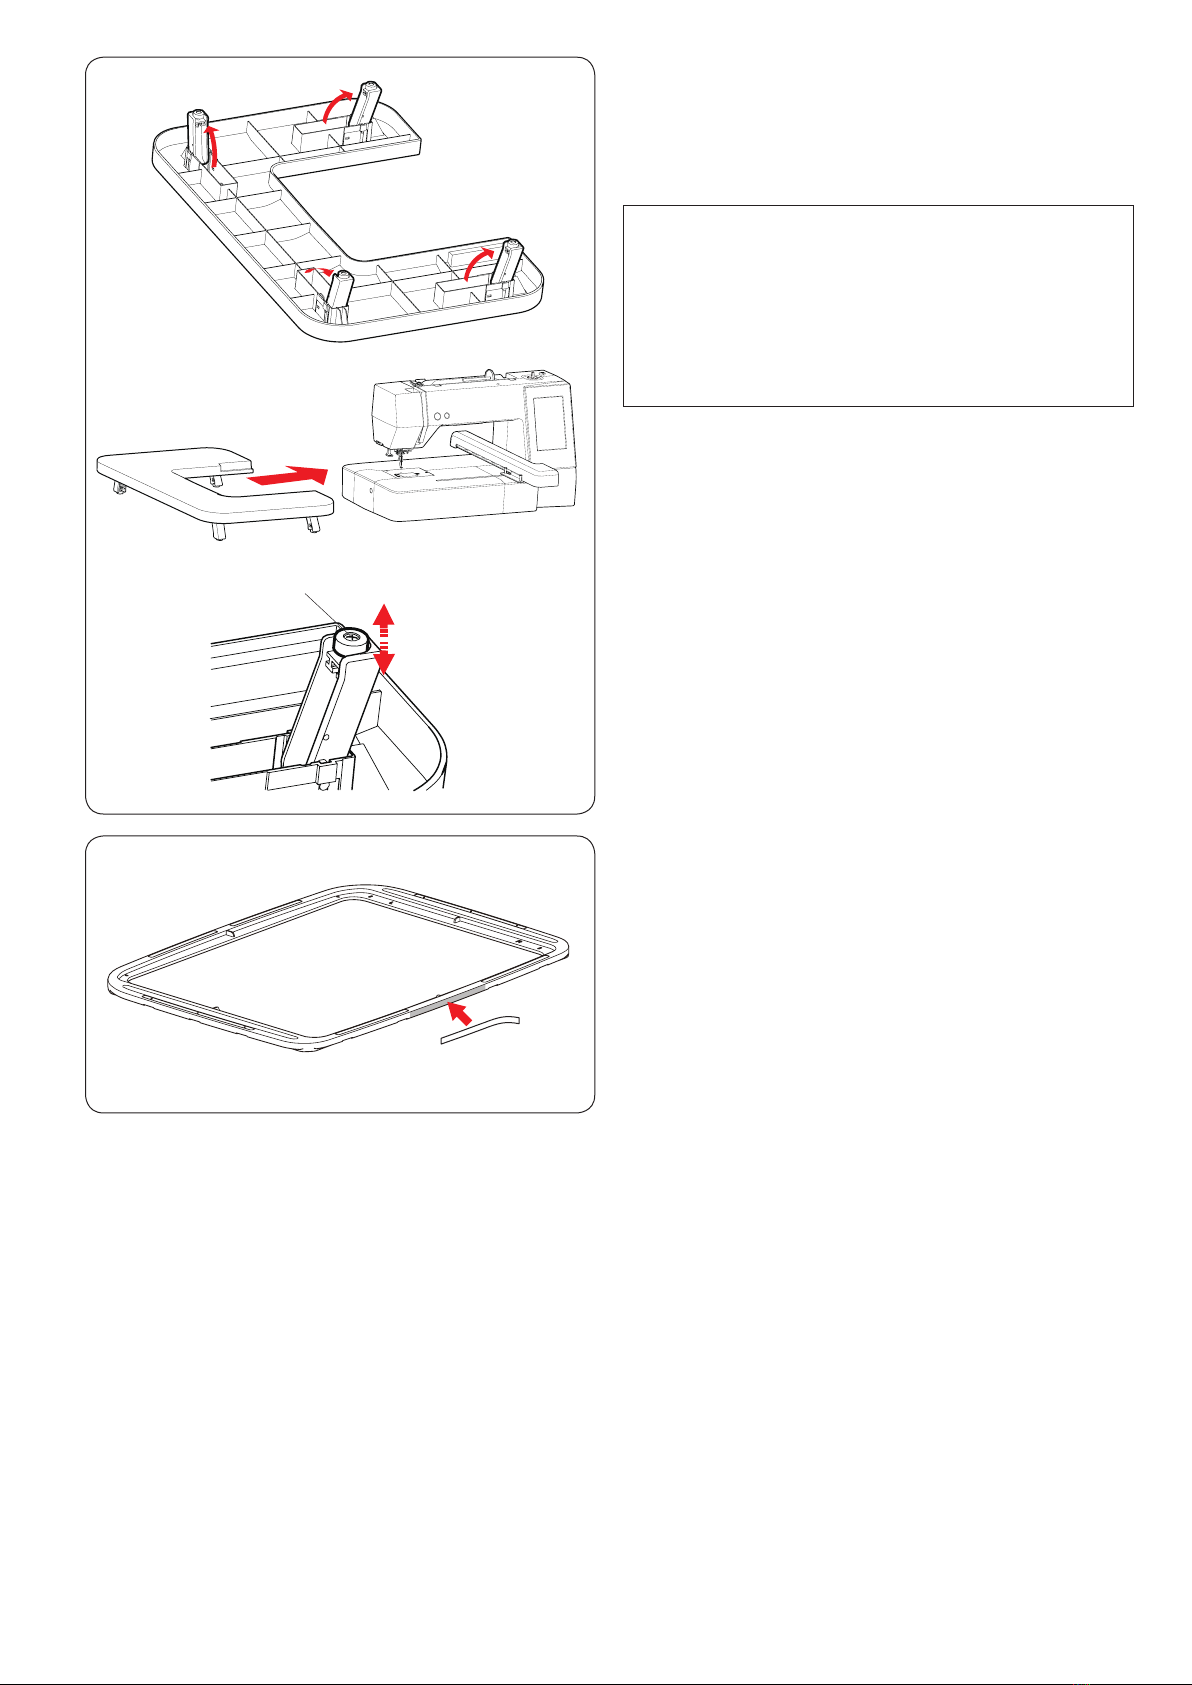
Extra Wide Table ............................................................. 5
Anti-slipping sticker (for Embroidery hoop RE28b).......... 5
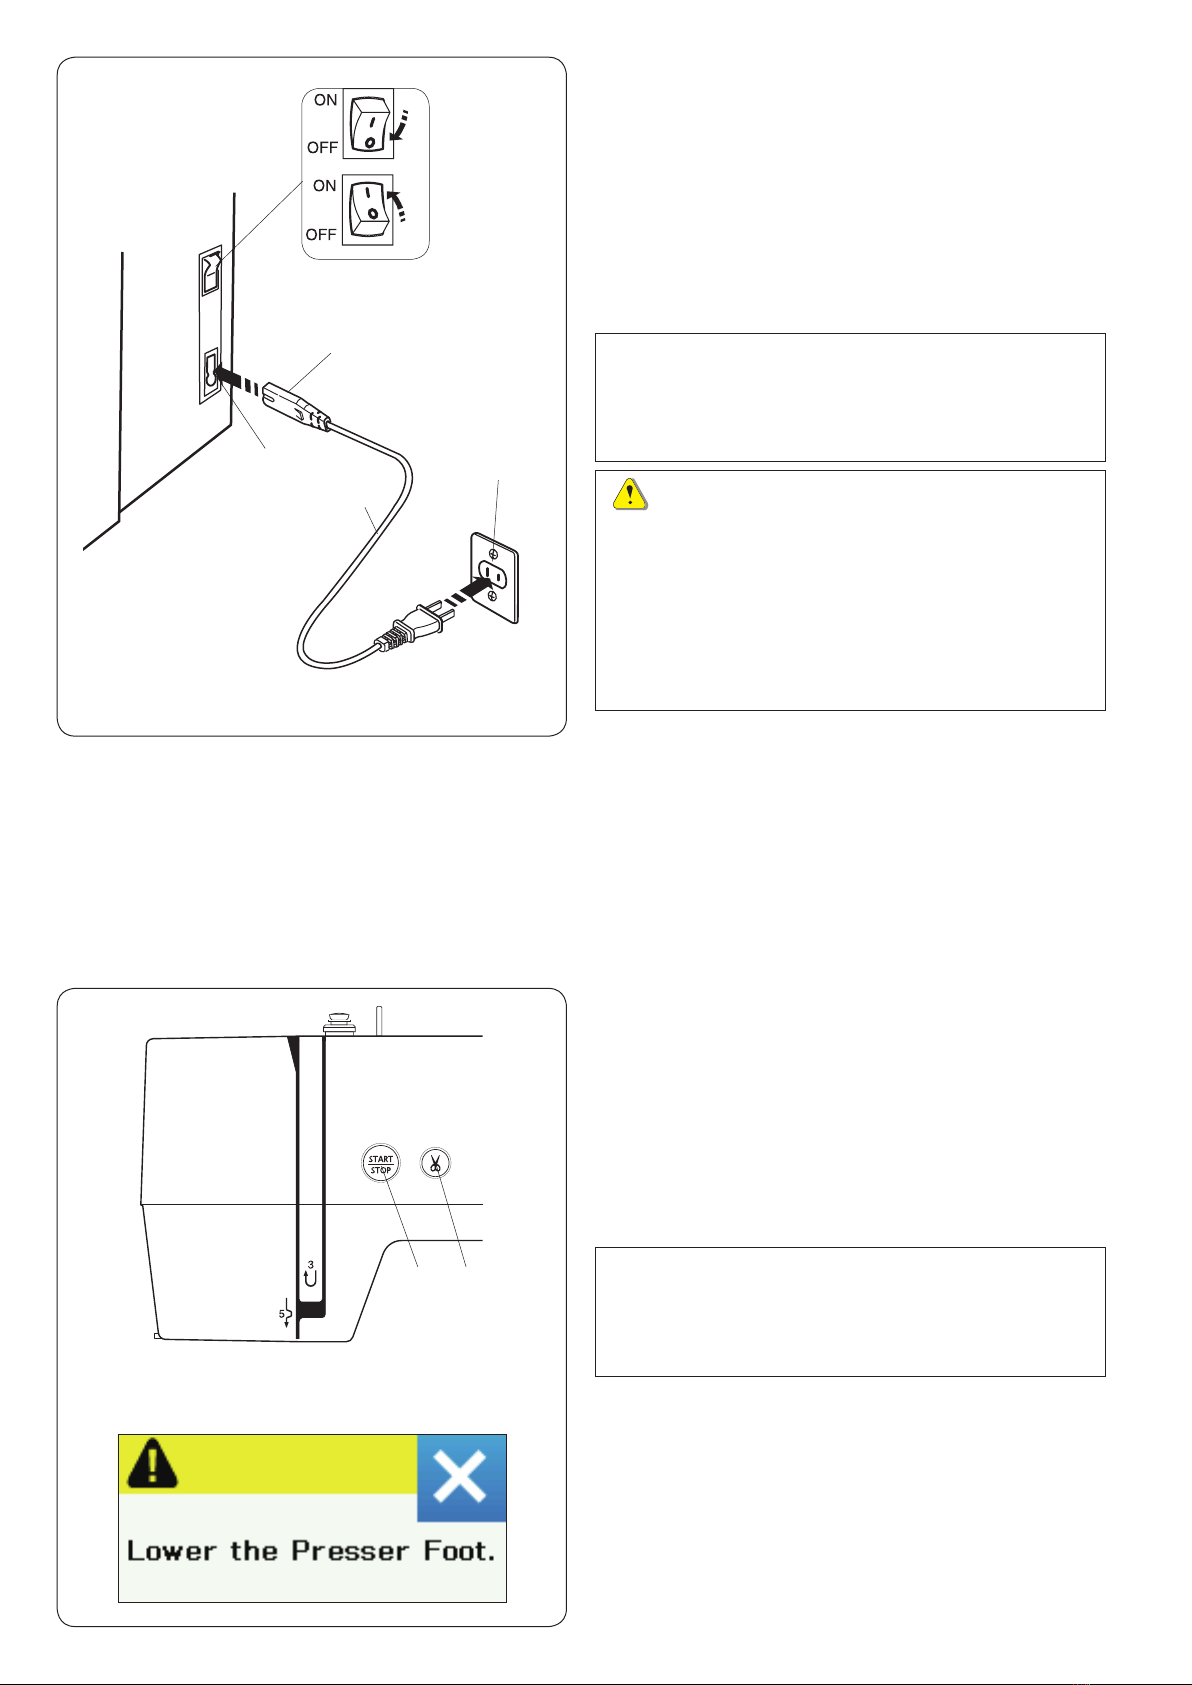
Connecting the Power Supply ......................................... 6
Machine Operating Buttons............................................. 6
Raising and Lowering the Presser Foot .......................... 7
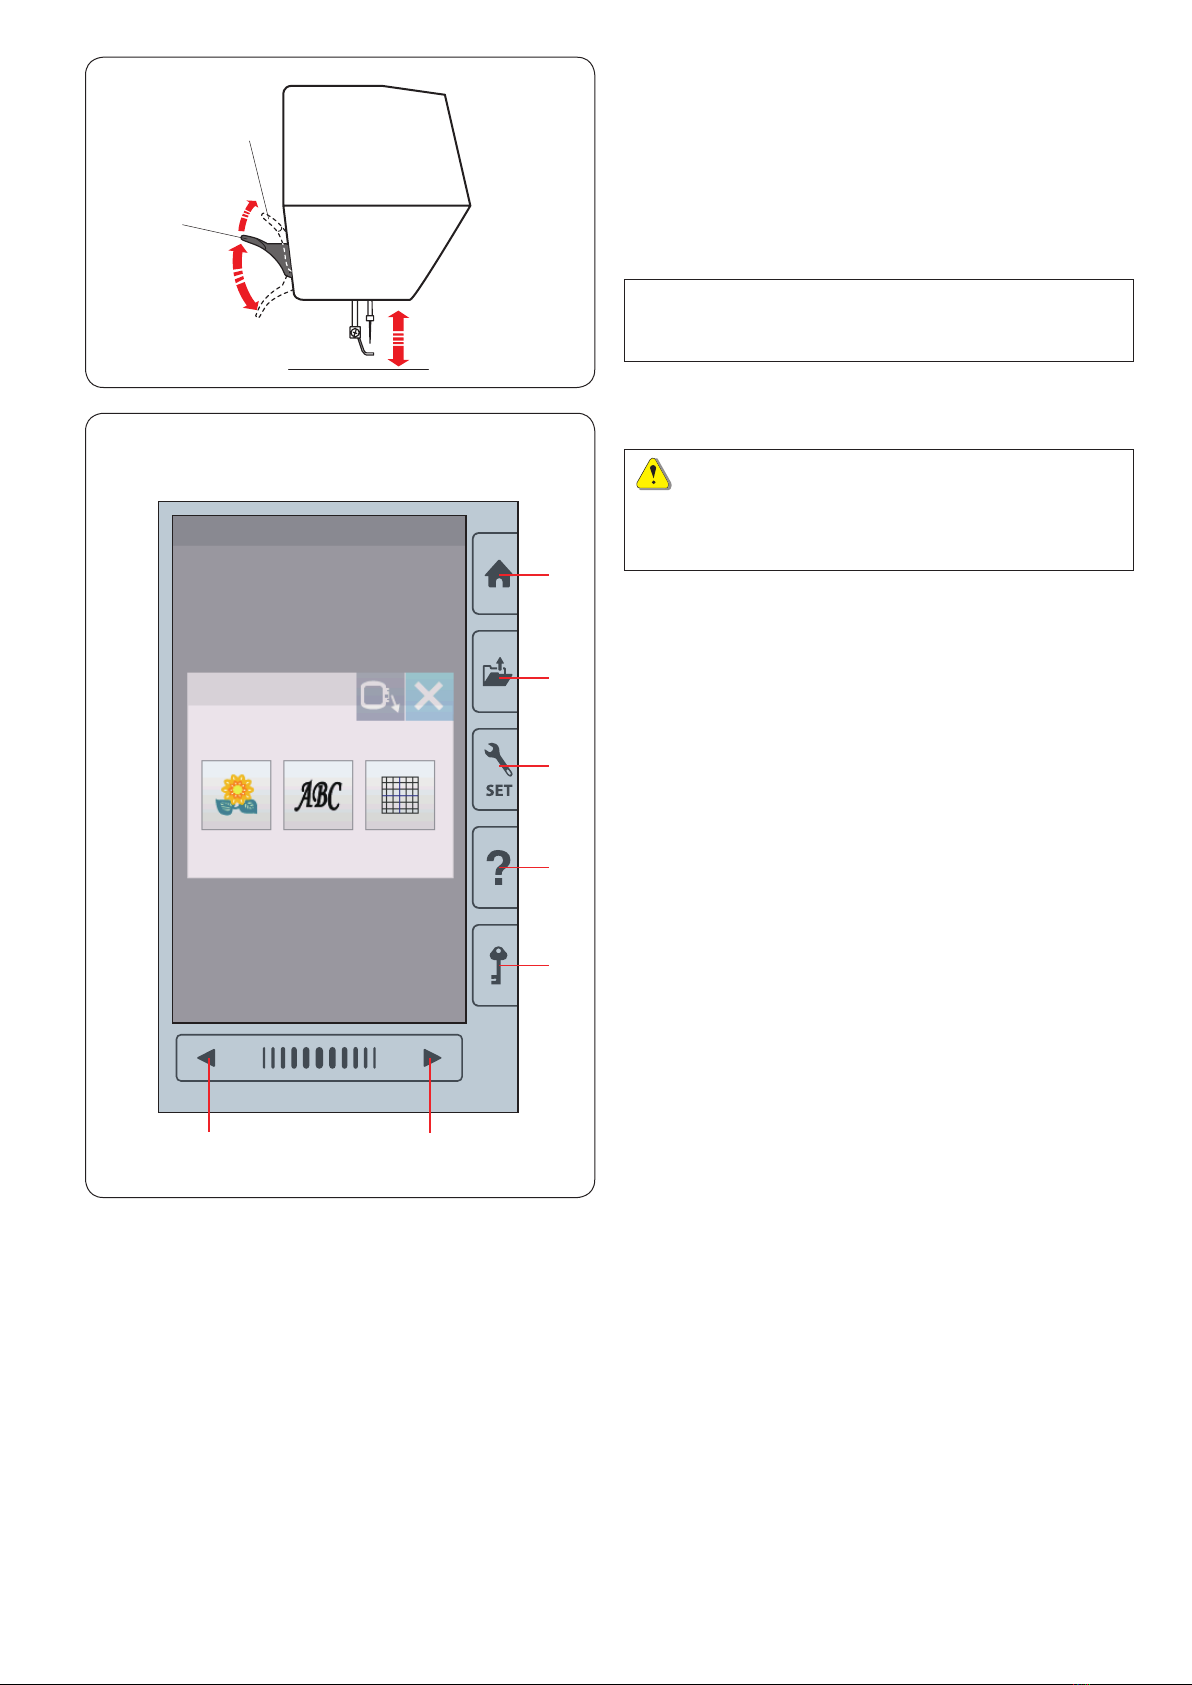
Common Keys................................................................. 7
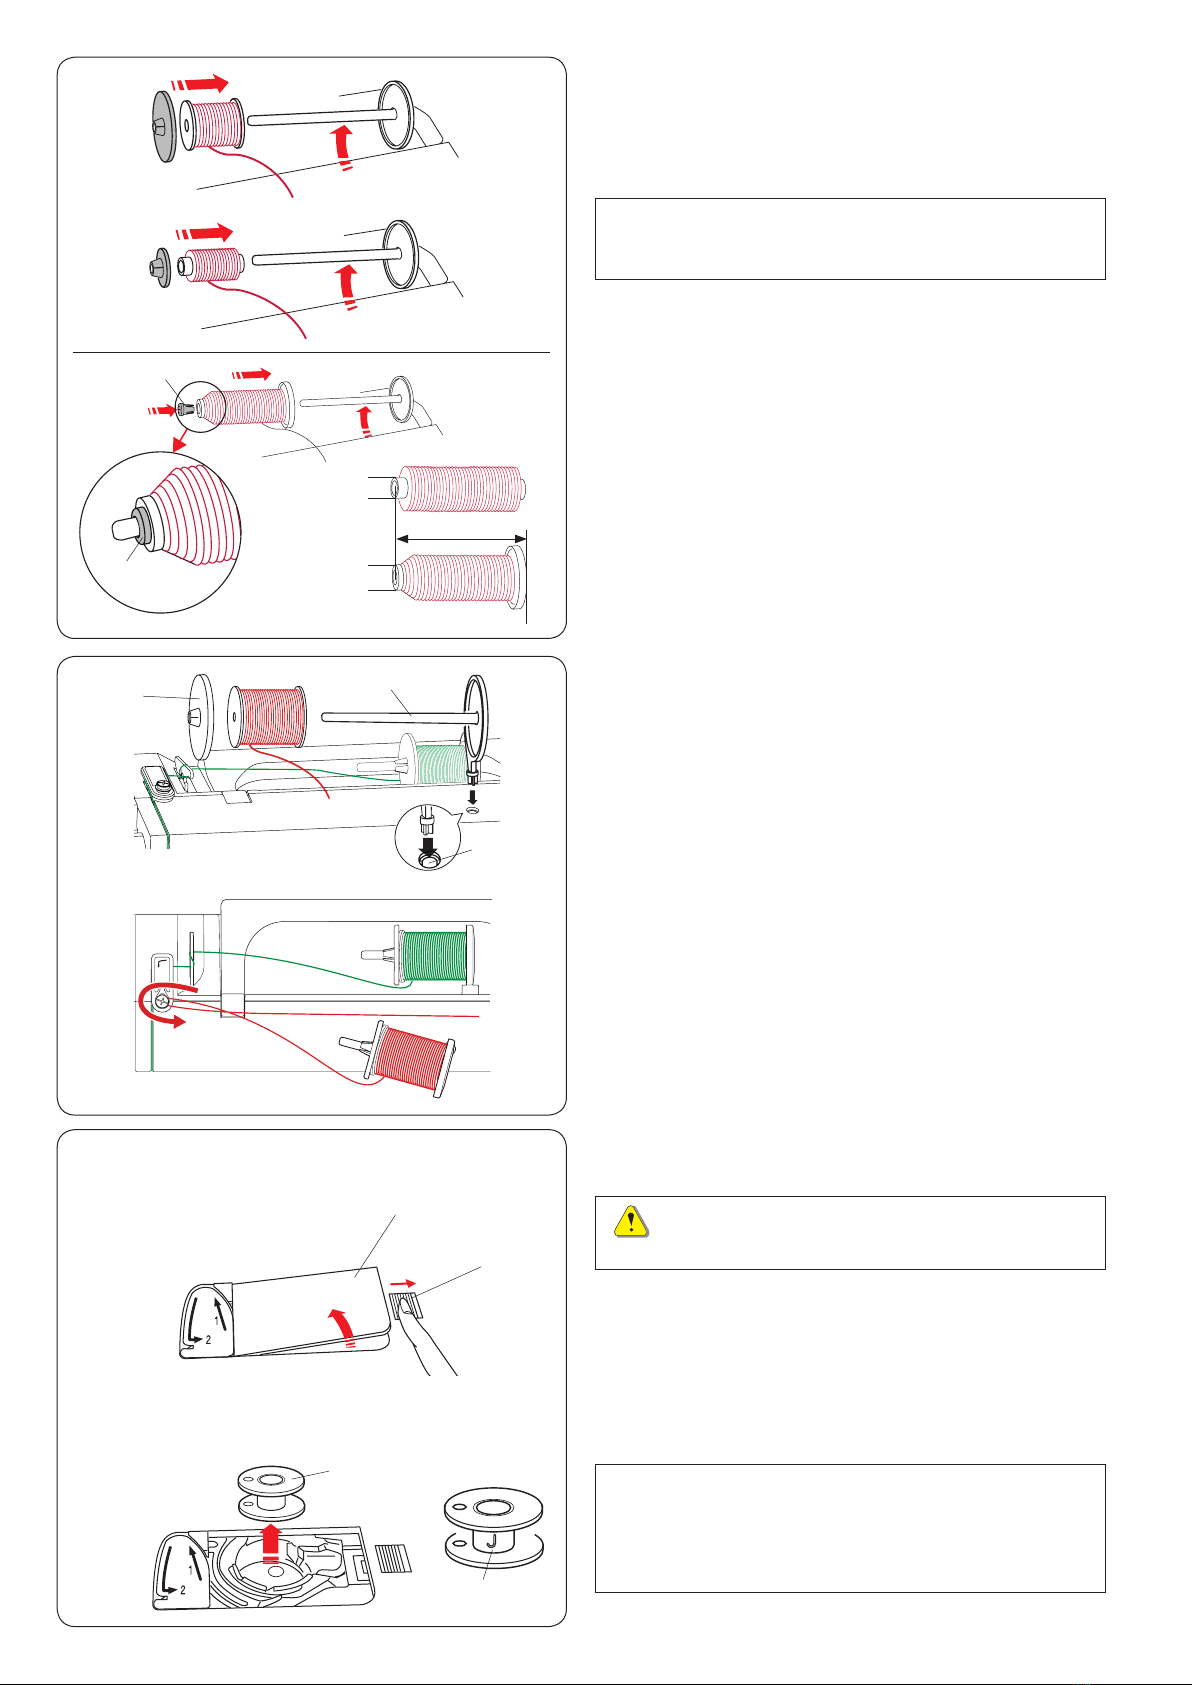
Setting the Spool of Thread............................................. 8
Extra spool pin.............................................................. 8
Winding the Bobbin ......................................................... 8
Removing the bobbin ................................................... 8
Winding the bobbin....................................................... 9
Inserting the bobbin.................................................... 10
Threading the Machine...................................................11
Built-in Needle Threader................................................ 12
Replacing Needles ........................................................ 13
Fabric and Needle Chart ............................................... 13
On-screen Help ............................................................. 14
Removing and Attaching the Embroidery Foot.............. 15
Bobbin Holder for Embroidery (high tension) ................ 16
Embroidery Hoops......................................................... 16
Types of the stabilizers............................................... 17
Stabilizers...................................................................... 17
Setting the Fabric in an Embroidery Hoop..................... 18
Attaching the Embroidery Hoop to the Machine............ 19
Thread Holder................................................................ 20
Selecting Built-in Embroidery Designs .......................... 20
Monogramming.............................................................. 21
Function Keys................................................................ 22
Programming a Monogram............................................ 23
Color change .............................................................. 23
Monogram placement................................................. 23
2-Letter monogram..................................................... 24
Editing a Monogram ...................................................... 25
Ready to Sew Window .................................................. 26
Function keys ............................................................. 26
Pattern information ..................................................... 26
Stitch back/forward keys ............................................ 27
Jump key .................................................................... 27
Cross mark ................................................................. 27
Color section key........................................................ 27
Trace key.................................................................... 28
Thread color/Jog key.................................................. 28
Fine position/angle adjustment key ............................ 29
Rotating a design ....................................................... 29
Moving a design ......................................................... 29
Color list key............................................................... 30
Adjust key ................................................................... 30
Auto thread tension level .......................................... 30
Cutting the tails of jump threads............................... 30
Hoop back key............................................................ 31
Starting to Sew Embroidery ........................................... 32
Editing Mode.................................................................. 33
Selecting a hoop size ................................................. 33
Opening the embroidery designs ............................... 33
Editing tool bar information......................................... 34
Selecting a pattern ..................................................... 34
Moving a pattern......................................................... 34
Duplicating a pattern .................................................. 35
Deleting a pattern ....................................................... 35
Resizing a pattern ...................................................... 35
Rotating a pattern....................................................... 36
Flipping a pattern........................................................ 36
Monogramming in an arc............................................ 37
Grouping patterns....................................................... 38
Customizing the display colors................................... 39
Color grouping............................................................ 40
Sewing order .............................................................. 41
Center positioning ...................................................... 41
Creating a square frame............................................. 42
Single color sewing .................................................... 42
Zooming in the editing window ................................... 43
Pantry Designs for Applique .......................................... 44
Alternative method ..................................................... 45
Celebration Designs ...................................................... 46
Bracelet Designs ........................................................... 47
CUSTOMIZING MACHINE SETTINGS
Machine Setting Mode................................................... 48
Registering the custom settings ................................. 48
Common Setting Mode.................................................. 49
CUSTOMIZING EMBROIDERY MODE
SETTINGS
Embroidery Mode Settings ............................................ 51
Language Selection Mode............................................. 54
Saving and Opening a File ............................................ 55
Creating a new folder ................................................. 55
Opening a le ............................................................. 56
Deleting a le or folder ............................................... 56
Changing a name of the le or folder ......................... 57
Direct PC-Link ............................................................... 57
CARE AND MAINTENANCE
Cleaning the Hook Area................................................. 58
Cleaning the Thread Path.............................................. 59
Oiling the Machine......................................................... 60
Troubleshooting............................................................. 65
DESIGN CHART
Embroidery .................................................................... 66
EC DECLARATION OF CONFORMITY ........................ 72

3
GETTING READY TO SEW
Names of Parts
Thread take-up lever
Upper thread guide
Pre-tension thread guide
Bobbin winder thread guide
Spool pin
Spool holder (large)
Hole for extra spool pin
Bobbin thread cutter
Bobbin winder spindle
Bobbin winder stopper
Face plate
Start/stop button
Thread cutter button
Visual touch screen
Carriage
Thread cutter/holder
Needle threader
Setscrew
Embroidery foot
Needle plate
Thread cutter
Lower thread guide
Needle clamp screw
Needle
Hook cover plate
Hook cover release button
Carrying handle
Handwheel
Touch panel stylus holder
USB port (type B)
USB port (type A)
Presser foot lifter
Power switch
Power inlet
q
w
e
r
t
y
u
i
o
!0
!1
!2
!3
!4
!5
!6
!7
!8
!9
@0
@1
@2
@3
@4
@5
@6
@7
@8
@9
#0
#1
#2
#3
#4
* Design and specications are subject to change without prior notice.
q
!1
@9
#0
#1
@8
ty
u oi !0
we
!2 !3 !4
!5
!6
!7
!9
@1
@5
@6
@2
@3
!8
@4
@7
#3
#4
#2
NOTE:
To carry the sewing machine, hold
the carrying handle with your hand,
and support the sewing machine
with the other hand.
r
@0

4
Standard Accessories
No. Part Name Part No.
1 Bobbin x 5 (1 set on the machine) 102261103
2Screwdriver (Large) 820832005
3Screwdriver key (for needle plate) 653802002
4 Lint brush 802424004
5Scissors 803813203
6 Needle set 852802108
7Spool holder (large) X 2 (1 set on the
machine) 822020503
8Spool holder (small) X 2 822019509
9Spool holder (special) X 2 862408008
10 Extra spool pin 809041004
11 Special bobbin holder for Embroidery
(high tension) 846652607
12 Touch panel stylus 860194002
13 Bobbin holder cleaner 859858007
14 Instruction book 864800594
15 Quick reference guide 864818001
16 Embroidery Editor 864850005
Installation guide 864849207
17 USB cable 850403006
18 Power cable*
U.S.A and Canada 856519004
U.K. 830377008
Australia 830314018
Continental Europe 830335004
19 Embroidery hoop SQ14b** -
OPTIONAL ITEM (with template) 864803003
20 Embroidery hoop RE20b** -
OPTIONAL ITEM (with template) 864802002
21 Embroidery hoop SQ20b (with
template) 864801001
22 Embroidery hoop RE28b (with
template) and anti-slipping sticker 864809009
23 Clamp X 8 861805305
24 Extra wide table 864805005
!6 !7
!8
!9 @0
@1 @2
@3 @4
* The power cable included may differ from the illustration.
**These two types of embroidery hoops are optional items.
q w e r
t y u
i o !0 !1
!2 !3 !4 !5
NOTE:
A presentation video with quick-start information is
available for this model and can be downloaded from
our website at www.elna.com/support

5
Extra Wide Table
Use the extra wide table when the Embroidery hoop
RE20b, SQ20b or RE28b is attached to the machine.
Extract the 4 legs located the underside of the table.
Place the extra wide table on the machine.
NOTE:
Adjust the height of the extra wide table to the height of
the machine table by turning the adjusting screws of 4
legs. Otherwise the carriage may hit the extra wide table
when attached. Use a phillips screwdriver* to turn the
adjusting screw.
q Adjusting screw
* Phillips screwdriver is not included with the machine.
q
Anti-slipping sticker (for Embroidery hoop RE28b)
Embroidery hoop RE28b unit includes the anti-slipping
sticker.
Peel and paste the sticker on the Embroidery RE28 as
shown to prevent slipping of the ne fabrics.

6
Connecting the Power Supply
zFirst make sure the power switch qis off.
xInsert the machine plug wof the power supply cord
into the power inlet e.
cInsert the power supply plug rinto the wall outlet t,
and turn the power switch qon.
q
Power switch
w
Machine plug
e
Power inlet
r
Power supply plug
t
Wall outlet
q
w
For the U.S.A. and Canada only
Polarized plug (one blade wider than the other):
To reduce the risk of electric shock, this plug is intended
to t in a polarized outlet only one way. If it does not t
fully in the outlet, reverse the plug. If it still does not t,
contact a qualied electrician to install the proper outlet.
Do not modify the plug in any way.
NOTE:
Make sure to use the power cable that came with the
machine.
If you turn off the power switch, wait for 5 seconds
before turning it on again.
WARNING:
While in operation, always keep your eyes on the
sewing area, and do not touch any moving parts such
as the thread take-up lever, handwheel or needle.
Always turn off the power switch and unplug the
machine from the power supply:
- when leaving the machine unattended.
- when attaching or removing parts.
- when cleaning the machine.
r
t
Machine Operating Buttons
qStart/stop button
Press this button to start or stop the machine. The button
turns red when the machine is running, and green when it
stops.
wThread cutter button
Press this button when you nish sewing to trim the
threads. The needle bar automatically rise after trimming
the threads.
qNOTE:
If you press the start/stop button without lowering the
presser foot, the warning message eappears on the
visual touch screen.
Lower the presser foot and press the start/stop button.
w
e
e

7
Raising and Lowering the Presser Foot
You can raise and lower the presser foot with the presser
foot lifter.
qPresser foot lifter
wExtra lifted position
You can raise the presser foot about 7 mm (1/4˝) higher
than the normal up position by exerting more pressure
when lifting the presser foot lifter.
NOTE:
Do not turn the hand wheel when the presser foot is in
the extra lifted position.
q
w
qHome key
Press this key to enter the category selection.
wOpen le key
Press this key and the open le window will open.
You can open embroidery designs saved in the machine’s
internal memory or on a USB ash drive.
eSet mode key
Press this key to enter the setting mode. You can
customize the machine settings to your preference.
The machine settings for common settings, embroidery
and language selection are available in this mode.
rHelp key
Press this key to view the step-by-step visual guide about
the essential operations.
tLockout key
Press this key to lockout the machine when threading the
machine, replacing the accessories etc.
To reduce the risk of injury, all the buttons and keys are
deactivated.
To unlock the machine, press the lockout key tagain.
yNext page key
To view the next page, press the next page key.
uPrevious page key
To view the previous page, press the previous page key.
Common Keys
CAUTION:
Do not press the visual touch screen with hard or sharp
objects like pencils, screwdrivers or the like. Use the
touch panel stylus included in the standard accessories.
q
w
e
r
t
yu

8
Extra spool pin
Use the extra spool pin when you need to wind a bobbin
without unthreading the machine while working on a
sewing project.
Insert the extra spool pin into the hole as shown.
Place a spool of thread on the extra spool pin and x the
spool with the spool holder.
qExtra spool pin
wHole for extra spool pin
eLarge spool holder
Setting the Spool of Thread
Lift up the spool pin. Place the spool of thread on the
spool pin.
Attach the large spool holder, and press it rmly against
the spool of thread.
Winding the Bobbin
Removing the bobbin
NOTE:
Use the small spool holder to hold narrow or small
spools of thread.
CAUTION:
Press the lockout key or turn the power switch off.
NOTE:
Use the plastic bobbins for horizontal hook marked with
a “J” r. Using other bobbins, such as pre-wound paper
bobbins, may cause stitching problems and/or damage
to the bobbin holder.
x
z
q
w
Use the spool holder (special) to hold the specic size of
the spool of threads as shown.
The sizes of the spools of thread are as follows;
The hole diameter of the spool has a range of 3/8˝ to
7/16˝ (9.5 to 10.5 mm)), and the spool length has a range
of 2 3/4˝ to 3˝ (70 to 75 mm).
q Spool holder (special)
w Hole diameter (3/8˝ to 7/16˝)
e Spool length (2 3/4˝ to 3˝)
Firmly insert the spool holder (special) into the hole and
hold the spool as illustrated.
q
q
w
w
e
Draw the thread to the left and forward around the bobbin
winder thread guide as shown.
Firmly pull the thread to the right.
Follow the procedure from xto ,of page 9 to wind the
bobbin.
r
e
q
w
e
z Slide the hook cover release button qto the right, and
remove the hook cover plate w.
q
Hook cover release button
w
Hook cover plate
xRemove the bobbin efrom the bobbin holder.
e
Bobbin

9
,Remove the bobbin.
Insert the thread into one of the slits of the ange plate
and pull the thread to cut.
xPut the bobbin on the bobbin winder spindle.
w
Bobbin
e
Bobbin winder spindle
cPass the thread to the bobbin.
Hold the thread with both hands and wind it around the
bobbin clockwise several times.
z
w
x
b
Winding the bobbin
zDraw the thread from the spool.
Guide the thread around the bobbin winder thread
guide.
q
Bobbin winder thread guide
v
n
NOTE:
For safety purposes, the machine will automatically stop
1.5 minutes after starting bobbin winding.
q
e
c
i
t
r
vInsert the thread into one of the slits t of the ange
plate rand pull the thread to cut.
r
Flange plate
t
Slit
bPush the bobbin winder spindle eto the right.
The visual touch screen will show the bobbin winding
sign.
If you wish to wind the bobbin thread more quickly or
slowly, you can adjust the maximum bobbin winding
speed by pressing the “+” key yor “–” key u.
m
,
nPress the start/stop button i.
i
Start/stop button
When the bobbin is fully wound, it will stop spinning
automatically.
Press the start/stop button ito stop the machine.
mReturn the bobbin winder to its original position by
moving the spindle to the left.
e
y
u
NOTE:
Do not move the bobbin winder spindle while the
machine is running.

10
z
x
c
v
Inserting the bobbin
zPress the lockout key.
Place a bobbin in the bobbin holder with the thread
running off counterclockwise as shown on the hook
cover plate.
q
Lockout key
w
End of thread
e
Bobbin holder
r
Hook cover plate
x Hold the bobbin with your ngertip so it does not
rotate.
Guide the thread into the front notch of the bobbin
holder.
Pull the thread to the left to pass it under the guide.
t
Front notch
y
Guide
cDraw the thread to the left to pass it into the guide path
marked “1”.
Make sure that the thread comes out from the side
notch of the bobbin holder.
u
Guide path 1
i
Side notch
vContinue to draw the thread along the guide path
marked “2” and pull the thread to the right through the
slit. The thread will be cut to a proper length and held
in place.
o
Guide path 2
!0 Slit (Thread cutter)
ew
r
t
y
u
Correct
i
ii
Wrong
o
!0
b
r
b Set the left edge of the hook cover plate into opening.
Push down the hook cover plate to t in place.
NOTE:
If the thread does not come out from the side notch,
rethread from step z.
q

11
z
x
q
w
c
e
r
t
t
i
o
!0
v
bnm
!1
!2
y
u
Threading the Machine
Raise the presser foot lifter.
Press the lockout key to lockout the machine.
Turn the handwheel toward you to raise the needle at its
highest position.
q
Lockout key
Pass the thread in order from zto m.
zPull the thread from the spool.
Hold the thread with both hands and pass the thread
into the slit of the pre-tension thread guide.
w
Slit
xWind the thread around the pre-tension thread guide
once as shown.
Draw the thread around the corner of the upper thread
guide.
Firmly pull the thread toward you along the right
channel until the thread snaps.
e
Pre-tension thread guide
r
Upper thread guide
t
Right channel
c Draw the thread down along the right channel and
around the bottom of the thread guide plate.
Pull the thread up along the left channel.
t
Right channel
i
Thread guide plate
o
Left channel
v While holding the thread at the spool, rmly draw the
thread up and to the back of the take-up lever. Draw
the thread forward to draw it into the eye of the take-
up lever.
!0 Eye of the take-up lever
bThen pull the thread down along the left channel and
through the lower thread guide.
!1 Lower thread guide
n Slide the thread from the right of the needle bar thread
guide to the left.
!2 Needle bar thread guide
mThread the needle with the needle threader (refer to
the next page).
NOTE:
If the thread slips out of the pre-tension thread guide
while sewing, wind the thread through the hole as
shown ywhen threading through the pre-tension
thread guide.
NOTE:
If the thread coming out from the needle eye is too short
after auto thread cutting and skipped stitch occurs,
draw the thread through the pre-tension thread guide as
shown u.

12
vPull down the needle threader knob as far as it will go.
cPull the thread up and slip it between the thread cutter
and face plate from behind.
Pull the thread toward you to cut.
Built-in Needle Threader
NOTE:
The needle threader can be used with a #11 to #14
needle.
Thread size 50 to 90 is recommended.
Do not use thread size 30 or thicker.
NOTE:
If the thread is caught in the hook and the thread loop is
not formed, remove the thread from the hook and pull it
to take the thread end out through the needle eye.
z
c
v
n
zPress the lockout key to lock the machine.
Lower the presser foot.
Turn the handwheel toward you to until the needle
thread sign wappears on the right upper corner of the
lockout window.
q
Lockout key
w
Needle threader sign
xDraw the thread through the slit eof the needle
threader. The thread should pass under the hook r.
e
Slit
r
Hook
b
e
x
q
w
r
bRaise the threader slowly so a loop of the thread is
pulled up through the needle eye.
nPull the thread loop to take the thread end out through
the needle eye to the rear.

13
r
e
w
q
Replacing Needles
CAUTION:
Always make sure to press the lockout key to lockout
the machine or turn the power switch off before
replacing the needle.
A loose needle or a loose screw may cause machine
malfunction or needle to break.
NOTE:
• Use the needles equipped with the machine or
supplied by an ELNA authorized dealer.
• Use size 11 blue tipped needle for ne fabrics.
• For medium to heavy weight fabrics, use size 14
needles or red tip needle*.
Fabric and Needle Chart
Fabric Thread Needle
Fine
Embroidery thread
Blue tip needle
Medium
Heavy
weight
Universal needle #14
Red tip needle*
* Red tip needle is an optional item.
CAUTION:
Be sure to tighten the needle clamp screw rmly with a
screwdriver when attaching a needle to the machine,
otherwise the needle may break or cause malfunction.
Raise the needle by turning the handwheel.
Turn the power switch off or press the lockout key.
qLockout key
Loosen the needle clamp screw by turning it
counterclockwise.
Remove the needle from the clamp.
wNeedle clamp screw
Insert a new needle into the needle clamp with the at
side of the needle to the rear.
eFlat side
When inserting the needle into the needle clamp, push it
up against the stopper pin and tighten the needle clamp
screw rmly with a screwdriver.
To check needle straightness, place the at side of the
needle onto something at (a needle plate, glass etc.).
The gap between the needle and the at surface should
be consistent.
rGap
Never use a blunt needle.

14
On-screen Help
Press the help key to open the help menu.
You can view instructions on 4 topics of essential
operations of the machine.
Select the help topic by pressing the book icon and the
step-by-step instruction will open.
q Help key
wBook icon
q
w
er
tTo view the next page, press the next page key.
To view the previous page, press the previous page key.
Press the X key to close the current window.
eNext page key
rPrevious page key
t X key

15
Removing and Attaching the Embroidery Foot
Remove the embroidery foot when removing the needle
plate for the maintenance, etc.
To remove:
zTurn the power switch off or press the lockout key.
Raise the needle by turning the handwheel toward
you.
q
Lockout key
xLoosen the setscrew with the screwdriver and remove
the embroidery foot.
w
Setscrew
z
x
zx
q
w
w
e
CAUTION:
Always make sure to press the lockout key to lockout
the machine or turn the power switch off before
removing or attaching the embroidery foot.
To attach:
zAttach the embroidery foot to the presser bar from the
left side.
w
Setscrew
e
Embroidery foot
xTighten the setscrew securely with the screwdriver.

16
zRemove the needle, embroidery foot and needle plate
(refer to the pages 13, 15 and 58).
Take out the standard bobbin holder.
w
Standard bobbin holder
xInsert the special bobbin holder into the hook race. Make
sure to match the knob of the bobbin holder with the
stopper on the machine.
Attach the needle plate, presser foot and needle.
e
Knob
r
Stopper
t
Special bobbin holder for embroidery (high tension)
Bobbin Holder for Embroidery (high tension)
Replace the standard bobbin holder with the bobbin
holder for embroidery (high tension) when using bobbin
threads other than Janome bobbin thread for embroidery.
r
e
NOTE:
The special bobbin holder for embroidery (high tension)
is marked with a yellow dot for identication.
qYellow dot
NOTE:
Use the standard bobbin holder when sewing quilting
designs that use the same thread for the bobbin as the
needle thread.
z
x
t
q
Embroidery Hoops
q Embroidery hoop SQ14b
A square embroidery hoop with a 14 cm (5.5˝) square
embroidery area.
wEmbroidery hoop RE20b
An extra large embroidery hoop with a 14 cm by 20 cm
(5.5˝ by 7.9˝) embroidery area.
q w
re
t
e Embroidery hoop SQ20b
A square embroidery hoop with a 20 cm (7.9˝) square
embroidery area.
rEmbroidery hoop RE28b
An extra large embroidery hoop with a 20 cm by 28 cm
(7.9˝ by 11˝) embroidery area.
t Clamp (RE20b, SQ20b and RE28b)
A clamp for holding the fabric to the embroidery hoops
RE20b, SQ20b and RE28b.
w
* The embroidery hoops supplied with your machine vary
depending on your model.
CAUTION:
Always make sure to press the lockout key to lockout
the machine or turn the power switch off before
attaching the bobbin holder.

17
Stabilizers
To create the best quality embroidery, it is important to
use stabilizers.
How to use:
Attach the stabilizer to the wrong side of the fabric.
You may need to use more than one layer.
For rm fabrics, you may place a thin sheet of paper
under the fabric.
The non-adhesive type should be used when
embroidering fabric which cannot be ironed or for sections
which are difcult to iron.
Cut the stabilizer larger than the embroidery hoop and set
it on the hoop so that the entire piece is fastened to the
hoop to prevent any looseness in the fabric.
Attaching the stabilizer
Place the wrong side of fabric and the glossy side of the
stabilizer together. Fold up a corner of the stabilizer and
fuse it with an iron.
Types of the stabilizers
Type Usage Property
Tear-away Stable woven fabrics Made from a ber that will tear easily.
Iron-on Knits and all kinds of unstable fabrics Adhesive type fusible with an iron.
Cut-away Knits and all kinds of unstable fabrics Non-woven fabric that does not tear.
Water soluble Cutwork or lace embroidery
Right side of looped fabrics such as towels to avoid loops
coming through the embroidery
A thin lm that will dissolve in water.
Heat-away Cutwork or lace embroidery A thin lm that will melt away with
heat.
NOTE:
Fold up a corner of the stabilizer, to make it easier to
peel off the excess stabilizer after stitching.
Ironing temperatures vary depending on the kind of
adhesive stabilizer you are using.
NOTE:
Sticky type stabilizers can be used only for securing a small piece of fabric or work that cannot be secured in the
hoop, or for securing velvet and other napped fabric that would be permanently marked by the hoop.
Clean the bobbin holder after stitching as glue can get stuck on it.

18
vPush the inner hoop and fabric into the outer hoop.
Tighten the screw on the outer hoop to stretch the
fabric. Make sure that the fabric is stretched tightly in
the hoop.
Remove the template.
cLoosen the hoop tightening screw on the outer hoop.
Place the inner hoop and fabric on the outer hoop.
t
Hoop tightening screw
y
Outer hoop
Setting the Fabric in an Embroidery Hoop
zPrepare a fabric and attach a stabilizer to the wrong
side of the fabric.
The fabric and stabilizer should be larger than the
hoop size.
Draw the centerlines on the fabric with tailor’s chalk.
q
Fabric
w
Centerlines
NOTE:
Thick layers of fabric and stabilizer may cause skipped
stitches, or broken threads and needles.
Avoid sewing on the layers thicker than 3 mm (1/8˝).
q
w
r
e
t
y
u
xLay the inner hoop and template on the fabric,
matching the centerlines of the fabric with the
template.
e
Inner hoop
r
Template
z
x
c
v
bbClamp the fabric to the hoop with the clamps when
using hoop SQ20b, RE20b or hoop RE28b.
u
Clamp
Table of contents
Other ELNA Sewing Machine manuals

ELNA
ELNA eXcellence 782 User manual

ELNA
ELNA 5000 computer User manual

ELNA
ELNA 8300 - LEAFLET User manual

ELNA
ELNA 6005 User manual

ELNA
ELNA 450 User manual

ELNA
ELNA 745 - User manual

ELNA
ELNA EnVision 8006 Wiring diagram

ELNA
ELNA Elina 21 User manual

ELNA
ELNA 845 - Wiring diagram

ELNA
ELNA eXcellence 730 PRO User manual