Elo Touch Solutions PayPoint Plus User manual

USER MANUAL
Elo Touch Solutions
PayPoint®Plus for Windows

UM600523 Rev.A, page 2 of 41
User Manual –PayPoint Plus for Windows
Copyright © 2018 Elo Touch Solutions, Inc. All Rights Reserved.
No part of this publication may be reproduced, transmitted, transcribed, stored in a retrieval system, or translated into any language or computer
language, in any form or by any means, including, but not limited to, electronic, magnetic, optical, chemical, manual, or otherwise without prior written
permission of Elo Touch Solutions, Inc.
Disclaimer
The information in this document is subject to change without notice. Elo Touch Solutions, Inc. and its Affiliates (collectively “Elo”) makes no representations or
warranties with respect to the contents herein, and specifically disclaims any implied warranties of merchantability or fitness for a particular purpose. Elo
reserves the right to
Revise this publication and to make changes from time to time in the content hereof without obligation of Elo to notify any person of such revisions or
changes.
Trademark Acknowledgments
Elo, Elo (logo), Elo Touch, Elo Touch Solutions and PayPoint, are trademarks of Elo and its Affiliates.

UM600523 Rev.A, page 3 of 41
User Manual –PayPoint Plus for Windows
Table of Contents
Section 1: Introduction............................................................................................................................................................................................................................... 4
Section 2: Unpacking and Operation......................................................................................................................................................................................................... 5
Section 3: Receipt Printer........................................................................................................................................................................................................................17
Section 4: Barcode Scanner....................................................................................................................................................................................................................22
Section 5: Technical Support and Maintenance ......................................................................................................................................................................................29
Section 6: Regulatory Information ........................................................................................................................................................................................................... 32
Section 7: Warranty Information ..............................................................................................................................................................................................................40

UM600523 Rev.A, page 4 of 41
User Manual –PayPoint Plus for Windows
Section 1: Introduction
Product Description
The Elo PayPoint Plus register is an all-in-one Wintel based cash register that comes equipped with built-in
receipt printer, magnetic stripe reader, barcode reader, and cash drawer. In addition to its built-in
peripherals, the system has USB, Serial, and HDMI ports that allow for connectivity of external devices.
Precautions
Follow all warnings, precautions and maintenance as recommended in this user manual to maximize the
life of your unit and prevent risks to user safety. See Section 6 for more information on safety.
This manual contains information that is important to ensure proper setup of the PayPoint Plus. Before
setting up and powering on your PayPoint Plus, read through this manual, especially Unpacking and
Operation, and Technical Support and Maintenance sections.

UM600523 Rev.A, page 5 of 41
User Manual –PayPoint Plus for Windows
Section 2: Unpacking and Operation
Box Contents
Verify that the box contains:
•PayPoint Plus for Windows
•Quick Install Guide
•Power Cable
•1x receipt paper roll
•2x cash drawer keys
•1x RJ45 to DB9 Serial Cable

UM600523 Rev.A, page 6 of 41
User Manual –PayPoint Plus for Windows
Elo PayPoint Plus Layout
2
1
A
3
4
B
11
9
10
8
7
12
6
5

UM600523 Rev.A, page 7 of 41
User Manual –PayPoint Plus for Windows
A. PayPoint Plus Display Head
1
Magnetic Stripe Reader (MSR)
2
Touch display
3
Barcode scanner
4
Barcode scanner manual trigger
5
Memory/SSD Door
6
Speaker

UM600523 Rev.A, page 8 of 41
User Manual –PayPoint Plus for Windows
1. Magnetic Stripe Reader (MSR)
The register has a built in encryptable magnetic stripe reader. Application provider is responsible for correctly encrypting the reader.
When the register is in cashier-facing view, the MSR will be on the left of the register display head. When register is in customer-facing view, the
MSR will be on the right of the register display head.
2. Touch display
The register is equipped with a 15.6” FHD with Multitouch TouchPro Pro-G (glass) PCAP touch display.
3. Barcode scanner
The register has a built-in barcode scanner that scans 1-D and 2-D barcodes. When the register is in cashier-facing view, the barcode scanner
will be on the right of the register display head.
4. Barcode scanner manual trigger
The back of the display head has a manual trigger for the barcode scanner. It can be accessed with a pin or paper clip.
5. Memory/SSD Door
Remove memory/SSD door to access the memory and SSD storage device for expandable.
B. PayPoint Plus Base
7
USB Port
16
AC power Input
8
Cash Drawer
17
Micro HDMI Port
9
Cash Drawer Lock
18
12V USB Port
10
Receipt Printer
19
USB Ports
11
Cash Drawer Media Slot
20
Ethernet Port
12
Printer Head Release Lever
21
RJ12 Cash Drawer Port
13
Power Button
22
2x RJ45 Serial Ports
14
Printer Feed Button
15
Printer Power Button

UM600523 Rev.A, page 9 of 41
User Manual –PayPoint Plus for Windows
6. Speaker
The register has a built in speaker on the back of the display head.
7. USB Port (USB 2.0)
This USB port can be used to connect other point of sale peripheral devices.
8. Cash Drawer
The register is equipped with a cash drawer for storing cash, coins, and checks.
9. Cash Drawer Lock
Use the key that comes with the Elo PayPoint Plus register to lock / unlock the cash register. When cash drawer is locked, cash drawer will not
open even when it is commanded to.
Note: Your register comes with one of three unique key and lock combinations. A key and lock pair are marked with matching numbers (001,
002, or 003).
10. Receipt Printer (built-in)
The register is equipped with a built-in receipt printer that is located on the register base.
11. Cash Drawer Media Slot
The cash drawer is designed with a slot for slipping checks into the cash drawer.
12. Printer Head Release Lever
Pull this release lever to release the printer head cover. For more information on how to change printer paper on the register, refer to the
Receipt Printer section of this manual.
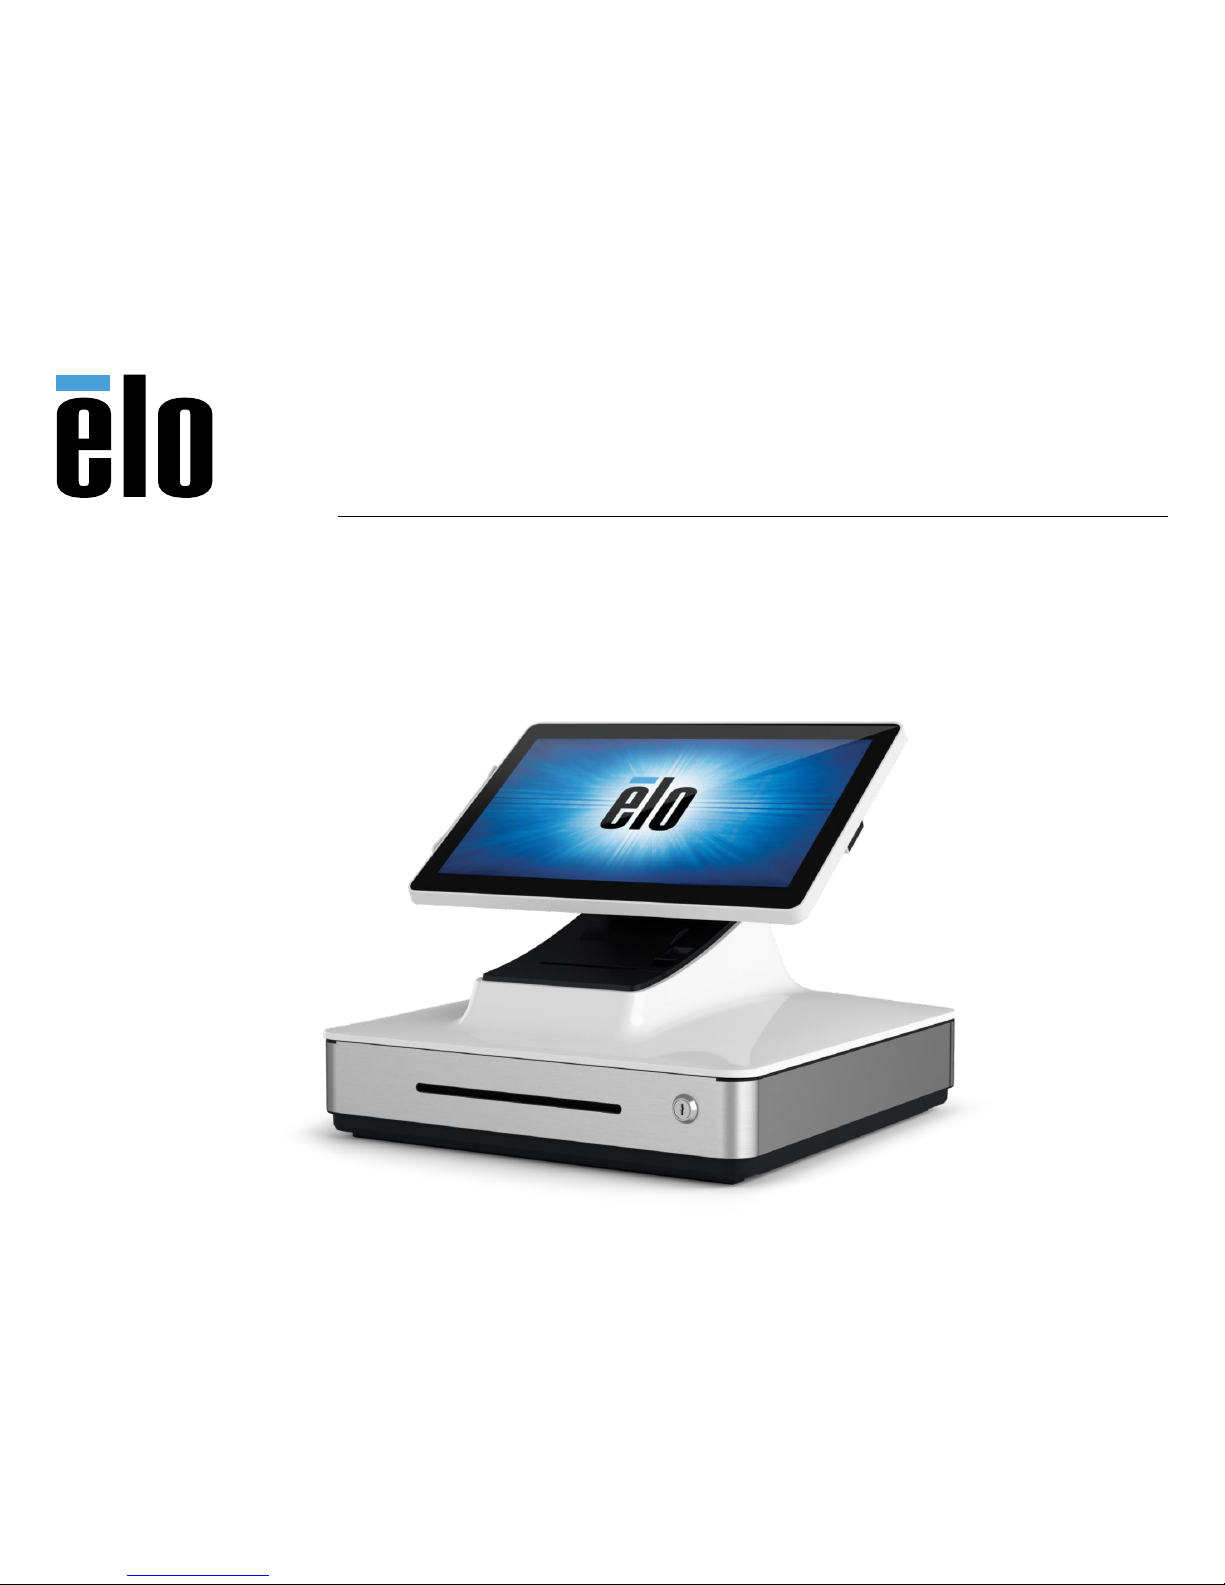
13. Power Button
The register has a power button on the back of the display head. A short press will turn off the LCD backlight. A long press will automatically
power down the PayPoint Plus.
14. Printer Feed Button
Press the printer feed button to feed paper through the PayPoint Plus printer.

UM600523 Rev.A, page 10 of 41
User Manual –PayPoint Plus for Windows
15. Printer Power Button
Press the printer power button to power off (and to turn back on) the PayPoint Plus printer. Printer will print printer diagnostics information when
printer power button is pressed and held during printer bootup / power on.
16. AC Power In
The PayPoint Plus has a built-in power supply. Plug in the AC power cable provided. The unit can be powered by 110V-240V output
17. Micro HDMI Port
The PayPoint Plus has a built-in micro HDMI port to support Elo Monitors for customer displays.
18. 12V Powered USB Port
The PayPoint Plus has a 12V powered USB port that can provide power (and touch interface) to an external Elo monitor.
19. USB Ports
The USB ports can be used for external peripherals or payment devices.
20. Ethernet Port
Connect a LAN cable to the Ethernet port to enable internet.
21. RJ12 Cash Drawer Port
The register is equipped with a secondary cash drawer port. The cash drawer port follows Star Micronics pin out. Please consult your cash
drawer user manual to determine which cash drawer cable you will require.
22. 2x RJ45 Serial Ports
The register has two RJ45 serial ports for connecting external peripherals or payment devices.

UM600523 Rev.A, page 11 of 41
User Manual –PayPoint Plus for Windows
Register Display Head
The Elo PayPoint Plus register display head can be flipped to allow customers to complete purchase
transactions by self-swiping payment cards, and to authorize transactions by signing directly onto the
touchscreen.
Figure 3. Elo PayPoint Plus display head can be flipped and supports two configurations:
Elo PayPoint Plus register cashier-facing view (top) and customer-facing view (bottom)
Power
Press the register power button to turn the Elo PayPoint Plus register on.

UM600523 Rev.A, page 12 of 41
User Manual –PayPoint Plus for Windows
In the event that the register freezes and does not respond, press and hold the power button until the
register turns off. If the register does not turn off via the power button, the register will need to be
powered down by unplugging the power cord from the wall.
The Elo PayPoint Plus register power button is equipped with an LED that indicates the power status of the
register, as follows:
Register Power Status
LED Status
OFF (disconnected from wall)
Off
OFF (connected to wall)
Red (Solid)
SLEEP
White (Blinking)
ON
White (Solid)
The system consumes low power when in SLEEP and OFF modes. For detailed power consumption
specifications, refer to technical specifications available on the Elo website www.elotouch.com.
To bring register out of sleep/standby mode, press the power button once.
If long periods of non-use are planned, turn off the Elo PayPoint Plus register to save power.
The maximum voltage, frequency and current for the register, are provided in the power ratings table
below:
Operating Voltage Range
Operating Frequency Range
Operating Current
100 - 240Vac
50 –60 Hz
2.5A Max

UM600523 Rev.A, page 13 of 41
User Manual –PayPoint Plus for Windows
Recovering the Operating System
If for any reason the touch computer’s operating system needs to be recovered to FACTORY SETTINGS, you can recover your system by following the
procedures below. PLEASE NOTE THAT ALL CUSTOMER SETTINGS AND DATA WILL BE LOST DURING THIS PROCESS. Please be sure to completely backup
all of your data, settings, and customer-installed software before proceeding.
1. Power off your system completely.
2. Power on your system.
3. After the Elo splash screen (shown below), press “↑” or “↓” repeatedly to pause
on the Windows Boot Manager.

UM600523 Rev.A, page 14 of 41
User Manual –PayPoint Plus for Windows
4. Select either Restore OS 32bit or Restore OS 64bit depending on your OS environment.
5. The following User Interface (UI) will be presented:

UM600523 Rev.A, page 15 of 41
User Manual –PayPoint Plus for Windows
6. Select Restore OS. System will test your hardware automatically. Once the process completes, click Start button to perform the system recovery
function.
7. The following process will reformat the primary hard drive. Please back up your data before performing the recovery process.
8. Once completed, click the Close button. The system will return to the main menu of the Elo Recovery Solution. Then click the Exit button to
restart your system.
NOTE: All data is deleted during the recovery process. The user must back up files when necessary. Elo Touch Solutions does not accept liability
for lost data or software.
NOTE: The end user must adhere to Microsoft's Licensing Agreement.

UM600523 Rev.A, page 16 of 41
User Manual –PayPoint Plus for Windows
Duty Usage Cycle
12 hours on per 24 hours
This will promote power savings, extend life of the display and trouble-free operation throughout the life of the register.

UM600523 Rev.A, page 17 of 41
User Manual –PayPoint Plus for Windows
Section 3: Receipt Printer
Printer Paper
The register receipt printer operates using heat, and not with ink. Printer paper compatible with the Elo
PayPoint Plus receipt printer are as follows:
Type: Thermal Paper
Paper width: 80 mm (58 mm with paper roll guide installed)
Printing width: 72mm (50.8mm with paper roll guide installed)
Roll Diameter (maximum): 80 mm
Thickness: 0.053 –0.085 mm
To change the paper for the Elo PayPoint Plus register receipt printer:
1. Ensure that the register display head is flipped away from the receipt printer (in customer-
facing view).
2. Pull the receipt printer head release lever to release the printer head cover.
3. Lift printer head cover.
4. Take out the roll of used printer paper and replace with new roll of printer paper. Make sure
that the paper is placed and positions in the correct orientation, as shown below.

UM600523 Rev.A, page 18 of 41
User Manual –PayPoint Plus for Windows
Installing Paper Roll Guide
To operate printer with a 58 mm width receipt paper roll, install paper roll guide as follows:
1. Insert the paper roll guide along the groove of the body
Note: Securely insert into the groove marked with “∆ 58”
2. Secure the paper roll guide by pressing on it until it clicks in place.

UM600523 Rev.A, page 19 of 41
User Manual –PayPoint Plus for Windows
Cleaning and Care of Printer
The following tips will help maintain optimal performance of your Elo PayPoint Plus register receipt printer:
•Do not pull any paper that is ejected from the printer.
•Do not touch the printer roller or thermal head surface with bare hands. In the case of
contact between printer roller or thermal head and hands, clean the roller and/or thermal
head surface with alcohol, as specified in the latter parts of this section herein.
Note: Contaminating heating elements with any oil or grease (e.g. oil from hands) may shorten the life of
the thermal head.
•Turn off printer before performing maintenance on it.
Prior to cleaning the PayPoint Plus register receipt printer, ensure that the register display head is flipped
away from the receipt printer (in customer-facing view). Pull the receipt printer head release lever to
release printer head cover and access the different printer components listed in Figure 4 above.
Guidance on how to clean the printer photo-sensor, thermal head, and roller are as follows:
Roller (Platen)
It is recommendable to clean the printer roller once every 6 months. To do so:
Use a dry, soft cloth, to wipe off any stains from the printer roller.
Clean the entire rubber roller by rotating it.

UM600523 Rev.A, page 20 of 41
User Manual –PayPoint Plus for Windows
Paper holder and its surrounding area:
It is recommendable to clean the paper holder and its surrounding area once every 6 months. To do so:
Use a Nylon brush (or equivalent) to brush off any paper dust or other residues that may have accumulated.
Thermal head
It is recommendable to clean the printer thermal head once every 6 months. To do so:
Moist cotton swab (or soft cloth) with alcohol (ethanol, methanol, or isopropyl alcohol).
Wipe the thermal head with the cotton swab to remove any stain from the thermal head.
Use a dry soft cloth to wipe the thermal head.
Wait to allow the thermal head to dry off, and then shut the printer head cover.
Note: Do not clean thermal head immediately after printing, as thermal head may be hot.
Be careful of static electricity while cleaning the thermal head. Static electricity can
damage the head.
Other manuals for PayPoint Plus
2
Table of contents
Other Elo Touch Solutions Cash Register manuals