ELTEX NV-711 User manual

Set-top box
NV-711
NV-711-Wac
User manual
Firmware version 1.1.2

User manual for NV-711, NV-711-Wac 2
Document version
Date of issue
Changes
Version 1.0
22.07.2019
First issue
Firmware version: 1.1.2

User manual for NV-711, NV-711-Wac 3
TABLE OF CONTENT
INTRODUCTION...................................................................................................................................................................4
Annotation .....................................................................................................................................................................4
Convention .....................................................................................................................................................................4
1DESCRIPTION ..............................................................................................................................................................5
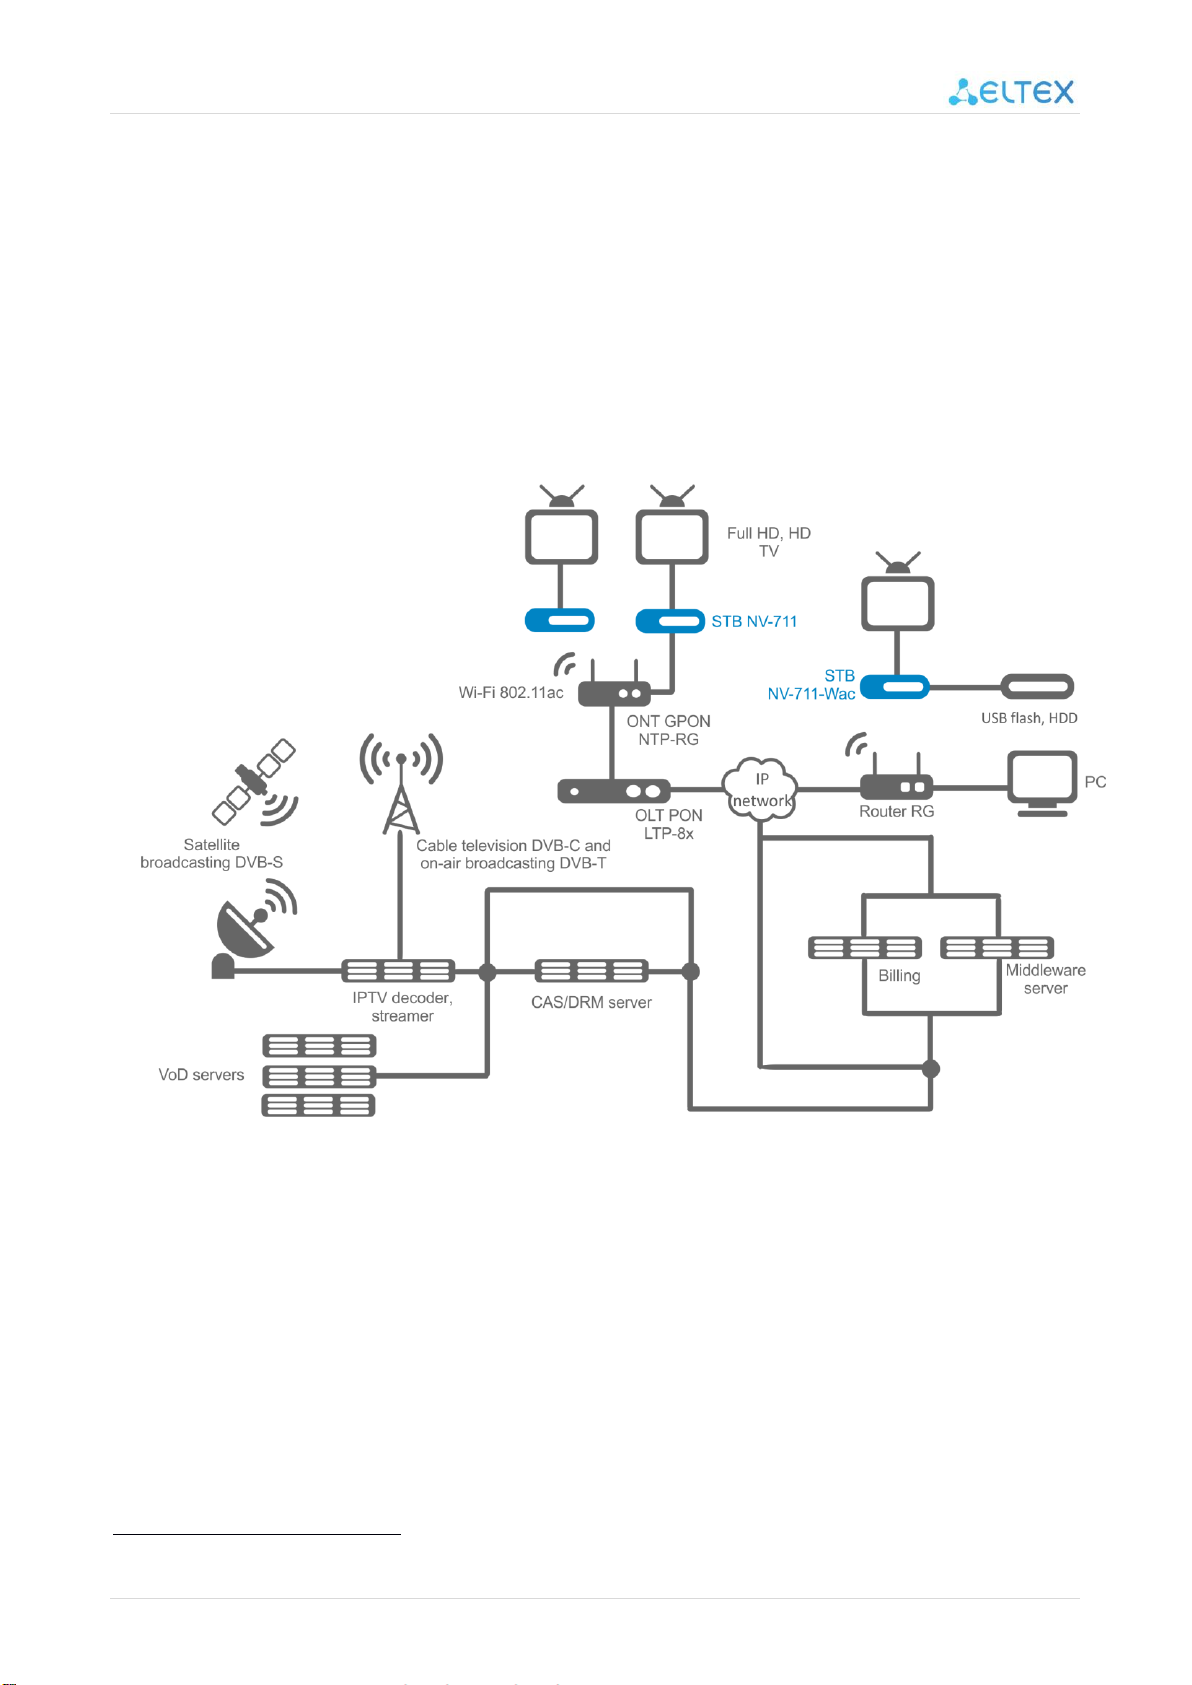
1.1 Purpose ..............................................................................................................................................................5
1.2 Functions............................................................................................................................................................5
1.3 Main technical parameters ................................................................................................................................7
2DESIGN........................................................................................................................................................................8
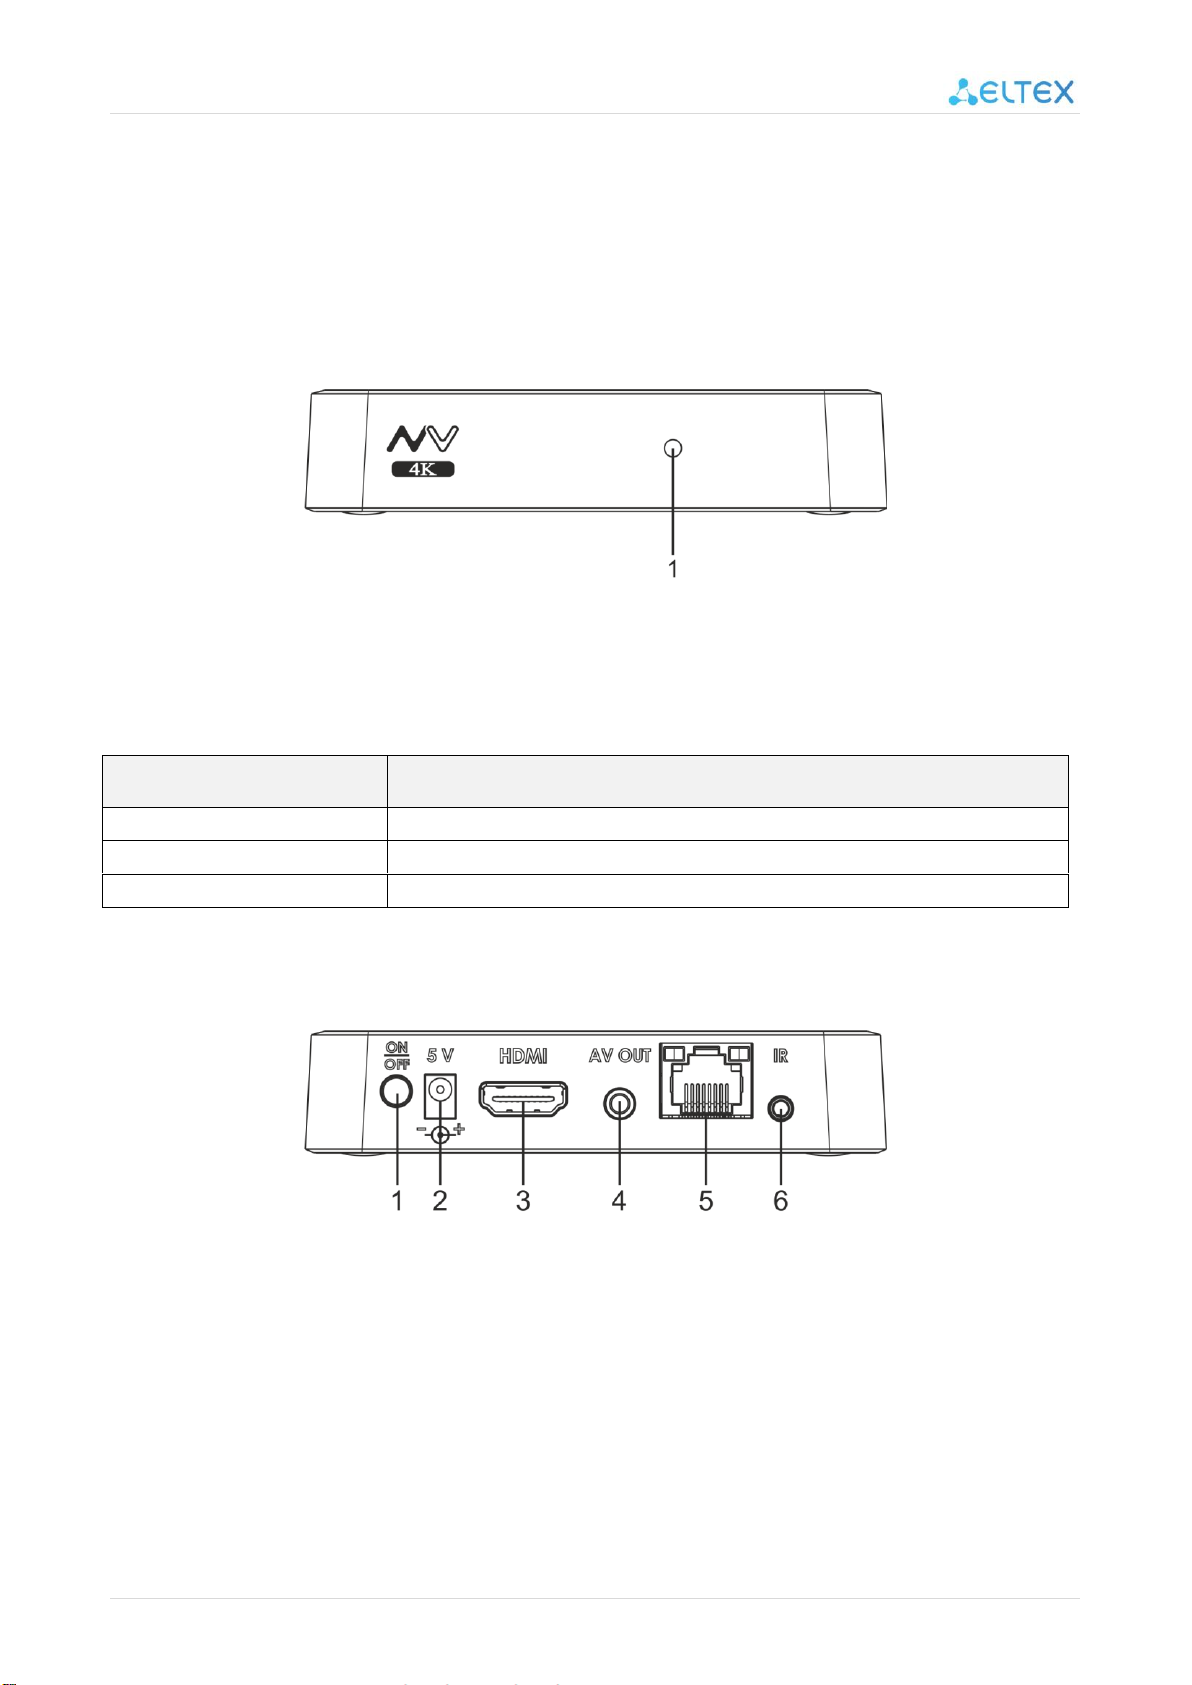
2.1 Front panel of the device. Status indicator ........................................................................................................8
2.2 Rear panel of the device. Description of the ports ............................................................................................8
2.2.1 Ethernet port light indication ....................................................................................................................9
2.3 Side panel of the device. USB port.....................................................................................................................9
2.4 Functional button «F»......................................................................................................................................10
3REMOTE CONTROL BUTTONS DESCRIPTION. ...........................................................................................................11
3.1 A remote control for set-top box and TV management...................................................................................11
4DELIVERY PACKAGE...................................................................................................................................................13
5INSTALLATION ...........................................................................................................................................................14
5.1 Safety instructions............................................................................................................................................14
5.2 Installation rules...............................................................................................................................................14
5.3 Switching on the device ...................................................................................................................................15
6CONTROLLING THE DEVICE.......................................................................................................................................19
6.1.1 General control principles........................................................................................................................19
6.1.2 General principles....................................................................................................................................19
6.1.3 General principles of typing.....................................................................................................................19
6.1.4 Managing video and audio ......................................................................................................................20
6.1.5 View images.............................................................................................................................................21
7DESCRIPTION OF THE MAIN MENU OF THE USER INTERFACE..................................................................................22
7.1 Indication .........................................................................................................................................................22
7.2 Sections of the main menu ..............................................................................................................................22
7.2.1 App Store .................................................................................................................................................24
7.2.2 "IPTV" application....................................................................................................................................28
7.2.3 File Manager............................................................................................................................................29
8SETTING UP THE DEVICE...........................................................................................................................................33
8.1 General description..........................................................................................................................................33
8.1.1 Section "Network" ...................................................................................................................................34
8.1.2 Section "Display" .....................................................................................................................................37
8.1.3 Section "HDMI-CEC" ................................................................................................................................38
8.1.4 Section "Playback settings"......................................................................................................................38
8.1.5 Section "Sound".......................................................................................................................................39
8.1.6 Section "Apps" .........................................................................................................................................41
8.1.7 Section "Storage & reset" ........................................................................................................................43
8.1.8 Section "About" .......................................................................................................................................44
8.1.9 Section "Date & time"..............................................................................................................................45
8.1.10 Section "Language"..................................................................................................................................46
8.1.11 Section "Keyboard"..................................................................................................................................46
9FIRMWARE UPDATE ..................................................................................................................................................47
9.1 General information.........................................................................................................................................47
9.2 Update via App Store .......................................................................................................................................47
9.3 Upgrade from USB drive...................................................................................................................................49
9.4 The procedure for recovering the factory settings ..........................................................................................51
9.5 Update and setup via ACS ................................................................................................................................52
APPENDIX A PROGRAMMING INSTRUCTIONS FOR THE REMOTE CONTROL...................................................................53
TECHNICAL SUPPORT........................................................................................................................................................54

User manual for NV-711, NV-711-Wac 4
INTRODUCTION
Annotation
This manual describes the purpose, specifications, rules for safe operation, recommendations for in-
stallation, configuration and use of high-resolution set-top boxes NV-711 and NV-711-Wac (hereinafter the
device).
Please read this manual carefully before using the device.
Convention
Designation
Description
<KEY>
The names of the keyboard keys are indicated in capital letters in angle
brackets.
Notes and warnings
Notes contain important information, tips, or recommendations for using and configuring
the device.
Warnings inform the user on situations that could harm the device or a person, lead to
incorrect operation of the device or loss of data.

User manual for NV-711, NV-711-Wac 5
1DESCRIPTION
1.1 Purpose
The device combines the functionality of a high-definition set-top box and a home HD/4K media play-
er. The network model of the device and a wide range of interfaces allow easy and convenient access to
IPTV and local media resources.
The embedded Amlogic S905X quad-core media processor supports a wide variety of audio and video
formats.
NV-711-Wac model has a built-in dual-band Wi-Fi 802.11ac module that provides high speed wireless
connection.
The device has a large set of built-in functions: broadcast IPTV with support for additional services,
playback of video and audio data, viewing images from various data storages.
The set of built-in functions of the device can be extended by provider's services (access to the ser-
vice provider's collection of videos, music, etc.).
1.2 Functions
High definition IPTV (Full HD/4K IPTV)
Home FullHD/4K media player
The device is a media player that allows you to play media content from the following
sources:
over a local wireless/wired network, such as a home computer or other LAN-
connected devices;
from external storages (external hard drive, USB flash drive).
The device has an intuitive interface and supports copying, deleting, relocating files.
Internet applications
The functionality of the device can be extended by installing applications from both
local media resources and the app store.
Multimedia capabilities:
support for advanced set of codecs and containers, including: M2TS, MKV,
MPEG-4.10/H.264, HEVC;
playback of multimedia streams with bitrate of up to 50 Mbps;
support for Mp3, MPEG Audio, AAC audio formats;
playback with licensed codecs (Dolby Digital AC-3, DTS) may be possible with the
installation of a special software module;
support for downmix to stereo mode;
viewing photos.
Network capabilities:
supported protocols: IPv4, HTTP, DNS, DHCP, NTP, IGMPv3 (multicast), IGMPv2,
ICMP, UDP, RTSP;
connection to Wi-Fi 802.11b/g/n/ac1wireless network;
1Wi-Fi is supported only by NV-711-Wac

User manual for NV-711, NV-711-Wac 6
remote update of operation system via HTTP, TR-069;
installation of applications through a network;
Samba client;
DLNA client.
Wide range of switching possibilities:
connection to the service provider network: over Ethernet cable, over Wi-Fi 11;
connection of A/V equipment, HDMI2.0;
connection of external storage devices, USB2.0;
connection of USB keyboard, USB mouse (wired/wireless).
Figure 1 —Connection scheme
1 Wi-Fi is supported only by NV-711-Wac

User manual for NV-711, NV-711-Wac 7
1.3 Main technical parameters
Table 1 –Main technical parameters
General parameters
Processor
Amlogic S905X
DDR3 RAM
1 GB
ROMeMMC (system memory)
8 GB
Operating system
Android 7.1
Protocols
IPv4, HTTP, DNS, DHCP, IGMP V2/V3, ICMP, RTP, RTSP, HLS
Media containers
MPEG-4.10/H.264, MPEG-2 TS, MPEG-2 PS, AVI, FLV, MOV, MP3,
WAV, MP4, MKV, OGG, M2TS, MTS
Video codecs
MPEG1, MPEG(+HD), MPEG4(+HD), XvID, DivX, H.264, Wm9,
AVCHD, Vc1, HEVC
Audio codecs
Mp3, MPEG Audio, AAC, AC3, DTS, FLAC
Image file formats
JPG, JPEG, GIF, PNG
Subtitle format
SRT, SMI, SSA, ASS
Playlist file formats
M3U1, XSPF
Web browser
HTML 3.2, HTML 4.01, HTTP 1.1/1.0 RFC2068, DHTML, JavaScript
V1.1/1.2/1.5, Unicode UTF-8, CSS3 support
Display mode
HD 1080p/i, HD 720p/i, UHD, 4K
File systems
NTFS, FAT32, EXT2, EXT3
Ethernet interface parameters
Number of interfaces
1
Electrical connector
RJ-45
Data rate, Mbps
auto-negotiation, 10/100, duplex/half-duplex
Standards support
10/100Base-T
Wireless interface parameters 2
Standards
IEEE 802.11a/b/g/n/ac
Frequency range, MHz
2.4, 5 GHz
Security
64/128/152-bit WEP data encryption; WEP, TKIP and AES
Wi-Fi Antenna
internal
Audio/video interface parameters
Audio/video output
HDMI 2.0
Other interfaces
USB
USB 2.0
Interface for external IR receiver connection
1
Configuration and management
Local control
via embedded graphic interface
Remote management
via SSH, TR-069, ADB
Physical characteristics and environmental conditions
Supply voltage
5 V DC
Maximum power consumption
10 W
Permissible USB port load
no more than 0.5 А
Operating temperature range
from +5 to +40°С
Relative humidity
up to 80%
Dimensions
102х22х93 mm
Weight
103 g
1 In the current firmware version, the format is supported only for Internet radio
2Wi-Fi is supported only by NV-711-Wac

User manual for NV-711, NV-711-Wac 8
2DESIGN
This section describes the design of the device case: the front, back and side panels of the device,
connectors, led indicators and controls.
2.1 Front panel of the device. Status indicator
The appearance of the front panel of the device is shown in the figure 2.
Figure 2 –Front panel of the device
The current state of the device is displayed through the light indicator (1) located on the front panel.
The meaning of the indicator states is described in the table 2.
Table 2 –device status light indication
Indicator (1) state
Device status
Solid green
The device is switched on and ready to operate
Solid red
The device is connected to a power supply, but is in a standby or recovery mode
Off
The device is disconnected from a power supply or faulty
2.2 Rear panel of the device. Description of the ports
The rear panel of the device is shown in the figure 3.
Figure 3 –Appearance of the rear panel of the device
The following connectors and controls are located on the back panel of the device (see table 3).

User manual for NV-711, NV-711-Wac 9
Table 3 –Description of connectors and controls located on the rear panel of the device
Rear panel element
Description
1
ON/OFF
The button for switching the device on/off
2
5V
Connector for power adapter
3
HDMI
HDMI connector for transmitting high-quality digital video and audio signals to
the TV.
4
AV OUT
AV OUT connector for analogue video and audio signals transmission to a
acoustic system or TV set.
5
LAN 10/100
RJ-45 connector of LAN Ethernet for connection to a service provider network.
6
IR
A connector for an external IR receiver.
2.2.1 Ethernet port light indication
The status of Ethernet interfaces is indicated by LEDs built into the 10/100 connector.
Figure 4 –RJ-45 connector
Table 4 –Light indication of Ethernet interfaces
ACT indicator
LINK indicator
Ethernet interface status
Off
Off
The port is off or the connection is not estab-
lished
Off
Flashes
Data transfer in 100BASE-T mode
Flashes
Off
Data transfer in 10BASE-T mode
2.3 Side panel of the device. USB port
Figure 5 –Side panel of the device
USB 2.0 port ( )located on the side panel of the device is dedicated for connection of peripheral
devices: external hard drives, flash drives, input devices (keyboard, mouse).
You can connect external devices such as USB hub to increase the number of USB devices that can be
connected at the same time.

User manual for NV-711, NV-711-Wac 10
2.4 Functional button «F»
The functional button «F» located on the bottom panel of the device is used for entering to a service
mode for the device update or resetting to the factory settings.
Attention! Inappropriate using of this button may cause the device malfunction. Before
using the F button, refer to the item 9.4 The procedure for recovering the factory settings

User manual for NV-711, NV-711-Wac 11
3REMOTE CONTROL BUTTONS DESCRIPTION.
3.1 A remote control for set-top box and TV management.
This section describes the purpose of the remote control buttons.
Figure 6 –Infrared remote control for set-top box and TV management
The remote control operates simultaneously in two modes:
TV control;
set-top box control.
Only buttons in «TV CONTROL» area are used for TV control. Other buttons are used to control the
set-top box.
In order to control the TV, you should assign functions for buttons in «TV CONTROL» area.
The procedure for programming the remote control buttons is described in Appendix A
Programming instructions for the remote control.
The table 5 describes the buttons and indicators of the remote control for operating with the set-top
box.

User manual for NV-711, NV-711-Wac 12
Table 5 –Remote control buttons
Buttons
Action
On/Off STB
Power on / standby. Switch on the set-top box or put it into standby
mode
Red button
The button's function is set depending on application
Green button
The button's function is set depending on application
Yellow button
The button's function is set depending on application
Blue button
The button's function is set depending on application
Playback
control
Buttons to control playback:
PLAY
Pause / continue playback
REW
Rewind
FWD
Forward wind
MUTE
Mute/unmute
REC
Start recording the broadcast. The feature is available for IPTV applica-
tion.
INFO
Help topic
Exit
Exit the application. The feature is available in Stalker
ZOOM
Enable ZOOM (zoom in/out, move the window)
Arrow
Enable/disable cursor. Press this button to switch to the cursor control
mode and back.
MENU
Used in the File manager (Explorer) application to open a context
menu.
Navigation buttons
«Up», «Down», «Right», «Left» buttons are used to select menu items.
When video or music is played, the «Right», «Left» buttons are used to
move to the needed episode.
«OK»button is used to select or confirm an option.
HOME
Return to the main menu
RETURN
Return to the previous level
Volume
Volume adjustment
AUDIO
Change an audio track
SUB
Change subtitles

User manual for NV-711, NV-711-Wac 13
CH
Sequential channel switching or adjustment of the image size in ZOOM
mode.
Numeric keypad
The keypad is used for navigation among channels and entering digits.
DEL
Delete characters when typing.
F
The functionality of the button is set depending on the menu section
4DELIVERY PACKAGE
The basic delivery package includes:
Set-top box;
5V, 2А power adapter;
Infrared remote control;
Batteries for remote control - 2;
HDMI cable;
Ethernet cable 5e (optional);
External IR receiver (optional);
Quick installation and configuration guide.

User manual for NV-711, NV-711-Wac 14
5INSTALLATION
This section describes the safety instructions, installation procedure, and how to turn on the device.
5.1 Safety instructions
1. Do not install the IP set-top box near heat sources and in rooms with temperatures below +5°C or
above +40°C.
2. Do not use the device in areas with high humidity. Do not expose the device to smoke, dust, wa-
ter, mechanical vibrations or shock.
3. Do not open the device. There are no user-serviceable items inside the device.
5.2 Installation rules
1. Before installing and turning on the device, check the device for visible mechanical damage. In
case of damage, stop installing the device, draw up a report and contact the supplier.
2. If the device has been kept at a low temperature for a long time, it should be kept at room tem-
perature for two hours before operating. After a long stay of the device in conditions of high hu-
midity, the device should be kept in normal conditions no less than 12 hours before switching on.
3. The device should be installed in a horizontal position and in compliance with the safety instruc-
tions.

User manual for NV-711, NV-711-Wac 15
5.3 Switching on the device
STEP 1. Connecting a TV
Connect the device to a TV set using HDMI cable, see the figure 7.
Figure 7 —Connecting a TV
STEP 2. Connecting to a provider's network
You will need a network Ethernet cable conducted by your service provider.
Select the scheme of connection to the provider's network:
1Connecting to a service provider's network through Ethernet cable.
a) Подключение к сети провайдера без использования домашнего маршрутизатора.
1) Connect Ethernet cable conducted by your service provider to the 10/100 LAN socket of the
device, figure Figure 8.
2) The device will obtain network settings automatically when it is turned on. If necessary, you
can change the network parameters in the device menu, see 8.1.1 Section "Network".
Figure 8 —Connecting to a provider network without a home router

User manual for NV-711, NV-711-Wac 16
b) Using your home router, switch, hub.
Using a home router allows you to organize a local network.
If you select this connection method, the device can play media content from your home
network.
1) Connect 10/100 LAN socket of the device with LAN socket of your router using Ethernet ca-
ble, figure 9.
2) Connect Ethernet cable conducted by your service provides to the WAN socket of the
router.
The name of the WAN connector may be different, in which case refer to the
documentation for your router..
If necessary, you can change the network settings in the device menu, see 8.1.1 Section
"Network".
Figure 9 –Connecting to a provider's network using a router
2Connecting to a service provider's network via Wi-Fi (organizing a local wireless network)1
This connection method requires a home Wi-Fi router. Using a home Wi-Fi router allows you to or-
ganize a wireless LAN.
If you select this connection method, the device can play media content from your home network.
1) Enable Wi-Fi on your router (to get more information, see manual for your router).
2) Then connect the set-top box to the Wi-Fi network the router. To do this, refer to the sec-
tion 8.1.1.1 Establishing Wi-Fi connection.
1Available only on NV-711-Wac

User manual for NV-711, NV-711-Wac 17
Figure 10 –Connecting to a service provider's network using a Wi-Fi router
STEP 3. Connecting the set-top box to the power supply
Connect the power adapter cord to the 5V socket of the device. Then connect the adapter to the
power supply network, figure 11.
Figure 11 —The example of the set-top box connection
STEP 4. Switching the device on
1) After connecting the set-top box to the power supply network, wait until the device is fully
loaded (this may take about a minute).
2) Then switch the TV to the source which the set-top box is connected to (for more
information, see a TV's manual).

User manual for NV-711, NV-711-Wac 18
Figure 12 —Screensavers which show that set-top box is loading
The firmware update may start when the set-top box is launched for the first time. Please do
not interrupt the update process. As soon as the device's firmware is updated, you will be able
to fully enjoy all its features.

User manual for NV-711, NV-711-Wac 19
6CONTROLLING THE DEVICE
The device is managed through a graphical user interface. The user interface provides full control
over the functions of the device. It allows you to access the provider menu, various applications and device
settings.
The main menu consists of sections, which are displayed as graphic images. When you select a sec-
tion, its icon is highlighted. Depending on the tasks performed, each section contains its own navigation and
control subsystem. A detailed description of the main sections is given in the section 7 Description of the
main menu of the user interface.
6.1.1 General control principles
6.1.2 General principles
The set-top box can be controlled by a remote control (included in the package), keyboard, mouse
(installed by a user if necessary). This section describes general principles of device management.
The table 6 shows the description of the keyboard keys and remote control buttons.
Table 6 —General principles of device management
Remote control's buttons
Action
HOME
return to the main menu
RETURN
←Backspace
return to the previous level
leftward
rightward
← →
menu navigation left, right;
tabs navigation left, right
up
down
↑
↓
menu navigation up, down;
select a value from the drop-down list
ОК
ENTER
menu option selection;
confirm the selection
6.1.3 General principles of typing
You can use the remote control or keyboard to enter numbers, letters, and symbols.
A virtual keyboard is used to enter a text using the remote control.
To navigate the virtual keyboard, use the buttons "down", "up", "left", "right".
To press the virtual keyboard button, use "OK" button on the remote control.

User manual for NV-711, NV-711-Wac 20
"DEL" button is used to delete characters.
To close the virtual keyboard without saving changes, press "RETURN".
You can configure the keyboard settings in the Settings → Keyboard menu, detailed description is
given in the section 8.1.11 Section "Keyboard".
6.1.4 Managing video and audio
This section describes how to manage audio and video through the remote control.
1Playback control:
-to start playback, press "PLAY" or "OK";
-to pause, press "PLAY" or "OK";
-to stop playback and return to the main
menu, press the "RETURN" button.
2Go to the specified episode:
-Use "left", "right" or "REW", "FWD"
buttons to place the cursor on the needed
episode and press "OK" button.
3Adjusting the sound:
To change the sound level use the buttons:
-«VOL» + –increase the volume;
-«VOL» - –decrease the volume;
-«MUTE» –mute the sound.
3Change the audio track 1.
To switch the audio track, press the "AUDIO"
button, and use the navigation buttons "up",
"down" to select the needed option and press
the "OK" button.
4Changing or disabling subtitles 1.
To switch subtitles, press "SUB" button, use the
navigation buttons "up", "down" to select the
needed option and press "OK" button.
«PLAY»:
- pause;
- start playback.
«ОК»:
- confirm the selection;
- pause;
- start playback.
«RETURN» —stop playback and return
to the previous level.
"FWD", "REW" and navigation buttons
"left", "right" —move the cursor back
and forth to the needed episode.
«ZOOM» —zoom in or out.
«VOL» —adjust volume.
«MUTE» —mute and unmute
the sound.
«AUDIO» —select an audio track.
«SUB» —select/disable subtitles.
5Changing the screen size:
To zoom in or out, press "ZOOM" to enter the zoom mode. Use the navigation buttons to select the
needed display mode:
Box –broadcast image without zooming;
Full –the image will be enlarged to fit the screen;
Panscan –the image will be enlarged to fit the width of the screen.
To exit the zoom mode, press "RETURN" button.
1The function is not available when playing audio content
This manual suits for next models
1
Table of contents
Other ELTEX Set-top Box manuals