elvita CHF5708S User manual
User manual
Kitchen fan
Bruksanvisning
Köksfläkt
CHF5708S

2
© 2022, Elon Group AB. All rights reserved.
Thank you
for your trust and the purchase of our product. This user manual is supplied to help you
use this product. The instructions should allow you to learn about your new product as
quickly as possible.
Make sure you have received an undamaged product. If you do find transport damage,
please contact the seller from which you purchased the product, or the regional
warehouse from which it was supplied.
Tack
för ditt förtroende och för köpet av vår produkt. Denna bruksanvisning medföljer för att hjälpa
dig att använda produkten. Med hjälp av instruktionerna kan du lära dig om din nya produkt
så snabbt som möjligt.
Kontrollera att produkten du har tagit emot är oskadad. Om du upptäcker en transportskada,
var vänlig kontakta återförsäljaren som du köpte produkten av, eller den lokala butiken som
levererade den.
Publication date: 2022-06-29
This document and its content, including written material and images, are the
property of Elon Group AB. You may not copy, reproduce, modify, republish or
distribute this document or any of its content without express written permission from Elon Group AB. ©
2022, Elon Group AB. All rights reserved.

3
© 2022, Elon Group AB. All rights reserved.
WARRANTY
Guarantee of quality for the consumer (does not include wear parts).
GARANTI
Kvalitetsgaranti gäller för konsument (omfattar ej förbrukningsdelar).

4
© 2022, Elon Group AB. All rights reserved.
CONTENTS/INNEHÅLL
ENGLISH 5
SVENSKA 49

5
© 2022, Elon Group AB. All rights reserved.
Contents
PREFACE. . . . . . . . . . . . . . . . . . . . . . . . . . . . . . . . . . . . . . . . . . . . . . . . . . . . . . . . . . . . . . . . . . . . . . . . . . . . . 6
WARNINGS . . . . . . . . . . . . . . . . . . . . . . . . . . . . . . . . . . . . . . . . . . . . . . . . . . . . . . . . . . . . . . . . . . . . . . . . . . .7
TECHNICAL DATA . . . . . . . . . . . . . . . . . . . . . . . . . . . . . . . . . . . . . . . . . . . . . . . . . . . . . . . . . . . . . . . . . . . . . 11
PRODUCT PERSPECTIVES. . . . . . . . . . . . . . . . . . . . . . . . . . . . . . . . . . . . . . . . . . . . . . . . . . . . . . . . . . . . . . . .12
PRODUCT OVERVIEW . . . . . . . . . . . . . . . . . . . . . . . . . . . . . . . . . . . . . . . . . . . . . . . . . . . . . . . . . . . . . . . . . .13
CONTROL PANEL . . . . . . . . . . . . . . . . . . . . . . . . . . . . . . . . . . . . . . . . . . . . . . . . . . . . . . . . . . . . . . . . . . . . . .14
SYMBOLS. . . . . . . . . . . . . . . . . . . . . . . . . . . . . . . . . . . . . . . . . . . . . . . . . . . . . . . . . . . . . . . . . . . . . . . . . . . .15
SEGMENT SCREENS. . . . . . . . . . . . . . . . . . . . . . . . . . . . . . . . . . . . . . . . . . . . . . . . . . . . . . . . . . . . . . . . . . . .16
STOVE HOOD USAGE TYPE . . . . . . . . . . . . . . . . . . . . . . . . . . . . . . . . . . . . . . . . . . . . . . . . . . . . . . . . . . . . . .16
ACTIVE CARBON FILTER REPLACEMENT. . . . . . . . . . . . . . . . . . . . . . . . . . . . . . . . . . . . . . . . . . . . . . . . . . . . .18
CLEANING AND PREVENTIVE MAINTENANCE. . . . . . . . . . . . . . . . . . . . . . . . . . . . . . . . . . . . . . . . . . . . . . . 20
CLEANING OF THE METAL OIL FILTER AND WATER TANK . . . . . . . . . . . . . . . . . . . . . . . . . . . . . . . . . . . . . . 20
INDUCTION COOKING SYSTEM WORKING PRINCIPLES . . . . . . . . . . . . . . . . . . . . . . . . . . . . . . . . . . . . . . . 22
COOKWARE. . . . . . . . . . . . . . . . . . . . . . . . . . . . . . . . . . . . . . . . . . . . . . . . . . . . . . . . . . . . . . . . . . . . . . . . . 23
PACKING . . . . . . . . . . . . . . . . . . . . . . . . . . . . . . . . . . . . . . . . . . . . . . . . . . . . . . . . . . . . . . . . . . . . . . . . . . . 25
INSTALLATION AND ASSEMBLY . . . . . . . . . . . . . . . . . . . . . . . . . . . . . . . . . . . . . . . . . . . . . . . . . . . . . . . . . . 26
ASSEMBLY . . . . . . . . . . . . . . . . . . . . . . . . . . . . . . . . . . . . . . . . . . . . . . . . . . . . . . . . . . . . . . . . . . . . . . . . . . 28
CONNECTION SCHEME. . . . . . . . . . . . . . . . . . . . . . . . . . . . . . . . . . . . . . . . . . . . . . . . . . . . . . . . . . . . . . . . 33
USE OF PRODUCT . . . . . . . . . . . . . . . . . . . . . . . . . . . . . . . . . . . . . . . . . . . . . . . . . . . . . . . . . . . . . . . . . . . . 34
POWER LEVELS. . . . . . . . . . . . . . . . . . . . . . . . . . . . . . . . . . . . . . . . . . . . . . . . . . . . . . . . . . . . . . . . . . . . . . . 45
PROCESS PLATE . . . . . . . . . . . . . . . . . . . . . . . . . . . . . . . . . . . . . . . . . . . . . . . . . . . . . . . . . . . . . . . . . . . . . . 46
ACCESSORIES AND SPARE PARTS . . . . . . . . . . . . . . . . . . . . . . . . . . . . . . . . . . . . . . . . . . . . . . . . . . . . . . . . 47
AUTHORIZED SERVICE. . . . . . . . . . . . . . . . . . . . . . . . . . . . . . . . . . . . . . . . . . . . . . . . . . . . . . . . . . . . . . . . . 48

6
© 2022, Elon Group AB. All rights reserved.
Follow the step-by-step instructions in this manual.
The manufacturer accepts no responsibility for any negativity,
damage or fire that may occur in the appliance as a result of not
following the instructions given in this manual. The appliance is
intended for domestic use only for cooking food and aspiration of
fumes from said cooking. Use for other purposes is not permitted
(eg. Heating the environment). The manufacturer accepts no
responsibility for improper use or incorrect setting of commands.
It is important to keep this user manual for future reference at any
time. Make sure that this user manual is not separated from the
product during the sale, lending or transfer of the product.
• Read the instructions carefully: It contains very important information
regarding installation, usage and safety.
• Do not perform electrical repairs on the product.
• Check whether all the components are usable before installing the
appliance. Otherwise contact the manufacturer and do not continue
installing.
• Make sure of the product’s integrity before installing. Otherwise contact the
manufacturer and do not continue installing.
The appearance of the product may differ from
those depicted in the images in this booklet,
but the instructions for use, maintenance and
installation remain the same.
PREFACE
7
© 2022, Elon Group AB. All rights reserved.
CAUTION!
Strictly follow the instructions specified on this manual.
CAUTION!
The appliance is not suitable for use in sockets without
grounding.
The power cable must be long enough to allow the appliance to be connected
to the mains.
In order for the installation to comply with the current safety regulations,
a standard-compliant switch is required, which ensures complete
disconnection of the network under overvoltage category conditions.
Do not use multiple sockets or extensions.
After completing the installation, the user should no longer be able
to access the electrical components.
The areas touched during use are hot. Keep children away from
the appliance and under supervision.
The appliance can be used by children under 8 years of age, persons
with limited physical, mental and emotional abilities, and persons
with incomplete experience or knowledge only if they are under the
supervision of a responsible person or have been informed about the safe use
of the appliance and the dangers that may occur. Cleaning and maintenance
should not be done by children without supervision.
Before starting any installation procedure, the appliance must be
disconnected from the mains.
The installation or maintenance of the appliance must be carried
out by a qualified technician in accordance with the manufacturer’s
instructions and in compliance with the local regulations in force on
safety.
In case of damage due to incorrect connection, the appliance will
be out of warranty.
Do not repair or replace any part of the appliance, unless it is specifically
stated in the user manual.
WARNINGS

8
© 2022, Elon Group AB. All rights reserved.
Before using the induction stove, people with pacemakers and
active implants should check whether their appliance is compatible
with the appliance. It is not possible to guarantee that 100% of the
appliances on the market will fulfil the electromagnetic compatibility
criteria in force and will not cause interference that will jeopardize
the correct operation of the appliance. It is also possible that
people wearing other appliances such as hearing aids may experience
some discomfort.
Do not touch the heater parts of the appliance during and after use.
Avoid contact with cloth or other flammable materials before all
components of the stove are sufficiently cooled.
Overheated greases and oils can easily catch fire. When cooking
food rich in oil, keep it under supervision.
Do not place metal items such as knives, forks, spoons and lids on
the stove as there is a possibility of overheating.
Do not use a steam cleaner.
Surface damage, discolouration and stains due to unsuitable detergent.
Use only detergent suitable for this type of stove.
Discolouration due to surface damage and pot friction. Lift and
carry pots and pans, do not push.
If the surface is cracked, turn off the appliance to avoid possible
electric shock.
The appliance is not suitable for operation via an external timer or
a separate remote control system.
Unsupervised cooking of oil on a stove can be dangerous and cause
a fire.

9
© 2022, Elon Group AB. All rights reserved.
The cooking process should always be monitored.
NEVER try to extinguish the fire with water. On the contrary, turn
off the stove immediately and smother the flames using a fireproof
lid or a cover.
Do not put any objects on the stove.
Before connecting the appliance to the electricity network, check
the information plate at the bottom of the stove to make sure that
the electrical voltage and power values are compatible with the
network and the connection cable is suitable. In case of doubt,
contact a qualified electrical expert.
Important:
After use, turn off the stove using the control and do not rely on the
pan sensor.
To prevent liquids from overflowing, reduce heat input when boiling
or heating liquids.
When your appliance is in operation and there is a
water overflow or a wet cloth is placed, your appliance
shuts down to protect itself. To restart your appliance, you must
unplug the power cord and plug it in again.
Do not leave an empty pot or pan on the heater components or
without a container.
After completing the cooking process, turn off the relevant section.
Using a high power function such as a booster is not suitable for
heating some liquids such as cooking oil. High temperature can be
dangerous. In these cases, it is recommended to use a lower
heating power.
The containers should be placed directly on the stove and centered.
There should be no other objects between the pot and the
stove.
10
© 2022, Elon Group AB. All rights reserved.
When the stove is in operation, accessible parts of
the hood become hot.
CAUTION!
Do not connect the appliance to the power grid
until the installation is completely complete.
In terms of safety measures and technical measures to be adopted
for smoke evacuation, strictly comply with the stated facts in the
regulations of the local competent authorities.
When there is high heat, the appliance automatically reduces the
power level of the cooking areas.
Before any cleaning or maintenance, disconnect the product from
the mains by unplugging or by turning off the cabinet’s main switch.
Wear work gloves for all installation and maintenance operations.
The inside and outside of the appliance should be cleaned frequently
(AT LEAST ONCE A MONTH). Also, follow what is clearly
stated in the maintenance instructions.
Failure to comply with standards regarding the cleaning of the
appliance and the cleaning and replacement of the filters creates
the risk of fire.
Frying should be done under control to prevent the overheated oil
from catching fire.
11
© 2022, Elon Group AB. All rights reserved.
3 TECHNICAL DATA
TECHNICAL DATA
FLOW-IN PRO PRODUCT FEATURES
Supply voltage 220-240 V(~) 50/60 Hz - 380-415 V(~)
2N(~) 50/60Hz
Frequency 50/60 Hz
Max. power consumption 7360 W
Fuse protection / power source 2x16 A /1x32 A
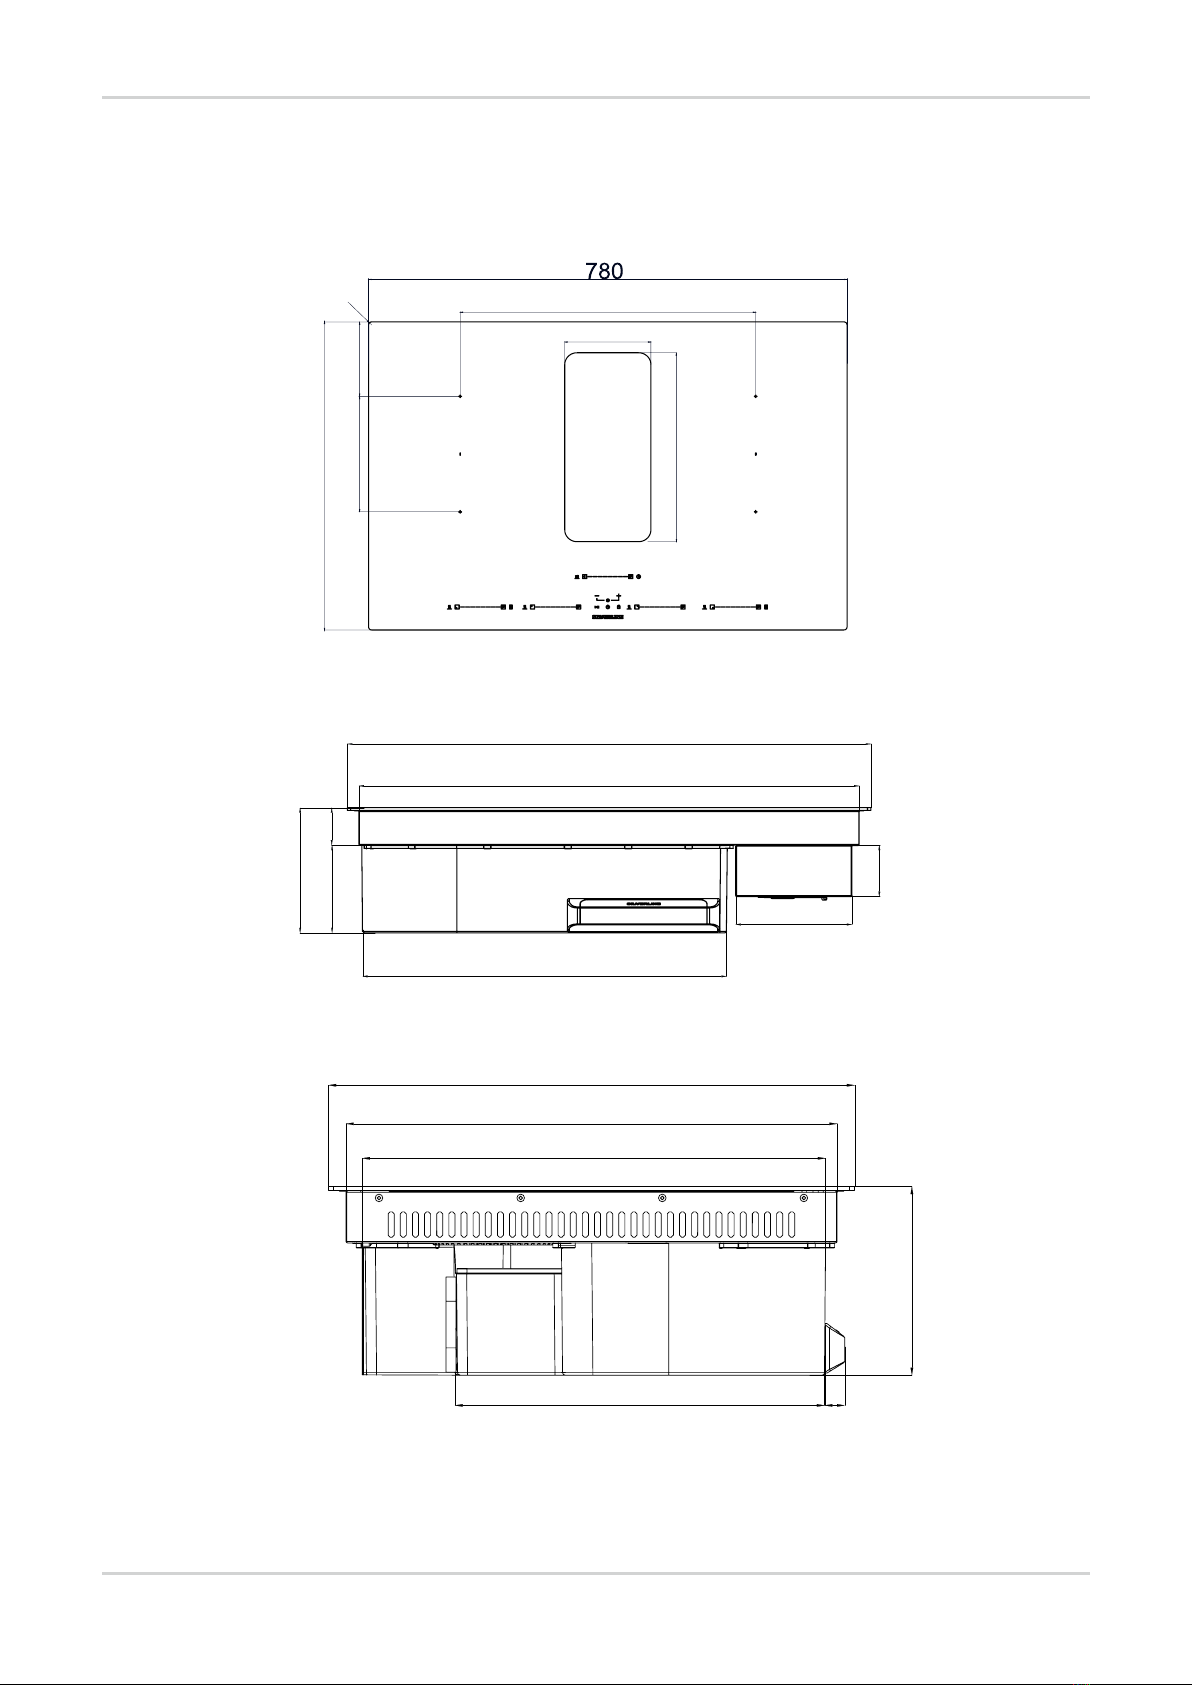
Product dimensions (width/depth/height) 780x520x210
STOVE
Power levels 1-9 P
Front cooking area cooking pot size 190mm
Front cooking area power value 2000 W / 2800 W
Rear cooking area cooking pot size 190mm
Rear cooking area power value 1500 W / 2000 W
Stove power efficiency_EN 60350-2
1st cooking area power consumption 172.25 (Wh/kg)
2nd cooking area power consumption 175.79 (Wh/kg)
3rd cooking area power consumption 174.01 (Wh/kg)
4th cooking area power consumption 173.61 (Wh/kg)
Power efficiency value 173.92 (Wh/kg)
OIL FILTER
Oil capacity 60 hours
Oil filter service life 2 years
12
© 2022, Elon Group AB. All rights reserved.
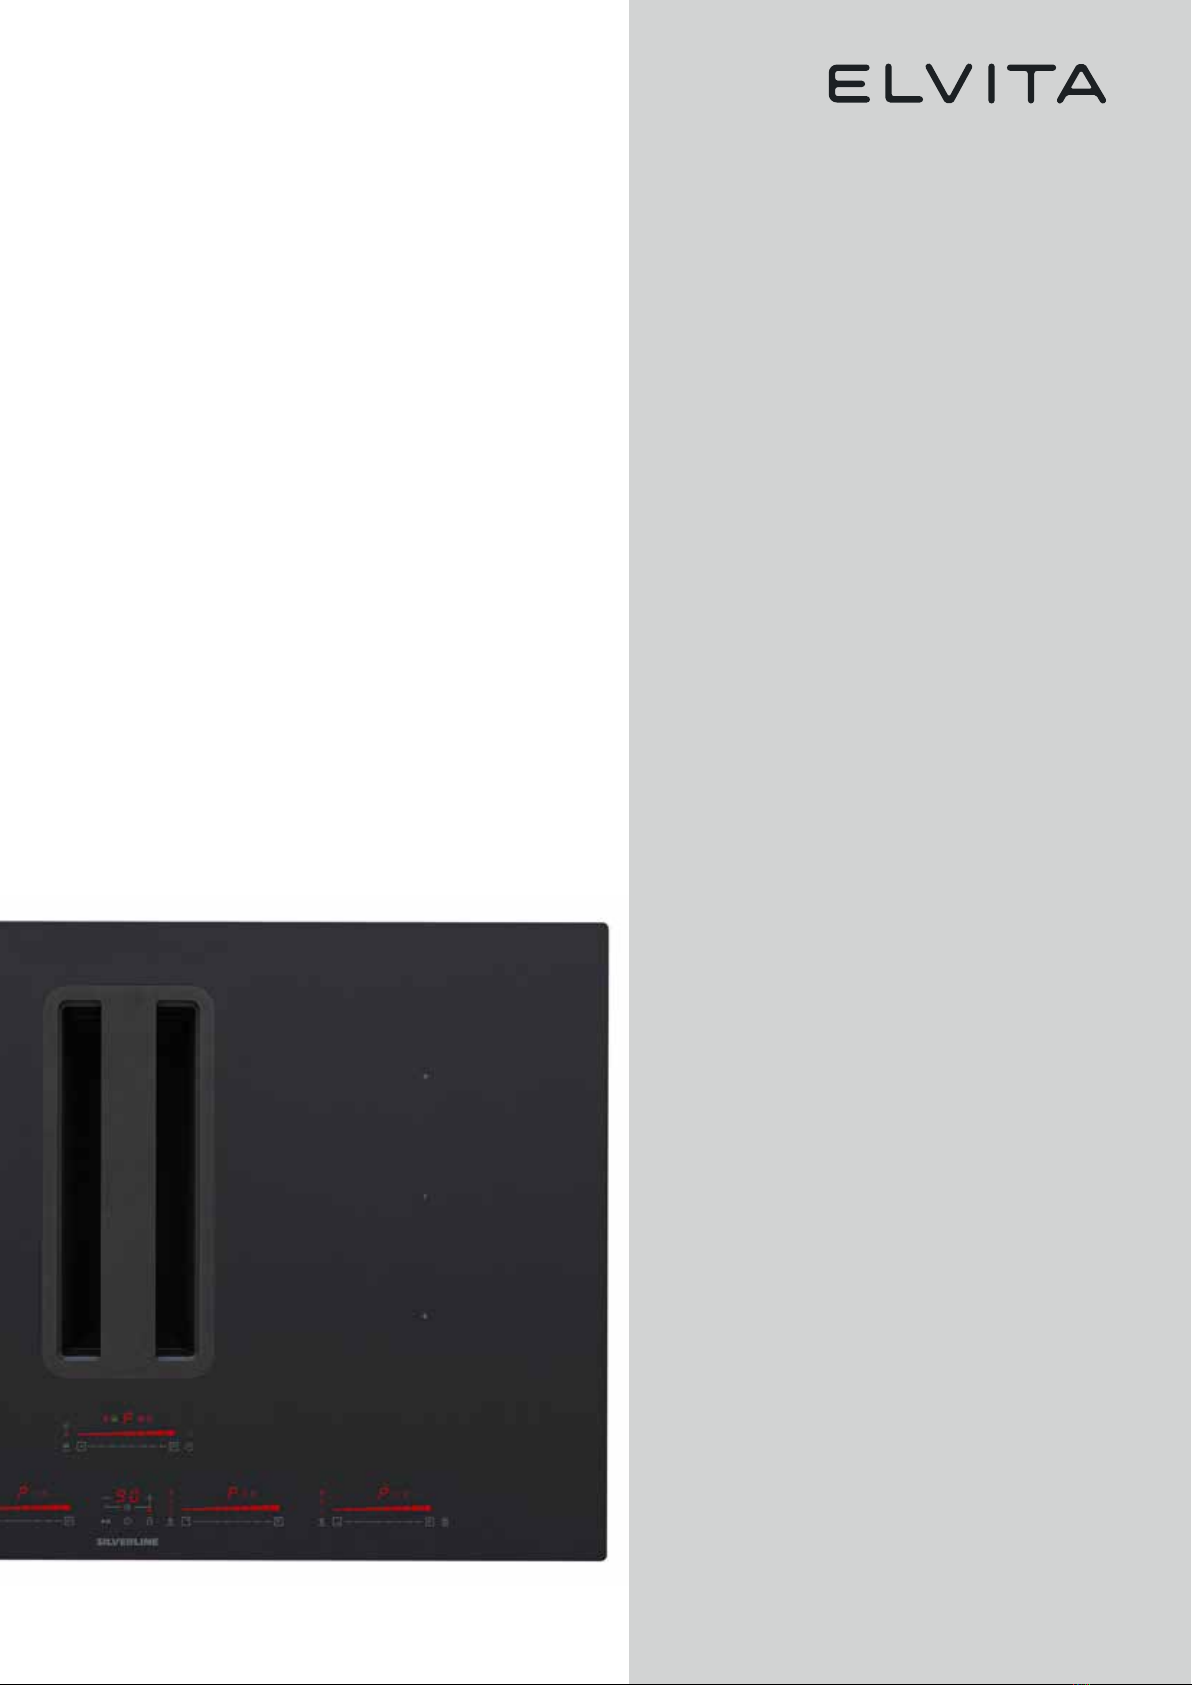
Fig. 1: Flow-in Pro
PRODUCT PERSPECTIVES
520
140,5
R5
319
126
195
482
145
512
152 58
210
780
740
480
363 20
210
453
520
06
13
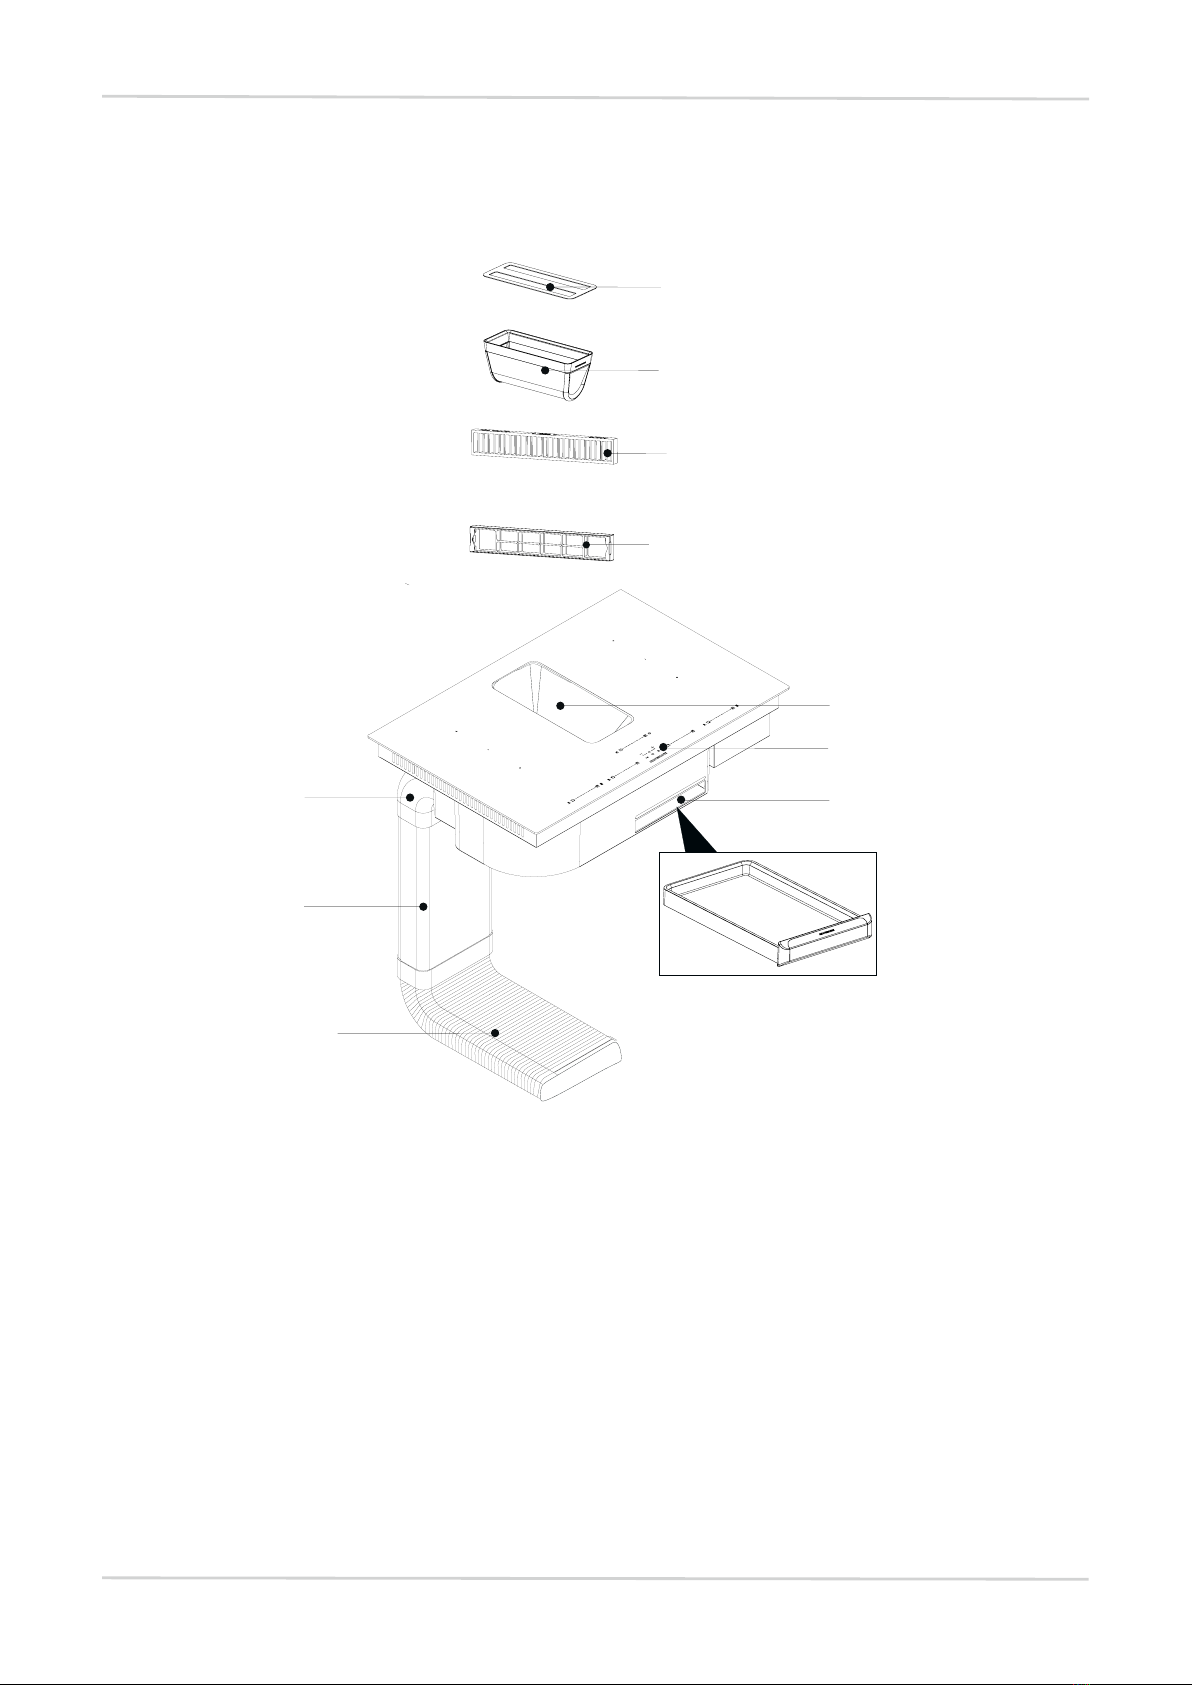
© 2022, Elon Group AB. All rights reserved.
Fig. 2
1- Decorative Lid
2 - Oil Filter
3 - Carbon Filter
4 - Carbon Filter Housing
5 - Oil filter Bed
6 - Control Panel
7 - Water Tank
8 - Elbow
9- Fladkanal
10- Flexi pipe
PRODUCT OVERVIEW
1
2
3
5
6
7
8
9
10
4

14
© 2022, Elon Group AB. All rights reserved.
In the Worktop platforms, the stove and hood operating panel consists
of electronic sensor keys (finger contact part) and display panels.
Fig. 3: Control panel located on the product
1 - Stove Hood Panel
2 - Timer Panel
3 - Stove Panel
Fig. 4: Control panel detail
Do not place wet towel or extremely hot pot on the Worktop control panel.
CONTROL PANEL
2
3
6789
12
11
13 14
10
15
© 2022, Elon Group AB. All rights reserved.
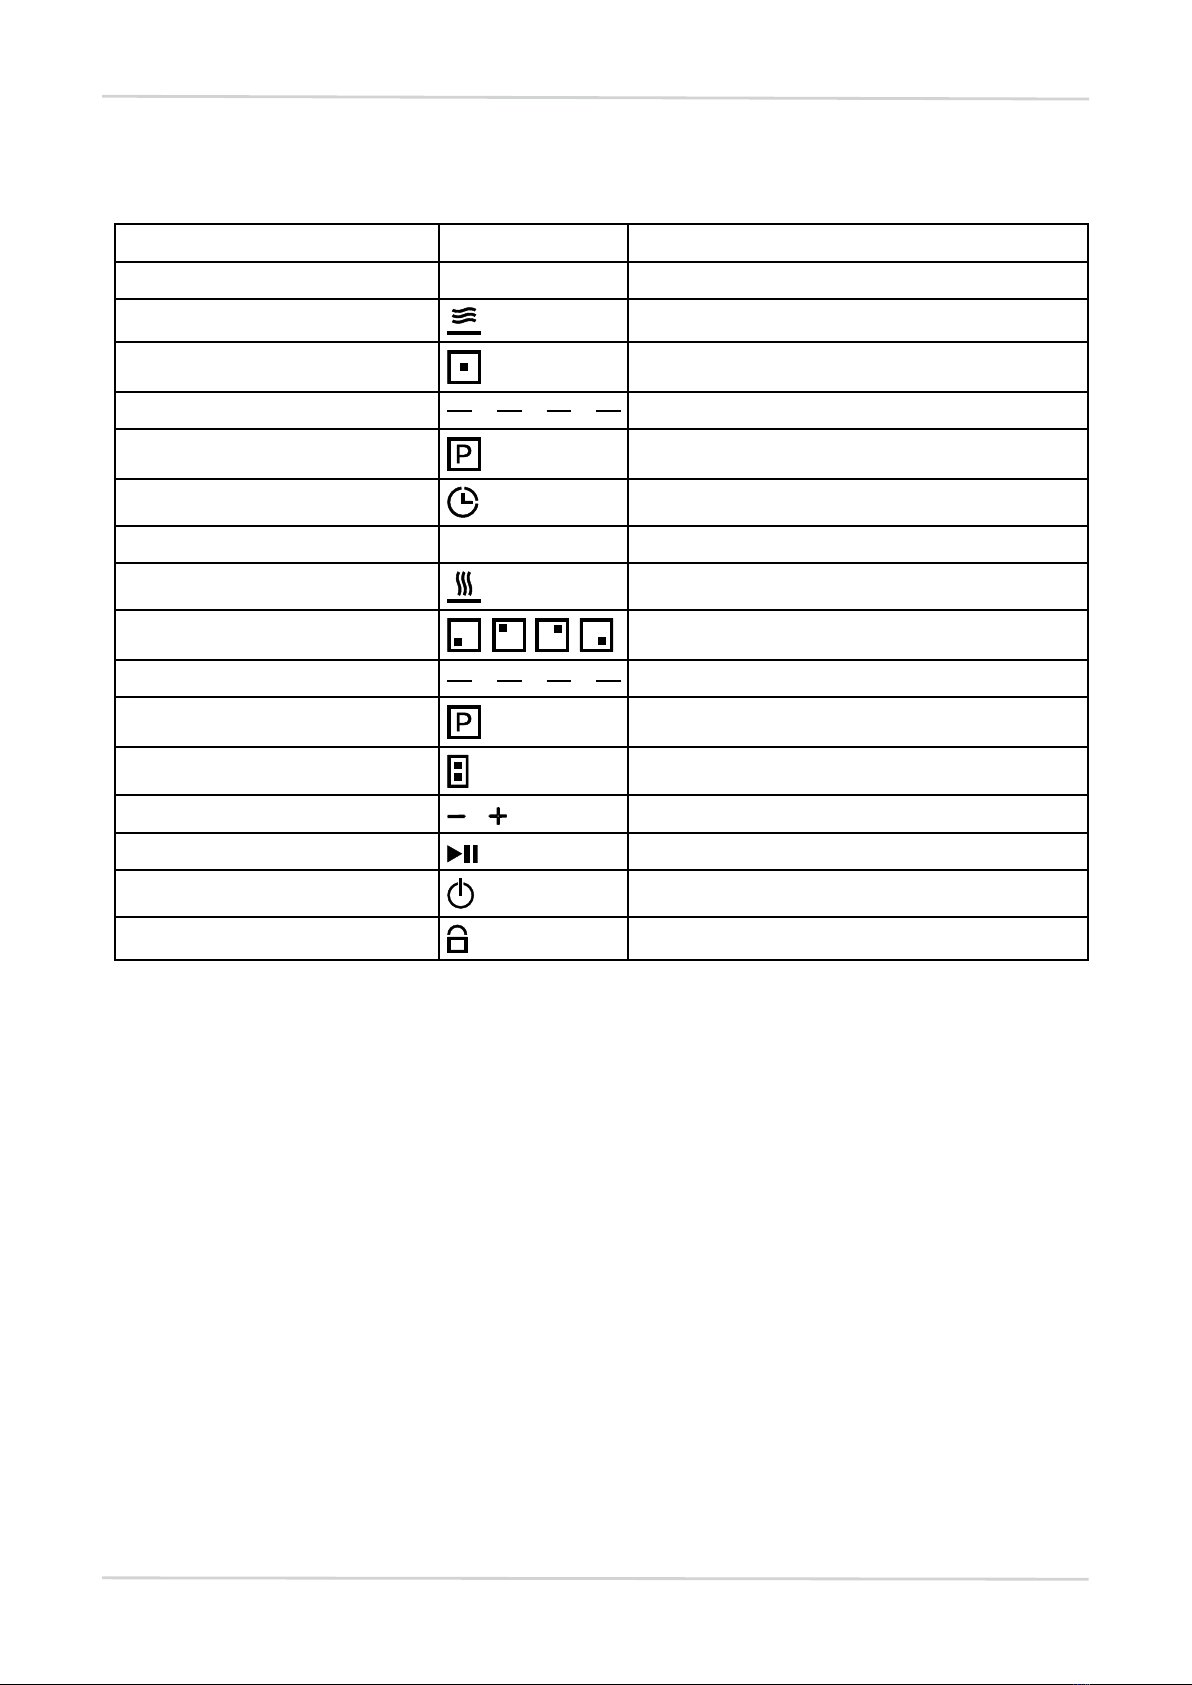
SYMBOLS
ORDER SYMBOL EXPLANATION
HOOD
1Automatic ventilation button
2Activation of hood field button
3Hood level indicator button
4Power-assisted ventilation button
5Timer button
STOVE
63 level temperature button
7Enabling stove zone - reset button
8Stove cooking level indicator button
9Power-assisted cooking button
10 Bridge button
11 Timer button
12 Pause/Resume selection button
13 Power On/Off button
14 Child Lock button

16
© 2022, Elon Group AB. All rights reserved.
SEGMENT SCREENS
STOVE HOOD USAGE TYPE
PRODUCT INDICATOR EXPLANATION
Power levels
Max. power (Booster)
Product is not active
Automatic mode
There is no pot on the stove or the pot is
not suitable.
3 level temperature mode activation
indicator
Standby mode
Pause mode
Metal oil filter warning
Active carbon filter warning
Time display
Error display
Depending on the model you purchased, the stove hood is in exhaust air mode or
recirculating air mode.
Exhaust Air Mode
The absorbed air is cleaned by the grease filters, and is discharged through a piping system.
NOTICE!
Exhaust air or an active smoke must be transferred to a waste gas flue; or a flue
used for ventilation of the places, where heat sources are installed.

17
© 2022, Elon Group AB. All rights reserved.
• If exhaust air or an active smoke is to be transferred to a waste gas flue; you need to obtain
permission from an authorized chimney sweep or an authorized engineer.
Circulating Air
Absorbed air is cleaned by the grease filters and an active carbon filter, and then it is transferred
back to the kitchen.
You need to install an active carbon filter, in order to catch the substances, which cause stink in
the circulating air. Consult your authorized dealer to know the different opportunities available for
enabling the appliance to function in circulating air mode. You can buy the accessories required
for this process from the relevant outlets, authorized technical service or online
sales center.
Provide adequate ventilation to remove moisture.
18
© 2022, Elon Group AB. All rights reserved.
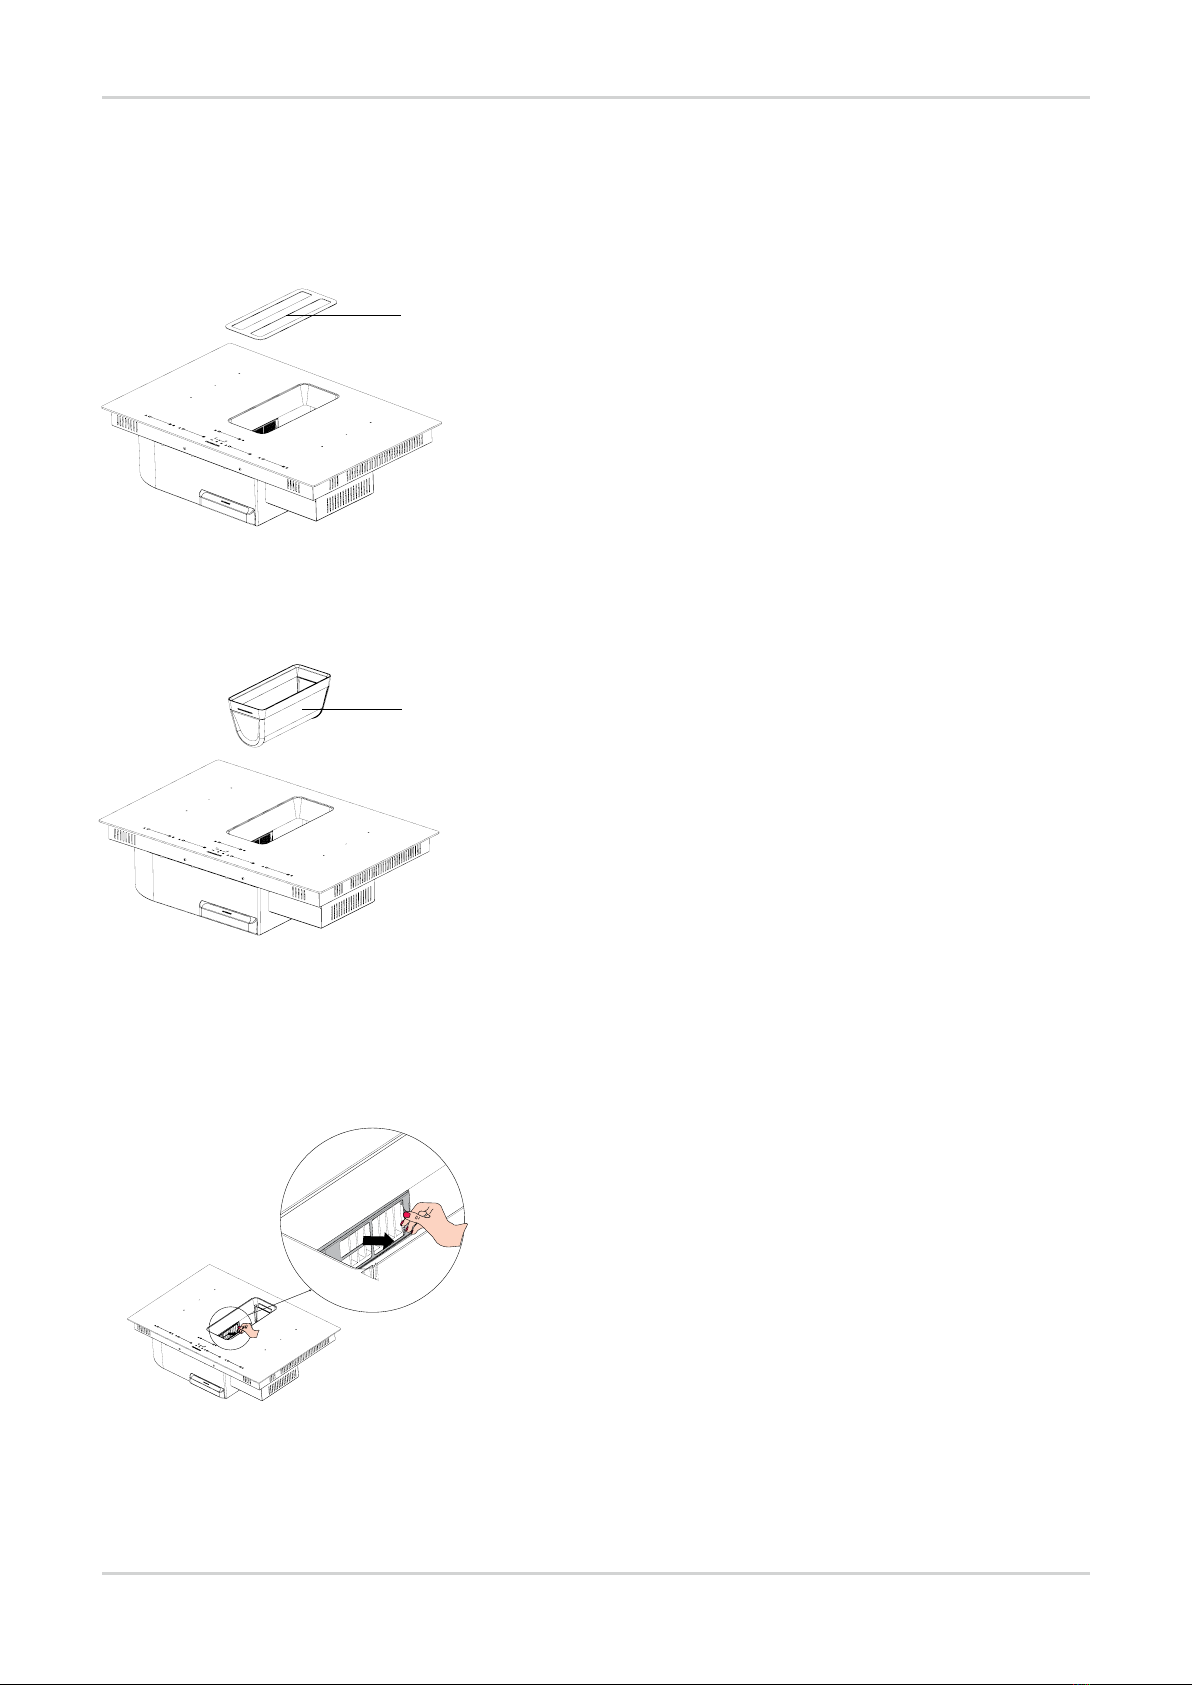
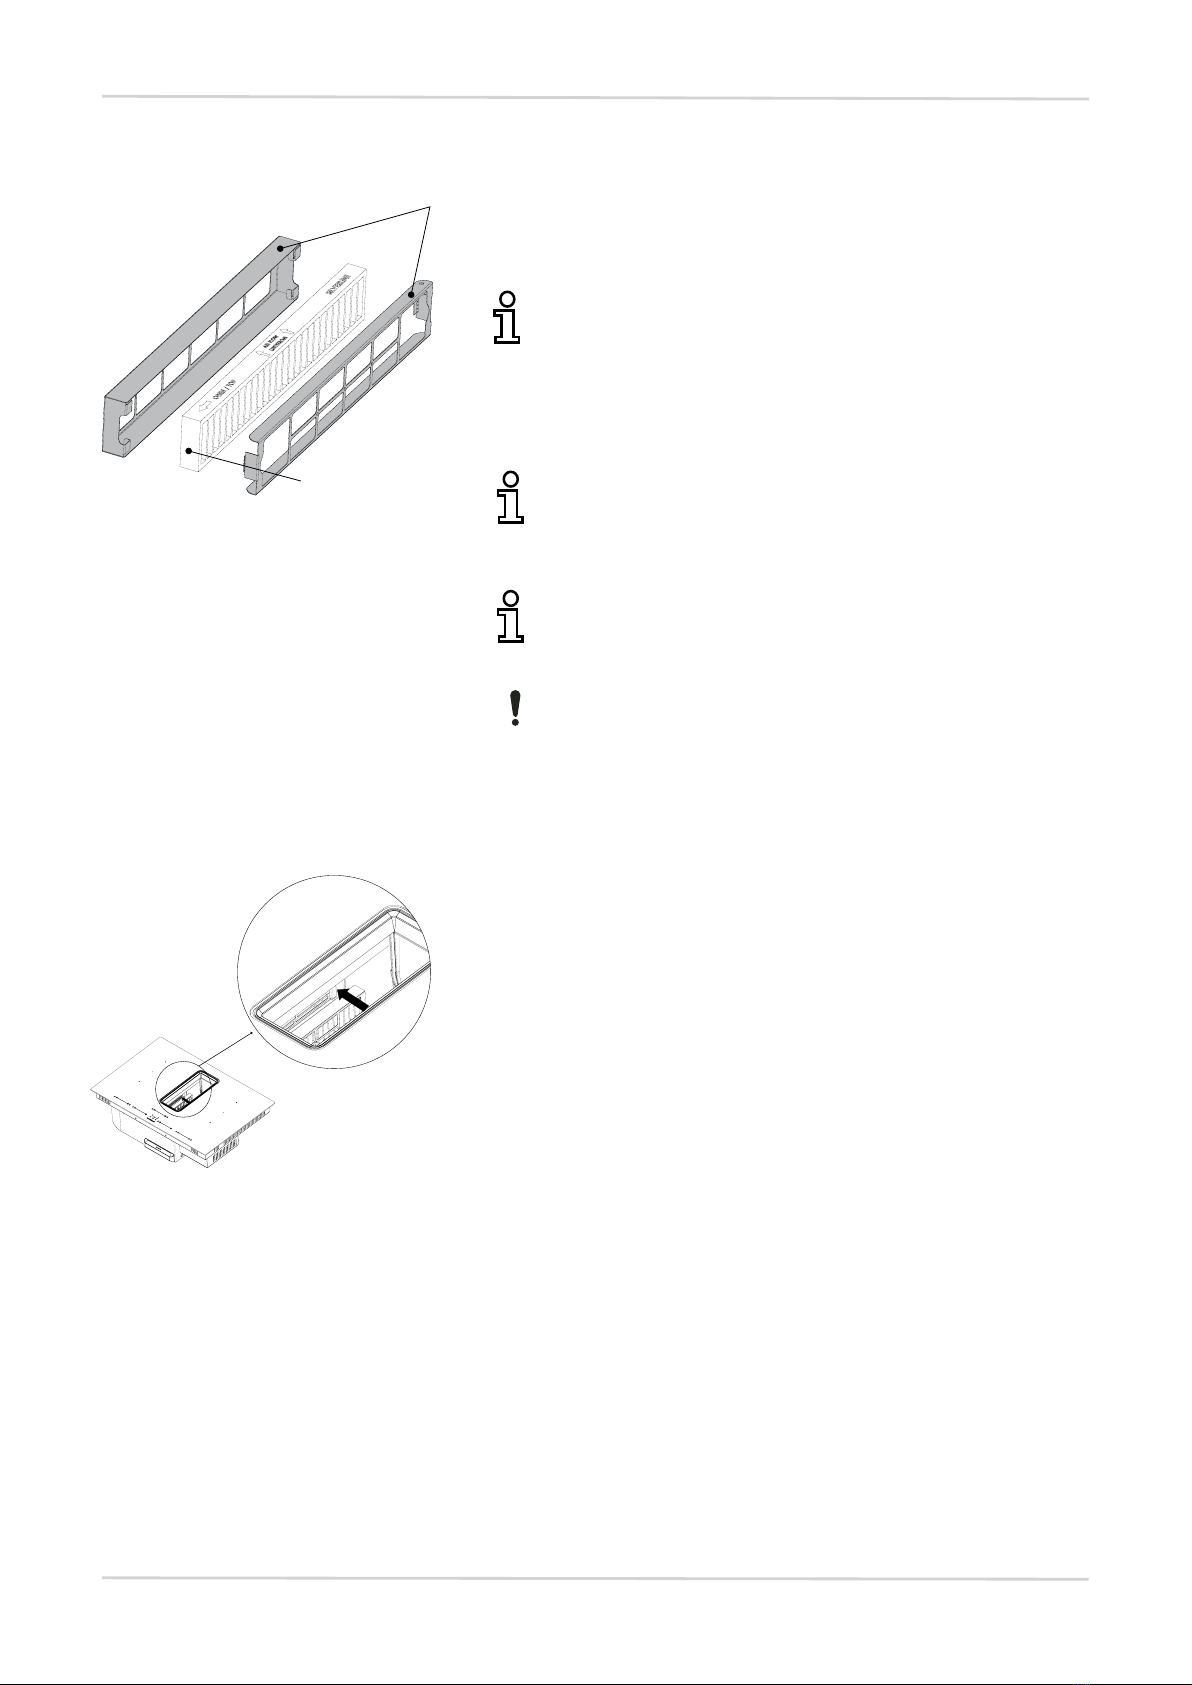
To replace the activated carbon filter, firstly remove the
decorative grill (Fig. 5).
Remove the grease filter (Fig. 6).
Pull out the carbon filter set as shown in the figure (Fig. 7).
Fig. 5
1 - Decorative Grill
1 - Grease Filter
1 - Carbon Filter Set
Fig. 6
Fig. 7
2.
3.
1.
ACTIVE CARBON FILTER REPLACEMENT
1
1
19
© 2022, Elon Group AB. All rights reserved.
By removing the old carbon filter from the housing,
replace with new carbon filter (Fig. 8).
During the carbon filter replacement, only replace
the carbon filter, do not throw away the carbon
filter housing. The carbon filter housing is not
disposable (Fig. 8).
When the carbon filter expires, replace it with a
new one. Do not wash in the dishwasher or by
hand.
Pay attention to the direction of air flow when
placing the carbon filter in its housing (Fig. 8).
NOTICE!
Carbon and Helsa filters shouldn’t be used without
assemblying Carbon Filter Housing (at the Fig. 8/1)
Insert the carbon filter as shown in the figure (Fig. 9)..
Fig. 8
1- Carbon Filter Housing
2- Carbon Filter
Fig. 9
4.
1
2

20
© 2022, Elon Group AB. All rights reserved.
• The surface could be damaged due to aggressive and abrasive cleaning agents. Never use
aggressive and abrasive cleaning agents. Supply your cleaning and protective substances
that are appropriate for your appliance from the authorized technical service.
• Clean the surfaces with a soft and damp cloth, dish-washing liquid or mild glass cleaning
agent. Soften the dry, sticky dirt with a damp cloth. Do not scrape!
• It is not appropriate to use dry cloths, sponges that may scratch, materials that require
rubbing, and other aggressive cleaning agents containing sand, soda, acid or chlorine.
• Clean the stainless steel surfaces in their brushing direction only.
• Cleaning metal oil filters Used metal oil filters catch the grease particles from the moist and
steam in the kitchen. Clean the metal grease filters about every three months, under normal
use conditions (1-2 hours a day).
• Do not use excessively effective, acidic or alkaline cleaning agents.
• You can clean the metal grease filters in the dishwasher or by hand.
• Do not apply spray cleaning supplies directly to the product.
• Do not keep flammable and/or heavy decorative items on the product.
CLEANING AND PREVENTIVE MAINTENANCE
CLEANING OF THE METAL OIL FILTER AND
WATER TANK
CAUTION!
Cleaning and user maintenance of the appliance
shall not be performed by unattended children.
WARNING!
Risk of fire due to oil sediments in metal oil filter!
There is a risk of fire due to oil sediments in metal oil filter.
– Clean the metal oil filter at least every 2 weeks when the oil filter
cleaning warning is displayed.
– Never operate the appliance without a metal oil filter.
Table of contents
Languages:
Other elvita Ventilation Hood manuals

elvita
elvita CSF4800S User manual

elvita
elvita CSF1500V User manual

elvita
elvita CSF5600S User manual

elvita
elvita CSF3600X User manual

elvita
elvita CHF5780S User manual

elvita
elvita CSF2600X User manual

elvita
elvita CSF1600V User manual

elvita
elvita CSF2620X User manual

elvita
elvita CSF4600S User manual

elvita
elvita CSF3600X User manual

Popular Ventilation Hood manuals by other brands


KOBE
KOBE CXX8130QF-GBK-1 Installation instructions and operation manual

Elba
Elba HS60CSEX3 Installation instructions and user guide

Franke
Franke FS VT 606 W XS user manual

Miele
Miele DA 216-2 EXT Operating and installation instructions

Blanco
Blanco BWC6X Instructions for the use and care and installation

Caple
Caple AS611 instruction manual