elvita CSF3600X User manual

CSF3600X
Quick start guide
Cooker hood
Snabbguide
Köksfläkt
Hurtigstartveiledning
Kjøkkenvifte
Hurtig
startvejledning
Emhætte
Pikaopas
Liesituuletin
Flýtileiðbeiningar
Eldavélarháfur

Thank you
for your trust and the purchase of our product. This quick start guide is supplied to help you get started
using this product.
Make sure you have received an undamaged product. If you do find transport damage, please contact
the seller from which you purchased the product, or the regional warehouse from which it was supplied.
Tack
för ditt förtroende och för köpet av vår produkt. Denna snabbstartsguide medföljer för att hjälpa dig att
börja använda produkten.
Kontrollera att produkten du har tagit emot är oskadad. Om du upptäcker en transportskada, var vänlig
kontakta återförsäljaren som du köpte produkten av, eller den lokala butiken som levererade den.
Takk
for at du valgte ett av våre produkter. Formålet med denne hurtigstartveiledningen er å hjelpe deg å
komme i gang med produktet.
Forsikre deg om at produktet du har mottatt, er uskadet. Hvis du oppdager en transportskade, kontakter
du selgeren du kjøpte produktet av eller lageret som produktet ble levert fra.
Tak,
fordi du har valgt at købe dette produkt. Formålet med denne hurtige startvejledning er at hjælpe dig i
gang med at bruge produktet.
Kontrollér, at apparatet ikke er beskadiget ved modtagelsen. Hvis du opdager en transportskade, skal du
kontakte salgsstedet eller det lager, som apparatet er afsendt fra.
Kiitos
luottamuksestasi ja tuotteemme ostamisesta. Tämä pikaopas on tarkoitettu auttamaan laitteen käytössä
alkuun pääsemisessä.
Tarkista, ettei tuotteessa ole vaurioita. Jos havaitset kuljetusvaurioita, ota yhteyttä tuotteen myyjään tai
paikalliseen myymälään, josta se toimitettiin.
Þakka þér fyrir
fyrir traust þitt og kaup á vöru okkar. Þessar flýtileiðbeiningar eru útvegaðar til að hjálpa þér að byrja að
nota tækið.
Gakktu úr skugga um að þú hafir fengið óskemmda vöru. Ef skemmdir vegna flutninga finnast skaltu
hafa samband við söluaðilann sem þú keyptir vöruna af, eða vöruhúsið á svæðinu þaðan sem því var
dreift.
Language: en-GB, sv-SE, nb-NO, da-DK, fi-FI, is-IS
Publication date: 2022-10-12
This document and its content, including written material and images, are the property of Elon Group AB.
You may not copy, reproduce, modify, republish or distribute this document or any of its content without
express written permission from Elon Group AB. © 2022, Elon Group AB. All rights reserved.
3
© 2022, Elon Group AB. All rights reserved.
This is a quick start guide. For your convenience you can find the user manual online, with full information about
installation, usage, maintenance, and troubleshooting. Please go to elvita.se and use the search function and the
product's model code to find the manual. To find the model code, see the instructions in section "Find the model code",
page 5.
Detta är en snabbstartsguide. Du hittar användarhandboken på webben, med full information om installation,
användning, underhåll och felsökning. Gå till elvita.se och använd sökfunktionen och produktens modellkod för att hitta
handboken. Hur du hittar modellkoden beskrivs i avsnitt "Hitta modellkoden", sida 22.
Dette er en hurtigveiledning. Brukerhåndboken er tilgjengelig i nettversjon, med all informasjon om installasjon, bruk,
vedlikehold og feilsøking. Gå til elvita.se, og bruk søkefunksjonen og produktets modellkode for å finne håndboken. Du
finner modellkoden ved å følge anvisningene i del "Finne modellkoden", side 40.
Dette er en hurtig startvejledning. For nemheds skyld kan du finde brugsanvisningen online med fuldstændige
oplysninger om installation, brug, vedligeholdelse og fejlfinding. Gå til elvita.se, og brug søgefunktionen og produktets
modelkode til at finde brugsanvisningen. Find modelkoden ved at se vejledningen i afsnit "Find modelkoden", side 58.
Tämä on pikaopas. Verkossa on kätevästi saatavilla käyttöohje, joka sisältää kattavat tiedot asentamisesta, käytöstä,
huollosta ja vianmäärityksestä. Löydät käyttöohjeen menemällä osoitteeseen elvita.se ja etsimällä tuotteen mallikoodilla
hakutoiminnosta. Löydät mallikoodin noudattamalla ohjeita kappale "Etsi mallikoodi", sivu 76.
Þetta eru flýtileiðbeiningar. Þér til hægðarauka getur þú fundir notendahandbókina á netinu, með öllum upplýsingum
um uppsetningu, notkun, viðhald og bilanagreiningu. Farðu á elvita.se og notaðu leitaraðgerðina og gerðarkóða vörunnar
til að finna handbókina. Til að finna gerðarkóðann skal sjá leiðbeiningarnar í hluti .
CONTENTS/INNEHÅLL/INNHOLD/INDHOLD/SISÄLLYSLUETTELO/EFNISYFIRLIT
ENGLISH ........................................................................................................................................... 4
SVENSKA .........................................................................................................................................21
NORSK............................................................................................................................................ 39
DANSK............................................................................................................................................ 57
SUOMI ............................................................................................................................................ 75
ÍSLENSKA ........................................................................................................................................ 93

4 Contents - ENGLISH
© 2022, Elon Group AB. All rights reserved.
Contents
READ THIS! 5
SAFETY 6
Admonitions .............................................................................................................................. 6
Intended use ............................................................................................................................. 6
Safety for children and people with disabilities........................................................................ 6
General safety........................................................................................................................... 7
Safety during installation .......................................................................................................... 7
Safety during operation ............................................................................................................ 8
Safety during maintenance ...................................................................................................... 9
Disposal..................................................................................................................................... 10
QUICK START 11
GETTING TO KNOW YOUR COOKER HOOD 12
Hood overview .......................................................................................................................... 12
Controls ..................................................................................................................................... 12
Installation parts........................................................................................................................ 13
USING THE COOKER HOOD 14
Turn on and turn off the cooker hood....................................................................................... 14
Turn on and turn off the lamp................................................................................................... 14
Save energy .............................................................................................................................. 14
INSTALLATION 15
Unpack the cooker hood .......................................................................................................... 15
Installation options and requirements ...................................................................................... 15
Installation area ........................................................................................................................ 16
Mount the cooker hood on the wall ......................................................................................... 17
Install the flue flaps................................................................................................................... 19
Install the flue............................................................................................................................ 19
Electrical wiring ......................................................................................................................... 20

Read this! - ENGLISH 5
© 2022, Elon Group AB. All rights reserved.
READ THIS!
WARNING!
Read the safety information and the full instructions before installing or using this product.
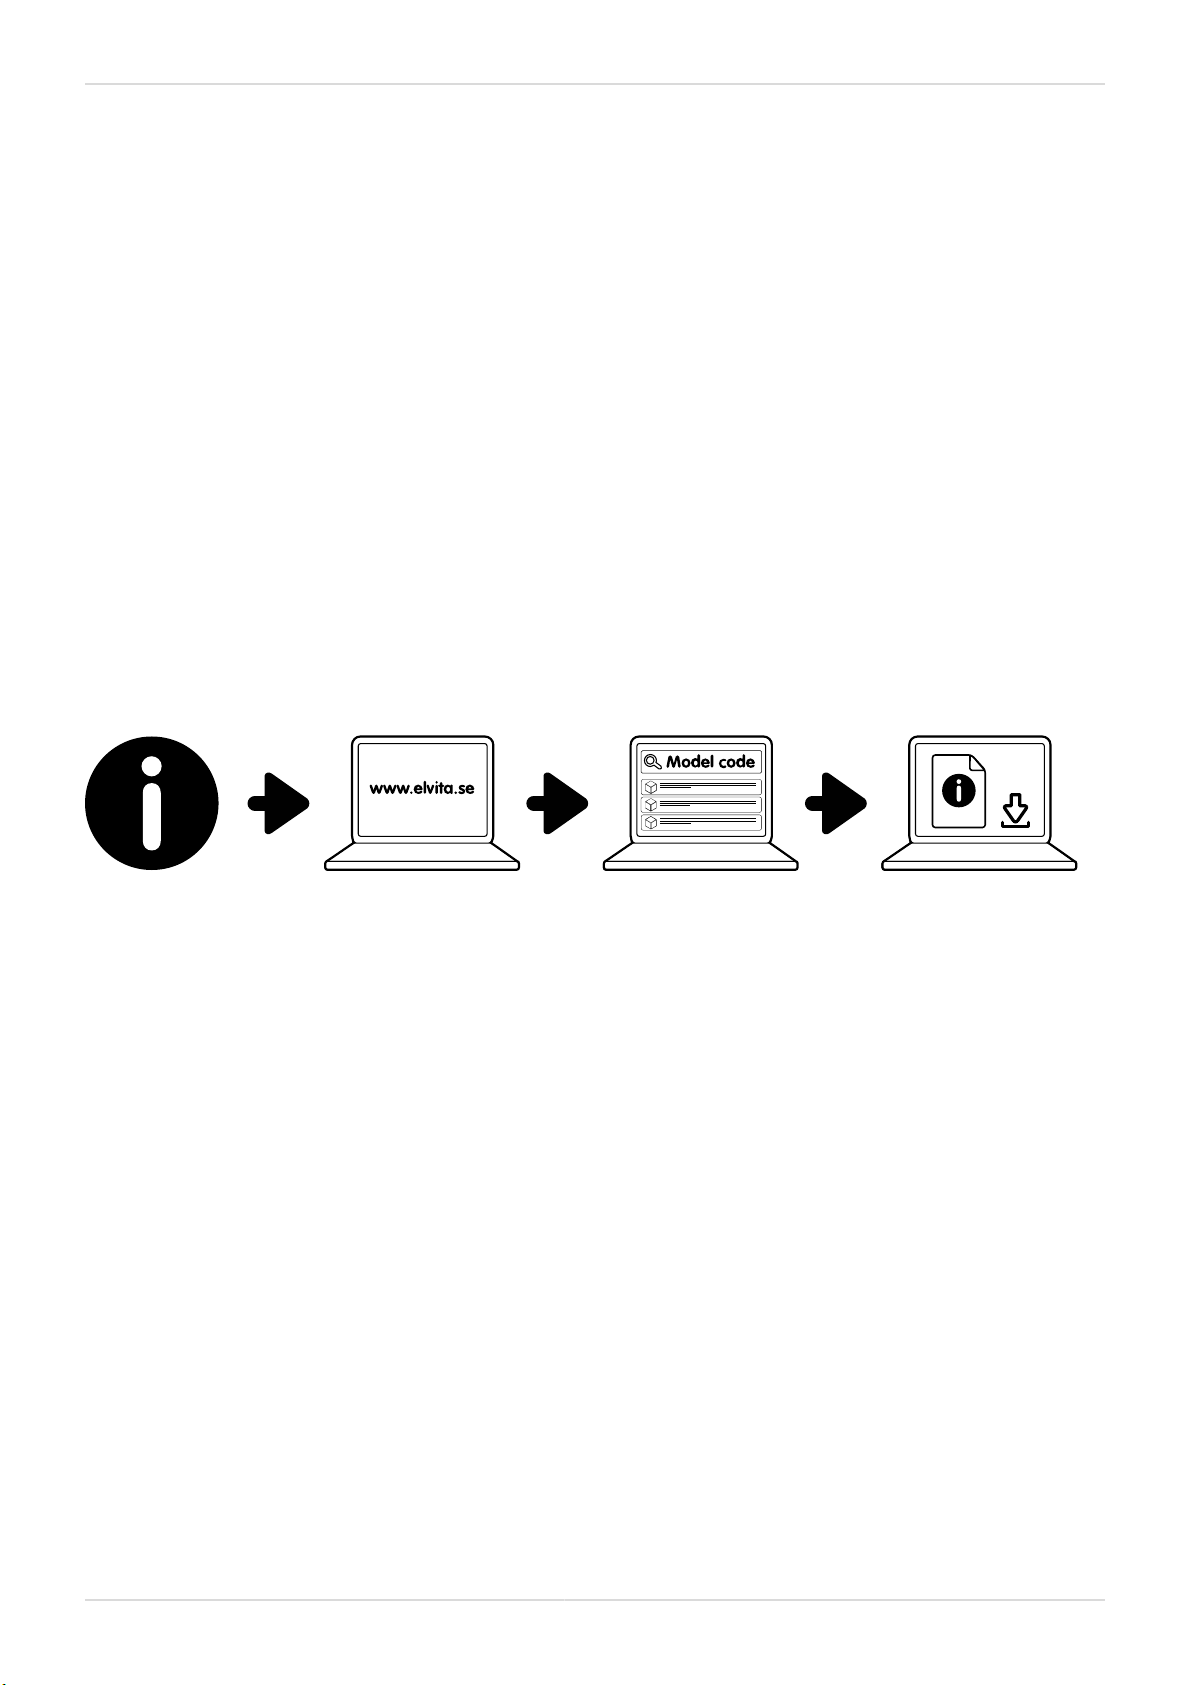
Find the full instructions
You will find the full and most recent user information for your product model on the web page www.elvita.se. This
includes details about installation, usage, maintenance, and troubleshooting. You will need the model code to search for
the information.
Find the model code
The model code is printed on a label on the product.
NOTE!
This product and label text are examples. Your
product and text may have a different look
and content.

6 Safety - ENGLISH
© 2022, Elon Group AB. All rights reserved.
SAFETY
Carefully read the instructions before you install and use the product. Save the instructions and keep them near the
product for future reference. All kinds of warranties shall be invalid if these instructions are not followed.
Admonitions
DANGER!
Used when there is a risk for personal injury or death.
WARNING!
Used when there is a risk for personal injury.
CAUTION!
Used when there is a risk for damage to the product.
NOTE!
General information that you should be aware of.
Helpful tips that you may find useful.
Intended use
• This product is only intended for household use in normal home cooking. Any other use may result in malfunction and
the warranty will be void.
Safety for children and people with disabilities
DANGER!
Warning - Choking hazard!
•Remove the packaging material, as it can be dangerous for children. Never allow children to play
with packaging materials.
•Keep carbon filters away from children.
WARNING!
This product must only be used by children aged from 8 years and above and persons with reduced physical,
sensory or mental capabilities or lack of experience and knowledge if they have been given supervision or
instruction concerning safe use of the product and understand the hazards involved.
WARNING!
• Do not let children play with the product.
• Do not let children clean the product without supervision.
• Do not let children tamper with the product.
• Do not let children perform user maintenance operations without supervision.

Safety - ENGLISH 7
© 2022, Elon Group AB. All rights reserved.
General safety
DANGER!
Electrocution hazard!
A malfunctioning product may cause electric shock. If the product is malfunctioning, remove the plug
from the socket, switch off the circuit breaker, and contact the support. Never turn on a malfunctioning
product.
DANGER!
Electrocution hazard!
•Water leaking into the product may cause electric shock.
•Do not use high-pressure cleaners or steam cleaners to clean the product.
WARNING!
Risk of physical injury!
• Do not place any objects on the product. Objects placed on the product may fall over.
• Do not look into the source of LED light for longer than 100 seconds. LED light is very bright and may
damage the eyes (risk group 1).
WARNING!
If the power cord is damaged, it must be replaced by its manufacturer or its authorised technical service or a
qualified electrician, in order to avoid any dangerous situation.
WARNING!
In case of fire adjacent to the product, unplug the product and turn off the main switch.
Safety during installation
DANGER!
Danger of physical injury!
•Use protective gloves throughout the installation of the product. There is a danger of physical injury
due to sharp edges.
•Assembly of safety bolts and covers must be performed as specified in the user manual to prevent
the product from loosening and falling down.
WARNING!
• All electrical wiring must be installed by a qualified electrician.
• Installation by unauthorised persons could lead to poor operation performance, damage to the product,
and accidents.
• Do not plug in the product before the installation.
• Make sure that the installation area allows the user to easily unplug the power cord in case of danger.
• The power cord must be plugged into a grounded power outlet. The power cord of the product is fitted
with a grounded plug.
• Do not expose the power cord to jamming or crushing during installation.
• Do not place the power cord near the cooker. There is a risk of heat from the cooker melting the power
cord, which may lead to fire.
• The usage voltage of the product is 220-240V, ~50-60Hz.
• In the hood system, only use fuses with a maximum rating of 6 A.

8 Safety - ENGLISH
© 2022, Elon Group AB. All rights reserved.
WARNING!
• Comply with the rules and instructions regarding discharge of outgoing air, stipulated by the relevant
authorities. This warning does not apply to uses without flue.
• When the product is used simultaneously with devices that use gas or other fuels, the negative pressure
in the room must not exceed 4Pa (4X10bar).
• Gas or fuel oil burning products, such as room heaters, which share the same space with your product,
must be fully insulated from the exhaust of this product or they must be airtight.
WARNING!
• When you make a flue connection for your product, use a pipe with a diameter of 120mm. The length of
the duct connection as well as the number of elbows must be as minimum as possible.
• Do not connect the air outlet pipe of this product to air ducts which may contain smoke from other
sources, for example devices that use gas or other fuels.
• The minimum distance between this product and any electric cooker shall be 45 cm.
• The minimum distance between this product and any gas cooker or cooker burning other fuels shall be
70 cm.
Safety during operation
DANGER!
Warning - Death hazard!
Combustion gases may cause life-threatening danger due to poisoning. Ventilated combustion products,
for example heaters (shower heaters, water heaters, other heaters) burning gas, oil, wood, or coal, use
air from their surroundings for combustion, and discharge the waste gas through a waste gas system (for
example a flue). When a cooker hood is active, it pulls in air from the kitchen and neighboring rooms. If
sufficient air supply is not provided, negative air pressure will occur, causing the toxic combustion gas in
the flue and waste gas channel to flow back into the room. During simultaneous use of the cooker hood's
air discharge outlet and any ventilated combustion product, make sure there is enough air inflow.
WARNING!
Risk of fire!
• Clean the grease filters once a month. The oil residue in the grease filters may catch fire.
• Never operate the product without the grease filters.
• Never work with open flame (for example flambé) near the product. The oil residue in the grease filters
may cath fire.
• Do not install the product near a heater burning solid fuel (for example wood or coal) unless it has a
non-removable cover. Ensure that no sparks can shatter.
• Never leave hot oils and fats unattended. They can easily start a fire. If a fire starts, turn off the cooker,
and kill the flames carefully using a cover, fire blanket or a similar material.
• Never try to put out fire with water.
• Operate gas cookers only when there is a cooking pot on them. Otherwise they can create high heat
during operation which can lead to a damaged or burned cooker hood.
• Never operate two gas cookers (or a large burner over 15 kW, for example a wok pot) longer than 15
minutes on high flame setting. Operating multiple gas cookers simultaneously creates high heat which
can lead to a damaged or burned ventilation product.
WARNING!
• Be careful when using the product simultaneously with combustion products, for example heaters that
use gas, diesel fuels, coal, wood, etc., which use air from the same space. The cooker hood leads away
air from the shared space and could adversely affect the combustion. This warning does not apply to
uses without a flue.
• When the product is used simultaneously with products that use gas or other fuels, there must be
sufficient ventilation in the room.
• The product should be cleaned regularly. There is a risk of fire if the product is not cleaned regularly
Safety - ENGLISH 9
© 2022, Elon Group AB. All rights reserved.
WARNING!
In case of deflagration, turn off the product and cover the flame. Never use water to extinguish the fire.
WARNING!
• Do not use non-fire-resistant filtering materials instead of the filter.
• Do not operate the product without filter, and do not remove the filters when the product is in operation.
WARNING!
Do not touch the product's lamps when they have been on for a long time. The lamps will be hot and may
burn you.
WARNING!
• Do not cook flammable foods under the product.
• Do not start the product before cookware is placed on the stove.
• Turn off the cooker's burner before removing the cookware.
• Do not leave boiling oil on the stove. Pots that contain boiling oil may catch fire by itself.
• Since oils could catch fire when cooking fried foods in particular, be careful about curtains and
tablecloths.
• Cookware and accessible parts of cooking products may become very hot during use. Be careful not to
touch hot parts.
WARNING!
When the bulbs of the product malfunction, switch off the circuit breaker and unplug the product's power plug
from the socket. Replace the defective bulbs immediately (leave bulbs to cool down first), in order to protect
the remaining bulbs against overloading.
CAUTION!
• Do not leave the product turned off while cooking. Not using the product while cooking increases the risk
of condensate forming, which may cause corrosion.
• Moisture intruding into electronic parts poses a risk of damage.
CAUTION!
Do not keep flammable and/or heavy decorative items on the product.
CAUTION!
Replace any cracked protective shield.
Safety during maintenance
DANGER!
Risk of fire and physical injury!
Only authorised service technicians may repair the product. Always disconnect the product from the
power supply before repairing the product.
DANGER!
Electrocution hazard!
•Only authorised service technicians may repair the product.
•If you experience problems with the product, please see if the user instructions and troubleshooting
information in the user manual can help you find a solution. If the problem persists:
–turn off the product,
–unplug the product from its power supply, and
–contact the support.

10 Safety - ENGLISH
© 2022, Elon Group AB. All rights reserved.
DANGER!
•Never wash the carbon filters.
WARNING!
Risk of burn and risk of electric shock!
• Before cleaning or performing maintenance, let the product cool down and disconnect the product and
any other cooking devices from the power supply.
• Do not clean the control components with a wet cloth. There is risk of damage due to ingress of moisture
into parts containing electronics.
• Do not use a stainless steel cleaner for the control elements.
WARNING!
• If the product is faulty or damaged, disconnect the product from the power supply and call an authorised
service provider.
CAUTION!
• Clean stainless steel surfaces only in their brushing direction otherwise the surface could be damaged.
• Never use aggressive and abrasive cleaning agents because the surface of the product could be
damaged.
Disposal
Dispose of packaging in an environmentally-friendly manner. Recycling packaging, while observing national
and local regulations, can reduce the consumption of raw materials and the amount of waste in landfill
sites.
This product is marked in compliance with European Directive 2012/19/EU, Waste Electrical and Electronic
Equipment (WEEE). The symbol on the product or on its packaging indicates that this product should not be
treated as household waste. Instead it shall be handed over to the applicable collection point for the
recycling of electrical and electronic equipment.
By ensuring this product is disposed of correctly, you will help prevent potential negative consequences for
the environment and human health, which could otherwise be caused by inappropriate waste handling of
this product. For more detailed information about recycling of this product, please contact the relevant
municipal body in charge of waste management, your household waste disposal service or the store where
you purchased the product.

Quick start - ENGLISH 11
© 2022, Elon Group AB. All rights reserved.
QUICK START
Using the cooker hood
After using the cooker hood

12 Getting to know your cooker hood - ENGLISH
© 2022, Elon Group AB. All rights reserved.
GETTING TO KNOW YOUR COOKER HOOD
Hood overview
A. Controls
B. Body
C. Lamps
D. Metal grease filter
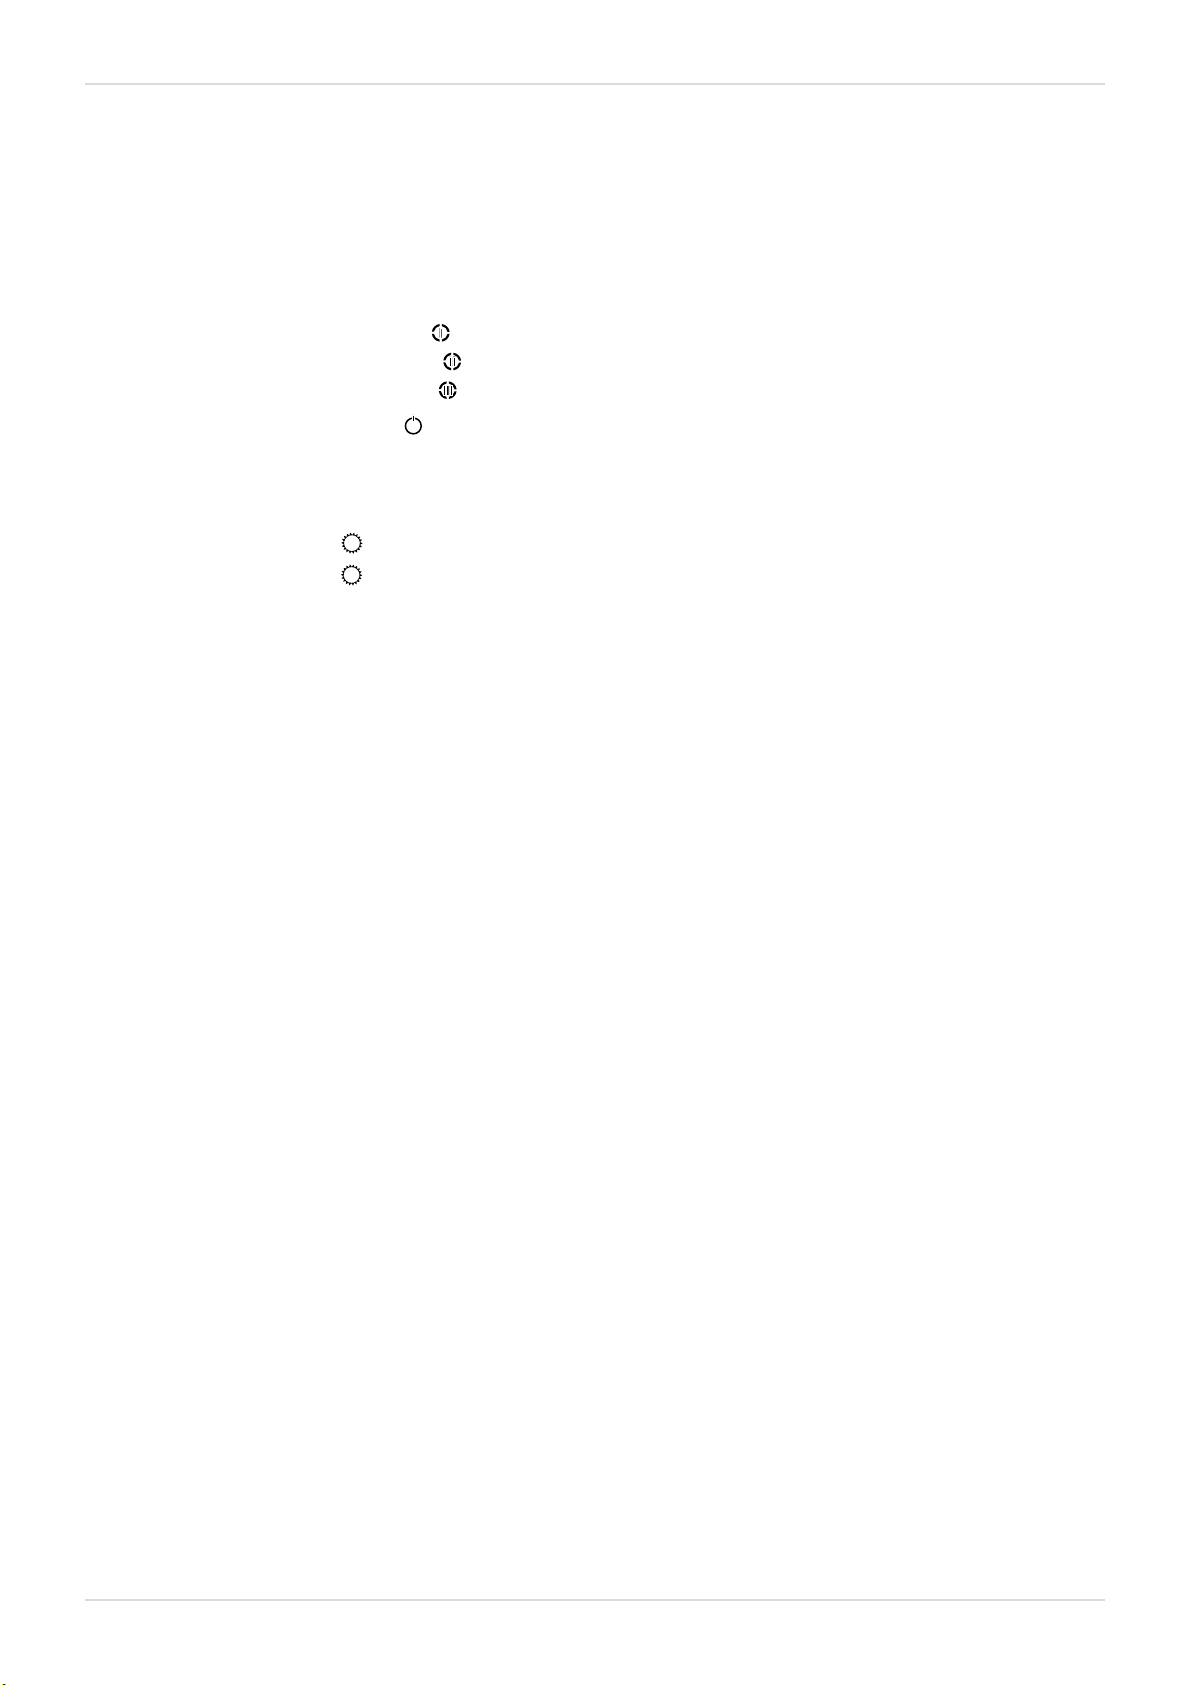
Controls
A. Fan, off
B. Fan setting, 1st speed level
C. Fan setting, 2nd speed level
D. Fan setting, 3rd speed level
E. Lamp, on/off
Getting to know your cooker hood - ENGLISH 13
© 2022, Elon Group AB. All rights reserved.
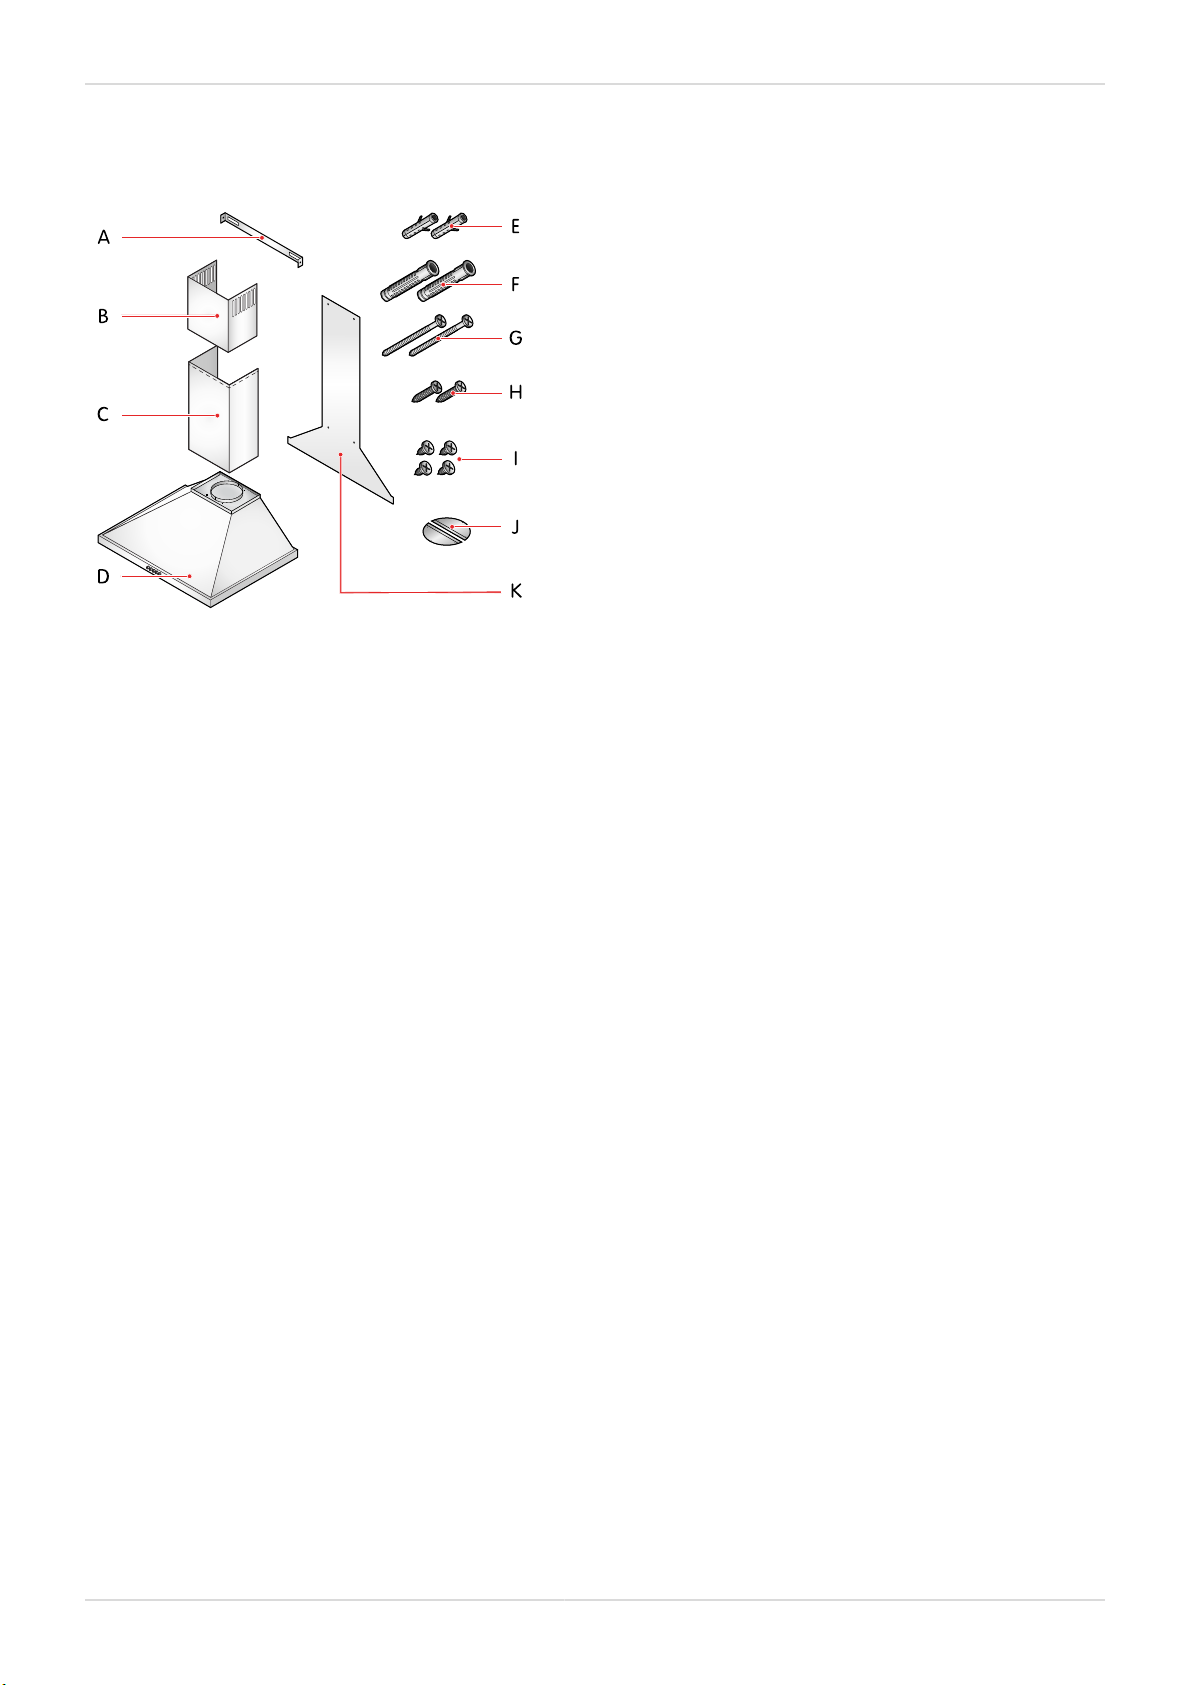
Installation parts
A. Flue connection sheet
B. Internal flue cover
C. External flue cover
D. Hood body
E. Ø6mm wall plug
F. Ø10mm wall plug
G. 5.5x60 mm wall mounting screw
H. 3.9x22 mm flue connection sheet screw
I. 3.5x9.5 mm flue connection screw
J. Flue flaps
K. Installation template
14 Using the cooker hood - ENGLISH
© 2022, Elon Group AB. All rights reserved.
USING THE COOKER HOOD
Turn on and turn off the cooker hood
The cooker hood has three fan speed levels.
1. To turn on the cooker hood
•on the 1st fan speed level, press .
•on the 2nd fan speed level, press .
•on the 3rd fan speed level, press .
2. To turn off the cooker hood, press .
Turn on and turn off the lamp
1. To turn on the lamp, press .
2. To turn off the lamp, press .
Save energy
Here are some recommendations for how you can save energy.
• Ensure there is adequate air inlet to enable your hood to work efficiently with low operating noise.
• Adjust the fan speed level according to the amount of steam brought on by your cooking. Use the higher setting only
when needed. A lower fan setting means less energy consumption.
• If you expect your cooking to bring about a high amount of steam and smoke, select a higher fan speed level
beforehand. The hood has to run for a much longer duration in order to clear kitchen smoke and/or steam that is
already spread in the kitchen.
• Turn off the hood when it is not needed.
• Clean the metal grease filters regularly, this way you can increase ventilation efficiency and avoid fire hazard.
• For installations with carbon filter, replace the carbon filter every 3 months.
Installation - ENGLISH 15
© 2022, Elon Group AB. All rights reserved.
INSTALLATION
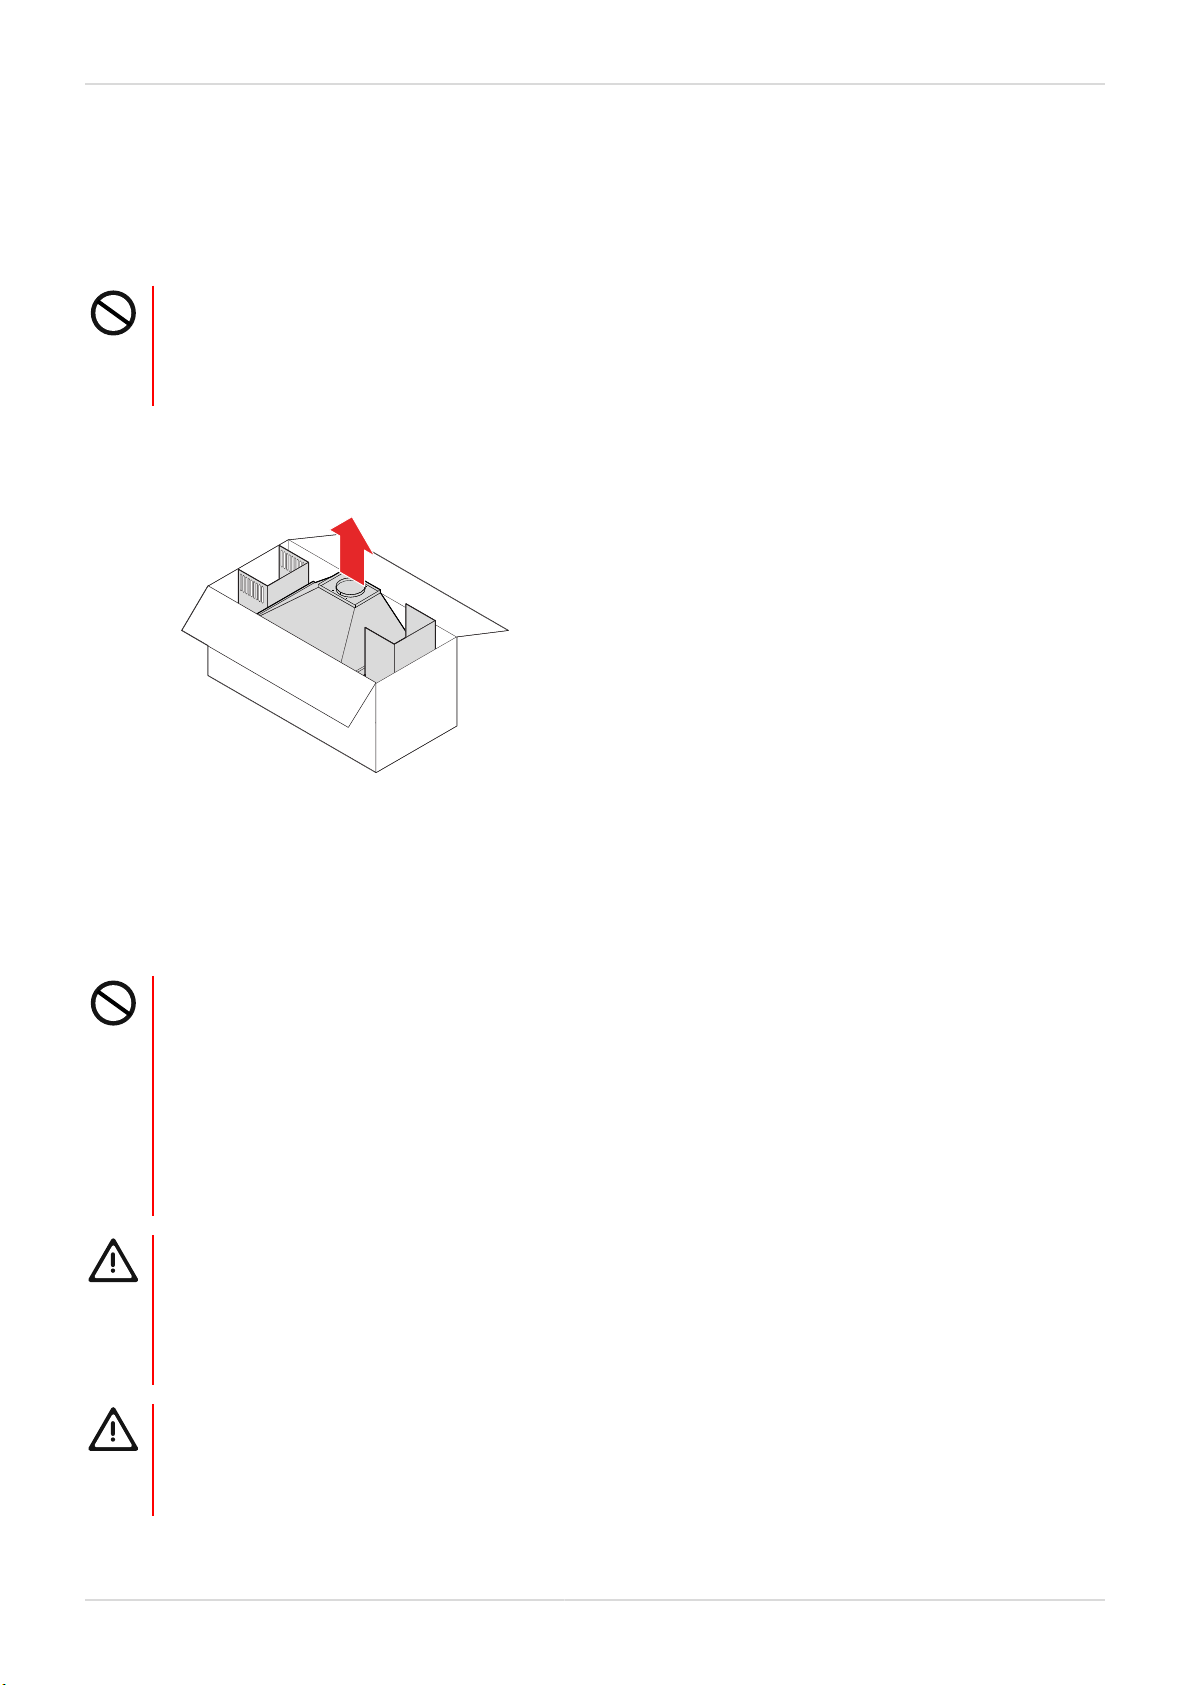
Unpack the cooker hood
DANGER!
Warning - Choking Hazard
Remove the packaging material, as it can be dangerous for children. Never allow children to play with
packaging materials.
1. Check the packaging and product for any damage. If the packaging or product is damaged, contact the transport
operator and the retailer where the product was purchased.
Installation options and requirements
This cooker hood can be installed without carbon filter or with carbon filter. In flue-connected use, the cooker hood must
be connected to a flue that will discharge the air outdoors.
DANGER!
Warning - Death hazard!
Combustion gases may cause life-threatening danger due to poisoning. Ventilated combustion products,
for example heaters (shower heaters, water heaters, other heaters) burning gas, oil, wood, or coal, use
air from their surroundings for combustion, and discharge the waste gas through a waste gas system (for
example a flue). When a cooker hood is active, it pulls in air from the kitchen and neighbouring rooms. If
sufficient air supply is not provided, negative air pressure will occur, causing the toxic combustion gas in
the flue and waste gas channel to flow back into the room. During simultaneous use of the cooker hood's
air discharge outlet and any ventilated combustion product, make sure there is enough air inflow.
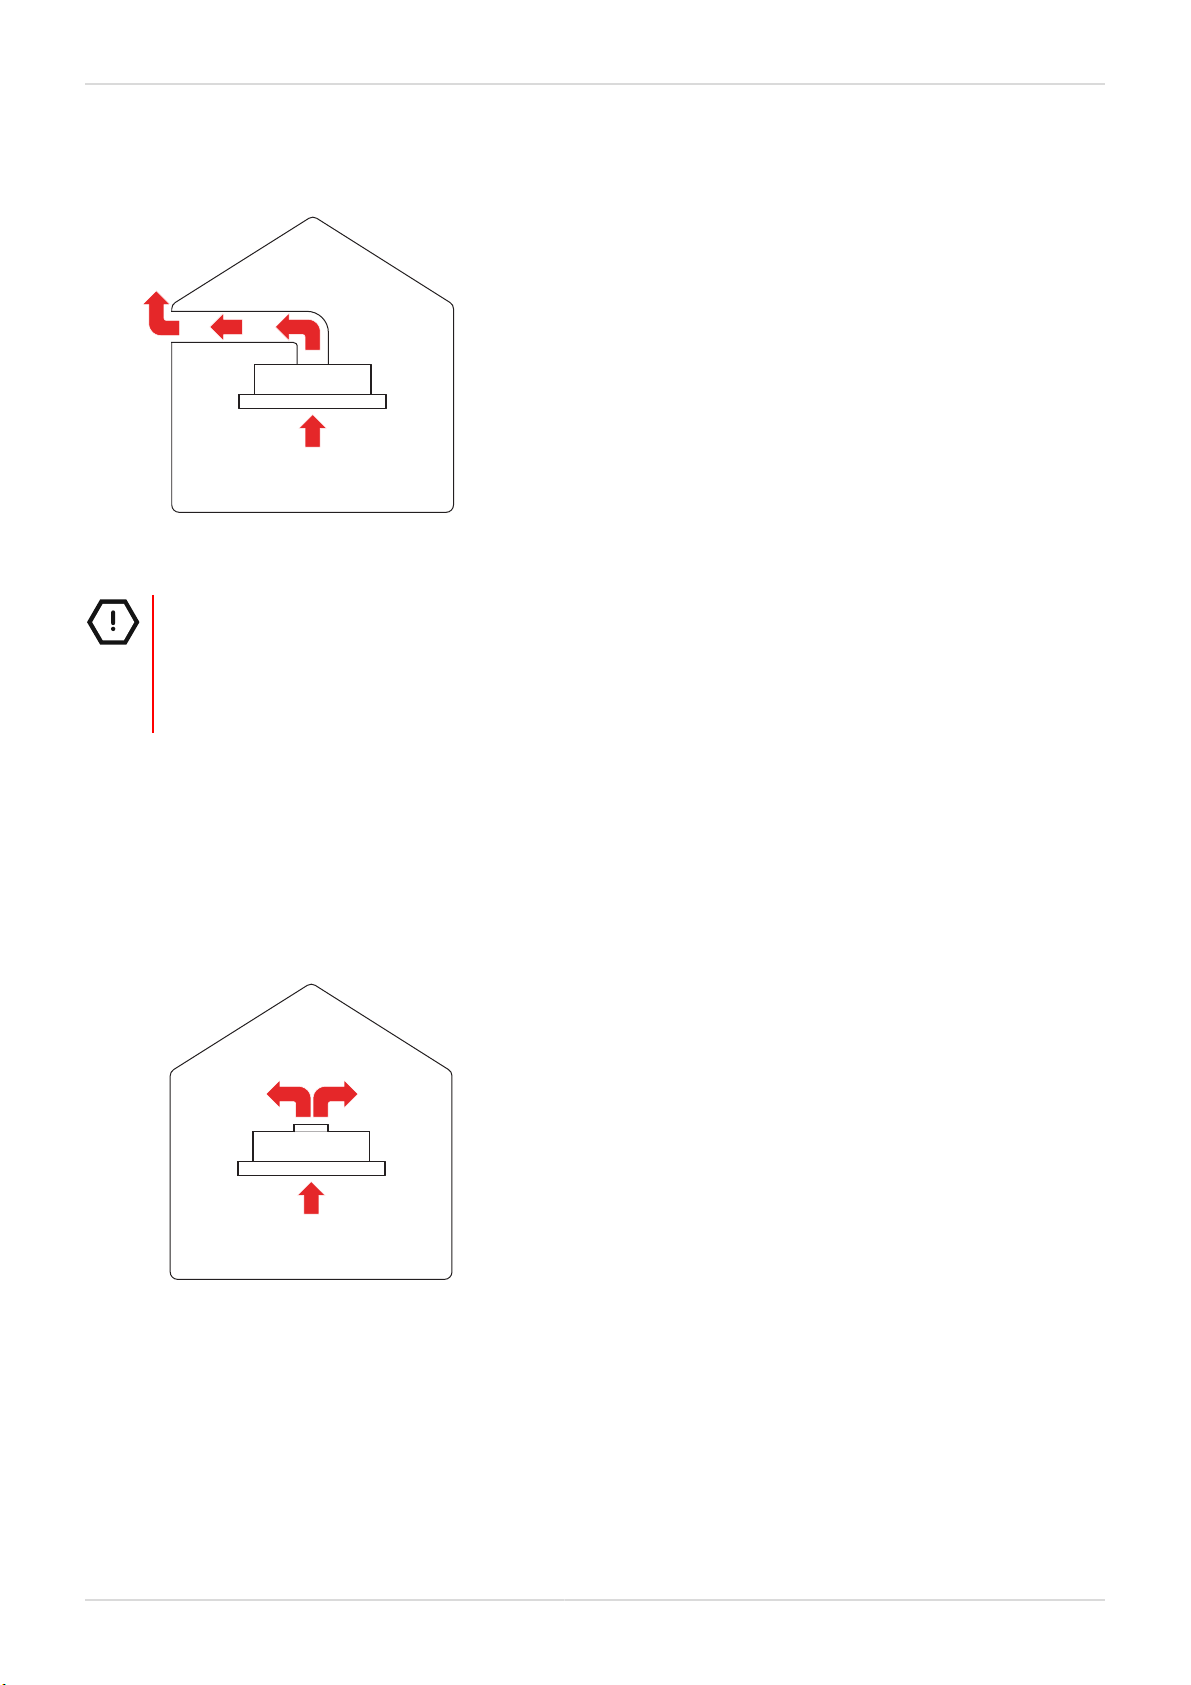
WARNING!
• Comply with the rules and instructions regarding discharge of outgoing air, stipulated by the relevant
authorities.
• When you make a flue connection for your product, the length of the duct connection as well as the
number of elbows must be as minimum as possible. Minimising the way from the flue to the pipe system
maximises the operating efficiency of the cooker hood.
WARNING!
Do not connect the pipe to:
• A flue used for discharging fume generated by products that use gas or other fuels.
• Air ducts which could contain smoke.
16 Installation - ENGLISH
© 2022, Elon Group AB. All rights reserved.
Installation without carbon filter
The absorbed air is cleaned by the grease filters and is discharged through a piping system.
Installation requirements:
CAUTION!
Exhaust air must not be transferred to;
• An active smoke flue;
• An active waste gas flue;
• A flue used for ventilation of spaces where heat sources are installed.
• If the installation requires transfer of exhaust air to an inactive smoke or waste gas flue, permission must be obtained
from an authorised chimney sweep.
• If exhaust air is discharged through the external wall, a telescopic wall safe must be used.
• Consult an authorised retailer to know the different opportunities available for flue connection. Accessories required
for flue connection can be bought from an authorised service provider.
Installation with carbon filter
The absorbed air is cleaned by the grease filters and an active carbon filter and is transferred back to the kitchen.
Installation requirements:
• An active carbon filter must be installed, in order to catch substances which cause stink in the circulating air.
• Consult an authorised retailer to know the different opportunities available for enabling the cooker hood to function in
circulating air mode. Accessories required for this process can be bought from an authorised service provider.
Installation area
Make sure to place the cooker hood considering the measurements and other factors described in this section.
Installation - ENGLISH 17
© 2022, Elon Group AB. All rights reserved.
WARNING!
Make sure that the installation area allows the user to easily unplug the power cord.
WARNING!
• Comply with the rules and instructions regarding discharge of outgoing air, stipulated by the relevant
authorities. This warning does not apply to uses without flue.
• When the product is used simultaneously with devices that use gas or other fuels, the negative pressure
in the room must not exceed 4 PA (4 X 10 bar).
• Products burning gas or fuel oil, such as room heaters, which share the same space with your product,
must be fully insulated from the exhaust of this product or they must be airtight.
WARNING!
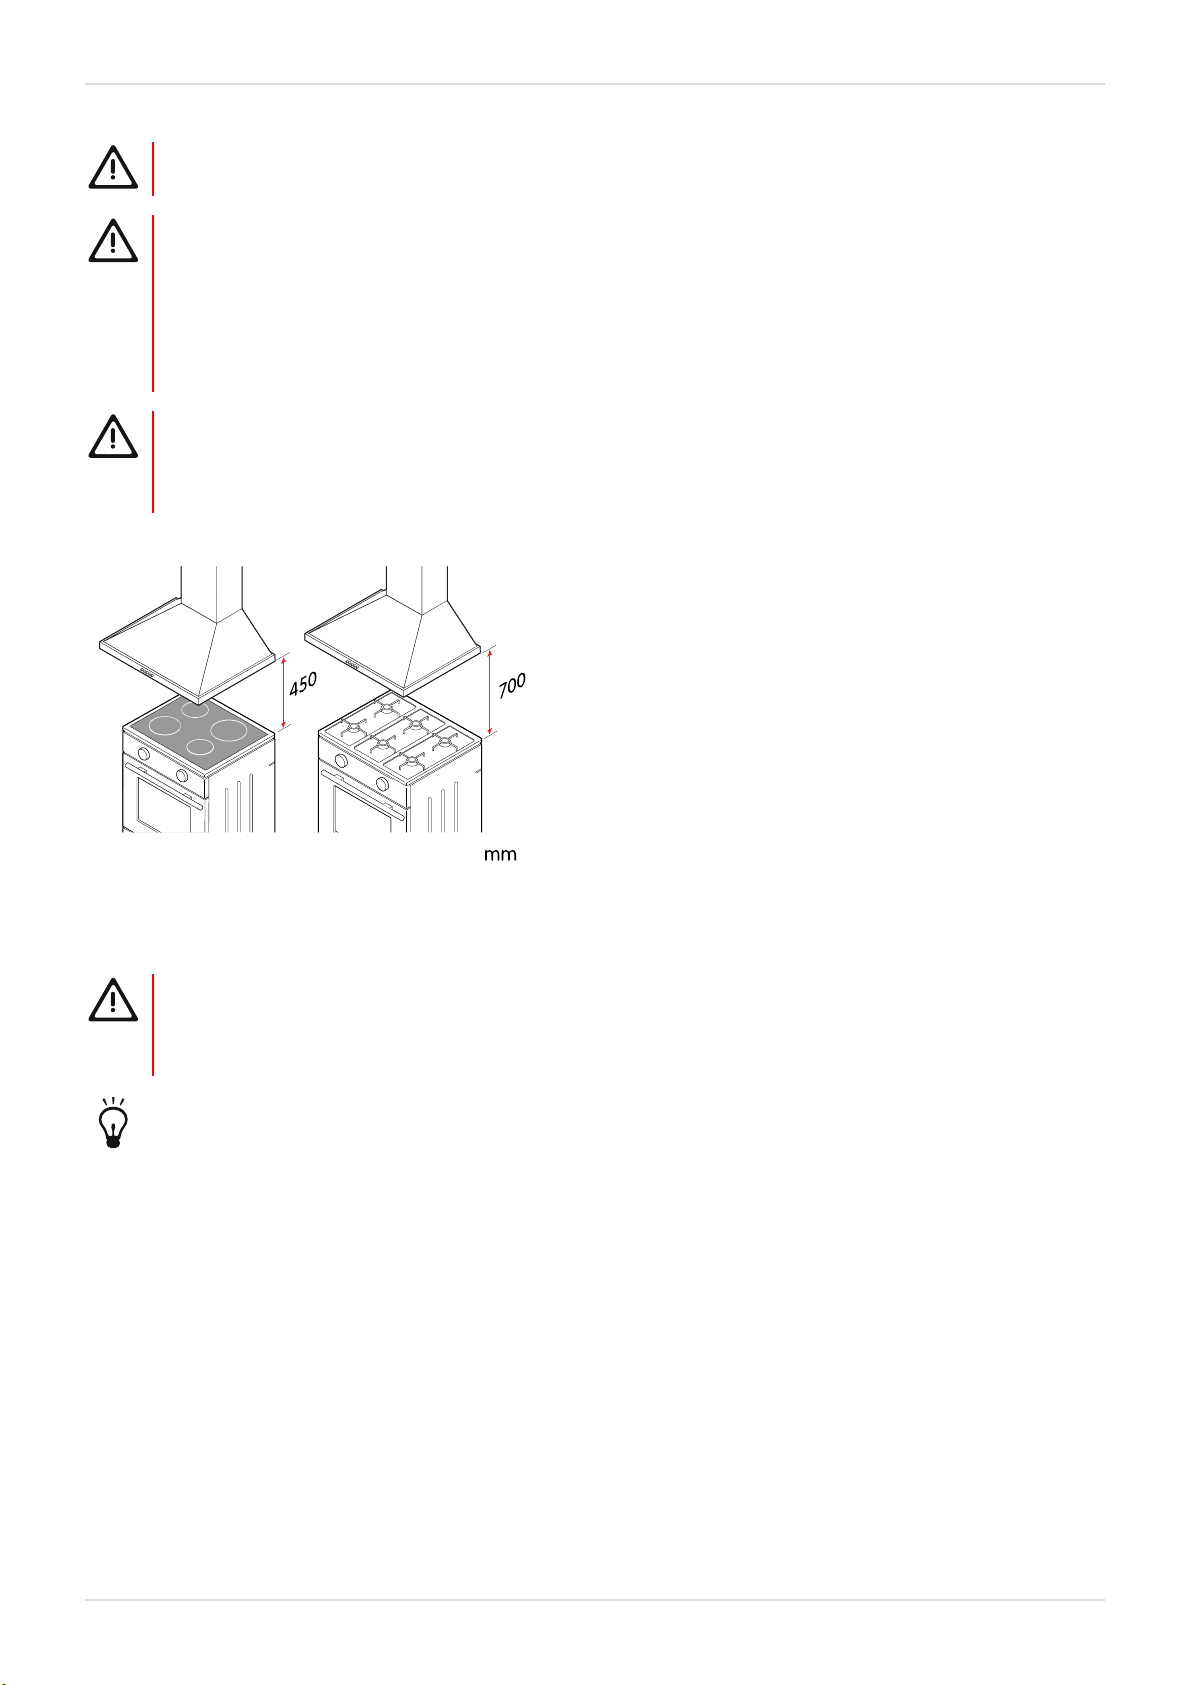
• The minimum distance between this product and any electric cooker shall be 450 mm.
• The minimum distance between this product and any gas cooker or cooker burning other fuels shall be
700 mm.
Mount the cooker hood on the wall
WARNING!
• The minimum distance between this product and any electric cooker shall be 45 cm.
• The minimum distance between this product and any gas cooker or cooker burning other fuels shall be
70 cm.
Place a protective cloth on the hob during the installation of the cooker hood.

18 Installation - ENGLISH
© 2022, Elon Group AB. All rights reserved.
Mount the cooker hood body on the wall
1. Place the installation template on the surface where the product is to be installed. Mark the holes for drilling using
the attached template and a pencil.
2. Drill 2 holes with a 10mm diameter on the points marked as A, B on the installation template.
3. Insert the 2 wall plugs with a 10mm diameter in the drilled holes.
4. Screw a 5.5 x 60 screw into each plug. Leave a 5mm gap between the screw head and the wall.
5. Hang the cooker hood on the 2 screws.
NOTE! For installations without carbon filter, install the flue flaps and the flue. See section "Install the flue flaps",
page 19 and section "Install the flue", page 19
Mount the flue on wall
1. Drill 2 holes with a 6mm diameter on the points marked as C, D on the installation template.
2. Insert the 2 wall plugs with a 6mm diameter into the drilled holes.
3. Place the flue connection sheet on the surface where the screws will be installed and screw a 3.9x22 screw into each
plug.
4. Install the internal- and external flue cover.
Installation - ENGLISH 19
© 2022, Elon Group AB. All rights reserved.
5. Use two 3.5 x 9.5 screws to secure the internal flue cover of the flue to the flue connection sheet.
6. Use two 3.5 x 9.5 screws to secure the external flue cover to the hood body.
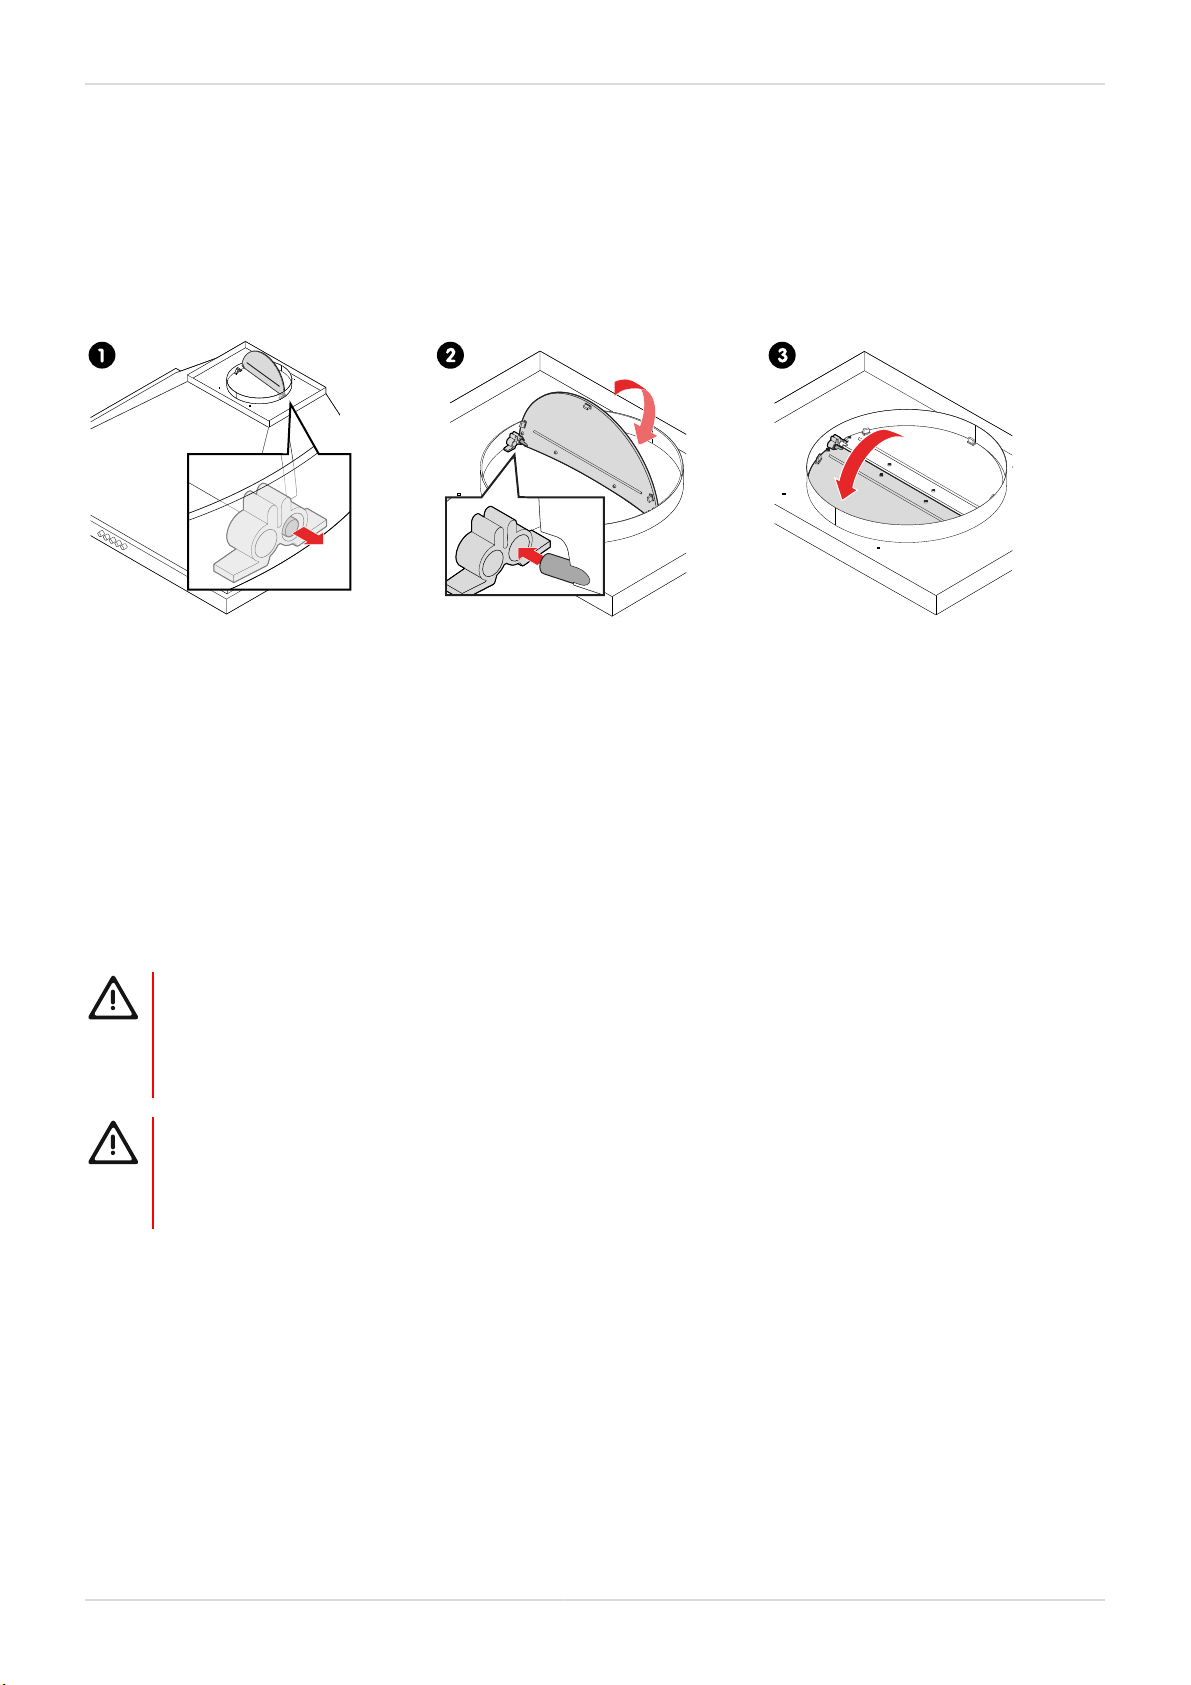
Install the flue flaps
For installations without carbon filter.
1. Insert the pin into the socket.
CAUTION! The tabs on the pins should be facing upwards.
2. Bend the flap lightly and insert the other pin into the other socket.
3. Repeat step 2 and step 3 for the other flap.
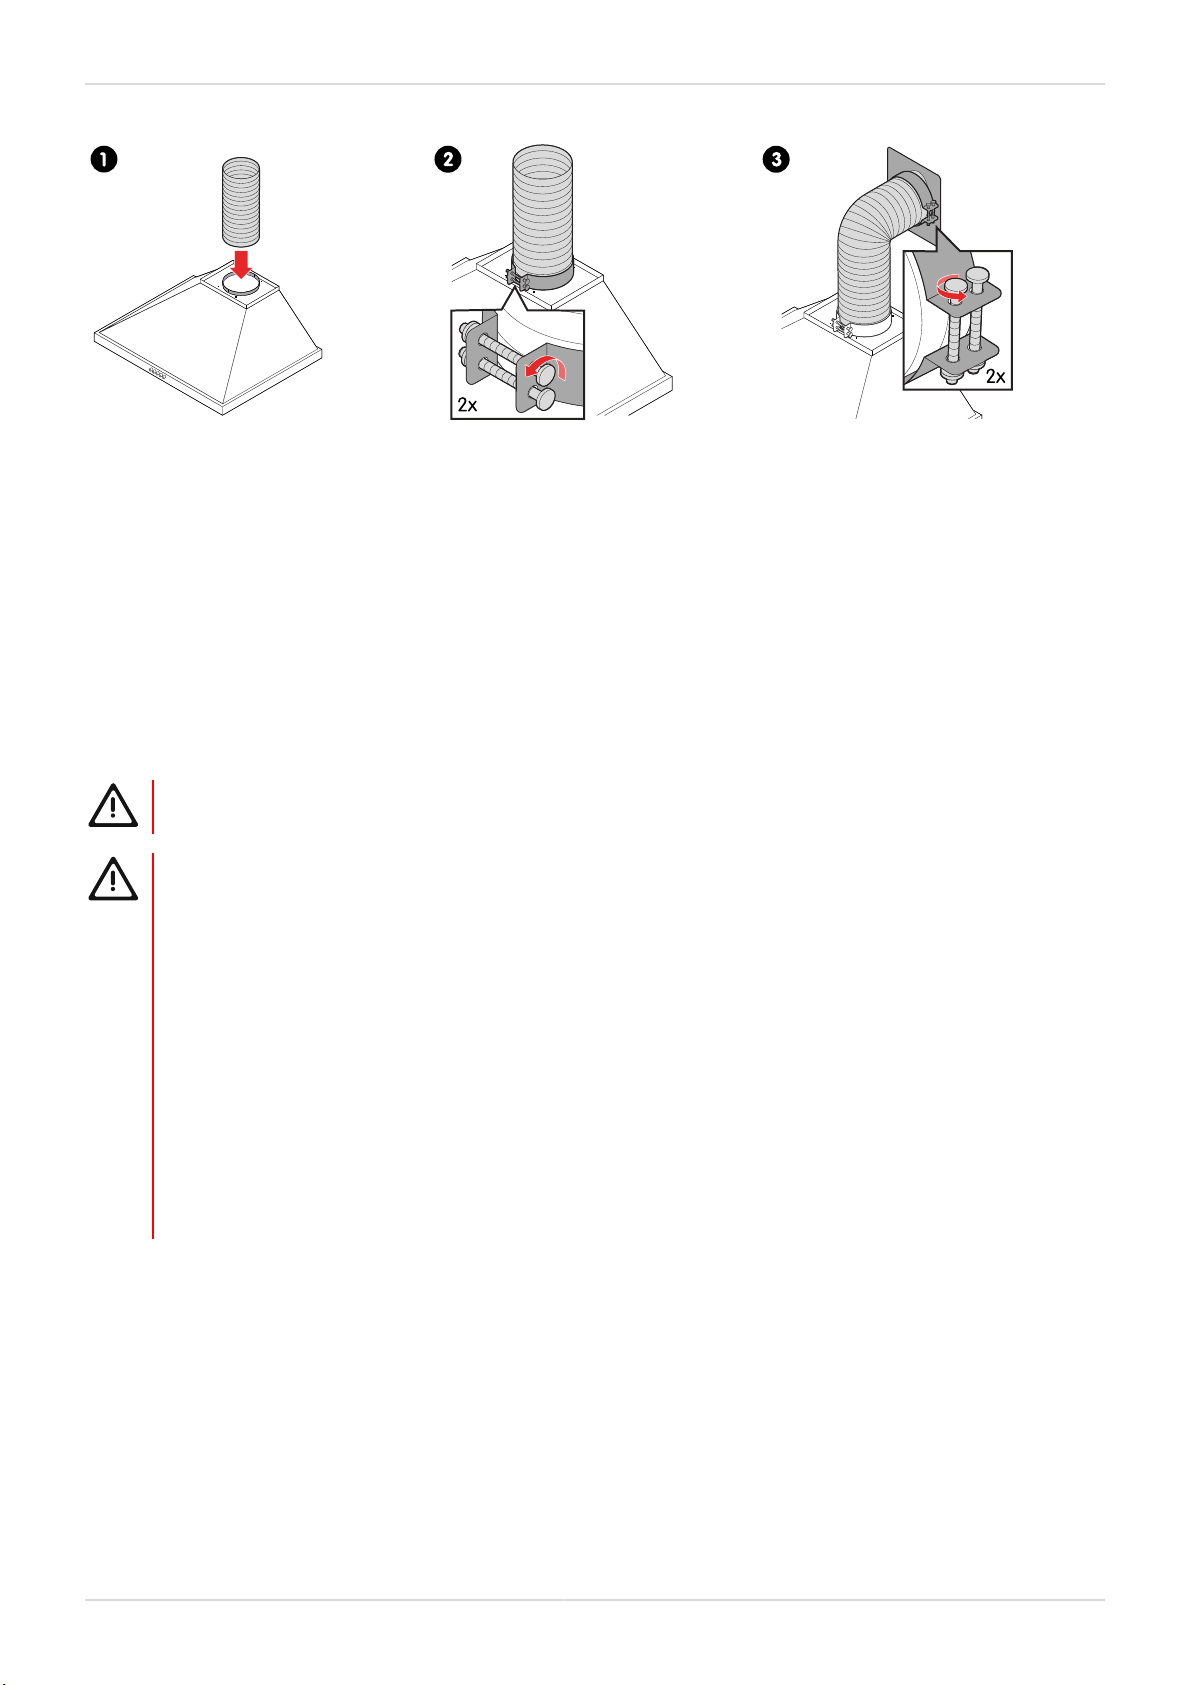
Install the flue
For installations without carbon filter.
In flue-connected use, the cooker hood must be connected to a flue that will discharge the air outdoors. Minimising the
way from the flue to the pipe system maximises the operating efficency of the cooker hood.
WARNING!
• Comply with the rules and instructions regarding discharge of outgoing air, stipulated by the relevant
authorities.
• When you make a flue connection for your product, use a pipe with a diameter of 120mm. The length of
the connection and the number of elbows must be as minimum as possible.
WARNING!
Do not connect the pipe to:
• A flue used for discharging fume generated by products that use gas or other fuels.
• Air ducts which could contain smoke
20 Installation - ENGLISH
© 2022, Elon Group AB. All rights reserved.
1. Put the flexible aluminium pipe on the plastic flue outlet.
WARNING!
• Avoid twisting and bending the aluminium pipe as much as possible. Twists and bends in the aluminium pipe
will reduce the air suction power.
2. Fasten the flexible aluminium pipe to the plastic flue outlet using a flue clamp.
WARNING! Install the air exit canal with a small downward inclination (1° inclination) from the cooker hood.
There is a risk of damage due to condensate liquid backflow.
3. Fasten the other end of the flexible aluminium pipe to the flue connection on the wall using a flue clamp.
Electrical wiring
WARNING!
All electrical wiring must be installed by a qualified electrician.
WARNING!
• Installation by unauthorised persons could lead to poor operation performance, damage to the product,
and accidents.
• Do not plug in the product before the installation.
• Make sure that the installation area allows the user to easily unplug the power cord in case of any
danger.
• The power cord must be plugged into a grounded power outlet. The power cord of the product is fitted
with a grounded plug.
• Do not expose the power cord to jamming or crushing during installation.
• The power cord must not be placed near the cooker. There is a risk of heat from the cooker melting the
power cord, which may lead to fire.
• Never turn on a malfunctioning product, in order to avoid any dangerous situation. If the product is
malfunctioning, pull the power plug and swith off the circuit breaker and contact the support.
• The usage voltage of the product is 220-240V, ~50-60Hz.
• In the hood system, only use fuses with a maximum rating of 6 A.
Other manuals for CSF3600X
1
Table of contents
Languages:
Other elvita Ventilation Hood manuals

elvita
elvita CSF2600X User manual

elvita
elvita CSF1600V User manual

elvita
elvita CHF5780S User manual

elvita
elvita CSF2620X User manual

elvita
elvita CSF3600X User manual

elvita
elvita CHF5708S User manual

elvita
elvita CSF1500V User manual

elvita
elvita CSF5600S User manual

elvita
elvita CSF4600S User manual

elvita
elvita CSF5600S User manual

Popular Ventilation Hood manuals by other brands


Amica
Amica OSC Series manual

Imperial Kitchen Ventilation
Imperial Kitchen Ventilation WH1900 Series Installation instructions & warranty information

ETNA
ETNA AB790RVS Instructions for use
 owner's manual")
Elba
Elba Elegante EH-B9025ST(SS) owner's manual

ILVE
ILVE X301ISL Series instruction manual
 owner's manual")
Elba
Elba EH-J9031ST(SS) owner's manual


