EM AMI-M Series User manual

AMI - midi interface
for guitar amplifiers
User manual
rev. 1.0 [07.2020]

Important safety instructions:
– Read these instructions and follow them.
– Prevent this device against moisture or spilling liquid inside.
– Clean only with dry cloth.
– Do not install near any heat sources such as radiators, heat registers, stoves, or other
apparatus producing a lot of heat.
– Protect the power supply cord from being walked on or pinched.
– Only use attachments/accessories specified by the manufacturer.
– Unplug this device during lighting storms or when unused for long periods of time.
– Do not open the device.
DO NOT PLACE THIS PRODUCT INTO THE WASTE CONTAINER !
This device is marked with a cross-lined waste container symbol according to
2002/96/EU Directive on Waste Electric and Electronic Equipment. Such
marking informs that after usage equipment can not be trashed together with
other household waste. An user obligation is to return wasted equipment to a
party collecting wasted electric and electronic equipment. Parties collecting
such equipment organise a system, including local collection points, shops
and other units, allowing to return such equipment. This Directive assures an
user free of charge utilisation of such delivered equipment. This device is
made of materials which can be recycled or utilised after becoming out of use. Proper handling
of wasted electric and electronic equipment reduces demand for raw materials and contributes
in avoiding harmful consequences for the environment and health of people caused by
dangerous components and not proper storing and utilising of such equipment.
2
Declaration of Conformity
EM Custom S.C., ul. Skłodowskiej-Curie 79B/6, 41-103 Siemianowice Śl., Poland,
declare under sole responsibility, that the following products:
MIDI interface for guitar amplifiers
AMI-Mxx, AMI-U, AMI-C, AMI-B, AMI-P
conforms with requirements of the EC Council Directives:
2014/30/EU Electromagnetic Compatibility,
2014/35/EU Low Voltage Directive,
and holds the CE mark. Above named product conforms with the following standards:
EN 301 489-1 V2.1.1 (2017-02)
EN 301 489-17 V3.1.1 (2017-07)
EN 300 328 V2.1.1
EN 62368-1:2014
EN 62368-1:2014/Cor.1:2015
Marek Kosiński /owner of the EM Custom S.C./
June 18, 2020
FCC statement
This device complies with Part 15 of the FCC Rules. Operation is subject to the following two conditions:
1. This device may not cause harmful interference, and
2. This device must accept any interference received, including interference that may cause undesired operation.
This equipment has been tested and found to comply with the limits for a Class B digital device, pursuant to Part 15 of
the FCC Rules. These limits are designed to provide reasonable protection against harmful interference in a
residential installation. This equipment generates, uses and can radiate radio frequency energy and, if not installed
and used in accordance with the instructions, may cause harmful interference to radio communications. However,
there is no guarantee that the interference will not occur in a particular installation. If this equipment does cause
harmful interference to radio or television reception, which can be determined by turning the equipment off and on,
the user is encouraged to try to correct the interference by one or more of the following measures:
- Reorient or relocate the receiving antenna
- Increase the separation between the equipment and receiver
- Connect the equipment into an outlet on a circuit different from that to which the receiver is connected.
- Consult the dealer or an experienced radio/TV technician for help.
This device contains FCC ID: XPYNINAB1 IC: 8595A-NINAB1
3

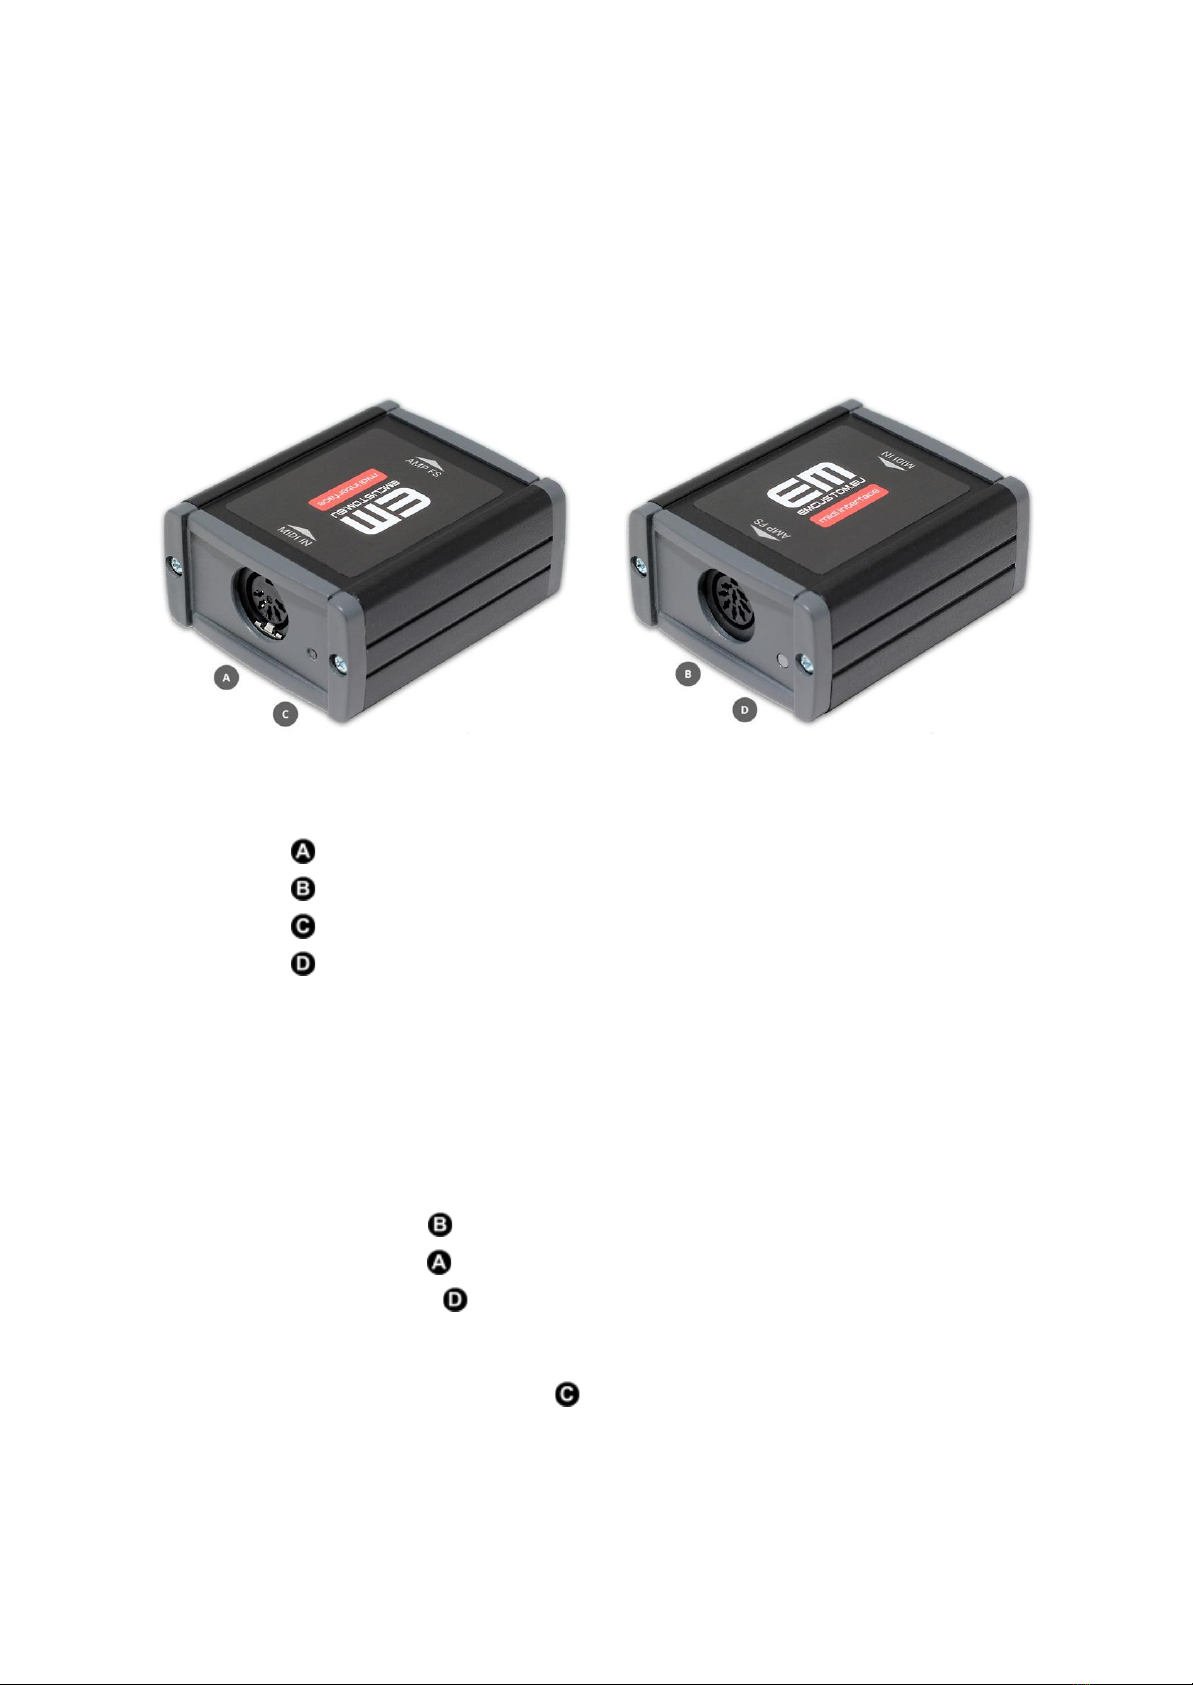
1. Description.
The amp interface allows switching channels and other amp functions via midi messages. In case
of MESA BOOGIE amps, Peavey JSX ( and similar ) no external power is needed.
The interface may replace original footswitch and it is possible to switch all available footswitch
functions by one midi message.
sockets: Midi IN – Midi socket
AMP FS – connect it into the footswitch socket of the amp
indicator: RX – Received midi message indicator
switch: Midi CH. SW. – Midi channel settings switch ( learn mode )
2. Using the interface.
2.1. Starting up the interface
●Power off the amp
●Connect the interface into the amp using original footswitch cable
●Connect the interface to the midi controller using standard midi cable
●Set a valid midi channel (chapter 2.3)
●Power on your system
After powering on the interface, RX LED is blinking for a one second and then goes off.
5

2.2. Working with midi messages.
The midi interface supports 2 types of MIDI messages:
- Program Change ( PC )
- Control Change ( CC )
According to the MIDI standard, all midi parameters range from 0 to 127
Program Change messages are used to recall presets and Control Change messages are used
to switch one function independently from presets.
●Send a valid midi message to switch your amp.
Refer to the table of default settings of supported amplifiers (AMI midi implementation).
User should send supported PC or CC including valid MIDI channel.
MIDI channel sent from the midi controller to the interface must correspond to MIDI channel
set in the interface.
Note: Some manufacturers use the range of 1 – 128. In this case, all of listed below values should
be increased by 1.
Example: The controller sends midi messages in the range of 1 – 128.
If you want to switch the interface by PC 0 you should send PC 1 from the midi controller.
2.3. MIDI channel settings.
Default MIDI channel is 1, but it is possible to change it.
- Press and hold switch until the LED starts blinking.
- The interface is in channel learn mode.
- Send any midi message ( PC or CC ) with new midi channel set.
- The interface will remember the midi channel.
Note: Midi channel number 16 is OMNI channel
2.4. LED actions
Color
Description
white
fast flashing for 1 second when Power on
blue
flashing when the interface is connected to the AMIcontrol app via BT
green
flashing once when the valid midi message is received
red
flashing once when the received midi message is out of range
orange
flashing when the midi channel setting mode is active
6

3. Specification.
Power supply:
●5V DC, 14mA, (from amp footswitch socket) AMI-M02
●12V DC, 14mA, (from amp footswitch socket) AMI-M01
●5-12 V DC, 14mA, AMI-U / AMI-C / AMI-B
●17V DC, 15mA, AMI-P
Dimensions: 60 x 70 x 31 mm
Weight: 96 g
4. Marking information.
AMI-Mxx-yy – Mesa amps settings
xx
MESA BOOGIE type
00
reserved / future use
01
option 1 (Mark V:35)
02
option 2 (as below)
yy
only for M02 (option2)
MESA BOOGIE model
M4
Mark IV
M5
Mark V
RK
Roadking
RD
Roadster
NO
Nomad
BF
Dual/Triple Rectifier (BigFoot)
RV
RectoVerb
AMI-U – 2 x TRS Universal settings ( additional DIN2TRS cable adapter is required )
AMI-B – Bugera
AMI-P – Peavey
AMI-A – PRS Archon
AMI-C – Custom settings ( on order )
Do not connect Mark V:35 interface into other MESA amps.
Do not connect option 2 MESA amps into the MARK V:35
7

5. Midi implementation.
Please download the midi implementation for your amp:
https://emcustom.eu/downloads/AMI_MI.pdf
6. AMIcontrol app.
In case of the Mesa Boogie amps this is possible to customize the AMI via bluetooth using a
smartphone.
You can change factory settings of PC messages, CC messages and midi channel number
according to your own preferences with this app.
This can make it easier to control your midi system.
You can also diagnose some problems in your midi system with a midi monitor feature.
Finally you can directly control the amplifier via bluetooth using this app and the AMI
interface.
You can find the app in Google Play
https://play.google.com/store/apps/details?id=eu.emcustom.amicontrol
or just type in Google Play the “amicontrol’ phrase.
* iOS version soon
7. Warranty.
EM Custom provides a warranty to the purchaser that this product will provide for a period of
2 years from the date of purchase.
Within the warranty period, the manufacturer will replace your faulty AMI at no charge (except
shipping & handling fees in some cases), provided that the product:
- Has been used for the intended purpose and in the manner described in this manual.
- Has not been connected to an unsuitable power source.
- Has not been subjected to misuse or neglect.
- Has not been modified or repaired.
- Has not been damaged further by mechanical shock or atmospheric discharges.
Legal rights are not affected by this warranty.
8

This manual suits for next models
6
Table of contents
Other EM Media Converter manuals

Popular Media Converter manuals by other brands

Asante
Asante AsanteTalk user manual

ZIMO
ZIMO MX638 Series instruction manual

Omnitron Systems Technology
Omnitron Systems Technology Plug-in Module iConverter 2FXM quick start guide

Philips
Philips SWS2101W Specifications

Samson
Samson 6111 Mounting and operating instructions

Atlona
Atlona CM-391 Operation manual


