eMotimo spectrum ST4 User manual
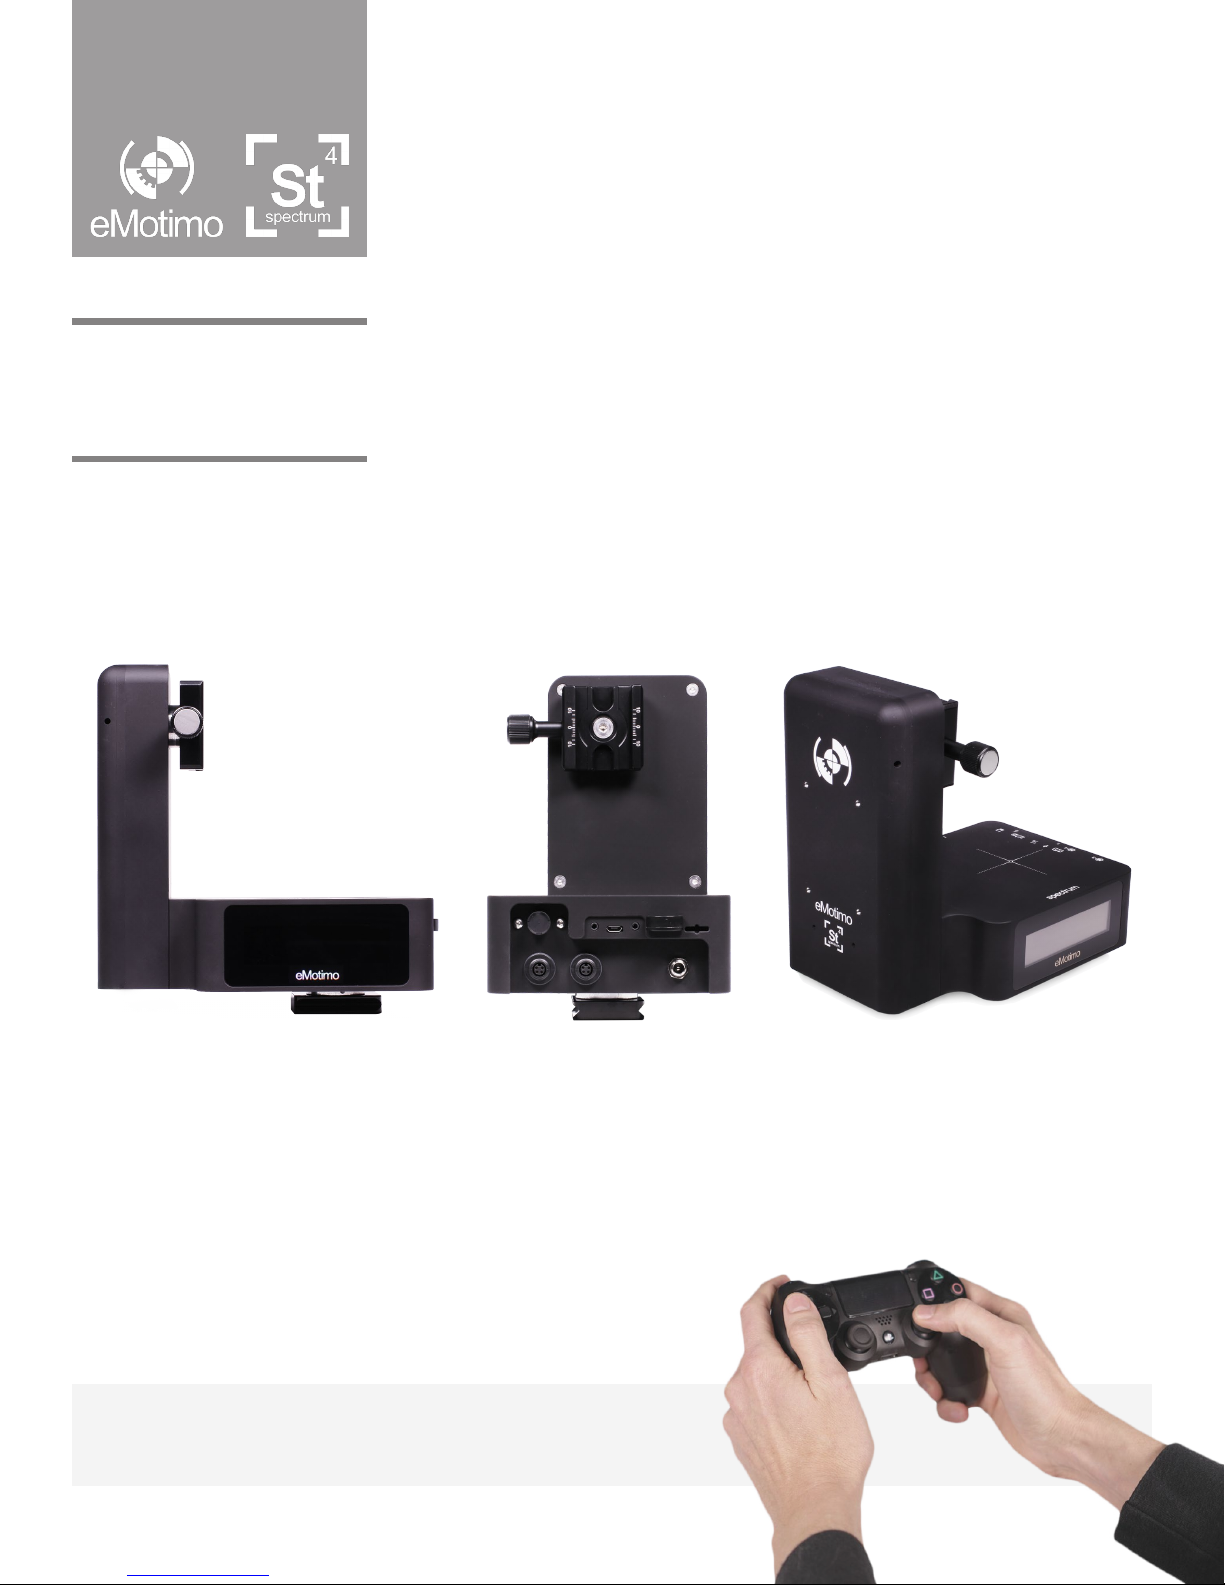
eMotimo spectrum ST4
Firmware
R007
V 1.1
Instruction Manual

2eMotimo spectrum Instructions R007
At any time, press the eMotimo or spectrum logo in the footer to come back to the contents page
Contents Page
Table of contents
Contents Page..................................................................................................................................... 2
Getting started..................................................................................................................................... 3
For Your Safety.................................................................................................................................... 4
What’s Included in basic bundles ........................................................................................................ 5
spectrum ST4 Hardware Map.............................................................................................................. 6
spectrum ST4 Electronics Map............................................................................................................ 7
Hardware Setup................................................................................................................................... 8
Connections / Ports ............................................................................................................................. 9
Powering spectrum ST4 ...................................................................................................................... 10
Controller............................................................................................................................................. 11
Remote LED Flash Indications............................................................................................................ 12
Remote Information............................................................................................................................. 13
Screen Map ........................................................................................................................................ 14
Screen Map ......................................................................................................................................... 15
Live Motion - Motor Preset (feel) ........................................................................................................ 16
Live Motion - Motor Preset (feel) ........................................................................................................ 19
Live Motion - Experimental ................................................................................................................. 20
Live Motion - Experimental ................................................................................................................. 21
Live Motion - Experimental ................................................................................................................. 22
Programmed moves ............................................................................................................................ 23
Using an external intervalometer......................................................................................................... 27
Photo Tools.......................................................................................................................................... 28
Settings................................................................................................................................................ 34
Resources and Customer Sevices
Instructional videos - https://vimeopro.com/emotimo/spectrum-instructional-videos
Support website / ticket creation: http://support.emotimo.com
3Copyright © 2018 eMotimo INC
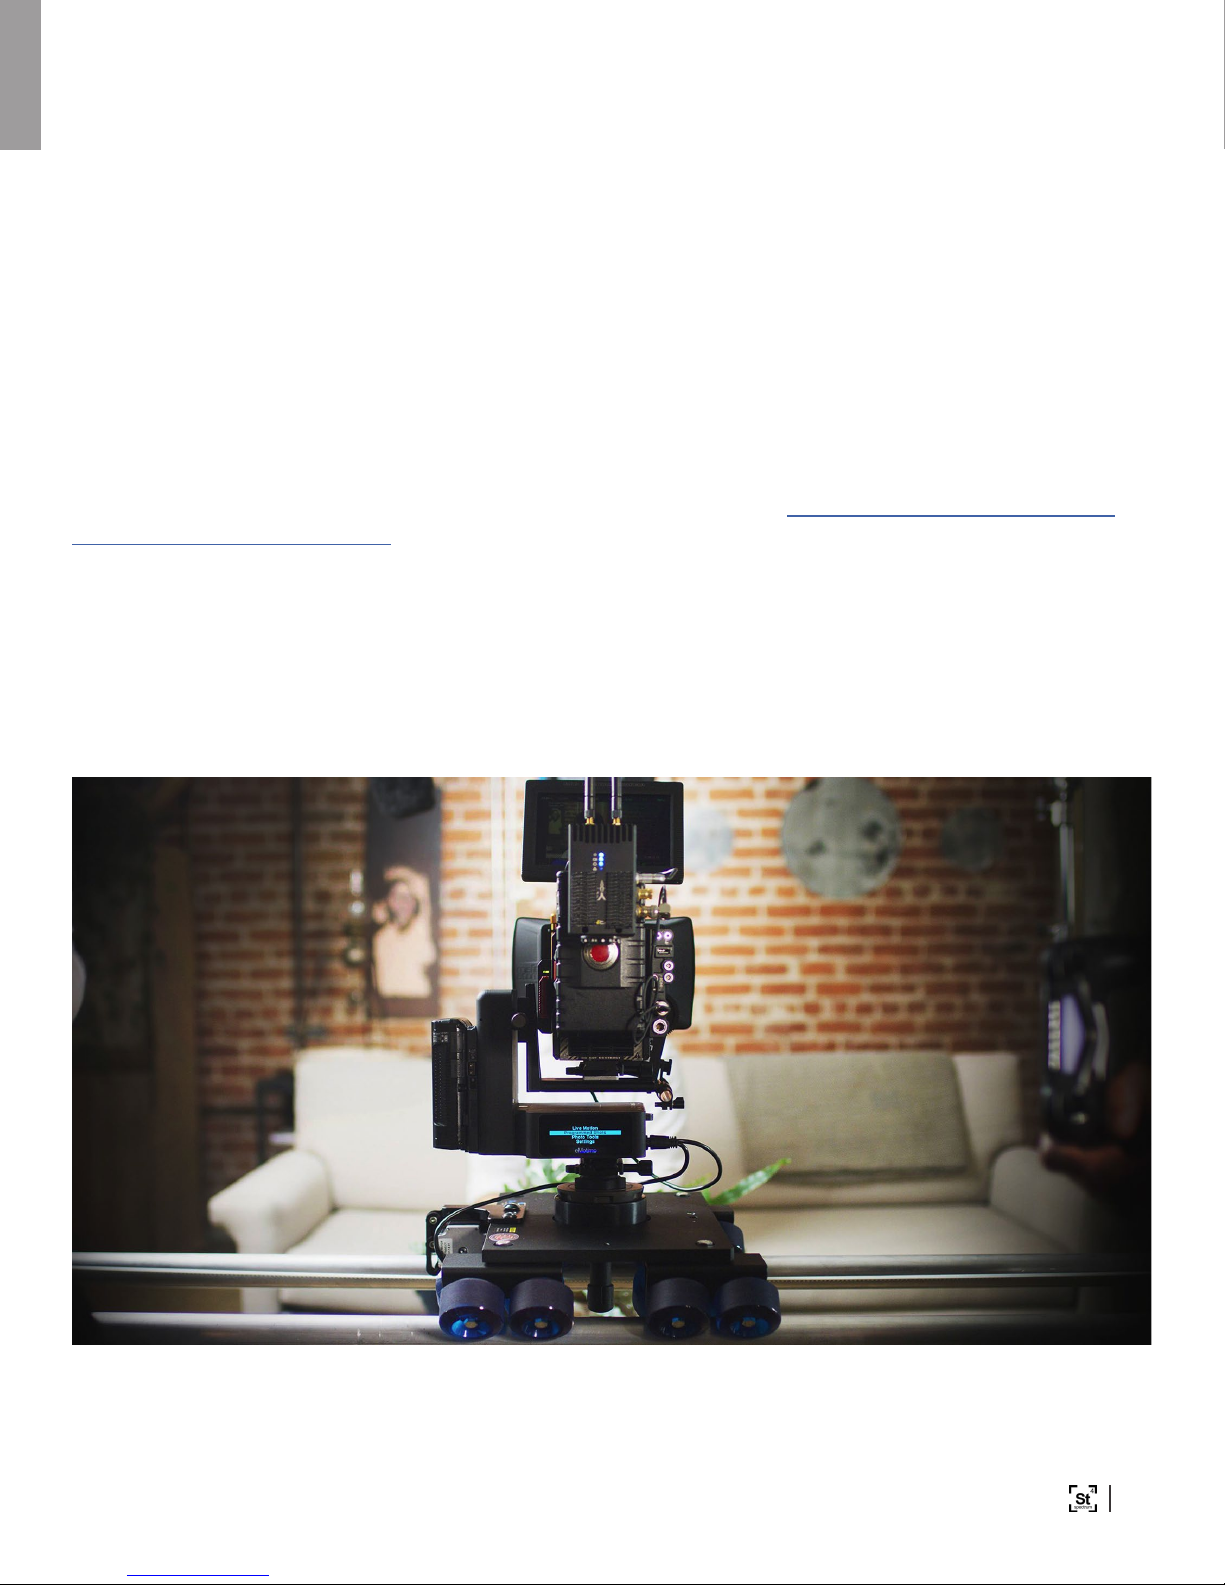
Welcome to your eMotimo spectrum ST4!
Getting started
Thank you for purchasing a spectrum ST4. Whether you choose to use the basic functionality of the
spectrum for programmed moves, or push the limits with brand new features never seen in motion
control, we are happy to have you as a customer.
A statement of warning/caution/excitement if you are used to other motion control: The spectrum
ST4 is going to push what is possible with motion control. It will push you in the process if
you let it.
Please take the time to play to review our instruction videos online: https://vimeopro.com/emotimo/
spectrum-instructional-videos
Please also, read this guide to understand the extent of what is possible with the spectrum. If you do,
you will know how to use the most powerful piece of portable motion control on the market.
Brian Burling – eMotimo founder

4eMotimo spectrum Instructions R007
Please read and observe the following precautions
For Your Safety
To prevent damage to the spectrum ST4 and/
or personal injury to yourself:
Do not disassemble the unit
This unit is a complex electronic device and
contains no user-serviceable parts. Any
unauthorized disassembly or modication may
void the service warranty of the unit.
Keep the unit dry
Avoid exposing the unit to excess water or rain.
While the spectrum is no particularly sensitive
to humidity or water, exposing the unit’s internal
circuitry to water may result in re and/or electric
shock.
Do not operate a malfunctioning unit
Should the unit emit smoke, or unusual
odors, remove the power source from the unit
immediately. Discontinue further use and
contact eMotimo support.
Avoid extreme temperature changes
Electronic devices may be damaged by sudden
and extreme changes in temperature. Just
like your camera, the unit should not be used
immediately after moving it from a very cold
temperature, to a warm environment. Allow at least
1.5 hours of slow warming in a sealed bag or case,
before using the spectrum st4 after removing it
from the cold.
Keep out of reach of children
This unit contains small parts which may can
cause choking.
Use only eMotimo approved accessories
While eMotimo encourages easily enable
connecting to many accessories, please check
with eMotimo before hooking up any accessory not
sourced from eMotimo. Improper or unsupported
accessories can damage the spectrum st4 or
cause damage that is not covered under warranty.
5Copyright © 2018 eMotimo INC
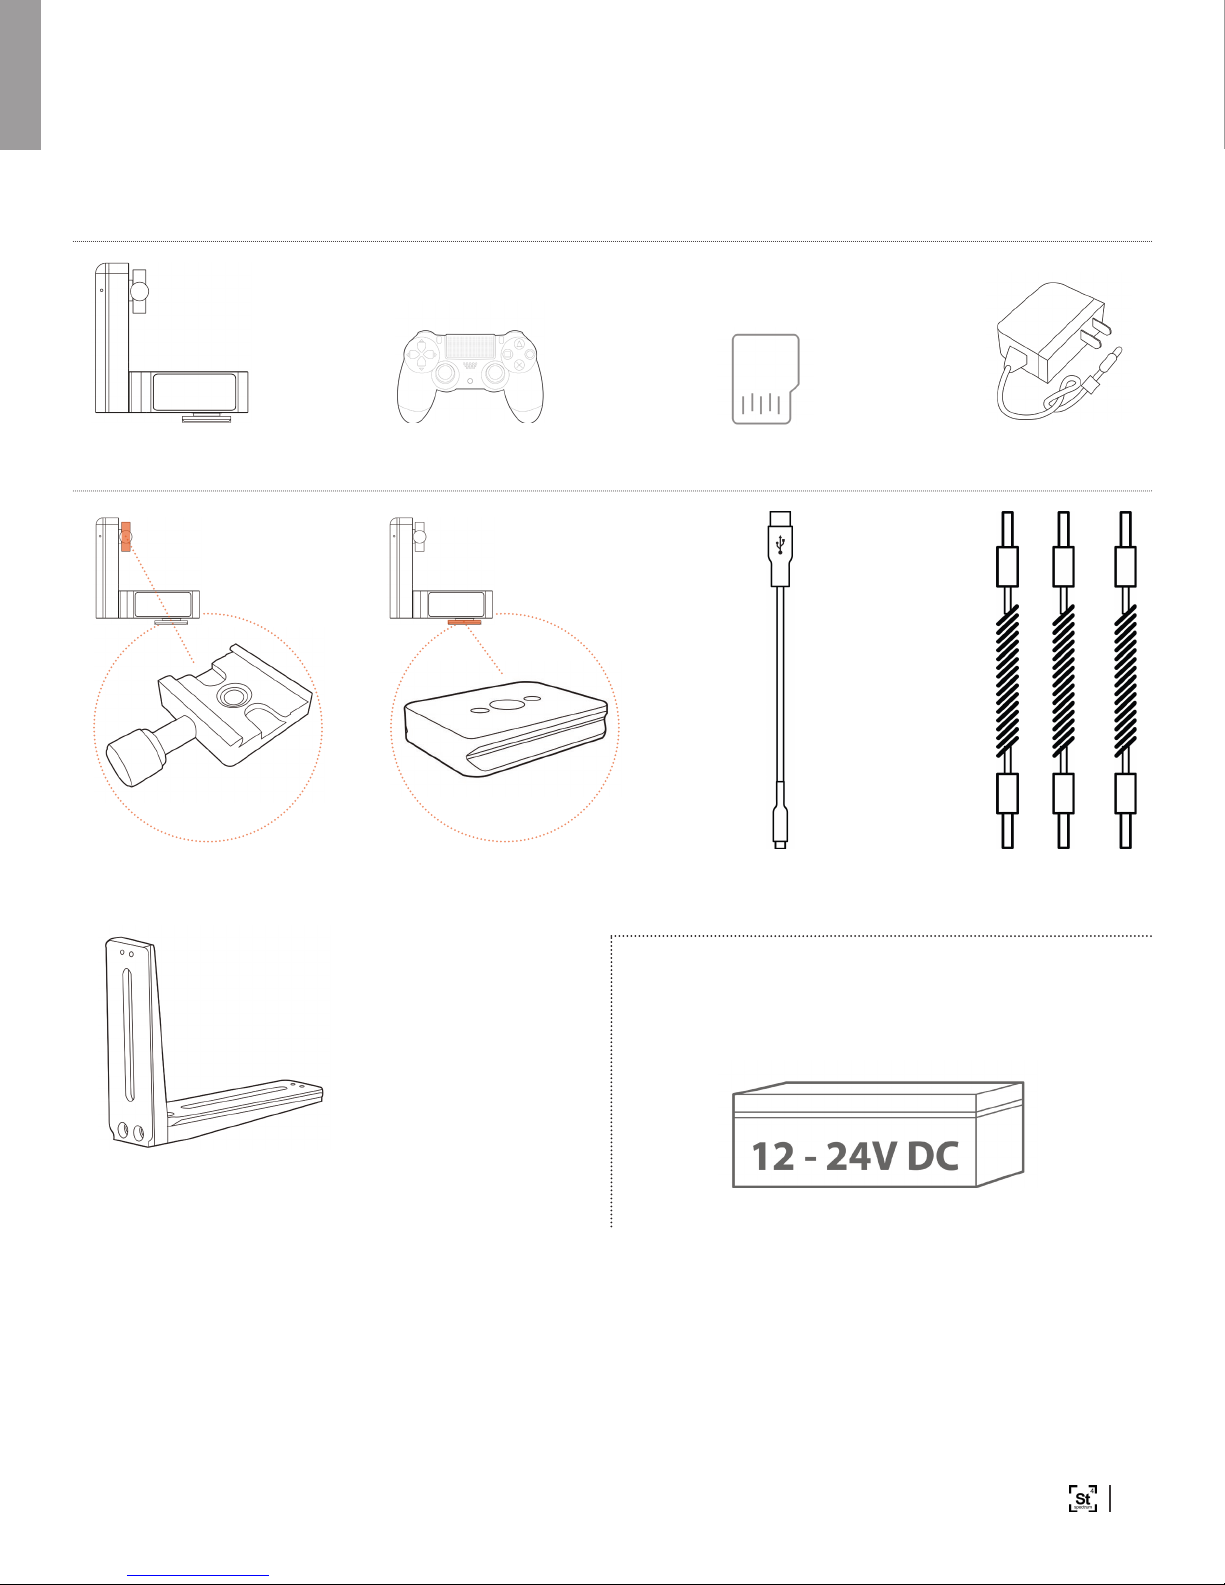
(In a basic spectrum purchase, before accessories)
Portable battery not included
What’s Included in basic bundles
spectrum ST4
Arca clamp ships
mounted to spectrum tilt
Controller Micro SD card 12V AC adapter
Arca plate mounted to
spectrum pan base
L-plate to mount
camera to spectrum
Micro USB to USB
remote charging cable
Pro Canon, Nikon, &
Sony camera cables

6eMotimo spectrum Instructions R007
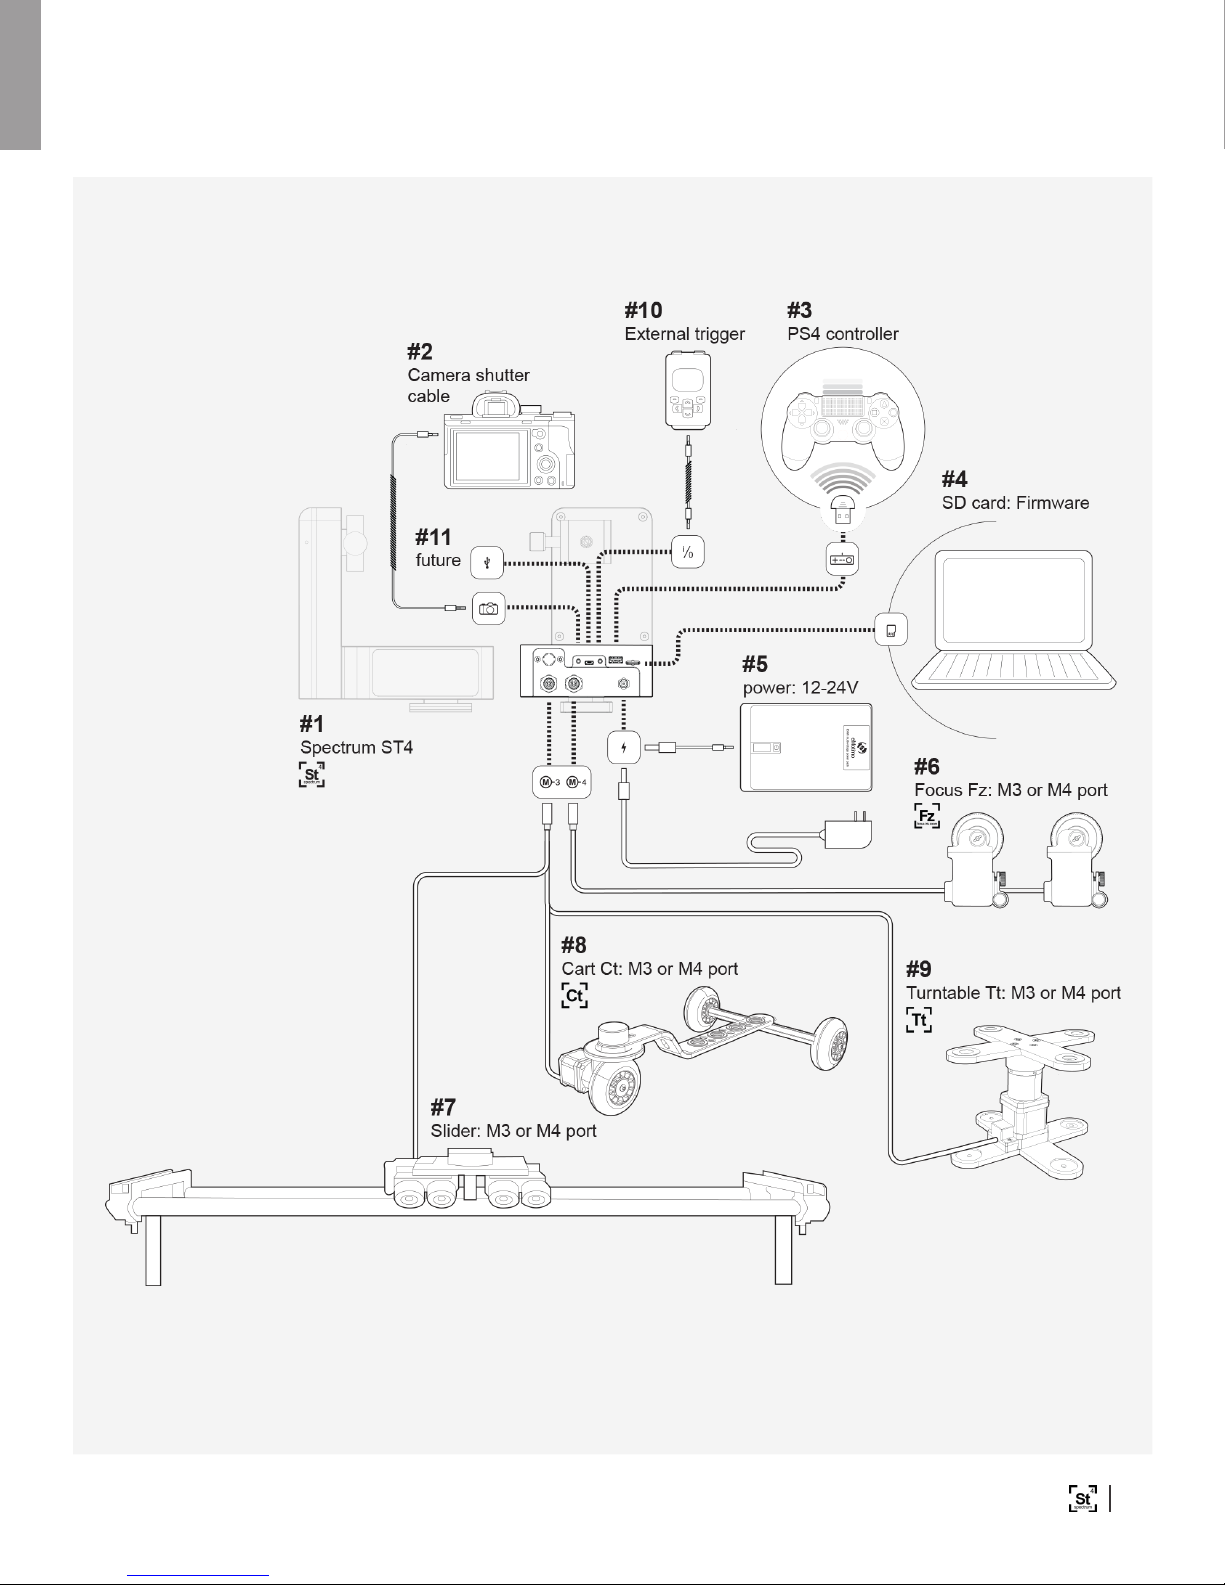
spectrum ST4 Hardware Map
7Copyright © 2018 eMotimo INC
spectrum ST4 Electronics Map
8eMotimo spectrum Instructions R007
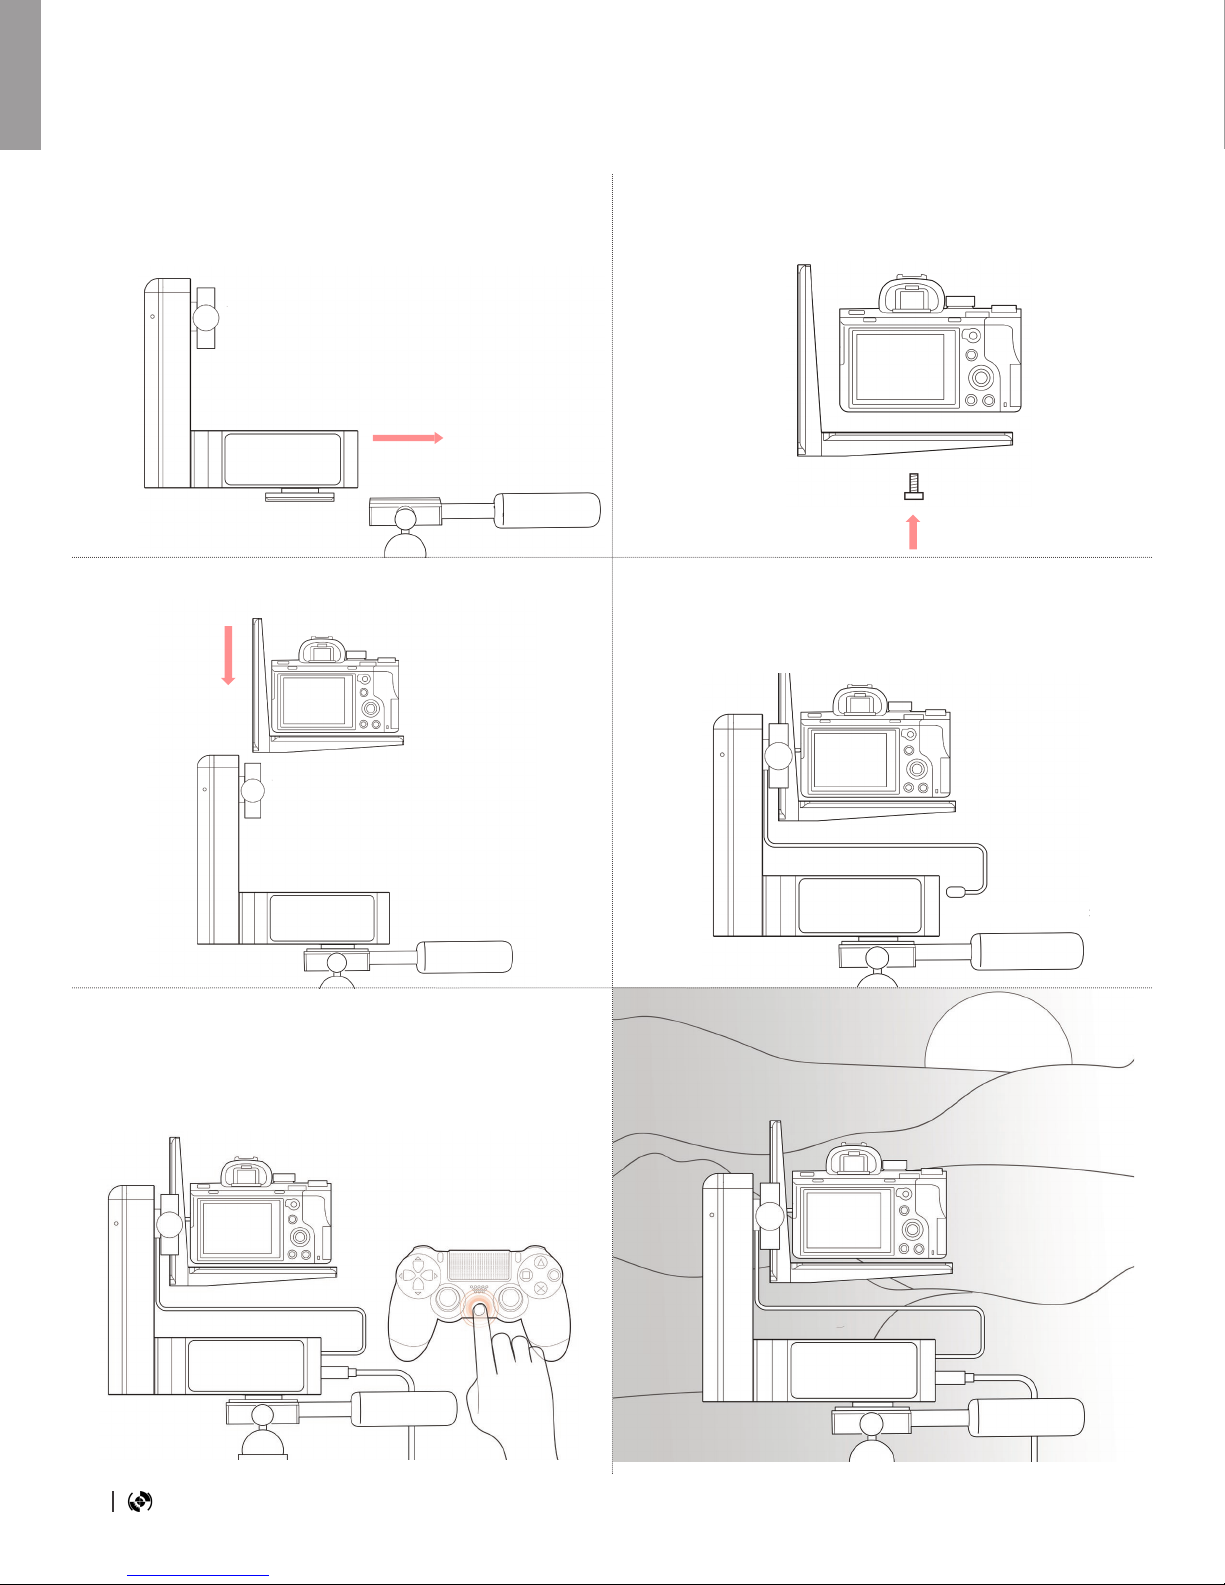
Hardware Setup
Step #1 Mount spectrum pan axis arca plate to arca
clamp on tripod or slider.
Step #3 Mount camera and L-plate to tilt clamp. Step #4 Optionally plug in camera triggering cables to
camera port / camera.
Step #5 Plug in 12-24 volt power and immediately
press and release the center PS button. Remote
shows blue LED when connected.
Step #6 Shoot something amazing.
Step #2 Mount camera to arca compatible L-plate.

9Copyright © 2018 eMotimo INC
Connections / Ports
1. 8 way Navigation Stick (NavStick): on
spectrum control for navigation, selection
and setting up programmed key-frame shots
without a remote. See how to program a shot
using only this controller - https://vimeopro.
com/emotimo/spectrum-instructional-videos/
video/189070569
2. Camera shutter port: Triggering you DSLR is
accomplished by hooking up a camera specic
shutter cable from the st4’s camera port to
your camera’s shutter release port. During
a timelapse sequence the st4 sends a focus
signal and shutter signal to your camera at the
same time for the duration of the Static Time
setting. Hint - Take Test Shots: The PS4 Controllers’
right trigger (R2) will focus and re the camera on most
screens. A half press is focus, and a full press is shutter/
focus to trigger your camera to shoot.
3. USB port: Future functionality - Powering the
spectrum for motor moves from any USB port
is not supported.
4. i/o port: The spectrum’s i/o port is used for
serial communication to external devices.
5. Remote control port: This full-sized USB
port is dedicated to hold the PS4 Controller’s
wireless dongle. If you remove the dongle
for travel, keep it safe. You can’t connect the
remote without it!
6. uSD card slot: The spectrum st4 ships with
a uSD card. This card and port are used for
rmware upgrades and future support of
saved moves and settings.
7. M3 (motor 3) port: The 3rd powered stepper
port typically used for slider, but can be used
for any approved stepper accessory. This
port is controlled by the PS4’s Left Joystick
(left/right)
8. M4 (motor 4) port: The 4th powered stepper
port typically used for Fz, but can be used for
any approved stepper accessory. This port is
controlled by the PS4’s triggers (L2/R2).
Did you know? – Did you know the “4” in “st4” is
for 4 axis control. The spectrum st4 is the rst 4 axis
powered controller of its type. We think having more
axis give you more options to play increasing the
palate of possibilities. Go tell better stories.
9. DC power in: See Powering your spectrum
st4 below for details
#1
#2 #3 #4 #5 #6
#7 #8 #9
10 eMotimo spectrum Instructions R007
Powering spectrum ST4
Powering your spectrum ST4 is easy. You can use many o the shelf AC adapters and batteries.
A 12V or 24V US AC adapter is included with most orders by default. The spectrum ST4 must be
powered within the following specications:
• Voltage – 10-24VDC.
• Current - Minimum 2Amps. 3.5A preferred.
• Connector for power port: 2.1mm x 5.5mm circular barrel connector – center positive.
Warning Powering the spectrum for motor moves from any USB port is not supported.
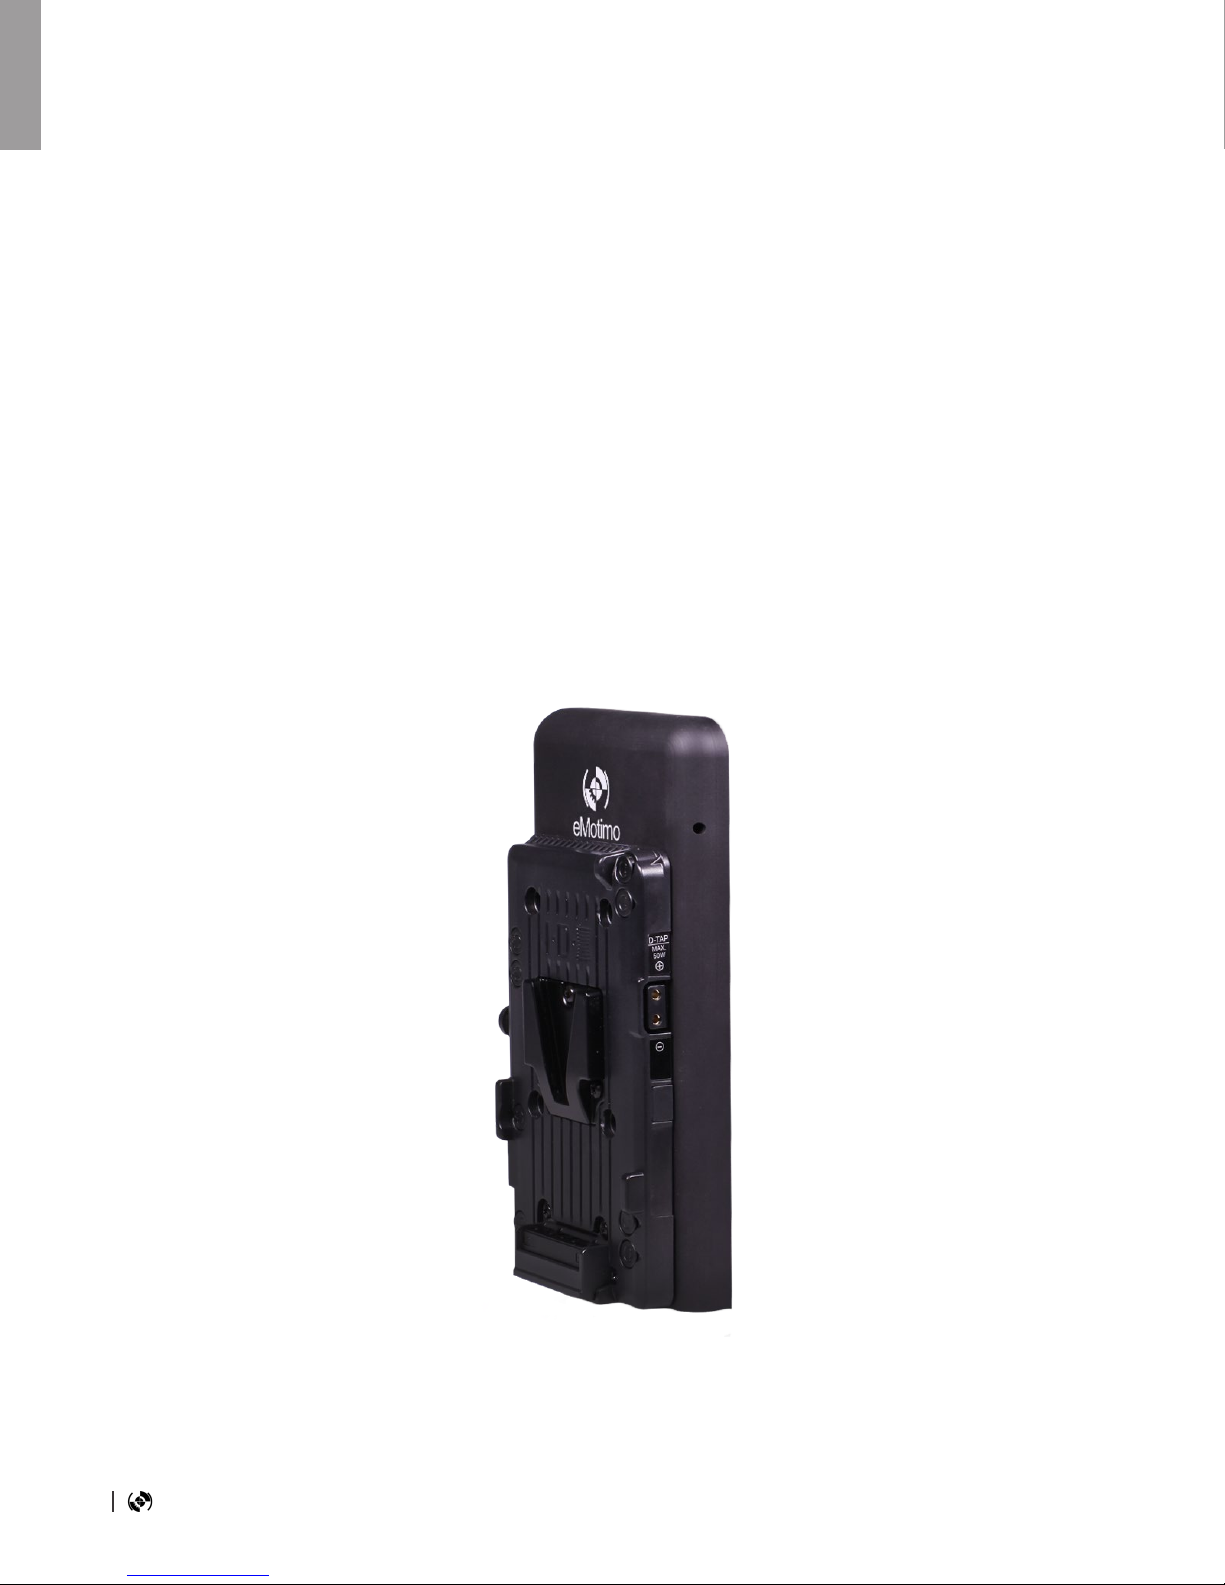
V-Mount upgrade option
With the V-Mount upgrade, your spectrum ST4 will power on anytime you engage the battery. We are
oering this upgrade with an IDX plate model P-V2. It includes a DTAP power port that allows you to
power your camera from a single battery too!

11Copyright © 2018 eMotimo INC
PS4 Dualshock Wireless Remote
Controller
D-Pad: Navigate interface
Left joystick: Controls live motion
Right joystick: Controls live motion
R2 and L2 Trigger: Analogue Focus control
X button: Select/advance (hold for cancel shot while shooting)
Circle, Triangle, L3, and R3: GoTo Frames
R1 and L1: Set soft stops for Focus Fz (Motor port 4)
Options: Clear soft stops for Focus Fz (Motor port 4)
PS button: Press to pair. Hold button to disconnect.
Your spectrum ST4 ships with an o the shelf PS4 Dualshock wireless remote for primary control.
The analogue sticks have a great feel to them, the buttons are reactive and numerous, the sensors
like gyros and touch-pads allow us creative options for control in the future and the rumble and light
feedback allow for intuitive two-way communication.
When you are programming a shot, and driving a camera for live work, the only place you should be
looking is the monitor. With a little practice, this controller allows you to intuitively move your spectrum
without ever looking at your hands. Try to do that with an app!
We think the selection of this controller is key for capturing more organic shots, faster and more
intuitively. See https://vimeopro.com/emotimo/spectrum-instructional-videos/video/189012765 for
video on how to pair and use your controller
12 eMotimo spectrum Instructions R007
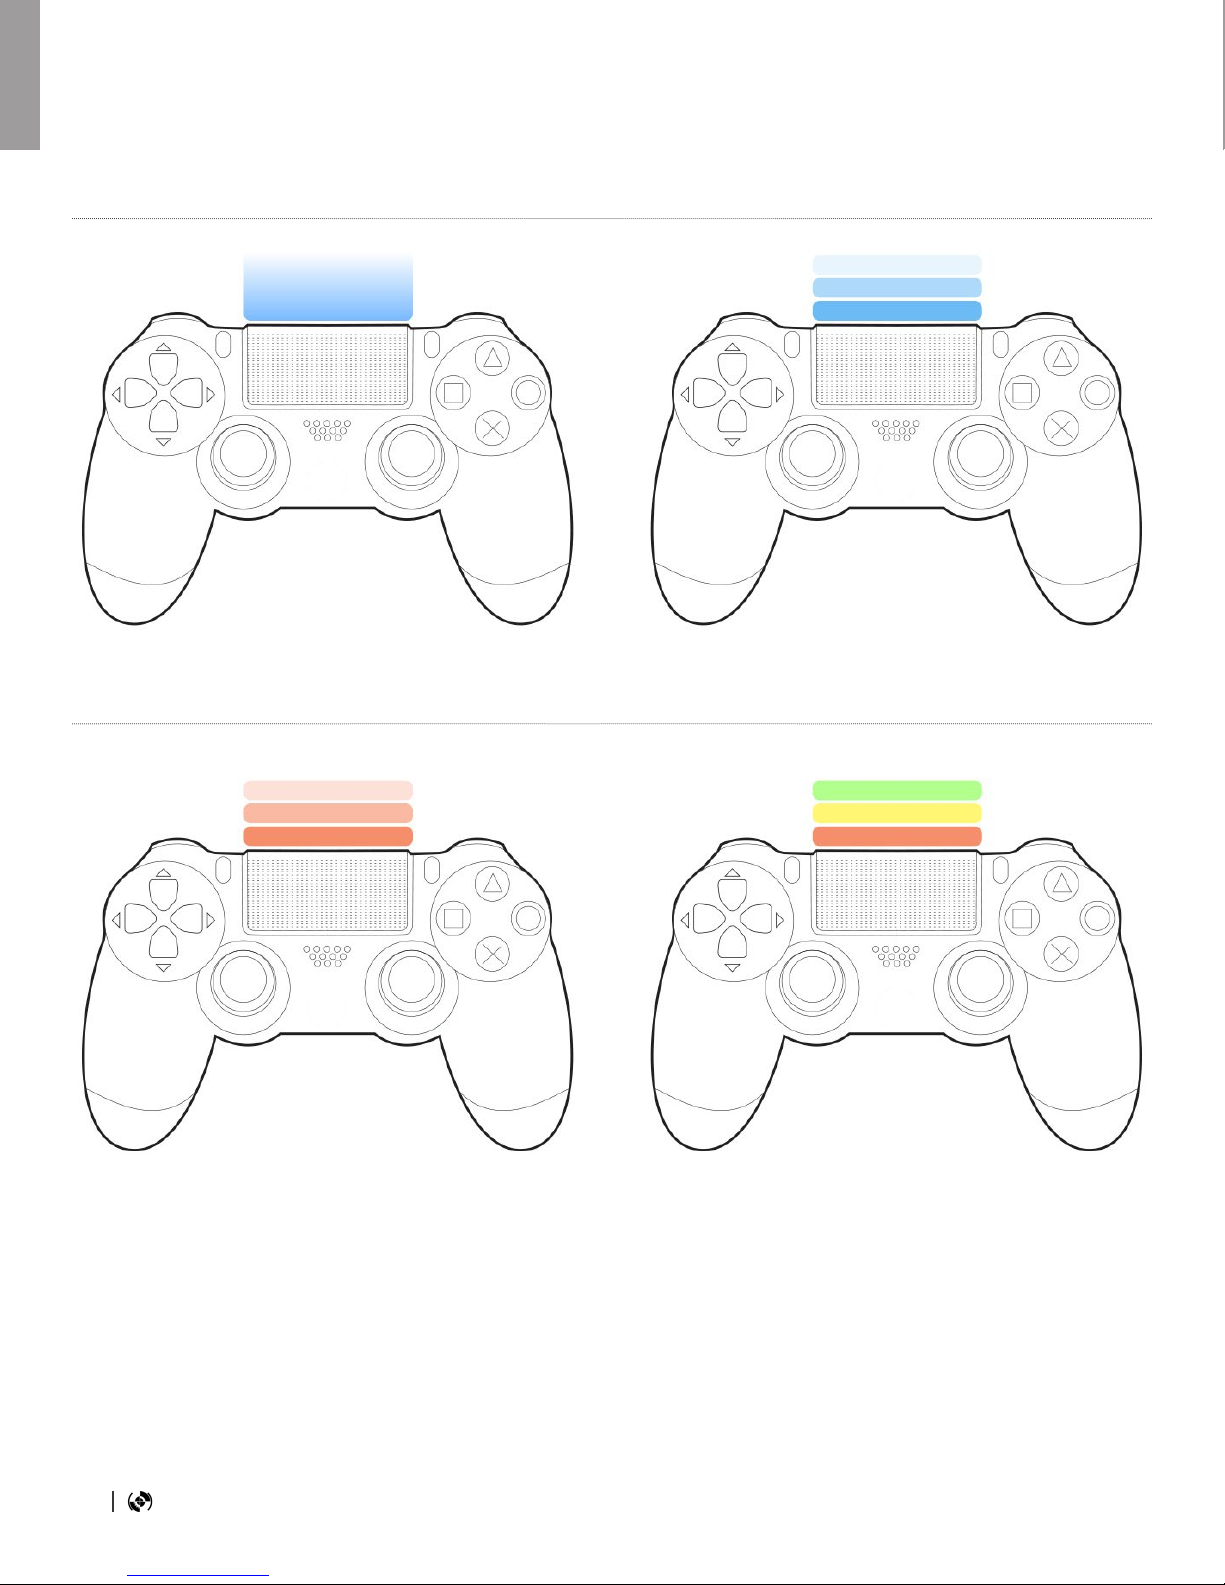
Remote LED Flash Indications
Standard Condition: Solid Blue Pairing Process: Blue Flash
Bloop Light: On programmed video modes:
Live Rec and Play, and Programmed Moves
a visual preamble on PS Remote LED ashes
Red, Yellow, Green, Go in a 1 second preamble.
Also shows same condition afterwards.
Hint Bloop Light: This is a pro tool for those
who need “blip lights” to line up multi-pass VFX
shots.
ERROR: Fast Red Flash: Error conditions
over-voltage or under-voltage. Check power
source.
ERROR: Slow Red Flash: Error conditions
remote battery is low. Charge remote.

13Copyright © 2018 eMotimo INC
Quick Reconnection
Remote Charging
Disconnecting
the remote while the rig is
running
Resetting a remote
Reconnecting
the remote while the rig is
running (in progress)
1.
1.
2.
2.
3.
4.
Remote Information
Quick connection should be used unless your remote is new.
Power on the spectrum, wait until main menu shows on the
screen.
Immediately Press and release the PS button (middle) of remote.
The PS4 remote’s LED will ash white in a slow even blinks while
it is trying to connect. When the remote connects, the LED will
show solid blue and is ready for use.
If the remote does not connect and stops ashing, press the PS
button to retry the connection.
If the remote doesn’t connect by indicating a solid BLUE on the
second try, unplug the spectrum st4 from power, wait for the
remote’s LED to turn o and start the remote pairing procedure
outlined above.
Make sure your remote is fully charged before you head out
into the eld.
Plug in a micro USB cable (not included, but typical of many
phones / cameras) to the PS4 and then USB end to a computer.
Look for an orange glow on the back of the PS4 while it is
charging. Once this turns o it is fully charged.
Watch out! Many eld packs with USB ports will not charge the
PS4. Use the orange glow as an indicator that the charging
process is working.
To save the remote’s batteries once a program is running, you
may disconnect the remote by pressing and holding the PS button
for 1 second. or simply walk out of range and it will disconnect.
On rare occasions, a remote’s battery gets really low or sits for a
long period of time, it might not charge (indicated by orange glow).
If it isn’t charging or connecting, reset it. You can do this by using
a thin tool to press the reset button on the bottom of the remote.
To reconnect, hit the PS button one and release. The remote
will ash white slowly while trying to reconnect. If this process
doesn’t reconnect a power cycle of the unit may be required.
Hint - NavStick– even if reconnection is having troubles or your
remote is out of batteries, you can still use the NavStick on the
side of the spectrum to start or reverse a programed move after a
shot is complete.
14 eMotimo spectrum Instructions R007
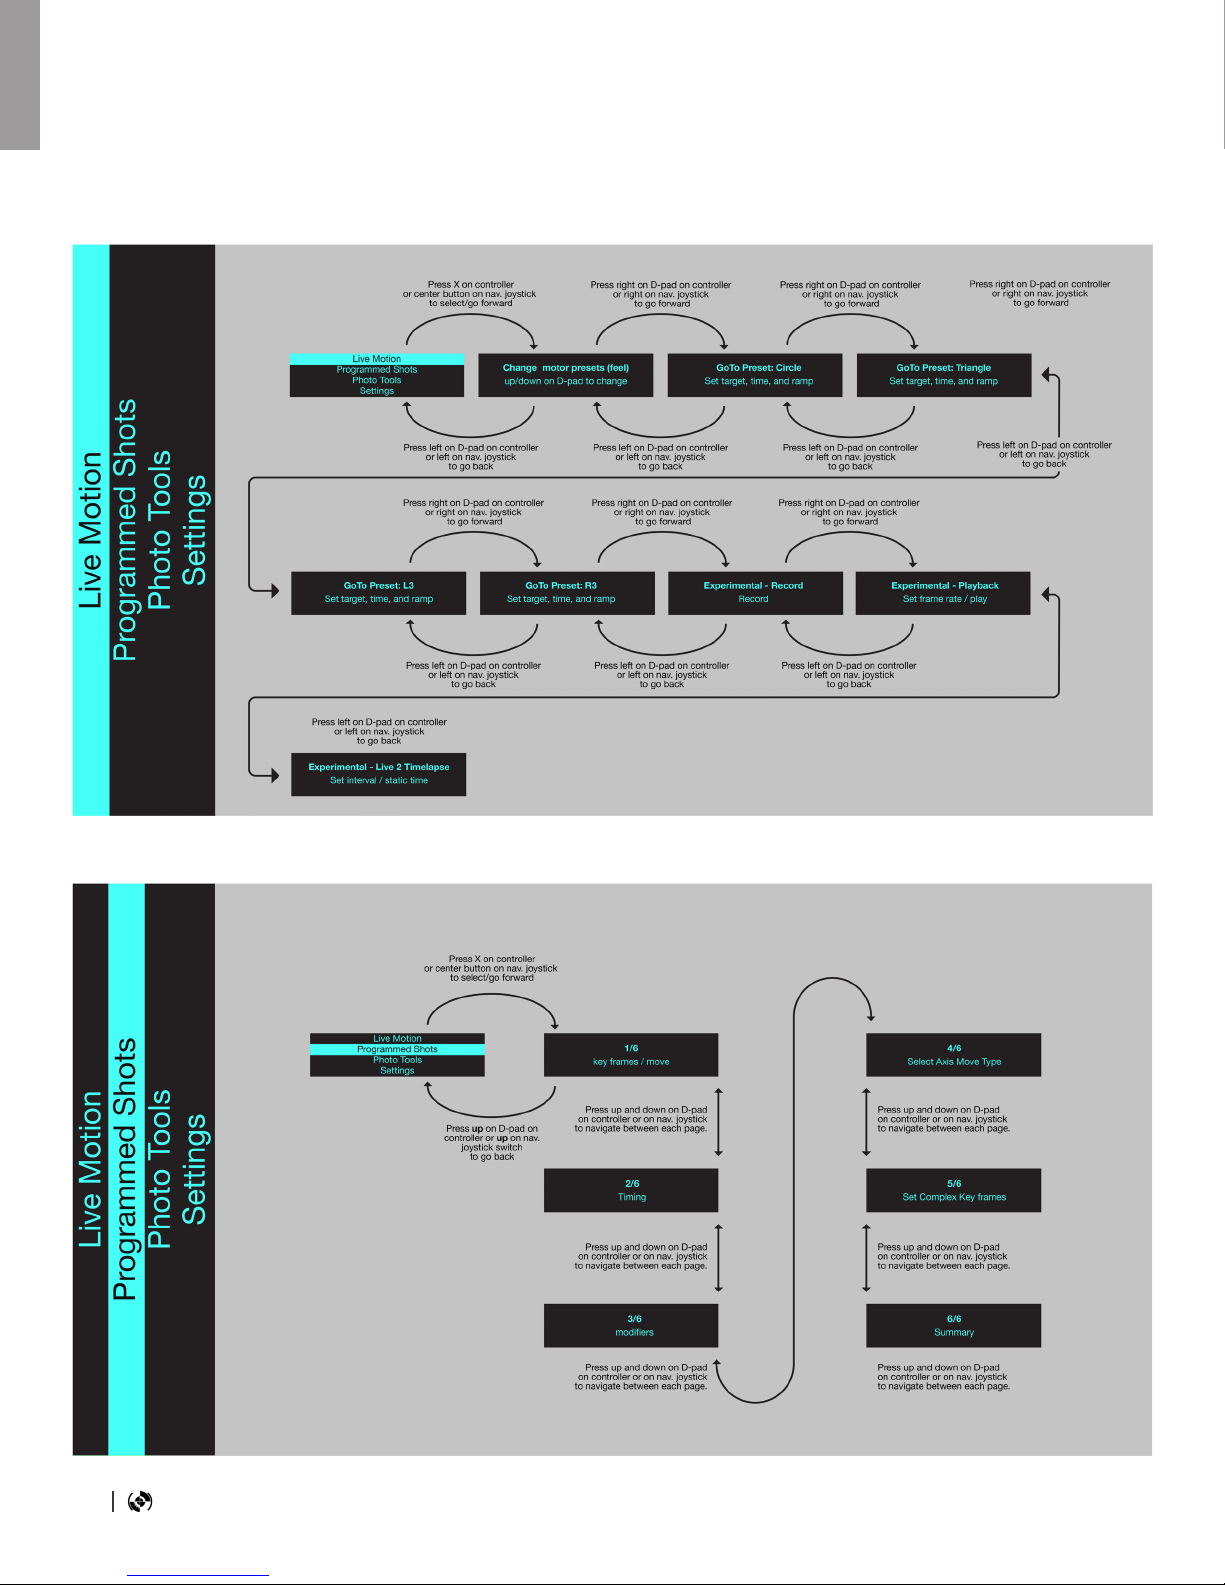
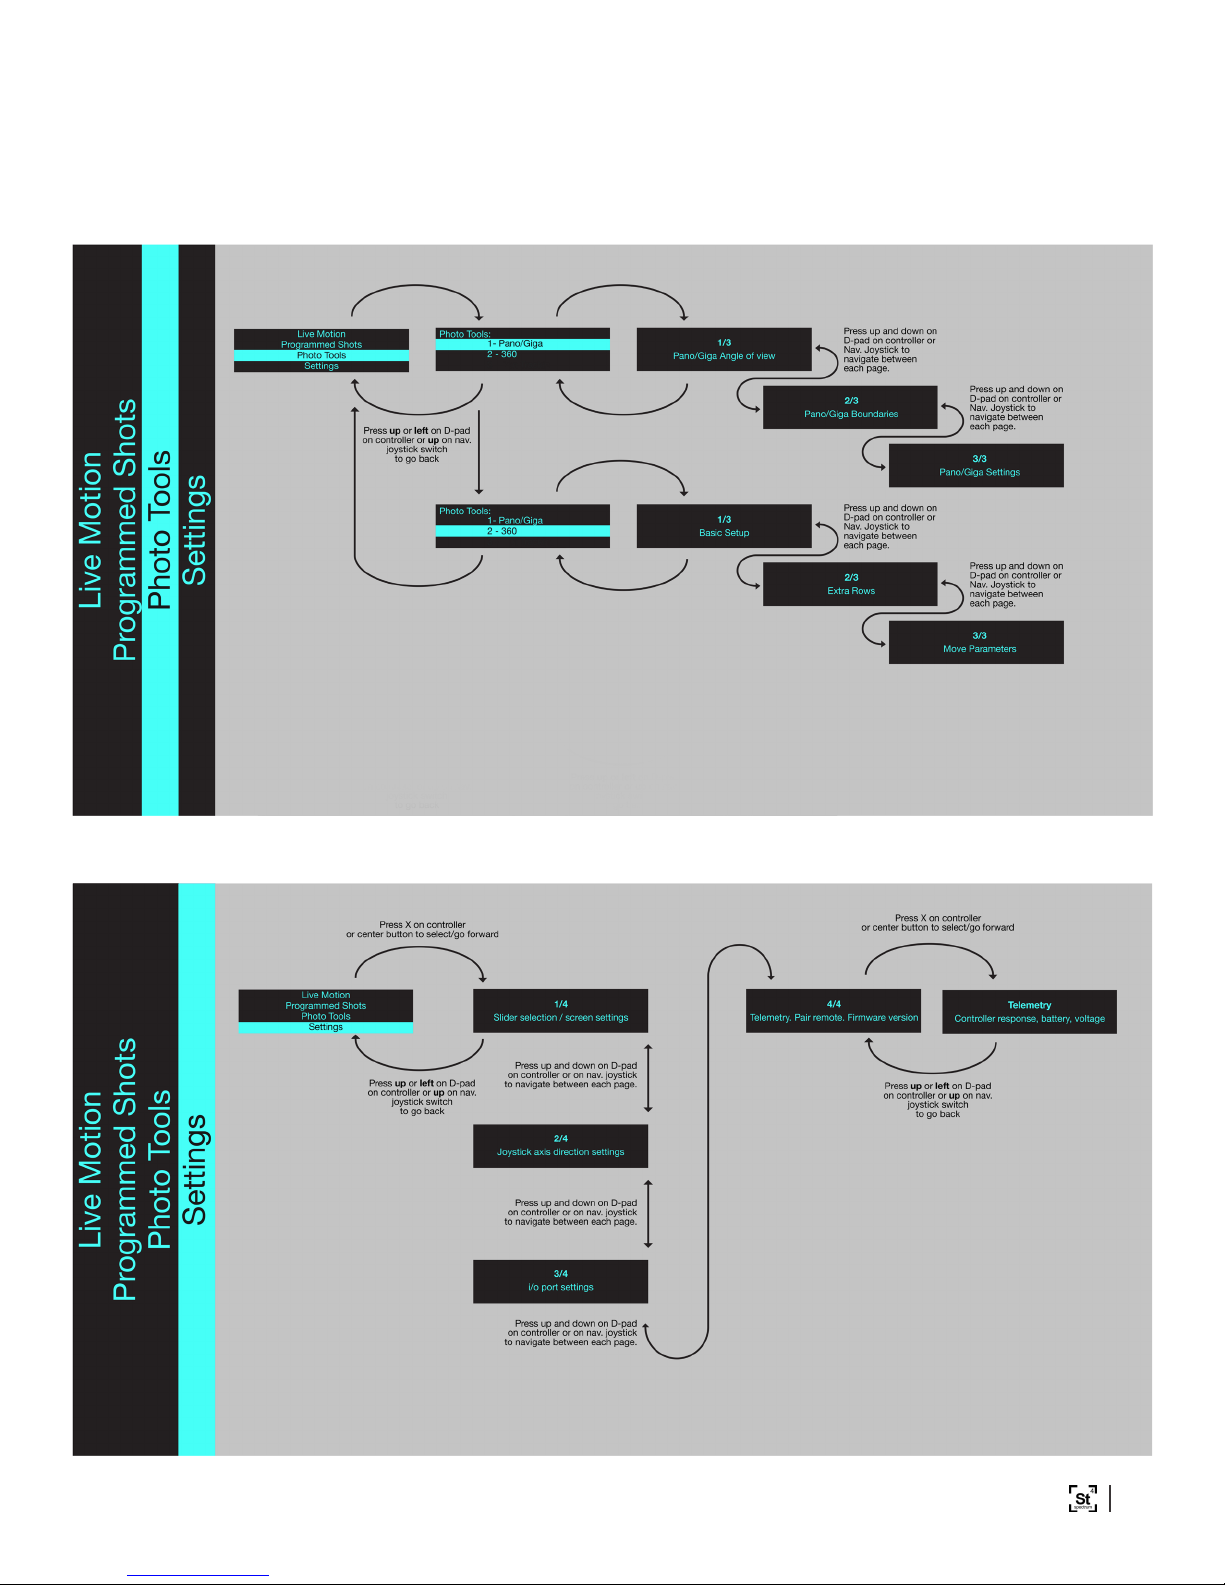
Live Motion / Programmed Shots
Screen Map
15Copyright © 2018 eMotimo INC
Photo Tools / Settings
16 eMotimo spectrum Instructions R007
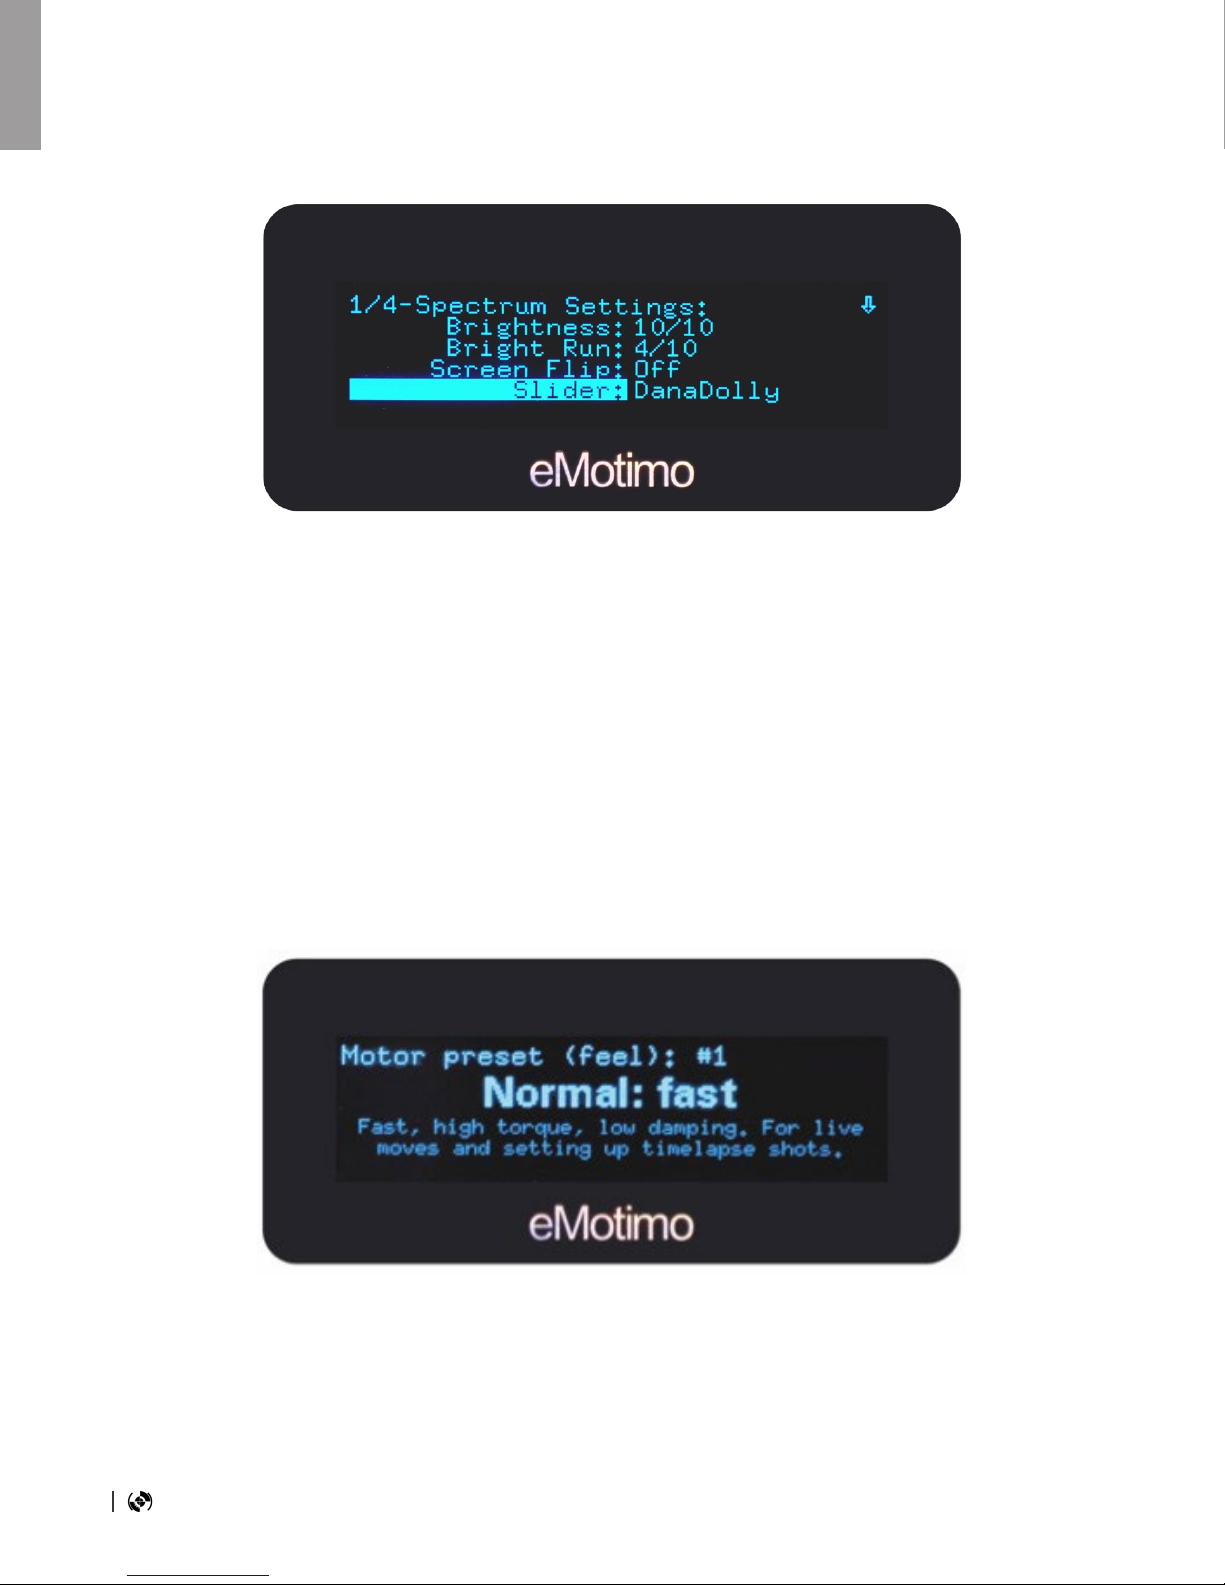
The spectrum st4 is all about the feel.
Before moving motors, visit settings menu and select your slider:
Live Motion - Motor Preset (Feel)
Unlike our previous products and most other motion control on the market, the spectrum has
outstanding live control through the remote. Because of this, we can live drive the head around for
single pass with fewer jitters or unwanted movements that can show up with manual control. As you
start to record moves, it becomes very important to tune your head for live control before you press
the record button.
Power on the unit and select the rst menu setting (Live Motion). Now you are on a motor presets
page that allows you to drive the head around and experiment with some predened motor move
proles. Important Note –motor preset selection will restore after a power cycle.
On this page, use the Up/Down DPad or NavStick to select a motor move prole. The names and
general parameters for relative speeds and accelerations are shown, listed from 1-9. There are some
motor proles that are slow, some that are fast, some that are nearly silent, and some are super
damped. Some are specically meant for angled slider shots where power to lift a load is required.
Play around and nd what works for you with your camera/lens style combination.
*If you’re using Dynamic Perceptions, Rhino, or Kessler slider, please select iFootage slider.

17Copyright © 2018 eMotimo INC
Dana Dolly Motor Presets
Preset: Name: Detail: Best for:
#1 DD Normal:
Quiet/Fast Quiet, medium damping mode. For fast live and programmed moves.
#2
DD Medium:
Quiet/Medium
Near silent, medium damping
mode.
For medium live and programmed
moves.
#3 DD Medium:
Quiet/Slow
Near silent, high damping
mode.
For slow live and programmed
moves.
#4
DD Medium:
Timelapse
Fast setup, ecient power
handling mode. Long runs with SMS timelapse.
#5 DD Turbo Fast, non-quiet mode For VFX. Only use with 24V AC
power.

18 eMotimo spectrum Instructions R007
iFootage Motor Presets
Preset: Name: Detail: Best for:
#1 Normal: Fast Default high torque, high speed
mode. General time lapse and live moves
#2
Normal: fast/
damped
Default high torque, high speed
mode with damping.
Live video with smooth and damped
starts and stops.
#3 Normal: slow/
damped
Default high torque, slow speed
mode with damping.
Fine control over small movements.
Live video for smooth, slow, powerful
shots.
#4 Quiet: fast Quiet motors with high speed
and low torque.
Lightweight cameras shooting video.
Quiet modes are great for recording
audio.
#5 Quiet: normal
Quiet motors with slow speed
and normal torque and
damping.
All cameras shooting video and
recording audio that don’t require
high speed moves.
#6 Quiet: damped
Quiet motors with our slowest
speed and high torque and high
damping.
Heavier cameras shooting video
with smooth, slow motion. Great for
shooting macro and telephoto.
#7 Turbo Fastest, lowest torque mode. High speed shots. High motion/high
frame video.
#8 Angled TL Fast moves with high torque M3
motor port.
Time lapse and video moves on
a slider that require torque. For
example, moving up a slight angle on
the slider M3 axis.
#9 Steep TL Fast moves with the most
torque for the M3 axis
Time lapse moves on a slider
that require the most torque. For
example, moving vertically on the
slider M3 axis.
#10 Live Focus
Normal
Normal slow/damped with
slower focus motor.
Smooth live video moves with ne
focus control where sound control
isn’t necessary.
#11 Live Focus Quiet
Normal slow/damped with
slower focus motor in quiet
modes
Smooth live video moves with ne
focus control with quiet pan/tilt/focus
motor.

19Copyright © 2018 eMotimo INC
Watch video: http://emotimo.com/project/st4202/
Live Motion - Motor Preset (Feel)
GoTo positions are targets or presets for a position of the motors. When shooting live you can use
these GoTo points to accurately hit the target that you preset in the time you set, with the cinematic
feel that you set. These points are very useful for long lenses where hitting your targets is dicult
manually, or for perfectly framing a shot. Using multiple GoTo positions are useful for setting up quick
video moves and traversing between these points live.
There are three GoTo presets you can program. To set, scroll over to the GoTo positions pages. Do
this from the main menu by selecting the top menu (Live Motion) and then pressing the right DPad
button or right on the NavStick until you see the GoTo frames headers. The rst heading you will see
is the GoTo Presets: Circle. By moving right on the DPad or right on the NavStick you will nd the
GoTo Presets: Triangle, L3, and R3.
Programming a GoTo Frame:
1.Target: Set your target parameter by moving all 4-axis to a position you want to lock in as a
preset. Press X to lock in this position.
2.Time: Once Time is highlighted, scroll up and down to program the amount of time/duration
you want your move to take to arrive at your target position.
Hint – The further away your position is from the target, the faster the spectrum will have to
move. This is an easy way to play with a target position. Set a start point and the head in many
directions and distances to see how the move looks and feels. Each time, the spectrum will hit
your target.
3.Ramp: Program the acceleration and deceleration in seconds at the start and end of your
move to the target position. Ramp is included in the overall duration of the shot. In other words,
ramp time is not added to the overall time of the shot.
4.Clear: Press X twice to clear your target position.
Once a preset is programed, you can move the head around freely. When you hit the preset button,
the head will drive all 4-axis to the preset (GoTo target position) with the qualities you programed in to
that preset. Any screen change will stop the move.
20 eMotimo spectrum Instructions R007
Record / Playback / Live 2 Time lapse screens
Live Motion - Experimental
Record, Playback, and Live 2 Time lapse screens allow you to record a move live and have the
spectrum play / repeat that move back to you over again. You can also program it to play it back to
you at dierent frame rates (speeds). You can also program it to play your move back in the form of
a time lapse (Live 2 Time lapse). This function enables you to program incredibly organic time lapse
moves.
To start, select the top menu (Live Motion) and then pressing the right DPad button or right on the
NavStick until you see the Experimental – Record screen.
1. Get the head “feeling” the way you want for a shot. See Live Motion – Motor Presets (feel)
section
2. Highlight and choose the Frame-rate for the spectrum’s record rate. Currently 24, 30, 60fps
are selectable. This setting dened how many times a second the spectrum st4 records its
live position. To start, we recommend that you select the frame rate to match what your nal
video’s frame rate will be. Hint: The Record Time will be calculated and shown below based
on the Frame rate and Max Frames.
3. Highlight and choose the Max Frames for the total frames that spectrum will record. -The
range is from 100 to 2880 frames in increments of 1. Hint: The Record Time will be calculated
and shown below based on the Frame rate and Max Frames.
4. When ready, move the cursor to the rst row, RECORD.
5. Press X immediately start recording. RECORD will highlight.
6. Move the head any way you want with live controls on all axis.
7. When the Record function is nished, your move is saved in memory.
8. You may choose to
a. Record – hit RECORD and the move will be overwritten
b. Change a Setting and rerecord
c. Move on to
9. Once you are satised, press right on DPad or NavStick to move to the Experimental –
Playback screen
Other manuals for spectrum ST4
2
Table of contents
Other eMotimo Camera Accessories manuals


