manuals.online logo
Brands
  1. Home
  2. •
  3. Brands
  4. •
  5. Emprex
  6. •
  7. Video Card
  8. •
  9. Emprex EMSLV3 User manual

Emprex EMSLV3 User manual

Other Emprex Video Card manuals

Emprex EMSA5500 User manual

Emprex

Emprex EMSA5500 User manual

Emprex NVIDIA GeForce 6600 series User manual

Emprex

Emprex NVIDIA GeForce 6600 series User manual

Popular Video Card manuals by other brands

Diamond Multimedia ATI Radeon SKU 4870PE51GDT Specification sheet

Diamond Multimedia

Diamond Multimedia ATI Radeon SKU 4870PE51GDT Specification sheet

NEC N8116-29 user guide

NEC

NEC N8116-29 user guide

ATI Technologies RADEON 137-40225-20 user guide

ATI Technologies

ATI Technologies RADEON 137-40225-20 user guide

MSI N220GT series user manual

MSI

MSI N220GT series user manual

ATI Technologies RADEON 7000 MAC EDITION user guide

ATI Technologies

ATI Technologies RADEON 7000 MAC EDITION user guide

SIIG aurora Quick installation guide

SIIG

SIIG aurora Quick installation guide

ClearSpeed ClearSpeed Advance e720 user guide

ClearSpeed

ClearSpeed ClearSpeed Advance e720 user guide

MSI R7850 series user guide

MSI

MSI R7850 series user guide

DVS Atomix HDMI installation guide

DVS

DVS Atomix HDMI installation guide

NEC N8116-48 user guide

NEC

NEC N8116-48 user guide

Nvidia Quadro Workstation user guide

Nvidia

Nvidia Quadro Workstation user guide

Aztech VGS3D-AGP user manual

Aztech

Aztech VGS3D-AGP user manual

Advoli TB4 Standard installation guide

Advoli

Advoli TB4 Standard installation guide

ELSA ERAZOR III LT user manual

ELSA

ELSA ERAZOR III LT user manual

Gigabyte GV-R7500L User'smanual

Gigabyte

Gigabyte GV-R7500L User'smanual

MSI R7770 PoweR Edition user guide

MSI

MSI R7770 PoweR Edition user guide

EMS XtremeRGB-Ex1 user manual

EMS

EMS XtremeRGB-Ex1 user manual

Gigabyte GV-N68T256D user manual

Gigabyte

Gigabyte GV-N68T256D user manual

manuals.online logo
manuals.online logoBrands
  • About & Mission
  • Contact us
  • Privacy Policy
  • Terms and Conditions

Copyright 2025 Manuals.Online. All Rights Reserved.

Allinformationis subject tochange without notice.
Allbrandnames andtrademarksarethepropertiesoftheirrespectiveowners.
VolariSeries V.1_EK400020110
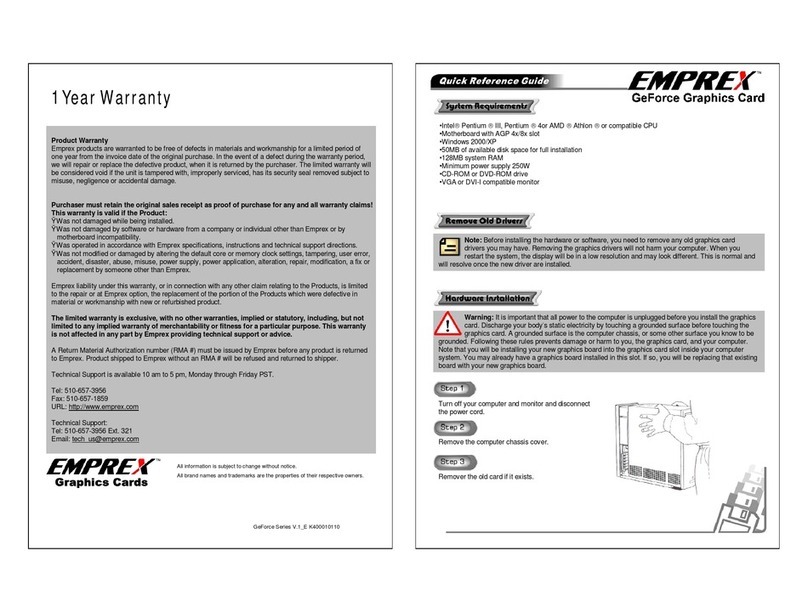
1YearWarranty
ProductWarranty
Emprexproductsarewarranted tobe freeof defectsinmaterialsand workmanshipforalimitedperiod of
oneyearfromtheinvoicedateofthe originalpurchase.Inthe eventof adefectduring thewarrantyperiod,
wewill repair orreplacethedefectiveproduct, whenit isreturnedbythepurchaser. Thelimited warrantywill
beconsideredvoidifthe unitistampered with,improperlyserviced, hasitssecuritysealremoved subjectto
misuse,negligenceoraccidentaldamage.
Purchasermustretaintheoriginal salesreceiptasproofofpurchase foranyandallwarrantyclaims!
ThiswarrantyisvalidiftheProduct:
ŸWasnotdamagedwhilebeinginstalled.
ŸWasnotdamaged bysoftwareorhardwarefromacompanyorindividualotherthanEmprexorby
motherboardincompatibility.
ŸWasoperated inaccordancewithEmprexspecifications, instructionsand technicalsupport directions.
ŸWasnot modifiedordamaged byalteringthedefaultcoreormemoryclocksettings,tampering,usererror,
accident,disaster, abuse,misuse, powersupply, powerapplication,alteration, repair,modification, afixor
replacementbysomeoneotherthanEmprex.
Emprexliabilityunderthiswarranty, orinconnection withanyotherclaim relating tothe Products,islimited
totherepair orat Emprexoption, thereplacementoftheportionoftheProductswhichweredefectivein
materialorworkmanshipwithneworrefurbished product.
Thelimitedwarrantyisexclusive, withno other warranties,impliedor statutory, including, butnot
limitedtoanyimpliedwarrantyofmerchantabilityorfitnessforaparticularpurpose.Thiswarranty
isnotaffectedinanypartbyEmprexproviding technicalsupportoradvice.
A ReturnMaterialAuthorization number(RMA#)mustbe issuedbyEmprexbeforeanyproduct isreturned
toEmprex. Productshipped toEmprexwithoutan RMA#willberefused andreturnedtoshipper.
TechnicalSupportisavailable10 amto5pm,Mondaythrough FridayPST.
Tel: 510-657-3956
Fax:510-657-1859
URL: http://www.emprex.com
TechnicalSupport:
Tel: 510-657-3956 Ext. 321
Email: tech_us@emprex.com
Turnoff yourcomputerandmonitoranddisconnect
the powercord.
Removethe computerchassiscover.
Removerthe oldcardifitexists.
Note: Beforeinstallingthehardwareorsoftware, you needtoremoveanyoldgraphicscard
driversyoumayhave. Removingthegraphicsdriverswillnotharmyourcomputer. When you
restartthe system, the displaywillbeinalowresolution and maylookdifferent.Thisisnormaland
willresolveoncethenewdriverareinstalled.
Warning: It isimportant thatallpowertothe computerisunpluggedbeforeyouinstall thegraphics
card.Discharge yourbody sstaticelectricitybytouching agrounded surfacebeforetouchingthe
graphicscard.A grounded surfaceisthe computerchassis, orsomeothersurfaceyouknowtobe
grounded. Following theserulespreventsdamageorharm toyou,the graphicscard,and yourcomputer.
Notethatyouwill be installing yournewgraphicsboardintothe graphicscardslotinsideyourcomputer
system.You mayalreadyhaveagraphicsboardinstalled inthisslot.If so,you willbe replacing that existing
boardwithyournewgraphicsboard.
•IntelPentium III,Pentium 4orAMD Athlon orcompatibleCPU
•MotherboardwithAGP 4x/8xslot
•Windows2000/XP
•50MBof availablediskspaceforfull installation
•128MBsystemRAM
•Minimumpowersupply250W
•CD-ROMorDVD-ROMdrive
•VGA orDVI-Icompatiblemonitor
GraphicsCard
Slot
Reconnect anycablesthat wereremovedearlier.
Connect yourmonitor'scabletothegraphicsboard
connector, asshowninthe figureright.
Replacethe screwtofasten thecardthecardinto
the chassis, and replacethe computerchassis
cover.
Grasptheedgeorbracketofthe card,alignyourcardwith
anemptygraphiccardexpansionslotandslide itintoplace.
Notethe notched edge onthe board.Thiscorrespondstoa
connectorlock onthe graphiccardslot. Disengage thelock
and installthe graphicsboardintothe graphiccardslot. Be
carefulnot todamage thepinsintheconnector. Usefirm
pressuretoseatthe card.
•Insert VGADriverPackageCD intoCD-ROMdriver.
•Click [InstallGraphics CardDriver].
•Click [DisplayDriver]tostartthe installationprocess.
•Click [Next]tocontinue.
•Select[Setup Type]andthen click[Next].
•Typeaprogramfoldernameinthe dialogboxprovided or
leaveitdefault,andthenclick [Next]tocopyfile.
•If usersselect [Yes],the read mefilewill display.And
then Click[Next]
•Select[Yes,Iwanttorestartcomputernow]or[No,I
willrestartmycomputerlater],then click [Finish]to
completethe installation.
Note: All the hardwaremust be installed priortoinstallation of software. Seetheprevious
section if youhavenotinstalled the hardware.
InstallingDisplayDriver
•Click [DIRECTX].
•Select [Iaccepttheagreement] then Click [Next] .
•Click [Next].
•Click [Finish] torestartthecomputer.
•Click [PhotoAlbumSE].
•Click [Next].
•Choosealicenseagreement languagethenclick [Next].
•Click [Yes] toexpress theacceptanceofthe licenseagreement. .
•Click [Next].
•Select [Yes, Iwanttorestartcomputernow],and click [Finish] torestart the computer.
InstallingDIRECTX
InstallingPhotoAlbumSE
WindowsTaskbarAccess
RightclickUtilityTraytoselectthe menu.
WindowsDisplayPropertiesSettingAccess
RightclickfromyourWindowsdesktop toopenthedesktop menu.
Click Properties ’Settingstab’Advanced ’UtilityManagertab toopen UtilityManagerSetting
Menu.
Note: TVOutput setting onlyworkswhenTV isconnected.