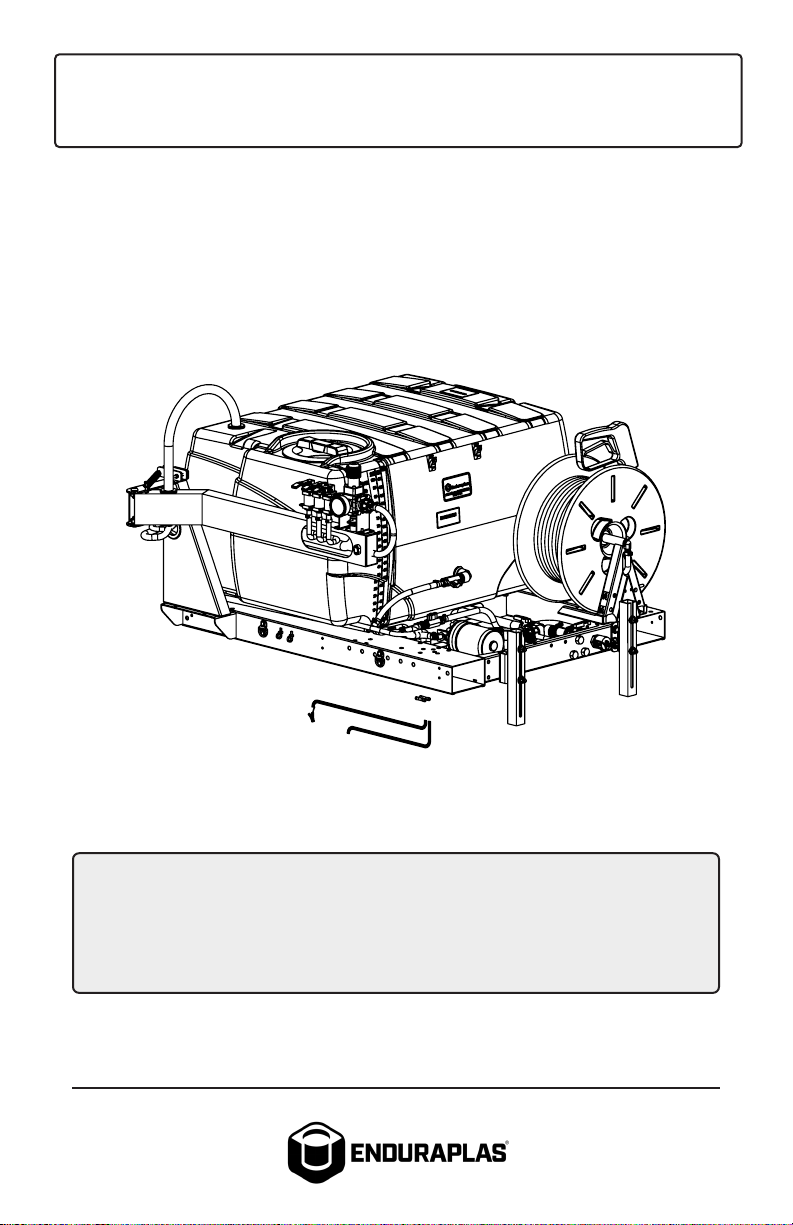
Enduraplas FIELD BOSS ECOLITE SFB060FG712V User manual

OWNER’S MANUAL
FIELD BOSS ECOLITE
™
Version 1.7 Copyright © Enduraplas. All Rights Reserved.
Product Codes:
SFB060FG712V, SFB100FG712V
SFB060FG712V-ESA, SFB100FG712V-ESA
SFB100FG712V

2Field Boss™ EcoLite
English
CONTENTS
INTRODUCTION 3
WARNINGS 4 & 5
GETTING STARTED 6 - 12
OPTIONAL ELECTRIC SOLENOID KIT 13 - 15
CALIBRATING 16 & 17
MAINTAINING 18 & 19
CLEANING 20 & 21
WINTERIZING 22 & 23
TROUBLESHOOTING 24 & 25
WARRANTY 26 - 30
PARTS BREAKDOWNS 31 - 45
!

3Version 1.7
English
INTRODUCTION
Congratulations! You now own an Enduraplas sprayer. Dura-
ble design and construction assure you a lifetime of extreme
performance. No sprayer is tougher. No sprayer will last lon-
ger.
Take a look through this owner’s manual to learn how the
pros use their Enduraplas sprayer.
Discover More Helpful Tips:
blog.enduraplas.com/spraying
Watch Instruction Videos:
www.youtube.com/enduraplas

4Field Boss™ EcoLite
English
WARNINGS
1. When connecting this sprayer to your UTV (or vehicle),
ensure that you have read the UTV’s Owner’s Manual
and that you comply with all the weight restrictions as
specified by the UTV’s manufacturer, as overloading can
cause injury or death. Remember that 1 gallon of water
weighs 8.33 pounds.
2. To ensure your own safety and that of others, you must
comply with all relevant environmental, work place health,
safety legislation and codes of practice.
3. Select and wear appropriate Personal Protection
Equipment in accordance with the label of the product
you intend to use.
4. Care should be taken when spraying in windy conditions
as spray drift may contaminate the air and may aect the
operator or damage adjacent non-target vegetation. It is
recommended that a speed of 6mph is not exceeded.
5. Once the spraying operation has been completed,
decontaminate the spray tank and spray accessories.
Dispose of tank rinsing’s in compliance with current
environmental, work place health and safety regulations.
6. Personal Protection Equipment must still be worn while
decontaminating your sprayer as per warning 3 above.
7. Improper or careless use of this sprayer can cause serious
injury. Minors should never be allowed to use this sprayer.
This sprayer should not be used when bystanders or
animals are in the area. This sprayer should never be used
while children are in the area.
8. Never leave the sprayer unattended without turning o
the pump, relieving the line pressure, and flushing the
sprayer of any harmful chemicals.
9. You must be in good mental health to operate this sprayer
and not be under the influence of alcohol or any drugs
!

5Version 1.7
English
that could impair your vision, physical strength, dexterity,
judgment, or other mental capacity.
10. No modifications and/or alterations may be made to this
sprayer. Any such modifications not only void the sprayer
warranty but can make the unit dangerous to anyone
operating the pump.
11. Always inspect hoses and piping to avoid burst injuries.
Discover More Helpful Tips:
blog.enduraplas.com/spraying
Watch Instruction Videos:
www.youtube.com/enduraplas

6Field Boss™ EcoLite
English
1) Loosely mount spring tension bracket
with provided two 1/4” x 2-1/2” bolts and
two 1/4” nylock nuts. Do not tighten bolts
at this point (hand tight).
2) Hook the spring onto the hole in the
mounting plate and connect it to the bolt
on the control arm.
3) Tighten the bolts on the mounting
plate using 1/2” wrench. This will tension
up the spring.
Connecting the Retention Spring
SFB100FG712V
GETTING STARTED

7Version 1.7
English
Installing the Optional Mounting System
1) If you wish to use the d-ring tiedown
system, select your desired mounting
points on each side of the frame
2) Install 2 d-ring tiedowns on each
side of the frame using the provided
d-rings and hardware. Tighten 1/4” bolts
(provided in bag) with 1/2” wrench.
SFB100FG712V
GETTING STARTED
Discover More Helpful Tips:
blog.enduraplas.com/spraying
Watch Instruction Videos:
www.youtube.com/enduraplas

8Field Boss™ EcoLite
English
1) If you purchased a hand wash tank,
wrap threads with sealant tape and
thread the spigot into the opening on the
fresh water tank.
Setting Up Sprayer
2) Clip the hand gun into the holders on
the side of the tank.
GETTING STARTED
3) Connect the electrical cables to your
battery.
4) When using the hose reel, make sure
the valve to the hose reel is open.

9Version 1.7
English
5) Before starting your pump, make
sure the pressure regulator is fully open
(counterclockwise) to avoid premature
wear or damage to the pump. This will
allow liquid to flow from pump and
return back to tank. Pump should prime
automatically.
6) Fill your tank 1/4 full with water.
7) Turn on electric pump switch on con-
trol arm (pump should prime automatical-
ly).
8) Once pump is running and liquid is
recirculating back into the tank, tighten
knob (clockwise) to desired pressure.
This will lessen the liquid flow from the
tank and redirect to the spray boom.
Setting Up Sprayer
GETTING STARTED

10 Field Boss™ EcoLite
English
1) To install boom brackets to the spray-
er, insert the 3/8” x 1” bolts through the
bracket and place plastic washers over
bolts to hold them in place.
2) Connect the brackets by sliding the
3/8” x 1” bolts through the C-bracket on
unit and install 3/8” washer and 3/8” lock
nuts loosely.
Mounting Your Boom
3) To install your boom to the brackets,
loosen the carriage bolts on the boom
(leaving nuts and washers on bolts).
Align carriage bolts with quick attach
brackets and slide them into the brack-
et slots, then lower the boom down to
desired height.
4) When the boom is set to desired
height, tighten the hardware, making
sure the square neck on the carriage
bolt is fully inserted through the slot.
GETTING STARTED

11Version 1.7
English
5) Once the boom is secure, tighten the
hardware on the boom brackets to make
sure they are also secure.
6) Take the feed hoses from boom and
connect to male brass hose fittings on
spray unit. Hook hoses up to the appro-
priate section control; 12’, 20’ and 30’
booms have 3 hose hookups and boom-
less nozzle has 2 hose hookups.
Mounting Your Boom
7) If you got the 30’ boom extensions,
once the 20’ boom is mounted, bolt on
the extensions to the boom ends.
8) Then, hook up the hoses using the
brass threaded connectors.
GETTING STARTED

12 Field Boss™ EcoLite
English
9) If you got the 30’ boomless nozzle kit,
bolt the boomless nozzle bracket to the
back of sprayer frame using provided
bolts.
10) Hook up hoses from boomless noz-
zle to brass ports on back of sprayer.
Mounting Your Boom
Please refer to the spray boom owner’s manual for boom
assembly and parts breakdown.
Discover More Helpful Tips:
blog.enduraplas.com/spraying
Watch Instruction Videos:
www.youtube.com/enduraplas
GETTING STARTED

13Version 1.7
English
Optional Electric Solenoid Kit
1) If you ordered your sprayer with the
optional electric solenoid controls, mount
contoller in cab; make sure this is mount-
ed where it will not obstruct operators
view.
2) Connect the wire harness from the
controller to the 3 electric valve banks
on sprayer by plugging in the matching
ends to the valves.
3) Connect white pressure line from con-
troller to valve bank with provided con-
nectors. Make sure white pressure hose
is bottomed out all the way into connec-
tor fittings before tightening connector.
4) This unit comes with power wires that
you will either need to add gator clips
to or wire directly to a power source. If
gator clips are used, connect to battery;
red to positive and black to negative.
GETTING STARTED

14 Field Boss™ EcoLite
English
5) Turn on vehicle key to power up
controller and turn on master switch on
controller.
Optional Electric Solenoid Kit
7) Fill tank 1/4 full with water.
8) With sprayer pump running, increase
your pressure to desired amount by
holding up on pressure control toggle
switch; hold up for a couple seconds,
then release.
6) To make sure your solenoids have
power, switch the 3 valve controls on
and o listening for the valves to click
open and shut on the sprayer.
GETTING STARTED

15Version 1.7
English
Optional Electric Solenoid Kit
9) Once you have reached desired pres-
sure, test the spray boom by turning on
the Left, Center, and Right control switch-
es.
GETTING STARTED

16 Field Boss™ EcoLite
English
CALIBRATING
1) Measure Nozzle Spacing
Measure the distance between each
nozzle to determine the length of your
travel distance.
Nozzle spacing = Distance to travel
(16” = 255’) (18” = 227’) (20” = 204’)
(22” = 185’) (24” = 170’)
2) Measure Appropriate Travel Distance
Mark the distance with flags or between
fence posts. A tape measure capable of
measuring farther than 200 ft. will make
this step easier.
3) Drive Measured Distance - Timed
Driving the sprayer at the intended
spraying speed, time how long it takes
to travel between the marked distance.
Repeat this procedure and average the
two measurements.
4) Set Correct Spraying Pressure
With the sprayer parked and the pump
running, set the ideal or intended
pressure.
*Distances shown with 110° nozzles

17Version 1.7
English
5) Catch Output From Each Nozzle
Catch the output in a container (marked
in ounces) for the same number of
seconds it took to drive in step 3.
Calculate the ‘average nozzle output’ by
adding the individual outputs and then
dividing by the number of nozzles tested.
7) Analyze Results
The ounces captured per nozzle equals
the gallons-per-acre application rate.
(eg: 16 ounces = 16 gallons-per-acre)
6) Clean Nozzles - If Needed
If any one nozzle’s output deviates from
the manufacturers’ guidelines by more
than 10%, the nozzle should be replaced
or cleaned. A toothbrush works perfect.
8) Compare Recommended Rate
If the gallons-per-acre rate is not within
5% of the intended rate, you will have to
adjust the pressure you spray at or the
speed you travel. You will have to repeat
steps 3 - 7.
For Your Safety, Watch Video:
blog.enduraplas.com/spraying

18 Field Boss™ EcoLite
English
MAINTAINING
Keeping your sprayer in good condition will help you length-
en the life of the sprayer. Everyone knows a well maintained
piece of equipment ensures a longer life span. Sprayer main-
tenance can seem a huge task if you don’t have the right
tools.
Cleaning Your Tank, Hoses & Fittings
Turn the page to see how the pros clean the tank
on their sprayer equipment.
Discover More Helpful Tips:
blog.enduraplas.com/spraying
Watch Instruction Videos:
www.youtube.com/enduraplas

19Version 1.7
English
The information applies in normal operating conditions. The specific intervals must be shortened
accordingly for longer daily working hours. If the machine is only used occasionally, the intervals
can be extended accordingly.
Before starting work
At the end of work
and/or daily
Weekly or every 40
operating hours
After the first 5
operating hours
Every 250 operating
hours o once a year
If damaged
If required
Complete machine
Visual inspection (condition, leaks) X
Clean X
Tank, hoses and fittings
Clean X
Drain X
Filter basket (inside lid) Clean X X
In-line filter Clean X X
Spray lance nozzle
Clean X
Replace X
All accessible screws and nuts Re-tighten X
Safety labels Replace X
Pump Maintain Read and follow all maintenance and care instructions in the
pump manual.

20 Field Boss™ EcoLite
English
CLEANING
1) Drain Tank and Rinse
Rinse all liquid out of the tank. When
flushing the sprayer, pay attention to
where the chemical will run. Always
clean in an area that will not contaminate
water supplies, streams or crops.
2) Pressure Wash Inside Tank
After draining the tank, rinse the inside
by spraying clean water with a pressure
washer.
3) Add Clean Water
It’s now time to shut the pump o and fill
the tank with clean water.
4) Flush Clean Water Through System
Turn the pump on and spray the clean
water through the boom and hand wand.
This manual suits for next models
3
Table of contents
Other Enduraplas Paint Sprayer manuals

Enduraplas
Enduraplas SPOT CHIEF SSC025212V User manual

Enduraplas
Enduraplas Gold Series User manual

Enduraplas
Enduraplas STEEL BOOM User manual

Enduraplas
Enduraplas FIELD BOSS 365 SFB060FG225GH User manual

Enduraplas
Enduraplas CLEAN BOSS PRO User manual

Enduraplas
Enduraplas XSTREAM User manual

Enduraplas
Enduraplas IceMaster Systems Liquid Master W Series User manual

Enduraplas
Enduraplas ICEMASTER LIQUID MASTER T Series User manual