ENER-J SHA5287 User manual
1
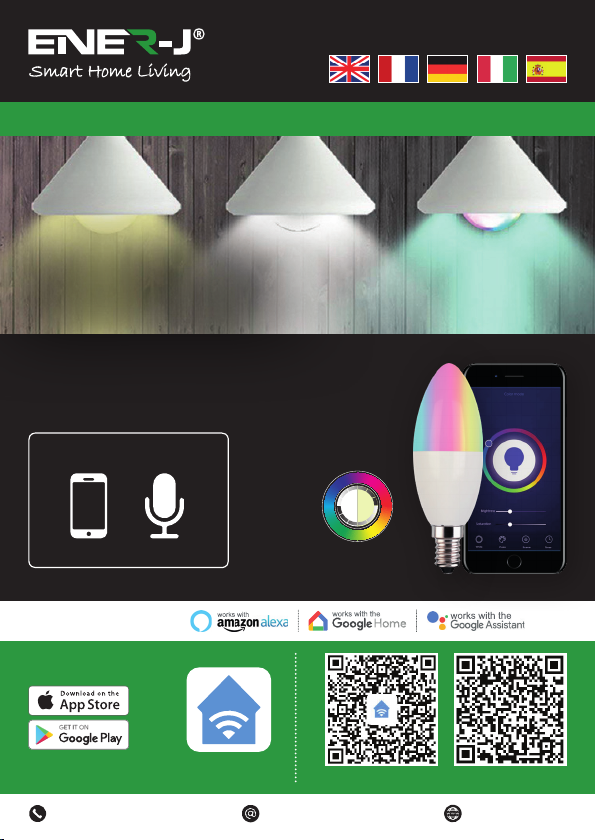
Take Control of Your
Lighting from Anywhere
Make your home smart & connected in simple steps with ENER-J
Compatible with:
ENERJSMART ANDROID iOS
Download our
app from
To download,
scan the QR code
Languages
Installation Guide
Control your power by:
VoiceMobile RGB+W+WW
Dimmable
2
WARNING: RISK OF ELECTRIC SHOCK
Always disconnect the mains power supply before Inspection/installation or
replacement. It is advised that a qualified person/engineer or electrician to do the
physical Installation.
Proceed in accordance with local safety regulations.
Instructions for proper grounding
Grounding must be performed in accordance with local regulations. Improper
grounding poses serious hazards to personnel and equipment.
Electrical Requirements
The Lamp has to be connected to main power supply. Special care shall be taken
during installation of this Ediscon Screw (E14) Bulb.
Physical Installation
Important Notice for Warranty:
The ENERJSMART lamp has 2 years warranty. Please Note that the device needs
cooling time and recommended usage is 10-12 hours/day. If used more than 12 hours
a day then warranty will be void.
SKU SHA5287
Model 5-C37
Power 5W (40W Equivalent)
Input Voltage AC 200-240V 50/60Hz
Lumen 380lm
Base / Cap E14
Wireless Type Wi-Fi 2.4GHz (5G not supported)
Colour Temp 6000k to 2700k - RGB Colour Changing
Dimmable Yes
Material Aluminium & Plastic
Beam Angle 180° degrees
Ra >80Ra (vivid and natural light)
Service Life ≥30000 hours
Works with Amazon Alexa, Google Home and Google Assistant
Dimensions 45mm x 97mm
Specifications
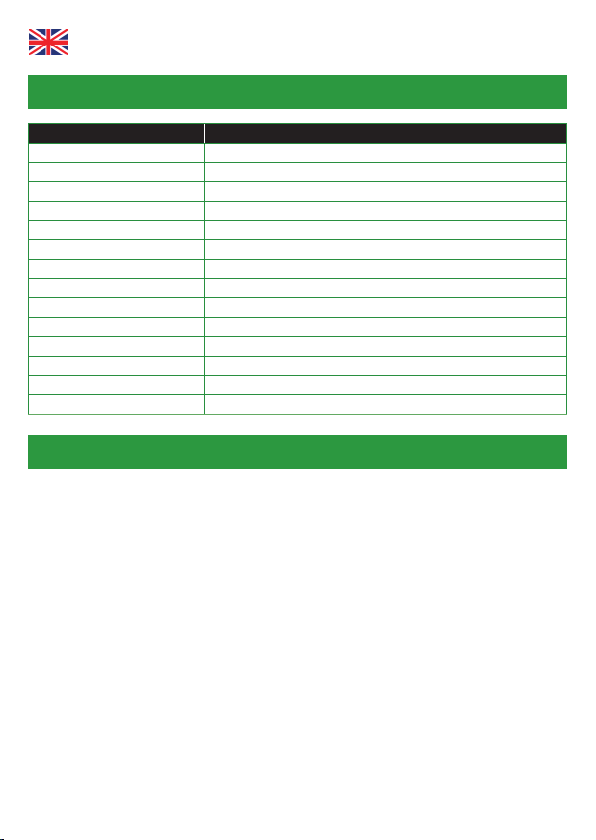
English
3
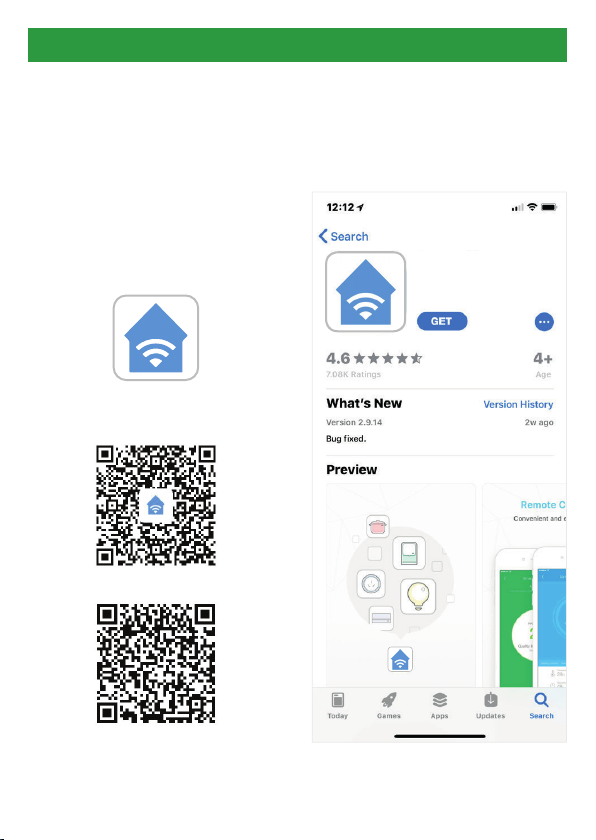
App Installation
1. DOWNLOAD AND INSTALL OUR
APP
Install ‘ENERJSMART’ in your
Smartphone or Tablet devices
through Google Play or iOS Play
Store. Alternatively, please scan
below QR code’s.
ENERJSMART
ANDROID
iOS
2. Navigate to the app store on your
mobile device.
3. Download an app called Enerjsmart.
Enerjsmart
4
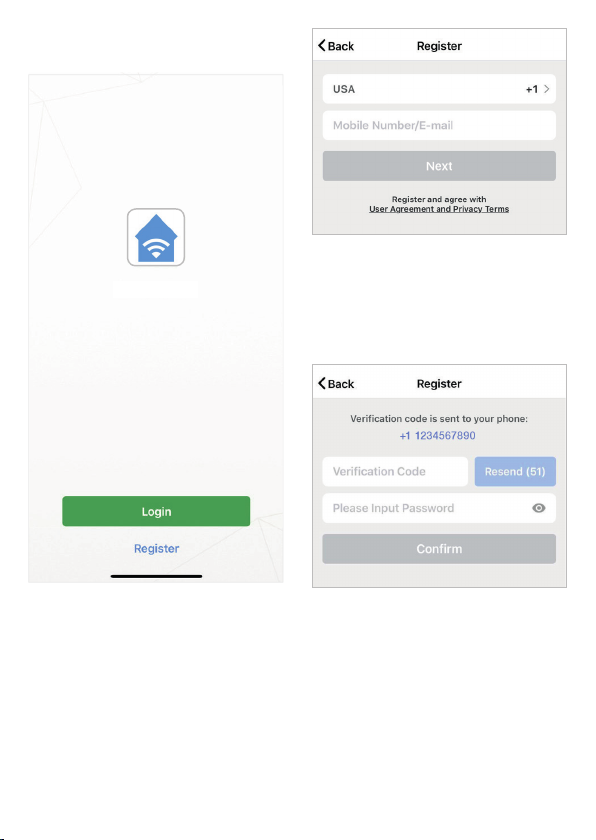
7. If you’re setting up using a phone
number, please enter the verification
code that was sent to your phone
and your desired password, then
select Confirm.
8. If you’re setting up using an email
address please enter your desired
password, and select Confirm.
Enerjsmart
5. The app should automatically detect
your country code. If not, please
select the country code for your
country of residence.
6. Enter either your email address or
phone number. (If you enter your
phone number you will be sent a
verification text message which you
will need in the Next Step).
4. Once app is downloaded, open the
app and select Register.

5
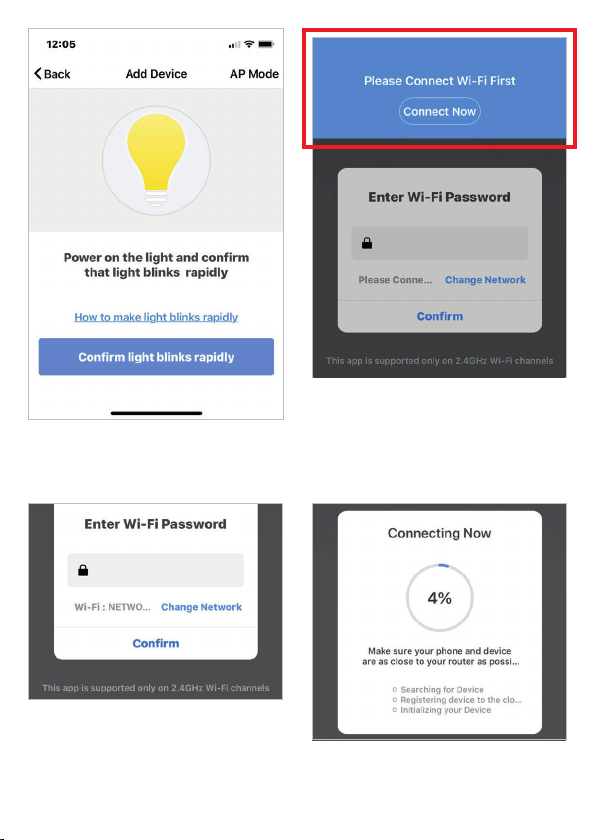
11. Select Lighting devices.
12. Connect your Smart light to a power
source. To enter pairing mode, turn
the Smart light on and then off for
3-5 seconds at a time. Do this 3
times. The Smart light will begin
blinking rapidly once in pairing
mode.
Enerjsmart
9. You have now successfully created
an account and you’re now ready
to start setting up your Smart lamps
and fixtures.
10. Select the Plus (+) in the top right
corner to add a device.

6
14. If a blue box appears at the top of
the screen it means you’re currently
not connected to a Wi-Fi network.
15. Once you select Confirm after
entering your password, the app
will start to pair the Smart light to
your app.
13. Connect to your desired Wi-Fi
network, enter your password, then
select Confirm.

7
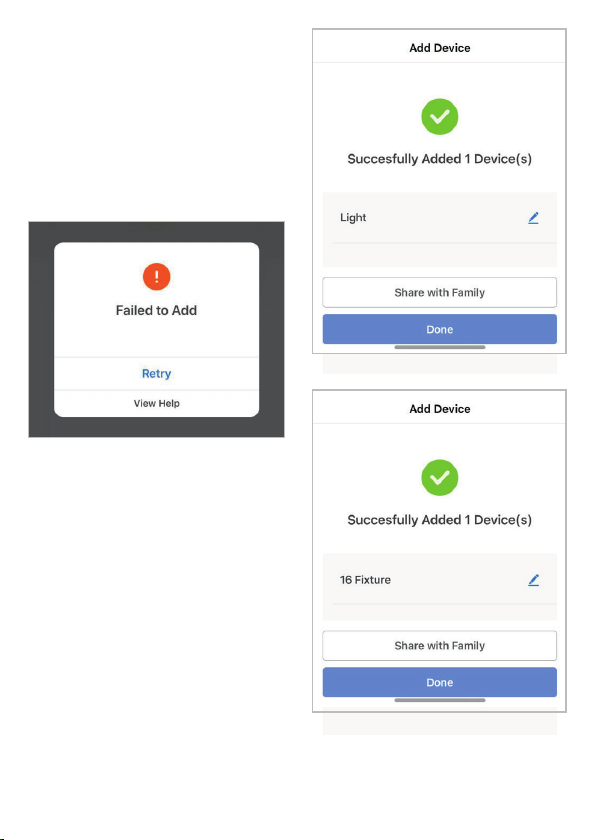
17. Once your Smart light successfully
connects to the app, the beside
screen will pop up and you can
change the name of your Smart
light/device.
For Example: 16 Fixture. It’s best
to make this simple so that if you
would like to connect this to your
Alexa App or Google Home, it will
be easier for the smart assistant to
understand which light you would
like to control.
After naming your Smart light, select
Done.
16. If you get a message that says
“Failed to Add” it means that the
connection has failed. You may
have to enter the Smart light into
pairing mode again, and repeat
steps 11 through 14. Please ensure
WiFi Frequency is set to 2.4G (5G
not compatible).
18. You’re now able to control your
Smart light in the Enerjsmart app.
8
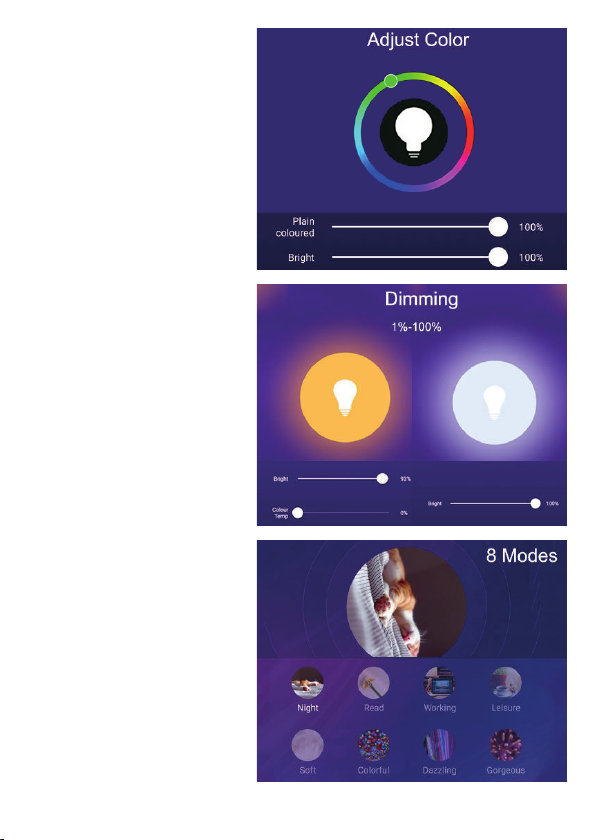
19. Select Profile. In your profile
you can use:
Adjust Colour
• RGB+6500K to 3000K:
You can adjust RGB
colour (1600 Million
colour) +6500K (Cold
white) or 3000K (Warm/
yellow light).
• RGB+3000K-6500K: You
can adjust RGB colour
(1600 Million colour)
+3000K (Warm/yellow
light) to 6500K (Cold
white).
• CCT: 3000K-6500K (Cold
white to warm white).
• C/W: 6000K or 3000K
(Cold white or warm
white).
*RGB not available in all
LED Lamps. Kindly check
the Product Specifications
for details.
Dimming
• The lamp is dimmable,
you can dim 1%-100%.
8 Modes
• Night, Read, Meeting,
Leisure, Soft Light,
Colourful...
9
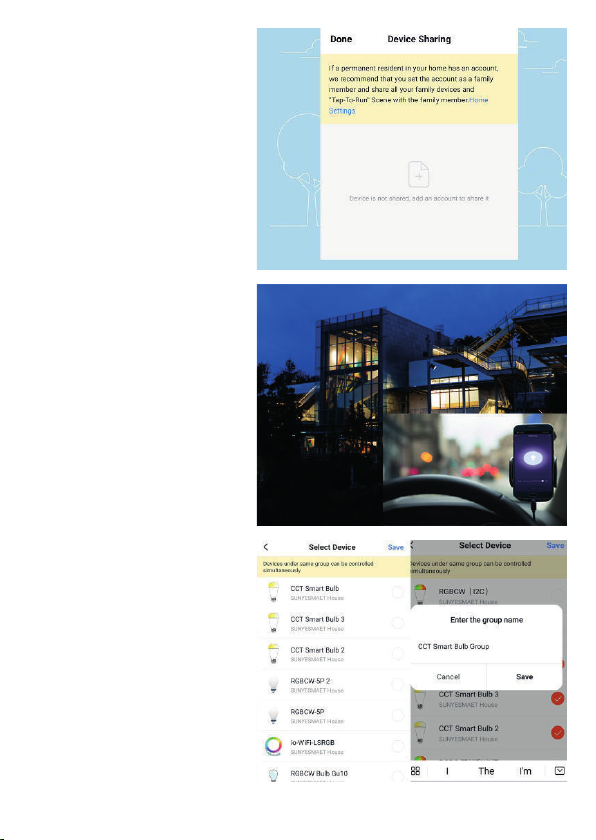
20. Share with your family
and friends
If you would like few people
to control the same lights,
then share with them.
21. Remote Control
12 million kilometers
remote control. When
we are still stuck with the
switch to control the lights,
smart lamps have made
it easy for you to master
the lighting at home on the
other side of the globe.
22. Create A Group to
Control
Control each Wi-Fi lamp
individually, or together as
a group.

10
23. Automation
Execute automatically
according to conditions
such as the weather, device
status, and time (When
the weather changes
(Temperature, Humidity,
Weather, PM2.5, Air quality,
Sunset/sunrise, Wind
speed), schedule, when the
device status change).
Now you can use Google’s voice-
activated speaker to control your Smart
Home Sockets and adaptors. With the
Google Assistant, you can turn on lights
without pressing a button.
1. Setup
Start by getting the Google Home app
and setting up your Google Home if you
have not done this already.
2. Add ENERJSMART Action
In the Google Home app, tap the menu
icon and select Home Control. Then
tap the + button to see a list of Action
tapping ENERJSMART to select the
Action.
3. Link you ENERJSMART Account
Now follow the in-app instructions to link
you ENERJSMART App account. Once
complete you’ll be able to say “Okey
Google, turn my lamp on” or “Okay
Google, set hallway to ON/OFF”.
Third Party Control Overview:
If you’re new to Echo, it’s a super smart
speaker from Amazon that responds to
your voice.
Once you’ve bought Amazon Echo and
downloaded the ENERJSMART App,
you’ll need to enable...
1. Enable the ENERJSMART App
In your Alexa app, tap Skills in the menu
and search for ENERJSMART. Tap
Enable.
2. Link Account
Enter your ENERJSMART App
username and password and follow the
onscreen instruction.
3. Talk to Alexa
Now the fun part Ask Alexa to control
your ENERJSMART device. Check a full
list of things you can control by clicking
here.

11
Thank you for choosing ENER-J!
Customer satisfaction is our TOP priority, please let us know how you felt about your experience.
Happy? We are so happy that you are pleased with our product. Feel free to express your newfound
joy! Share your experience by writing a review.
Not Happy? If you are not fully satisfied with the item you received, have any problems like damages,
or questions, please contact us. We typically respond within 24-48 hours.
Products should be installed as per the instructions mentioned in this manual and also as per current
electrical codes National Electric Code (NEC).To avoid the risk of fire, electrical shock or injury, it is
advisable that the installation is done by a trained Electrician. Also it is important that mains power
supply is switched off before the product is installed or repaired.It is advisable to keep the manual for
future reference.
Wi-Fi frequency is 2.4GHz and not 5GHz (5GHz not supported). You can do this by contacting your
broadband service provider and requesting to either switch to 2.4GHz entirely or split it between
2.4GHz and 5GHz.
If despite following the process as instructed above, you still fail to add the device, then possibly
there is a firewall on your Wi-Fi router blocking this device to be connected to your Wi-Fi Router. In
such a case you would need to disable the firewall, add this device following above process and once
the device is added, enable the firewalls back again.
Caution
Please Note
Stuck? Confused?
Contact our Technical Support team on:
Lines are open Mon - Fri (8am to 4pm)
11

1
Prenez le contrôle de votre
éclairage de tous les côtés
Guide d’installation
Rendez votre maison intelligente & connectée dans les pas simples avec ENER-J
Compatible avec :
ENERJSMART ANDROID iOS
Contrôlez votre
pouvoir par :
VoixMobile
Téléchargez notre
application à partir de
Pour télécharger,
scannez le code QR
Langues
RGB+W+WW
Dimmable
2
AVERTISSEMENT : RISQUE DE CHOC ÉLECTRIQUE
Débranchez toujours l’alimentation électrique avant l’inspection/l’installation ou le
remplacement. Il est conseillé de faire appel à une personne/un ingénieur ou un
électricien qualifié pour effectuer l’installation physique.
Procédez conformément aux règlements de sécurité locaux.
Instructions pour une bonne mise à terre
La mise à la terre doit être effectuée conformément aux réglementations locales. Une
mise à la terre incorrecte présente de graves dangers pour le personnel et le matériel.
Exigences en matière d’électricité
La lampe doit être connectée à l'alimentation électrique principale. Un soin particulier
doit être apporté lors de l'installation de cette ampoule à vis Ediscon (E14).
Spécifications
Installation physique :
Avis important pour la garantie :
La lampe ENERJSMART est garantie 2 ans. Veuillez noter que l’appareil a besoin d’un
temps de refroidissement et que l’utilisation recommandée est de 10 à 12 heures/jour.
Si elle est utilisée plus de 12 heures par jour, la garantie sera nulle.
Français
SKU SHA5287
Modèle 5-C37
Puissance 5W (Équivalent 40W)
Tension d’entrée AC 200-240V 50/60Hz
Lumen 380lm
Base / Cap E14
Type de connexion sans fil Wi-Fi 2.4GHz (5G non supporté)
Température de couleur 6000k à 2700k - RGB Couleur changeante
Dimmable Oui
Matériel Aluminium et plastique
Angle du faisceau 180° degrés
Ra >80Ra (lumière vive et naturelle)
Durée de vie ≥30000 heures
Fonctionne avec Amazon Alexa, Google Home et Google Assistant
Dimensions 45mm x 97mm

3
Installation de l'application
1. TÉLÉCHARGER ET INSTALLER
NOTRE APPLICATION
Installez "ENERJSMART" sur votre
Smartphone ou votre tablette via
Google Play ou iOS Play Store.
Sinon, veuillez scanner sous les
codes QR.
ENERJSMART
ANDROID
iOS
2. Naviguez vers l'app store de votre
appareil mobile.
3. Téléchargez une application
appelée Enerjsmart.
Enerjsmart

4
7. Si vous vous installez en utilisant
un numéro de téléphone, veuillez
entrer le code de vérification qui a
été envoyé à votre téléphone et le
mot de passe que vous souhaitez,
puis sélectionnez Confirmer.
8. Si vous utilisez une adresse
électronique, veuillez saisir le mot
de passe que vous souhaitez utiliser
et sélectionner "Confirmer".
Enerjsmart
5. L'application devrait
automatiquement détecter votre
code pays. Si ce n'est pas le cas,
veuillez sélectionner le code de
votre pays de résidence.
6. Saisissez votre adresse
électronique ou votre numéro de
téléphone ( Si vous entrez votre
4. Une fois l'application téléchargée,
ouvrez l'application et sélectionnez
Register.
numéro de téléphone, vous recevrez
un SMS de vérification dont vous
aurez besoin à l'étape suivante).

5
11. Sélectionnez les appareils
d'éclairage.
12. Connectez votre Smart light à une
source d'énergie. Pour entrer en
mode d'appariement, allumez puis
éteignez la lumière Smart pendant
3 à 5 secondes à la fois. Faites-le
3 fois. La lumière Smart se met à
clignoter rapidement une fois en
mode d'appariement.
Enerjsmart
9. Vous avez maintenant créé un
compte avec succès et vous êtes
maintenant prêt à commencer
à installer vos ampoules et vos
luminaires Smart.
10. Sélectionnez le Plus (+) dans le
coin supérieur droit pour ajouter un
appareil.
6
14. Si une case bleue apparaît en haut
de l'écran, cela signifie que vous
n'êtes pas actuellement connecté à
un réseau Wi-Fi.
15. Une fois que vous aurez sélectionné
"Confirmer"; après avoir entré
votre mot de passe, l'application
commencera à coupler le Smart
light à votre application.
13. Connectez-vous au réseau Wi-Fi
souhaité, saisissez votre mot de
passe, puis sélectionnez Confirmer.
7
17. Une fois que votre Smart light
se connecte avec succès à
l'application, l'écran ci-dessous
s'affiche et vous pouvez modifier le
nom de votre Smart light/appareil.
Par exemple : 16 Fixture. Il est
préférable de faire simple, de sorte
que si vous souhaitez le connecter
à votre Alexa App ou Google Home,
il sera plus facile pour l'assistant
intelligent de comprendre quelle
lumière vous souhaitez contrôler.
Après avoir nommé votre Smart
light, sélectionnez Done.
16. Si vous recevez un message qui
dit "Failed to Add" cela signifie que
la connexion a échoué. Il se peut
que vous deviez remettre le Smart
light en mode d'appariement et
répéter les étapes 11 à 14. Veuillez
vous assurer que la fréquence
WiFi est réglée sur 2,4G (5G non
compatible).
18. Vous pouvez maintenant contrôler
votre Smart light dans l'application
Enerjsmart.

8
19. Sélectionnez le profil. Dans
votre profil, vous pouvez
utiliser :
Ajuster la couleur
• RGB+6500K à 3000K:
Vous pouvez ajuster
la couleur RGB (1600
Millions de couleurs)
+6500K (Blanc froid) ou
3000K (Lumière chaude/
jaune).
• RGB+3000K-6500K: Vous
pouvez ajuster la couleur
RGB (1600 millions
de couleurs) + 3000K
(lumière chaude/jaune) à
6500K (blanc froid).
• CCT: 3000K-6500K (Cold
white to warm white).
• C/W: 6000K or 3000K
(Cold white or warm
white).
*RGB n'est pas disponible
dans toutes les lampes
LED. Veuillez consulter les
spécifications du produit pour
plus de détails.
Diminution
• La lampe est graduable,
vous pouvez varier de 1
à 100 %.
8 Modes
• Nuit, Lecture, Réunion,
Loisirs, Lumière douce,
Coloré...

9
20. Share with your family
and friends
Si vous souhaitez que peu
de personnes contrôlent
les mêmes lumières, alors
partagez avec elles.
21. Contrôle à distance
12 millions de kilomètres
télécommandés. Lorsque
nous sommes encore
coincés avec l'interrupteur
pour contrôler les lumières,
les lampes intelligentes
vous permettent de
maîtriser facilement
l'éclairage chez vous, à
l'autre bout du monde.
22. Créer un groupe de
contrôle
Contrôlez chaque lampe
Wi-Fi individuellement,
ou ensemble en tant que
groupe.
Table of contents
Languages:
Other ENER-J Lighting Equipment manuals

Popular Lighting Equipment manuals by other brands


Lampo
Lampo Vogue 575 W user manual

PR Lighting
PR Lighting PR-8836 manual

DIMON TECHNOLOGY
DIMON TECHNOLOGY LED Neon flex user manual

In the Swim
In the Swim Automatic Solar Blanket Reel System Installation and operation guide

Golight
Golight RadioRay 2000 Instruction guide

SEMIGROW
SEMIGROW IT 5040 owner's manual