Energetics XT 1090 Series User manual

XT 1090 CROSSTRAINER
Mod. A25 / A26
GB
D
CZ
SK
H

2
Table of contents - Inhaltsverzeichnis - Obsah - Obsah - Tájékoztató
1. English………………………………………………………………………………………………………………………………
P 3
2. Deutsch………………………………………………………………………………………………………………………………
P 27
3. Česky………………………………………………………………………………………………………………………………….
P 52
4. Slovensky……………………………………………………………………………………………………………………………
P 76
5. Magyar……………………………………………………………………………………………………………………………….
P 100
© The owner’s manual is only for the customer reference. ENERGETICS can not guarantee for mistakes occurring due to translation or
change in technical specification of the product.
©Die Gebrauchsanweisung dient nur zur Referenz für den Kunden. ENERGETICS übernimmt keine Haftung für Fehler die durch
Übersetzung oder technische Änderungen des Produkts entstehen.
©Návod k použití je pouze doporučení pro zákazníky. ENERGETICS nepřebírá žádné ručení za chyby způsobené překladem či změnami v
technické specfikaci výrobku.
© Návod je určený len pre potrebu zákazníkov. ENERGETICS nezodpovedá za chyby, ktoré sa môžu vyskytnúť kvôli chybnému prekladu
alebo zmenám v technickej špecifikácii produktu.
© A használati útmutató kizárólag felhasználói referenciaként szolgál. az ENERGETICS nem vállal felelősséget a fordítási hibákból
vagy a termék műszaki módosításaiból eredő hibákért.
© Copyright by ENERGETICS

3
Dear Customer,
Congratulations on your purchase of an ENERGETICS home exerciser. This product has been designed and
manufactured to meet the needs and requirements of in-home use. Please carefully read the instructions prior
to assembly and first use. Be sure to keep the instructions for reference and/ or maintenance. If you have any
further questions, please contact us. We wish you lots of success and fun while training,
Your Team
Warranty
ENERGETICS offers high quality home exercisers that have been tested and certified according to European
Norm EN 957.
ENERGETICS warrants to the original purchaser 2 years against possible defects in material and workmanship.
Excluded are damages caused by misuse and wearing parts. All electronic parts are warranted for a period of 1
year. The warranty period starts at the date the product was purchased (retain your sales receipt).
Safety Instructions
Consult your physician before starting with any exercise programme to receive advice on the optimal
training.
Warning: incorrect/ excessive training can cause health injuries. Stop using the home exerciser when
feeling uncomfortable.
Ensure that training only starts after correct assembly, adjustment and inspection of the home
exerciser.
Always start with a warm-up session.
Only use original ENERGETICS parts as delivered (see checklist).
Follow the steps of the assembly instruction carefully.
Only use suitable tools for assembly and ask for assistance if necessary.
Place the home exerciser on an even, non-slippery surface.
For all adjustable parts be aware of the maximum position to which they can be adjusted.
Tighten all adjustable parts to prevent sudden movement while training.
This product is designed for adults. Please ensure that children only use it under the supervision of an
adult.
Ensure that those present are aware of possible hazards, e.g. movable parts during training.
The resistance level can be adjusted to your personal preference.
Do not use the home exerciser without shoes or loose shoes.
Ensure that sufficient space is available to use the home exerciser.
Be aware of non-fixed or moving parts whilst mounting or dismounting the home exerciser.
To protect the floor or carpet from damage, place a mat under the Elliptical Trainer.
Turn off the power whilst the Elliptical Trainer is not in use.
Ensure that an area of 2000 x 1000 mm behind the Elliptical Trainer is free from any obstacles.
This product is made for home use only and tested up to a maximum body weight of 135 kilograms.
We take no responsibility for personal injury or damage sustained by or through the use of this
Elliptical Trainer
GB

4
Adjustment Pin
Connecting Arm
Front
Stabilizer
Cover
Pedal Arm
Rear Shroud
Cushion Foot Pad
Pedal
Console Mast Cover
Console Mast
Handlebar Cover
Handlebar
Beverage Holder
Console
Handpulse
Fan (Mod A25)
Model A26 w/o Fan

5
Checklist
Step 1
Step 2
#96.3/8" x 19 x 1.5T
Flat Washer (2pcs)
#104.3/8" x 23 x 2.0T
Curved Washer (4pcs)
#82 M5 x 15m/m
Phillips Head Screw (2pcs)
#75.3/8”x 2-1/4”
Hex Head Bolt (2pcs)
#77. 3/8”x 3-3/4”
Hex Head Bolt (4pcs)
#85. M5 x 12m/m
Phillips Head Screw (4pcs)
#128.3/8" x 2.0T
Split Washer (1pc)
#104.3/8" x 23 x 2.0T
Curved Washer (2pcs)
#76. 3/8”x 3/4”
Hex Head Bolt (2pcs)
#75.3/8”x 2-1/4”
Hex Head Bolt (1pc)

6
Step 3
Step 4
#102.ψ25
Wave Washer (2 pcs)
#131.3/8" x 30 x 2.0T
Flat Washer (2 pcs)
#107. 3.5 x 12m/m
Sheet Metal Screw (8 pcs)
#76. 3/8”x 3/4”
Hex Head Bolt (2 pcs)
#107. 3.5 x 12m/m
Sheet Metal Screw (8 pcs)
#109. 5 x 16m/m
Tapping Screw (2 pcs)
#155.5/16" x 20 x 1.5T
Flat Washer (2 pcs)
#82. M5 x 15m/m
Phillips Head Screw (12 pcs)
#91. 5/16" x 7T
Nyloc Nut (2 pcs)
#79. 5/16”x 1-1/4”
Hex Head Bolt (2 pcs)
#123. M5 x 50m/m
Phillips Head Screw (2 pcs)

7
Tools
#126. Phillips Head Screw Driver (1 pc)
#125. Short Phillips Head Screw Driver (1 pc)
#129. 12m/m Wrench (2 pcs)
#124. 13/14m/m Wrench (1 pc)

8
Assembly
Unpacking the Unit
Carefully remove all parts from carton and inspect for any damage or missing parts. If damaged parts are
found, or parts are missing, contact your dealer immediately.
Locate the hardware package. The hardware is separated into steps. Remove the tools first. Remove the
hardware for each step as needed to avoid confusion.
Step 1
REAR RAIL ASSEMBLY
1. Put the 2pcs of 3/8”×19×1.5T Flat Washers (96) on the 2pcs of 3/8”×2-1/4” Hex Head Bolts (75) and
hand-tighten them, through the Top of the Rear Stabilizer Tube (Main Frame), into the Rear Assembly
(2) by using the 13/14 m/m Wrench (124).
2. Put the 4pcs of 3/8”×23×2T Curved Washers (104) on the 4pcs of 3/8”×3-3/4” Hex Head Bolts (77) and
hand-tighten them through the Front of the Rear Stabilizer Tube (Main Frame), into the Rail Assembly
(2) by using 13/14 m/m Wrench (124).
3. Then install Front Stabilizer Cover (59) with 2pcs of M5×15 m/m Phillips Head Screws (82) by using the
Phillips head screw driver (126).

9
Step 2
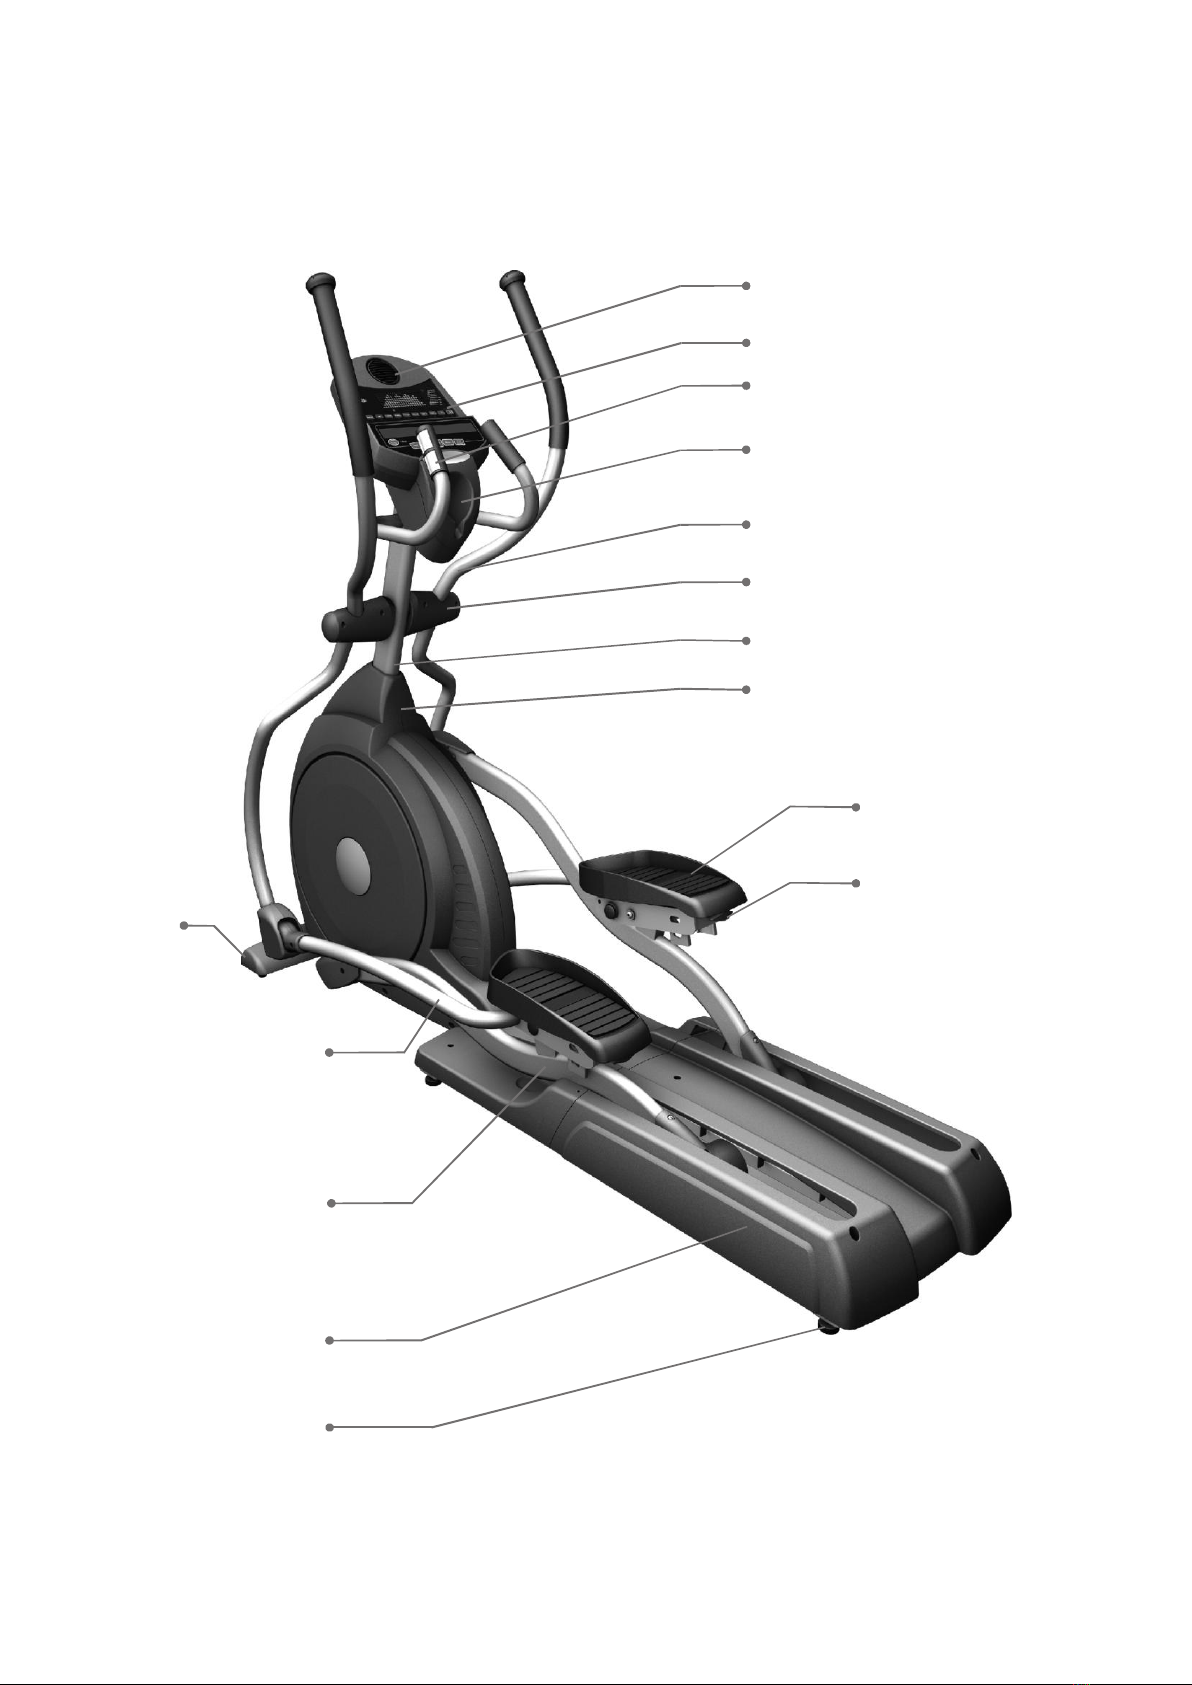
1. Locate the Console Mast (12) and Console Mast Cover (49)
and slide the Cover onto the Mast as far as it will go. Make
sure the Console Mast Cover (49) is facing the correct way.
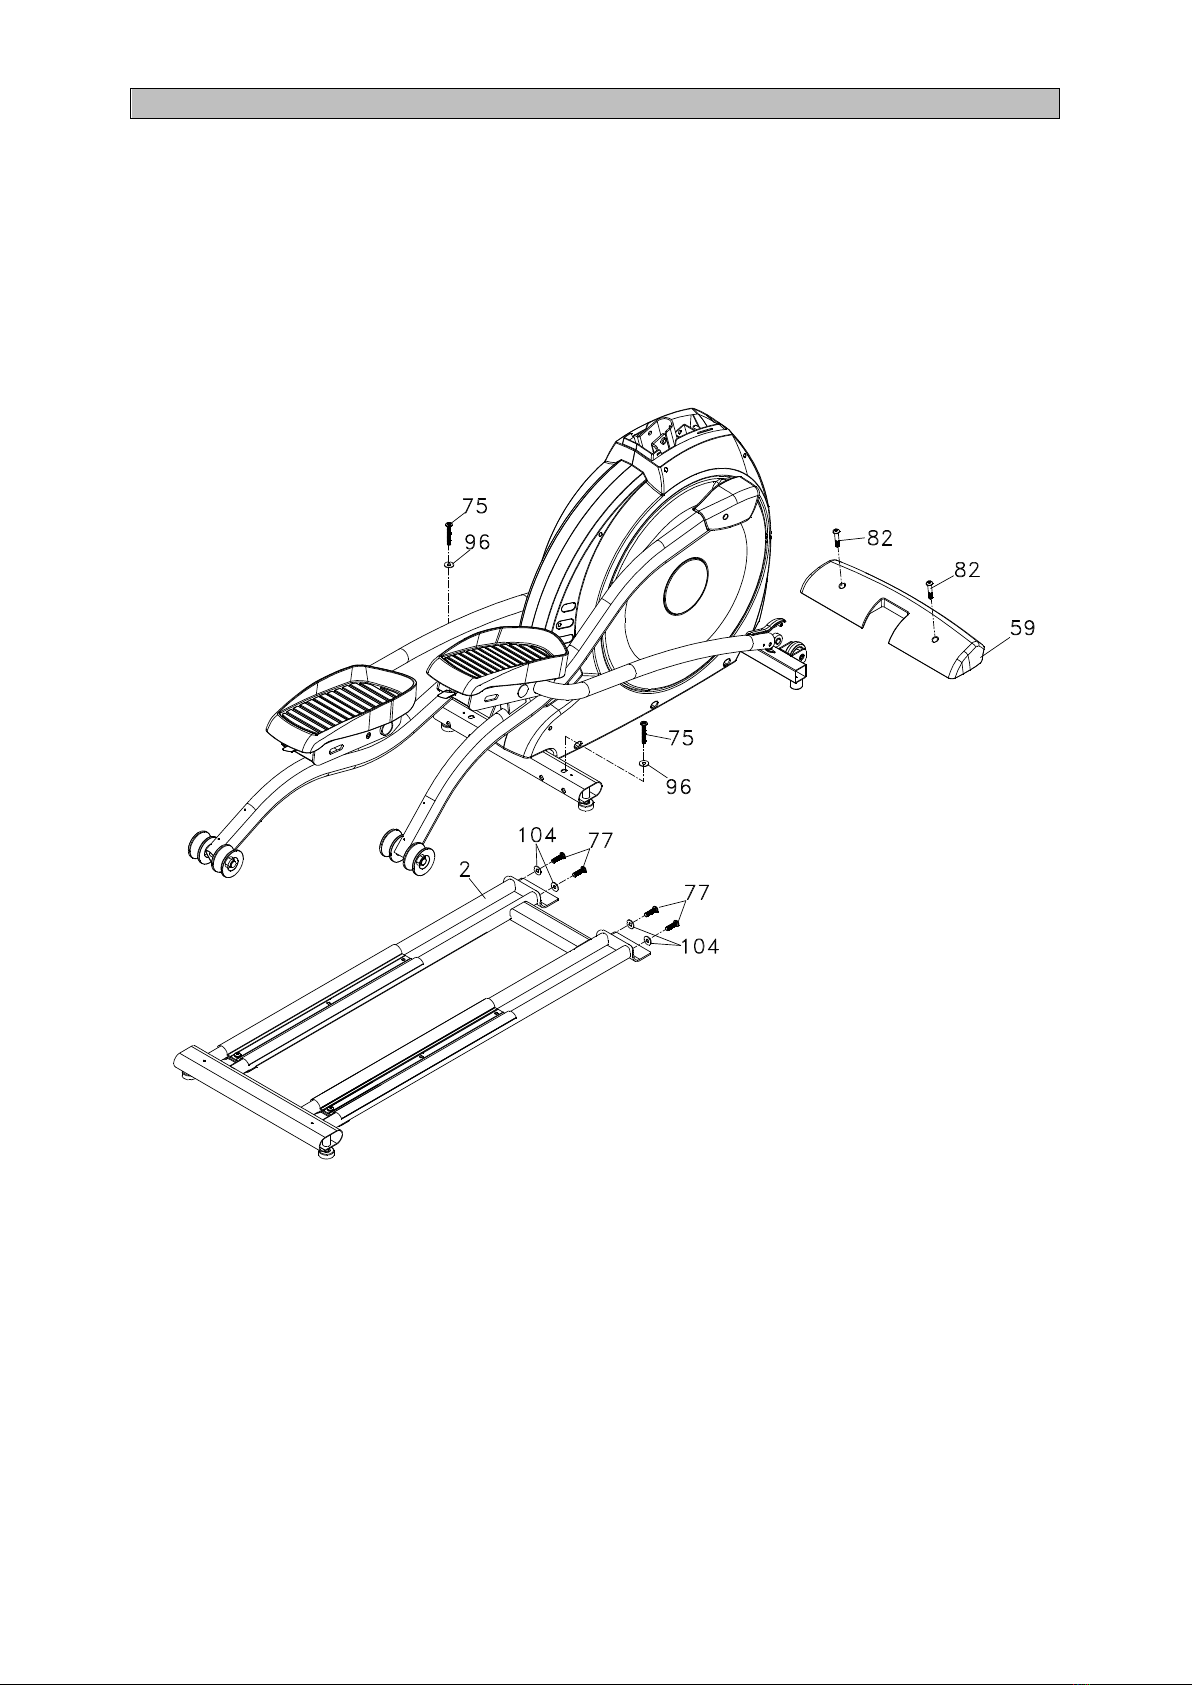
2. At the top opening of the Main Frame (1), there is a
Computer Cable (39) tied with a guiding wire. Unravel the
wire and feed the Computer Cable (39) it into the bottom
of the Console Mast tube (12) and out of the top opening.
3. Install the Console Mast (12) into the receiving bracket on
the top of the Main Frame (1).
NOTE: there is one bolt already installed in the receiving
bracket that will engage with the slot at the bottom of the
Console Mast. This needs to be tightened at the end along
with the three other console mast bolts.
4. Put the 1pc of 3/8" x 2T Split Washer (128) onto the 1pc of
3/8" x 2-1/4" Hex Head Bolt (75) and the 2pcs of 3/8” x 23
x 2T Curved Washers (104) onto the 2pcs of 3/8" x 3/4"
Hex Head Bolts (76). Install, and hand tighten them. The
3/8" x 2-1/4" Hex Head Bolt (75) should go through the left
side of the receiving bracket into the Console Mast (12).
NOTE: The Computer Cable (39) runs through the Console
Mast tube (12). Be careful not to damage or pinch this
cable during this procedure. Be careful as damage to the
Console Assembly (32) could result. Install, and hand
tighten the 2pcs of 3/8" x 3/4"Hex Head Bolts (76) with
3/8” x 23 x 2T Curved Washers (104) through
the front of the receiving bracket into
the Console Mast (12).
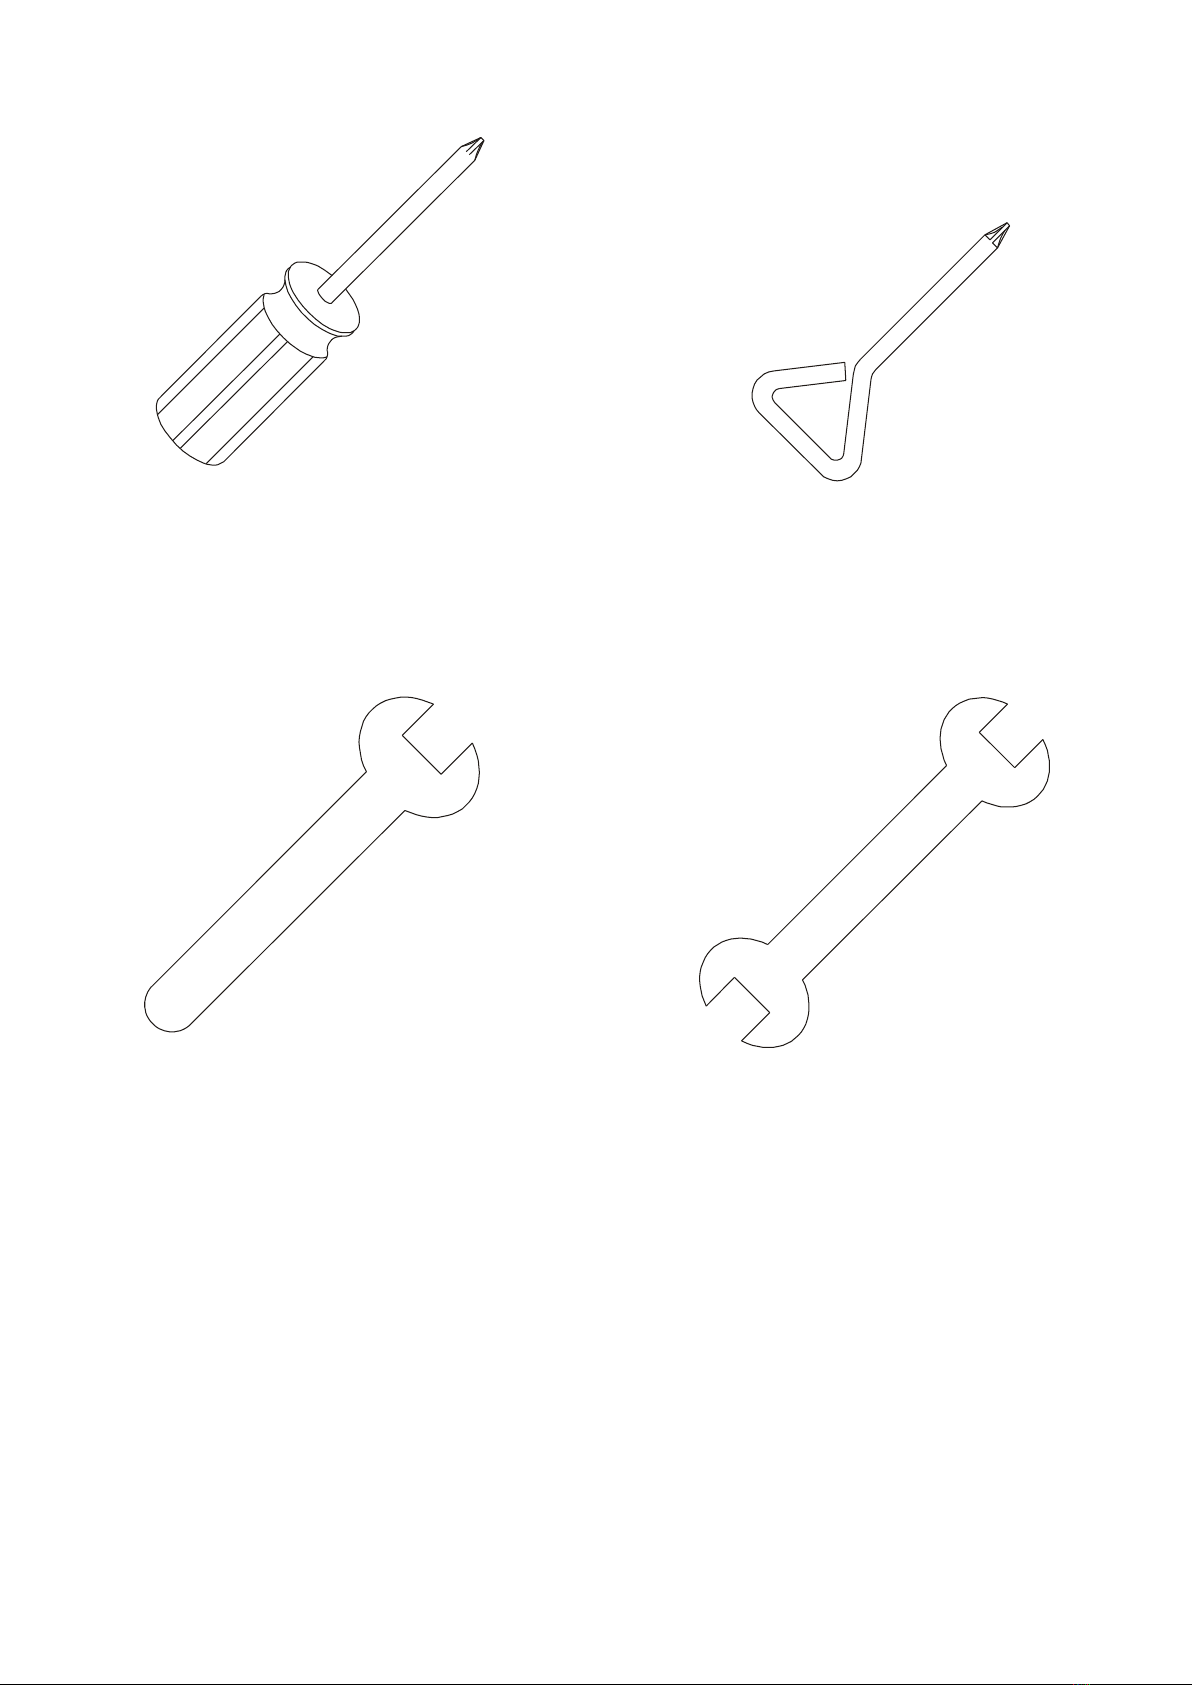
5. Use the 13/14m/m Wrench (124) to
tighten the three bolts, together with
the pre-installed screw, firmly. These
bolts should be tightened as much
as you possibly can.
6. Locate the Console (32)
and tighten it with the
4pcs of M5×10 m/m
Phillips Head Screws
(85) by using the
Phillips Head Screw
Driver (126).
7. There are 3pcs connectors at the top opening of the Console Mast (12), two Handpulse W/Cable
Assembly (44) and one Computer Cable (39). Connect these to the mating connectors on the back of the
Console (32). Do not force them while connecting as the connectors are keyed so that you cannot plug
them in the wrong way.
8. Store the excessive cables back into the Console Mast (12) and carefully install the Console (32) onto the
mounting plate of Console Mast (12) and secure the 4pcs of M5 x 10m/m Phillips Head Screws (85) by
using Philips head screw driver (126).

10
Step 3
HANDLE BAR ASSEMBLY
1. Install the 2pcs of Ø25 Wave Washers (102) onto the Handle Bars (10,11) axle.
2. Slide the Left and Right Handle Bars (10,11) onto the appropriate side of the axle.
3. Put the 2pcs of 3/8”×30×2.0T Flat Washers (131) onto the 2pcs of 3/8”×3/4” Hex Head Bolts (76) and
install, and tighten by using the 13/14m/m Wrench (124) in the threaded holes in the ends of the axle.
4. Install the Front Handle Bar Cover (L)(68) and Rear Handle Bar Cover (L)(68~1) onto the Handle Bar
(L)(10) with the 4pcs ofØ3.5x12m/m Sheet Metal Screws (107) by using the Phillips Head Screw Driver
(126).
5. Install the Front Handle Bar Cover (R)(69) and Rear Handle Bar Cover (R)(69~1) onto the Handle Bar
(R)(11) with the 4pcs of Ø3.5x12m/m Sheet Metal Screws (107) by using the Phillips Head Screw Driver
(126).

11
Step 4
1. Align the hole in the end of the Connecting
Arms (L&R)(8&9)(pivoting rod end) with the
hole in the bracket of the Handle Bars
(L&R)(10&11). The rod end should be inside
of the Handle Bars (L&R)(10&11) bracket.
Take 2pcs of 5/16" x 1-1/4" Hex Head Bolts
(79) and install it through the Handle Bar
(L&R)(10&11) bracket and the rod end.
Install 2pcs of 5/16" x 20 x 1.5T Flat Washers
(155), 5/16" x 7T Nyloc Nuts (91) and Fish-
eye Sleeve (22) on the 5/16" x 1-1/4" Hex
Head Bolt (79) and tighten firmly by using
12m/m Wrench (129) and 13/14 m/m
Wrench (124) on the 5/16" x 7T Nyloc Nut
(91) and on the 5/16" x 1-1/4"
Hex Head Bolt (79).
2. Match Connecting Arm Cover
B (R)(163), with Connecting
Arm Cover B (L)(164), for
both sides of connecting
arms and tighten
with 2pcs of
M5 x 15m/m Phillips Head
Screws (82) and 4pcs of
Ø3.5x12m/m Sheet Metal
Screws (107) by using Short
Phillips Head Screw Driver
(125)
3. Repeat step 1 for the Connecting
Arm (R)(9).
4. Match the Connecting Arm Cover
A (R) (161), with Connecting Arm
Cover A (L) (162), onto the Handle
Bar (L) (10) and secure the covers with 2pcs of M5 x 15m/m Phillips Head Screws (82) and 2pcs of
Ø3.5x12m/m Sheet Metal Screws (107) by using the Phillips Head Screw Driver(126).
5. Repeat step 3 for the Handle Bar (R) (11).
6. Install the 2pcs of Sliding Wheel Cover (64) above the Slide Wheel, Urethane (47) and Pedal Arm (L,
R)(6,7) with the 4pcs of M5x12m/m Phillips Head Screws (82) and tighten them by using Phillips Head
Screw Driver (126).
7. Install the Rear Cover (A) (60), on the Rear Stabilizer of the Main Frame (1), with the openings facing
backward, and tighten the 2pcs of M5x15m/m Phillips Head Screws (82) by using the Phillips Head Screw
Driver (126).
8. Install the Rear Shroud (B) (61), above the Rail Assembly (2), with the openings facing the Rear Shroud
(A) (60), and guide the Sliding Wheel (47) into the Rear Shroud (B) (61).
9. Match the openings of Rear Shroud (B) (61), with Rail Assembly Cover (A) (60) and secure both covers
with 2pcs of 5x16m/m Tapping Screws (109) by using Philips Head Screw Driver (126). Secure the Rear
Shroud (B) (61), at the rear end with 2pcs of M5 x 50m/m Philips Head Screws (123).
PLEASE LOCK ALL COMPONENTS UP AFTER THE ACCESSSORIES HAVE BEEN ASSEMBLED.

12
Notice to avoid injury
The foot plates on your new elliptical have a pull-pin adjustment. This adjustment allows you to change the
angle of the footpad to add variety to your workouts. The foot plates are spring loaded, and when the pull-pin
is pulled, the foot plate can drop suddenly. To avoid any injury please do not put your hand, or any other body
part, under the foot plate when pulling the pull-pin. Only place your hand under the very rear of the foot
plate, just above the pull-pin.
Transport
The elliptical is equipped with two transport wheels which are engaged when rear of it is lifted.

13
Computerinstruction
Power up
The Elliptical is supplied with an external power supply. When power is connected to the Elliptical, the console
will automatically power up. If there is no input to the console for 20 minutes the console will go to stand-by
mode. In stand-by mode the console display will turn off. To turn the console on press any key.
When initially powered on the console will perform an internal self test. During this time all the lights will turn
on. When the lights go off the dot matrix display will show a software version (ie: VER 1.0) and the message
window will display an odometer reading. The odometer reading displays how many hours the elliptical has
been used and how many virtual miles the elliptical has gone. The display will look like this: ODO 123 MI 123
HRS.
The odometer will remain displayed for only a few seconds then the console will go to the start up display. The
dot matrix display will be scrolling through the different profiles of the programs and the message window will
be scrolling the start up message. You may now begin to use the console.
Fan (Mod. A25)
Mod. A26 w/o Fan
Dot Matrix
Heart rate Indicator
Heart rate bar graph
Fan Power switch
(Mod. A25)
Message window
Pulse sensors
Control keys
Program Buttons
Display view
Display view

14
Quick Start
This is the quickest way to start a workout. After the console powers up you just press the Start key to begin,
this will initiate the Quick Start mode. In Quick Start the Time will count up from zero and the workload may be
adjusted manually by pressing the Up or Down buttons. The dot matrix display will have only the bottom row lit
at first. As you increase the work load more rows will light indicating a harder workout. The elliptical will get
harder to pedal as the rows increase.
Basic information
The Dot Matrix has two display modes:
When you begin a program it will be in the Profile display mode. To the left of the dot matrix there is a button
labeled Display. Pressing this button once will switch the display to show a quarter mile track. If the Display
button is pressed again the Track indicator light, next to the Display button, will start to blink. This indicates the
display is in Scan mode. The display will switch back and forth between Track and Profile mode every few
seconds. To turn off the scan mode press the Display key again. This will return you to the profile display mode.
The Message Window will initially be displaying Time and Distance information. On the bottom left of the
message window is another Display button. Each time this Display button is pressed the next set of information
will appear, four windows in all. In order: Time and Distance, Pulse and Calories, Speed in RPM and MPH, Work
Level and Watts. If the Display button is pressed during the Level and Watts display the Scan light will come on
and the message window will show each set of data for four seconds then switch to the next set of data in a
continuous loop. Pressing the Display button again will bring you back to the beginning.
To the right of the Dot matrix display on the elliptical is a Heart Icon and a Bar Graph. The elliptical has a built
in heart rate monitoring system. Simply grasping the hand pulse sensors on the stationary handle bars, or
wearing the heart rate transmitter, will start the Heart Icon blinking (this may take a few seconds). The
Message Window will display your heart rate, or Pulse, in beats per minute. The Bar Graph represents the
percentage of your maximum heart rate you are currently achieving.
NOTE: You must enter your age for the Bar Graph to be accurate. Refer to Heart Rate section for details about
these features and how they can help you work out more efficiently.
The Stop/Reset button actually has several functions. Pressing the Stop/Reset key once during a program will
Pause the program for 5 minutes. If you need to get a drink, answer the phone or any of the many things that
could interrupt your workout, this is a great feature. To resume your workout during Pause just press the Start
key. If the Stop/Reset button is pressed twice during a workout the program will end and the console will
return to the start up screen. If the Stop/Reset key is held down for 3 seconds the console will perform a
complete Reset. During data entry for a program the Stop/Reset key performs a Previous Screen function. This
allows you to go back one step in the programming each time you press the Stop/Reset key.
The Program Keys are used to preview each program. When you first turn the console on you may press each
program key to preview what the program profile looks like. If you decide that you want to try a program, press
the corresponding program key and then press the Enter key to select the program and enter into the data
setting mode.
The program keys also act as a Number Key Pad when you are in the data setting mode. Under each program
key is a number. If you are setting new data, such as Age, weight etc., you can use these keys to enter the
numbers quickly.
The consoles include a built-in fan to help keep you cool. To turn the fan on, flip the switch on the right side of
the console case (only on Mod. A25).
Each of the programs can be customized with your personal information and changed to suit your needs. Some
of the information asked for is necessary to ensure the readouts are correct. You will be asked for your Age and
Weight. Entering your Age ensures that the Heart Rate bar graph shows the correct number. Your Age is also
necessary during the Heart Rate control programs to ensure the correct settings are in the program for your
Age. Otherwise the work settings could be too high or low for you. Entering your Weight aides in calculating a
more correct Calorie reading. Although we cannot provide an exact calorie count we do want to be as close as
possible.

15
A message about Calories:
Calorie readings on every piece of exercise equipment, whether it is in a gym or at home, are not accurate and
tend to vary widely. They are meant only as a guide to monitor your progress from workout to workout. The
only way to measure your calorie burn accurately is in a clinical setting connected to a host of machines. This
is because every person is different and burns calories at a different rate. Some good news is that you will
continue to burn calories at about the same rate as during exercise for 20-30 minutes after you have finished
exercising!
Entering/Changing Settings
When you enter a program, by pressing a program key, then enter key, you have the option of entering your
own personal settings. If you want to workout without entering new settings then just press the Start key. This
will bypass the programming of data and take you directly to the start of your workout. If you want to change
the personal settings then just follow the instructions in the message window. If you start a program without
changing the settings the default, or saved, settings will be used.
The default computer settings are: Age = 35, Weight = 155 Lbs., Time = 30:00, Max Level, each program has a
different maximum work level: Hill = 7, Fatburn = 5, Cardio = 7, Strength = 8, Interval = 7.
NOTE: Age and Weight default settings will change when you enter a new number. So the last Age and Weight
entered will be saved as the new default settings. If you enter your Age and Weight the first time you use the
Elliptical you will not have to enter it every time you work out unless either your Age or Weight changes or
someone else enters a different Age and Weight.
Manual
The Manual program works as the name implies; manually. This means that you control the work load yourself
and not the computer. To start the Manual program follow the instructions below or just press the Manual
button then the Enter button and follow the directions in the message window.
1. Press the Manual key then press the Enter key.
2. The message window will ask you to enter your Age. You may enter your Age, using the Up and Down
keys or the numeric key pad, then press the Enter key to accept the new number and proceed on to
the next screen.
3. You are now asked to enter your Weight. You may adjust the Weight number using the Up and Down
keys or the numeric key pad, then press enter to continue.
4. Next is Time. You may adjust the Time and press enter to continue.
5. Now you are finished editing the settings and can begin your workout by pressing the Start key. You
can also go back and modify your settings by pressing the Enter key. NOTE: At any time during the
editing of Data you can press the Stop key to go back one level, or screen.
6. Once the program starts you will be at level one. This is the easiest level and it is a good idea to stay
at level one for a while to warm up. If you want to increase the work load at any time press the Up
key; the Down key will decrease the work load.
7. During the Manual program you will be able to scroll through the data in the message window by
pressing the adjacent Display key, switch between the profile display and a quarter mile track by
pressing the Display key adjacent to the matrix, use the heart rate monitoring features and can switch
to heart rate Auto-Pilot mode (See Heart Rate section for details of this feature).
8. When the program ends you may press Start to begin the same program again or Stop to exit the
program or you can save the program you just completed as a custom user program by pressing a
User key and following the instructions in the message window.

16
Preset Programs
The Elliptical has five different programs that have been designed for a variety of workouts. These five
programs have factory preset profiles for achieving different goals. The initial built-in level of difficulty for
each program is set to a relatively easy level. You may adjust the level of difficulty for each program before
beginning by following the instructions in the message window after selecting your program.
The PROGRAM
HILL
The Hill program simulates going up and down a hill. The resistance in the pedals will steadily increase and
then decrease during the program. To start the Hill program follow the instructions below or just press the Hill
button then the Enter button and follow the directions in the message window.
1. Press the Hill key then press the Enter key.
2. The message window will ask you to enter your Age. You may enter your Age, using the Up and Down
keys or the numeric key pad, then press the Enter key to accept the new number and proceed on to the
next screen.
3. You are now asked to enter your Weight. You may adjust the Weight number using the Up and Down
keys or the numeric key pad, then press enter to continue.
4. Next is Time. You may adjust the Time and press enter to continue.
5. Now you are asked to adjust the Max Level. This is the peak exertion level you will experience during the
program, at the top of the hill. The factory setting is level seven. Adjust the level and then press enter.
6. Now you are finished editing the settings and can begin your workout by pressing the Start key. You can
also go back and modify your settings by pressing the Enter key. NOTE: At any time during the editing of
Data you can press the Stop key to go back one level, or screen.
7. If you want to increase or decrease the work load at any time during the program press the Up or Down
key. This will only affect the workload for the present position in the profile. When the profile changes
to the next column it will return to the preset work level.
8. During the Hill program you will be able to scroll through the data in the message window by pressing
the adjacent Display key, switch between the profile display and a quarter mile track by pressing the
Display key adjacent to the matrix, use the heart rate monitoring features and can switch to heart rate
Auto-Pilot mode.
(See Heart Rate section for details of this feature).
9. When the program ends you may press Start to begin the same program again or Stop to exit the
program or you can save the program you just completed as a custom user program by pressing a User
key and following the instructions in the message window.

17
Fat Burn
The Fat Burn program is designed, as the name implies, to maximize the burning of fat. There are many
schools of thought on the best way to burn fat but most experts agree that a lower exertion level which stays
steady is the best. The absolute best way to burn fat is to keep your heart rate at around 60% to 70% of it’s
maximum potential. This program does not use heart rate but simulates a lower, steady, exertion workout.
To start the Fat Burn program follow the instructions below or just press the Fat Burn button then the Enter
button and follow the directions in the message window.
1. Press the Fat Burn key then press the Enter key.
2. The message window will ask you to enter your Age. You may enter your Age, using the Up and Down
keys or the numeric key pad, then press the Enter key to accept the new number and proceed on to the
next screen.
3. You are now asked to enter your Weight. You may adjust the Weight number using the Up and Down
keys or the numeric key pad, then press enter to continue.
4. Next is Time. You may adjust the Time and press enter to continue.
5. Now you are asked to adjust the Max Level. This is the peak exertion level you will experience during the
program. The factory setting is level five. Adjust the level and then press enter.
6. Now you are finished editing the settings and can begin your workout by pressing the Start key. You can
also go back and modify your settings by pressing the Enter key. NOTE: At any time during the editing of
Data you can press the Stop key to go back one level, or screen.
7. If you want to increase or decrease the work load at any time during the program press the Up or Down
key. This will only affect the workload for the present position in the profile. When the profile changes
to the next column it will return to the preset work level.
8. During the Fat Burn program you will be able to scroll through the data in the message window by
pressing the adjacent Display key, switch between the profile display and a quarter mile track by
pressing the Display key adjacent to the matrix, use the heart rate monitoring features and can switch to
heart rate Auto-Pilot mode
(See Heart Rate section for details of this feature).
9. When the program ends you may press Start to begin the same program again or Stop to exit the
program or you can save the program you just completed as a custom user program by pressing a User
key and following the instructions in the message window.

18
Cardio
The Cardio program is designed to increase your Cardio vascular function. This is, simply said, exercise for your
heart and lungs. It will build up your heart muscle and increase blood flow and lung capacity. This is achieved
by incorporating a higher level of exertion with slight fluctuations in work. To start the Cardio program follow
the instructions below or just press the Cardio button then the Enter button and follow the directions in the
message window.
1. Press the Cardio key then press the Enter key.
2. The message window will ask you to enter your Age. You may enter your Age, using the Up and Down
keys or the numeric key pad, then press the Enter key to accept the new number and proceed on to the
next screen.
3. You are now asked to enter your Weight. You may adjust the Weight number using the Up and Down
keys or the numeric key pad, then press enter to continue.
4. Next is Time. You may adjust the Time and press enter to continue.
5. Now you are asked to adjust the Max Level. This is the peak exertion level you will experience during the
program. The factory setting is level seven. Adjust the level and then press enter.
6. Now you are finished editing the settings and can begin your workout by pressing the Start key. You can
also go back and modify your settings by pressing the Enter key. NOTE: At any time during the editing of
Data you can press the Stop key to go back one level, or screen.
7. If you want to increase or decrease the work load at any time during the program press the Up or Down
key. This will only affect the workload for the present position in the profile. When the profile changes
to the next column it will return to the preset work level.
8. During the Cardio program you will be able to scroll through the data in the message window by
pressing the adjacent Display key, switch between the profile display and a quarter mile track by
pressing the Display key adjacent to the matrix, use the heart rate monitoring features and can switch to
heart rate Auto-Pilot mode.
(See Heart Rate section for details of this feature).
9. When the program ends you may press Start to begin the same program again or Stop to exit the
program or you can save the program you just completed as a custom user program by pressing a User
key and following the instructions in the message window.

19
Strength
The Strength program is designed to increase muscular strength in your lower body. This program will steadily
increase in resistance to a high level and then keeps you there. This is designed to strengthen and tone your
legs and glutes. To start the Strength program follow the instructions below or just press the Strength button
then the Enter button and follow the directions in the message window.
1. Press the Strength key then press the Enter key.
2. The message window will ask you to enter your Age. You may enter your Age, using the Up and Down
keys or the numeric key pad, then press the Enter key to accept the new number and proceed on to the
next screen.
3. You are now asked to enter your Weight. You may adjust the Weight number using the Up and Down
keys or the numeric key pad, then press enter to continue.
4. Next is Time. You may adjust the Time and press enter to continue.
5. Now you are asked to adjust the Max Level. This is the peak exertion level you will experience during the
program. The factory setting is level eight. Adjust the level and then press enter.
6. Now you are finished editing the settings and can begin your workout by pressing the Start key. You can
also go back and modify your settings by pressing the Enter key. NOTE: At any time during the editing of
Data you can press the Stop key to go back one level, or screen.
7. If you want to increase or decrease the work load at any time during the program press the Up or Down
key. This will only affect the workload for the present position in the profile. When the profile changes
to the next column it will return to the preset work level.
8. During the Strength program you will be able to scroll through the data in the message window by
pressing the adjacent Display key, switch between the profile display and a quarter mile track by
pressing the Display key adjacent to the matrix, use the heart rate monitoring features and can switch to
heart rate Auto-Pilot mode
(See Heart Rate section for details of this feature).
9. When the program ends you may press Start to begin the same program again or Stop to exit the
program or you can save the program you just completed as a custom user program by pressing a User
key and following the instructions in the message window.

20
Interval
The Interval program takes you through high levels of intensity followed by periods of low intensity. This
program increases your endurance by depleting your oxygen level followed by periods of recovery to replenish
oxygen. Your cardio vascular system gets programmed to use oxygen more efficiently this way. To start the
Interval program follow the instructions below or just press the Interval button then the Enter button and
follow the directions in the message window.
1. Press the Interval key then press the Enter key.
2. The message window will ask you to enter your Age. You may enter your Age, using the Up and Down
keys or the numeric key pad, then press the Enter key to accept the new number and proceed on to the
next screen.
3. You are now asked to enter your Weight. You may adjust the Weight number using the Up and Down
keys or the numeric key pad, then press enter to continue.
4. Next is Time. You may adjust the Time and press enter to continue.
5. Now you are asked to adjust the Max Level. This is the peak exertion level you will experience during the
program. The factory setting is level seven. Adjust the level and then press enter.
6. Now you are finished editing the settings and can begin your workout by pressing the Start key. You can
also go back and modify your settings by pressing the Enter key. NOTE: At any time during the editing of
Data you can press the Stop key to go back one level, or screen.
7. If you want to increase or decrease the work load at any time during the program press the Up or Down
key. This will only affect the workload for the present position in the profile. When the profile changes
to the next column it will return to the preset work level.
8. During the Interval program you will be able to scroll through the data in the message window by
pressing the adjacent Display key, switch between the profile display and a quarter mile track by
pressing the Display key adjacent to the matrix, use the heart rate monitoring features and can switch to
heart rate Auto-Pilot mode (See Heart Rate section for details of this feature).
9. When the program ends you may press Start to begin the same program again or Stop to exit the
program or you can save the program you just completed as a custom user program by pressing a User
key and following the instructions in the message window.
This manual suits for next models
2
Table of contents
Languages:
Other Energetics Elliptical Trainer manuals

Energetics
Energetics ET 620 User manual

Energetics
Energetics XT 740T User manual

Energetics
Energetics XT 420p User manual

Energetics
Energetics ET3.7 MAGNETIC User manual

Energetics
Energetics ET 210 User manual

Energetics
Energetics ET 610 User manual

Energetics
Energetics ET 1070 User manual

Energetics
Energetics ET 870 PRO User manual

Energetics
Energetics XT 520p User manual

Energetics
Energetics XT 740T User manual