Energizer EDC2-1001-RGB-MWT User manual

SMART WIFI
LED DOWN LIGHT
QUICK
START GUIDE
EDC2-1001-RGB-MWT
v1.1

GETTING STARTED
QUICK
START
GUIDE
Thank you for choosing the Energizer
®Smart LED
Bulb. Use this product to convert most 5 to 6 inch
recessed fixtures that use standard E26 socket to a
Smart WiFi LED Down Light This quick start guide will
help you with setup and installation.
Before setup, make sure your phone is connected to the
2.4GHz WiFi network that your device will be placed on.
You may also need to turn on location and
Bluetooth to find nearby networks.
Smart LED Down
Light Assembly
Torsion Spring x2
E26 Light Socket Adapter
Circular Felt Spacer
Quick Start Guide
Package Includes:
What You Need:
App 2.4GHz WiFi
®

CONNECT THE DEVICE
STEP 1
STEP 2
Download the free Energizer
®Connect app from the App
Store (for iPhones) or Google Play Store (for Android phones).
Make sure your mobile device is connected to your 2.4GHz
WiFi network.
Open the app, click “Create Account”, and follow the
on-screen instructions.
Aﬞer your initial sign in, your app will remember
your password and log you in automatically.
You can also choose to manually log out under
Seמּings in the Main Menu.
You may need to check your Spam
folder for the verification code
1
Click
Login
Create Account Create Account
Get Verication Code

STEP 3
Connect the E26 light socket adapter to the LED Down
Light by plugging its cable connector into the connector
on the Down Light Assembly. Screw the LED Down Light’s
E26 light socket adapter into a portable lamp. Move the
lamp close to your WiFi router. Plug the lamp into a wall
outlet and turn it on.
2
NOTE: The light should start blinking rapidly
(about 4 times per second) for EZ pairing mode.
Single Click Cycle through Color Options
Double Click On/Off
Hold for 5 Seconds Enter/Cycle through Pairing Modes
Buמּon Operation
Flashing Slowly AP Pairing
LED Behavior Device Status
Flashing Rapidly EZ Pairing

3
STEP 4
Make sure your Bluetooth® is enabled.
Aﬞer logging in, click “+” on the top right of the screen and
select "Add device".
The app will detect the
WIFI+BLE enabled device and
ask if you if you want to add it
Make sure your 2.4GHz network
is selected, input the password
and press confirm
Make sure the check is makred
next to the device you want to
add, click the + buמּon
Click Select
NOTE: Once successful then
go directly to Step 7.
If the app does not detect
your device, skip this
part and proceed to Step 5.
Home
*********
RGBMW Down Light RGBMW Down Light

4
STEP 5
Conrm light is rapidly blinking
Select the Lighting category and confirm that the LED
Down Light is still rapidly blinking Click “Next Step”.
Confirm
Click
?
Help: Switch between pairing modes.
See troubleshooting page 15.
Select
Lighting

5
STEP 6
Confirm that the displayed WiFi network is your 2.4GHz
WiFi network, enter your WiFi password and click “Confirm”.
Help: If you need information about 2.4GHz WiFi
networks, click the link to go to our Connect FAQs
on our website.
?
Conrm
Enter and Click
Confirm WiFi

TIP: You can match the location of the Down Light in
the App by selecting one of the available rooms. Click
the buמּon to change the name of the product.
Done
Energizer LED Bulb
6
Your LED Down Light will now be connected to the network.
Confirm the seמּings for your device and then Click “Done”.
STEP 7
Your Energizer
®Smart LED Down Light is now ready to use.
You can now change color, dimness and set schedules.
We hope you enjoy using your Energizer
®Smart LED Down Light.
For frequently asked questions and instruction videos, please visit
our website at www.energizerconnect.com
1-2
minutes
PROCESSING TIME

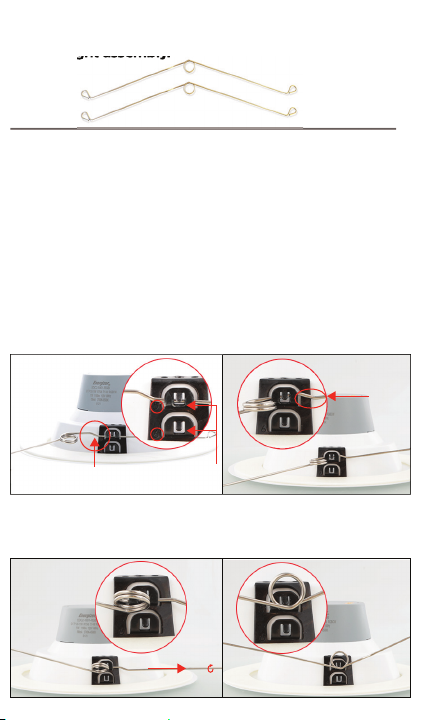
MOUNTING INSTALLATION
7
Follow these mounting installation instructions to install the
Smart LED Down Light into an existing standard E26 ceiling
light fixture recess.
A. Turn off the power.
Caution: Prevent electric shock!
Make sure that the power to the existing fixture is turned off
at the circuit breaker.
B. Remove the existing bulb and lighting trim assembly.
Remove the existing bulb and trim assembly to expose the
lighting socket and to make sure that the LED Down Light can
be installed.
C. Position the felt spacer on the LED down light assembly.
Place the spacer on the Smart Wi-Fi LED Down Light
assembly so that it will be positioned between the downlight
and the ceiling.
Caution: This product is connected to the AC power
supply. Carefully read and understand the instructions
in this manual before installing this product. Failure to
do so could lead to electrical shock or other injuries.
Help: Push the Smart Wi-Fi LED Down Light into
the recess to test to make sure that nothing will
impede its installation.
?

D. Install the torsion spring on to the brackets on the LED
down light assembly.
NOTE: There are two clips on each side of the Smart Wi-Fi
LED Down Light. One is marked with a ‘5’ for 5” wide
recesses, and one is marked with a ‘6’ for 6 inch wide
recesses. (FIG.1)
Select the clips that matches the width of the recess in
your ceiling. Hold the torsion spring flat (horizontal) and
place the long part of the spring (where it’s curved) onto
the clip. (FIG.1)
Then slide the long part of the spring until the coil is right
up against the clip, making sure to keep the coil horizontal.
(FIG.2)
Pull the spring to the right and at the same time start
twisting the coil upright. (FIG.3) The coil will split the clip
and snap into place. (FIG.4)
Figure 3 Figure 4
Figure 1 Figure 2
Curve
Curve Clips
Pull to right & twist
8

G. Install Smart LED Down Light Into recess.
Compress the torsion spring clips and insert them into the
recess. Carefully push the Smart Wi-Fi LED Down Light
Assembly into recess until its trim is flush with the ceiling
surface.
H. Turn on the power.
Turn the power back on.
E. Connect the light socket adapter.
Screw the E26 light socket adapter
into the light socket in the recess.
E. Connect the light socket adapter.
into the light socket in the recess.
F. Connect the light socket adapter cable to the LED
down light.
Plug the cable connector on the E26 light socket adapter
securely into the connector on the Smart Wi-Fi LED Down
Light assembly.
9
Help: It may be helpful to put one side of the
torsion spring, the side opposite you, into the
recess first; and then compress the opposite side
torsion spring and then push it inside the recess.
Take care during installation that the wires do not
get pinched.
?

APP CONTROL
This icon in the top right will take you to Device Seמּings
Turn ON and OFF your LED Down
Light by tapping the bulb icon in
the center of the screen.
The lines around the bulb will
change based on your color and
brightness seמּings.
You can also tap the switch at the boמּom for
ON and OFF.
You can set schedules by clicking the clock buמּon.
Swipe the entire screen from right to leﬞ to adjust the mode.
There are three main MODES to select from
Select a scene for a colorful decor lighting effect!
You can edit the scene name, color sequence,
color change effect and speed by clicking the
arrow on the right side of the scene.
Change Scene Name
Select what colors and
what order
(Each scene can
have a maximum of 6 colors)
Select the speed you want
the colors to change
Select the way the colors
change
Add and remove up to 15
favorite colors!
Select for white Choose a color Select and edit
decor scenes
Use scroll bar
to adjust the
brightness.
10
Adjust
Saturation
Remove
Favorite
Add
Favorite

VOICE ACTIVATION
To enable voice access for your Smart LED Down Light, you will
need to link the Energizer
®Connect skill with your choice of
voice assistant.
Search for & choose
Energizer
®Connect.
Authorize your account with the Alexa skill using the username
and password from your Energizer
®Connect app.
Voice Activation for Alexa
Make sure your Alexa device is installed and set up first.
Open your Alexa app.
Open the menu to search for “Skills”.
STEP 1
STEP 4
STEP 3
STEP 2
Choose
11
Using the name you assigned your LED Down Light, you can ask
Alexa to turn on/off your LED Down Light.
Ex: “Alexa, change bedroom LED Down Light to red”.
STEP 5

Search for & choose
Energizer
®Connect.
Voice Activation for the Google Assistant
Make sure your Google Assistant device is installed and
set up first.
Open your Google Home app.
Search for &
choose
Energizer
®
Connect.
Using the name you assigned your LED Down Light, you can
ask the Google Assistant to turn on/off your LED Down Light.
Ex: “Ok Google, change bedroom LED Down Light to red”.
Click
“Have something already set up?”
Authorize your account with the Google Assistant skill using the
username and password from your Energizer
®Connect app.
Click “Set up device”.
Click the “+” to add a new device.
STEP 6
STEP 7
STEP 1
STEP 2
STEP 4STEP 5
STEP 3
Click
Click Choose
Click
12

13
STEP 1
Open the Energizer Connect app and click the
“+” at the top right of the Home Screen and
select “Add Scene”.
STEP 2
Select “Launch Tap To Run” and fill out the
information.
STEP 3
Once your Smart Scene is created, return to
the Smart Scene manager by clicking on the
three lines in the top leﬞ of the Home Screen
to open the main Menu, and then selecting
“Smart Scenes”.
STEP 4
Click the buמּon at the boמּom of the screen
that says “Add to Siri”.
STEP 5
Select your new Tap to Run Smart Scene from
the list and click “Add to Siri”.
STEP 6
Create a custom phrase for Siri to run
your Smart Scene.
(this can be any verbal command)
Select
Now Siri can use your voice and custom verbal command to turn your
LED Down Light on or off, activate your favorite lighting paמּern, adjust
the device at the same time as your other smart devices, or whatever
you’ve set up as your Tap To Run Smart Scene.
|
Voice Activation for Siri

14
LEGAL & WARRANTY
To see Warranty information and Certification Legal warnings,
please see our website.
www.energizerconnect.com
©2021 Energizer. Energizer, Energizer Bunny design and certain
graphic designs are trademarks of Energizer Brands, LLC and
related subsidiaries and are used under license by Jem
Connected IOT, Inc. All other brand names are trademarks of
their respective owners. Neither Jem Connected IOT, Inc. nor
Energizer Brands, LLC is affiliated with the respective owners of
their trademarks.
Apple and the Apple logo are trademarks of Apple Inc.,
registered in the U.S. and other countries.
App store is a service mark of Apple Inc.
Google, Android and Google Play are trademarks of Google LLC.
Amazon, Alexa and all related logos are trademarks of
Amazon.com, Inc. or its affiliates.

15
TROUBLESHOOTING
HAVING TROUBLE WITH SETUP?
Don’t return this product to the retailer, we’re here to help
Please call us at 888-693-4189 or visit www.energizerconnect.com
for video tutorials, updated manuals and more FAQs for your device.
My device won’t connect to my network!
1. Make sure you are connected to your 2.4 GHz network and your
device is blinking red before you start trying to connect your device.
2.You may need to reset your device if you are having trouble.
Check out page 2 for the location of your device’s reset buמּon.
3.To allow the app to locate the network, you may need to
allow permissions for location and turn on your Bluetooth.
4.If you are not certain what type of network you have, contact
your Internet Service Provider and ask them to create a
separate, dedicated 2.4GHz network. You can also do this
manually in your router’s seמּings.
5.Try moving to a spot closer to your router for connecting.
6.You can also purchase a WiFi extender to increase your WiFi
range and strength.
7. In some cases, you can try using the secondary pairing mode
by clicking “Net Pairing Mode” on the Add Device screen (see
boמּom of page 3). Follow the on-screen instructions.

Save these instructions
• To prevent the risk of electric shock, disconnect the power,
during installation and handling, by switching off the circuit
breaker to the fixture.
• Only install the product in a recess that matches the product as
described in this user manual.
• Take care to prevent damage to wiring during installation.
Prevent wires from being pinched or from being pushed against
sharp metal surfaces.
•Do not modify the product, or use it for purposes not defined in
this manual.
•Not intended for use with emergency exits or in other safety
critical locations.
• Wear gloves and protective glasses, to prevent injury from
sharp edges, debris, or other material.
• Work on a sturdy ladder or surface when installing the product.
• This product is designed to be used in a circuit protected by a
fuse or circuit breaker, and it is designed to be installed in
accordance with electrical codes. Consult a qualified electrician.
If you are in any dubt about the your wiring, or about the
installation, of this product.
16
CAUTIONS
Table of contents
Other Energizer Lighting Equipment manuals
Popular Lighting Equipment manuals by other brands

Philips
Philips SP160P LED40S 840 W60L60 PSU SI Mounting instruction

ONFORU
ONFORU DT5UV product manual

Peak Roots
Peak Roots GOLDi600 Owner's manual & safety instructions

Global Pool Products
Global Pool Products TIDAL WAVE owner's manual

ERA Lighting
ERA Lighting 280W Beam Spot Wash user manual

BARRON
BARRON TL301 installation instructions

VERTUO
VERTUO 44001336 Assembly guide

Clevertronics
Clevertronics LP Ultrablade Pro CUBPRO Series Installation & maintenance instructions

Ikan
Ikan WS-F100A quick start guide

Chauvet
Chauvet Strike 324 Quick reference guide

MOFLASH SIGNALLING
MOFLASH SIGNALLING RA201-20 INSTALLATION & TECHNICAL INFORMATION

Saxby Lighting
Saxby Lighting 76768 Instruction leaflet