Eng3 NanoVi User manual

User Manual
NanoVi™ Devices
Eng3 Corporation

eng3
1

2
eng3
NanoVi Eco™ / NanoVi Pro™ / NanoVi Exo™
User Manual
User Manual Eng3 Part Number: 4530-00
M004-rev10
Copyright 2017, Eng3 Corporation. All rights reserved. No part of this publication may be
reproduced, copied, stored in a retrieval system, or transmitted, in any form or by any means without
the prior written permission of Eng3 Corporation.
eng3

eng3
3

4
eng3
Table of Contents
1Device Description.........................................................................................................................1
2Contra Indications..........................................................................................................................3
3Possible Side Effects .....................................................................................................................3
4Warnings and Precautions.............................................................................................................4
4.1 Device and Accessory Warnings........................................................................................5
5Initial Set Up...................................................................................................................................5
5.1 Unpacking Device & Accessories.......................................................................................5
5.2 Set Up ................................................................................................................................ 6
6Operating Instructions....................................................................................................................8
6.1 General Use .......................................................................................................................8
6.2 Use of Flex-Arm ................................................................................................................. 9
6.3 Nasal Cannula ..................................................................................................................10
6.4 Power On .........................................................................................................................10
6.5 Touch Screen Interface....................................................................................................10
6.6 Application Schedule .......................................................................................................11
6.7 Lights Illuminating the Glass Container...........................................................................11
6.8 Session Running...............................................................................................................13
7Operating in Standard Mode........................................................................................................13
8Operating in SmartCard Mode.....................................................................................................15
8.1 Owner Card......................................................................................................................15
8.2 User Card .........................................................................................................................18
9Use with Accessories...................................................................................................................20
9.1 Transportation Case ........................................................................................................ 20
10 Cleaning Instructions....................................................................................................................22
11 Maintenance.................................................................................................................................23
12 Disposal of NanoVi™ Device and Parts ......................................................................................23
13 Storage.........................................................................................................................................23
14 Troubleshooting ...........................................................................................................................24
14.1 Normal Operation ............................................................................................................24
14.2 Errors...............................................................................................................................24
15 Product Specifications and Registrations ....................................................................................26
15.1 Technical Specifications..................................................................................................26
15.2 Product Registrations ......................................................................................................27
16 Warranty.......................................................................................................................................29
17 Service Policy...............................................................................................................................30
18 Ordering Parts and Accessories..................................................................................................30
19 Contact Information......................................................................................................................31
20 Appendix A: Accompanying Documents......................................................................................32
20.1 User Manual for Nasal Cannulas Model # 1600-1 ..........................................................32
20.2 User Manual for Power Supply Part # TR60M12-01E12 ................................................36

eng3
5

eng3
1
1 Device Description
The process that takes place within the NanoVi™ device occurs in four steps:
1 Creation of a constant air stream with intake of ambient air
2 Humidification of the air stream, enriching the air stream with water molecules
3 Generation of a specific signal known to initiate repair mechanisms in the body
4 Transfer of the signal across the humid air stream to the user via a Flex-Arm
The NanoVi™device is designed to help initiate the body’s natural repair of free radical damage.
When this damage accumulates it is called oxidative stress damage and is, in optimal situations,
counterbalanced by the body’s oxidative response. This involves repair and rejuvenation at the cellular
level. Within the body, on an ongoing basis, oxidative response is triggered by a specific signal
naturally emitted by certain free radicals (called Reactive Oxygen Species or ROS). NanoVi™devices
generate the same specific signal, which is transferred across a humid air stream to the user.
Figure 1.1: Front view of the NanoVi Exo™ device
Glass
container
Touch screen
display
Humidifier
SmartCard slot
(Pro & Exo models)
Flex-Arm
Power
Button
Glass container
holder
Diffuser
Disposable
Paper Tube

2
eng3
Figure 1.2: Back view of the NanoVi™ device
WARNING: Do not unscrew or remove the factory port on the back of the device (see
Figure 1.2). There are no user-serviceable parts or parts required for maintenance inside.
This port is for factory use only. Do not open or remove the factory port.
The NanoVi™ device has a universal power supply and is plugged into a standard power outlet, 110v
to 220v.
Figure 1.3: Power supply and power cord
Humidifier
connectors
Power cord
Power supply
Power
connector
!
Factory Port

eng3
3
2 Contraindications
Do not use NanoVi™ when the PATIENT is using other breathing related therapy or remedy.
Pregnant women should consult their physician before using the device.
PATIENTS must be awake and alert when using the NanoVi™. Do not use the NanoVi™ when
unconscious or when under the influence of drugs or medications which interfere with alertness.
3 Possible Side Effects
The following temporary reactions have been occasionally observed when first using the NanoVi™
device. Typically, when side effects occur the body is going through an adjustment. Try shorter
sessions if necessary.
•Drowsiness: Use a shorter session length for the first few sessions, Choose the time of the first
session to accommodate unexpected drowsiness, which might occur after the initial application.
This will disappear after several sessions.
•Insomnia: To avoid trouble falling asleep, do your session at least 4 hours before going to bed
when you first start using the device.
•Dizziness and/or headaches: Dizziness and/or headaches can temporarily appear and will disap-
pear after a short period of time. Should this occur, use shorter session times.
•Changes in stool: If unwanted changes in stool consistency appear, use shorter session times.
•Skin reactions: If skin reactions, such as reddening and itching, appear use shorter session times
until skin reactions have disappeared.

4
eng3
4 Warnings and Precautions
Read the User Manual carefully before using the NanoVi™ device for the first time.
•Refer to the User Manual whenever questions or uncertainties arise with respect to correct hand-
ling of the NanoVi™ device.
•Before use, make sure that the water level in the container is between the maximum and minimum
levels marked on the container. Never fill above the maximum level as a higher level could cause
water drops to enter the tubing.
•Change the water in the glass container regularly. At least once a day if there are multiple users
and at least once a week or every five hours of use for individual users. Use only distilled, purified
or osmotic water. Normal water could cause chalky deposits in the diffuser and the glass
container.
•Never use the device if any part of the humidifier is damaged. A defect can cause leakage and pe-
netration of water into the inner parts of the device. Contact your retailer to purchase a
replacement.
•Protect the NanoVi™ device from extreme temperatures and moisture during operation or storage.
These conditions can damage internal components.
•The device should only be used on a stable surface. The NanoVi™ device should not be used
during transport.
WARNING: This product is not designed for use on an unconscious PATIENT
(unresponsive to stimuli). If the PATIENT is unresponsive to stimuli do not use this
product.
WARNING: This product is not designed for use in Oxygen rich environments. Do not use
in or near Oxygen rich environments.
WARNING: This product is not water or drip resistant. Do not use in wet environments or
areas that may have splash or drip issues.
WARNING: Spilling water on the device may be hazardous and may damage the device.
Do not spill water on the device.
WARNING: No modification of this equipment is allowed. Any changes could cause harm
or increase hazard for the OPERATOR or the PATIENT. The warranty is void if any
modification is made to this equipment.
WARNING: Do not carry the device with the humidifier installed. The humidifier is not
secured to the device and could fall and cause injury to the OPERATOR, PATIENT, or
another person or animal, or could damage other objects or surfaces.
!
!
!
!
!
!

eng3
5
WARNING: Do not connect or attach any item that is not specified as an attachment by
the manufacturer.
WARNING: This product is not meant to be used in temperatures below 59°F (15°C) or
temperatures exceeding 97°F (36°C).
This device complies with Part 15 of the FCC Rules. Operation is subject to the following two
conditions: (1) this device may not cause harmful interference, and (2) this device must accept any
interference received, including interference that may cause undesired operation.
If there is interference being caused by electromagnetic emissions then the user is encouraged to try
to correct the interference by one or more of the following measures:
•Reorient or relocate the device.
•Increase the separation between the NanoVi™ and the other device/s.
•Connect the NanoVi™ into an outlet on a circuit different from that to which the other device/s are
connected.
•If it is not resolved or if you have questions contact the service department (see section 16).
4.1 Device and Accessory Warnings
WARNING: If the power cord is damaged or the casing of the power supply is cracked or
damaged in any way, DO NOT USE IT.
WARNING: Always use the power supply (power adapter) provided by Eng3. Operation is
restricted to 12V DC at the device input. If the original power adapter is defective or lost,
only replace it with a power supply provided by Eng3. Power supply make and model is
Cincon TR60M12-01E12, which must be an IEC 60601-1 compliant power supply. Use of
any other supply is prohibited.
•Only use the Salter Labs nasal cannula model 1600-1.
5 Initial Set Up
5.1 Unpacking Device & Accessories
1. Inspect shipping box for damage upon arrival. Contact your retailer immediately if the box is
damaged.
!
!
!
!
6
eng3
2. Unwrap the NanoVi™ device carefully and keep the original packing materials for future trans-
portation of the device.
3. Place the NanoVi™ device on a flat, clean surface, such as a table.
4. Unpack all accessories and place them beside the device.
5.2 Set Up
There are no special tools or materials required for setup other than distilled, purified or osmotic water
to clean and fill the glass container. The user who receives treatment is the PATIENT and when they
also operate the device they are considered the OPERATOR and SERVICE PERSONEL.
WARNING: Do not connect or attach any item that is not specified as an attachment by
the manufacturer.
WARNING: This product is not meant to be used in temperatures below 59°F (15°C) or
temperatures exceeding 97°F (36°C).
Follow these steps to set up your device:
1. Use indoors, away from wet/splash/drips, between 59°F (15°C) and 97°F (36°C).
2. Place the NanoVi™ device on a clean, solid surface.
3. Rinse glass container using distilled, purified or osmotic water.
4. Fill the container with distilled, purified or osmotic water. Make sure the water is between the
maximum and minimum filling levels on the container.
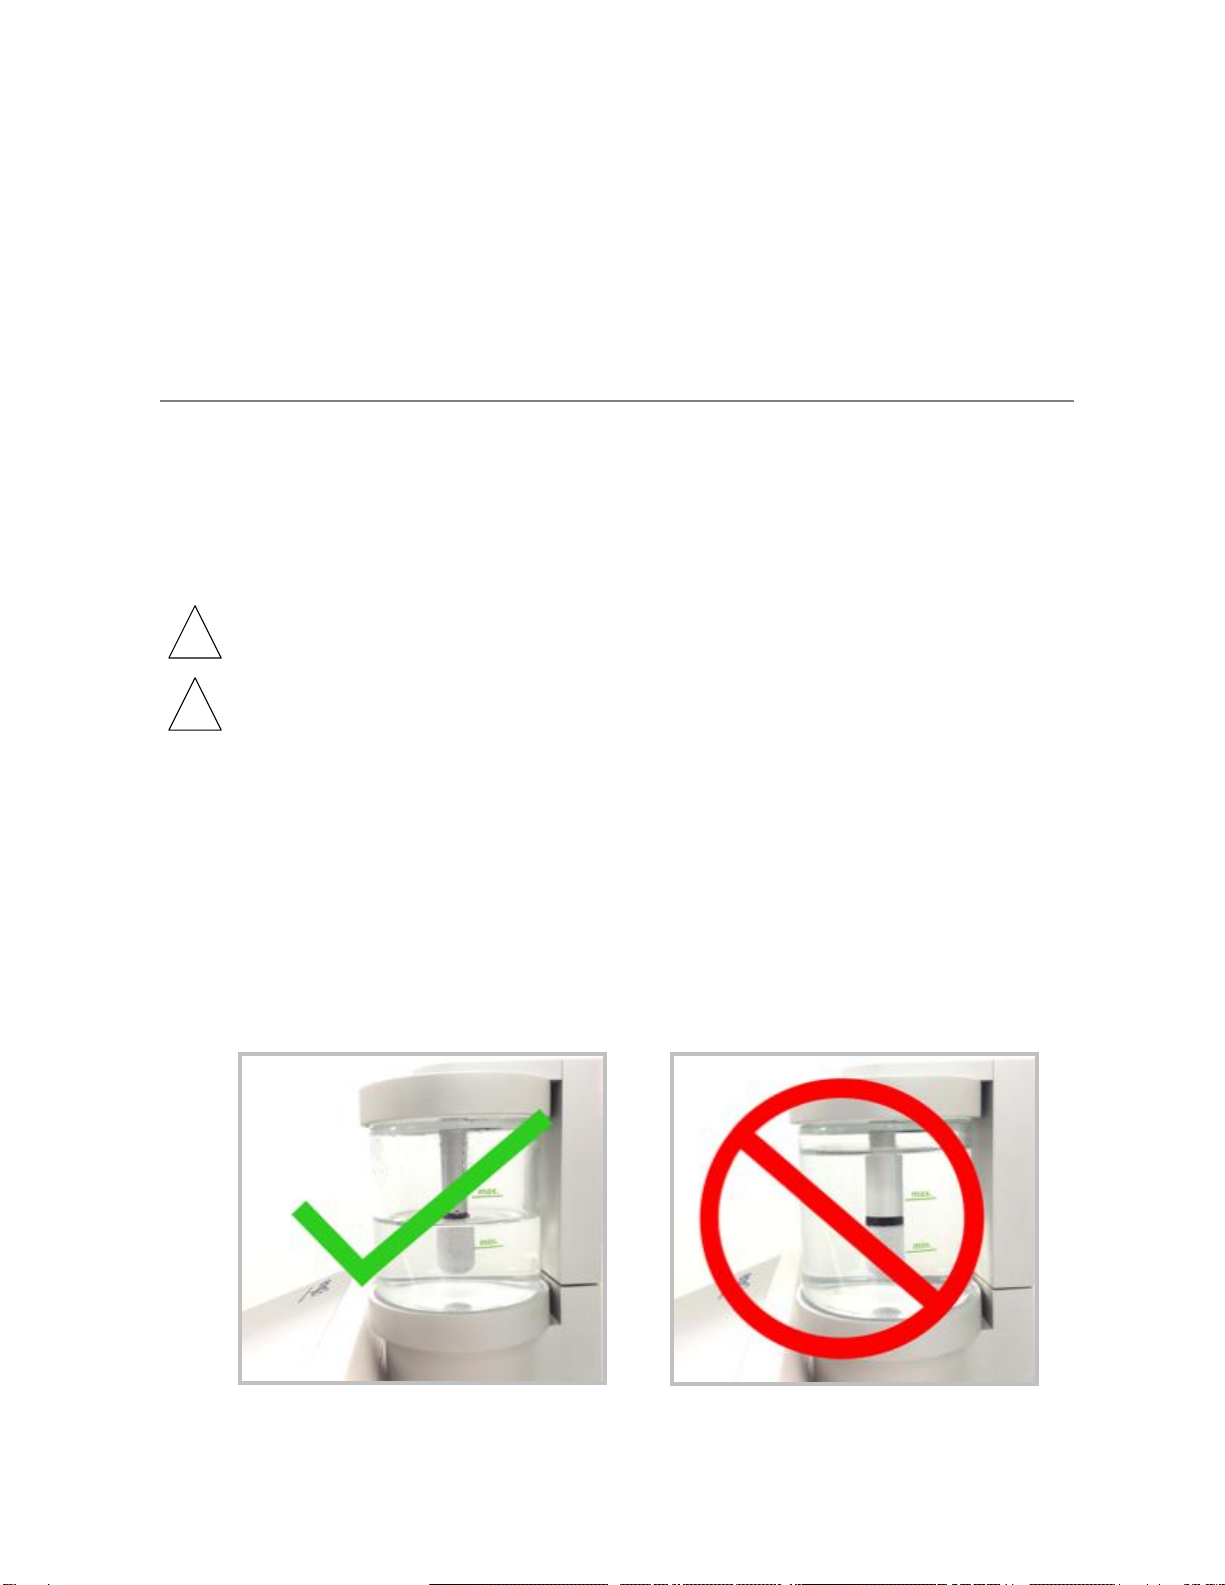
Figure 5.1: Correct water levels Figure 5.2: Incorrect water levels
!
!
eng3
7
WARNING: Fill water at least to the minimum filling level as indicated on the container.
Adequate air humidification depends on the amount of available water. (Figure 5.1)
WARNING: Do not fill the container with more water than the maximum filling level indica-
tes, as water drops or water may enter the tube system or device. (Figure 5.2)
5. Hand tighten glass container into the glass container holder.
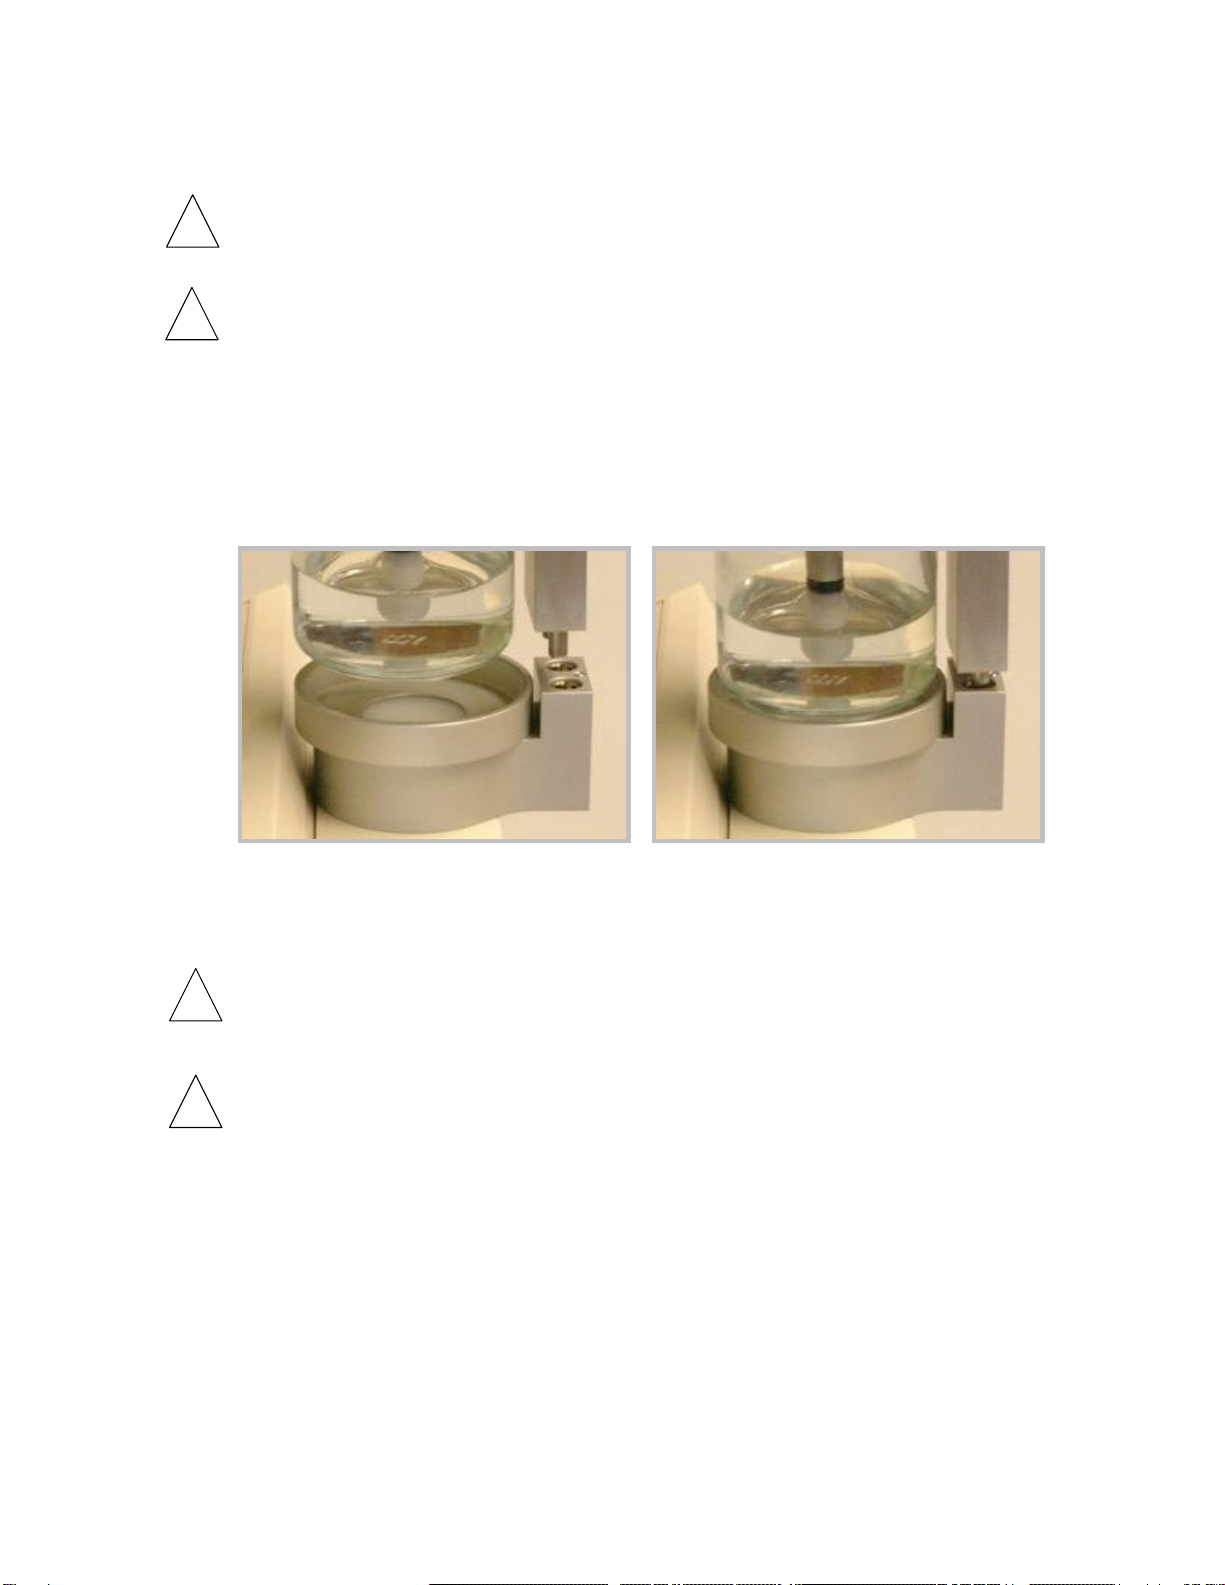
6. Insert humidifier into the fitting on the top of the device, at the back. The connecting tubes
protruding from the humidifier slide down into the device as shown in Figure 5.3. There will be
a small gap between the humidifier and the device when there is a proper connection.
Figure 5.3: Inserting humidifier into device
WARNING: Only insert the humidifier with the glass container facing the front of the
device. The glass container must be aligned with the circular metal component on top of
the device. Inserting the humidifier in any other position, could injure the PATIENT or
damage the device.
WARNING: Do not tip the container when inserting it into the top of the device, as water
drops or water may enter the tube system or device.
Confirm that there is only a small gap between the humidifier and the device. This ensures a
proper connection. (Figure 5.4).
!
!
!
!
8
eng3
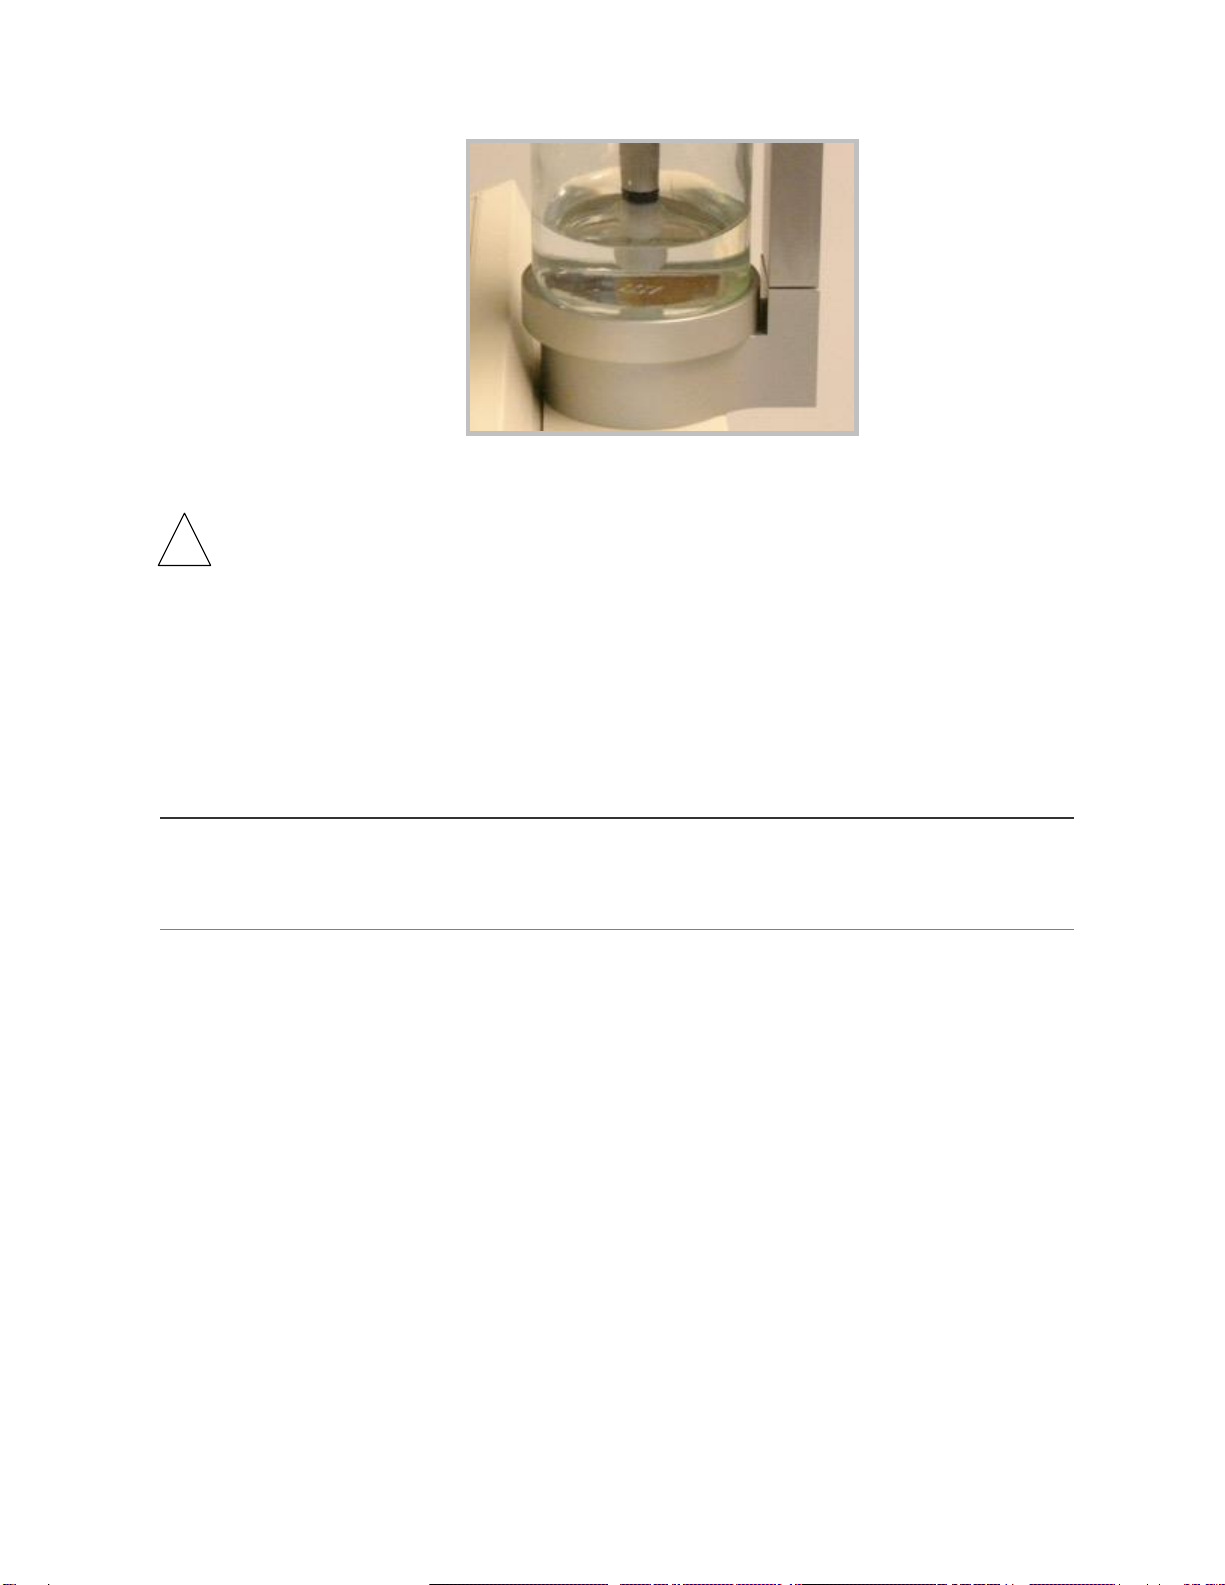
Figure 5.4: Correct insertion of humidifier
WARNING: Do not force humidifier into the device; it will fit firmly with a small gap
between the two metal pieces.
7. Connect the power cord to the power supply. Plug the power supply into the NanoVi™ device.
Note Figure 1.2 to locate the power connector on the back of the device. Plug the power cord
into an electrical outlet.
The NanoVi™ device is now ready for operation.
6 Operating Instructions
6.1 General Use
The NanoVi™ device is intended to be used on a flat surface. The device may be moved on a cart
with the humidifier installed but should never be carried with the humidifier installed because it could
fall off and do damage. The PATIENT can be sitting or lying down. The Flex-Arm bends following its
natural curvature and should be positioned for comfort. The device can be used with or without a nasal
cannula. When used with a nasal cannula, the PATIENT should be positioned close enough to the
device that there is never tension (pulling) on the nasal cannula. The nasal cannula should be worn
correctly (see section 6.3) as show in figure 6.1. See Appendix A for proper nasal cannula use. If the
PATIENT is using the device with no cannula, the Paper Tube should be positioned 1-3 inches (2.5 -
7.6 cm) away from the nose as show in in figure 6.2.
!

eng3
9
Figure 6.1: Use of Nasal Cannula Figure 6.2: Use of Paper Tube
6.2 Use of Flex-Arm
NanoVi™devices come with an installed Flex-Arm, as shown in Figure 6.3.
Remove the protective cap from the outlet on the Flex-Arm, if it is in place. Place one of the disposable
paper tubes that come with the device onto the end of the arm and push it on to fit snuggly.
Gently pull the Flex-Arm towards your face. The end of the paper tube should be in front of your nose,
one to three inches away, as shown in Figure 6.4. The Flex-Arm can be moved and repositioned for
comfort but must not be bent sharply. It is important to be sitting or lying still and to have the Flex-Arm
correctly positioned so that you are inhaling the output from the device.
WARNING: Do not try to bend the Flex-Arm into sharp angles.
WARNING: Do not move or attempt to lift the device by pulling on the Flex-Arm.
Figure 6.3: NanoVi Pro™ Device
Figure 6.4: Flex-Arm use
!
!

10
eng3
6.3 Nasal Cannula
The NanoVi™device can be used with a nasal cannula inserted on the outlet in the middle of the Flex-
Arm attachment. For proper use of the nasal cannula, refer to Appendix A: Accompanying Documents,
User Manual for Nasal Cannulas. The NanoVi™ device should only be used with the nasal cannula
that has the make and model: Nasal Cannula (Adult) Salter Style 1600-1. For proper operation, a short
cannula that has one-foot instead of the standard seven-foot length tubing is used. The one-foot
disposable cannula is shown in Figure 6.5. The user does not have to be still when using the cannula.
It allows the user to make small movements and turn their head without interrupting their session. Use
of the cannula is shown in Figure 6.6.
6.4 Power On
Press the large button on the front of the device to turn the power on. The power button will illuminate
with a green circle and the touch screen display will automatically start with a self-test. Once the
device is ready, the screen will display standard user options. Pressing the power button at the end of
a session will turn the device off. If you do not turn the device off and it is not used for 15 minutes, it
will turn itself off.
6.5 Touch Screen Interface
The touch screen is operated by lightly touching it with a finger. If necessary, a soft blunt object could
be used to operate the touch screen. Hard or sharp objects should never be used.
A tone sounds each time you press a button, indicating that your input was registered through the
touch screen.
Nosepiece
Fitting to
Flex-Arm
Figure 6.5: Nasal cannula
Figure 6.6: Nasal cannula use

eng3
11
WARNING: The use of hard or sharp objects to operate the touch screen could result in
damage to the device.
6.6 Application Schedule
The session time depends on which NanoVi™ device is used. The NanoVi Exo™device is twice as
powerful as the NanoVi Pro™, and the Pro device is twice as powerful as the NanoVi Eco™. As a
result, the standard session time of 15 minutes on the Exo is similar to 30 minutes on the Pro, or 60
minutes on the Eco device.
It may be necessary to build up use of the device slowly. The appropriate amount of time depends on
the state of each person’s health and physical condition. Although adverse reactions are experienced
by only a small percentage of people, a safe approach is to start by using the NanoVi Eco™ device for
only 10 minutes the first day (5 minutes for the NanoVi Pro™ or just a few minutes on the NanoVi
Exo™). If you feel well and are not light headed, it is fine to do more time. Feeling light headed or
uncomfortable in any way signifies that the session should be stopped for the day and time should be
added gradually. If adverse reactions occur, revert to shorter session times.
It is important to start slowly to stay within your comfort zone. If you are highly sensitive and/or in need
of detoxification, start with only a few minutes and keep adding time each day, as long as there are no
adverse reactions. In the event of an adverse reaction, reduce the number of minutes of use until there
is no reaction, then start adding minutes until the desired session time is reached.
For prevention in younger healthy people, two or three standard NanoVi™ sessions per week are
adequate. Individuals that have health challenges, are older, or are performance athletes should use
the device more. NanoVi™ devices can be used every day and several times a day, if desired. There
is no potential to be harmed by the device so overuse is not a concern, once you are accustomed to it.
The device can be used for many hours a day if desired.
6.7 Lights Illuminating the Glass Container
This lighting has no bearing on the PATIENT’S treatment, and can be set to any preference as
needed.
The lights illuminating the glass container are adjusted in the color selection screen. This screen is
accessed by touching the color wheel icon of the splash screen, during the 10-second self-test (Figure
6.7). The color wheel does not show once the self-test is complete so it is necessary to restart the
NanoVi™ device if you want to adjust the color.
!

12
eng3
Figure 6.7: Splash screen with color wheel
The default light setting is blue. This can be changed to a different color or to a transition of colors.
The device keeps running while you are in the color selection screen so you can see the effect of any
changes before leaving the screen. Figure 6.8 shows the color options available. Touch the circle to
select a color. Pressing the white circle eliminates the color but leaves the water illuminated. The
brightness level is adjusted by pressing the sun or moon symbols. To turn the lights off, press the
moon symbol until the illumination disappears. The orange bar will be all the way to the left.
The rotating color option is selected by pressing the symbols for the long or short wavelength.
Pressing any part of the color transition bar will start the rotating colors. Pressing any individual color
circle will stop the colors from changing.
Figure 6.8: Color selection screen
Once you have selected your preferences, press the check mark button near the middle of the screen
(Figure 6.8). This saves the settings and takes you back to the input screen to start your session.
Set Brightness
Save Settings
No Color
(White)
Set color transition speed
Color wheel

eng3
13
6.8 Session Running
When a session is started you will hear a quiet humming sound, see bubbles in the glass container,
and, if the lights are turned on, see the illumination of the water in the glass container.
If the water is bubbling, the device is operating correctly. If it is not bubbling, check to make sure the
humidifier is correctly seated in the back of the device and that the glass container is firmly screwed
into the glass container holder. Correctly seating the humidifier also minimizes the noise.
7 Operating in Standard Mode
All three NanoVi™ devices can be operated in standard mode. Once the device is turned on, a splash
screen appears. A self-test runs for 10 seconds with progress shown by the bar at the bottom of the
screen. (Figure 7.1)
Figure 7.1: Initial splash screen
Upon completion of the self-test, an input screen appears allowing you to enter the amount of time for
the session (Figure 7.2). Enter the desired session time by touching the appropriate numbers on the
touch screen. Time is entered in minutes. The minutes entered shows in the session time indicator in
the centre of the screen. Touching the “C” clears a number that has been entered, allowing you to
change your input.
The “M” on the input screen lets you capture the amount of time in the memory of the device as the
default session time. The amount of time most recently captured in memory will be displayed instead
of “0 min” in the time indicator for all future sessions. The default time in memory can be reset to zero
or to a different default time at any point, while the input screen is displayed.
Once the correct amount of time is entered, touch the blue start button to begin the session.

14
eng3
Figure 7.2: Input screen
Figure 7.3 shows the screen when the session is in progress. The digital clock counts down the minutes
and seconds remaining in the session. The rotating dots to the left indicate that a session is in progress.
The pause button allows you to interrupt a session (Figure 7.4). Pressing the start button restarts a
paused session. If a session has not been restarted within 15 minutes, the device will automatically turn
off.
Figure 7.3: Session in progress screen Figure 7.4: Paused session screen
Sessions can be stopped at any time by pressing the stop button. Stopping the session takes you back
to the initial entry screen shown in Figure 7.2.
Other manuals for NanoVi
2
This manual suits for next models
6
Table of contents
Other Eng3 Medical Equipment manuals


Popular Medical Equipment manuals by other brands


Getinge
Getinge Arjohuntleigh Nimbus 3 Professional Instructions for use

Mettler Electronics
Mettler Electronics Sonicator 730 Maintenance manual

Pressalit Care
Pressalit Care R1100 Mounting instruction

Denas MS
Denas MS DENAS-T operating manual

bort medical
bort medical ActiveColor quick guide

AccuVein
AccuVein AV400 user manual


