English Blinds Faux Wood Blinds User manual

Installation Guide for Faux Wood Blinds
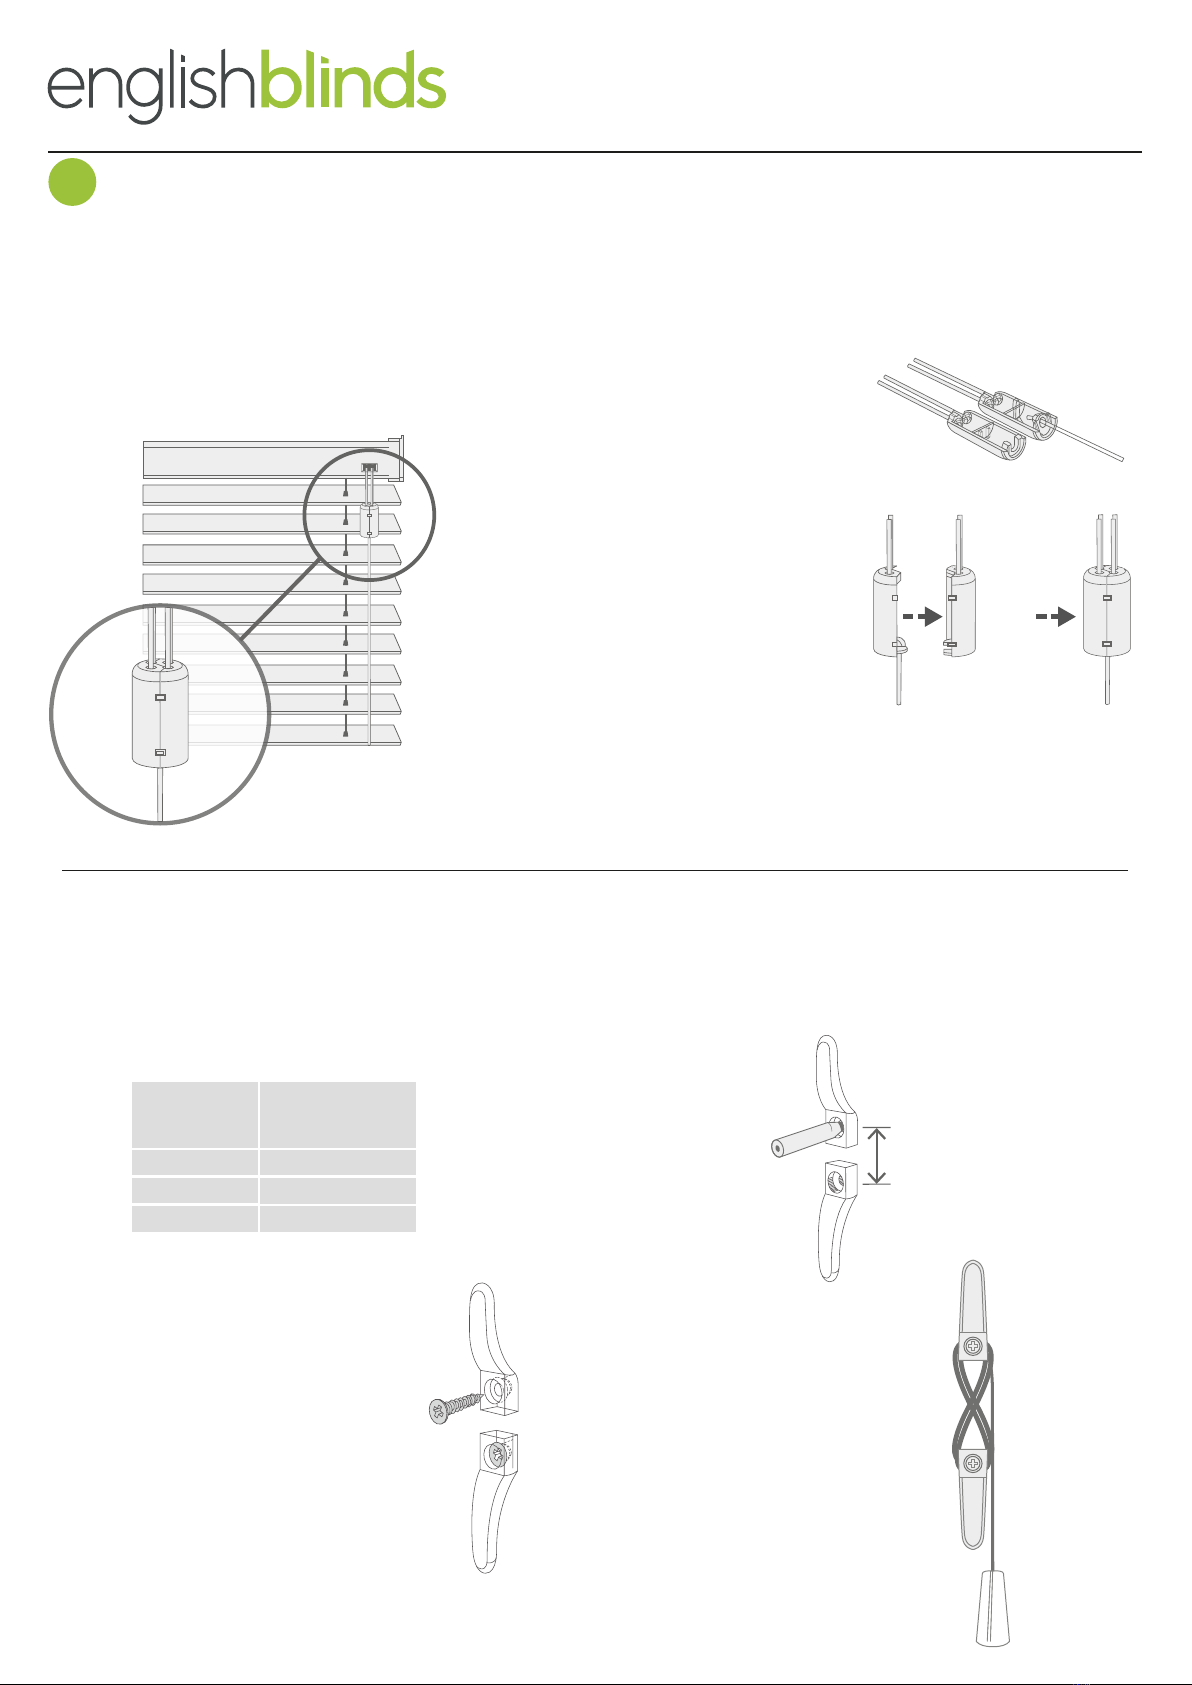
1Fitting the Brackets
The brackets can be fitted in three dierent ways:
Face Fix Top Fix Side Fix
Face Fix Top Fix
Blinds with a larger width come supplied with center support brackets. These need to be aligned with the top of the box (side) brackets. Install
them with the bigger flap situated at the top and space them equally along the width of the blind making sure they are clear of any cords
coming out of the headrail. They can be both face-fixed or top-fixed.

Installation Guide for Faux Wood Blinds
2Installing the Blind
Valance Clips
Prior to installing the blind into
the brackets, hook the valance
clips evenly along the length
of the headrail.
Open the gate of the box brackets,
li the blind up and slide the headrail
into the open brackets. Swing the
hinged section of the bracket down
and press firmly until it is locked.
3Installing the Valance
Place the valance onto the valance
clips and push it into position.
If your blind has been supplied with valance returns, slide the valance return clip
into the valance. Slot the other end of the valance clip onto the valance return
and push them together until the edges align.
Handy Tip
If you pull on the cords to tilt/rotate the slats and they do not move:
• Firstly, make sure the slats are in the fully open position and the two tilt cords are the same length.
• Next, pull the blind all the way up to the top, lock it o and remove the blind from the brackets.
• Now check inside the headrail and make sure the long metal rod is pushed fully into the tilting
mechanism (as illustrated).
Installation Guide for Faux Wood Blinds
4Child Safety
Drop of Blind
*Distance between
cord cleats
(center to center)
1 - 1000mm
1001 - 2000mm
2001 - 3000mm
100mm
150mm
300mm
Breakaway Cord Condenser
A breakaway cord condenser comes pre-fitted
to the li cords, so when a horizontal force is
applied to the cords entering the condenser, it
will safely break apart thereby eliminating any
hazardous loops.
If the cord condenser becomes separated:
Firstly, untwist and untangle the cords.
If the blind features 2 cords: press
the cord condenser together until it
is fully closed.
If the blind features 3 cords: Place the
loose cord into the opening in one half
of the cord condenser and press the cord
condenser together until it is fully closed.
If the blind features 4 cords: Place one of
the loose cords into the opening of one
half of the condenser, next place the
remaining loose cord into the opening
in the other half, then press the cord
condenser together until it is fully closed.
Cord Safety Cleat
The safety cleat needs to be installed as close as possible to the headrail and in all cases not less than 1500mm from the floor. The
cords must be fully wrapped around the safety cleat(s) when the blind is not in use. Refer to the table below to determine the
distance required between the cleats to fully accumulate the cords when the blind is completely raised up.
*Distance between
cord cleats
(center to center)
Place the safety cleat in the
desired position on the wall
and mark the positions of
the holes with a pencil.
With the hole positions marked,
drill as required and use the
screws provided to attach the
safety cleat to the wall.
Wrap the cords around the
cord cleats in a figure of 8.
When the cords are fully
accumulated, ensure they
are secure so that when any
cord is pulled, no excess
cord is released.

Li
Cord
Tilt
Cords
Installation Guide for Faux Wood Blinds
5Operation Instructions
To tilt the blind: Pull on the required tilt cord tassel to tilt slats to the desired position.
Make sure to tilt the slats to the horizontal (open) position before raising or lowering to extend the life of the blind.
To lower the blind: Move the li cord towards middle of the blind, pulling down gently until the cord lock releases.
To raise the blind: Pull the li cord downward until the blind reaches the desired height.
To lock the cords: Pull the li cord towards the outside of the blind and release. The cord will lock automatically.
6Recommended Care
This product is maintenance free, however we do recommend that regular visual checks are completed to ensure
that no components have been damaged, which could result in operating diiculties and/or cause a safety risk.
Also, follow the guidelines below to ensure the blind remains in good working order.
1. When opening or closing the blind, only raise or lower it when the slats are in the horizontal (open) position.
Larger blinds must be raised or lowered in stages. Raising or lowering in one singular motion will place excessive
stress on the mechanism, strings and brackets. Do not force the cord when tilting the blinds, this may cause the
mechanism to break.
2. It is not recommended for faux wood blinds to be fitted in areas where the temperature is likely to exceed 55
degrees Celsius, as this is likely to cause warpage of the slats.
3. Dust the blinds regularly.
Other English Blinds Window Blind manuals


Popular Window Blind manuals by other brands

MHZ
MHZ 11-8220 Installation and operating instructions

MHZ
MHZ LOOK_2 04-1621 Installation and operating instructions

John Lewis
John Lewis Roman blind user manual

Victoria M
Victoria M Bamboo Roller Blind installation instructions

Blinds on the Net
Blinds on the Net Zebra Product information

Blöcker
Blöcker Cosiflor F1 quick start guide


