manuals.online logo
Brands
  1. Home
  2. •
  3. Brands
  4. •
  5. VENETA
  6. •
  7. Window Blind
  8. •
  9. VENETA 65101-11752-D Instruction sheet

VENETA 65101-11752-D Instruction sheet

Items Not Included
How to install your
#65101-11752-D
Motorised Honeycomb Blind
Included Hardware
measuring
tape
drill with
2mm bit
phillips bit or
screwdriver
pencil knife
The hardware can be found in
the end of every box.
1Installation Brackets
15mm Screw
31mm Screw
50mm Screw
63mm Screw
Installing inside the window frame…
At top of window frame, measure 40mm in from each end and mark
with a pencil (30mm for blind width less than 610mm); this is the
centre of the outer brackets.
Place brackets in position 2mm back from the front of the window
opening and mark where the screws will go.
We recommend drilling pilot holes for the screws using a 2mm bit.
Fix the brackets into position using 2 long screws for each bracket into
the first two holes closest to the front of the bracket.
If more brackets are supplied, space them evenly between the first
two brackets.
Installing outside the window frame…
Measure 40mm (30mm for blind width less than 610mm) in from top left
and top right of where the blind will sit (normally edge of architrave)
and mark where the screws will go; this is the centre of the outer brackets.
We recommend using a spirit level to align brackets if not installing on
the architrave.
We recommend drilling pilot holes for the screws using a 2mm bit.
Fix the brackets into position using two 31mm installation screws for
each bracket.
If more brackets are supplied, space them evenly between the first two
brackets.
Note: If spacer blocks are required then always make sure the raised
side of the spacer block is against the bracket, then use 50mm screws
when using 1 or 2 blocks, or use the 63mm screws if using 4 blocks.
2Install Battery Tube
Please first take off the battery clip from the battery tube.
Attach to back of headrail:
Screw the battery clips into the pre-drilled
holes on the back of the headrail using one 15mm screw for each clip.
Or attach to window frame:
Position the battery clips 113mm apart and
within reach of the motor cord using one 15mm screw for each clip.
Unscrew the end cap of the battery tube and load 8 AA Batteries (Not
Included).
Clip the battery tube to the battery clips.
Connect the battery tube to the motor of the blind.
Installation
Bracket
Battery Clip
(Attached to
Battery Tube)
Wall Plugs for
Brick or Cement
using a 6mm bit
(If requested)
8 x AA Batteries
Required Tools
Spacer Block
(Outside Mount Only)
113mm
40mm Space Evenly Space Evenly 40mm
3Install Blind
Position the top front lip of the blind under the top front lip of
the brackets.
Push the blind up at the back to click into position as per
diagram to the right.
!
1
Please write a review on our
website at…
www.venetablinds.com.au
Feedback?
We would love to know how you
went with your installation…
100% Child Safe
This product has no cord or
chain and is 100% Child Safe
How to install, operate and maintain your
Motorised Honeycomb Blind
Operating your
Blind
Use the remote to raise and lower the blind. Ensure the channel displayed on the remote
matches the channel of the motor.
Replacing Batteries
Disconnect the battery tube from the motor, then remove the battery tube from
the battery clips and remove the end cap.
Replace the AA batteries, re-clip the tube into place and re-connect the motor.
2Manual Control of Blind
You can operate the blind using the manual control button found on the
front of the blind head rail.
Do not continue to press the manual control
button over 4 seconds.
3Dusting
Dust can be removed using a feather duster or vacuum with brush attachment on low suction.
4Spot Cleaning
Use a warm damp cloth or a mild detergent for tougher stains.
Dab the affected area, but do not rub the fabric. Finish with just a warm damp cloth.
Allow the fabric to dry in the lowered position.
5Ultrasonic
If ultrasonically cleaning the blind please specify that a mild solution must be used.
Note the rails should never be immersed in liquid.
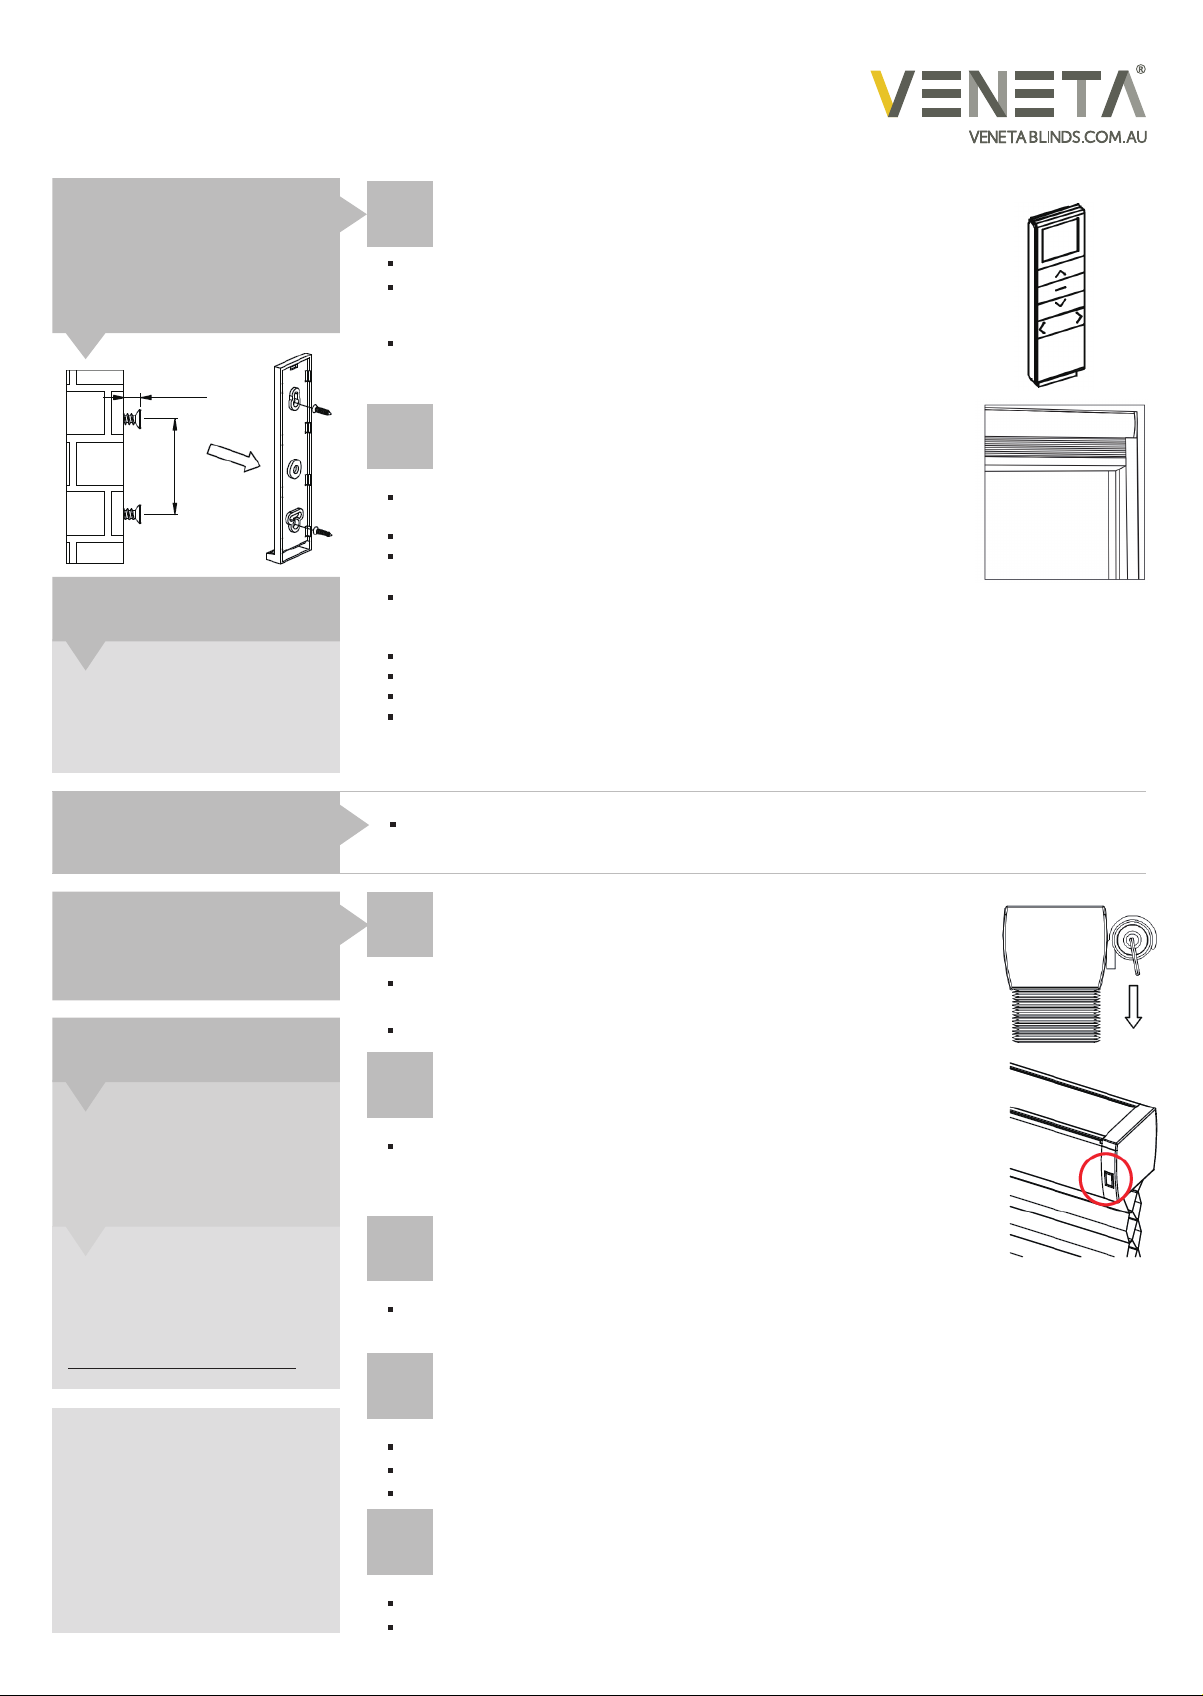
4Remote Control
Install battery into the remote.
Optional: Install your remote control holder using two 15mm screws. Each
screw should be placed with a distance of 82mm between them, and
should protrude 3.5mm from the wall. Attach the remote holder to the wall.
Note:The remote is pre-programmed in the factory and will work straight
out of the box. If you would like to change the settings, please see the
appendix on the next page.
Need HELP?
Call our
Customer Service team
for assistance
1300 836 382
82.5mm
3.5mm
Maintaining your
Blind
1
Installation
Continued…
Great Job… Enjoy your new Veneta Blinds!
The Light Guard is to be placed at the front and the back of the blind at
either side as per image.
Note: all 4 Light Guards are identical.
Note: try to leave a 2mm gap between the blind (bottom rail) and the
Light Guard to prevent scraping.
Note: use the double sided tape on the short side of the Light Guard to
attach to the window frame.
Place the front Light Guards in position and mark the edges with a pencil.
Remove the double sided tape and carefully place the Light Guard in position.
Place the rear Light Guards in position and mark the edges with a pencil.
Remove the double sided tape and carefully place the Light Guard in position.
5Install Light Guard (optional)
2
#65101-11752-D
Connecting the remote to the blinds:
Install the CR2450 battery into the back of the remote and leave the back plate off. Then
select the required channel on the remote.
Install the 8 AA batteries into the battery wand
Motorised Honeycomb Blind
Need HELP?
Call our
Customer Service team
for assistance
1300 836 382
Appendix
3
1.
2.
Connect the battery wand to the blind (blind will respond by moving up and down slightly)
On the back of remote in the battery compartment…
Press the left P2 button (blind will move up and down slightly)
Press UP (^) button
Press the Stop (-) button
Your remote is now connected to the blind
3.
4.
5.
6.
7.
8.
9.
Note: Ensure the battery wand has been disconnected from the blind for 30 seconds:
Setting the upper and lower limits:
Connect the battery wand to the blind (blind will respond by moving up and down slightly)
Select the channel number of the blind you are setting the limits for
Press the left P2 button (blind will move up and down slightly)
Press the UP button (blind will move up and down slightly)
Press the left P2 button (blind will move up and down slightly)
Press the UP button and wait for the blind to rise to the desired upper limit
Press the STOP button, the blind will stop
Press the STOP button 5 times
Wait for the blind to stop responding (blind will move up and down slightly)
Press the DOWN button and wait for the blind to lower to the desired lower limit
Press the STOP button, the blind will stop
Press the STOP button 5 times
1.
2.
3.
4.
5.
6.
7.
8.
9.
10.
11.
12.
Note: Ensure the battery wand has been disconnected from the blind for 30 seconds:
If the sequence does not work or you press a button out of sequence, unplug the battery pack for
30 seconds, then re-connect and try the sequence again.

Other VENETA Window Blind manuals

VENETA Smartfit Single Cell Honeycomb Blind Instruction sheet

VENETA

VENETA Smartfit Single Cell Honeycomb Blind Instruction sheet

VENETA Zebra Blind User manual

VENETA

VENETA Zebra Blind User manual

VENETA 65101-40160-D Instruction sheet

VENETA

VENETA 65101-40160-D Instruction sheet

VENETA Smartfit Honeycomb Blind User manual

VENETA

VENETA Smartfit Honeycomb Blind User manual

VENETA Skylight Honeycomb Blind User manual

VENETA

VENETA Skylight Honeycomb Blind User manual

VENETA 65101-50725-D Instruction sheet

VENETA

VENETA 65101-50725-D Instruction sheet

VENETA 65101-10242-G User manual

VENETA

VENETA 65101-10242-G User manual

VENETA Cordloop Instruction sheet

VENETA

VENETA Cordloop Instruction sheet

VENETA Smartfit Day & Night Honeycomb User manual

VENETA

VENETA Smartfit Day & Night Honeycomb User manual

VENETA 65101-21734-E Instruction sheet

VENETA

VENETA 65101-21734-E Instruction sheet

VENETA Vertical Honeycomb Blind User manual

VENETA

VENETA Vertical Honeycomb Blind User manual

VENETA 65101-40159 Instruction sheet

VENETA

VENETA 65101-40159 Instruction sheet

VENETA 65101-20145-A Instruction sheet

VENETA

VENETA 65101-20145-A Instruction sheet

VENETA 65101-40168-E Instruction sheet

VENETA

VENETA 65101-40168-E Instruction sheet

VENETA 65101-21717-B Instruction sheet

VENETA

VENETA 65101-21717-B Instruction sheet

Popular Window Blind manuals by other brands

rollease acmeda Automate FT instructions

rollease acmeda

rollease acmeda Automate FT instructions

Velux RMM A manual

Velux

Velux RMM A manual

IKEA KADRILJ 60 manual

IKEA

IKEA KADRILJ 60 manual

Cosiflor F1 quick guide

Cosiflor

Cosiflor F1 quick guide

Velux INTEGRA Solar DSL instructions

Velux

Velux INTEGRA Solar DSL instructions

Alpha Motors WSERD30B Guide

Alpha Motors

Alpha Motors WSERD30B Guide

walser 30271 User instructions

walser

walser 30271 User instructions

Nien Made Cordless Faux Wood Blind Installation & maintenance instructions

Nien Made

Nien Made Cordless Faux Wood Blind Installation & maintenance instructions

Bettio Adriatico Instructions for use and maintenance

Bettio

Bettio Adriatico Instructions for use and maintenance

TOSO DUAL 100 instruction manual

TOSO

TOSO DUAL 100 instruction manual

Draper Clutch-Operated FlexShade instructions

Draper

Draper Clutch-Operated FlexShade instructions

HunterDouglas Standard Hardware System Installation operation care

HunterDouglas

HunterDouglas Standard Hardware System Installation operation care

HunterDouglas Solera Soft Shades manual

HunterDouglas

HunterDouglas Solera Soft Shades manual

Euro Systems Serena 95 Operation and maintenance

Euro Systems

Euro Systems Serena 95 Operation and maintenance

MV LINE CLARA 40 DOUBLE Installing instructions

MV LINE

MV LINE CLARA 40 DOUBLE Installing instructions

Claus NEW DARKENING BLIND Instruction for correct Installation and Use

Claus

Claus NEW DARKENING BLIND Instruction for correct Installation and Use

Benthin P1634 Installation operation care

Benthin

Benthin P1634 Installation operation care

Duemmegi Contatto Mod4TP/I quick start guide

Duemmegi

Duemmegi Contatto Mod4TP/I quick start guide

manuals.online logo
manuals.online logoBrands
  • About & Mission
  • Contact us
  • Privacy Policy
  • Terms and Conditions

Copyright 2025 Manuals.Online. All Rights Reserved.