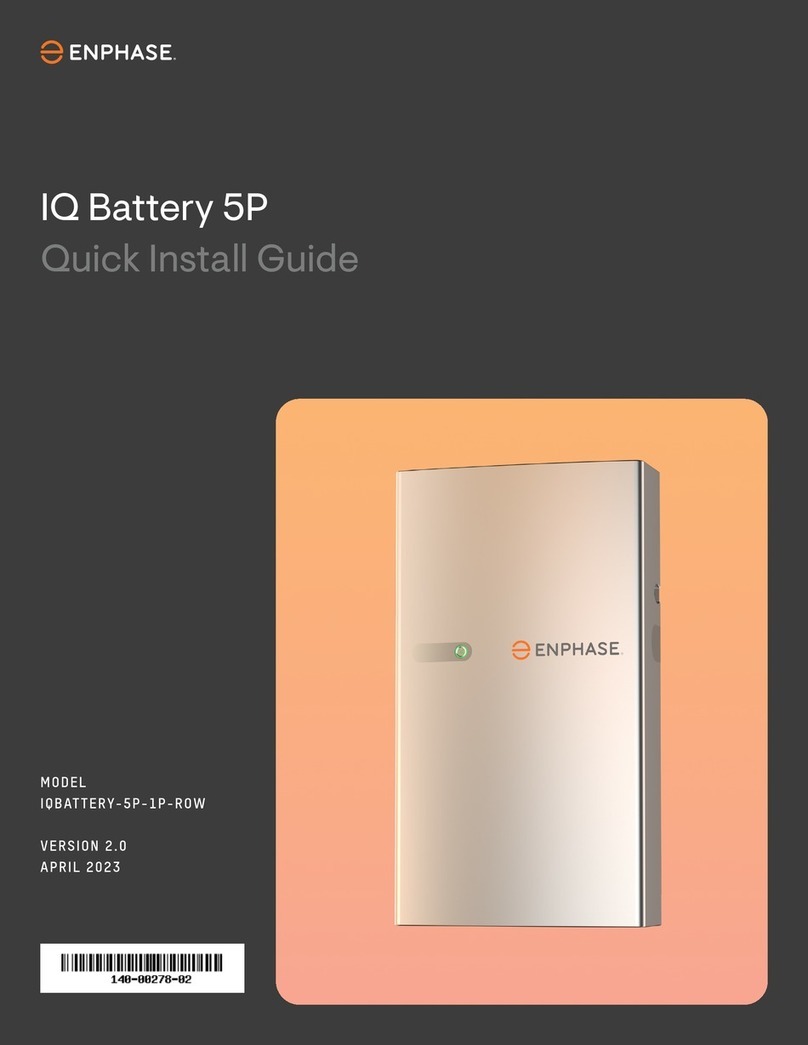
enphase B05-PM-0550-O User manual

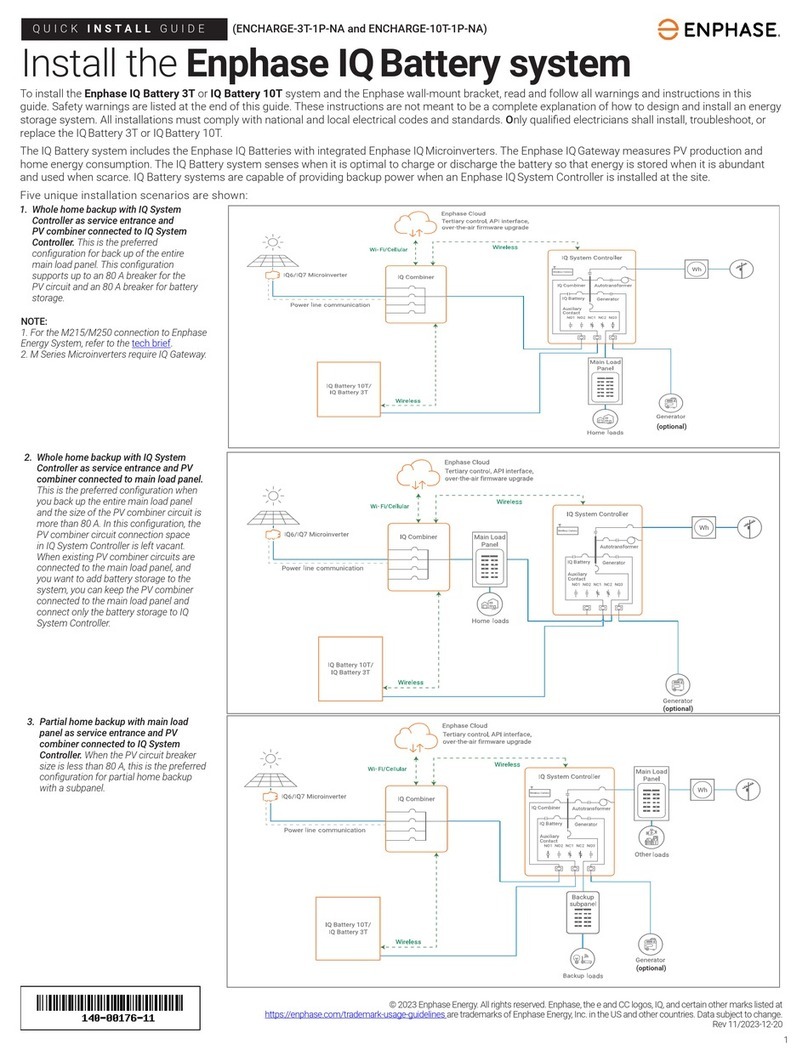
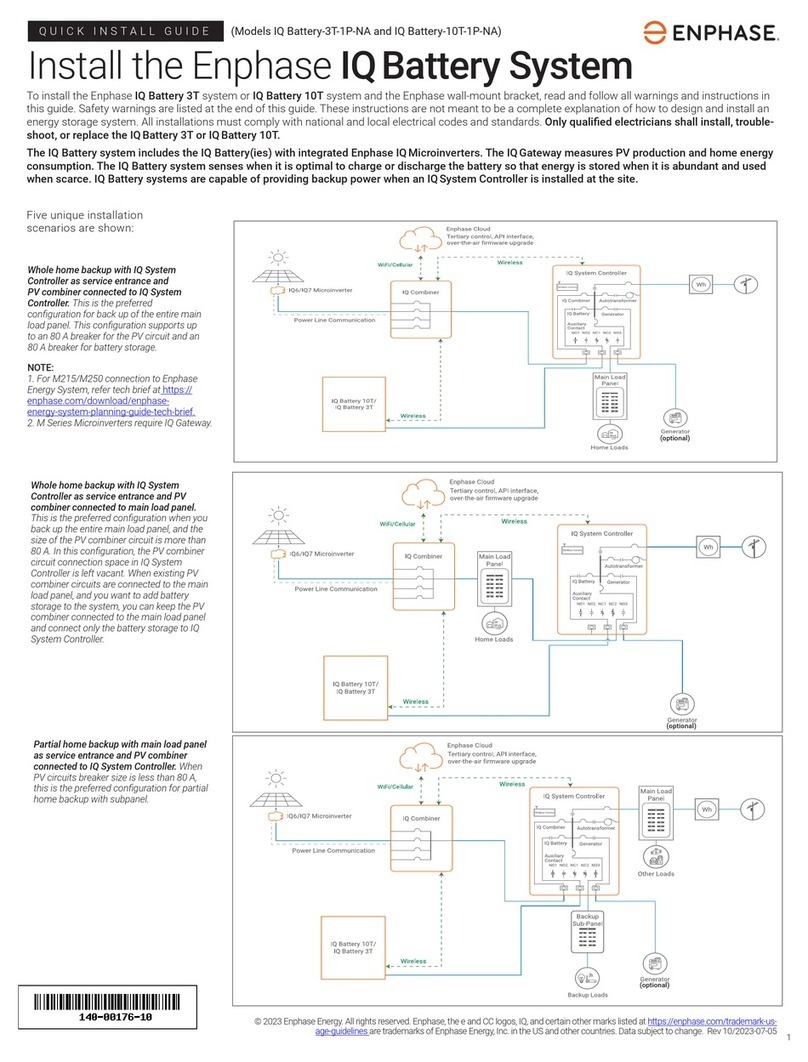
QUICK INSTALL GUIDE (Model: B05-PM-0550-O)
Installing IQBattery 5P on Pedestal Mount
To install the Enphase IQ Battery 5P on the oor using Pedestal Mount, read and follow all warnings and instructions in this guide. Safety warnings are
listed at the end of this guide. These instructions are not meant to be a complete explanation of how to design and install an energy storage system. All
installations must comply with national and local electrical codes and standards. Only Enphase certied installers shall install, troubleshoot, or replace
the Pedestal Mount.
© 2023 Enphase Energy. All rights reserved. Enphase, the e and CC logos, IQ, and certain other marks listed at
https://enphase.com/trademark-usage-guidelines are trademarks of Enphase Energy, Inc. in the US and other countries.
Data subject to change. Rev02/05-18-2023
A. PREPARATION
IQ Battery 5P unit(s) can be installed on the oor using the Pedestal Mount. The
components required for installation are shown in the following image.
Required tools:
• #4 Phillips bit
• #2 Phillips bit
• X20 bit
• SW15 drive
• A 10 mm drill bit
• Hammer drill
• Torque driver 1 N m to 60 N m or equivalent
* Only four M10 at washers are required for the installation. The remaining
four washers can be used to level uneven surfaces.
The Pedestal Mount can be used to mount one IQ Battery 5P on a level
oor. This section provides guidelines on how to choose and prepare a oor
surface, and to determine the amount of space needed to meet spacing
requirements when installing IQ Battery 5P units on a Pedestal Mount. Follow
these instructions in addition to the site preparation instructions mentioned in
the IQ Battery 5P Quick Install Guide.
Dimensions of an IQ Battery 5P mounted on a Pedestal Mount
B. INSTALLATION
1Planning and site preparations
LABEL DESCRIPTION QUANTITY
Items in IQ Battery 5P packaging
1 IQ Battery 5P cover 1
2 IQ Battery 5P unit 1
3 Wall-mount bracket 1
4 Seismic screw 2
5 Battery cover grounding screws 2
6 Conduit cover 2
Items in IQ Battery 5P Pedestal Mount packaging
7 Pedestal bracket assembly 2
8 Pedestal cover 1
9 L bracket 2
10 Screw, M4*10 mm Lg 6
11 Screw, M8*18 mm Lg 8
12 M10 anchor bolts 4
13 M10 at washer 8*
14 Concrete oor mount 1
✓NOTE: In locations such as garages, local requirements may
exist to additionally prevent damage to the equipment from
vehicles. Make sure to check local building codes for require-
ments.
✓NOTE: The top shield provided with IQ Battery 5P is not required
for installing the battery on a pedestal mount. Installers can
dispose it as per local guidelines.

2
2
A. Choose a location with at least 200 mm of space between a battery and
the battery mounted in front.
B. Select a smooth, at concrete surface with a minimum thickness of 102
mm to hold the supplied anchor bolts.
2Prepare leg assembly
Items required for the step:
A. Place the wall-mount bracket aligned over the mounting holes on the
pedestal bracket assembly.
B. Screw the wall-mount bracket onto the pedestal bracket assembly using
the eight M8 screws (torque to 17 N m).
C. Attach the L brackets onto the pedestal bracket assembly using the two
M4 screws (torque to 1.5 N m).
Drill holes in the oor for installation
Pedestal Mount spacing details - Top view
Pedestal Mount spacing details - Side view
3
✓NOTE: The spacings mentioned in this section are minimum al-
lowable spacings as per UL9540A. Installers should also ensure
compliance with local battery system spacing codes.
76.2 mm
200 mm
362 mm
254 mm
311 mm
Wall mounted IQ Battery 5P units
Pedestal
mounted IQ Battery 5P units
152 mm 152 mm
Min. distance from
the oor to bottom
of the unit. (both
oor mount and wall
mount congura-
tions).
✓NOTE: Minor unevenness in the concrete surface can be
corrected by using the extra four at washers included in the
package.
✓NOTE: Minimum distance from the oor to the bottom of the
battery unit is 152.4 mm.
LABEL DESCRIPTION QUANTITY
3 Wall-mount bracket 1
7 Pedestal bracket assembly 2
9 L bracket 2
10 Screw, M4*10 mm Lg 2
11 Screw, M8*18 mm Lg 8
Use the paper board template provided with the Pedestal Mount
kit tomark the drill holes in the oor.
A. Fix the paper board template on the identied smooth and at
concrete surface.
B. Drill a hole with 10 mm diameter and 70 mm depth through the xture and
into the concrete.
C. Clean the drill holes thoroughly.
D. Remove the paper board template.
✓NOTE: The surface at the drilling location should be at least 102
mm thick to support the oor mount installation.
✓NOTE: To ensure that there is no misalignment, installers can verify
the alignment of anchor holes of the leg assembly with drilling
points on the template by placing the leg assembly on the template
before drilling the holes.
Fix leg assembly on the oor
Items required for the step:
Secure the pedestal assembly on the oor using four M10 anchor bolts
and four M10 at washers (torque to 54 N m).
4
LABEL DESCRIPTION QUANTITY
12 M10 anchor bolts 4
13 M10 at washer 4

3
3
A. Assemble the battery cover to the battery unit and fasten the battery
cover grounding screws (torque to 3.0 N m) as per IQ Battery 5P Quick
Install Guide.
B. Use conduit covers to close the unused conduit openings on the battery.
Mount the battery unit to the wall-mount bracket (on the keyhole slot)
using mount bolts, and fasten the seismic screws (torque to 5.6 N m) as
per IQ Battery 5P Quick Install Guide.
C. This completes the IQ Battery 5P installation on a Pedestal Mount. To
nish the installation and energize the battery, follow the instructions in
the IQ Battery 5P Quick Install Guide.
Fix the pedestal cover on the leg assembly
Items required for the step:
5
Assemble the pedestal cover onto the L-brackets using four M4 screws
(torque to 1.5 N m) as shown in the following image.
LABEL DESCRIPTION QUANTITY
8 Pedestal cover 1
10 Screw, M4*10 mm Lg 4
✓NOTE: Install the pedestal cover before installing the IQ Battery
5P unit.
Mount IQ Battery 5P unit on the leg assembly
Items required for the step:
6
LABEL DESCRIPTION QUANTITY
2 IQ Battery 5P unit 1
4 Seismic screw 2
WARNING! Risk of injury and equipment damage. Two per-
sons are required to lift the IQ Battery 5P.
WARNING! Lift the IQ Battery 5P using the handles, ensure
that the battery’s front side is facing towards you.
Fix the battery cover on the IQ Battery 5P unit
Items required for the step:
7
LABEL DESCRIPTION QUANTITY
1 IQ Battery 5P cover 1
5 Screw, M5, 10 mm 2
6 Conduit cover 2

Enphase customer support: https://enphase.com/contact/support
Safety and Advisory Symbols
+DANGER: This indicates a hazardous situation, which if not avoided, will result in
death or serious injury.
*WARNING: This indicates a situation where failure to follow instructions may be a
safety hazard or cause equipment malfunction. Use extreme caution and follow
instructions carefully.
✓NOTE: This indicates information particularly important for optimal system opera-
tion. Follow instructions carefully.
Safety Instructions
+DANGER: Risk of electric shock. Risk of re. Only qualied electricians should
install, troubleshoot, or replace the IQ Battery(ies).
+DANGER: Risk of re or explosion. Only qualied personnel, using personal protec-
tive equipment (PPE) should transport or handle the IQ Battery(ies).
+DANGER: Risk of explosion. Do not dispose of IQ Battery(ies) in a re or by burn-
ing. The IQ Battery(ies) can explode.
+DANGER: Risk of re or explosion. This product is designed for stationary
installation only and should be used accordingly. It is not designed for mobile
applications such as installation and on vehicles and trailers and should not be
used in such applications.
+DANGER: Risk of re. During use, when stored, or during transport, keep the IQ
Battery(ies) in an area that is well-ventillated and protected from the elements,
where the ambient temperature and humidity are within -20°C to 55°C (-4°F to
131°F) and 5% to 100% RH, non-condensing, preferably out of direct sunlight. Do
not install the IQ Battery(ies) at elevations over 2,000 m (6,562 feet) above sea
level.
+DANGER: Risk of re. If the IQ Battery(ies) generate smoke, remove AC power
from the Enphase System and turn the DC connect switch to the o position so
that charging/discharging stops.
+DANGER: Risk of electric shock. Do not use Enphase equipment in a manner not
specied by the manufacturer. Doing so may cause death or injury to persons, or
damage to equipment.
+DANGER: Risk of electric shock. Do not install the IQ Battery(ies) without rst
removing AC power from the photovoltaic system. Disconnect the power coming
from the photovoltaics before servicing or installing.
+DANGER: Risk of electric shock. Always de-energize the AC branch circuit during
an emergency and/or before servicing the IQ Battery(ies).
+DANGER: Risk of electric shock. Risk of high short-circuit current. Observe the
following precautions when working on batteries:
• Remove watches, rings, or other metal objects.
• Use tools with insulated handles.
• Wear insulating gloves and boots.
• Do not lay tools or metal parts on top of batteries.
+DANGER: Risk of electric shock. Risk of re. Do not work alone. Someone should
be in the range of your voice or close enough to come to your aid when you work
with or near electrical equipment.
+DANGER: Risk of re. Do not allow or place ammable, sparking, or explosive
items near the IQ Battery(ies).
+DANGER: Risk of electric shock. In areas where ooding is possible, install the IQ
Battery(ies) at a height that prevents water ingress.
+DANGER: Risk of electric shock. AC voltage is present at the output when the DC
switch is on.
+DANGER: Risk of electric shock. Branch circuit protection must be o before
switching DC power on or o.
+DANGER: Risk of electric shock. The DC switch must be in the OFF position for
shipping and service.
*WARNING: Risks of electric shock, energy hazard, and chemical hazard. Do not
disassemble.
*WARNING: Risk of equipment damage. During use, storage, transport, or installa-
tion, always keep the IQ Battery(ies) in an upright position.
*WARNING: You must install the IQ Battery(ies) only on a suitable wall using an
Enphase wall-mount bracket.
*WARNING: Before installing or using the IQ Battery(ies), read all instructions and
cautionary markings in this guide and on the equipment.
*WARNING: Do not install or use the IQ Battery(ies) if it has been damaged in any
way.
*WARNING: Do not exceed the maximum number (1) of IQ Batteries in a 20 A AC
branch circuit.
*WARNING: Do not sit on, step on, place objects on, or insert objects into the IQ
Battery(ies).
*WARNING: Do not place beverages or liquid containers on top of the IQ Bat-
tery(ies). Do not expose the IQ Battery(ies) to liquids or ooding.
*WARNING: When placing the IQ Battery(ies) in storage, ensure that AC power
is not present and that the DC switch is in the OFF position. While in storage,
damage to the battery can occur from over-discharge. If the battery state
of charge falls to 0%, the IQ Battery(ies) can be damaged or destroyed.
Because of this, the IQ Battery(ies) must only be stored for a limited amount
of time.
• The IQ Battery(ies) must be installed and energized by the “Must
Energize By” date on the shipping box label.
• The IQ Battery(ies) must have a charge state of no more than 30%
when placed in storage. To do this, the IQ Battery(ies) must be placed
in Sleep Mode.
• If the IQ Battery(ies) is already been installed, it must be placed
into Sleep Mode prior to uninstalling. A battery in Sleep Mode can be
stored for a maximum of two months after being placed into Sleep Mode.
✓NOTE: Perform installation and wiring, including protection against lightning and
resulting voltage surge, in accordance with all applicable local electrical codes
and standards.
✓NOTE: Using unapproved attachments or accessories could result in damage or
injury.
✓NOTE: Install properly rated over current protection as part of the system instal-
lation.
✓NOTE: To ensure optimal reliability and to meet warranty requirements, the IQ
Battery(ies) must be installed and/or stored according to the instructions in this
guide.
✓NOTE: The Enphase IQ Battery(ies) are intended to operate with an Internet
connection. Failure to maintain an Internet connection may have an impact on
the warranty. See Limited Warranty for full terms and services (enphase.com/
warranty).
✓NOTE: When replacing Enphase IQ Battery(ies), you must replace it with an IQ
Battery(ies) of the same type, with the same AC current rating.
✓NOTE: When disconnected and stored, no automatic charge of the battery is
possible.
✓NOTE: Properly mount the IQ Battery(ies). Ensure that the mounting location is
structurally suited to bearing the weight of the IQ Battery(ies).
✓NOTE: During use, storage, and transport, keep the IQ Battery(ies):
• Properly ventilated
• Away from water, other liquids, heat, sparks, and direct sunlight
• Away from excessive dust, corrosive and explosive gases like ammonia,
and oil smoke
• Away from direct exposure to gas exhaust, such as from motor vehicles
• Free of vibrations
• Away from falling or moving objects, including motor vehicles. If mounted
in the path of a motor vehicle, we recommend a 91 cm (36 in)
minimum mounting height
• At an elevation of lower than 2,000 m (6,562 feet) above sea-level
• In a location compliant with re safety regulations
• In a location compliant with local building codes and standards
✓NOTE: Conditions for the IQ Battery 5P installation site apply also to storage
conditions.
SAFETY
IMPORTANT SAFETY INSTRUCTIONS. SAVE THESE INSTRUCTIONS. This guide contains important instructions that you must follow during the installa-
tion and maintenance of the Enphase IQ Battery(ies). Failing to follow any of these instructions may void the warranty (enphase.com/warranty).
In Case of Fire or other Emergency
In all cases:
• If safe to do so, switch o the AC breaker for the IQ Battery 5P circuit, and if an
isolator switch is present, switch o the AC isolator for the IQ Battery 5P circuit.
• Contact the re department or other required emergency response team.
• Evacuate the area.
• Contact Enphase customer support at https://enphase.com/contact/support.
In case of re:
• When safe, use a re extinguisher. Suitable types are A, B, and C dry chemical
re extinguishers. Additional extinguishing media include carbon dioxide or
alcohol-resistant foams.
In case of ooding:
• Stay out of the water if any part of the IQ Battery(ies) or wiring is submerged.
• If possible, protect the system by nding and stopping the source of the water,
and pumping it away.
• If water has contacted Enphase equipment, such as IQ Battery(ies), IQ
System Controller, IQ Combiner, or IQ Gateway, they should be replaced. Please
work with your installer to evaluate the next steps.
In case of unusual noise, smell, or smoke:
• Ensure nothing is in contact with the IQ Battery(ies) or in the venting area of the
IQ Battery(ies).
• Ventilate the room.
In the event of an electrolyte leakage:
The Enphase IQ Battery 5P has a lithium iron phosphate (LFP) battery that contains
organic electrolyte and is sealed in a protective case. Leaked electrolyte is toxic
and highly ammable. Leaked electrolyte is colorless and has a sweet odor. Electro-
lyte uid tends to evaporate quickly, leaving behind a white grainy substance. If an
odor is obvious, proceed to the following steps:
•
• Evacuate personnel to a safe area and keep unauthorized personnel away.
• Isolate the spill area to a minimum distance of 75 feet (25 meters).
• Eliminate all ignition sources (no smoking, sparks, ames, hot equipment) in the
immediate area around the spill.
• Do not touch or walk through spilled material.
• Avoid breathing vapors. Ensure adequate ventilation.
• Use personal protective equipment.
• Emergency Telephone Number (Chem Tel):
• Inside United States Territories and Canada: (800) 255-3924
• Outside United States Territories and Canada: +01 (813) 248-0585
Safety Instructions, continued
Environmental Protection
ELECTRONIC DEVICE: DO NOT THROW AWAY. Waste electrical
products should not be disposed of with household waste.
Proper disposal of batteries is required. Refer to your local codes
for disposal requirements.
9
4
DANGER! DO NOT TOUCH OR INGEST ANY LIQUID SUSPECTED TO BE
BATTERY ELECROLYTE.
Other enphase Batteries Pack manuals
