Entel DX Series User manual

Designed in the United Kingdom
Quick Start User Guide
DX Series

Quick Start User Guide V2.6
INTRODUCTION
The Entel DX Series is designed for those users who demand the ultimate
performance for their business critical communications.
Your radio can be congured for Digital or Analogue channels (DX644/ATIS
analogue only), or both and to meet your exact requirements the radio may
have been customised by your Entel dealer. These features will be explained
in a separate guide issued by the dealer.
OPTIONAL ACCESSORIES
Attaching and removing accessories
1. To attach an accessory, remove the
accessory cover by unscrewing the locking
screw anti-clockwise (store in a safe place).
2. Plug the accessory into the socket,
then carefully tighten the locking screw
clockwise until nger tight (do not
overtighten or use any implement)
3. To remove an accessory, unscrew the
locking screw of the accessory by hand
in an anti-clockwise direction. Ensure you
re-t the accessory socket cover so as to
protect the socket.
4. To prevent corrosion or damage to the
accessory connector terminals ensure either a) the accessory cover is tted or
b) an accessory is securely tted, never leave the terminals exposed.
BATTERY INFORMATION
Battery charging
1. Connect the AC adapter to the charger pod and plug in.
2. Turn the radio off.
3. Insert the battery pack into the charger pod, either with or without the radio
attached. The charger LED status light changes to red and charging begins.
4. When charging is complete the charger status LED changes from red to green,
a fully charged battery pack will take approximately 2-6 hours to recharge.
A ashing red LED on the charger indicates there is a problem with the battery.
Remove the battery from the charger and consult your Entel Dealer.
CAUTION
BATTERY PACK PRECAUTIONS
• Do not recharge the battery pack if it is already fully charged. Doing so may
reduce the life of the battery pack.
• After charging is complete, remove the battery from the charger. If the power to
the charger is turned off and on again, charging will restart and the battery will
become overcharged.
• Please ensure the radio is turned off before placing it in the charger and never
switch a radio on whilst in the charger.
• Only use Entel branded battery packs and chargers.
• Do not short the battery terminals or dispose of the battery in a re.
• Do not charge the radio and/or battery pack if they are wet.
DANGER
DO NOT DISASSEMBLE OR MODIFY THE BATTERY IN ANY WAY!
Your Entel battery pack incorporates a safety circuit to avoid danger, if the safety
circuit is damaged or bypassed, or the battery cells are damaged directly, they
may generate extreme heat, smoke, rupture and emit ames.
REPAIR & MAINTENANCE
Repair and maintenance of this product can only be carried out by Entel. Any
damage to the anti-tamper seal will invalidate the product approval. Should you have
any difculties in operating this product please contact your Entel Dealer for support.
DX Series
PACKING LIST
DXxxx Radio
CNB450E Rechargeable Li-Ion battery
CBH450 Loaded belt clip
CATxxx High efciency antenna
CxAHX Drop in charger

CONTROLS & INDICATORS
1. On/Off/Volume control.
Rotate clockwise to turn on and increase
volume. Rotate anticlockwise to reduce
volume and turn off.
2. Channel control
3. Accessory socket
4. Push-To-Talk (PTT) button.
Press to speak and release to listen.
5. Dealer programmable buttons
(ask your Dealer for more information)
DISPLAY - UHF MODEL DX644/ATIS
6. LED indicator
Red Steady - Transmitting
Red Double Flash - Low Battery
Red Fast Flash - Error
Green Steady - Receiving
Green Steady (AM) - Monitoring Channel
Green slow ash (DM) - Digital call hang time
Amber steady - Receiving invalid signal
Amber Flash every 5-seconds - Radio in standby
Amber Rapid Flash - Scanning
7. Navigation key - channel up/down
8. Microphone
9. Monitor
10. Quick access channel 16
11. Scan memorised channels
12. Programmable button
13. Memorise channels for scan
NON DISPLAY
1
5
6
3
2
8
Talk here 7
8
11
13
9
10
12
Talk here
7
1
5
6
3
21
5
6
3
2
8
Talk here
5
4
5
4
5
4
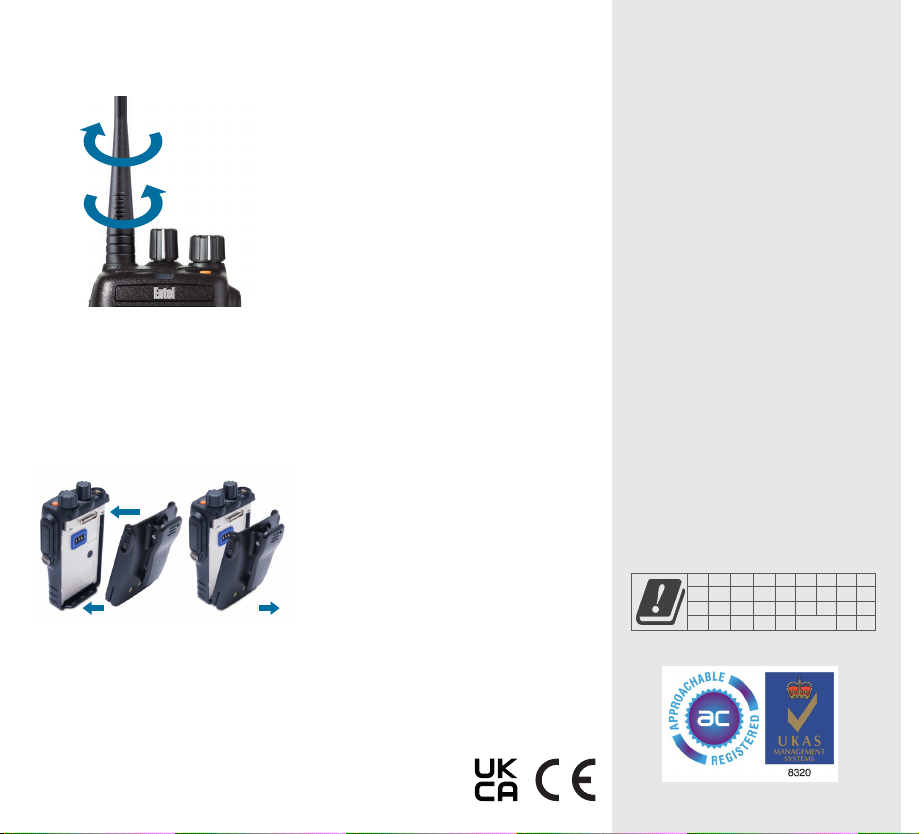
PREPARING YOUR RADIO FOR USE
Attaching / removing the antenna
1. To attach, carefully align the antenna with the
socket. Screw in the antenna and clockwise
(taking care not to cross the thread) until it is
seated rmly. (A)
2.To remove, unscrew the antenna
anti-clockwise. (B)
1. To attach (C), locate the pegs on the bottom of
the battery into the slots on the radio and pull
the 2 latches downwards, carefully pushing
the battery into the radio. Release the latches
ensuring the battery is full attached.
2.To remove (D), pull down the 2 latches and
carefully pull the battery away from radio.
A
B
C
D
SWITCHING ON, RECEPTION
AND SWITCHING OFF
1. To switch on rotate the on/off/volume control (1)
on the top of the radio clockwise, you will hear
a click from the control.
2.When the radio has passed its diagnostic tests,
it will emit a fanfare tone.
3.The radio will enter standby mode. This is
indicated by the LED ashing Amber once
every 5 seconds, indicating the radio is ready
for use.
4.Adjust the volume control (1) to select the
desired volume level.
5. Using the channel/contact list control (2)
ensure that you have the correct channel/
contact selected.
6.When receiving a valid signal the LED will
illuminate steady green and audio will be
emitted from the radio’s speaker or audio
accessory (if attached)
7. When nished using the radio, switch off by
turning the on/off/volume control (1) counter
clockwise until it clicks and the radio will be
switched off.
TRANSMITTING
1. Perform steps 1 through to 5 of ‘Switching On,
Reception and Switching Off.’
2.Before transmitting, monitor the channel and
make sure it is clear.
3.When receiving a signal, wait until the signal
stops before transmitting. The radio cannot
transmit and receive simultaneously.
4.Press the PTT (Push To Talk) button (4)
to begin your transmission. To conrm
transmission the LED illuminates red.
5. For best transmitted speech quality you must
talk directly into the radio's microphone (8) at
around 4cm between your mouth and the radio.
6.Please note: with your mouth further away, you
will transmit poor quality speech.
7. When the transmission is nished, release the
PTT button.
DECLARATION OF CONFORMITY
Hereby, Entel UK Limited
Declares that the radio equipment type
DX Series is in compliance with
Directive 2014/53/EU and Radio Equipment
Regulations 2017.
The full text of the relevant declaration of
conformity is available at the following
internet address:
EU www.entel.co.uk/red
UK www.entel.co.uk/UKCA
The product shall only be put into service
after it has been professionally configured by
a specialist radio communications dealer for
the EU member state or geographical area
it is intended to be operated within.
Intended country of use
www.entel.co.uk
Attaching / removing the battery pack
All Rights Reserved. Copyright Entel UK Ltd.
AT BE BG CH CY CZ DE DK EE
ES FI FR EL HR HU IE IS IT
LI LT LU LV MT NL NO PL PT
RO SE SI SK TR UK(NI)
Other Entel Radio manuals

Entel
Entel DX-IS Land Series Setup guide

Entel
Entel HT649 LCD GMDSS User manual

Entel
Entel HT 44 Series Setup guide

Entel
Entel HT446E/L User manual

Entel
Entel DX482M Setup guide

Entel
Entel HT446E Installation instructions

Entel
Entel HT981 Installation guide

Entel
Entel DX Marine Series Setup guide

Entel
Entel HT8/944 User manual

Entel
Entel HT544 Setup guide


Popular Radio manuals by other brands


Ericsson
Ericsson M-RK I Disassembly and assembly

auna
auna Radio Gaga 2.0 instruction manual

Makita
Makita DMR106 instruction manual

Silvercrest
Silvercrest SDRF 10 B1 Operation and safety notes

Sirius Satellite Radio
Sirius Satellite Radio SIRIUS STILETTO 2 Installation and user guide

Mutant
Mutant Wi-Fi / FM Radio user manual