EP Lighting EP-UVAW-20 User manual

EP-UVAW-20: AIR Purifying Sterilizer (Wall-Mount)
User Manual
Remote Controlled
Smart SenseTM for air quality detection and automatic sterilization control
Six layers of sterilization: Pre-Cotton, HEPA, Activated Carbon, UVC, TiO2 + UVA, Negative Ions
Quite running double fans to cover 10 ~ 22 m2 (110 ~ 230 ft2)
Filter replacement warning
Three speed settings Designed in the USA

Operational Environment
All the specifications from the above table are measured under laboratory conditions, that may
differ from working environment. If the product is technically updated, please be subject to
the new instructions, no further notification will be published.
UVAW-20 is a patented Air purifying sterilizer from the labs of EP Lighting, USA. UVAW20 is suitable
for all kids of indoor spaces. The unit filters and kills PM2.5, bacteria, virus, dust, smell and
smoke using proprietary TiO2 photocatalytic technology along with OH radical generation. The
unit also releases negative ions into the air helping to rejuvenate the environment.
Rated Voltage
The product is designed for indoor use only.
Do not use the device under the environment of high temperature, high humidity, excessive dust,
corrosive, flammable and combustible gas (such as kitchen and bathroom).
Do not use the device around heating equipments (such as oven, fan heater or other heating
devices) or under direct sunshine.
Do not use the device while the operating temperature varies extremely.
While working, the device should be 1) placed on steady and dry horizontal plane without any
incline OR 2) securely hanged on the wall with the provided wall hanger.
While working, please ensure the inlet and outlet is 30cm (12inch) far away from other objects to
ensure proper airflow.
Please make sure that the facility system voltage matches with the units voltage described in
the Technical Specification Table.
Technical Specification
AC 110/220V Rated Power 13W
50/60 Hz Noise index 53 dB
62 m3 (2189 ft3)/Hr Net Weight 2.5 kg (5.5lb)
Rated Frequency
Air Volume
Application Area Up to 22m2 (230ft2) Size 33.4 x 12.9 x 29.5 cm
13.14 x 5.07 x 11.6 in

Preparations
Please remove the package and protection film on the product and plastic bag of the filter
before the first usage of the product.
Please place the device on steady and dry horizontal plane and ensure 30cm far away from other
objects. Before plug into the power, please make sure the socket and power wire satisfy the requirement
of the product.
Operation Method
Starting up: After connecting with the power, slightly touch the “On/Off” to start up the sterilizer; Touch
again the “On/Off” button turns off the device.
Air Speed: Three air speed modes “sleep, low, and fast” are designed for the device. The unit runs at
"low" speed by default after the machine is turned on. Gently press the air speed button to change the
speed of the fan.
Timer: Two options of “1 hour, 3 hours”, slightly touch “timing” button for successive choices. 1 hour
timer lets the unit runs for an hour and auto shutdown after the timer elapses.
Sterilization: After starting up, the user could slight touch “Function” button to turn on and turn off the
UV-C lamp.
Negative ion: "Negative ion” function turns ON with the unit, and turns OFF with the
unit. While the device is on, the negative ion module continuously emits 20 minutes
negative ion, then stops for 5 minutes to repeat this action again.
Air Quality Index (AQI): The device is equipped with built-in high air quality sensor that indicates the
air quality in the room. The sensor takes 2 minutes to warm up after the machine starts, during which
the air quality indicator is not bright. After 2 minutes of warm-up, the air quality indicator
automatically detects the air quality and turns ON appropriate indicator on the unit.
Automatic and manual speed control: The default setting is the “automatic speed control” mode
after the machine is turned on. In this mode, the wind speed will be automatically adjusted according to
the air quality level. The "Manual Mode" kicks in when the user tries to adjust the fan speed on the
control panel or remote. In this mode, the wind speed will not automatically adjust based on the air
quality. If it is necessary to restore the automatic speed regulation, you need to restart the machine and
then restart it.
Filter replacement warning: When accumulated operational time reaches 1500 hours, the
three indicator lights of air quality flash simultaneously, it reminds the user to replace the filter by
alarm sound of “di di di”. After the new filter replacement, push “timing” and “air
speed” buttons for 5 seconds to reset and eliminate the alarm.
Remote control: The device is equipped with infrared remote controller with effective distance of
4~5 meters. While using, it is suggested to direct to the IR receiving window on the right of the
control panel to achieve a better function.
Fragrance Box: The user can add different varieties of fragrance to the air through the fragrance
box located inside the unit. Recommended types of fragrances are bottled perfume, wood, bead,
dried flower and fluids. Tip: Soak a sponge with the desired fragrance for economical use of the
fragrance.
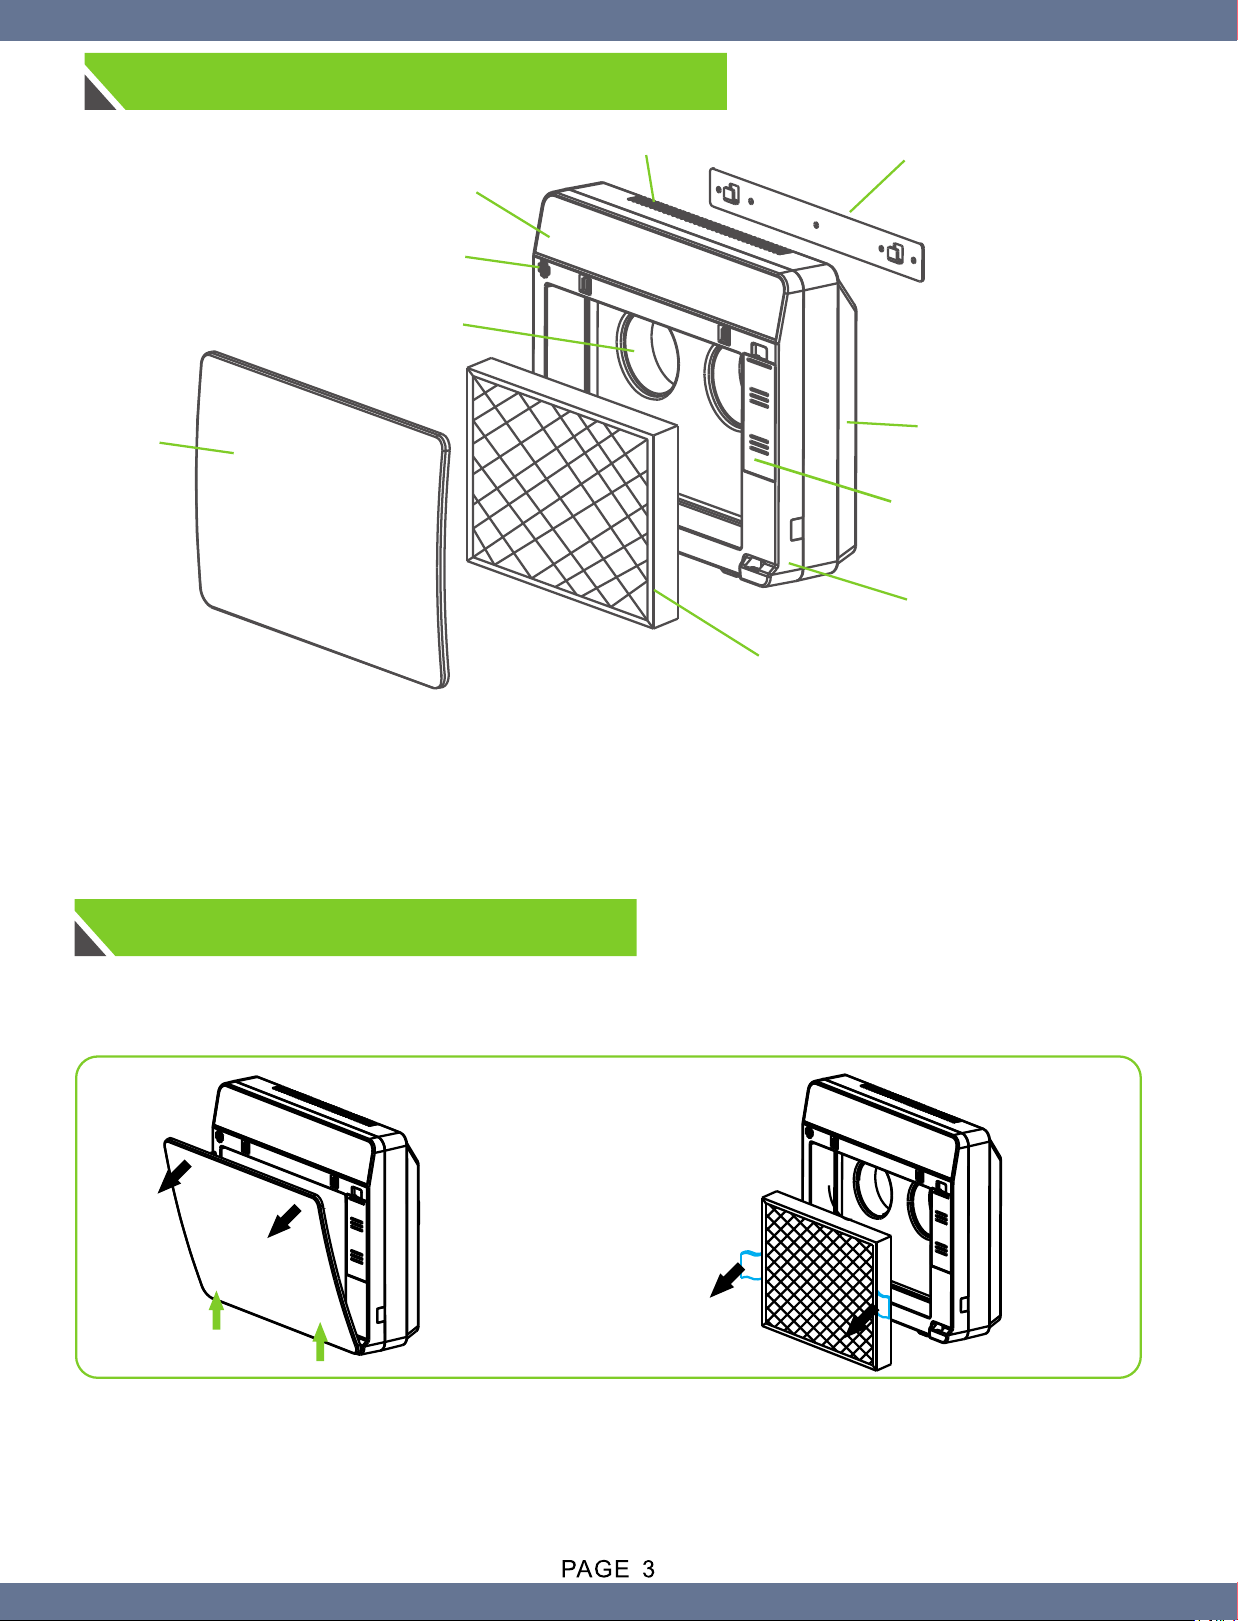
Front cover
AQI sensor
Air circulation duct
Control panel
Multi-functional fragrance box
One large and multi-functional fragrance box is originally designed to this product, allowing user to add
different fragrance into the box according to preferences and different environment conditions. For
instance, bottled perfume, agilawood, pasty fluid fragrance, fragrance bead, dried flower etc, which
immediately fills the whole room with healthy and fresh smell. A piece of sponge is recommended to use
the fragrance.
Warning (Disassembly)
Please make sure the power plug is pulled out before disassembling the product.
Tip: while disassembling, the product could be laid againt the wall or other fixed object for enhanced
stability.
Disassemble the front panel / Disassemble the filter
Hold the top by left hand, and hold the top edge of the front panel by right hand, then pull the panel out to
a 45-degree angle, then lift up the panel. Pull and hold the two braces on both sides of the five-in-
one filter by both hands, then pull it slightly to disassemble it.
Structural Drawing
Front cover
Air outlet Mounting bracket
Multi-functional
fragrance box
Composite filter
Rear cover
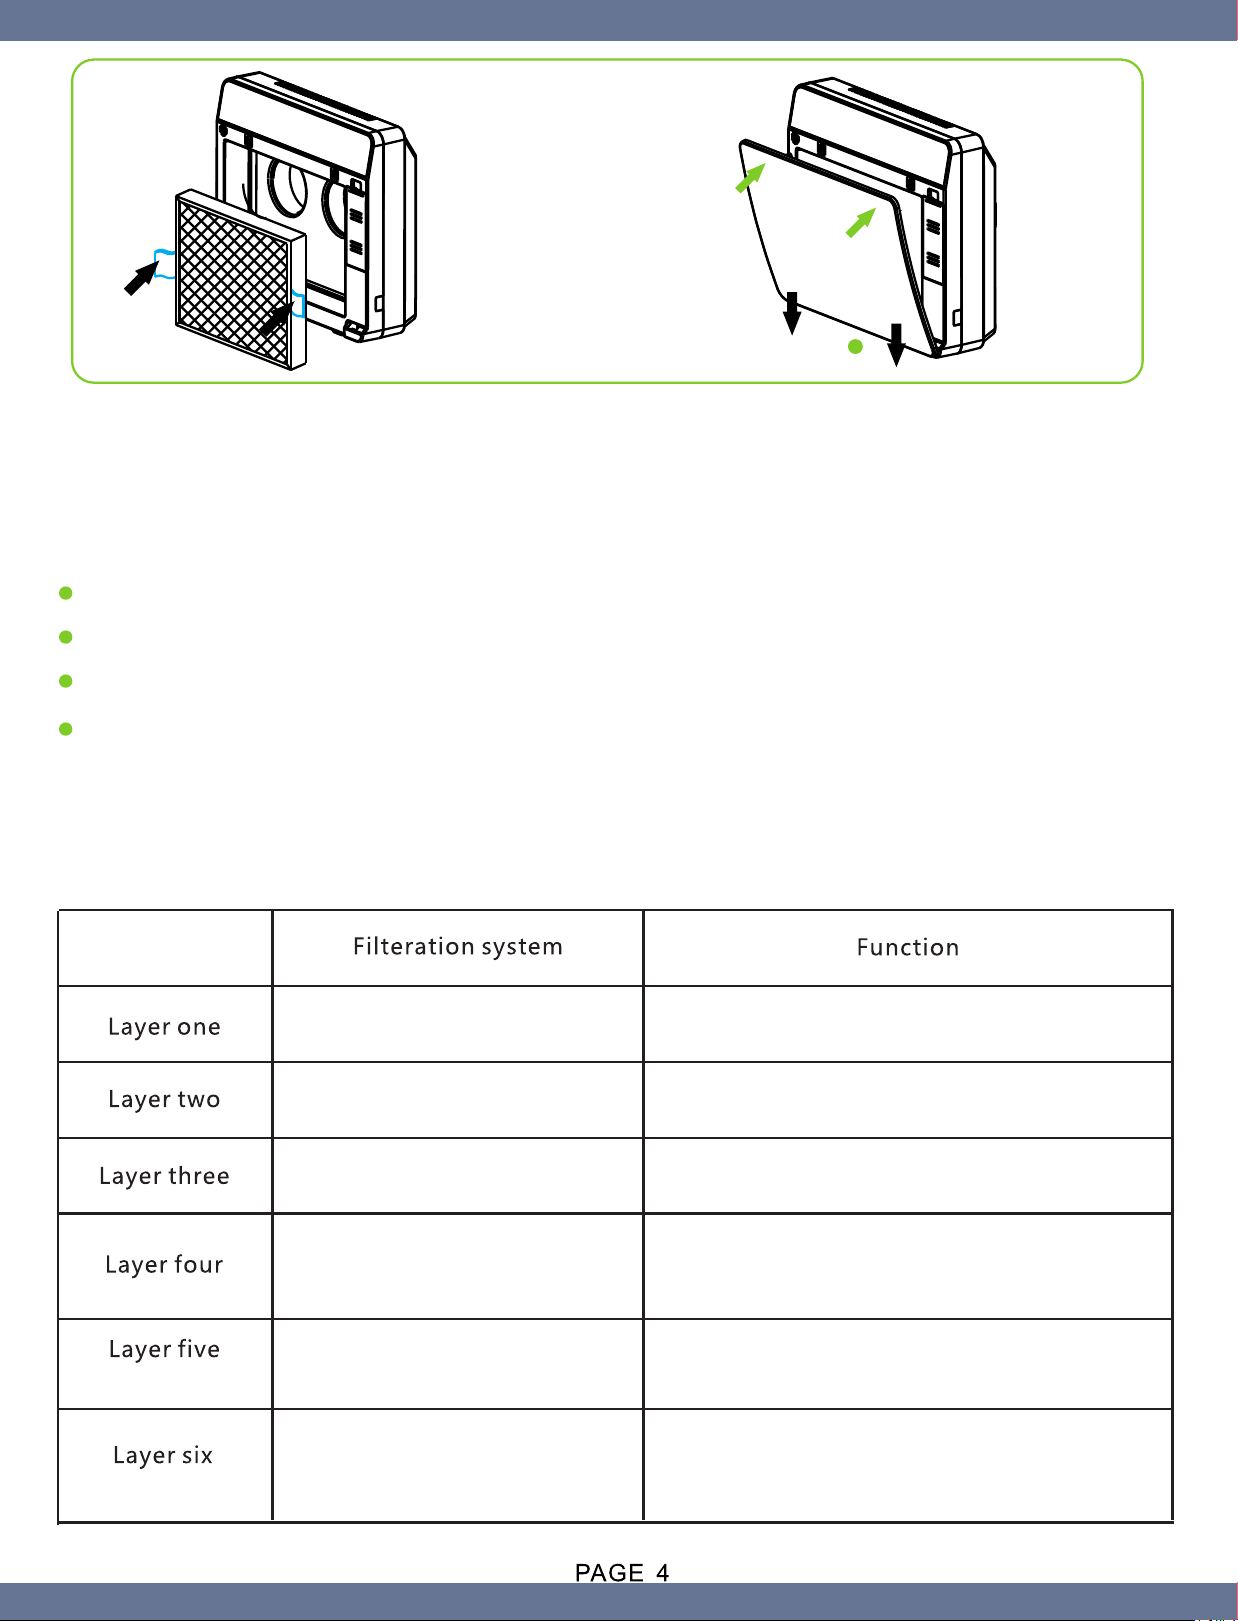
Assemble the filter/ Assemble the front panel
Align the filter to the slot, the side with braces outward, then push filter into the unit slightly.
Insert the bottom buckle to the holes in the front cover, then assemble the front panel into the cover
gently.
The life-time of the filter differs based on indoor environment, usage times, and usage location.
To improve the efficiency, please purchase the filter suggested by EP Lighting.
Please make sure the power is turned off before replacing new filter.
Primary anti-microbial composite filter should be cleaned by soft brush every half month to clear
away the large pollutant, like hairs.
Waring: Do not flush or soak the filter in water or any other liquid detergents.
Pre-Cotton filter
High Efficiency HEPA filter
Activated Carbon +
Cold Catalyst filter
UVC sterilization
Negative Ion
Photocatalytic Oxidation (TiO2)
Filter large particles in the air, such as
hair and foreign debris
Filter PM2.5, 99.97% of germs, dust,
pollen to the 0.3 micron size
Uses UVC254 germicidal efficacy to
kill virus and bacterial by 99.99%
Generate OH radicals to eliminate
virus and bacteria in the air
Ionizes the air by deactivating dust and
contaminants in the air, releasing
refreshing crisp air into the room.
Absorbs pollutants, odor, smoke,
toxic gases and other VOCs

Product Maintenance
Common failure Possible cause Troubleshooting
The unit is not
working
The purification
effect is poor
Power cord is not plugged, or
power has no electricity
If above corrective actions are not able to solve the problem, please contact sales and after-sales
service assigned by our company. For safety, please do not disassemble the unit and maintain by
yourself to avoid damage.
Please follow the following instructions for the safety of personnel, equipment and the other electrical loads in the
system. Failure to do so may result in the damage of the equipment and harm to the personnel operating the unit, and
warranty void.
Do not plug or unplug the power by wet hands to avoid electric shock. Unplug the power while moving the purifier.
It is prohibited to use the device in moist area such as bathroom to avoid shock and accelerated aging of electrical
system.
The air purifying sterilizer is not designed for filtering kitchen smoke near around kitchen exhaust.
High-voltage negative ion module is contained inside of the device, do not repair or disassemble.
Please do not cover the air inlet and outlet that prevent the efficient purification of the air.
It is prohibited to touch air inlet metal part and insert any foreign matter in air outlet, to avoid equipment malfunction.
In case any damage on the appearance or interior, or any abnormal noise, peculiar smell, smog, please cut off the
power in a safe way, and contact the EPL promptly. Please do not disassemble the product.
If the equipped power plug does not match with user socket, or damage occurs to the power cord, please contact the
EPL to change or allocate new parts. Please do not change the power cord without EPL approval.
Remove the plug if the product is not in use for a long time.
This product is not able to eliminate carbon monoxide or radon, thus, in case any fire or chemical disaster, it can not
be used as security liability or replacement option or ventilate equipment.
While replacing the filter or cleaning the internal parts, please turn off the power by On/Off button on the control panel
then remove the plug.
Safety Instructions
Plug in the power supply
Air output is low
Abnormal noise
from the unit
Power switch is not ON Press ON/OFF button
Change the filter
End of service life
Air inlet/outlet is blocked
Wrong installation of the filter direction
The filter is too dirty Change the filter
Install the filter in correct direction
Clear the inlet/outlet passages
Make sure all the plastic packaging is removed / check any damage on the
appearance before the operation
Make sure air inlet and outlet is not blocked by other objects, clean it if any
While turning on the negative ion function, "fizz" sounds is normal

Warranty and Regstration
Thank you for choosing EP Lighting products. For your consumer rights and interests, please
carefully read the warranty terms. Items related to the product warranty are specified as
follows:
1. We are responsible for free maintenance within one year since the date of purchase.
In case of any quality issue, you can maintain it at any of our company's service network across
the country by purchase-invoice and this warranty card.
2. The following conditions are not in the scope of free repair service:
●Damage by man-made causes (such as drop, crash, misplacement in the corrosive environment
etc)
● Damage by irresistible reasons or acts of God (such as lightning surges, earthquake, fire, flood and
some other natural disasters),
●Damage caused by maintenance technician who are not assigned by EP Lighting;
●Damage caused by violation of operating requirements noted in user manual;
●Out of warranty or exchange period;
●Unable to provide product warranty card.
For all damages caused by reasons listed above, EP lighting provides paid maintenance services.
3. Request for RMA before sending the damaged unit back to EPL for repair or replacements
Registration
Please send an email to [email protected] to register your product for warranty purposes.
Include the following information for our records:
1. Product name and model number
2. Product Serial Number
3. Contact name and address of the purchaser
4. Date of Purchase
5. Source of Purchase (agent or web or other)
Contact Information
EP Lighting Inc,
:66XLWH1
6DOW/DNH&LW\87
LQIR#HSOLJKWLQFFRP

EP Lighting, Inc.
Please visit our websites @
eplightinc.com
uvkleen.us
ep2000.com
Table of contents
Other EP Lighting Laboratory Equipment manuals

Popular Laboratory Equipment manuals by other brands


King Quest
King Quest VQ4100-OE Quick reference guide

Thermo Scientific
Thermo Scientific iCAP RQ ICP-MS Pre-installation requirements guide

Agilent Technologies
Agilent Technologies Turbo-V 6000 instruction manual

SP Scientific
SP Scientific VirTis BenchTop Pro Series Operator's manual

Macherey-Nagel
Macherey-Nagel Visocolor manual

Irritrol
Irritrol 550 R Series user guide


