EpiValley SEC-8089 User manual

SEC-8089 User Manual
Rev 0.1
EpiValley
APRIL 15, 2009

2
Revision History
Rev 0.1
2009 04 15
First issue
JBK

3
Contents
1. Installation & Setup............................................................................................................................4
2. etting Started ...................................................................................................................................6
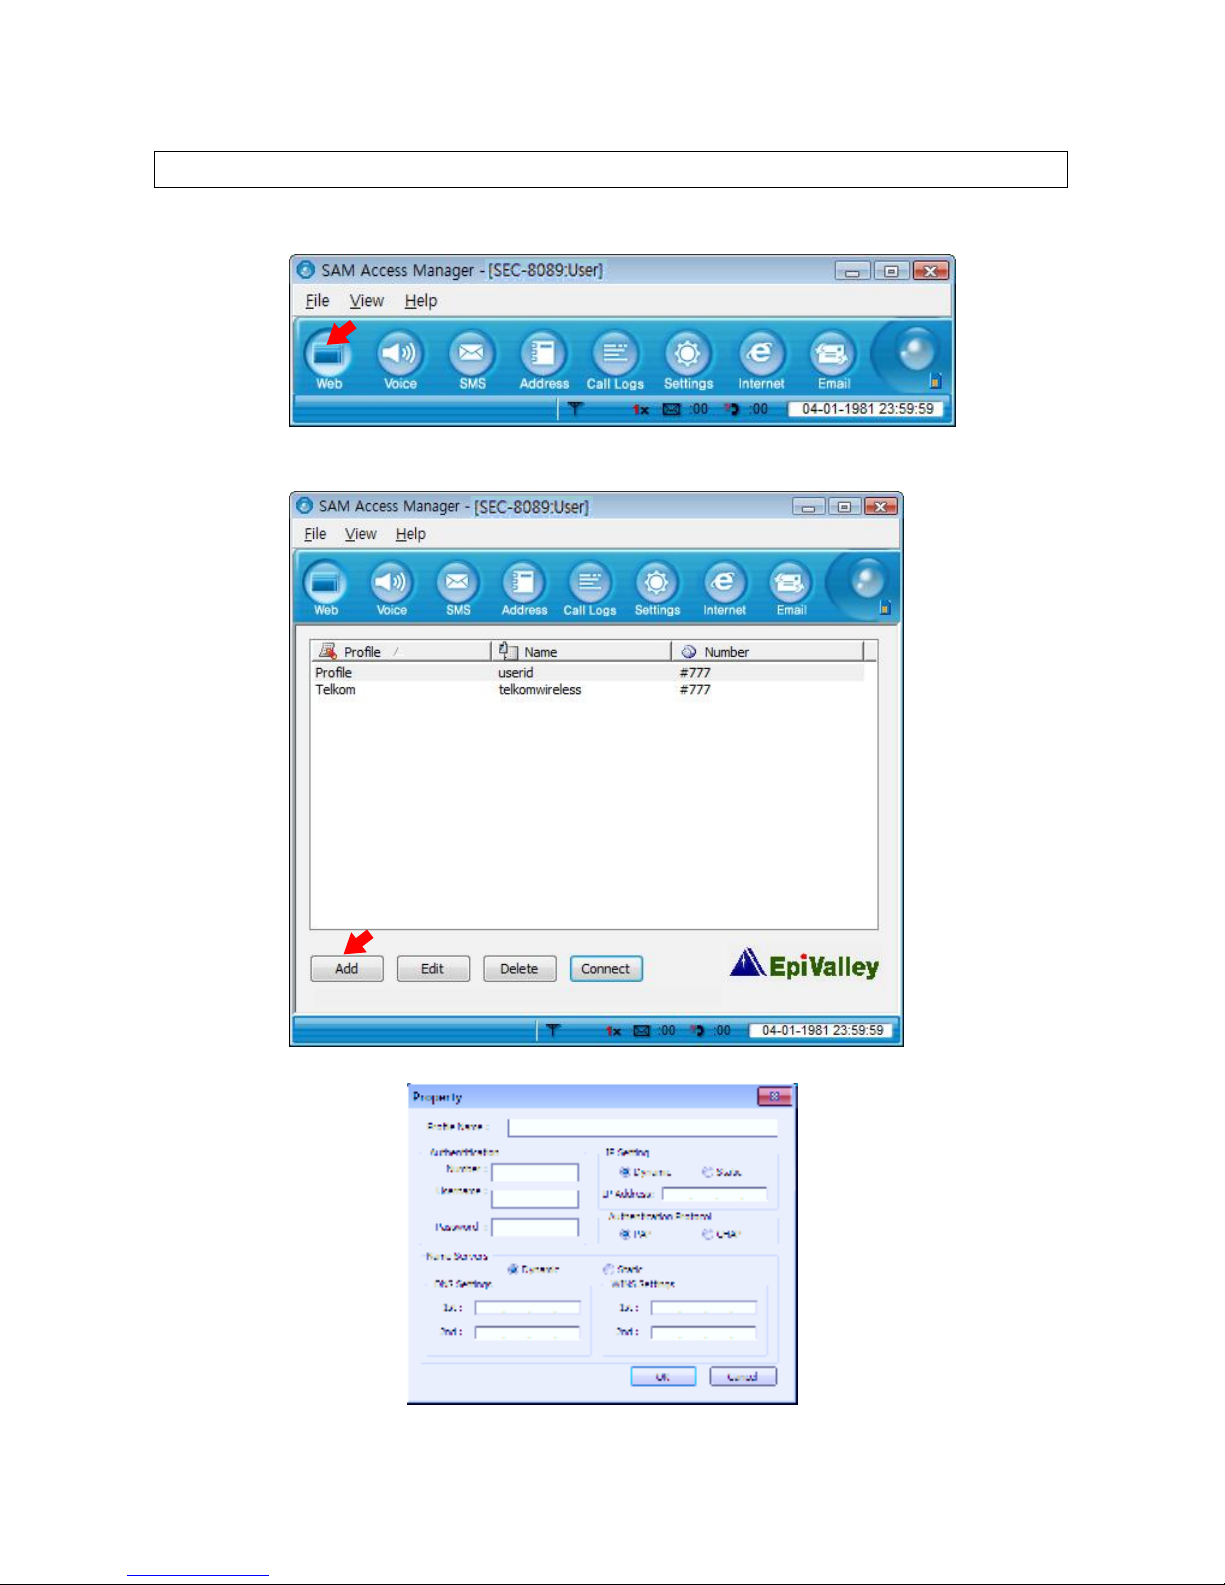
3. Web......................................................................................................................................................7
4. Voice ....................................................................................................................................................9
1. Call placing/receiving buttons.......................................................................................................9
2. Call placing/receiving display .....................................................................................................10
5. SMS ................................................................................................................................................... 11
1. Send............................................................................................................................................ 11
3. Sent.............................................................................................................................................14
4. Draft ............................................................................................................................................15
5. Spa ...........................................................................................................................................16
6. Voice ...........................................................................................................................................17
6. Address .............................................................................................................................................18
1. List ..............................................................................................................................................18
2. Search.........................................................................................................................................19
3. Group ..........................................................................................................................................19
7.Log......................................................................................................................................................20
1. Call Log.......................................................................................................................................20
2. Internet Log.................................................................................................................................21
8.Settings ..............................................................................................................................................22
1. General Settings .........................................................................................................................22
2. Call Settings................................................................................................................................22
3. SMS Settings ..............................................................................................................................23
6. UIM Settings ...............................................................................................................................24
7. Lock Settings ..............................................................................................................................24
8. Infor ation..................................................................................................................................25
9. Internet ..............................................................................................................................................26
10. Email................................................................................................................................................26
11. Others..............................................................................................................................................27
1. File ..............................................................................................................................................27
2. View ............................................................................................................................................27
3. Help.............................................................................................................................................27
4. Internet access status icon on the top right of the progra e ulator ........................................28
5. Tray Icon .....................................................................................................................................28
12. Part of the USB Modem .................................................................................................................29
13. Specification...................................................................................................................................30

4
1. Installation & Setup
1. SAM Installation
1.1 Insert the Installation CD to the CD-ROM Drive. If the installation process does not start auto atically,
run Setup.exe file in the CD-ROM Drive. Select a language and click “OK”. (Do not plug the USB
ode in the USB port before you finish installing SAM.)
1.2 To continue installation, click “Next”.
1.3 Click “I Agree”.

5
1.4 In order to use the ode for the first ti e, you need to install the device driver.
If the device driver is installed, click “OK” and wait until installation process is co pleted.
1.6 If SAM is installed successfully, click “Finish”.
1.7 After installation of SAM, plug the ode in the USB port. Then, the ode will be recognized
auto atically.

6
2. etting Started
1. Plug the ode in the USB port, and select “sa .exe”. Then the following initial window appears.
2. If the ode is not properly plugged in, the following essage appears.
3. If UIM is not installed nor ally in the ode , the following essage is displayed.
4. If the syste finds the ode , SAM is started as in the following figure.

7
3. Web
1. To access Internet, click “web”.
2. Click “Add” to create a connection profile or Click “Edit” to edit existing profile.
3. Set the profile for connection.

8
4. Select a profile from the list, and click “Connect”.
5. If Internet is accessed, “Hybrid Modem Connected” is displayed in the Status bar (bottom of the
program window). Rx or Tx status appears, and the Internet connection icon appears in the top right
of the program window.
6. If you click “Web” after the syste is connected to Internet, the Internet browser appears. If you click
“E ail”, the E ail Client or the web ail selected by the service provider is started.
7. In order to disconnect fro Internet, click “Disconnect”, and if the confir ation window appears, click
“Yes”.

9
4. Voice
1. Call placing/receiving buttons ___________________________________________
1.1 Enter the phone nu ber with the nu ber pad or the keyboard, and click “Send”. Click “End” to finish the
call.
1.2 To receive a call, click “Send”, and to end a call, click “End”.
1.3 You can control the volu e using the control button during a
call.
1.4 If you click “Mute”, your voice is uted. If “Mute” is selected, the button is changed to “Un ute”. Click
“Un ute” if you wish to clear Mute.
1.5 To save the phone nu ber you have entered or that of the caller in the Address book, click “Add”.
1.6 To view the call history, click “Log”. Refer to “1. Call Log” in chapter “8. Log”.
1.7 To search a nu ber in the Address book, click “Search”. Refer to chapter “6. Address”.

10
2. Call placing/receiving display_____________________________________________
2.1 The caller ID of the inco ing call is displayed.
2.2 The current call status is displayed. “Inco ing call” is displayed if a call is inco ing. After connected, the
call ti e is displayed.

11
5. SMS
1. Send _________________________________________________________________
1.1 To send a essage, click “SMS”, and select “Send”.
1.2 Write a essage, enter the nu bers of the receivers one by one, and click “Add”. To delete a nu ber
fro the list, select the nu ber and click “Del”.

12
1.3 Select “Nor al”, “Urgent” or “E ergency” for the priority of the essage, and click “Send”.
1.4 To send a essage to nu bers of users, the window shows the current nu ber of receivers.
1.5 To send a essage at the designated date and ti e, click “Reserved”. Select Year, Month, Day, Hour and
Minute, and click “OK”. The reserved essage is saved in the Te porary Box.
1.6
▶ You can use the following functions with the buttons provided under the list or by right-clicking the
ouse button on an entry in the list.
- Search : You can search nu bers in the Address Book.
- Log : You can add nu bers searched in Call Log.
- Add : You can add addresses in the sender list.
- Del : You can delete entries fro the sender list.
- Clear : The essage you have written is all cleared.
- Emoticon : You can select/edit e oticons and insert the in the essage. To insert an
e oticon, double-click the e oticon, or select and click the “Insert” button. To edit
an e oticon, click “Edit”, edit the e oticon, and click “Save”.
- Templates : You can select/edit te plates to enter a essage.
- Special Characters : You can select special characters to enter a essage.
- Reserved : You can set the date and ti e for a reserved essage.
- Save : The essage is saved in the “Te porary” box.
- Send : The essage is trans itted.

13
2. Inbox
2.1 If a essage is inco ing, an auto popup essage appears, or the tray icon blinks, or the alert is
sounded depending on your selection in “Inco ing SMS Alert”. The received essage is auto atically
saved in Inbox.
To set the “Inco ing SMS Alert” option, press the “SMS” tab in the “Settings” enu, and set “Inco ing
SMS Alert” option. Refer to “9. Settings” for details.
2.2 If there are essages you have not read, the count is indicated in the Status bar (in the botto of the
window).
2.3 The essages are sorted by Nu ber, Na e, Date and Content in the “Inbox” enu. The icon indicates
if the essage is read or unread, and if it is in the PC, UIM or Mode .
2.4 If you select a essage, the content of the essage is displayed under the list.
▶ You can use the following functions with the buttons provided under the list or by right-clicking the
ouse button on an entry in the list.
- Delete : The selected essages are deleted fro the list.
- Forward : Select this button to forward a essage to other persons. The "Send” enu is
auto atically selected, and the content is auto atically entered.
- Reply : Select this button to send a reply. The "Send” enu is auto atically selected, and
the nu ber of receiver is added to the “Contacts” list.
- Unread : You can change essage status fro “Read” to “Unread”.
- Save : You can add the essage senders in the Address book. Enter data, select location
(PC, Mode or UIM), and click “OK”.
- Call : Select this button to ake a call to the sender of a essage. The “Voice” enu is
auto atically selected, and the nu ber of receiver is auto atically entered.

14
3. Sent__________________________________________________________________
3.1 In the “Sent” enu, the sent essages are sorted by Nu ber, Na e, Date and Content. You can
identify the location of the essages (PC, UIM or Mode ) with the icons.
▶ You can use the following functions with the buttons provided under the list or by right-clicking the
ouse button on an entry in the list.
- Delete : The selected essages are deleted fro the list.
- Forward : Select this button to forward a essage to other persons. The "Send” enu is
auto atically selected, and the content is auto atically entered.
- Save : You can add the essage senders in the Address book. Enter data, select location
(PC, Mode or UIM), and click “OK”.
- Call : Select this button to ake a call to the sender of a essage. The “Voice” enu is
auto atically selected, and the nu ber of receiver is auto atically entered.

15
4. Draft__________________________________________________________________
4.1 In the “Draft” enu, the failed essages or unsent essages are listed.
▶ You can use the following functions with the buttons provided under the list or by right-clicking the
ouse button on an entry in the list.
- Delete : The selected essages are deleted fro the list.
- Edit : Select this button to edit and send the essages selected in the list. The "Send”
enu is auto atically selected, and the content is auto atically entered.
- Resend : The selected essages are retrans itted.
- Save : You can add the essage senders in the Address book. Enter data, select location
(PC, Mode or UIM), and click “OK”.
- Call : Select this button to ake a call to an entry in the list. The “Voice” enu is
auto atically selected, and the nu ber of receiver is auto atically entered.

16
5. Spam _______________________________________________________________
5.1 In the “Spa ” enu, the filtered essages containing specific nu bers or words are listed. The
essages are sorted by Date, Nu ber, and Content.
5.2 You can select the nu bers or words you wish to filter as spa essage in the “SMS” tab of the
“Settings” enu. You can select “Use” or “Not Use” in “Spa Message Settings”, and add/edit/delete the
Spa nu bers with the “Add”, “Edit” or “Delete” button in the Nu ber list. You can also add/edit/delete
the Spa words with the “Add”, “Edit” or “Delete” button in the Word list.
▶ You can use the following functions with the buttons provided under the list or by right-clicking the
ouse button on an entry in the list.
- Delete : The selected essages are deleted fro the list.
- To Inbox : The received essages are oved to “Inbox”.
- Save : You can add the essage senders in the Address book. Enter data, select location
(PC, Mode or UIM), and click “OK”.
- Call : Select this button to ake a call to an entry in the list. The “Voice” enu is
auto atically selected, and the nu ber of receiver is auto atically entered.

17
6. Voice _______________________________________________________________
6.1 The voice ail essages fro BTS are displayed in the “Voice” enu. You can sort the essages by
Nu ber, Data and Content.
▶ You can use the following functions by right-clicking the ouse or with the buttons at the botto of
the list.
- Delete : The selected essages are deleted fro the list.
- Call : If you wish to ake a call to “Voice Mail Center” fro BTS or there is no nu ber
fro BTS, ake a call to “Voice Mail Center” set in “SMS Settings”, and check the
voice ails. Refer to “9. Settings” for details.

18
6. Address
1. List __________________________________________________________________
1.1 To save a phone nu ber in the Address book, click “Add” under the phone nu bers list. Select the
location between “PC”, “Mode ” and “UIM”, enter Na e, Mobile, Group, Ho e, Office, FAX, Address,
E- ail and Co ent, and then, click “OK”.
▶ You can use the following functions with the buttons provided under the list or by right-clicking the
ouse button on an entry in the list.
- Add: Add a new nu ber in the Address book.
- Edit : To odify a nu ber or other data, click “Edit”, odify contents, and then, click “OK”.
- Delete : To delete a nu ber, select the checkbox of the entry in the list, and click “Delete”. To
delete all the entries in the list, select the checkbox on the top of the list, and click
“Delete”.
- Call : If you click “Call” after selecting a nu ber in the list, the “Voice” enu is selected. If
a default is selected between Mobile, Ho e and Office nu ber, a call is atte pted to
the default nu ber. If you drag and drop “Call” to Mobile, Ho e or Office nu ber a
call is atte pted to the selected nu ber.
- SMS : If you click “SMS” after selecting a nu ber in the list, the “SMS” enu is selected.

19
2. Search _______________________________________________________________
2.1 To search an entry in the list, select a field (Na e, All no, Mobile, Group, Address, Ho e, Office, FAX,
E ail, or Co ents) in the top left of the list, enter a na e or nu ber, and then, click “Search”. Then,
the entries containing the na e or nu ber are listed.
2.2 You can search entries in a specific storage (PC, Mode , UIM, or All) by clicking the concerned button
under the search field.
3. roup _______________________________________________________________
3.1 There are 20 groups (Group1 ~ Group20), and you can only rena e the groups.
3.2 To ove a e ber between groups, click the e ber in the list, and drag and drop to the target group
folder.
▶ You can use the following functions with the buttons provided under the group list or by right-
clicking the ouse button on an entry in the list.
- Add : Add groups.
- Edit : To change the na es, select the groups and click “Edit”.
- Delete : You can delete groups with all the e bers in the groups.
- SMS : To send an SMS to all the e bers in a group, click “SMS”. The “SMS” window is
displayed, and the nu bers of all the e bers of the group are auto atically
entered in “Contacts”.

20
7.Log
1. Call Log ______________________________________________________________
1.1 You can see All Calls, Dialed Nu bers, Received Calls and Missed Calls. The nu ber of entries stored
in the list is displayed in the right of the window.
1.2 “All Calls” shows Dialed Nu bers, Received Calls and Missed Calls which can be identified by the icons.
The entries can be sorted by Date, Ti e and Nu ber.
1.3 “Dialed Nu bers” shows the nu bers you have dialed.
1.4 “Received Calls” shows the nu bers fro which you have received calls.
1.5 “Missed Calls” shows the nu bers fro which you have issed calls.
▶ You can use the following functions with the buttons provided under the list or by right-clicking the
ouse button on an entry in the list.
- Reset : You can delete all the entries of the list, and reset all the values in “Total” field to 0.
- Delete : The selected logs are deleted fro the list.
- Call : If you click “Call” after selecting an entry in the list, the “Voice” enu is displayed,
and the phone nu ber is auto atically entered.
- SMS : Select this button to forward a essage to the nu bers selected in the list. The
"Send” enu is auto atically selected in “SMS”, and the nu bers are entered
auto atically in “Contacts”.
- Save : Select the nu bers to add in the Address book, select the location (PC, Mode or
UIM), and click “OK”.
Table of contents
Other EpiValley Modem manuals