Epson Stylus PHOTO 935 User manual


i
All rights reserved. No part of this publication may be reproduced, stored in a retrieval
system, or transmitted in any form or by any means, electronic, mechanical, photocopying,
recording, or otherwise, without the prior written permission of SEIKO EPSON
CORPORATION. The information contained herein is designed only for use with this EPSON
printer. EPSON is not responsible for any use of this information as applied to other printers.
Neither SEIKO EPSON CORPORATION nor its affiliates shall be liable to the purchaser of
this product or third parties for damages, losses, costs, or expenses incurred by the purchaser
or third parties as a result of accident, misuse, or abuse of this product or unauthorized
modifications, repairs, or alterations to this product, or (excluding the U.S.) failure to strictly
comply with SEIKO EPSON CORPORATION's operating and maintenance instructions.
SEIKO EPSON CORPORATION shall not be liable for any damages or problems arising from
the use of any options or any consumable products other than those designated as Original
EPSON Products or EPSON Approved Products by SEIKO EPSON CORPORATION.
SEIKO EPSON CORPORATION shall not be held liable for any damage resulting from
electromagnetic interference that occurs from the use of any interface cables other than those
designated as EPSON Approved Products by SEIKO EPSON CORPORATION.
EPSON is a registered trademark and EPSON Stylus is a trademark of SEIKO EPSON
CORPORATION.
Copyright 2001 SEIKO EPSON CORPORATION. All rights reserved. PRINT Image Matching
is a trademark of SEIKO EPSON CORPORATION. The PRINT Image Matching logo is a
trademark of SEIKO EPSON CORPORATION.
Copyright 2002 SEIKO EPSON CORPORATION. All rights reserved.USB DIRECT-PRINT is
a trademark of SEIKO EPSON CORPORATION.The USB DIRECT-PRINT logo is a
trademark of SEIKO EPSON CORPORATION.
Microsoft and Windows are registered trademarks of Microsoft Corporation.
Apple and Macintosh are registered trademarks of Apple Computer, Inc.
DPOF is a trademark of CANON INC., Eastman Kodak Company, Fuji Photo Film Co., Ltd.
and Matsushita Electric Industrial Co., Ltd.
Zip®is a registered trademark of Iomega Corporation.
The BLUETOOTH trademarks are owned by Bluetooth SIG, Inc., U.S.A. and licensed to
SEIKO EPSON CORPORATION.
Panorama Stitcher is developed by SANYO Electric Co., Ltd. and SANYO Electric Software
Co., Ltd.
SD is a trademark.
General Notice: Other product names used herein are for identification purposes only and
may be trademarks of their respective owners. EPSON disclaims any and all rights in those
marks.
Copyright © 2003 by SEIKO EPSON CORPORATION, Nagano, Japan.

ii

iii
Contents
Important Safety Instructions . . . . . . . . . . . . . . . . . . . . . . . . . . . . . . . .1
Warnings, Cautions, and Notes . . . . . . . . . . . . . . . . . . . . . . . . . . . . . .8
Printer Parts and Control Panel Functions . . . . . . . . . .9
Printer Parts . . . . . . . . . . . . . . . . . . . . . . . . . . . . . . . . . . . . . . . . . . . . . . .9
Buttons . . . . . . . . . . . . . . . . . . . . . . . . . . . . . . . . . . . . . . . . . . . . . . . . . .11
Control panel . . . . . . . . . . . . . . . . . . . . . . . . . . . . . . . . . . . . . . . . . . . . .12
Lights . . . . . . . . . . . . . . . . . . . . . . . . . . . . . . . . . . . . . . . . . . . . . . . . . . .14
Direct Printing Basics . . . . . . . . . . . . . . . . . . . . . . . . . .15
Introduction . . . . . . . . . . . . . . . . . . . . . . . . . . . . . . . . . . . . . . . . . . . . . .15
Loading the Paper . . . . . . . . . . . . . . . . . . . . . . . . . . . . . . . . . . . . . . . .16
Loading Memory Cards . . . . . . . . . . . . . . . . . . . . . . . . . . . . . . . . . . . .18
Printing a Selected Photo . . . . . . . . . . . . . . . . . . . . . . . . . . . . . . . . . . .21
Ejecting Memory Cards . . . . . . . . . . . . . . . . . . . . . . . . . . . . . . . . . . . .26
Various Setting Options . . . . . . . . . . . . . . . . . . . . . . . .28
Using the LCD Panel . . . . . . . . . . . . . . . . . . . . . . . . . . . . . . . . . . . . . .28
Using the Print Mode Settings . . . . . . . . . . . . . . . . . . . . . . . . . . . . . .33
Advanced Settings . . . . . . . . . . . . . . . . . . . . . . . . . . . . . . . . . . . . . . . .37
PRINT Image Matching . . . . . . . . . . . . . . . . . . . . . . . . . . . . . . . . . . . .49
DPOF Settings . . . . . . . . . . . . . . . . . . . . . . . . . . . . . . . . . . . . . . . . . . . .50
PRINT Image Framer . . . . . . . . . . . . . . . . . . . . . . . . . . . . . . . . . . . . . .51
Digital Camera Direct Printing . . . . . . . . . . . . . . . . . . . . . . . . . . . . . .53
Using The Bluetooth unit . . . . . . . . . . . . . . . . . . . . . . . . . . . . . . . . . .56
Storing and Loading the Settings . . . . . . . . . . . . . . . . . . . . . . . . . . . .57
Printing with an External Device . . . . . . . . . . . . . . . . . . . . . . . . . . . .58
Exif Print . . . . . . . . . . . . . . . . . . . . . . . . . . . . . . . . . . . . . . . . . . . . . . . .60
Printing with PRINT Image Matching . . . . . . . . . . . . . . . . . . . . . . .61
Using Roll Paper . . . . . . . . . . . . . . . . . . . . . . . . . . . . . .63
Precautions for Using Roll Paper . . . . . . . . . . . . . . . . . . . . . . . . . . . .63

iv
Loading Roll Paper . . . . . . . . . . . . . . . . . . . . . . . . . . . . . . . . . . . . . . . 64
Attaching the Catcher for 210 mm Roll Paper . . . . . . . . . . . . . . . . 69
Printing Area and Margins . . . . . . . . . . . . . . . . . . . . . . . . . . . . . . . . 71
Printing on Roll Paper . . . . . . . . . . . . . . . . . . . . . . . . . . . . . . . . . . . . 72
Cutting the Remaining Last Photo after Printing . . . . . . . . . . . . . . 73
Removing Roll Paper . . . . . . . . . . . . . . . . . . . . . . . . . . . . . . . . . . . . . 74
Storing EPSON Roll Paper . . . . . . . . . . . . . . . . . . . . . . . . . . . . . . . . . 75
Replacing Ink Cartridges . . . . . . . . . . . . . . . . . . . . . . 76
Checking the Ink Supply . . . . . . . . . . . . . . . . . . . . . . . . . . . . . . . . . . 76
Replacing an Ink Cartridge . . . . . . . . . . . . . . . . . . . . . . . . . . . . . . . . 77
Maintenance . . . . . . . . . . . . . . . . . . . . . . . . . . . . . . . . 84
Checking the Print Head Nozzles . . . . . . . . . . . . . . . . . . . . . . . . . . . 84
Cleaning the Print Head . . . . . . . . . . . . . . . . . . . . . . . . . . . . . . . . . . . 85
Aligning the Print Head . . . . . . . . . . . . . . . . . . . . . . . . . . . . . . . . . . . 87
Adjusting the Cutting Position . . . . . . . . . . . . . . . . . . . . . . . . . . . . . 89
Cleaning the Printer . . . . . . . . . . . . . . . . . . . . . . . . . . . . . . . . . . . . . . 90
Transporting the Printer . . . . . . . . . . . . . . . . . . . . . . . . . . . . . . . . . . . 91
Troubleshooting . . . . . . . . . . . . . . . . . . . . . . . . . . . . . . 93
Error/Warning Display . . . . . . . . . . . . . . . . . . . . . . . . . . . . . . . . . . . 93
Print Quality Problems . . . . . . . . . . . . . . . . . . . . . . . . . . . . . . . . . . . . 96
Printout Problems Not Related to Print Quality . . . . . . . . . . . . . . . 99
Paper Does Not Feed Correctly . . . . . . . . . . . . . . . . . . . . . . . . . . . . 100
Printer Does Not Print . . . . . . . . . . . . . . . . . . . . . . . . . . . . . . . . . . . 104
Printing Problem when Using Bluetooth Unit . . . . . . . . . . . . . . . 106
Cancelling Printing . . . . . . . . . . . . . . . . . . . . . . . . . . . . . . . . . . . . . . 106
Contacting Customer Support . . . . . . . . . . . . . . . . . 107
Technical Support Web Site . . . . . . . . . . . . . . . . . . . . . . . . . . . . . . . 107
Regional Customer Services . . . . . . . . . . . . . . . . . . . . . . . . . . . . . . 107
Options and Consumable Products . . . . . . . . . . . . . 110
Options . . . . . . . . . . . . . . . . . . . . . . . . . . . . . . . . . . . . . . . . . . . . . . . . 110
Consumable Products . . . . . . . . . . . . . . . . . . . . . . . . . . . . . . . . . . . . 113

v
Printer Specifications . . . . . . . . . . . . . . . . . . . . . . . . . 117
Printing . . . . . . . . . . . . . . . . . . . . . . . . . . . . . . . . . . . . . . . . . . . . . . . . .117
Paper . . . . . . . . . . . . . . . . . . . . . . . . . . . . . . . . . . . . . . . . . . . . . . . . . . .117
Ink Cartridges . . . . . . . . . . . . . . . . . . . . . . . . . . . . . . . . . . . . . . . . . . .121
Mechanical . . . . . . . . . . . . . . . . . . . . . . . . . . . . . . . . . . . . . . . . . . . . . .122
Electrical . . . . . . . . . . . . . . . . . . . . . . . . . . . . . . . . . . . . . . . . . . . . . . . .123
Environmental . . . . . . . . . . . . . . . . . . . . . . . . . . . . . . . . . . . . . . . . . . .123
Built-in card slots . . . . . . . . . . . . . . . . . . . . . . . . . . . . . . . . . . . . . . . .124
External Storage Devices . . . . . . . . . . . . . . . . . . . . . . . . . . . . . . . . . .125
Standards and Approvals . . . . . . . . . . . . . . . . . . . . . . . . . . . . . . . . .125

vi

1
Safety Instructions
Important Safety Instructions
Read all of the instructions in this section before using your
printer. Also, be sure to follow all warnings and instructions
marked on the printer.
When setting up your printer
Observe the following when setting up the printer:
❏Do not block or cover the openings in the printer.
❏Use only the type of power source indicated on the printer’s
label.
❏Use only the power cord that comes with this product. Use of
another card may result in fire or electric shock.
❏This product’s power cord is for use with this product only.
Use with other equipment may result in fire or electric shock.
❏Be sure your AC power cord meets the relevant local safety
standards.
❏Connect all equipment to properly grounded power outlets.
Avoid using outlets on the same circuit as photocopiers or air
control systems that regularly switch on and off.
❏Avoid electrical outlets controlled by wall switches or
automatic timers.

2
❏Keep the entire computer system away from potential sources
of electromagnetic interference, such as loudspeakers or the
base units of cordless telephones.
❏Do not use a damaged or frayed power cord.
❏If you use an extension cord with the printer, make sure that
the total ampere rating of the devices plugged into the
extension corddoes not exceed the cord’sampere rating. Also,
make sure that the total ampere rating of all devices plugged
into the wall outlet does not exceed the wall outlet’s ampere
rating.
❏Do not attempt to service the printer yourself.
❏Unplug the printer and refer servicing to qualified service
personnel under the following conditions:
The power cord or plug is damaged; liquid has entered the
printer; the printer has been dropped or the cabinet damaged;
the printer does not operate normally or exhibits a distinct
change in performance.
When choosing a place for the printer
Observe the following when choosing a place for the printer:
❏Place the printer on a flat, stable surface that extends beyond
the printer base in all directions. If you place the printer by
the wall, leave more than 10 cm between the back of the
printer and the wall. The printer will not operate properly if
it is tilted at an angle.
❏Leave enough space in front of the printer for the paper to be
fully ejected.

3
❏When storing or transporting the printer, do not tilt it, stand
it on its side, or turn it upside down. Otherwise, ink may leak
from the cartridges.
❏Avoid places subject to rapid changes in temperature and
humidity. Also, keep the printer away from direct sunlight,
strong light and heat sources.
❏Avoid places subject to dust, shocks, and vibrations.
❏Leave enough room around the printer to allow for sufficient
ventilation.
❏Place the printer near a wall outlet where the power cord can
be easily unplugged.
When using the printer
Observe the following when using the printer:
❏Do not block or cover the openings in the printer.
❏Do not insert objects through the slots in the printer.
❏Take care not to spill liquid on the printer.
❏Do not put your hand inside the printer or touch the ink
cartridges during printing.
❏Do not move the print head by hand; otherwise, you may
damage the printer.
❏Always turn the printer off using the Ppower button. When
this button is pressed, the LCD panel goes out. Do not unplug
the printer or turn off the power to the outlet until the LCD
panel goes out.

4
❏Before transporting the printer, make sure that the print head
is in the home (far right) position and the ink cartridges are
in place.
❏Leave the ink cartridges installed. Removing the cartridges
can dehydrate the print head and may prevent the printer
from printing.
❏Unplug the printer and refer servicing to qualified service
personal under the following conditions:
The power cord or plug is damaged; liquid has entered the
printer; the printer has been dropped or the cabinet damaged;
the printer does not operate normally or exhibits a distinct
change in performance.
When using a memory card
❏Do not remove the memory card or turn off the printer while
the computer and the memory card are communicating
(when the memory card light is flashing).
❏The methods for using memory cards vary according to card
type. Be sure to refer to the documentation packaged with
your memory card for details.
❏Use only memory cards compatible with the printer. Refer to
Loading Memory Cards.
When using LCD panel or the optional Preview
Monitor
❏The LCD panel or optional Preview Monitor may contain a
few small bright or dark spots. These are normal and do not
mean that the LCD monitor is damaged in any way.

5
❏Only use a dry, soft cloth to clean the LCD panel or the
optional Preview Monitor. Do not use liquid or chemical
cleansers.
❏If the LCD panel on your printer’s control panel or optional
Preview Monitoris damaged, contact your dealer.If the liquid
crystal solution gets on your hands, wash them thoroughly
with soap and water. If the liquid crystal solution gets into
your eyes, flush them immediately with water. If discomfort
or vision problems remain after a thorough flushing, see a
doctor immediately.
❏Do not remove the Preview Monitor slot cover unless you are
using the optional Preview Monitor.
When using the optional Bluetooth™ unit
Refer to Bluetooth Unit User’s Guide for the safety instructions
when using the Bluetooth unit.
When handling the ink cartridges
Observe the following when handling the ink cartridges:
❏Keep ink cartridges out of the reach of children. Do not allow
children to drink from or otherwise handle the cartridges.
❏Do not open the ink cartridge packages until just before you
install them.
❏Do not shake the ink cartridge; this can cause leakage.
❏You must remove the yellow tape seals from the cartridges
before installing them; otherwise, the cartridges will become
unusable.

6
❏Do not remove the blue portion of the tape seal from the top
of the cartridges.
❏Do not remove the tape seals from the bottom of the
cartridges.
❏Be careful when you handle used ink cartridges, as there may
be some ink remaining around the ink supply port. If ink gets
onto your skin, wash the area thoroughly with soap and
water. If ink gets into your eyes, flush them immediately with
water. If discomfort or vision problems remain after a
thorough flushing, see a doctor immediately.
❏Install the ink cartridge immediately after you remove it from
its package. If you leave a cartridge unpacked for a long time
before using it, normal printing may not be possible.
❏Do not use an ink cartridge beyond the date printed on the
cartridge carton: otherwise, it may result in reduced print
quality. For best results, use all of the ink in the cartridge with
in six months of installation.
❏Do not dismantle the ink cartridges or try to refill them. This
could damage the print head.
❏After bringing an ink cartridge inside from a cold storage site,
allow it to warm up at room temperature for at least three
hours before using it.
❏Store ink cartridges in a cool, dark place.
❏Do not touch the green IC chip on the back of the cartridge.
Doing so may prevent normal operation and printing.
❏Each time the cartridge is inserted, some ink is consnmed
because the printer autometically performs a reliability check.

7
❏The IC chip on this ink cartridge retains a variety of
cartridge-related information, such as the amount of ink
remaining, so that the cartridge may be removed and
reinserted. However, each time the cartridge is reinstalled,
some ink is consumed because the printer automatically
performs a reliability check.
❏If you remove an ink cartridge for later use, protect the ink
supply area from dirt and dust and store it in the same
environment as the printer. A valve in the ink supply port
makes covers or plugs unnecessary, but the ink may stain
items that come in contact with this area of the cartridge. Do
not touch the ink supply port or surrounding area.
When using the Automatic Roll Paper Cutter
❏Keep the cutter out of the reach of children.
❏Do not touch the paper ejection slot and cutter blade.
❏Do not disassemble or modify the cutter.
ENERGY STAR®Compliance
As an ENERGY STAR®Partner, EPSON has
determined that this product meets the ENERGY
STAR®guidelines for energy efficiency.
The International ENERGY STAR®Office Equipment Program is
a voluntary partnership with the computer and office equipment
industry to promote the introduction of energy-efficient personal
computers, monitors, printers, fax machines, copiers, and
scanners in an effort to reduce air pollution caused by power
generation.

8
Warnings, Cautions, and Notes
wWarnings must be followed carefully to avoid bodily injury.
cCautions must be observed to avoid damage to your equipment.
Notes contain important information and useful tips on the operation
of your printer.
9
Printer Parts and Control Panel
Functions
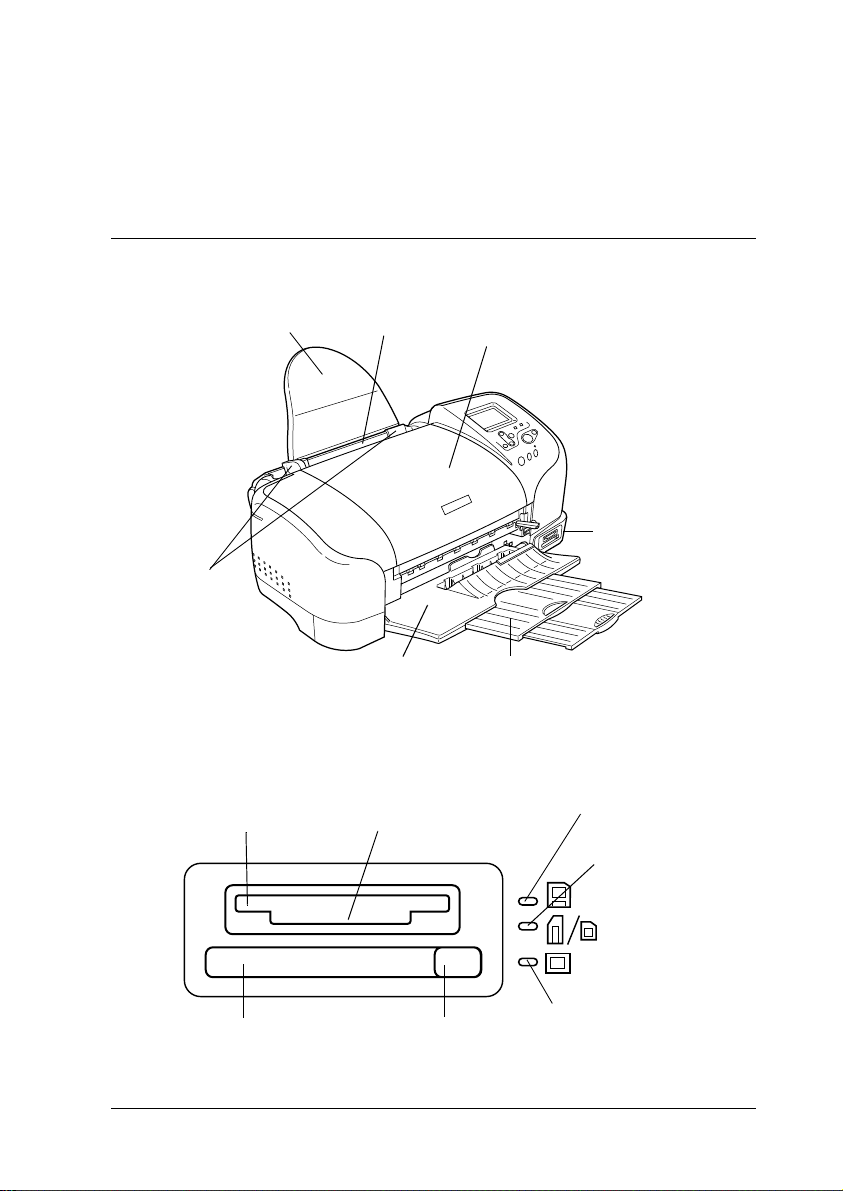
Printer Parts
Memory card slot (enlarged figure)
edge guides
output tray
paper support printer cover
sheet feeder
output tray extension
memory card slot
card eject
button
Memory Stick/SD/MultiMediaCard
memory card slot
SmartMedia
memory card slot
CompactFlash
memory card slot
Memory Stick/SD/
MultiMedia Card
memory card light
SmartMedia
memory card light
CompactFlash
memory card light

10
roll paper
holder
preview monitor cable connector computer USB connector
preview monitor slot
adjust lever
external device
USB connector
Bluetooth port
ink cartridge clamps
control panel
LCD panel
print head

11
Buttons
Buttons
Button Function
P
power
Turns the printer on and off.
b
maintenance
Displays instructions to resolve errors, or cleans the
following errors:
No ink
No ink cartridge/abnormality
No paper (cut sheet only)
Paper jam
Starts the Ink Cartridge Replacement utility.
Displays the Advanced Settings menu when the
(maintenance light is off and the button is pressed.
z
roll paper
Loads and ejects the roll paper.
Cuts and ejects the roll paper when the print job is
finished, then rewinds the roll paper to the startposition
for printing.
When held down for more than 3 seconds, rewinds the
roll paper to a position where it can be removed from
the sheet feeder.
Prints a nozzle check pattern when pressed while
turning on the printer.

12
Control panel
Control panel
2
6
7
3
4
5
1
10
98

13
Buttons
1. LCD panel: Shows the items and settings you change with the
buttons on the control panel.
2. Up/Down arrow buttons: Move the cursor on the LCD panel.
Increase and decrease numbers being entered.
3.Back button: Returns to the main menu on the LCD panel.
4. Select button: Opens the setting menu and selects the item to
be set on the LCD panel.
5. Custom buttons: Store the current settings on the LCD panel
when held down for more than two seconds. Load the stored
settings when pressed.
6. Cancel button: Cancels print operations, or the settings on the
LCD panel.
7. Print button: Starts printing with the settings on the LCD panel
selected via the buttons on the control panel.
8. Maintenance button: Refer to “Buttons” on page 11 for details.
9. Roll paper button: Refer to “Buttons” on page 11 for details.
10. Power button: Refer to “Buttons” on page 11 for details.
Note:
With the exception of the maintenance button, the roll paper button, and
the power button, the control panel buttons are used only with direct
printing from a memory card.
Table of contents
Other Epson Stylus Printer manuals

Epson Stylus
Epson Stylus PHOTO R800 Manual

Epson Stylus
Epson Stylus PHOTO 830 Series User manual

Epson Stylus
Epson Stylus CX6900F Series User manual

Epson Stylus
Epson Stylus PHOTO R2400 Instruction Manual

Epson Stylus
Epson Stylus Photo 1410 Instruction Manual

Epson Stylus
Epson Stylus C110 Series Instruction Manual

Epson Stylus
Epson Stylus CX1500 Instruction Manual

Epson Stylus
Epson Stylus CX1500 Instruction Manual

Epson Stylus
Epson Stylus Office T30 Instruction Manual

Epson Stylus
Epson Stylus PRO 7000 User manual


