EQUIPRITE 5100815 Instructions for use
This is the safety alert symbol. It is used to alert you to potential personal injury hazards.
Obey all safety messages that follow this symbol to avoid possible injury or death.
!
Read this manual and follow all the Safety Rules and Operating Instructions before using this product.
Fastenal
www.fastenal.com
!ADVERTENCIA
• Leer, comprender, y seguir las instrucciónes antes
de utilizar el aparato.
• El manual de instrucciónes y la información de
seguridad deben estar comunicado en lengua del
operador antes del uso.
• No seguir estas indicaciónes puede causar daños
personales o materiales.
!WARNING
To avoid crushing and related injuries:
NEVER work on, under or around a
load supported only by a hydraulic
jack. ALWAYS use adequately rated
jack stands.
Printed in Taiwan
5100815-M0 01/10
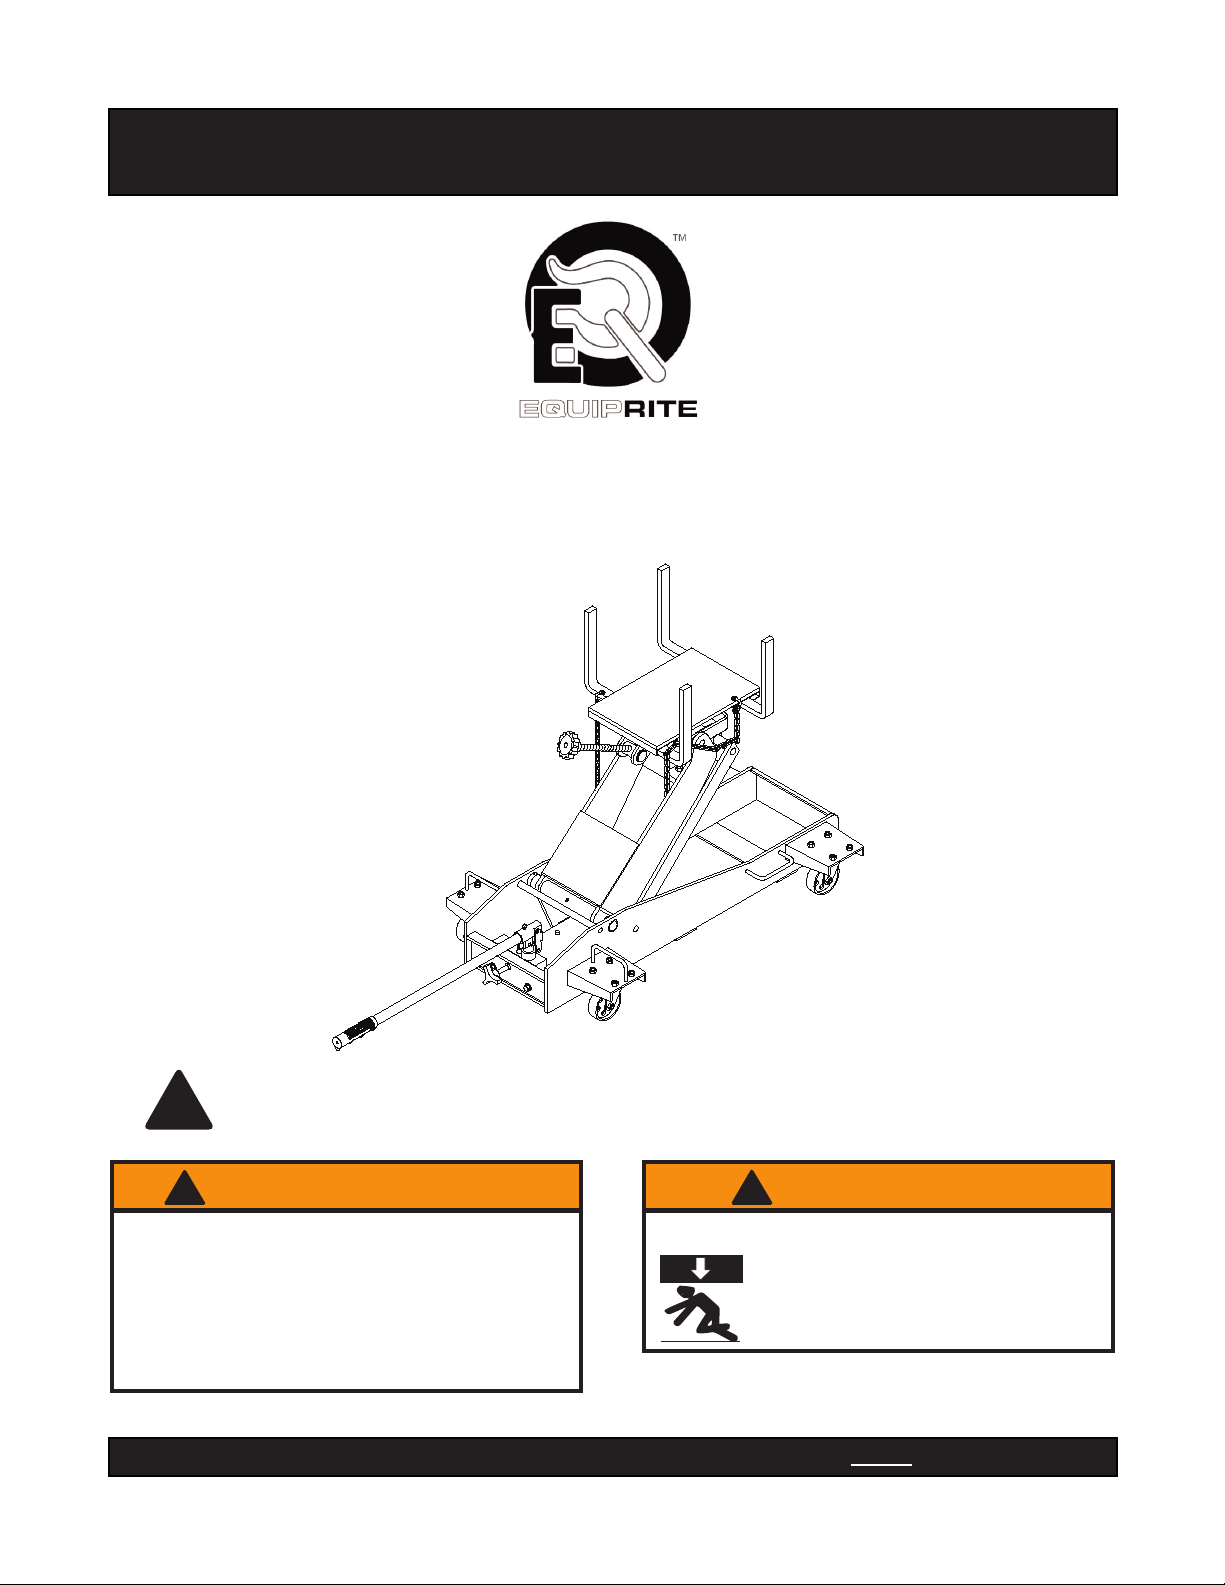
Transmission Jack, Floor
Operating Instructions & Parts Manual
Capacity
1-1/2 Ton
Model
5100815
U.S. Patent No. 5,946,912

2
SAFETY and GENERAL INFORMATION
Save these instructions. For your safety, read, understand, and follow the information provided with and on this jack
before using. The owner and operator of this equipment shall have an understanding of this jack and safe operating
procedures before attempting to use. The owner and operator shall be aware that use and repair of this product
may require special skills and knowledge. Instructions and safety information shall be conveyed in the operator's
native language before use of this jack is authorized. If any doubt exists as to the safe and proper use of this jack,
remove from service immediately.
Inspect before each use. Do not use if broken, bent, cracked or damaged parts are noted. Any jack that appears
damaged in any way, or operates abnormally shall be removed from service immediately. If the jack has been or
suspected to have been subjected to a shock load (a load dropped suddenly, unexpectedly upon it), immediately
discontinue use until jack has been checked by a factory authorized service center (contact distributor or manufacturer
for list of authorized service centers). It is recommended that an annual inspection be done by qualied personnel.
Labels and Operator's Manuals are available from manufacturer.
PRODUCT DESCRIPTION
This Transmission Jack is designed to be used as an aid in the removal and installation of automotive and light truck
transmissions, transfer cases and transaxles. This jack is for use under portable lift equipment, where vehicle must
be supported by a pair of appropriately rated jack stands.
NEVER use for any purpose other than those uses outlined above!
!
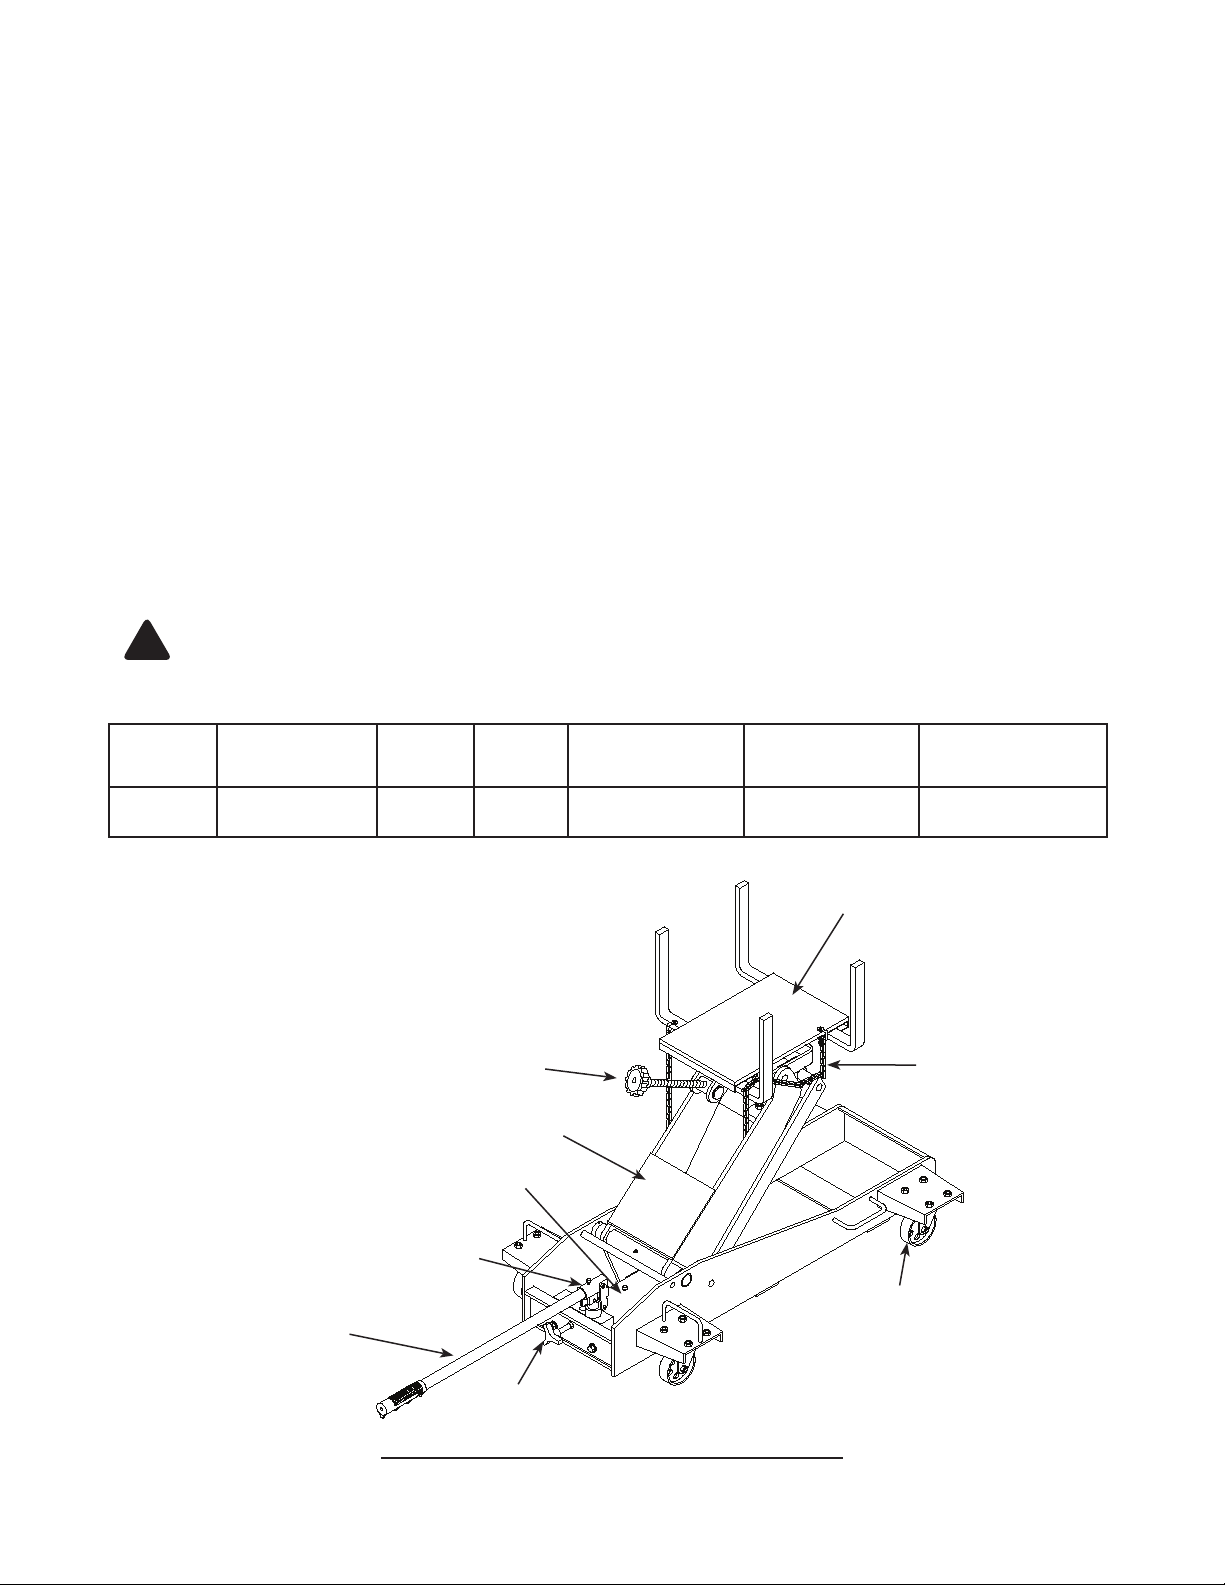
Saddle Plate
Handle
Release Valve Knob
Lift Arm
Tilt Adjustment Knob
Caster
Chain
Handle Sleeve
*Oil Filler Plug (not shown)
(*) on the hydraulic unit,
below the lift arm
Figure 1- Typical Transmission Jack Components
SPECIFICATIONS
Model Capacity Min.
Height
Max.
Height Base Size Saddle Base Extended Saddle
Area
5100815 1-1/2 Ton 7-7/8" 37-1/4"
46-3/4" x 25-5/8"
15-1/2" x 13-1/4" 24-7/8" x 19"

3
PREPARATION
Assembly
Little or no assembly is required. Refer to Figures in the manual for details in understanding the assembly and the
components of your product.
Before Use
1.
Verify that the product and application are compatible, if in doubt contact your local Fastenal Representative or
visit www.fastenal.com to locate your nearest store.
2. Before using this product, read the operator's manual completely and familiarize yourself thoroughly with the
product, its components and recognize the hazards associated with its use.
3. To familiarize yourself with basic operation, locate and turn the release valve knob (see Fig 1):
a. Clockwise until rm resistance is felt to further turning. This is the ‘CLOSED’ release valve position used to
raise the saddle plate.
b. Counter-clockwise, but no more than 1/2 turn from the closed position. This is the ‘OPEN’ release valve
position used to lower the saddle plate.
4. With saddle fully lowered, remove the oil ller screw. Pump 6 to 8 full strokes. This will help release any pressurized
air which may be trapped within the reservoir. Check oil level. Proper oil level will vary from just covering the ram
cylinder to 3/16” above it as seen from the oil ller hole. Reinstall the oil ller screw.
5. Ensure that jack rolls freely. Raise and lower the unloaded jack throughout the lifting range before putting into
service to ensure the pump operates smoothly. Replace worn or damaged parts and assemblies with factory
authorized replacement parts only.
Bleeding / Venting Trapped Air
With the release valve in the OPEN position (3b.) and with saddle fully lowered, locate and remove the oil ller
screw. Pump 6 to 8 full strokes. This will help release any pressurized air which may be trapped within the reservoir.
Reinstall the oil ller screw.
!WARNING
•Read, understand, and follow all printed material provided with and on this product before use.
• Do not exceed rated capacity.
• Use only on hard, level surfaces.
•Adequately support the vehicle before starting repairs.
• If loaded jack must be moved, make certain that load is secured by appropriate means, is stable, is in
the lowest possible position, is moved over a smooth, hard level surface and that the lifting platform
is level.
• Use of this product is limited to removal, installation, and transportation of automotive and light
truck transmissions, transfer cases and transaxles.
• Use only adapters / accessories provided by the manufacturer of this transmission jack.
• Use only adapters / accessories whose rated capacity is greater than the rated capacity of this jack.
• Ensure the center of gravity is center loaded on the saddle.
• Never use this device as a work/repair station. Transfer the load immediately to a suitable work station.
• No alteration shall be made to this product.
• Failure to heed these markings may result in personal injury and/or property damage.

4
OPERATION
Follow the instruction for removal and installation of transmission, transfer case or transaxle according to the vehicle
manufacturer's service manual.
Raise saddle:
1. Close release valve by turning release valve knob clockwise rmly.
2. Insert handle into handle sleeve, then pump handle until the load is contacted.
3. Secure load with provided chains.
Ensure center gravity of load is centered on the saddle and load is stable before moving jack. An off-center
transmission could cause the jack to tip or ip over .
Lower saddle:
Be sure all tools and personnel are clear before
lowering load. Slowly open the release valve! The more
you turn the knob counter-clockwise, the faster the load will come down. Maintain control of the rate of
speed at which the load lowers at all times!
1. Secure load to the jack with provided chain.
2. Slowly, gently turn the release valve knob counter-clockwise, never more than 1/2 full turn until the load is
completely lowered.
3. Immediately transfer the load to an appropriate work station.
4. After removing load from the jack, ensure that saddle is fully lowered to reduce ram exposure to rust and
contamination.
Never use this jack as a workstation!
!
!
!
To avoid crushing and related injuries:
•
Never work on, under or around a load supported only by hydraulic jack.
• Be alert and sober when using this product. Do not operate under the
inuence of drugs or alcohol.
!WARNING
MAINTENANCE
Important: Use only good grade hydraulic jack oil. Avoid mixing different types of uid and NEVER use brake uid,
turbine oil, transmission uid, motor oil or glycerin. Improper uid can cause premature failure of the jack and the
potential for sudden and immediate loss of load. Mobil DTE 13M or equivalent recommended.
Adding oil
1. With saddle fully lowered set jack in its upright, level position. Locate and remove oil ller screw.
2. Fill with oil until ~3/16" above the inner cylinder as seen from the oil ller hole. Reinstall oil ller screw.
Changing oil
For best performance and longest life, replace the complete uid supply at least once per year.
1. With saddle fully lowered, remove oil ller screw.
2. Lay the jack on its side and drain the uid into a suitable container.
Note. Dispose of hydraulic uid in accordance with local regulations.
3. Set jack in its level position. Fill with oil until ~3/16" above the inner cylinder as seen from the oil ller hole. Reinstall
oil ller screw
.

5
TROUBLESHOOTING
Symptom Possible Causes Corrective Action
Jack will not lift load • Release valve not tightly closed
• Load is too heavy
• Ensure release valve tightly closed
•Consider higher capacity jack
Jack will lift, but not maintain
pressure
•Release valve not tightly closed
•Hydraulic unit malfunction
•Ensure release valve tightly closed
•Discontinue use, contact your local
Fastenal Representative or visit www.
fastenal.com to locate your nearest store.
Jack will not lower after
unloading
• Reservoir overlled
• Linkage binding
• Ensure load is removed, then drain uid
to proper level
• Clean and lubricate moving parts
Poor lift performance • Fluid level low
•Air trapped in system
• Ensure proper uid level
•With ram fully retracted, remove oil ller
screw to let pressurized air escape,
reinstall oil ller screw
Jack will not lift to full extension • Fluid level low • Ensure proper uid level
Lubrication
A periodic coating of light lubricating oil to pivot points, axles and hinges will help to prevent rust and assure that
casters and pump assemblies move freely.
Cleaning
Periodically check the pump piston and ram for signs of rust or corrosion. Clean as needed and wipe with an oily
cloth.
Note: Never use sandpaper or abrasive material on these surfaces!
Storage
When not in use, store the jack with saddle fully lowered.
6
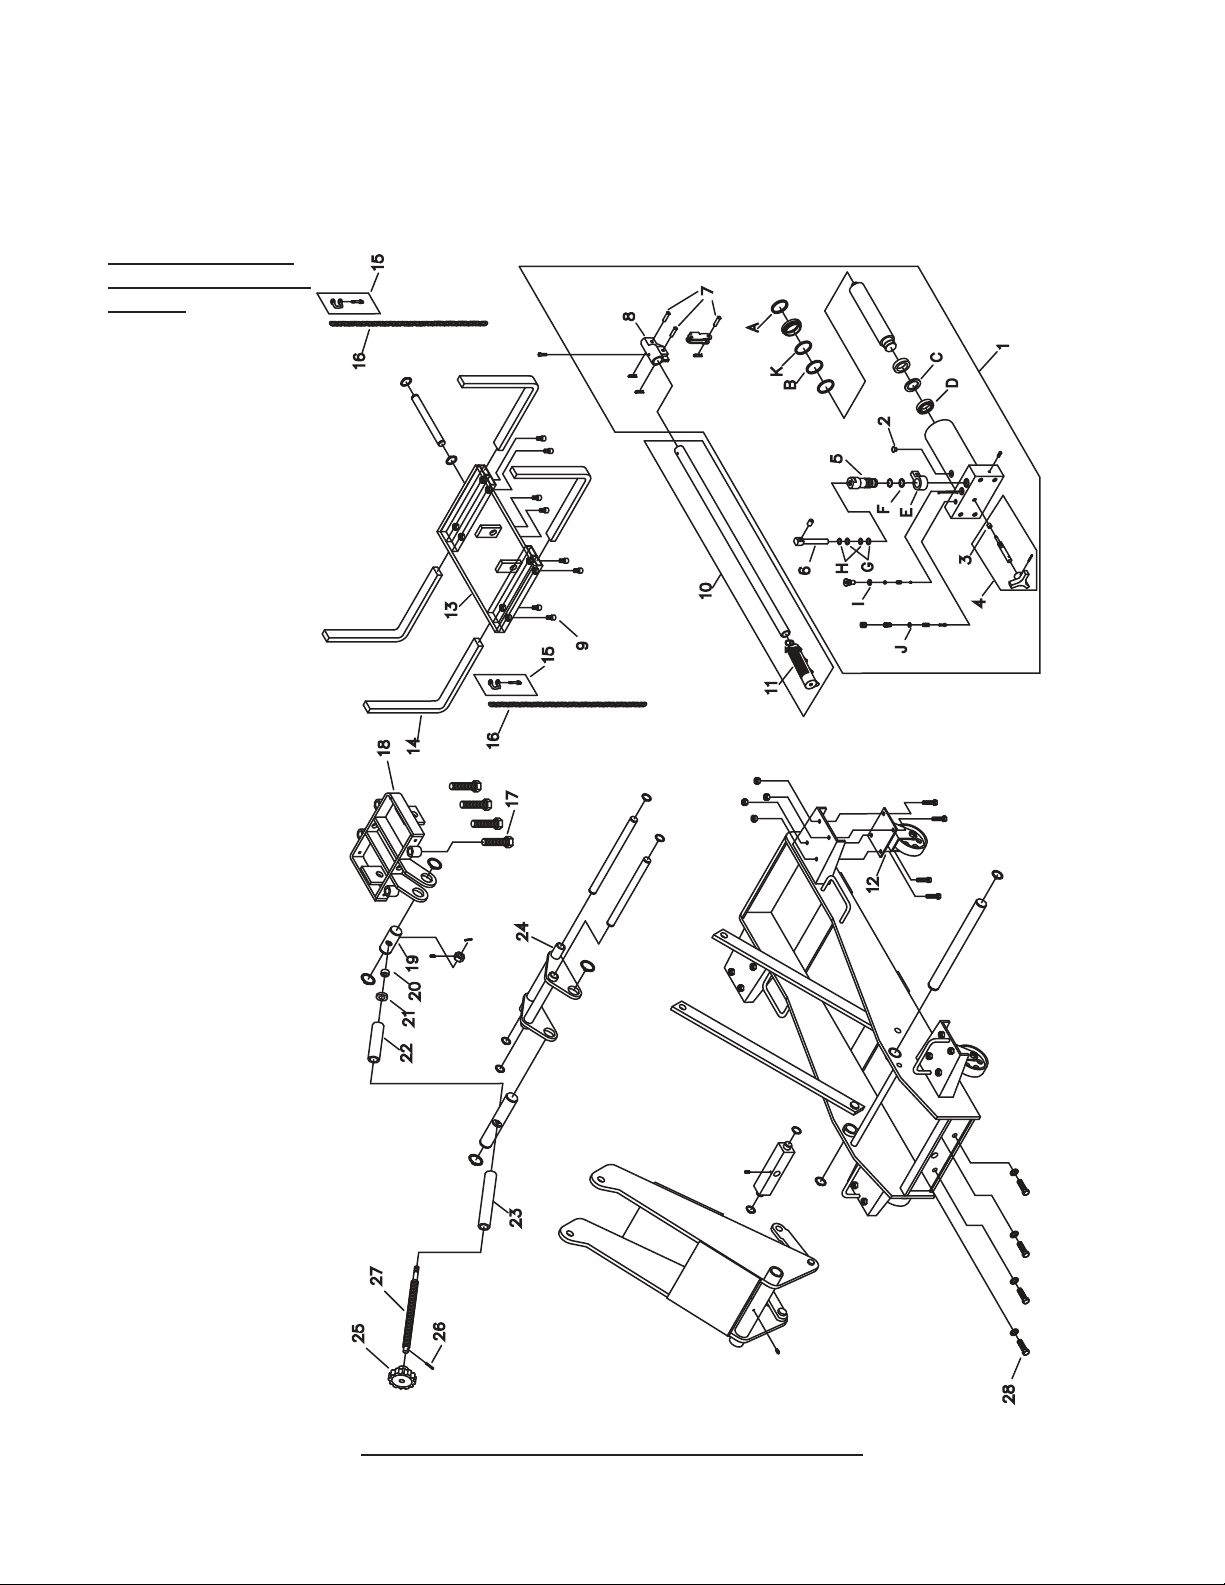
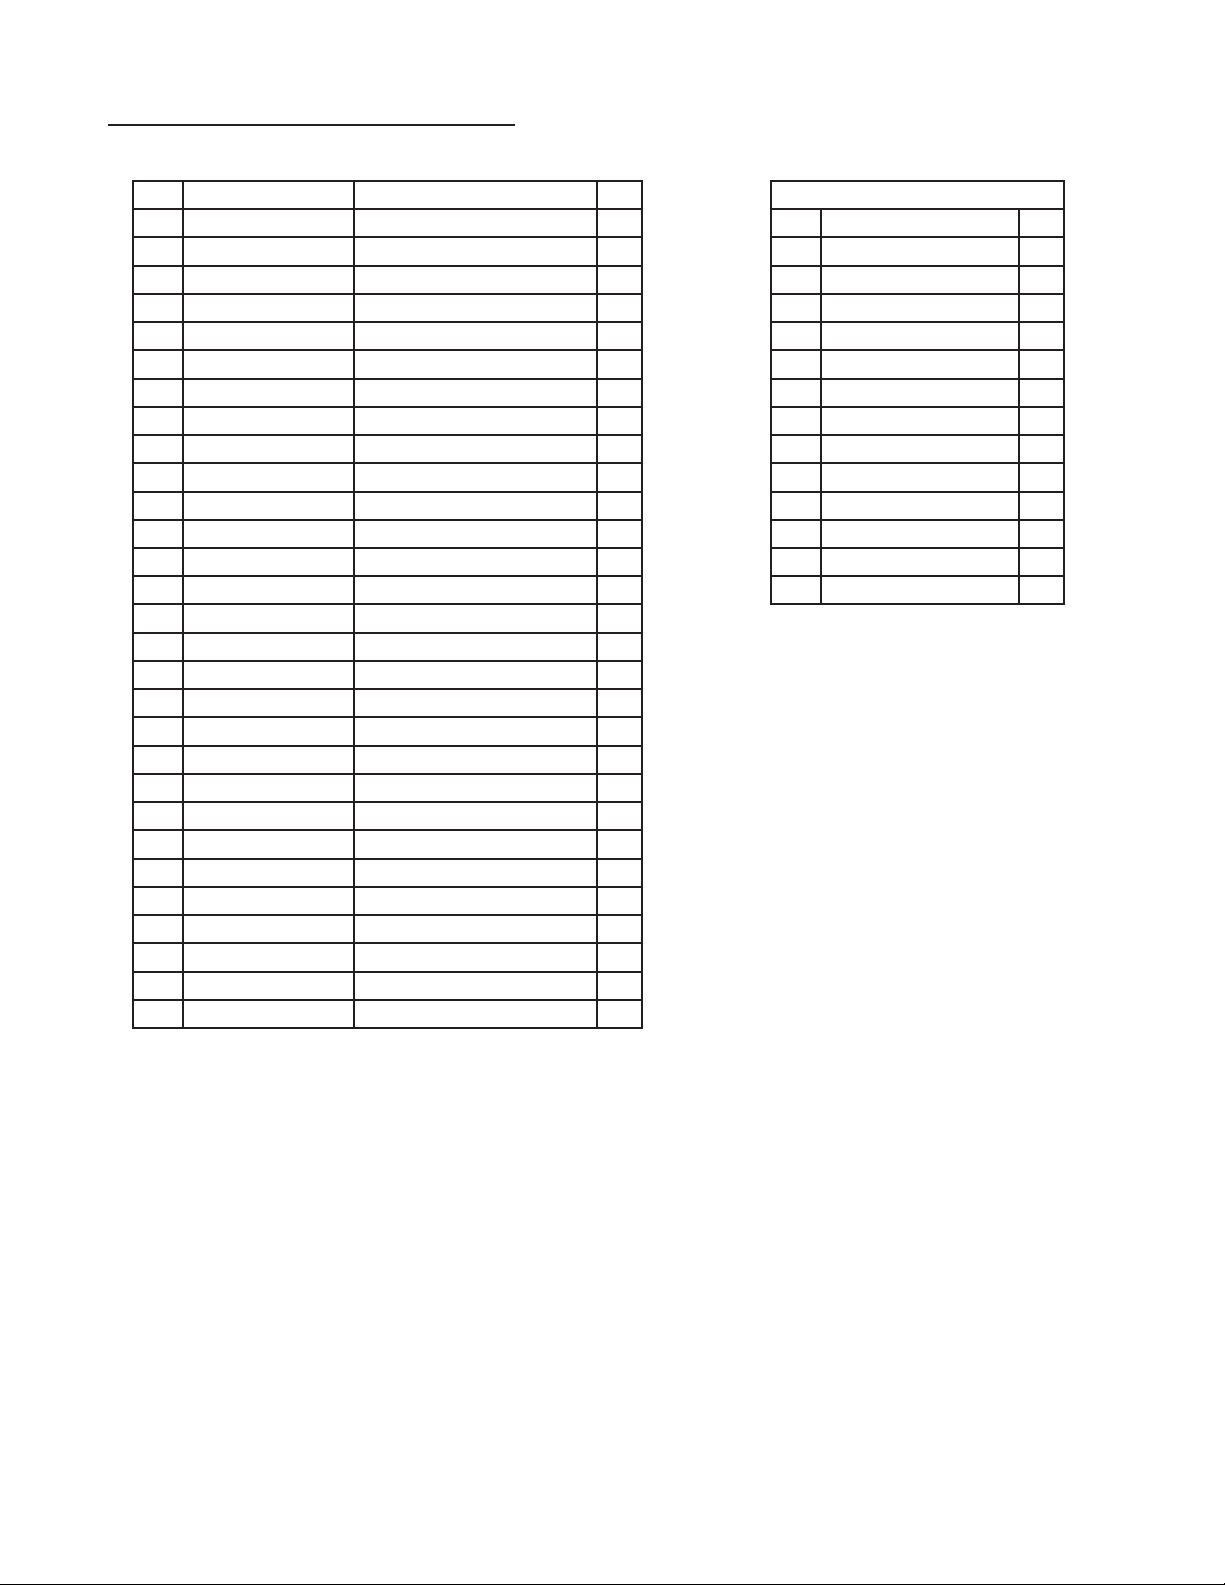
REPLACEMENT PARTS
Not all components of the jack are replacement items. When ordering parts, give Model number, serial number and
parts description. Call or write for current pricing: Fastenal, 4730 Service Dr., Winona, MN 55987, U.S.A. Or contact
your local Fastenal Representative or visit www.fastenal.com to locate your nearest store.
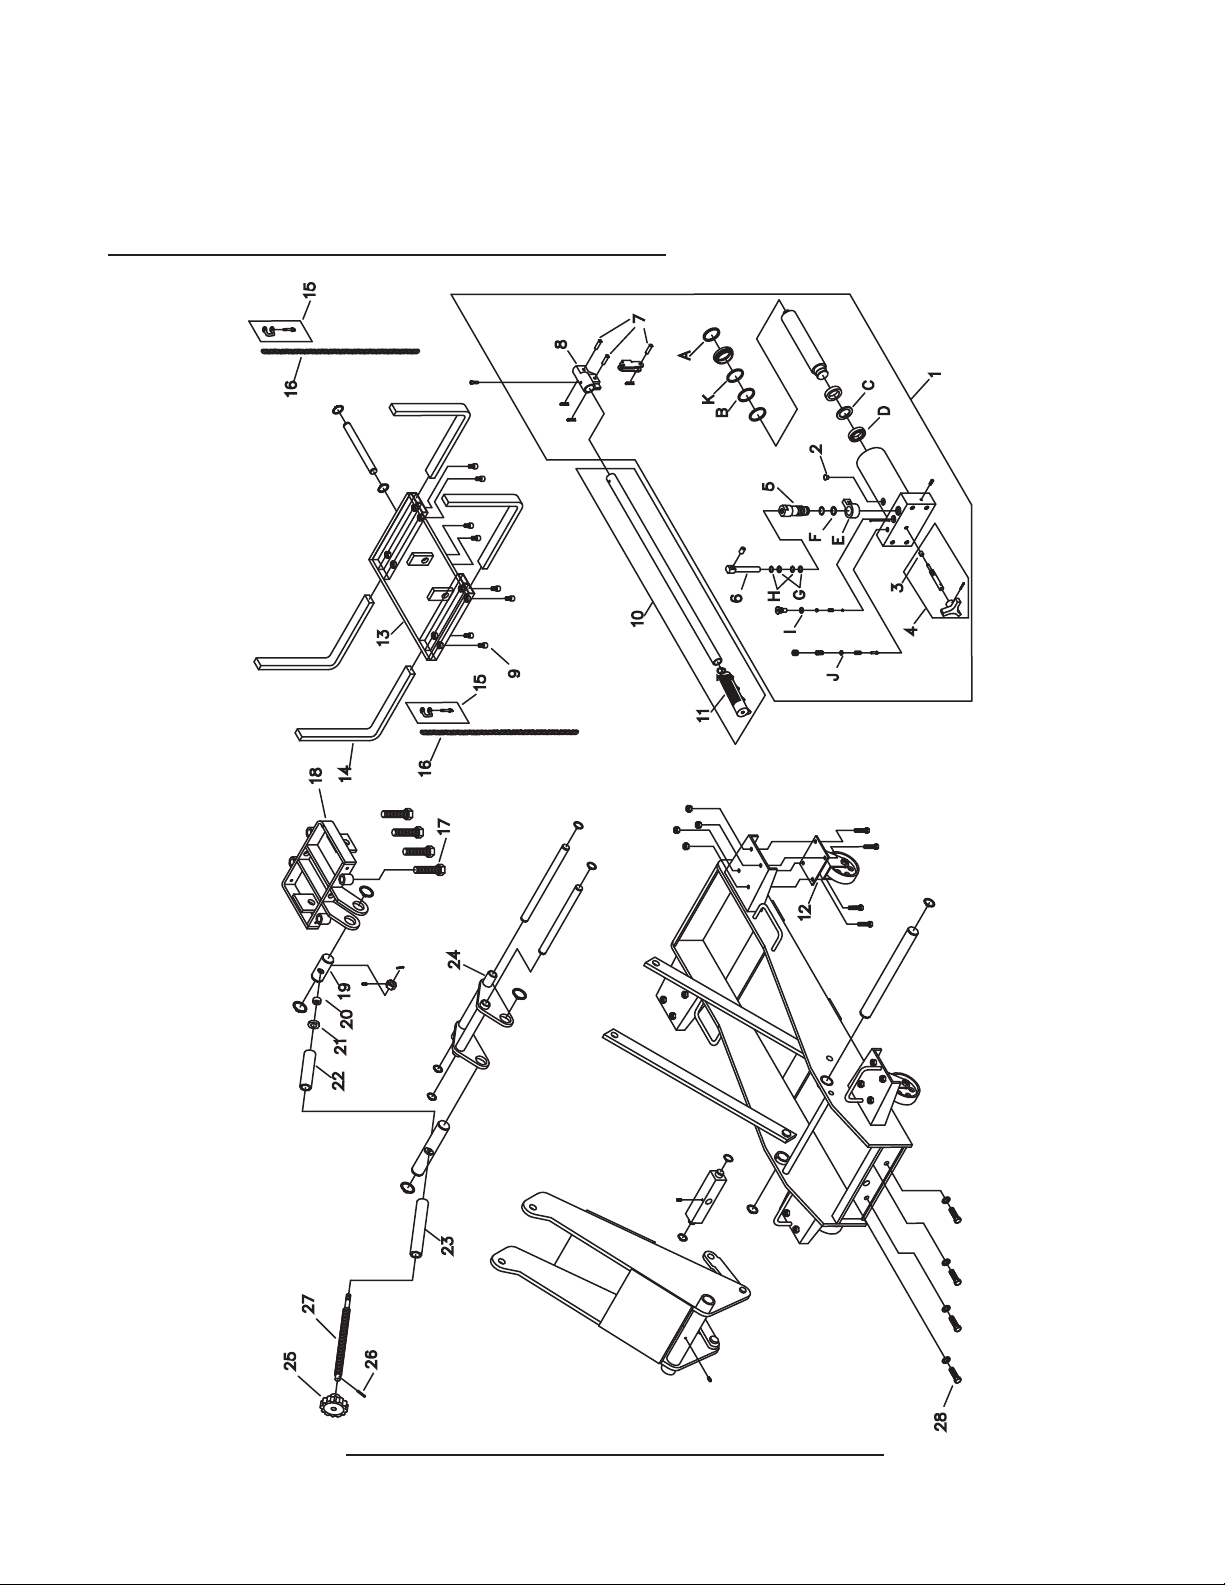
Replacement Parts
Illustration for Model
5100815
Figure 2 - Model 5100815 Replacement Parts Illustration
28
12
23
26
27
25
21
22
24
19
20
4
3
J
11
39
IG
H
F
E
5
6
10
1
2
D
C
A
B
7
9
15
17
16
14
18
13
8
15
16
K
7
Item Part No. Description Qty.
1G62-1-1000-108 Hydraulic Unit 1
2 324-4-1900-208 Filler Screw Assembly 1
3551-7-0060-066 Oil Seal 1
4 G46-3-9906-100 Release Valve Assembly 1
5G62-6-1401-106 Pump Cylinder 1
6 G62-6-1306-102 Pump Piston 1
7566-4-0080-508 Pin 3
8G46-6-1301-205 Handle Sleeve 1
9 649-1-0095-103 Hex socket Set Screw 8
10 G38-3-9901-106 Handle Assembly 1
11 506-9-0264-106 Handle Grip 1
12 G38-4-5200-102 Caster Assembly 1
13 G62-3-4200-101 Saddle Assembly 1
14 G62-5-4302-103 Support Bar 4
15 G52-4-4102-101 Hook & Chain 4
16 G36-6-7000-102 Chain 2
17 G62-3-4502-109 Screw Assembly 4
18 G62-3-4203-109 Saddle Holder 1
19 G62-6-4207-103 Stationary Rod 1
20 G36-3-5100-108 Bearing 1
21 G62-6-4505-103 Washer 1
22 G62-6-4504-101 Tube II 1
23 G62-6-4503-109 Tube I 1
24 G62-3-4300-107 Saddle Base 1
25 G52-6-1709-106 Knob 1
26 601-4-0040-034 Spring Pin 1
27 G62-6-4501-105 Tilt Screw 1
28 653-1-0127-409 Hex. Bolt 4
*G62-3-9901-108 Seal Kit, Hyd. Unit -
(*) Seal Kit Contents:
Item Description Qty.
2Filler Screw 1
3 Oil Seal 1
ASeal 1
B O-ring 1
C Back-up Ring 1
D U-cup 1
EO-ring 1
F Back-up Ring 1
G O-ring 1
H Back-up Ring 1
I O-ring 1
J O-ring 1
K O-ring 1
Replacement Parts List for Model 5100815:

8
ONE YEAR LIMITED WARRANTY
For a period of one (1) year from date of purchase, Fastenal will repair or replace, at its option, without
charge, any of its products which fails due to a defect in material or workmanship under normal usage. This limited
warranty is a consumer's exclusive remedy.
Performance of any obligation under this warranty may be obtained by returning the warranted product,
freight prepaid, to Fastenal Warranty Service Department, 4730 Service Dr., Winona, MN 55987.
Except where such limitations and exclusions are specically prohibited by applicable law, (1) THE
CONSUMER'S SOLE AND EXCLUSIVE REMEDY SHALL BE THE REPAIR OR REPLACEMENT OF DEFECTIVE
PRODUCTS AS DESCRIBED ABOVE. (2) Fastenal SHALL NOT BE LIABLE FOR ANY CONSEQUENTIAL OR
INCIDENTAL DAMAGE OR LOSS WHATSOEVER. (3) ANY IMPLIED WARRANTIES, INCLUDING WITHOUT
LIMITATION THE IMPLIED WARRANTIES OF MERCHANTABILITY AND FITNESS FOR A PARTICULAR
PURPOSE, SHALL BE LIMITED TO ONE YEAR, OTHERWISE THE REPAIR, REPLACEMENT OR REFUND AS
PROVIDED UNDER THIS EXPRESS LIMITED WARRANTY IS THE EXCLUSIVE REMEDY OF THE CONSUMER,
AND IS PROVIDED IN LIEU OF ALL OTHER WARRANTIES, EXPRESS OR IMPLIED. (4) ANY MODIFICATION,
ALTERATION, ABUSE, UNAUTHORIZED SERVICE OR ORNAMENTAL DESIGN VOIDS THIS WARRANTY AND
IS NOT COVERED BY THIS WARRANTY.
Some states do not allow limitations on how long an implied warranty lasts, so the above limitation may not
apply to you. Some states do not allow the exclusion or limitation of incidental or consequential damages, so the
above limitation or exclusion may not apply to you. This warranty gives you specic legal rights, and you may also
have other rights, which vary from state to state.
Fastenal
4730 Service Dr., Winona, MN 55987
www.fastenal.com
Este es el símbolo de alerta de seguridad. Se utiliza para que le avise a los posibles
riesgos de lesiones personales. Obedezca todos los mensajes de seguridad que siguen
a este símbolo para evitar posibles lesiones o muerte.
!
Fastenal
www.fastenal.com
!ADVERTENCIA
• Leer, comprender, y seguir las instrucciónes antes
de utilizar el aparato.
• El manual de instrucciónes y la información de
seguridad deben estar comunicado en lengua del
operador antes del uso.
• No seguir estas indicaciónes puede causar daños
personales o materiales.
!WARNING
To avoid crushing and related injuries:
NEVER work on, under or around a
load supported only by a hydraulic
jack. ALWAYS use adequately rated
jack stands.
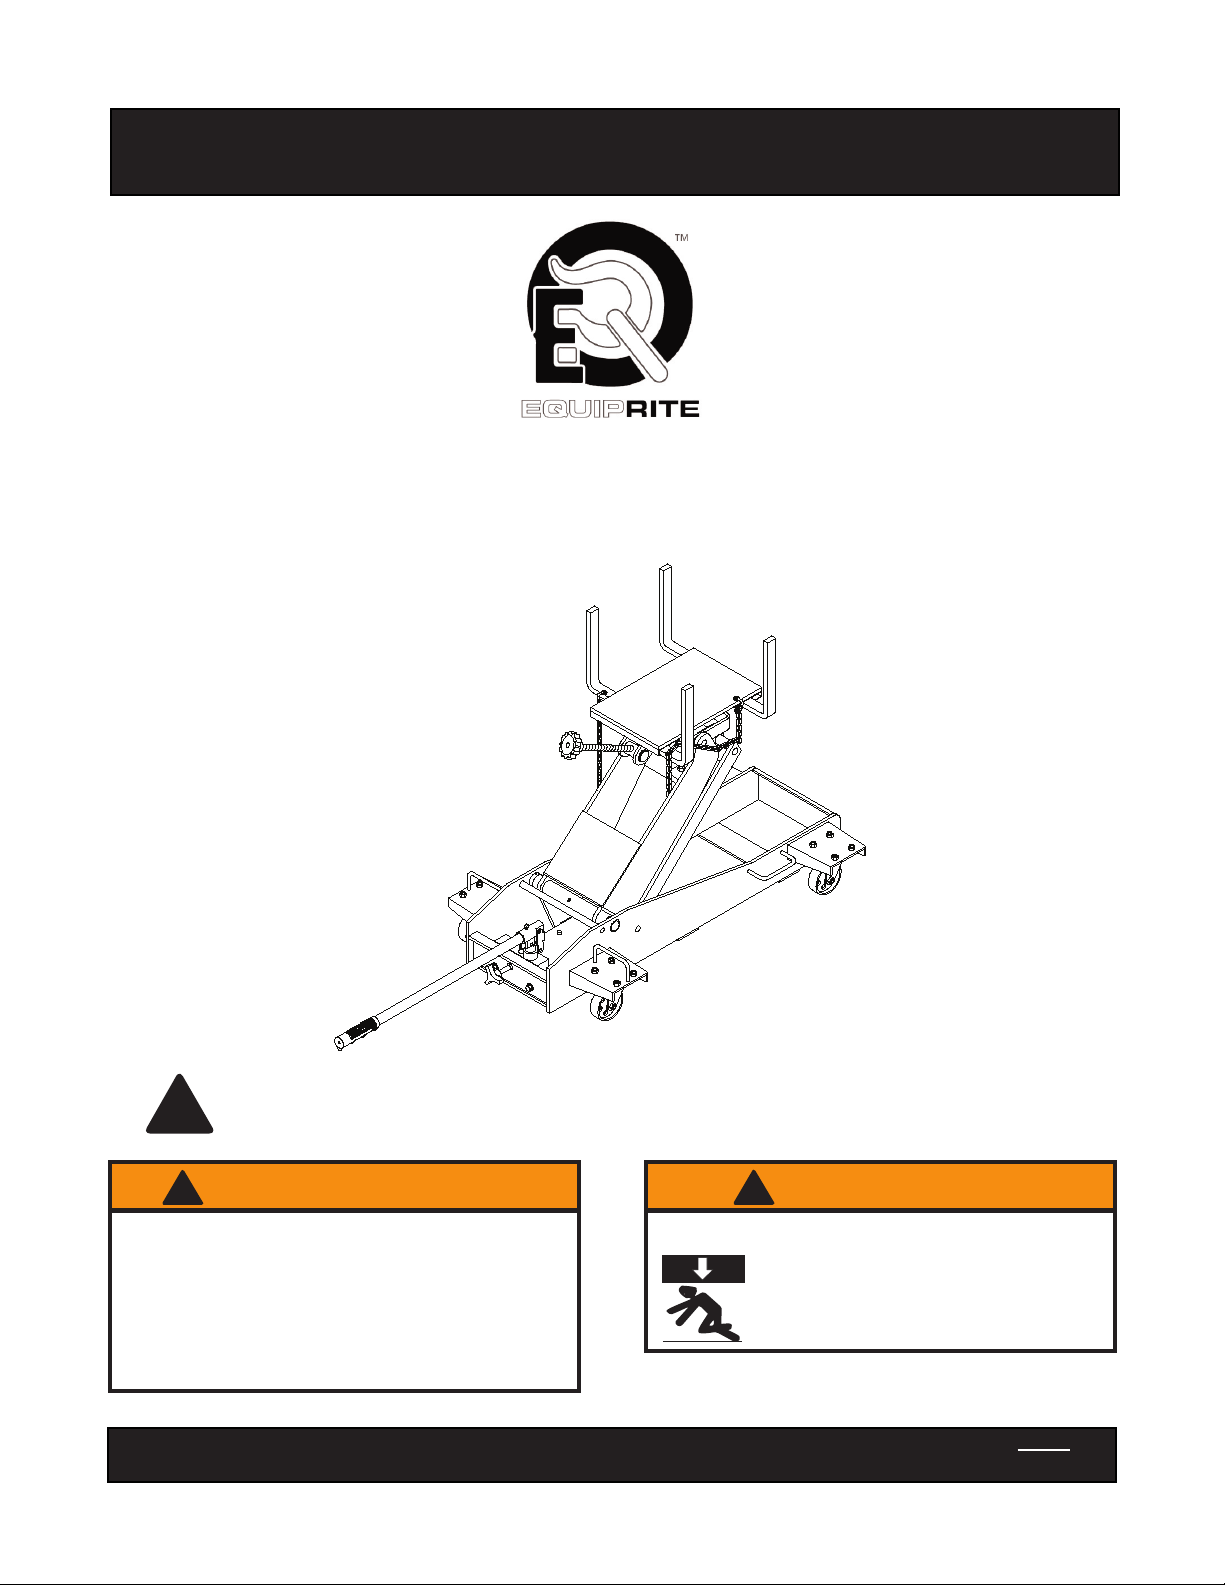
Gatos de transmisión, Suelo
Manual de Instrucciones y Partes
Capacidad
1-1/2 Tonelada
Modelo
5100815
U.S. Patent No. 5,946,912
9
mpresado en Taiwan
5100815-M0 01/10
Lea este manual y siga todas las normas de seguridad y las instrucciones de funcionamiento antes de
utilizar este producto.
10
SEGURIDAD Y INFORMACIÓN GENERAL
Guarde estas instrucciones. Para su seguridad, lea, comprenda y siga la información proporcionada a este
gato antes de usar. El propietario y operador de este equipo deberá tener una comprensión de este gato y los
procedimientos operativos de seguridad antes de intentar utilizar. El propietario y operador deberá tener en cuenta
que el uso y reparación de este producto puede requerir habilidades especiales y conocimientos. Instrucciones de
seguridad y información se transmite en la idioma nativo del operador antes de su uso de este gato está autorizado.
Si existe alguna duda en cuanto a la seguridad y el buen uso de este gato, retire inmediatamente de servicio.
Inspeccione antes de cada uso. No utilize si está roto, doblado, craqueado, o se tomó nota de partes dañadas.
Cualquier gato que aparece dañado de alguna manera, o funciona anormalmente será retirado de servicio
inmediatamente. Si el gato ha sido o se sospecha que han sido sometidos a un choque de carga (una carga cayó
de repente, inesperadamente sobre él), inmediatamente deje de utilizar el gato hasta que ha sido vericado por un
centro de servicio autorizado por la fábrica (contacte el distribuidor o el fabricante para la lista de centros de servicio
autorizados). Se recomienda una inspección anual que se realiza por personal calicado. Etiquetas y manuales del
operador están disponibles por el fabricante.
DESCRIPCIÓN DEL PRODUCTO
El gato de transmisión está diseñado para la ayuda en el retiro y instalación de transmisiones de automóvil y camiones
pequeños, ejes de trans y cajas de tranferencía. Este gato es para el uso debajo de equipo de levantamiento
portable, donde el vehículo debe estar soportado con un par de soportes de elevación evaluados adecuadamentes.
Nunca usé para algo diferente que los usos designados arriba.
!
Placa de la
montura
Manejadera
Perilla de la válvula de
liberacion
Brazo de levantamiento
Perilla para ajustar la
inclinación
Rueda
Cadena
Manga de la manejadera
Tapon de llenar el aceite (no demostardo)
(*) en la unidad hidráulica debajo del
brazo de levantamiento
Figura 1- Componentes típicos de Jack Transmisión
ESPECIFICACIONES
Modelo Capacidad Altura
min.
Altura
max.
Medida de la
base
Base de la
montura
Area de la
montura extendida
5100815 1-1/2 Tonelada 7-7/8" 37-1/4"
46-3/4" x 25-5/8"
15-1/2" x 13-1/4" 24-7/8" x 19"

11
PREPARACIÓN
Asamblea
Un poco o no asamblea es requerida. Consulte las guras en el manual para obtener más información en la
comprensión de la asamblea y los componentes de su producto.
Antes de Usar
1. Verique que el producto y la aplicación son compatible, en caso de duda llame a su representante de fastenal o visite
www.fastenal.com para encontrar una tienda local.
2. Antes de utilizar este producto, lea el manual de utilización completo y familiarizarse completo con el producto,
sus componentes y reconosca los peligros asociados con su uso.
3. Para familiarizarse con las operaciónes básicas, localize y gire la manejadera de la valvula de liberacion:
a. Gire la manejadera en el sentido de las agujas del reloj hasta que hay resistencia rme. Esta es la posición
"Cerrada" de la válvula utilizada para elevar la placa de la montura.
b. Gire la manejadera en sentido contrario a las agujas del reloj, pero no más de 1 / 2 vuelta de la posición cerrada.
Este es la posición "Abierta" de la válvula utilizada para descender la placa de la montura.
4. Con la montura completamente retraída, quite el tapon de llenar el aceite. Mueva la manejadera de arriba hacia
abajo 6 a 8 veses. Esto le ayudará a liberar cualquier presión de aire, que puede ser atrapado en el embalse.
Cheqee el nivel de aceite. El nivel de aceite debe estar al mismo nivel con el agujero del tapon de llenar aceite.
Reponga el tapon de llenar aceite.
5. Asegúrese que el gato se mueve libremente. Suba y baje el gato descargado a todo la rango de elevación antes
de la puesta en servicio para asegurar el buen funcionamiento de la bomba. Sustitua piezas dañadas o gastadas
y asambleas con piezas de recambio autorizadas por el fabricante.
Sangrado / Ventilando Aire Atrapado
Con la válvula en la posición ABIERTA (3b.) y con la montura completamente bajada, localize y retire el tapón/tornillo
de llenar el aceite. Muéva la manejadera arriba hacia abajo 6 a 8 veses. Esto le ayudará a liberar cualquier presión
de aire que puede quedar atrapado en el embalse. Vuelva a instalar el tapón/tornillo de llenar el aceite.
•Estudie, entienda y siga todos los materiales impresos con / para este producto antes de su uso.
• No exceda la capacidad nominal.
• Use sólo en un supercie liso, duro, y nivel.
•Soporte adecuadamente el vehículo antes de empezar los reparaciones.
• Si necesita mover un gato con carga, tenga cuidado que la carga está segura de una manera
apropiada, está stable, está en la posición más baja que es posible, mueva por un supercie duro y
liso y que la plataforma de levantar este nivel.
• El uso de este producto es limitado a el retiro, a la instalación, y transportación de transmisiones
de automóviles y camiones ligeros, cajas de transferencía , y transejes.
• Solamente use adaptadores y accesorios hechos por el fabricante de este gato de transmission.
• Solamente use adaptadores y accesorios con una capacidad normal que es más de la capaciadad
normal de este gato.
• Asegúrese de que el centro de gravedad esta al centro de la carga en la montura
• Nunca use el gato como una estación de trabajo/reparo. Transre la carga inmediatamente a una
estación de trabajo adecuada.
• No se haga cambios a este producto.
• Si no presta atención a las marcas puede resultar en lesiones personales y / o daños a la propiedad
!ADVERTENCIA

12
OPERACIÓN
Sigua las instruciones para el retiro y la instalación de la transmision, la caja de transferencía, o el eje de trans,
como dice el manual de servicio del fabricante del vehículo.
Levantamiento de la montura
1. Cerre la válvula de liberacion por manera de dar vuelta a la derecha a la perilla de la válvula de liberacion.
2. Inserte la manejadera entre la manga be manejadera, despúes muévela arriba hacia abajo hasta que la carga
está connectada.
3. Asegura la carga con las cadenas incluidas.
Tenga cuidado que el centro de gravedad de la carga está al centro de la montura y que la carga está segura
antes de mover el gato. Si la transmisión no está al centro de la montura, el gato puede caerse.
Bajar la montura:
Tenga cuidado que todas las herramientas y personal están lejos del gato antes de bajar la carga. ¡Abre dispacio
la válvula de liberacion! Lo más rapído que mueve la perilla a la izquierda, lo más rapído que la carga va a bajar.
¡Mantenga control de la carga y la velocidad de la bajada todo el tiempo!
1. Asegura la carga al gato con las cadenas incluidas.
2. Muy despacio, dé vuelta a la perilla de la válvula de liberacion a la izquierda, nunca más de ½ vuelta cuando la
carga está completamente bajada.
3. Inmediatamente transera la carga a una estación de trabajar apropriada.
4. Despúes de quitar la carga del gato, asegure que la montura está bajada completamente para reducir la exposición
a moho y contaminación.
Nunca utilize este gato como estación de trabajo!
!
!
!
Para evitar el aplastamiento y lesiones:
• Nunca trabaje sobre, debajo o alrededor de una carga apoyada sólo por gato
hidráulico
• Esté alerto y sobrio al usar este producto.No opere bajo la inuencia de drogas
o alcohol
MANTENIMIENTO
Importante: Utilize únicamente un buen grado de aceite de gato hidráulico. Evite la mezcla de diferentes tipos
de uidos y NUNCA use el líquido de frenos, aceite de turbina, uido de transmisión, aceite de motor o glicerina.
Líquidos inadecuados pueden provocar el fallo prematuro del gato y la potencial pérdida súbita inmediata de la
carga. Recomendamos Mobil DTE 13m.
Adición de aceite
1. Con la montura completamente bajada, quite el tapón/tornillo de llenar el aceite.
2. Llene con aceite justo hasta ~3/16” arriba de adentro del cilindro como se puede ver por el agujero de llenar el
aceite. Vuelva a instalar el tapón/tornillo de llenar el aceite.
Cambio de aceite
Para obtener el mejor rendimiento y más larga vida, cambie el contenido completo del uido por lo menos una vez
al año.
1. Con la montura completamente bajada, quite el tapón/tornillo de llenar el aceite.
2. Coloque el gato en su lado y drene el líquido en un recipiente adecuado.
Nota: Deshágase de aceite hidráulico, en conformidad con las normativas locales.
3. Ponga el gato a su posición vertical. Llene con aceite justo hasta ~3/16” arriba del cilindro adentro como se puede
ver por el agujero de llenar el aceite. Vuelva a instalar el tapón/tornillo de llenar el aceite.
!ADVERTENCIA

13
SOLUCIÓN DE PROBLEMAS
Síntoma Causas posibles Acciones Correctivas
El gato no levanta la carga • La válvula no está cerrada
completamente
• La carga es demasiado pesada
• Asegúrese que la válvula está cerrada
•Considere un gato de mayor capacidad
El gato levanta, pero no
mantiene la presión
•La válvula no está cerrada
completamente
•Mal funcionamiento de la
unidad hidráulica
•Asegúrese que la válvula está cerrada
•Suspenda el uso, y llame a su Represen-
tante de Fastenal o visite www.Fastenal.
com para encontrar una tienda local
El gato no descende después
de la descarga
• Reservorio sobrellenos
• Vínculos unidos
• Asegue que la carga está discargada y
drene el uído a nivel correcto
• Limpie y lubrice las piezas móviles
Pobre rendimiento ascensor • Nivel de uído bajo
•Aire atrapado en el sistema
• Asegure un nivel adecuado del uído
•Con el piston completamente retraído,
retire el tornillo de llenar el aceite para
dejar escapar el aire, vuelva a instalar el
tornillo de llenar el aceite.
El gato no levanta a la
extensión completa
• Nivel de uído bajo • Asegure un nivel adecuado del uído
Lubricación
Periódicamente recubrimiento de aceite lubricante en los puntos de giro, ejes y bisagras le ayudará a evitar la
oxidación y asegurar que la bomba y components se mueven libremente.
Limpieza
Periódicamente revise el piston de la bomba y émbolo en busca de signos de roya o corrosión. Limpie si es necesario
y limpie con un trapo aceitoso.
Nota: No utilize papel de lija o materiales abrasivos sobre estas supercies!
Almacenamiento
Cuando no en uso, guarde el gato con la montura totalmente bajada.
14
PIEZAS DE REPUESTO
No todos los componentes del gato son elementos de reemplazo. Al pedir piezas, de el número de modelo, número
de serie y descripción de las partes. Llame o escriba para los precios actuales: Fastenal, 4730 Service Dr., Winona,
MN 55987, U.S.A o llame a su Representante de Fastenal local or visite www.fastenal.com para encontrar una
tienda local.
Parte de repuesto para Ilustración de los modelos 5100815
Figura 2 - Repuesto para Ilustración de los modelo 5100815
28
12
23
26
27
25
21
22
24
19
20
4
3
J
11
39
IG
H
F
E
5
6
10
1
2
D
C
A
B
7
9
15
17
16
14
18
13
8
15
16
K

15
Parte Nu. De Parte Descripción Cant.
1G62-1-1000-108 Unidad hidráulica 1
2 324-4-1900-208 Asamblea de tornillo
de relleno 1
3551-7-0060-066 Sello de aceite 1
4 G46-3-9906-100 Asamblea de la válvula
de liberacion 1
5G62-6-1401-106 Cílindro de la bomba 1
6 G62-6-1306-102 Piston de la bomba 1
7566-4-0080-508 Perno 3
8G46-6-1301-205 Manga de la manejadera 1
9 649-1-0095-103 Tornillos de encaje hex 8
10 G38-3-9901-106 Asamblea de la
manejadera 1
11 506-9-0264-106 Empuñadura de la
manejadera 1
12 G38-4-5200-102 Asamblea de la rueda 1
13 G62-3-4200-101 Asamblea de la montura 1
14 G62-5-4302-103 Barra de soporte 4
15 G52-4-4102-101 Cadena y gancho 4
16 G36-6-7000-102 Cadena 2
17 G62-3-4502-109 Asamblea de Tornillo 4
18 G62-3-4203-109 Sostenedor de la montura 1
19 G62-6-4207-103 Barra estacionaria 1
20 G36-3-5100-108 Cojinete 1
21 G62-6-4505-103 Arandela 1
22 G62-6-4504-101 Tubo II 1
23 G62-6-4503-109 Tubo I 1
24 G62-3-4300-107 Base de la montura 1
25 G52-6-1709-106 Perilla 1
26 601-4-0040-034 Perno de resorte 1
27 G62-6-4501-105 Tornillo de Inclinación 1
28 653-1-0127-409 Perno Hex 4
*G62-3-9901-108 Kit de sello, unidad hid. -
(*) Sello Contenido del kit
Parte Descripción Cant.
2Tornillo de relleno 1
3 Sello de aceite 1
ASello 1
BAnillo O 1
CAnillo de reserva 1
D Casquillo de U 1
E Anillo O 1
FAnillo de reserva 1
GAnillo O 1
HAnillo de reserva 1
IAnillo O 1
JAnillo O 1
KAnillo O 1
Lista de piezas de repuesto para modelo 5100815:

16
GARANTÍA LIMITADA DE UN AÑO
Durante un período de un (1) año desde la fecha de compra, Fastenal reparará o reemplazará, a su elección,
sin cargos, sus productos que fallen debido a un defecto de material o mano de obra bajo condiciones normales de
uso. Esta garantía limitada es un recurso exclusivo del consumidor.
Realización de cualquier obligación en virtud de esta garantía se puede obtener la devolución del producto
justicado, portes pagados, a la Fastenal Departamento de Servicio de Garantía, , 4730 Service Dr., Winona, MN
55987.
Aparte de cuando tales limitaciones y exclusiones están expresamente prohibidos por la ley aplicable,
(1) EL CONSUMIDOR DEL ÚNICO Y EXCLUSIVO RECURSO SERÁ LA REPARACIÓN O EL REEMPLAZO DE
PRODUCTOS DEFECTUOSOS COMO SE DESCRIBIÓ ANTERIORMENTE. (2) Fastenal NO SERÁ RESPONSABLE
POR CUALQUIER DAÑO O INCIDENTALES O PÉRDIDA. (3) LAS GARANTÍAS IMPLÍCITAS, INCLUYENDO
SIN LIMITACIÓN LAS GARANTÍAS IMPLÍCITAS DE COMERCIABILIDAD Y APTITUD PARA UN PROPÓSITO
PARTICULAR, ESTARÁ LIMITADA A UN AÑO, DE OTRA MANERA LA REPARACIÓN, REEMPLAZO O REEMBOLSO
SEGÚN LO DISPUESTO EN VIRTUD DE ESTA GARANTÍA LIMITADA EXPLÍCITA ES EL RECURSO EXCLUSIVO
DEL CONSUMIDOR , Y SE OTORGA EN LUGAR DE CUALQUIER OTRA GARANTÍA, EXPRESA O IMPLÍCITA.
(4) CUALQUIER MODIFICACIÓN, ALTERACIÓN, ABUSO, ORNAMENTALESNO AUTORIZADO DE SERVICIO DE
DISEÑO ANULARA ESTA GARANTÍA Y NO ESTARA CUBRIDO POR LA PRESENTE GARANTÍA.
Algunos estados no permiten limitaciones a la duración de una garantía implícita, por lo que la limitación
anterior puede no aplicarse a usted. Algunos estados no permiten la exclusión o limitación de daños incidentales
o consecuentes, por lo que la anterior limitación o exclusión puede no aplicarse a usted. Esta garantía le otorga
derechos legales especícos, y usted también puede tener otros derechos que varían de estado a estado.
Fastenal
4730 Service Dr., Winona, MN 55987
www.fastenal.com
Table of contents
Languages:
Other EQUIPRITE Jack manuals


