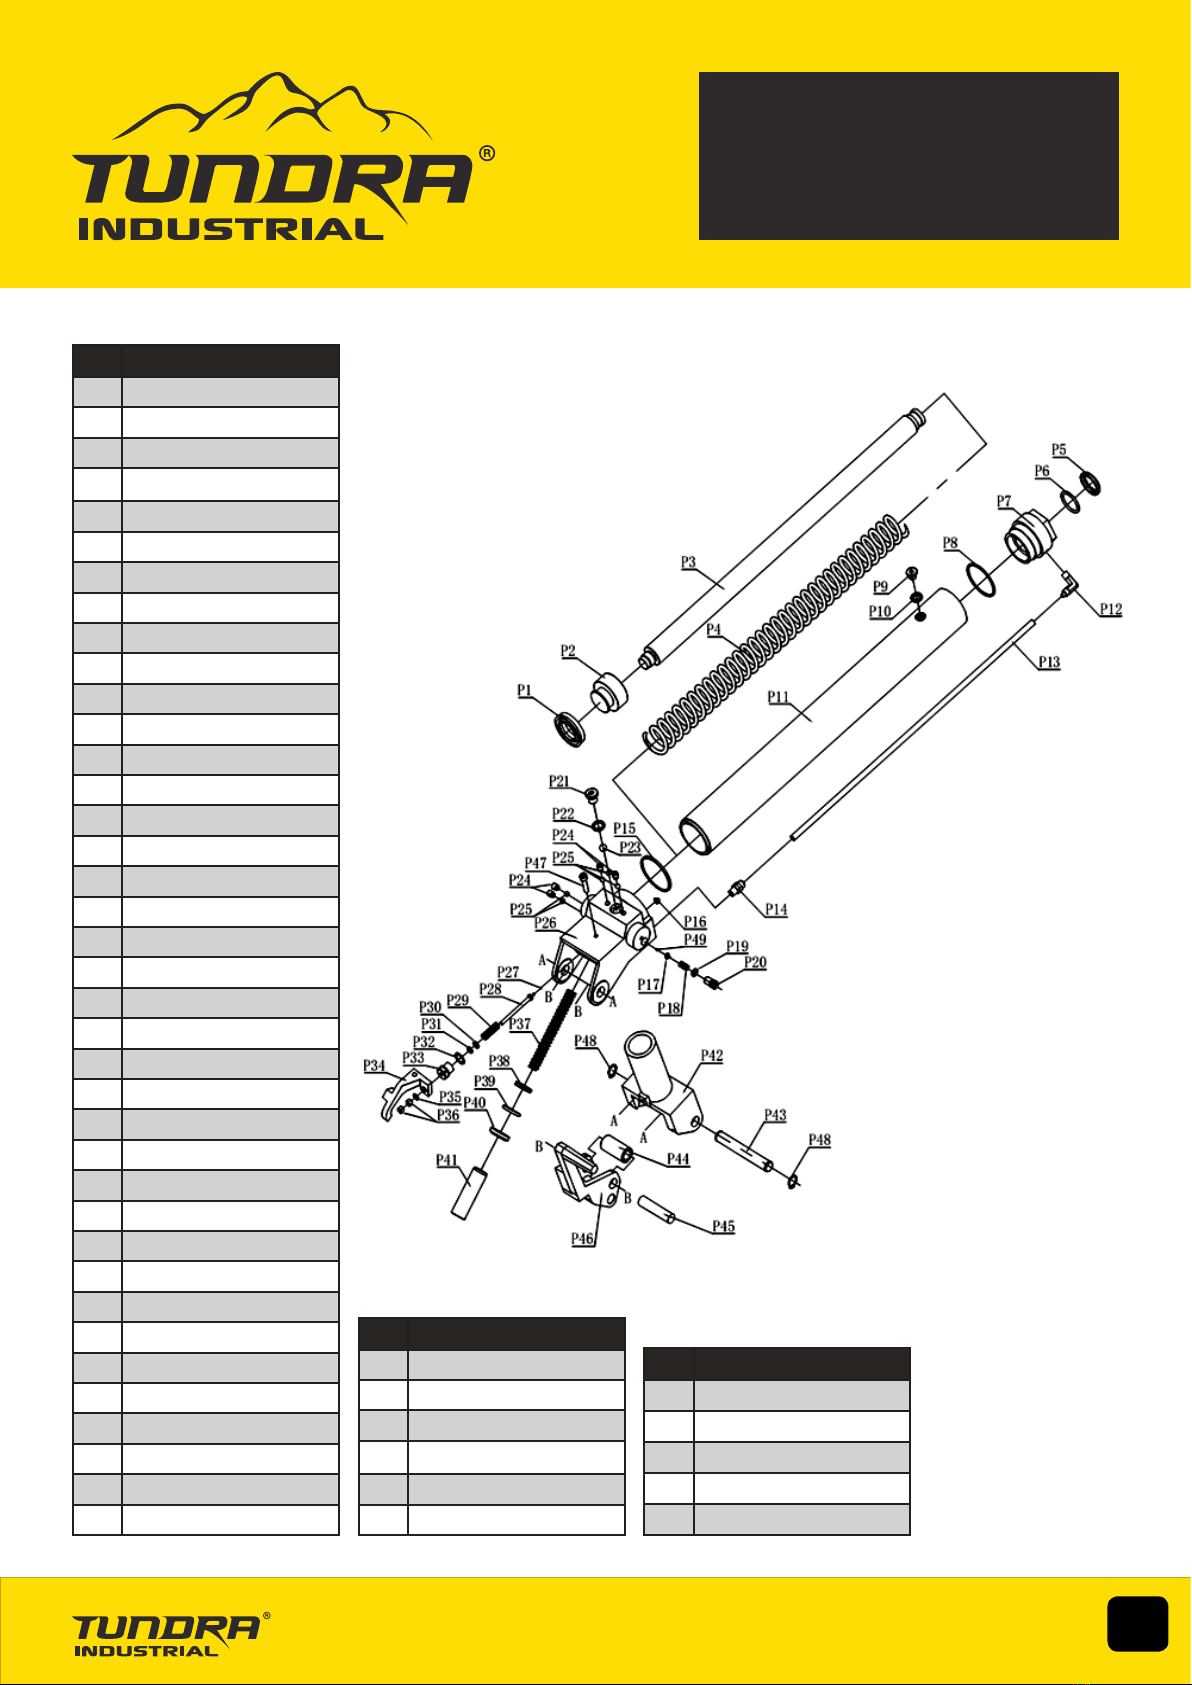
Tundra TUNJKTRLY02 User manual

USER MANUAL
TUNJKTRLY02
2 TONNE
HIGHLIFT
TROLLEY JACK
EXTRA LONG & LOW PROFILE

2
USER MANUAL
TUNJKTRLY02
Disclaimer:
The information in this document is to the best of our knowledge true and accurate, but all recommendations or suggestions are
made without guarantee. Since the conditions of use are beyond their control, Tundra Industrial ® disclaim any liability for loss or
damage suffered from the use of this data or suggestions. Tundra Industrial ® reserve the right to change product specifications
and warranty statements without further notification. All images are for illustration purposes only.

3
USER MANUAL
TUNJKTRLY02
1.1 Please read the following guidelines carefully before using this equipment. This equipment must be kept clean and kept in good
working order in order to ensure safe and effective operation. Inspect the equipment carefully before use and do not use if any
defects are identified. Contact your nearest Tundra Industrial Dealer for further information on repairs and replacement parts.
1.2 The maximum load for this equipment is 2 Tonnes. Do not exceed this rated capacity.
1.3 Centre the load on the saddle before lifting.
1.4 This jack is a lifting device ONLY. Support the vehicle with appropriate means immediately after lifting.
1.5 Do not go under the vehicle after lifting until it is supported correctly with axle stands.
1.6 Do not move or dolly the vehicle after lifting until it is supported correctly with axle stands.
1.7 Use jacks only on areas of the vehicle as specified by the vehicle manufacturer.
1.8 Use this bottle jack for the purpose for which it is intended. Do not use it for any other purpose it is not designed to perform.
Do not modify or attempt to enhance the equipment in any way.
1.9 Keep children, unauthorized persons & animals away from the work area.
1.10 Only use this jack on a hard surface that is stable, level, dry and not slippery, and capable of sustaining the load.
1.11 Inspect the jack before each use. Do not use if bent, broken, cracked, leaking or otherwise damaged, any suspect parts are
noted or it has been subjected to a shock load.
1.12 Check to ensure that all applicable bolts and nuts are firmly tightened.
1.13 Do not operate the jack when you are tired or under the influence of alcohol, drugs or any intoxicating medication.
1.14 Do not allow untrained persons to operate the jack.
1.15 Do not make any modifications to the jack.
1.16 Do not use brake fluid or any other incorrect fluid and avoid mixing different types of oil when adding hydraulic oil.
Only good quality hydraulic jack oil should be used.
1.17 If the jack needs repairing and/or there is any part that needs to be replaced, have it repaired by authorized technicians and
only use the replacement parts supplied by the manufacturer.
1. SAFETY GUIDELINES
WARNING:
No responsibility is accepted for incorrect use of this equipment. Incorrect use can result in damage to the equipment and
danger to the user. Warranty will be void in the event of incorrect use. Hydraulic products are only repaired by Tundra
Industrial authorised engineers. The warnings, cautions and instructions discussed in this instruction manual cannot cover
all possible conditions and situations that may occur. It must be understood by the operator that common sense and
caution are factors which cannot be built into this product, but must be supplied by the operator.

4
USER MANUAL
TUNJKTRLY02
2. SPECIFICATIONS
Model Number TUNJKTRLY02
Maximum Load: 2 Tonne
Minimum Height: 80mm
Maximum Height: 795mm
Length: 950mm
Weight (NW/GW): 52kg / 57kg
3. DESCRIPTION
High lift jack arm with incredible low access height of just 80mm. Fitted with quick lift foot pedal and dead man's control.
Heavy-duty long steel chassis with wide wheelbase provides inherent stability and easy access to deep set jacking points.
Fitted with one-piece hydraulic unit with built-in safety overload protection. Features include:
• Lifting range of 80mm - 795mm
• Manufactured from heavy-duty steel for strength and durability
• Twin pump
• Quick lift
• Extra long & low profile
4. ASSEMBLY
Loosen locating bolt at the side of the handle base. Push handle into socket and re-tighten locating bolt,
ensuring that it fits correctly in the groove.
• Before using the jack for the first time, purge the hydraulic circuit in order to eliminate any air in the system. To do so, pull the
handle upward and turn it anti-clockwise to open the release valve. Hold the handle in the open position and pump it up and down
7 or 8 times. To close the hydraulic valve turn the handle clockwise and push down.
• Place a few drops of hydraulic jack oil on the pump piston and pump the handle several times to distribute the oil.
• Thoroughly lubricate all moving parts.
5. OPERATING INSTRUCTIONS
WARNING! Ensure you prepare vehicle and use jack according to Section 1 SAFETY INSTRUCTIONS.
Check that the supporting ground upon which the jack will stand is level and solid and not tarmacadam.
• Position the jack saddle under the vehicle manufacturer's recommended lifting point (see vehicle handbook).
• Ensure the release valve is closed (i.e. the handle is pushed down and turned fully clockwise). Commence pumping
the handle, or the foot pedal, using the full stroke, until the vehicle reaches the working height.
• Should the jack become overloaded, a safety excess pressure valve will open and stop the vehicle from lifting.
• Position axle stands under the vehicle before attempting any work.
Lowering the load
• Pull the handle up and turn it anti-clockwise to open the valve and lower the load.
• The lowering speed is controlled and constant regardless of how much you turn the handle.
WARNING! Ensure that there are no persons or obstacles beneath the vehicle, or in the path of descent.

5
USER MANUAL
TUNJKTRLY02
6. TROUBLESHOOTING
Symptom Possible Causes Solution
Jack will not lift the load 1. Overloaded
2. Low oil level
3. Release valve not correctly closed
4. Air in system
5. Piston rod not functioning
6. Packing worn or defective
1. Be sure to use jack with adequate capacity
2. Top up oil lever
3. Check and close release valve
4. Open release valve and pump the handle a few times.
Close valve and re-try
5. Clean and replace oil
6. Replace packing
Jack does not lift high
enough or feels 'spongy'
1. Oil level too high or too low
2. Worn seals
3. Air in system
4. Release valve not closed
1. Fill or remove excess oil
2. Return jack to local service agent
3. Open release valve and pump the handle a few times.
Close valve and re-try
4. Check and close release valve
Jack lifts poorly 1. Pump packing or valves
malfunctioning
2. Oil is dirty
3. Air in the system
1. Replace packing and / or clean valves
2. Replace oil
3. Open release valve and pump the handle a few times.
Close valve and re-try
Jack lifts but will not
hold load
1. Release valve partially open
2. Dirt on valve seats
3. Air in system
4. Faulty seals
5. Packing worn or defective
1. Check and close release valve.
2. Lower jack, close release valve. Place foot on front
wheel and pull up lifting arm to full height by hand.
Open the release valve to lower arm
3. Open release valve and pump the handle a few times.
Close valve and re-try
4. Replace or contact local service agent
5. Replace packing
Jack will not lower
completely
1. Unit requires lubrication
2. Piston rod bent or damaged
3. Jack frame / link system distorted
due to overloading / poor positioning
4. Air in system
5. Release valve partially closed
6. Jack spring damaged
1. Oil all external moving parts
2. Replace rod or contact local service agent
3. Replace damaged parts or contact local service
agent
4. Open release valve and pump the handle a few times.
Close valve and re-try
5. Check and fully open release valve.
6. Replace spring or contact local service agent
Jack does not lower at all 1. Release valve closed 1. Check and fully open release valve

6
USER MANUAL
TUNJKTRLY02
7. PARTS LIST & EXPLODED PARTS DIAGRAMS
No. Description
01 Handle Grip
02 Handle
03 Dust Cap
04 Screw
05 Nut
06 Lock Washer
07 Washer
08 Wheel Assembly
09 Screw
10 Screw
No. Description
11 Retaining Ring
12 Lifting Frame Assembly
13 Retaining Ring
14 Fixed Wheel
15 Base Frame Assembly
16 Saddle Holder
17 Screw
18 Hydraulic Unit
19 Link Arm
20 Saddle Assembly

7
USER MANUAL
TUNJKTRLY02
No. Description
01 U-Ring
02 Piston
03 Piston Rod
04 Spring
05 Dust Ring
06 O-Ring
07 Ram Cover
08 O-Ring
09 Screw
10 Seal Washer
11 Cylinder
12 Joint
13 Pu Hose
14 Joint
15 Washer
16 Filter
17 Steel Ball Seat
18 Spring
19 O-Ring
20 Valve Seat
21 Screw
22 Seal Washer
23 Steel Ball
24 Screw
25 Steel Ball
26 Pump Body
27 Steel Ball
28 Unloader Valve Rod
29 Spring
30 Washer
31 O-Ring
32 Copper Washer
33 Valve Seat
34 Unloader Plate
35 Washer
36 Nut
37 Spring
38 U-Ring
No. Description
39 O-Ring
40 Dust Ring
41 Pump Piston
42 Handle Socket
43 Pin, Handle Socket
44 Spacer, Handle Socket
No. Description
45 Pin, Pedal
46 Pedal
47 Screw
48 Retaining Ring
49 Steel Ball

8
USER MANUAL
TUNJKTRLY02
8. MAINTENANCE
NOTICE: Use high grade hydraulic oil only. Never use brake fluid, motor oil, transmission fluid, turbine oil or any other fluids.
ISO-VG22 or equivalent hydraulic oil is recommended.
Check and Refill Oil
•With the jack fully lowered and in a level location, if unit cover is provided, remove unit cover, then remove oil filler plug.
•The oil should just cover the inner cylinder as seen from the oil filler plug hole.
•Do not overfill. Always fill with new, clean hydraulic jack oil as recommended above.
•Replace oil filler plug, then replace unit cover.
Lubrication and Cleaning
•Periodically clean and lubricate all moving parts and pivot points.
Air Venting Procedures
•With the jack fully lowered and the release valve open, remove the oil filler plug.
•Pump the handle rapidly several times. Replace the oil filler plug.
•Turn the handle/release valve clockwise to the closed position.
•Pump the handle until the lift arm reaches maximum height. Continue to pump several times to remove trapped air in the system.
•Turn the handle/release valve counterclockwise one full turn and lower the lift arm to the lowest position.
Use force on saddle if necessary.
•Carefully and slowly loosen oil filler plug to release pressurized air.
•Repeat above steps until trapped air is completely vented.
Damaged Equipment
•Any jack that appears to be damaged in any way, is found to be worn, or operates abnormally SHOULD BE REMOVED FROM
SERVICE UNTIL REPAIRED. It is recommended that necessary repairs be made by a manufacturer’s or supplier’s authorized
repair facility if repairs are permitted by the manufacturer or supplier.
Alterations
•Because of potential hazards associated with this type of equipment, no alterations shall be made to the product.
Attachments and Adapters
•Only attachments and/or adapters supplied by the manufacturer shall be used.

9
USER MANUAL
TUNJKTRLY02
EC DECLARATION OF CONFORMITY
We, Tundra Industrial, as the authorised European Community representative of the manufacturer, declare that the following
equipment conforms to the requirements of the following Directives:
BS EN 1494:2000+A1:2008
Mobile or movable jacks and associated lifting equipment
2006/42/EC (as amended)
Machinery Directive
Equipment Category: Trolley Jack / Lifting Equipment
Product Name/Model: TUNJKTRLY02 - 2 Tonne Trolley Jack
Maximum Load: 2 Tonne
Signed by: Stephen McIntyre
Position in the company: Operations Director
Date: 09 March 2016
This technical document is held by: Jimmy Hemphill
Technical file holder's address as shown below
Name and address of manufacturer or authorised representative:
Tundra Industrial,
Herons Way,
Chester Business Park,
Chester,
United Kingdom,
CH4 9QR
Telephone: +44 (0)1244 646 048
Fax: +44 (0)1244 241 1

10
USER MANUAL
TUNJKTRLY02
LIMITED WARRANTY STATEMENT
Tundra Industrial warrants its customers that its products will be free of defects in workmanship or material.
Tundra Industrial shall, upon suitable notification, correct any defects, by repair or replacement, of any parts or components of
this product that are determined by Tundra Industrial to be faulty or defective.
This warranty is void if the equipment has been subjected to improper installation, storage, alteration, abnormal operations,
improper care, unauthorised service or repair.
Warranty Period
Tundra Industrial will assume both the parts and labour expense of correcting defects during the stated warranty periods below.
All warranty periods start from the date of purchase from an authorised Tundra Industrial dealer. If proof of purchase is not
available from the end user, then the date of purchase will be deemed to be 3 months after the initial sale to the distributor.
1 Year
• Tundra Industrial 2 Tonne Trolley Jack - [TUNJKTRLY02]
90 Days
• All replacement parts purchased outside of the warranty period
Important: All parts used in the repair or replacement of warranty covered equipment will be subject to a minimum of 90 days
cover or the remaining duration of the warranty period from the original date of purchase.
Warranty Registration / Activation
You can register and activate your warranty by visiting the Jefferson Tools website using the following address:
www.jeffersontools.com/warranty and completing the online form. Online warranty registration is recommended as it eliminates
the need to provide proof of purchase should a warranty claim be necessary.
Warranty Repair
Should Tundra Industrial confirm the existence of any defect covered by this warranty the defect will be corrected by repair or
replacement at an authorized Tundra Industrial dealer or repair centre.
Packaging & Freight Costs
The customer is responsible for the packaging of the equipment and making it ready for collection. Tundra Industrial will arrange
collection and transportation of any equipment returned under warranty. Upon inspection of the equipment, if no defect can be
found or the equipment is not covered under the terms of the Tundra Industrial warranty, the customer will be liable for any
labour and return transportation costs incurred. These costs will be agreed with the customer before the equipment is returned.
Warranty Limitations
Tundra Industrial will not accept responsibility or liability for repairs made by unauthorised technicians or engineers. Tundra
Industrial's liability under this warranty will not exceed the cost of correcting the defect of the Tundra Industrial products. Tundra
Industrial will not be liable for incidental or consequential damages (such as loss of business or hire of substitute equipment etc..)
caused by the defect or the time involved to correct the defect. This written warranty is the only express warranty provided by
Tundra Industrial with respect to its products.
Any warranties of merchantability are limited to the duration of this limited warranty for the equipment involved. Tundra Industrial
is not responsible for cable wear due to flexing and abrasion. The end user is responsible for routine inspection of cables for pos-
sible wear and to correct any issues prior to cable failure.

11
USER MANUAL
TUNJKTRLY02
Claiming Warranty Coverage
The end user must contact Tundra Industrial (Tel: +44 (0) 1244 646 048) or their nearest authorised Tundra Industrial dealer
where final determination of the warranty coverage can be ascertained.
Step 1 - Reporting the Defect
Online Method:
• Visit the website www.jeffersontools.com/warranty and complete the Warranty Returns form. You can complete the form
online and submit it to us directly or download the form to print out and return by post.
Telephone Method:
Contact your Tundra Industrial dealer or sales representative with the following information:
• Model number
• Serial number (usually located on the specification plate)
• Date of purchase
A Warranty Returns form will be sent to you for completion and return by post or fax, together with details of your nearest
authorised Tundra Industrial repair centre. On receipt of this form Tundra Industrial will arrange to collect the equipment from you
at the earliest convenience.
Step 2 - Returning the Equipment
It is the customer's responsibility to ensure that the equipment is appropriately and securely packaged for collection. Please
ensure that you include a copy of your proof of purchase. Please note that Tundra Industrial cannot assume any responsibility for
any damage incurred to equipment during transit. Any claims against a third party courier will be dealt with under the terms &
conditions of their road haulage association directives.
Step 3 - Assessment and Repair
On receipt, the equipment will be assessed by an authorised Tundra Industrial engineer and it will be determined if the equipment
is defective and in need of repair and any repairs needed are covered by the warranty policy. In order to qualify for warranty cover
all equipment presented must have been used, serviced and maintained as instructed in the user manual.
Where repair is not covered by the warranty a quotation for repair, labour costs and return delivery will be sent to the customer
(normally within 7 working days). Note: If the repair quotation is not accepted Tundra Industrial will invoice 1 hour labour time at
£30 per hour plus return carriage costs (plus VAT).
In cases where no fault can be found with the equipment, or, if incorrect operation of the equipment is identified as the cause
of the problem, a minimum of 1 hour labour at £30 per hour plus carriage costs will be required before the equipment will be
despatched back to the customer.
Any equipment repaired or replaced under warranty will normally be ready for shipment back to the customer within 7 working
days upon receipt of the equipment at an authorised Tundra Industrial Repair centre (subject to part availability). Where parts are
not immediately available Tundra Industrial will contact you with a revised date for
completion of the repair.
General Warranty Enquiries
For any further information relating to Tundra Industrial warranty cover please call +44 (0) 1244 646 048.

12
USER MANUAL
TUNJKTRLY02
Table of contents
Other Tundra Jack manuals
Popular Jack manuals by other brands

Larzep
Larzep HN-360 manual

Tractel
Tractel hydrofor H 5 Operation and maintenance manual

Omega Lift Equipment
Omega Lift Equipment 18124C Operating instructions & parts manual

Clarke
Clarke STRONG-ARM CTJ2500QLGB Operating & maintenance instructions

HOLZMANN MASCHINEN
HOLZMANN MASCHINEN RWH125ALU user manual

Borum
Borum BTJ50TA owner's manual

K Tool International
K Tool International KTI-XD63213 owner's manual

Cartrend
Cartrend 7740014 Original operating instructions

Mega
Mega N10-3 Operation and maintenance instructions

ATD Tools
ATD Tools ATD-7328 Operating instructions & parts manual

Tektronix
Tektronix Keithley HV-CS-1589 Installation information

Berger & Schröter
Berger & Schröter C56635 quick start guide