Ericsson T10s User manual

Visit us on our website
http://mobile.ericsson.com
Ericsson Mobile Communications AB, SE-221 83 Lund, Sweden
EN/SVV 000 000 R1A
Mobile Phone
T10s
User’s Guide

Contents
at a Glance
Getting Started 3
Preparin
g
Your Phone for Use 4
Turnin
g
Your Phone On and Off 9
Display Information and Key Functions 11
Makin
g
and Receivin
g
Calls 13
Durin
g
a Call 16
Functions and Settings 19
Usin
g
the Menu System 20
Your Personal Phone Book 22
Usin
g
the Call List 28
Your Voice Mail Service 30
Personalizin
g
Your Phone 31
Sendin
g
and Receivin
g
Text Messa
g
es (SMS) 36
Divertin
g
Incomin
g
Calls 44
Security for Your Phone and Subscription 46
Handlin
g
More than One Call Simultaneously 53
Settin
g
Network Preferences 58
Knowin
g
the Call Time/Call Cost 61
Usin
g
Two Voice Lines 63
Callin
g
from Your Car 64
Callin
g
Card or Credit Card Calls 66
Sendin
g
and Receivin
g
Faxes and Data 68
Some Useful Functions 69
Additional Information 73
Troubleshootin
g
74
Quick Keys 76
Technical Data 77
Glossary 78
Guidelines for Safe and Efficient Use 83
Warranty 87
Declaration of Conformity 89
Index 91
Ericsson T10s
Second edition (October 1999)
This manual is published by Ericsson
Mobile Communications AB, without any
warranty. Improvements and changes to
this manual necessitated by typographical
errors, inaccuracies of current information,
or improvements to programs and/or
equipment, may be made by Ericsson
Mobile Communications AB at any time
and without notice. Such changes will,
however, be incorporated into new editions
of this manual.
All rights reserved.
©Ericsson Mobile Communications AB,
1999
Publication number: EN/LZT 108 2699 R1B
INNOVATRON PATENTS

Please note!
Some of the services in this manual are not supported by all net-
works. This also applies to the GSM International Emergency
Number 112.
Please contact your network operator or service provider if you are
in doubt whether you can use a particular service or not.
The symbol on our products signifies that they have been certi-
fied according to the EMC directive 89/336/EEC, the Telecommu-
nications directive 91/263/EEC, and the Low Voltage directive
73/23/EEC when applicable. The products fulfil the requirements
according to the following standards:
Cellular Phones and Accessories in Combination:
ETS 300 342-1 EMC for European digital cellular telecommunica-
tions.
Accessories Without Direct Connection to a Cellular Phone:
EN 50081 Electromagnetic compatibility, Generic Emission
Standard, and EN 50082 Electromagnetic compatibility, Generic
Immunity Standard.

GETTING STARTED
Preparing Your Phone for Use 4
Turning Your Phone On and Off 9
Display Information and Key Functions 11
Making and Receiving Calls 13
During a Call 16

4 Preparing Your Phone for Use
Preparin
g
Your Phone
for Use
Overview
Front
Back
A
ntenna
Earpiece
Display
Keypad
Flip
Indicator li
g
ht
Volume keys
Microphone
Microphone channel
Threaded hole for belt clip
SIM release button
Battery
Battery release
catch

Preparing Your Phone for Use 5
Assembly
You need to do the following to use your phone:
•insert the SIM card
•attach the battery to the phone
•charge the battery
The SIM Card
When you register as a subscriber with a network operator, you get a SIM
(Subscriber Identity Module) card. The SIM card contains a computer chip
that keeps track of your phone number, the services included in your subscrip-
tion, and your Phone Book information, among other things.
SIM cards come in two sizes. One is the size of a credit card, and the other is
smaller. Your phone uses the smaller card. Many credit card-sized SIM cards
have a perforated smaller card that you can take out easily. Before you can use
your phone, you must insert the SIM card as shown below.
Inserting the SIM Card
Removing the SIM Card
nectors facing down and the cut
corner turned to the left.
1. Remove the battery (if attached).
2. Slide the SIM card into the SIM
card slot with the golden con-
3. Pull out the SIM card.
1. Remove the battery (if attached).
2. Slide the SIM release button
towards you.

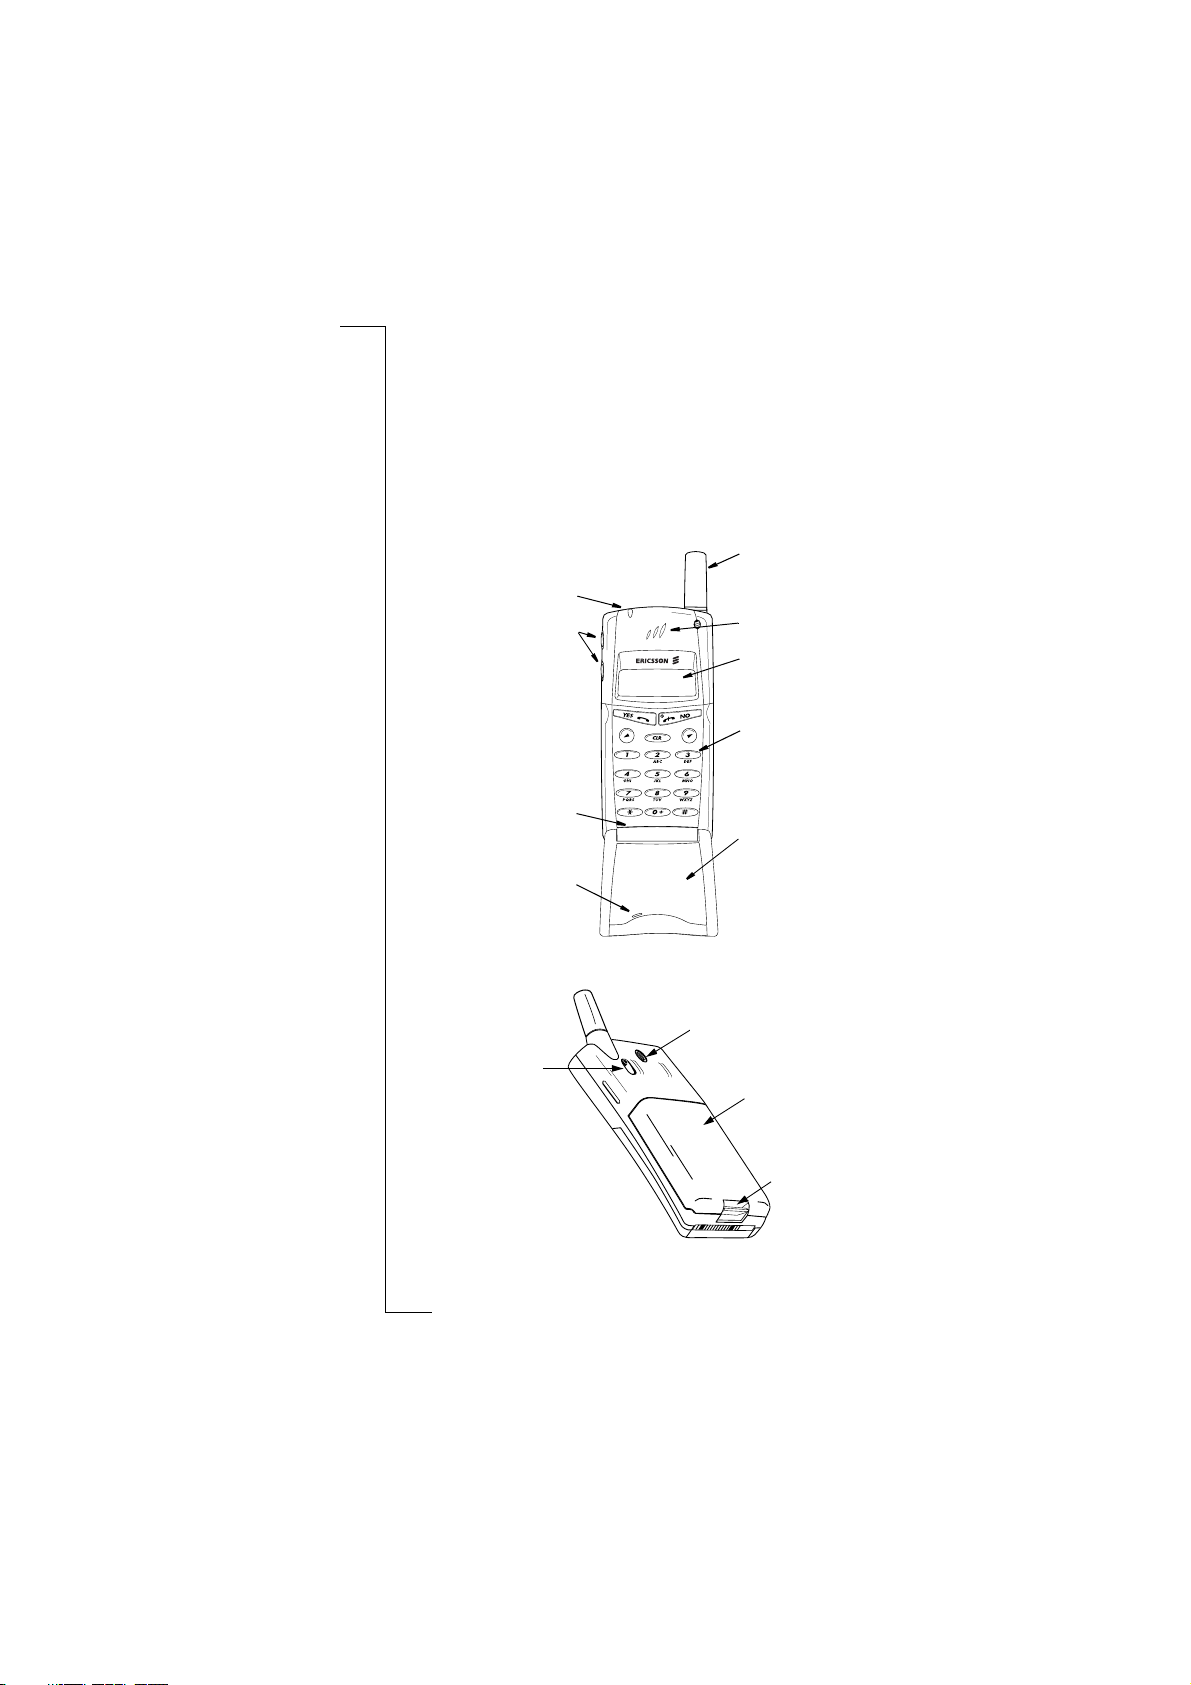
6 Preparing Your Phone for Use
The PIN
Most SIM cards are supplied with a security code or PIN (Personal Identity
Number), which you need to access the network. Every time you turn on your
phone, it prompts you to enter your PIN. You will find your PIN in the infor-
mation from your operator.
Some operators may have services that require a second PIN, your PIN2.
You should be careful with your PIN, since it is your protection against
unauthorized use of your subscription.
If your PIN is entered incorrectly three times in a row, the SIM card is
blocked. If this happens, you can unlock it by using your PUK (Personal
Unblocking Key code), which you also get from your operator.
The Battery
Your phone comes with a nickel metal hydride (NiMH) battery. The battery is
not charged when you buy your phone, but there may be enough power to turn
the phone on. We recommend that you charge the battery before you use the
phone for the first time.
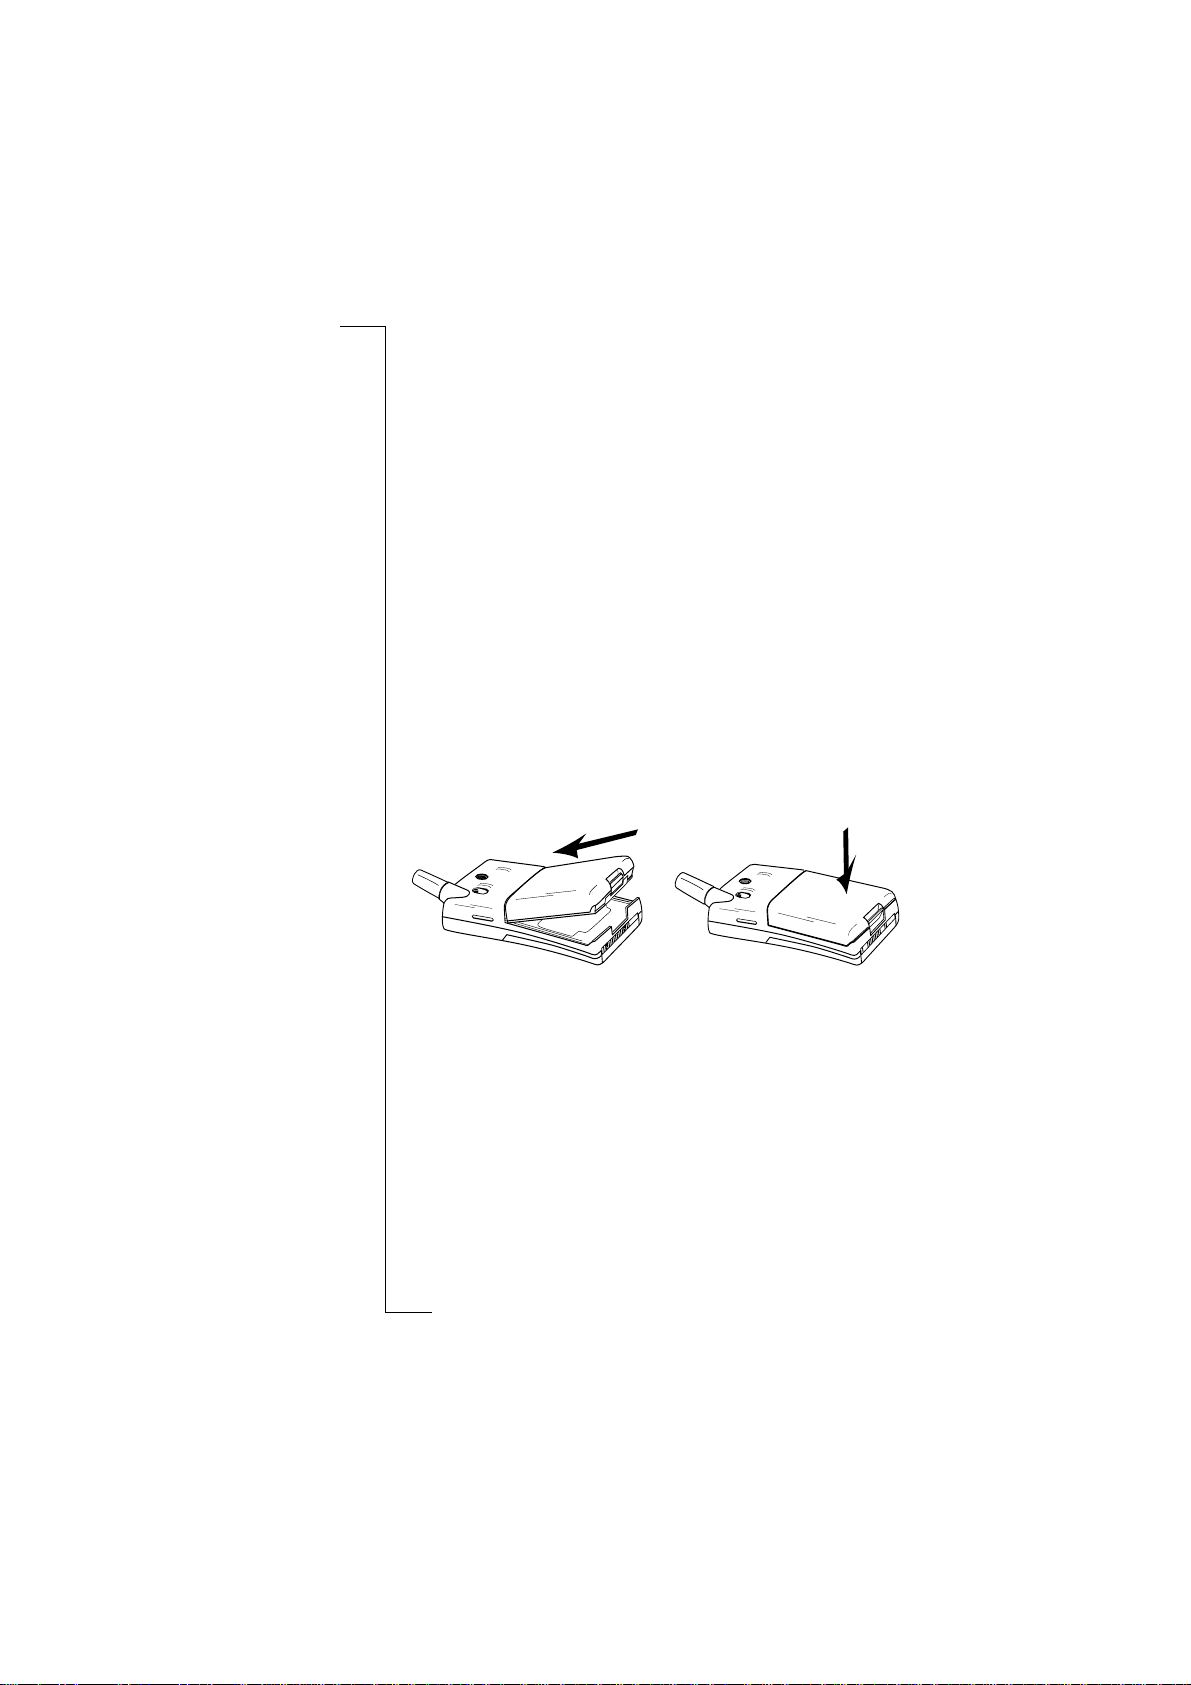
Attaching the Battery to Your Phone
When to Charge the Battery
The nickel metal hydride battery that comes with your phone can be charged
whenever you wish without affecting its performance. This is not the case
with the cheaper nickel cadmium type batteries, often sold as accessories by
other suppliers. For the best talk and standby time in the long run, we recom-
mend that you use only Ericsson original batteries with your phone.
To remind you that you will soon need to charge the battery or replace it with
a charged one:
•an alarm signal (a long beep) sounds and the message
Battery low
appears
for ten seconds in the display. The signal is repeated several times.
•Place the battery on the back of the phone and push until you hear a click.

Preparing Your Phone for Use 7
•the indicator light on the top of the phone starts flashing red.
Note! The phone turns itself off when the battery can no longer power it satis-
factorily.
Charging the Battery
To indicate charging:
•the battery meter in the display pulses continuously.
•the indicator on the top of the phone shows a steady red light (or green, if
the phone is turned on).
When the battery is fully charged, the battery meter in the display is full and
the indicator on the top of the phone shows a steady green light.
Tip! You can use the phone while the battery is being charged. However, this
increases the charging time.
Disconnecting the Charger
3. Connect the charger to the phone
as shown in the picture. The flash
symbol on the plug must face
upwards.
1. Make sure that the battery is
attached to the phone.
2. Connect the charger to the mains.
•Bend the plug connected to the phone upwards and pull it out.

8 Preparing Your Phone for Use
Removing the Battery
3. Lift the battery up and away from
the phone.
1. Turn off the phone.
2. Press the catch on the bottom of
the battery.

Turning Your Phone On and Off 9
Turnin
g
Your Phone On
and Off
Turning Your Phone On
•Press and hold the NO (ON/OFF) key until you hear a click.
If “Enter PIN” Appears in Display
Some SIM cards are protected with a PIN code. If
Enter PIN
appears in the dis-
play after you have turned on the phone, do this:
1. Enter your PIN. If you make a mistake while entering your PIN, erase the
wrong digit by pressing the CLR key.
2. Press YES.
Note! If your PIN is entered incorrectly three times in a row, the SIM card is
blocked. You can unblock it by using your PUK, see “Security for Your Phone
and Subscription” on page 46.
Network Search
After you have turned on the phone (and entered your PIN), the Ericsson logo
appears in the display and the phone searches for a network.
When a network is found, the phone beeps three times. The indicator light on
the top of the phone flashes green once every second and your network opera-
tor’s name (in most cases abbreviated) appears in the display.
This is called standby mode. You can now make and receive calls.
Initial Settings
The first time you turn on your phone, you may want to change the language
in the display, choose the ring signal type and set the clock. For more informa-
tion about these settings, see “Personalizing Your Phone” on page 31.
Display Language
Most modern SIM cards automatically set the display language to the lan-
guage of the country where you bought your SIM card. If this is not the case,
the default language is English. To change the display language, see “Display
Language” on page 34.
Enter
PIN
Enter
PIN
****
NETWORK
00:00

10 Turning Your Phone On and Off
If your phone displays a language you do not understand, you can change it to
English.
To change the display language to English
1. Press the CLR key.
2. Press the LEFT arrow key.
3. Enter 0000.
4. Press the RIGHT arrow key.
Network
Normally, the name of a network appears in the display after you have turned
your phone on, but sometimes there is no network that you can use. The dis-
play then shows one of the following:
112 only
If the message
112 only
is displayed, you are within range of a network, but you
are not allowed to use it. However, in an emergency, some operators allow
you to call the international emergency number 112. See “Making Emergency
Calls” on page 14.
No network
If the message
No network
is displayed, there is no network within range or the
received signal is too weak. You have to move to get a stronger signal.
Turning Your Phone Off
•In standby mode, press and hold the NO (ON/OFF) key until you hear a
click.
NETWORK
16:21
112 only
16:21
No network
06:01

Display Information and Key Functions 11
Display Information
and Key Functions
Display Information
Your phone display will help you to:
•verify that you are dialling correctly
•check your signal strength and service availability
•find out if you have received messages
•check which line is in use if you have the Alternate Line Service (ALS)
•check battery level
Icons in the Display
Icons are displayed when specific functions are active or if you have received
a message. The figure in the margin shows an overview of all the possible
icons and where they appear.
The table below shows every icon separately and also gives you an explana-
tion.
Icon/Indicator: Name: Description:
Signal strength
meter The strength of the received signal is
indicated in steps. Six steps indicate
the strongest signal.
Battery meter Indicates the current state of the bat-
tery. The fuller the icon, the more
power there is.
Keypad lock
indicator The keypad is locked.
Divert indicator An arrow means that the Divert all
function is active.
Silent ring signal A crossed note means that no sound
can be heard when you receive a call.
SMS indicator The envelope icon means that you
have received a text message (SMS).
Voice mail indicator The tape loops mean that you have
received a voice message. Will not
appear on all networks.

12 Display Information and Key Functions
Key Functions
The keys have other functions when you access the menu system “Using the
Menu System” on page 20.
Line indicator Tells you which line is in use if you
have the Alternate Line Service.
Home zone indica-
tor The house icon indicates that the
phone is within the home zone. Will
not appear on all networks.
Key: Use:
YES To make calls and answer calls.
NO To turn the phone on or off. Press and hold the key.
To end a call.
LEFT and RIGHT
arrow keys To access and navigate (scroll through) the menu system.
CLR (Clear) To erase digits from the display. Press and hold the key to
erase all digits.
To mute the microphone during a call. Press and hold the
key.
To turn the ring signal on/off in standby mode. Erase all dig-
its from the display. Then press and hold the key. The sym-
bol for silent ring signal is shown in the display when the
ring signal is turned off.
To silence the ring signal when you receive a call. Press the
key briefly
Number keys To enter the digits 0-9.
The 0 key enters the international prefix (+) if held down.
Star To enter a star (*) character.
If held down it enters a p (pause).
Hash To enter #.
To terminate the input of PIN and security codes.
If held down it enters the phone icon.
Volume keys
UP and DOWN To increase or decrease the volume of the earpiece or
handsfree loudspeaker during a call.
To show today’s date in the display during standby.
To reject a call, double-click a volume key.
Icon/Indicator: Name: Description:

Making and Receiving Calls 13
Makin
g
and Receivin
g
Calls
In this chapter, we assume that you have turned on your phone and that you
are within range of a network. If you are abroad, you may use other networks,
provided your home network has an agreement that allows you to do this (see
also “Setting Network Preferences” on page 58).
Making a Call
1. Enter the area code and phone number.
2. Press YES.
While a call is in progress, a time counter automatically starts and you can see
how long you have been on the phone. If you have activated the Call Cost
option (see “Knowing the Call Time/Call Cost” on page 61) and your network
and SIM card supports it, you see the price of the call in the display.
Ending a Call
•Press NO to end the call.
Re-dialling a Previously Called Number
1. Clear the display using CLR.
2. Press YES.
3. Press an arrow key until the number (and name) you want to call appears.
4. Press YES to make the call.
Automatic Re-dialling
If the display shows
Retry?
you can re-dial the number by pressing YES. Your
phone automatically re-dials (up to 10 times)
•until the call is answered. When the call is answered, you hear a beep fol-
lowed by a ring signal.
•until you press a key or receive a call.
NETWORK
0123456789
01:06
Julia
+3456789012

14 Making and Receiving Calls
Making International Calls
1. Press and hold the 0key until a + sign appears.
2. Enter the country code, area code (without any leading zero) and phone
number.
3. Press YES.
Making Emergency Calls
1. Enter 112 (the international emergency number).
2. Press YES.
The international emergency number 112 can be used in most countries, with
or without a SIM card inserted, if a GSM network is within range.
Note! Some network operators may require that a SIM card is inserted, and in
some cases that the PIN code has been entered, as well.
Some networks may not use the international emergency number, 112.
In a number of countries, the emergency number is 999 instead.
If you are unsure of what emergency number is used in your country, please
contact your network operator or service provider.
What Happens when I Receive a Call?
The phone rings and the indicator light on the top of the phone flashes green
rapidly. The display shows
Answer?
Tip! The phone has an in-built vibrating unit which allows you to receive
calls discretely. See “Vibrating unit” on page 33.
Answering a Call
•Press YES.
Rejecting a Call
•Double-click one of the volume keys on the side of the phone,
or press NO.
The caller hears a busy tone if the function is supported by the caller’s net-
work. If Divert on Busy is activated, the call is diverted to the number you
have specified. See, “Diverting Incoming Calls” on page 44.
Calling Line Identification (CLI)
If your subscription includes the Calling Line Identification service and the
caller’s network sends the number, you see the caller’s number at the bottom
of the display when you receive a call. If the number is stored with a name in
the phone book, the name is also shown in the display.
Answer?
Busy tone
Tommy
+2345678901
Answer?
Janina
+234343556

Making and Receiving Calls 15
Ciphering
Ciphering is a built-in feature that scrambles your calls and messages to pro-
vide additional privacy.
An exclamation (!) mark, shown next to the handset icon in the display during
a call, indicates that ciphering is currently not being provided by the network.

16 During a Call
Durin
g
a Call
Your phone has several functions which you might find helpful while a call is
in progress.
Changing the Earpiece Volume
To change the earpiece volume during a call
•Press the volume keys (UP or DOWN) on the side of the phone.
Pressing UP increases the volume.
Pressing DOWN decreases the volume.
Muting the Microphone
To turn the microphone off temporarily during a call
1. Press and hold the CLR key.
Mute
appears in the display.
2. To continue your conversation, release the CLR key.
Tip! Instead of pressing and holding the CLR key, you can put the call on
hold.
To put the call on hold
1. Press YES.
1 on hold
appears in the display
2. To continue your conversation, press YES again.
Scratch Pad Function
If you need to make a note of a phone number during a call, you can use the
Scratch Pad.
To use the scratch pad
•Use the number keys to enter the number.
When you end the call, the number remains in the display. You can now call
the number by pressing YES, or save it in the Phone Book (see “Your Personal
Phone Book” on page 22).

During a Call 17
Sending Tone Signals
To use telephone banking services or to control an answering machine, you
need to use codes. These codes are sent as tone signals (also known as DTMF
tones or touch tones).
•Press the appropriate keys (0-9, * and #).
Tip! You can also save a code together with a phone number in the Phone
Book. See “Your Personal Phone Book” on page 22.
Checking Duration/Cost of Call
During a call, the display shows the duration in minutes and seconds. If you
prefer, you can have the call cost displayed, provided your network and your
SIM card support this feature. See “Knowing the Call Time/Call Cost” on
page 61 on how to use this feature.
More than One Call Simultaneously
Your phone is capable of handling more than one call simultaneously. You can
put the current call on hold, and then make or answer a second call. You can
also set up a conference call with up to five people. See “Handling More than
One Call Simultaneously” on page 53 on how to use this feature.

18 During a Call

FUNCTIONS AND SETTINGS
Using the Menu System 20
Your Personal Phone Book 22
Using the Call List 28
Your Voice Mail Service 30
Personalizing Your Phone 31
Sending and Receiving Text Messages (SMS) 36
Diverting Incoming Calls 44
Security for Your Phone and Subscription 46
Handling More than One Call Simultaneously 53
Setting Network Preferences 58
Knowing the Call Time/Call Cost 61
Using Two Voice Lines 63
Calling from Your Car 64
Calling Card or Credit Card Calls 66
Sending and Receiving Faxes and Data 68
Some Useful Functions 69
Table of contents
Other Ericsson Cell Phone manuals

Ericsson
Ericsson T28z User manual

Ericsson
Ericsson GH688 - OTHER User manual

Ericsson
Ericsson R380 User manual

Ericsson
Ericsson EF738 User manual

Ericsson
Ericsson T65 User manual

Ericsson
Ericsson R250d PRO User manual

Ericsson
Ericsson T28s User manual

Ericsson
Ericsson R320S User manual

Ericsson
Ericsson T28 User manual

Ericsson
Ericsson T60c User manual

Ericsson
Ericsson T60LX User manual

Ericsson
Ericsson A1018 User manual

Ericsson
Ericsson A1228ds User manual

Ericsson
Ericsson T18s User manual

Ericsson
Ericsson R520S User manual

Ericsson
Ericsson A1228di User manual

Ericsson
Ericsson W20 User manual

Ericsson
Ericsson EF738 User manual

Ericsson
Ericsson R380 User manual

Ericsson
Ericsson T20S User manual