ERT SpiroSphere User manual
781235
Version 00.16
Instructions for Use
SpiroSphere®

SpiroSphere®Instructions for Use
Page 2/84 9HUVLRQ0$<
Product names or services are trademarks of their respective companies.
All rights, including those of translations, are reserved. Written permission of
eResearchTechnology (ERT) shall be obtained for the reproduction of this manual or any excerpt
WKHUHRIE\DQ\PHDQVLQFOXGLQJSULQWLQJSKRWRVWDWLFGXSOLFDWLRQPLFUR¿OPVRUDQ\RWKHU
processes.
eResearchTechnology GmbH
Sieboldstrasse 3
97230 Estenfeld, Germany
Tel: +49 9305 720-9891
Fax: +49 9305 720-7891
www.ert.com
© 2017 eResearchTechnology GmbH. All rights reserved.
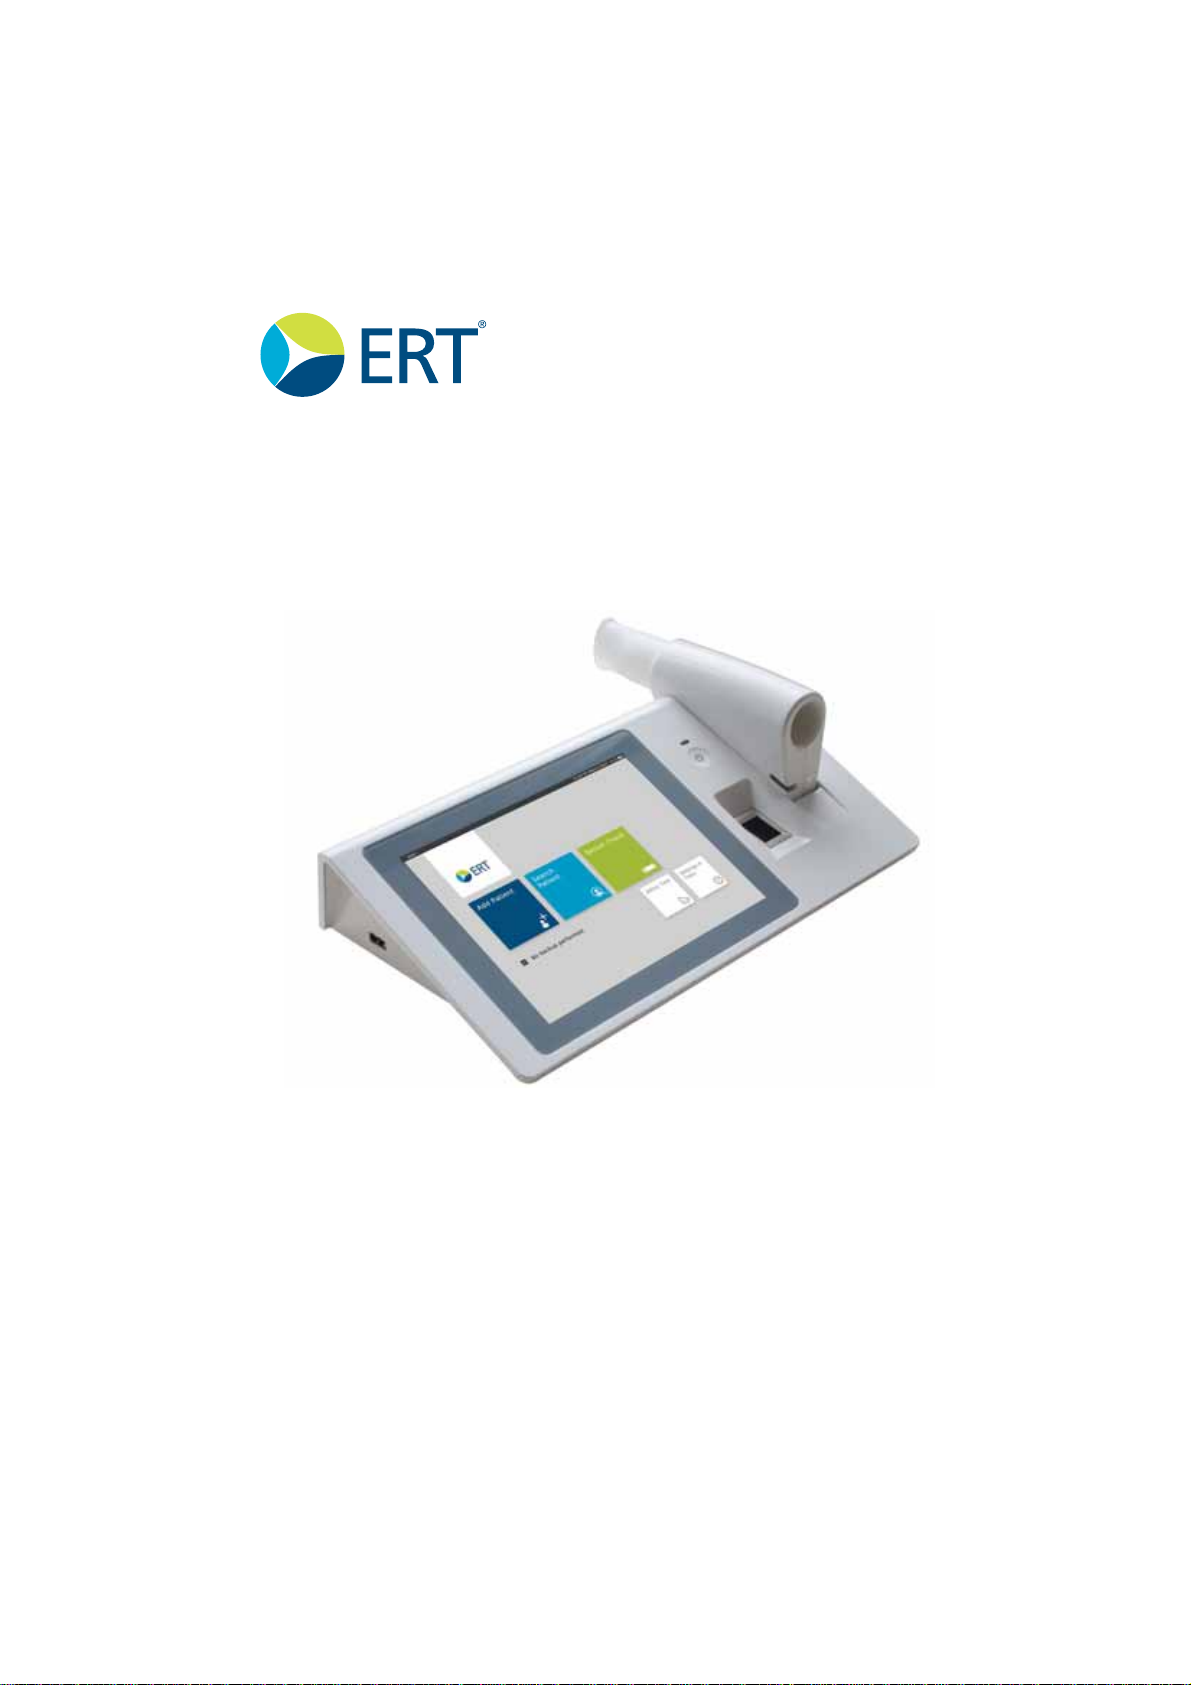
The SpiroSphere is a diagnostic compact device to measure inspiratory and expiratory lung
function parameters in adults and children. In addition the SpiroSphere can collect, store and
transfer vital data from other external devices.
,WFDQEHXVHGE\SK\VLFLDQVLQWKHRI¿FHRUKRVSLWDODQGLQRFFXSDWLRQDOPHGLFLQH
Indications for Use
Federal U.S. law restricts this device to sale by or on the order of a
physician. (Rx only)

SpiroSphere®Instructions for Use
Page 3/84
9HUVLRQ0$<
Table of Contents
Indications for Use...........................................................................................................2
Notes on Safety in this Instruction Manual......................................................................4
Declaration of Conformity................................................................................................4
Device Description...........................................................................................................5
Unpacking and Starting Operation ..................................................................................5
The SpiroSphere ............................................................................................................6
Start-Up...........................................................................................................................7
Troubleshooting...............................................................................................................9
LED Status SpiroSphere .................................................................................................9
LED Status SpiroSphere Sensor.....................................................................................9
Sensor insert .................................................................................................................10
Setup ..........................................................................................................................11
The Home Screen .........................................................................................................13
Sensor Check ...............................................................................................................14
Calibration Check..........................................................................................................14
Linearity Check..............................................................................................................16
Add Patient....................................................................................................................17
Search Patient...............................................................................................................19
Actions ..........................................................................................................................21
Preparing a Measurement.............................................................................................22
Perform a Forced Spirometry Measurement.................................................................23
Perform a Slow Spirometry Measurement.....................................................................28
Dosing ..........................................................................................................................31
Perform a Post Spirometry Measurement.....................................................................32
Adhoc Test.....................................................................................................................34
Perform an Adhoc Test..................................................................................................34
Assign Adhoc Test now..................................................................................................35
Assign Adhoc Test later.................................................................................................36
Show, Edit, Delete and Print Tests ................................................................................37
Print Recorded Results..................................................................................................40
Settings and Tools.........................................................................................................41
User Management.........................................................................................................54
Update ..........................................................................................................................69
About Device.................................................................................................................69
Restore Default Settings................................................................................................69
Factory reset..................................................................................................................69
Cleaning/Hygiene..........................................................................................................70
General Safety Precautions...........................................................................................72
Graphical Symbols ........................................................................................................77
Notes on EMC according to EN60601-1-2 ..................................................................80
Technical Data...............................................................................................................81
Item Numbers of Disposables and Accessories............................................................83

SpiroSphere®Instructions for Use
Page 4/84 9HUVLRQ0$<
Declaration of Conformity
Notes on Safety in this Instruction Manual
Following the ANSI (American National Standards Institute) recommendations for safety notes,
VSHFL¿FSDVVDJHVRIWKLVLQVWUXFWLRQPDQXDODUHFOHDUO\PDUNHGDVVDIHW\QRWHV
Degree of
Danger Meaning of Indicator
Injury
to
persons
Damages
to
property
X
(X)
DANGER indicates an immediate hazardous
situation, which, if not avoided, may result in
serious injury or death. Limited to extremely
dangerous situations.
WARNING indicates a potential hazardous
situation, which, if not avoided, may result in
serious injury or death.
Caution indicates a potential hazardous situation,
which, if not avoided, may result in minor or slight
injury. Also used to indicate precarious procedures.
Additional icons used in this manual:
X
X
Important information on operation and other
useful information. Does not warn of dangerous or
harmful situations.
Tips, general information and information on
operation.
The original Declaration of Conformity document can be obtained from ERT.
SpiroSphere®Instructions for Use
Page 5/84
9HUVLRQ0$<
Device Description
The SpiroSphere is a compact spirometry device. Its Sensor Unit is battery-powered. The Main
Unit can be powered by battery or power supply. The SpiroSphere is used to measure inspiratory
and expiratory lung function parameters in adults and children. The measured data is saved into
the device and can be read out at any time.
The disposable easy-to-exchange, high-quality pneumotach guarantees a high degree of patient
safety and provides precise recording results.
The Main Unit is equipped with a graphical LCD touch display, providing a state of the art solution
for selection of menu functions and the navigation throughout the menu.
The SpiroSphere Sensor is paired via Bluetooth with the Main Unit.
A printer can be connected with the SpiroSphere and all needed data can be printed. Moreover, it
is possible to transfer data via USB, WiFi, 3G and Ethernet.
7KHGHYLFHFDQEHXVHGE\SK\VLFLDQVLQWKHRI¿FHRUKRVSLWDODVZHOODVLQRFFXSDWLRQDOPHGLFLQH
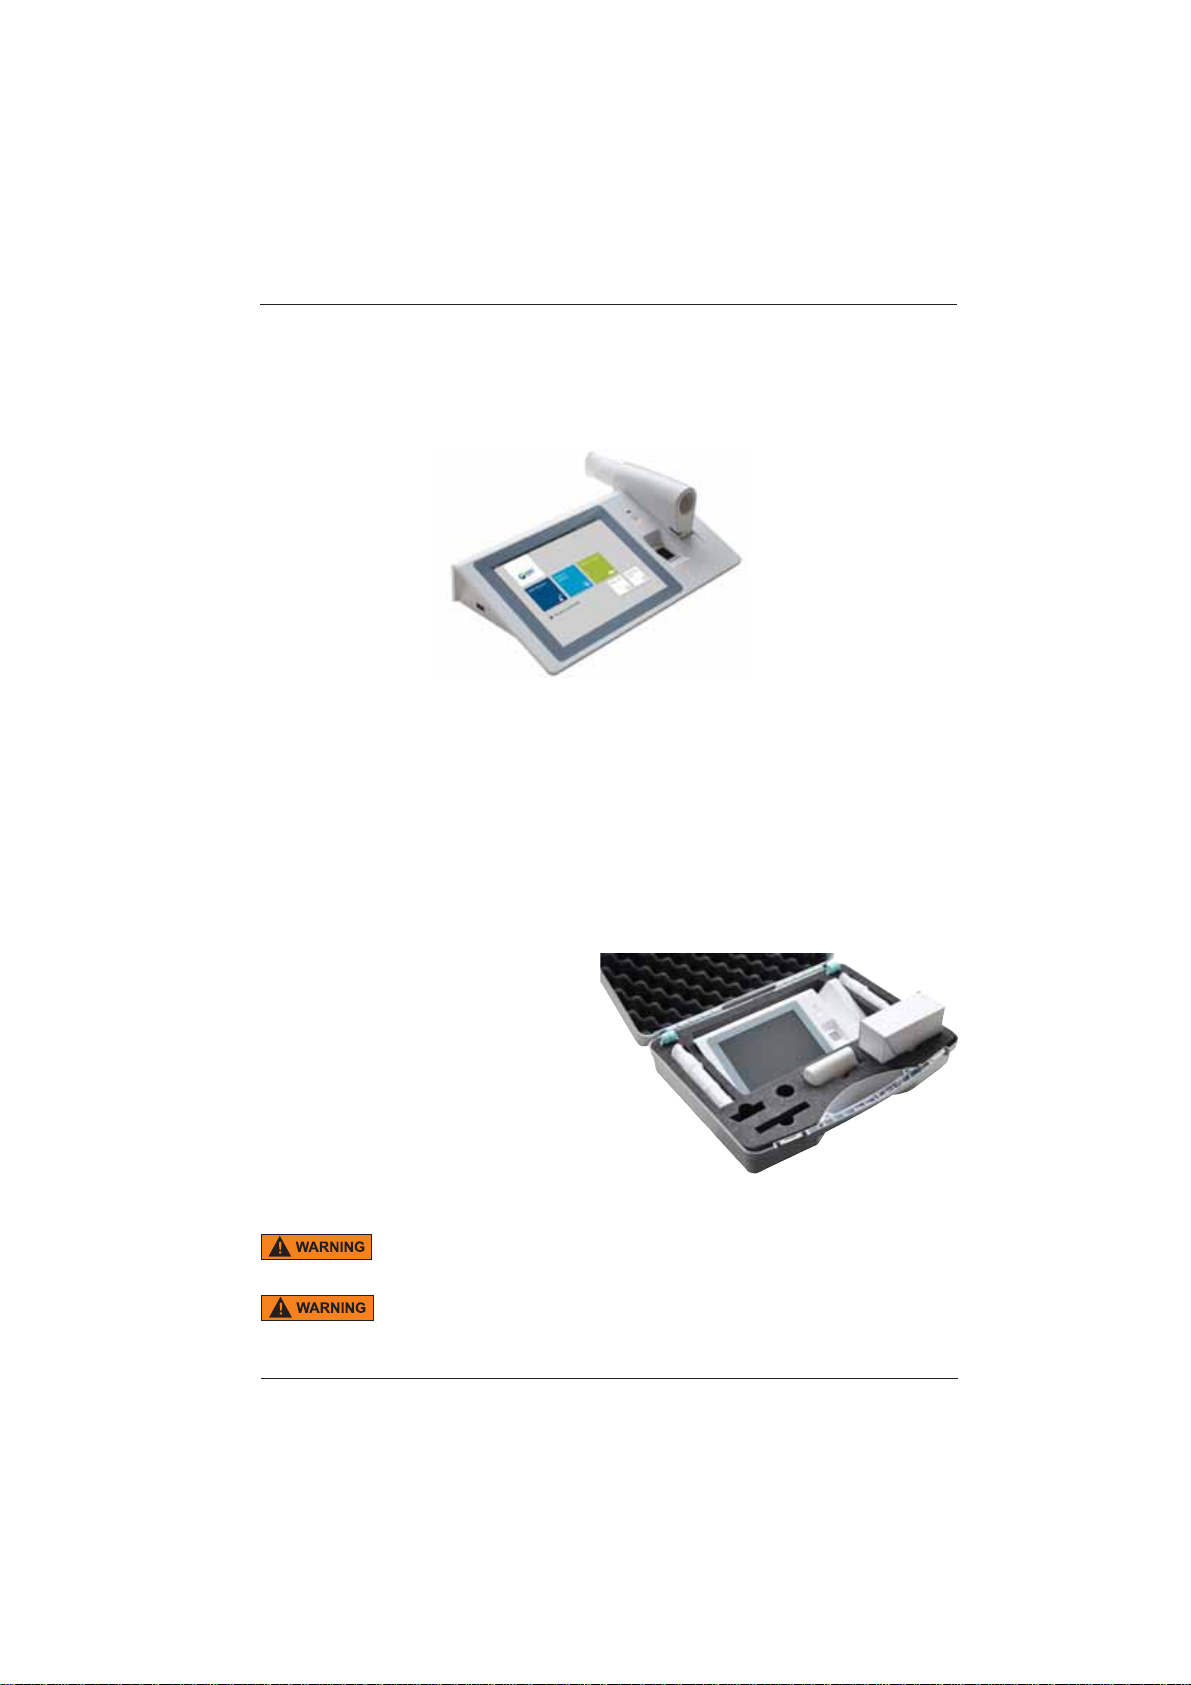
Unpacking and Starting Operation
SpiroSphere is delivered with the
following accessories*:
1 Main Unit
1 SpiroSphere Sensor
1 Power Supply
4 ERT PT with Mouthpiece
2 Nose clips and Pads
1 Instruction manual
*Depending on the type of equipment either included in the delivery or available as an option
Death due to suffocation may occur if packing material is swallowed.
Store packing material out of reach of children and dispose of properly!
Use only ERT approved accessories and spare parts for this medical device.
7KH5HWXUQRI*RRGVLQ0HGLFDO,QVWLWXWLRQ&HUWL¿FDWHRI+\JLHQHLVSURYLGHGDVDVHSDUDWH
GRFXPHQWÀ\HU
SpiroSphere®Instructions for Use
Page 6/84 9HUVLRQ0$<
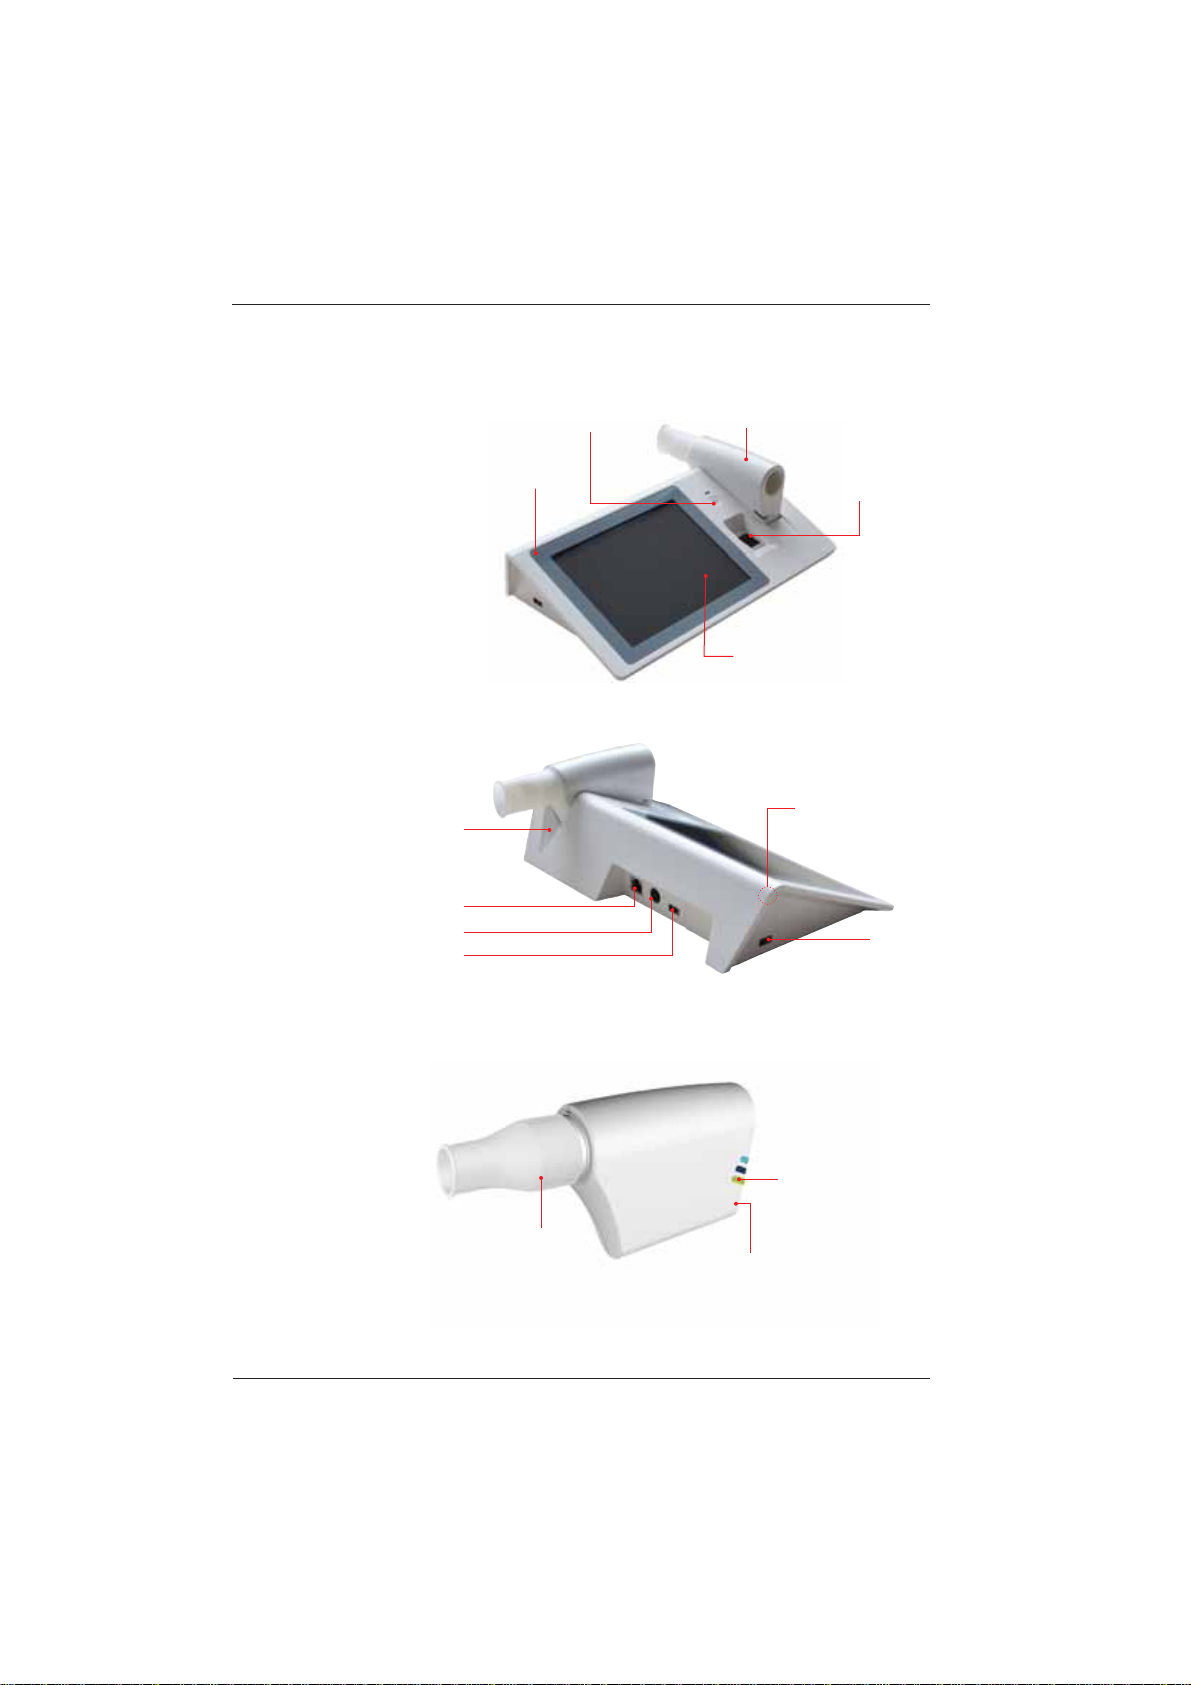
The SpiroSphere
Main Unit:
Main Unit
SpiroSphere Sensor
LCD touch display
Fingerprint
Sensor
Power On/Off
Power
USB
Speaker
USB
LAN
Power On/Off
LED Status Indicator
ERT PT with
Mouthpiece
SpiroSphere Sensor:
Charging Cradle
Front view:
Rear view:
SpiroSphere®Instructions for Use
Page 7/84
9HUVLRQ0$<
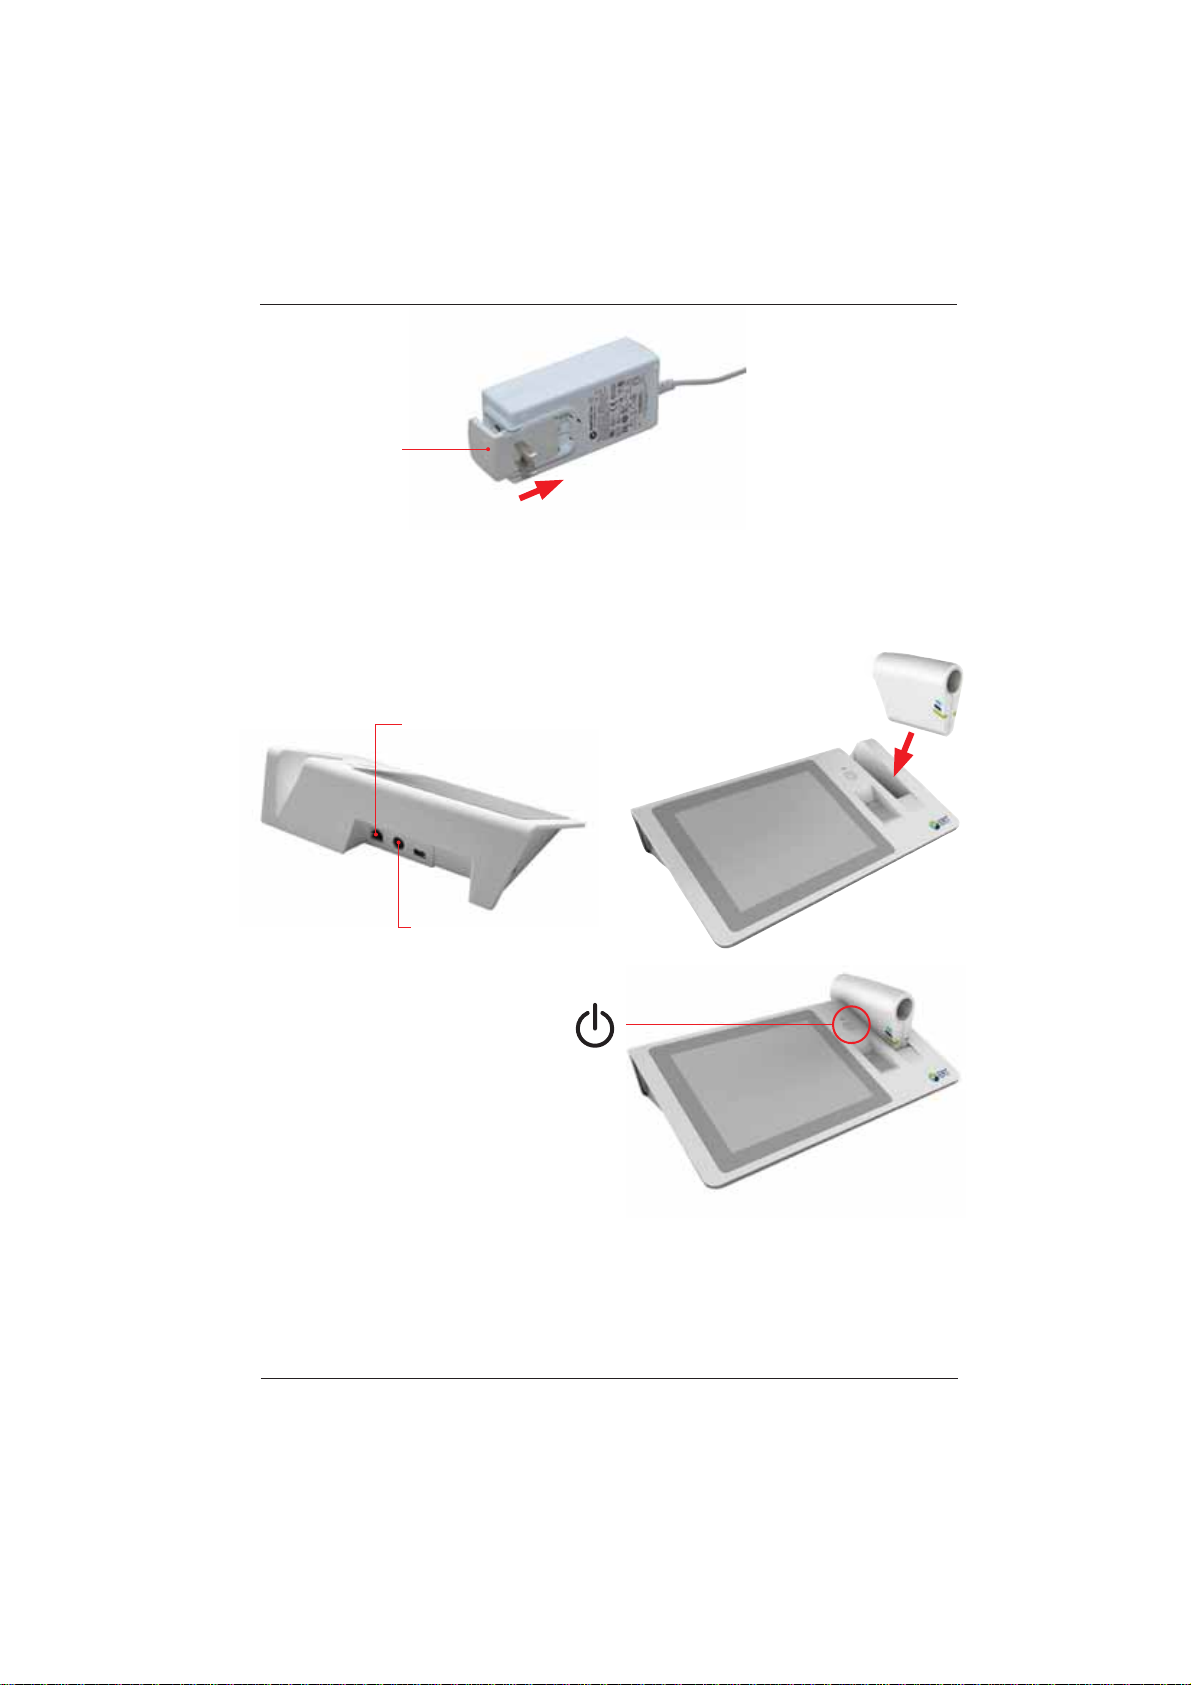
Start-Up
1. Connect the SpiroSphere to a power
source complying with local regulations.
3. Use the Power On switch located at
the front of the main unit to switch on
the SpiroSphere Main Unit.
LAN
Power Supply
Connection
2. Put the SpiroSphere
Sensor into the slot of
the main unit as shown
below.
Power supply:
The operating status of the device is indicated via an LED on the main unit and on the
SpiroSphere Sensor.
Mains adapter

SpiroSphere®Instructions for Use
Page 8/84 9HUVLRQ0$<
3ULRUWRWKH¿UVWXVDJHVZLWFKRQWKH6SLUR6SKHUH6HQVRUE\SUHVVLQJWKHPower On" switch
located at the back side of the SpiroSphere Sensor.
ERT PT with mouthpiece
ERT PT is only for single use. Do not reuse the ERT PT due to risk of cross
contamination.
Do not remove the mouthpiece from the ERT PT. Only use the ERT PT with
connected mouthpiece.
3ULRUWRWKH¿UVWXVHPDNHVXUHWKDWWKH6SLUR6SKHUH6HQVRULVIXOO\FKDUJHG
5. Ensure an ERT PT is inserted into the SpiroSphere Sensor.
The maximum temperature of the SpiroSphere Sensor Unit can get up to
47°C.
Spirometry should only be performed by patients who can cooperate in the performance.
Shut down
1. To switch off the SpiroSphere Main Unit, press the Power On/Off switch located
at the front of the main unit. Disconnect the main unit from the power source.
2. Switch on the SpiroSphere Sensor by pressing the "Power Off" switch located
at the back side of the SpiroSphere Sensor. Disconnect the SpiroSphere Sensor
from the main unit.
'RQRWSRVLWLRQWKH3RZHU6XSSO\DQGWKH6SLUR6SKHUHVRWKDWLWLVGLI¿FXOW
to operate the disconnection of the device from the mains supply.

SpiroSphere®Instructions for Use
Page 9/84
9HUVLRQ0$<
LED Status SpiroSphere Sensor
Only the highest priority LED at a time is turned on (LED priority: Orange - Blue).
Orange LED On Charging in cradle
Orange LED Off No charging/ charging complete
in cradle
Orange LED
blinking slowly Low battery Put the SpiroSphere Sensor
into the cradle of the Main Unit
Orange LED
blinking fast Indicates an error in the
SpiroSphere Sensor
Blue LED blinking
slowly SpiroSphere Sensor is actively
transferring data to the Main Unit
Blue LED Off Device in sleep mode Put the device into the
charging dock or press the
Power On switch
Blue LED blinking
fast Device powered on and paired
with Main Unit
LED Status SpiroSphere
Blue LED On Main Unit powered on N/A
Blue LED Off Main Unit powered off N/A
Blue LED Pulse Main Unit Standby N/A
Orange LED On Charging
Orange LED Off Not charging/ charging complete
Orange LED
blinking Low battery Connect Main Unit to a
power socket
To do:
Troubleshooting
Error Messages

SpiroSphere®Instructions for Use
Page 10/84 9HUVLRQ0$<
Sensor insert
Take care that you have aligned the rail with the sensor holes of the PT tube with the grooved
edge of the SpiroSphere Sensor (as below) when inserting the ERT PT into the SpiroSphere
Sensor:
The ERT PT should be inserted fully without force.
rail with sensor holes

SpiroSphere®Instructions for Use
Page 11/84
9HUVLRQ0$<
3ULRUWRWKH¿UVWXVHDV\VWHPVHWXSQHHGVWREHSHUIRUPHG
$IWHUVZLWFKLQJRQWKH6SLUR6SKHUHIRUWKH¿UVWWLPHIROORZLQJVFUHHQDSSHDUV
Enter the Global Password and
press <OK>. (The preset global
password is "691982".)
The System Setup wizard starts automatically.
1. Language Settings
Select the appropriate language
DQGFRQ¿UPZLWKNext>.
2. Date & Time Settings
Select the appropriate settings
DQGFRQ¿UPZLWKNext>.
Follow the system setup steps (step 1 - 6) and enter or select the appropriate settings. Tap on
<Next!WRFRQ¿UPWKHUHVSHFWLYHVHWWLQJVDQGWRFRQWLQXHZLWKWKHQH[WVWHS
Setup

SpiroSphere®Instructions for Use
Page 12/84 9HUVLRQ0$<
3. Sensor Settings
Tap on <Scan> to scan for
available sensors. Tap on the
sensor you want to pair the
SpiroSphere with and select
<Pair> from the dropdown menu.
&RQ¿UPZLWKNext>.
4. Ethernet Settings
Choose the appropriate settings
DQGFRQ¿UPZLWKNext>. (Refer
to chapter "Communication".)
5. WiFi Settings
Choose the appropriate settings
DQGFRQ¿UPZLWKNext>. (Refer
to chapter "Communication".)
6. User Management Settings
Choose the appropriate settings
DQGFRQ¿UPZLWKNext>.
Complete the initial setup of the device by tapping
on <Yes>.

SpiroSphere®Instructions for Use
Page 13/84
9HUVLRQ0$<
The Home Screen
After the SpiroSphere has been set up, upon powering on the device the following screen appears:
Here, you can select the submenus "Add Patient", "Search Patient", "Sensor Check", "Adhoc
Test" as well as "Settings and Tools" by tapping on the respective button.
Add Patient Enter patient data for a new patient into your patient directory and start a
test.
Search Patient 6HDUFKIRUDVSHFL¿FSDWLHQWLQ\RXUSDWLHQWGLUHFWRU\6HOHFWDVSHFL¿F
patient from the list to perform a test or to edit his/her data.
Sensor Check Perform a volume or linearity check.
Adhoc Test Immediately perform a test without entering patient data or searching for a
VSHFL¿FSDWLHQW¿UVW
Settings & Tools Change settings.
SpiroSphere®Instructions for Use
Page 14/84 9HUVLRQ0$<
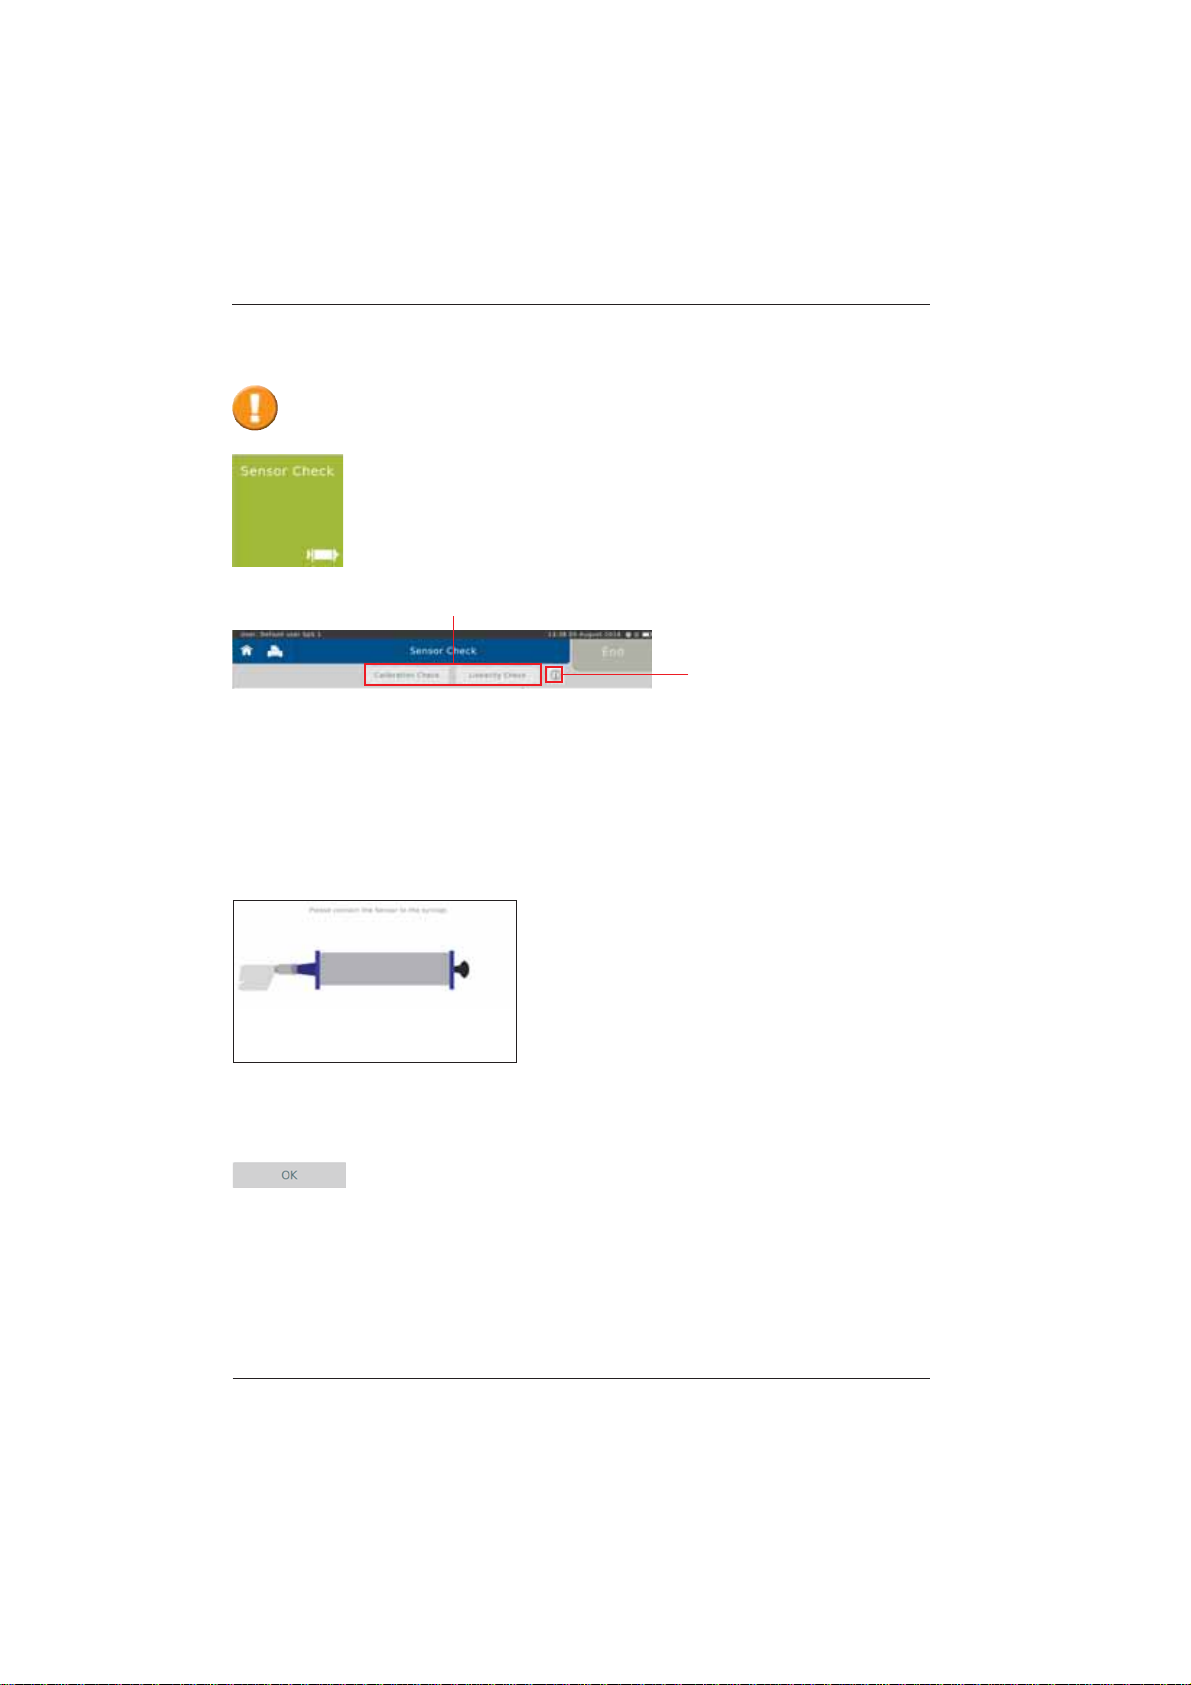
Calibration Check
The sensor check consists of a calibration check as well as a linearity check.
In order to perform a calibration check, tap on <Calibration Check>.
Following screen appears:
Ensure a new ERT PT (with mouthpiece removed) is connected to the 3 L calibration syringe via
an adapter (as shown).
Proceed by tapping <OK>. A zero adjustment of the connected SpiroSphere
Sensor will be performed automatically.
Tapping on the "i"- symbol
will display information on the
respectively selected check
type.
Tap <Sensor Check> to perform a sensor check.
Sensor Check
The ERT PTs included with the delivery are pre-calibrated as part of manufacture.
$VHQVRUFKHFNFDQEHSHUIRUPHGWRFRQ¿UPDFFXUDWHPHDVXUHPHQWGDWD
SpiroSphere®Instructions for Use
Page 15/84
9HUVLRQ0$<
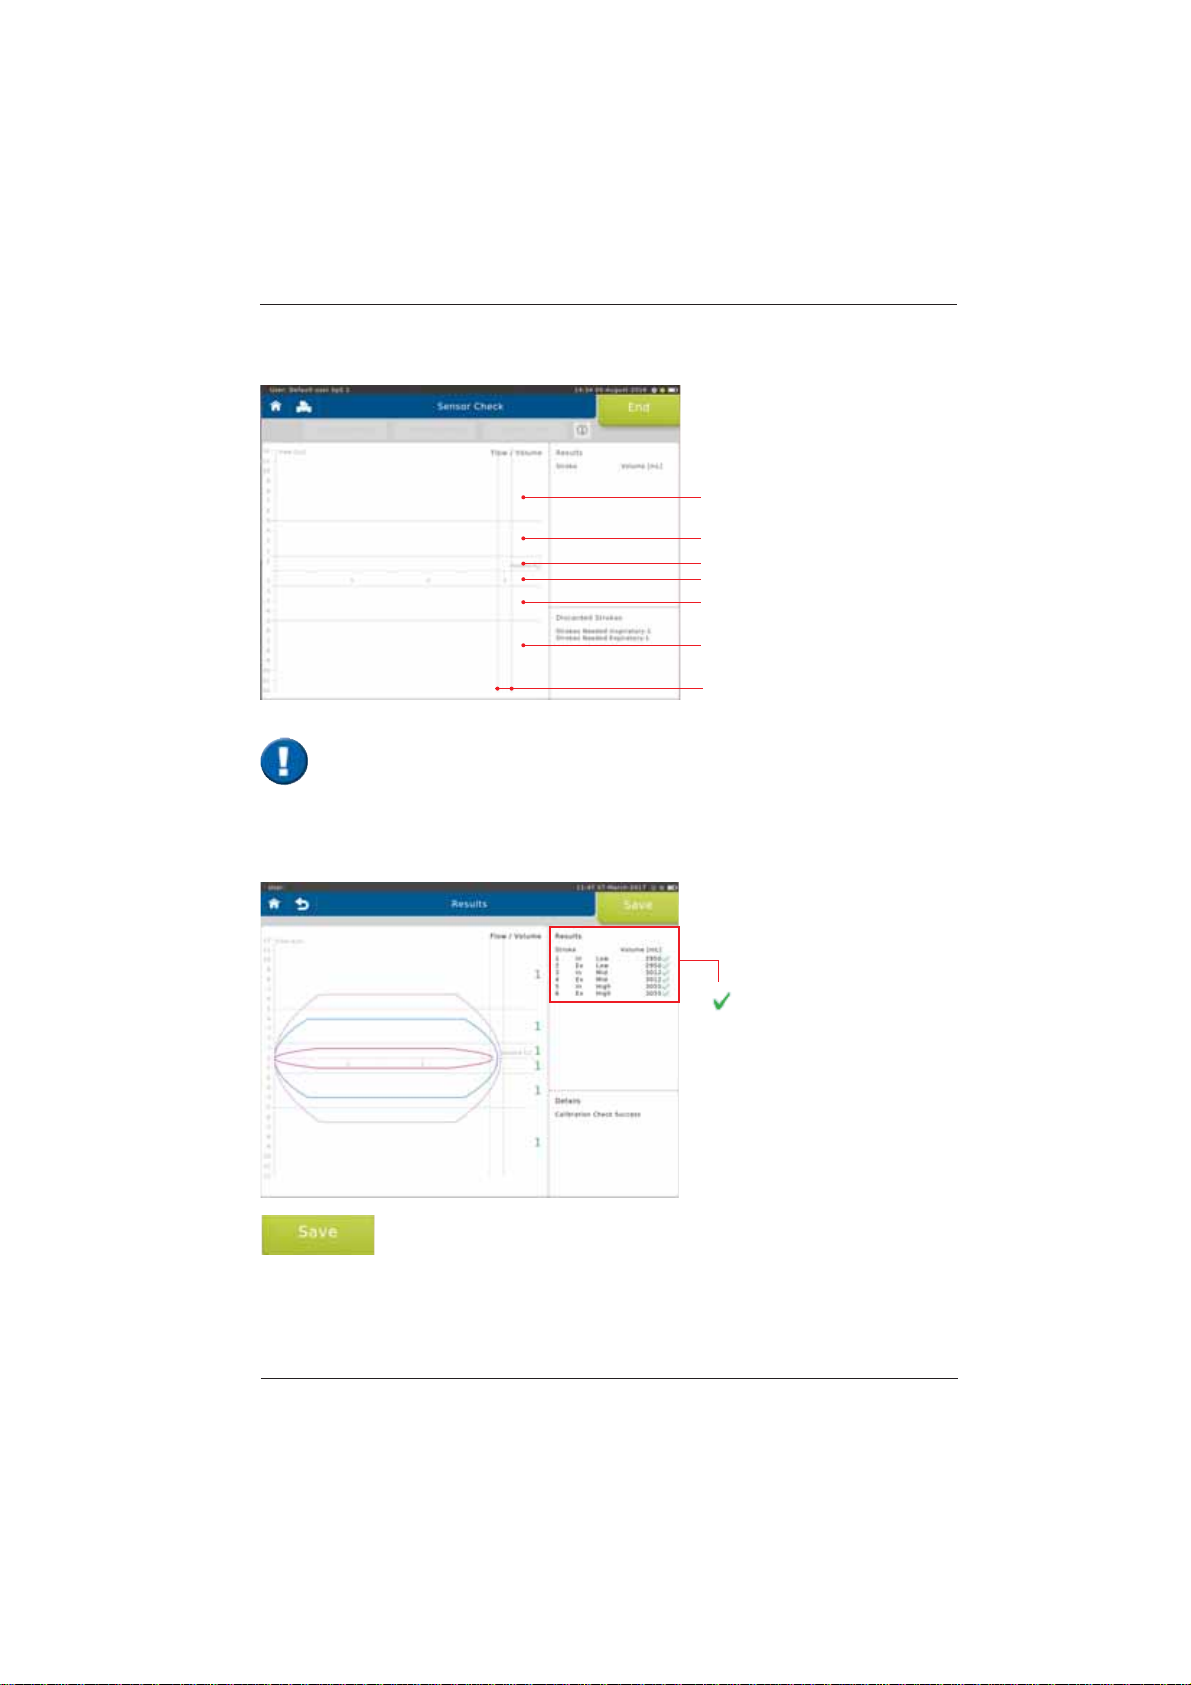
The calibration checkLVXVHGWRFKHFNWKHYROXPHDFFXUDF\ZLWKLQGLIIHUHQWÀRZUDQJHV
With each syringe stroke, the volume accuracy should be within ± 3 %.
High Ex
Mid Ex
Low Ex
Low In
Mid In
High In
± 3 %
End the calibration check by tapping on <Save>.
better than ± 3 %
X
worse than ± 3 %
Screen display after a total of three syringe strokes:
,WLVLPSRUWDQWWRSXPSZLWKRXWLQWHUUXSWLRQIURPLPSDFWWRLPSDFW7KH¿UVWSXPSVWURNH
is not relevant and will be discarded. There should be one pump stroke in each of the
IROORZLQJÀRZUDQJHVORZPLGDQGKLJKUDQJH
1 syringe stroke = pump twice, i.e. from impact to impact.
SpiroSphere®Instructions for Use
Page 16/84 9HUVLRQ0$<
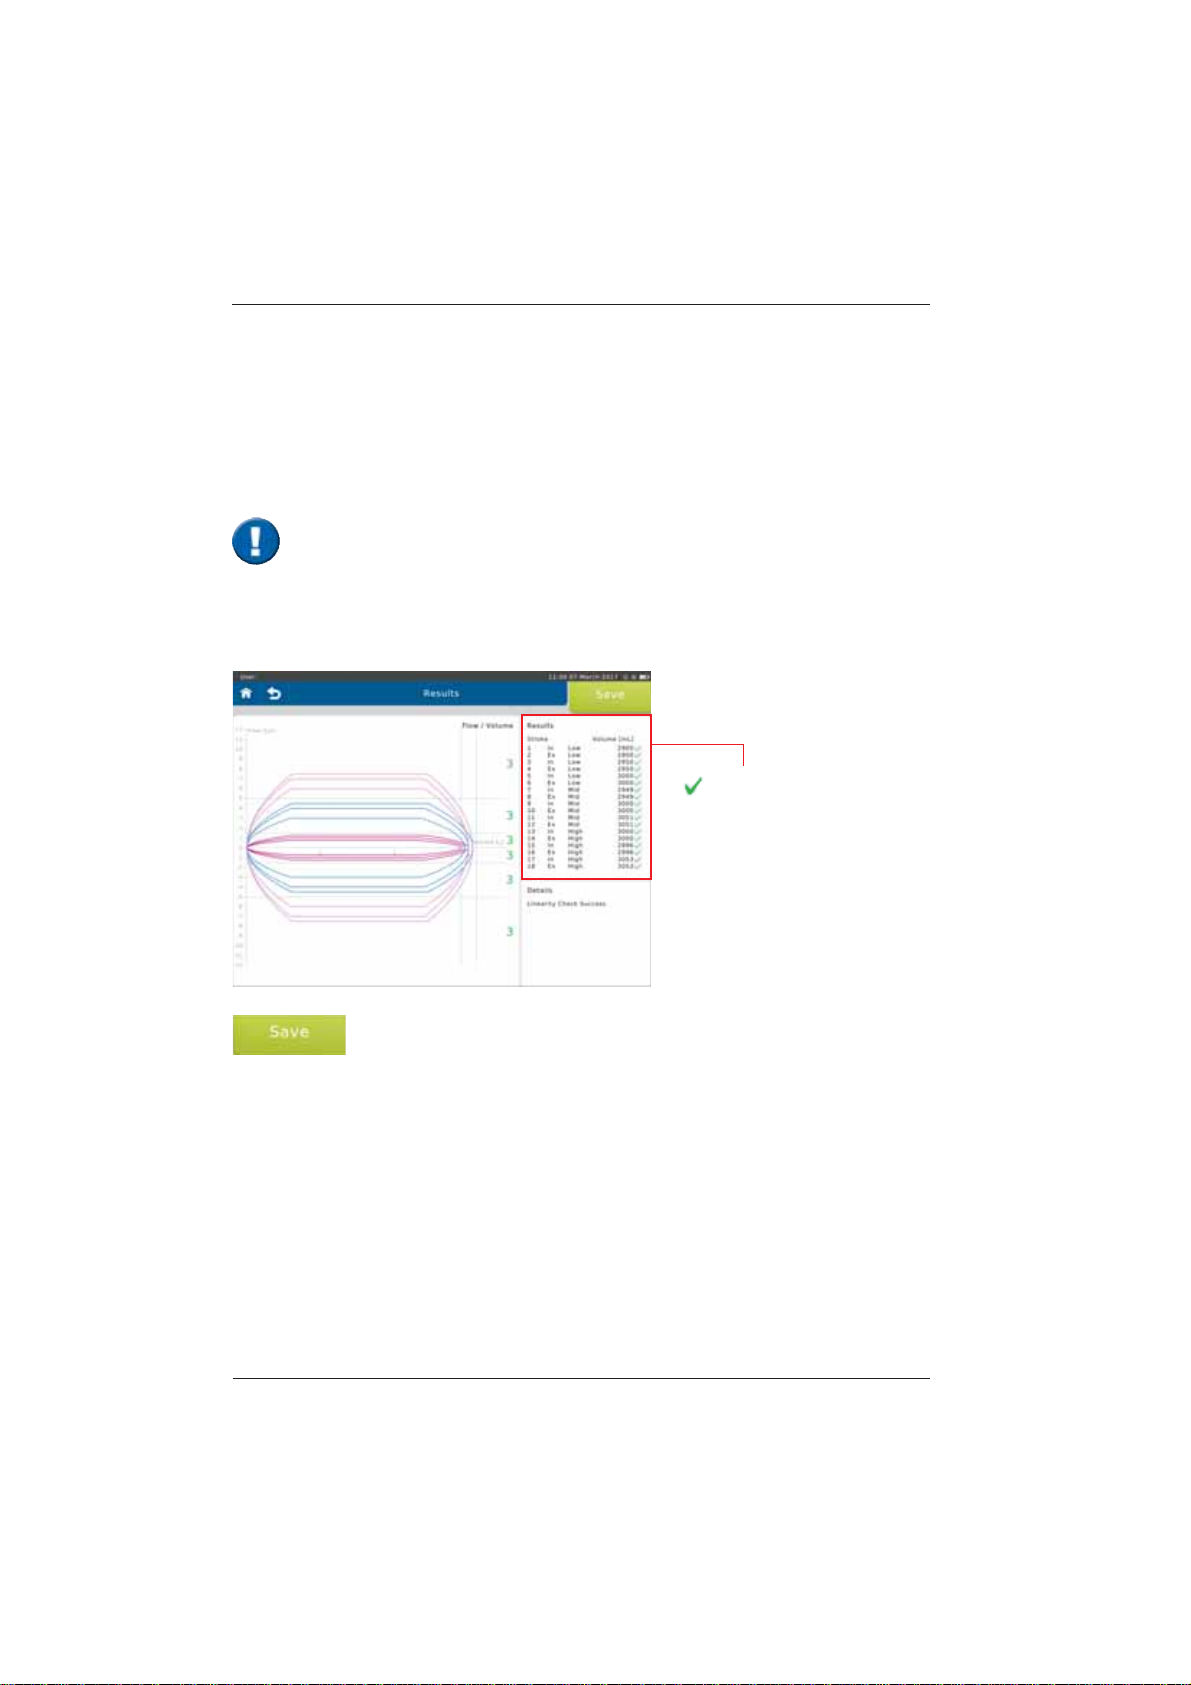
End the linearity check by tapping on <Save>.
Screen display after a total of 9 syringe strokes:
better than ± 3 %
X
worse than ± 3 %
In order to perform a linearity check, tap on <Linearity Check>.
Proceed as described in the "Calibration Check" section.
'XULQJDOLQHDULW\FKHFNYROXPHDFFXUDF\DWGLIIHUHQWÀRZVLVWHVWHG7KUHHV\ULQJHVWURNHVDWD
ORZWKUHHDWDPLGUDQJHÀRZDQGWKUHHDWDKLJKÀRZDUHUHTXLUHG
With each syringe stroke, the volume accuracy should be within ± 3 %.
Linearity Check
,WLVLPSRUWDQWWRSXPSZLWKRXWLQWHUUXSWLRQIURPLPSDFWWRLPSDFW7KH¿UVWSXPSVWURNH
is not relevant and will be discarded. Three pump strokes are required in each of the
IROORZLQJÀRZOHYHOVORZPLGDQGKLJKUDQJH
1 syringe stroke = pump twice, i.e. from impact to impact.
SpiroSphere®Instructions for Use
Page 17/84
9HUVLRQ0$<
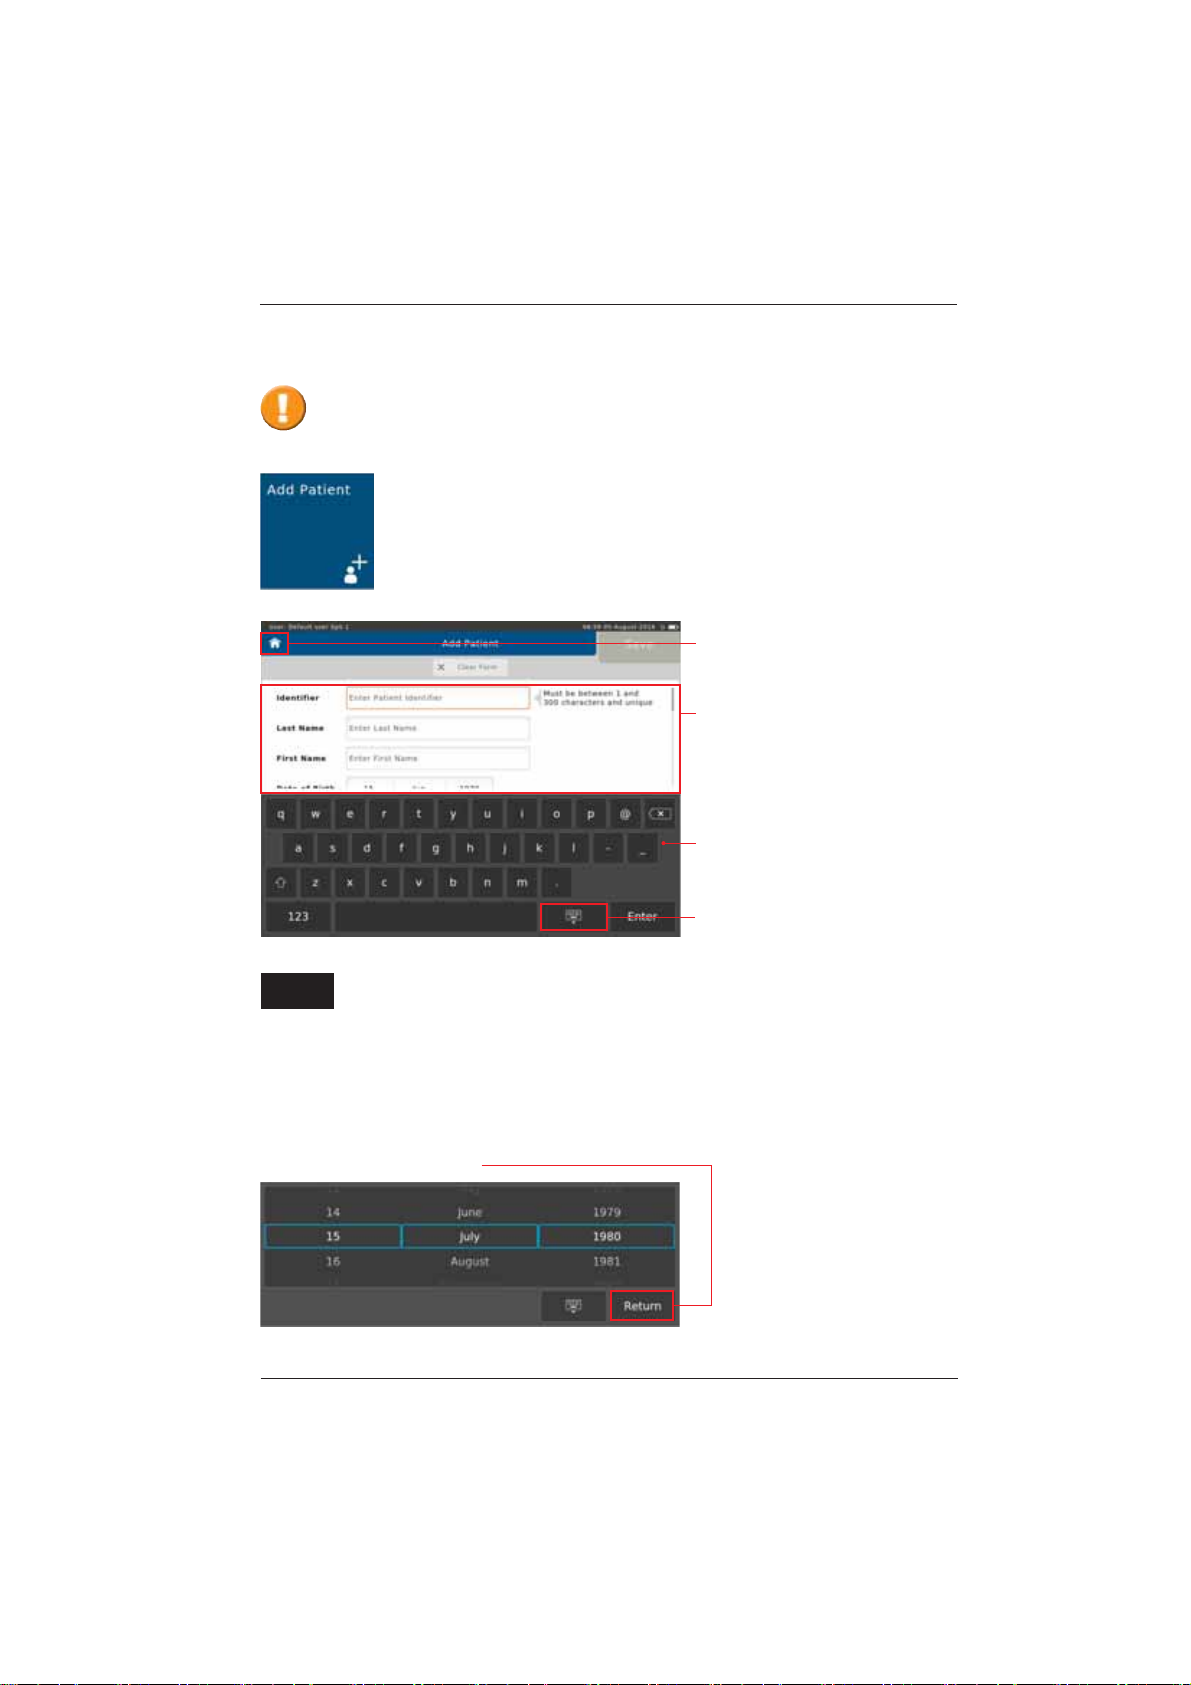
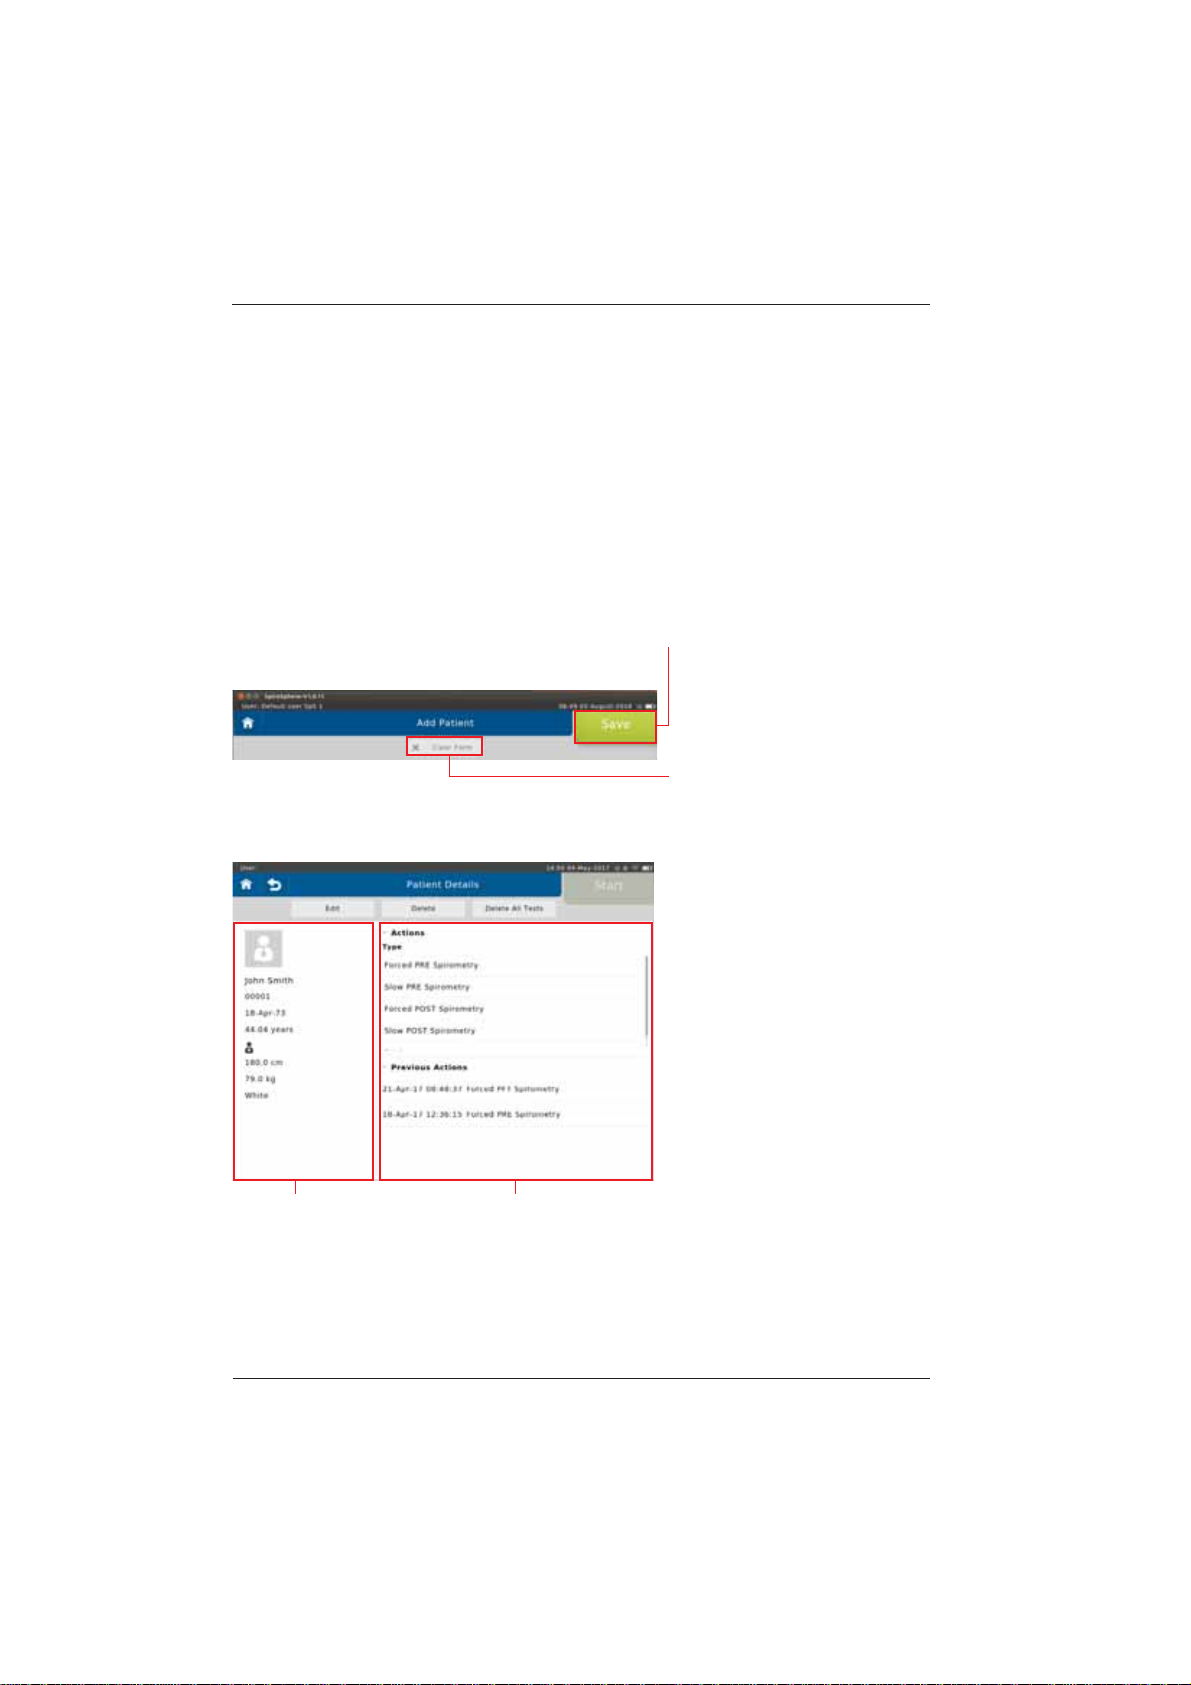
To add a new patient to your patient directory, tap on the "Add Patient" button
on the Home Screen. The following screen appears:
(QWU\¿HOGVZLWK
instructions on
entering
Touchscreen
Keyboard
Hide Keyboard
Return to the
Home Screen
(QWHUWKHDSSURSULDWHSDWLHQWGDWDXVLQJWKHWRXFKVFUHHQNH\ERDUGDQGFRQ¿UPZLWK
<Enter!7KHFXUVRUDXWRPDWLFDOO\MXPSVWRWKHQH[WHQWU\¿HOG
Add Patient
The following data must be entered:
,GHQWL¿HU (QWHUWKH3DWLHQW,GHQWL¿HU
Last Name: Enter the Patient's last name
First Name: (QWHUWKH3DWLHQWV¿UVWQDPH
Date of Birth: Select appropriate Day, Month and Year of Birth and continue by tapping on
<Return>.
%HIRUHPHDVXULQJDSDWLHQWIRUWKH¿UVWWLPHWKHSDWLHQWVSHUVRQDOGDWDKDVWREH
entered. Predicted values are calculated from patient data, so verify that the entered data
are correct. Incorrect patient data produces incorrect predicted values!
Enter
SpiroSphere®Instructions for Use
Page 18/84 9HUVLRQ0$<
Age: The Patient's age will be calculated automatically from the entered date of birth
Gender: Select appropriate gender
Height: Enter the Patient's height
Weight: Enter the Patient's weight
Ethnicity: Select the appropriate ethnicity
Additionally, there is an option to enter:
Technician: Enter the Technician's name
Physician: Enter the Physician's name
Set A Name 1:
Set A Name 2:
As soon as all required patient data is entered, tap on <Save> to save the patient to your patient
directory.
If you want to discard all data just
entered, tap on <Clear Form>. All
ENTRYlELDSWILLBECLEARED
Screen display after patient data input:
Patient data Available Actions (Type), and list of
tests already performed (Previous
Tests)
SpiroSphere®Instructions for Use
Page 19/84
9HUVLRQ0$<
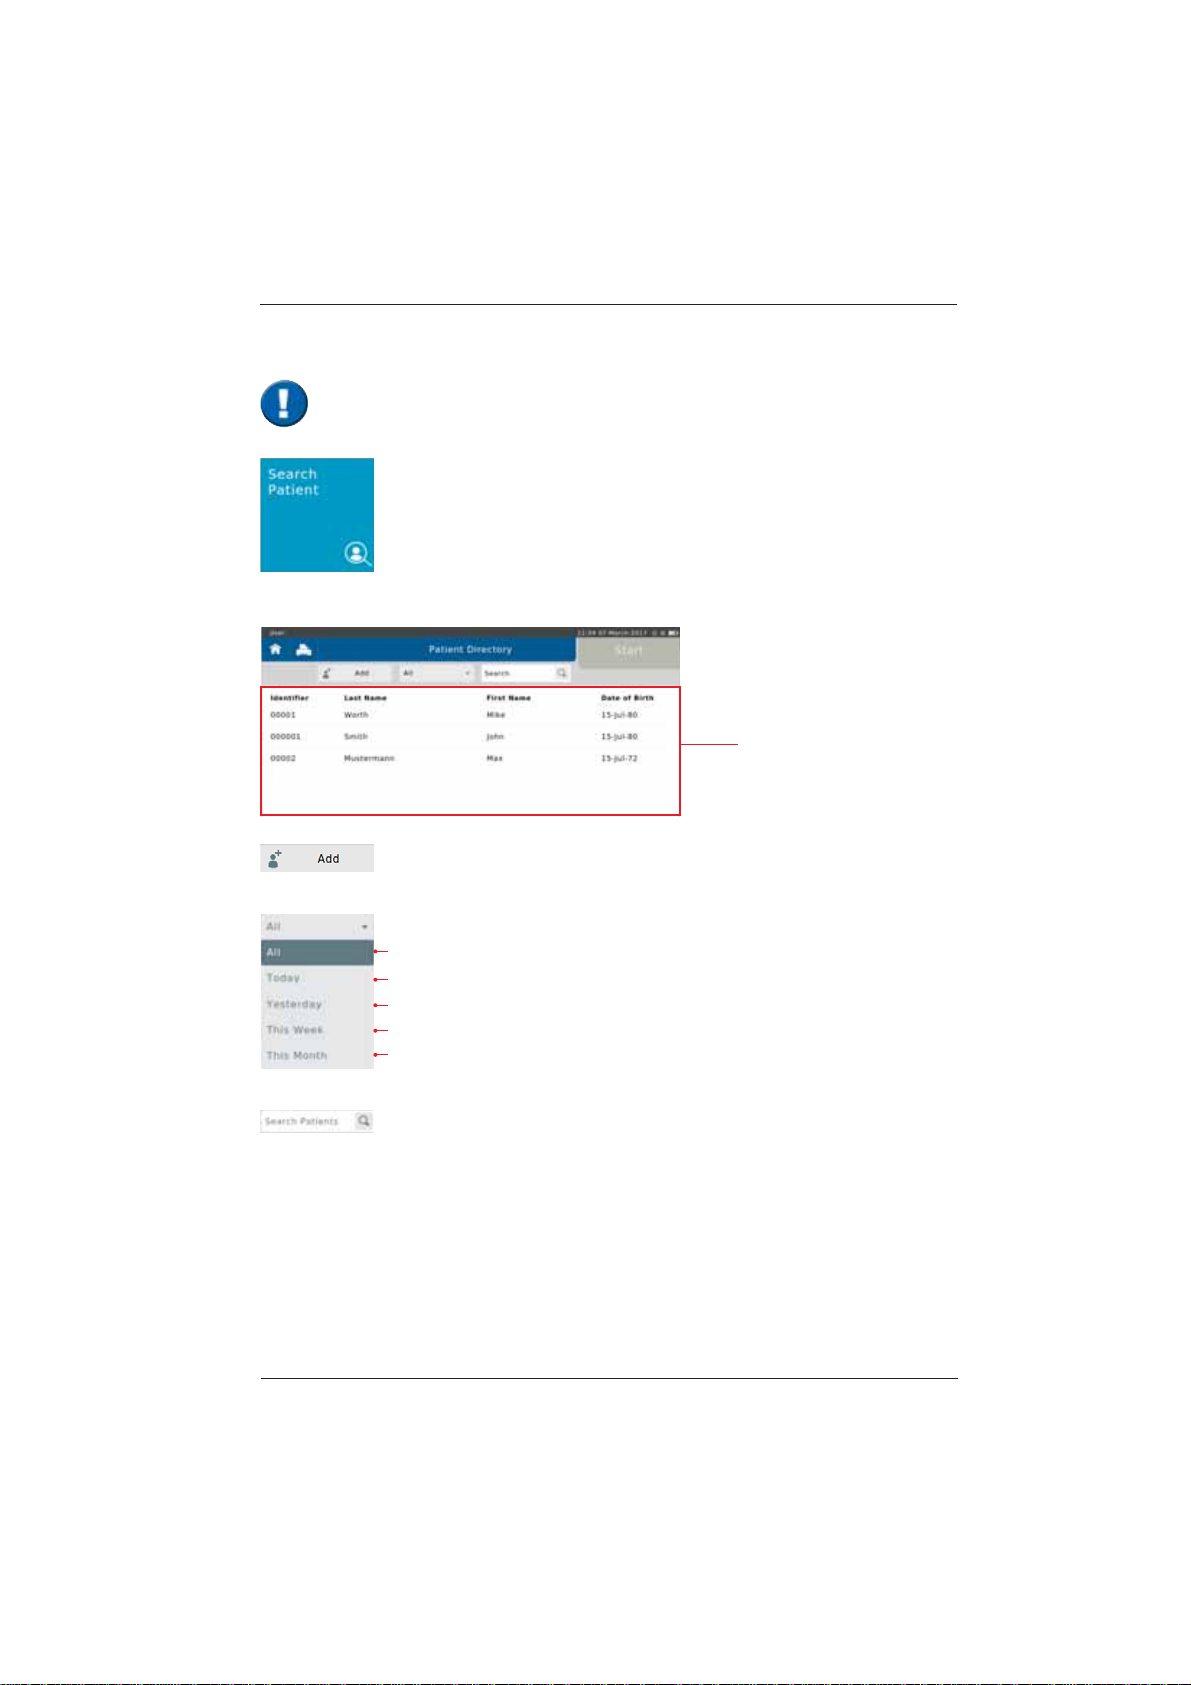
Tap on the "Search Patient" button on the Home Screen to open the list of all
patient data saved in the database.
data of a new Patient can be entered
Display all tested patients
Display all Patients tested today
Display all Patients tested yesterday
Display all Patients tested this week
Display all Patients tested this month
6HDUFKIRUVSHFL¿F3DWLHQWVE\HQWHULQJKLVKHUODVWQDPHRU,'(QWHULQJWKH
¿UVWOHWWHURUWKH¿UVWFKDUDFWHURIWKHSDWLHQWV,'LVVXI¿FLHQWDVZHOO,IHJ6
is entered, all patients whose last names start with "S" are displayed.
Search Patient
The following screen appears:
List of all patients
When a patient whose data is already stored in the database comes for another visit,
you can reload his/her data from the patient directory. You do not have to enter the data
again.

SpiroSphere®Instructions for Use
Page 20/84 9HUVLRQ0$<
,IDOLVWHGSDWLHQWLVVHOHFWHGWKHIROORZLQJÀ\RXWPHQXDSSHDUV
Tap on <Start> to display the patient's personal data on the left.
The "Previous Actions"
section shows the actions
already performed for the
VSHFL¿FSDWLHQW
Tap on <Edit> to display the patient's demographic information. If incorrect
patient data was entered or if the patient data need to be updated (e.g. due to
weight or height change in children), the respective data can be edited and will
be used for future tests.
In the "Actions"section,
all conductable actions are
listed.
Other manuals for SpiroSphere
1
Table of contents
Other ERT Medical Equipment manuals


