ERT SpiroSphere User manual

781239
Version 02.02
Instructions for Use
SpiroSphere®ECG

SpiroSphere®ECG Instructions for Use
Page 2/136 Version 02.02 • 04AUG2022
Product names or services are trademarks of their respective companies.
All rights, including those of translations, are reserved. Written permission of
eResearchTechnology (ERT) shall be obtained for the reproduction of this manual or any excerpt
thereof by any means, including printing, photo static duplication, microlms, or any other
processes.
eResearchTechnology GmbH
Sieboldstrasse 3
97230 Estenfeld, Germany
Tel: +49 9305 720-9891
Fax: +49 9305 720-7891
www.ert.com
© 2020 eResearchTechnology GmbH. All rights reserved.
The SpiroSphere is a compact device to measure inspiratory and expiratory lung function
parameters in adults and children aged 4 years and older.
With the option ECG electrocardiographic diagnoses can be made. For this purpose a 12-channel
surface electrocardiogram can be measured and recorded. Automatic interpretation of the ECG is
not possible for pediatric subjects with an age below 16 years and for pacemaker subjects. It is not
intended for intra-cardial use.
The minimum age for ECG application is 4 years.
It can be used by physicians in the ofce or hospital.
Indications for Use
According to "STANDARDIZATION OF SPIROMETRY 2019 UPDATE”
(American Journal of Respiratory and Critical Care Medicine, October 2019)
performing lung function tests can be physically demand for a minority of
patients. The forced expiratory maneuver used in spirometry increases
intrathoracic, intraabdominal, and intracranial pressures. Potential risks of
spirometry are primarily related to maximal pressures generated in the thorax
and their impact on abdominal and thoracic organs, venous return and systemic
blood pressure, and expansion of the chest wall and lung. The physical effort
required can increase myocardial demand. Caution must be used for patients
with medical conditions that could be adversely affected by these physiological
consequences:
Due to increases in myocardial demand or changes in blood pressure
• Acute myocardial infarction within 1 week
• Systemic hypotension or severe hypertension
• Signicant atrial/ventricular arrhythmia
• Noncompensated heart failure
• Uncontrolled pulmonary hypertension
• Acute cor pulmonale
• Clinically unstable pulmonary embolism
• History of syncope related to forced expiration/cough
Contraindications

SpiroSphere®ECG Instructions for Use
Page 3/136
Version 02.02 • 04AUG2022
LIMITATION:
• The ECG unit is not suitable to be used with HF surgery devices.
• The ECG unit is not intended for intracranial use.
• The ECG unit is not intended for use in an EMS environment (Emergency Medical Services
Environment).
• The ECG unit is not intended for use in home healthcare environments.
• The ECG unit is intended for indoor use only.
Any non-observance of the procedure described in this Instructions for Use
(such as preparation for the measurement, operation, desinfection, accessories
and replacement of parts etc.) results in a deviation from the intended use.
Due to increases in intracranial/intraocular pressure
• Cerebral aneurysm
• Brain surgery within 4 weeks
• Recent concussion with continuing symptoms
• Eye surgery within 1 week
Due to increases in sinus and middle ear pressures
• Sinus surgery or middle ear surgery or infection within 1 week
Due to increases in intrathoracic and intraabdominal pressure
• Presence of pneumothorax
• Thoracic surgery within 4 weeks
• Abdominal surgery within 4 weeks
• Late-term pregnancy
Infection control issues
• Active or suspected transmissible respiratory or systemic infection,
including tuberculosis
• Physical conditions predisposing to transmission of infections, such as
hemoptysis, signicant secretions, or oral lesions or oral bleeding
Spirometry should be discontinued if the patient experiences pain during the
maneuver. Relative contraindications do not preclude spirometry but should
be considered when ordering spirometry. The decision to conduct spirometry
is to be determined by the ordering healthcare professional on the basis
of their evaluation of the risks and benets of spirometry for the particular
patient. Potential contraindications should be included in the request form for
spirometry.

SpiroSphere®ECG Instructions for Use
Page 4/136 Version 02.02 • 04AUG2022
Table of Contents
Indications for Use............................................................................................................................ 2
Contraindications.............................................................................................................................. 2
Notes on Safety in this Instruction Manual ....................................................................................... 6
Declaration of Conformity................................................................................................................. 6
Graphical Symbols on the ECG amplier......................................................................................... 7
Device Description............................................................................................................................ 8
Unpacking and Starting Operation ................................................................................................... 8
The SpiroSphere ............................................................................................................................. 9
Start-Up .......................................................................................................................................... 10
Shut down....................................................................................................................................... 11
LED Status SpiroSphere.......................................................................................................... 12
LED Status SpiroSphere Sensor.............................................................................................. 12
Troubleshooting.............................................................................................................................. 13
Sensor Insert and Remove............................................................................................................. 15
Setup .............................................................................................................................................. 16
The Home Screen .......................................................................................................................... 19
Sensor Check ................................................................................................................................ 20
Calibration Check ........................................................................................................................... 20
Linearity Check............................................................................................................................... 22
Add Patient..................................................................................................................................... 23
Search Patient................................................................................................................................ 25
Actions ........................................................................................................................................... 27
Preparing a Spirometry Measurement............................................................................................ 28
Perform a Forced Spirometry Measurement............................................................................ 29
Perform a Slow Spirometry Measurement ............................................................................... 34
Medication Dosing Record ............................................................................................................. 37
Perform a Post Spirometry Measurement................................................................................ 38
Adhoc Test...................................................................................................................................... 40
Perform an Adhoc Test............................................................................................................. 40
Assign Adhoc Test now ............................................................................................................ 41
Assign Adhoc Test later............................................................................................................ 42
Show, Edit, Delete and Print Tests ................................................................................................. 43
Print Recorded Results................................................................................................................... 46
Settings and Tools .......................................................................................................................... 47
Resting ECG................................................................................................................................... 61
Information on ECG Recording................................................................................................ 61
Performing an ECG Recording ................................................................................................ 66
ECG Results ............................................................................................................................ 72
ECG Evaluation........................................................................................................................ 74
ECG Settings ........................................................................................................................... 75
Connecting an ECG Unit.......................................................................................................... 76
User Management.......................................................................................................................... 78
Backup & Recover ................................................................................................................... 88
Communication ........................................................................................................................ 90
Local IT Guide for Ethernet (LAN), WI-FI (WLAN) or optional 3G (Mobile Network) ............... 93
Report & Printing...................................................................................................................... 95
Update ..................................................................................................................................... 97
About Device............................................................................................................................ 98
Restore Default Settings .......................................................................................................... 98
Factory Reset........................................................................................................................... 98

SpiroSphere®ECG Instructions for Use
Page 5/136
Version 02.02 • 04AUG2022
Cleaning/Hygiene Spirometry......................................................................................................... 99
Hygiene ECG................................................................................................................................ 102
Functional Check ECG................................................................................................................. 103
Troubleshooting Guide ECG ........................................................................................................ 103
Return of Goods in Medical Institutions........................................................................................ 105
General Safety Precautions.......................................................................................................... 109
Safety Precautions ECG............................................................................................................... 114
General Cautions and Warnings ............................................................................................ 114
Operation Cautions and Warnings ......................................................................................... 115
Graphical Symbols ....................................................................................................................... 118
UDI ......................................................................................................................................... 118
MD.......................................................................................................................................... 118
SN .......................................................................................................................................... 118
REF ........................................................................................................................................ 118
Electromagnetic Emission and Immunity SpiroSphere ECG........................................................ 122
Bluetooth®Wireless Communication...................................................................................... 127
Technical Data Spirometry............................................................................................................ 128
Technical Data Flow Sensor................................................................................................... 129
Technical Data ECG ..................................................................................................................... 130
Item Numbers of Disposables and Accessories ........................................................................... 132

SpiroSphere®ECG Instructions for Use
Page 6/136 Version 02.02 • 04AUG2022
Declaration of Conformity
Notes on Safety in this Instruction Manual
Following the ANSI (American National Standards Institute) recommendations for safety notes,
specic passages of this instruction manual are clearly marked as safety notes.
Degree of
Danger Meaning of Indicator
Injury
to
persons
Damages
to
property
X
(X)
DANGER indicates an immediate hazardous
situation, which, if not avoided, may result in
serious injury or death. Limited to extremely
dangerous situations.
WARNING indicates a potential hazardous
situation, which, if not avoided, may result in
serious injury or death.
Caution indicates a potential hazardous situation,
which, if not avoided, may result in minor or slight
injury. Also used to indicate precarious procedures.
Additional icons used in this manual:
X
X
Important information on operation and other
useful information. Does not warn of dangerous or
harmful situations.
Tips, general information and information on
operation.
The original Declaration of Conformity document can be obtained from ERT.

SpiroSphere®ECG Instructions for Use
Page 7/136
Version 02.02 • 04AUG2022
Graphical Symbols on the ECG amplier
Symbol Description
Applied Part of type CF, Debrillation-proof (ECG unit cable variant)
Disposal of electronic devices in compliance with WEEE
IP classication according to IEC60529
Radio symbol, non-ionizing radiation
Manufacturer
Date of manufacturing
CE conformity symbol (Medical Device Directive) with code number of Notied
Body.
Follow the Instructions for Use
Federal U.S. Law restricts this device to sale by or on the order of a physician.
Attention!
General warning sign acc. to ISO 7010-W001
On button
SpiroSphere®ECG Instructions for Use
Page 8/136 Version 02.02 • 04AUG2022
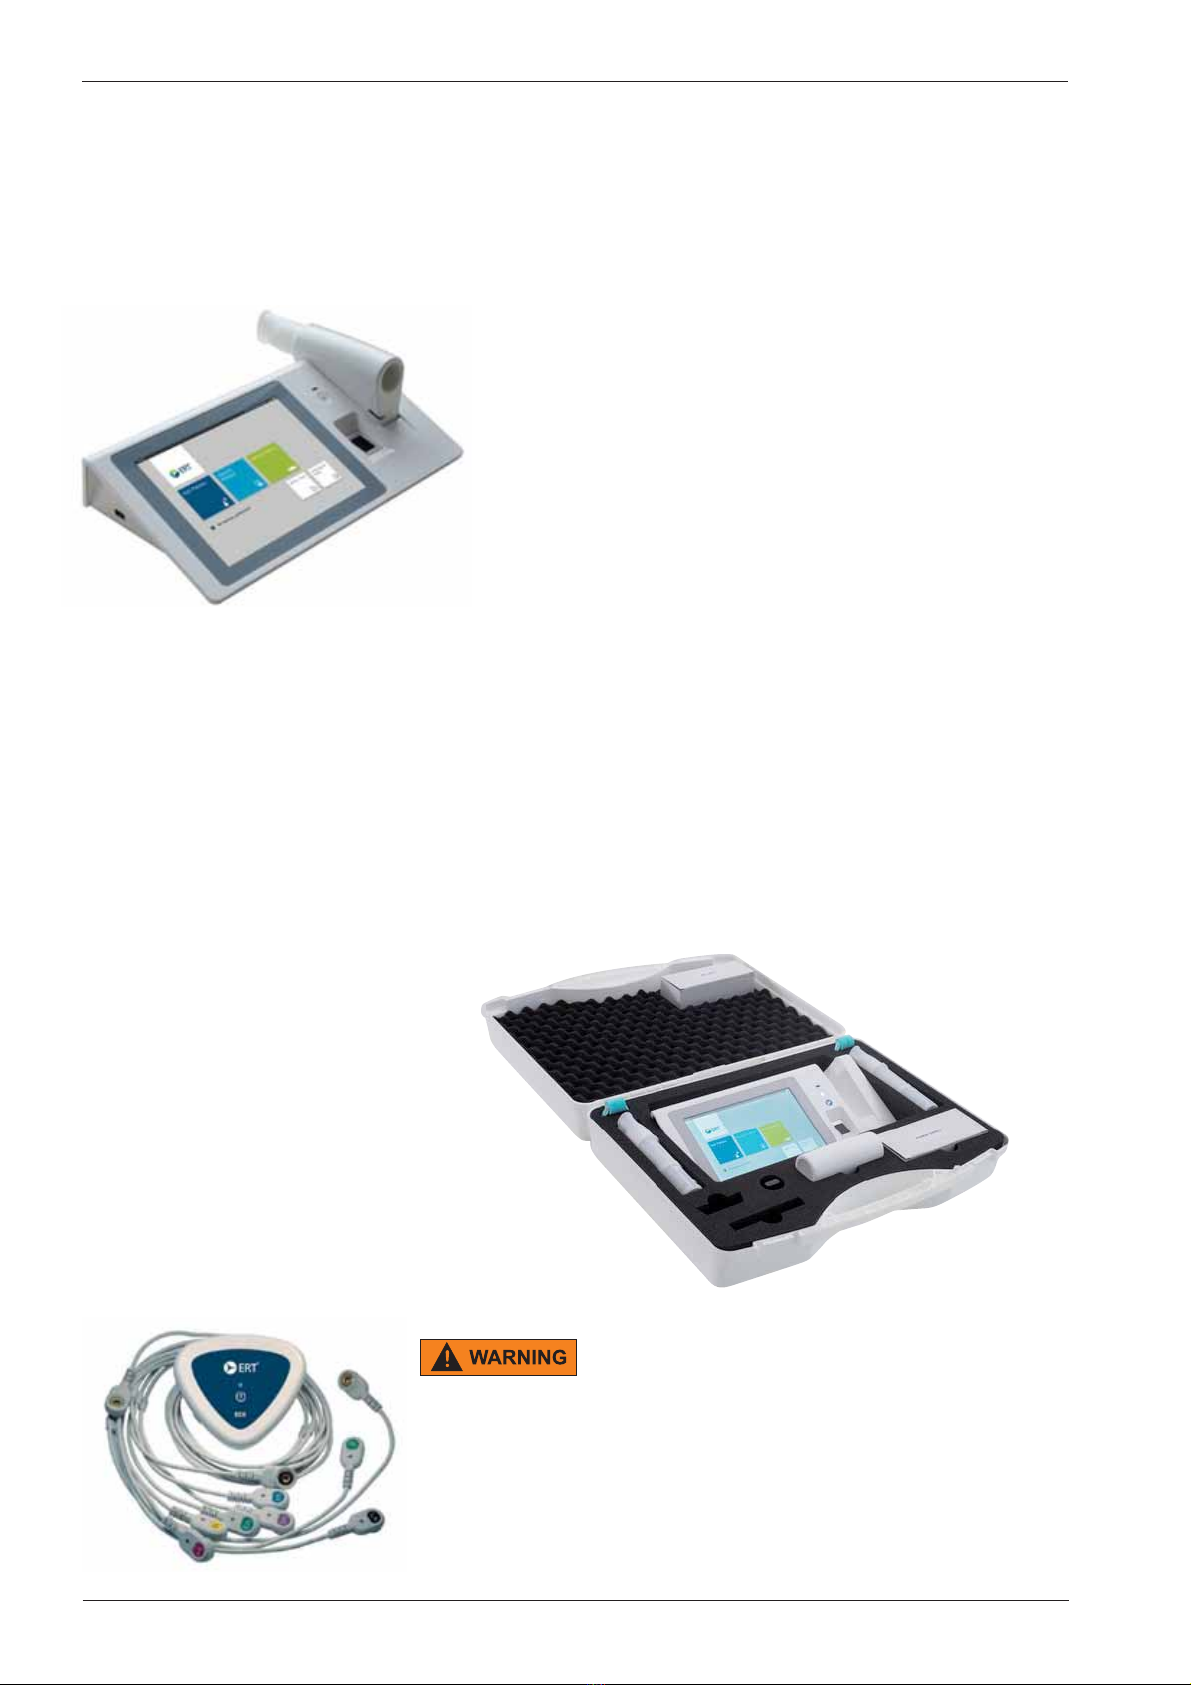
Device Description
The SpiroSphere is a compact spirometry device. Its Sensor Unit is battery-powered. The Main
Unit can be powered by battery or power supply. The SpiroSphere is used to measure inspiratory
and expiratory lung function parameters in adults and children aged 4 years and older. The
measured data is saved into the device and can be read out at any time.
The disposable easy-to-exchange, high-quality
pneumotach guarantees a high degree of patient safety
and provides precise recording results.
The Main Unit is equipped with a graphical LCD touch
display, providing a state of the art solution for selection
of menu functions and the navigation throughout the
menu.
The SpiroSphere Sensor is paired via Bluetooth with the
Main Unit.
A printer can be connected with the SpiroSphere and
all needed data can be printed. Moreover, it is possible
to transfer data via USB, WiFi, optional 3G module and
Ethernet.
Unpacking and Starting Operation
SpiroSphere is delivered with the
following accessories*:
1 Main Unit
1 SpiroSphere Sensor
1 Power Supply with country
adapters
4 ERT PT with Mouthpiece
2 Nose clips and Pads
1 Instruction manual
Optional:
1 ECG Unit
With the option ECG electrocardiographic diagnoses can be made. For this purpose a 12-channel
surface electrocardiogram can be measured and recorded. Automatic interpretation of the ECG is
not possible for pediatric subjects with an age below 16 years and for pacemaker ubjects. It is not
intended for intra-cardial use.
The minimum age for ECG application is 4 years. The SpiroSphere is intended to be used in a
professional healthcare facility environment.
*Depending on the type of equipment either included in the delivery or
available as an option.
Death due to suffocation may occur if
packing material is swallowed.
Store packing material out of reach of children
and dispose of properly!
Use only ERT approved accessories and
spare parts for this medical device.
SpiroSphere®ECG Instructions for Use
Page 9/136
Version 02.02 • 04AUG2022
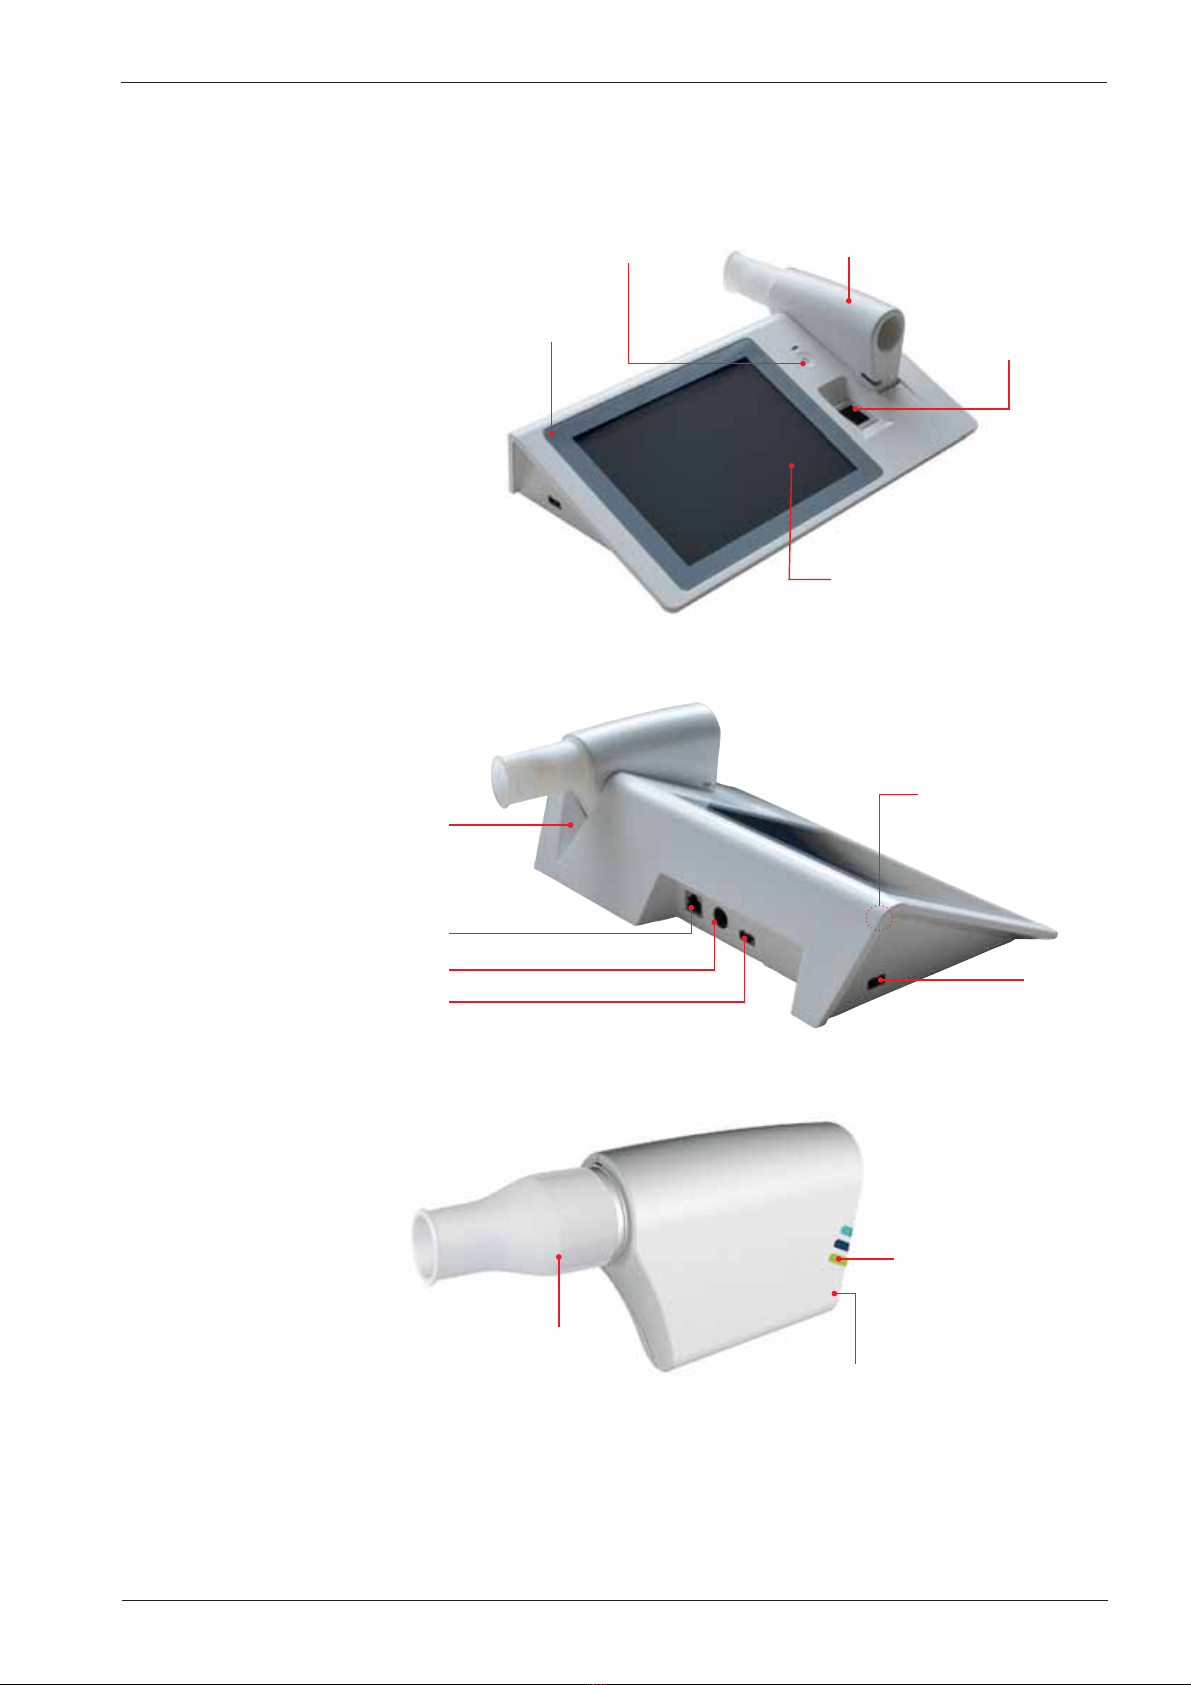
The SpiroSphere
Main Unit:
Main Unit
SpiroSphere Sensor
LCD touch display
Fingerprint
Sensor
Power On/Off
Power
USB
Speaker
USB
LAN
Power On/Off
LED Status Indicator
ERT PT with
Mouthpiece
SpiroSphere Sensor:
Charging Cradle
Front view:
Rear view:
The SpiroSphere must not be exposed to direct sunlight nor
positioned immediately near heating elements.

SpiroSphere®ECG Instructions for Use
Page 10/136 Version 02.02 • 04AUG2022
Start-Up
1. Connect the SpiroSphere to a power
source complying with local regulations.
3. Use the Power On switch located at
the front of the main unit to switch on
the SpiroSphere Main Unit.
LAN
Power Supply
Connection
2. Put the SpiroSphere
Sensor into the slot of
the main unit as shown
below.
Power supply:
The operating status of the device is indicated via an LED on the main unit and on the
SpiroSphere Sensor. Please refer "LED Status SpiroSphere and "LED Status SpiroSphere
Sensor" on page 9.
Mains adapter

SpiroSphere®ECG Instructions for Use
Page 11/136
Version 02.02 • 04AUG2022
4. Prior to the rst usage, switch on the SpiroSphere Sensor
by pressing the "Power On" switch located at the back side
of the SpiroSphere Sensor for at least 3 seconds.
ERT PT with mouthpiece
ERT PT is only for single use. Do not reuse the ERT PT due to risk of cross
contamination.
Do not remove the mouthpiece from the ERT PT. Only use the ERT PT with
connected mouthpiece.
Prior to the rst use, make sure that the SpiroSphere Sensor is fully
charged.
5. Ensure an ERT PT is inserted correctly into the
SpiroSphere Sensor (refer to Chapter "Sensor Insert").
Take care that you have aligned the rail with the sensor
holes of the PT tube with the grooved edge of the
SpiroSphere Sensor (as below) when inserting the ERT PT
into the SpiroSphere Sensor.
The maximum surface temperature of the SpiroSphere Sensor Unit can get
up to 47°C during charging.
Spirometry should only be performed by patients who can cooperate in the
performance.
Shut down
1. To power off the SpiroSphere Main Unit, press the "Power" button located at the front
of the main unit. Disconnect the main unit from the power source (please note that this
will prevent the battery from charging).
2. Power off the SpiroSphere Sensor by pressing the "Power" button located near
the LEDs of the SpiroSphere Sensor.
Do not position the Power Supply and the SpiroSphere so that it is difcult
to operate the disconnection of the device from the mains supply.
rail with sensor holes

SpiroSphere®ECG Instructions for Use
Page 12/136 Version 02.02 • 04AUG2022
LED Status SpiroSphere Sensor
Only the highest priority LED at a time is turned on (LED priority: Orange - Blue).
Orange LED On Charging in cradle
Orange LED Off No charging/ charging complete
in cradle
Orange LED
blinking slowly
Low battery Put the SpiroSphere Sensor
into the cradle of the Main Unit
Orange LED
blinking fast
Indicates an error in the
SpiroSphere Sensor.
The user has the following
options:
- restart the SpiroSphere
Sensor by pressing the power
button on the SpiroSphere
Sensor for more than 8
seconds
- go to "Spirometry Settings" >
"Sensor" and try connecting to
the SpiroSphere Sensor
Blue LED On SpiroSphere Sensor is actively
transferring data to the Main Unit
Blue LED Off Device in sleep mode Device may be off or battery
might be discharged. Put the
device into the charging dock
or press the Power On switch
Blue LED blinking
slowly
Device powered on and paired
with Main Unit
LED Status SpiroSphere
Blue LED On Main Unit powered on N/A
Blue LED Off Main Unit powered off N/A
Blue LED Pulse Main Unit Standby N/A
Orange LED On Charging
Orange LED Off Not charging/ charging complete
Orange LED
blinking
Low battery Connect Main Unit to a
mains supply
To do:

SpiroSphere®ECG Instructions for Use
Page 13/136
Version 02.02 • 04AUG2022
Problem Troubleshooting
SpiroSphere Main Unit
does not start
SpiroSphere Main Unit is not switched on. Try to switch on with the
power button (press the button for at least 3 seconds).
Power supply is not connected and the battery discharged. Connect
the power supply and let the SpiroSphere Main Unit charge for a
few minutes.
SpiroSphere Main Unit is in standby mode. Use the touch screen or
power button to wake up.
SpiroSphere Sensor does
not start
SpiroSphere Sensor is not switched on. Press the power button for
at least 3 seconds to switch the SpiroSphere Sensor on.
Battery is discharged. Place the SpiroSphere Sensor in the
charging cradle for at least 10 minutes, then try again.
SpiroSphere Main Unit
LED is blinking orange
Battery is discharged. Connect power supply immediately.
SpiroSphere Sensor
orange LED is blinking
slowly
Battery is discharged. Place SpiroSphere Sensor in charging cradle
of the SpiroSphere Main Unit.
SpiroSphere Sensor LED
is off while in the charging
cradle
SpiroSphere Sensor is in sleep mode. Remove from the cradle and
insert again.
SpiroSphere Sensor might be fully charged or off.Try to identify
the SpiroSphere Sensor in the Spirometry Settings. Place the
SpiroSphere Sensor again in the charging cradle.
SpiroSphere Sensor can't
be paired
SpiroSphere Sensor is powered off. Switch on SpiroSphere Sensor
(see above)
SpiroSphere Sensor is not in the pairing mode. Remove the
SpiroSphere Sensor from the charging cradle if already inserted
and then insert the SpiroSphere Sensor in the charging cradle.
SpiroSphere Sensor is now in pairing mode for 90 seconds.
Connection to the
SpiroSphere Sensor is
not possible
SpiroSphere Sensor is off. Power on SpiroSphere Sensor (see
above).
SpiroSphere Sensor is out of range. Check that the SpiroSphere
Sensor is in the range (10m in the line of sight).
Calibration Check or
Linearity Check not
successful
Check if the calibration pump has the correct volume setting.
Check if ERT PT is inserted correctly.
ERT PT has been used – replace by a new ERT PT
SpiroSphere Main Unit is
not responding
Touch the Home icon (top left).
Restart the SpiroSphere Main Unit by pressing the Power button for
3 seconds – Shutdown Menu – use restart.
Press the power button for more than 8 seconds to switch off the
SpiroSphere Main Unit.
Then restart by pressing the power button for min 3 seconds.
Troubleshooting

SpiroSphere®ECG Instructions for Use
Page 14/136 Version 02.02 • 04AUG2022
Problem Troubleshooting
SpiroSphere Sensor
orange LED is blinking
fast
(error in SpiroSphere
Sensor)
Press the power button of the SpiroSphere Sensor for more than 8
seconds to switch off the SpiroSphere Sensor.
Then restart by pressing the power button for min. 3 seconds.
Try to identify the SpiroSphere Sensor in the Spirometry Settings.
Finger prints not
recognized
Clean and dry the ngerprint sensor
Restart the SpiroSphere Main Unit
Touch Screen not
reacting on touch
Press the power button for more than 8 seconds to power off the
SpiroSphere Main Unit.
Then restart by pressing the power button for min 3 seconds.
No Flow detect Check if ERT PT is inserted correctly.
Press the power button of the SpiroSphere Sensor for more than 8
seconds to power off. Then restart by pressing the power button for
more than 3 seconds.
SpiroSphere Sensor is
not charging
Check if the power supply is connected to the SpiroSphere Main
Unit. The SpiroSphere Sensor will only be charged if the power
supply is connected.
Check if the SpiroSphere sensor is inserted correctly in the cradle.
SpiroSphere Sensor might be fully discharged; place it in the
cradle and wait a few minutes then try to power on the SpiroSphere
Sensor by pressing the power button for more than 3 seconds.
SpiroSphere Main Unit is
not charging
Check if the power supply is connected to mains supply.
Check if power supply is connected to the SpiroSphere Main Unit.

SpiroSphere®ECG Instructions for Use
Page 15/136
Version 02.02 • 04AUG2022
Sensor Insert and Remove
Take care that you have aligned the rail with the sensor holes of the PT tube with the grooved
edge of the SpiroSphere Sensor (as below) when inserting the ERT PT into the SpiroSphere
Sensor:
The ERT PT should be inserted fully without force.
Remove the ERT PT in the direction of the arrow.
rail with sensor holes

SpiroSphere®ECG Instructions for Use
Page 16/136 Version 02.02 • 04AUG2022
Prior to the rst use, a system setup needs to be performed.
After switching on the SpiroSphere for the rst time, following screen appears:
Enter the Global Password and
press <OK>. (The preset global
password is "691982".)
The System Setup wizard starts automatically.
1. Language Settings
Select the appropriate language
and conrm with <Next>.
(Refer to chapter "Settings &
Tools >Regional")
2. Date & Time Settings
Select the appropriate settings
and conrm with <Next>.
(Refer to chapter "Settings &
Tools >Timezone Date & Time")
Follow the system setup steps (step 1 - 6) and enter or select the appropriate settings. Tap on
<Next> to conrm the respective settings and to continue with the next step.
Setup

SpiroSphere®ECG Instructions for Use
Page 17/136
Version 02.02 • 04AUG2022
3. Sensor Settings
Place the SpiroSphere Sensor in
the cradle, and tap on <Scan> to
scan for available sensors. Tap
on the sensor you want to pair
the SpiroSphere with and select
<Pair> from the dropdown menu.
Conrm with <Next>.
(Refer to chapter "Settings &
Tools >Spirometry Settings -
Sensor")
4. Ethernet Settings
Choose the appropriate settings
and conrm with <Next>. (Refer
to chapter "Communication".)
5. WiFi Settings
Choose the appropriate settings
and conrm with <Next>. (Refer
to chapter "Communication".)
Note that pairing is only possible for 90 seconds after the SpiroSphere Sensor is
placed in the cradle.

SpiroSphere®ECG Instructions for Use
Page 18/136 Version 02.02 • 04AUG2022
6. User Management Settings
This tool enables an authorized
person to create an Administrator
account. The newly created
administrator will then be able
to create additional accounts for
individuals authorized to work with
the SpiroSphere.
Choose the appropriate settings
and conrm with <Next>.
(Refer to chapter "User
Management").
Complete the initial setup of the device by tapping
on <Yes>.
All settings made in "SpiroSphere Setup" can be changed at any time
should be changed. For detailed information please refer to chapter
"Settings & Tools".

SpiroSphere®ECG Instructions for Use
Page 19/136
Version 02.02 • 04AUG2022
The Home Screen
After the SpiroSphere has been set up, upon powering on the device the following screen appears:
Here, you can select the submenus "Add Patient", "Search Patient", "Sensor Check", "Adhoc
Test" as well as "Settings and Tools" by tapping on the respective button.
Add Patient Enter patient data for a new patient into your patient directory and start a
test.
Search Patient Search for a specic patient in your patient directory. Select a specic
patient from the list to perform a test or to edit his/her data.
Sensor Check Perform a volume or linearity check.
Adhoc Test Immediately perform a test without entering patient data or searching for a
specic patient rst.
Settings & Tools Change settings.

SpiroSphere®ECG Instructions for Use
Page 20/136 Version 02.02 • 04AUG2022
Calibration Check
The sensor check consists of a calibration check as well as a linearity check.
Following screen appears:
Ensure a new ERT PT (with mouthpiece removed) is connected to the 3 L calibration syringe via
an adapter (as shown).
In order to perform a calibration check, tap on <Calibration Check>.
Tapping on the "i"- symbol
will display information on the
respectively selected check
type.
Tap <Sensor Check> to perform a sensor check.
Sensor Check
The ERT PTs included with the delivery are pre-calibrated as part of manufacture.
A sensor check can be performed to conrm accurate measurement data.
An automatic zero adjustment is performed.
Other manuals for SpiroSphere
1
Table of contents
Other ERT Medical Equipment manuals


Popular Medical Equipment manuals by other brands


Getinge
Getinge Arjohuntleigh Nimbus 3 Professional Instructions for use

Mettler Electronics
Mettler Electronics Sonicator 730 Maintenance manual

Pressalit Care
Pressalit Care R1100 Mounting instruction

Denas MS
Denas MS DENAS-T operating manual

bort medical
bort medical ActiveColor quick guide

AccuVein
AccuVein AV400 user manual


